Solid state drives have appeared not so long ago and are sensitive devices to BIOS settings and versions, firmware and connection. Often, the systematic problem of the appearance of a BSOD can be fixed on your own.
Common problems and solutions
While the computer is running, idle or running an application, the computer crashes into a BSOD (Blue Screen of Death);
When starting the computer, a message is displayed: "NTDL is missing press Control + Alt + del and restart", although everything worked fine yesterday;
When starting the computer, the SSD does not appear in the lists of visible drives (including in the BIOS).
So, let's start in order.
Step one
This is trite, but quite often the problem may occur due to the fact that the interface cable / motherboard connector has been damaged, or the device has come into conflict with others. Therefore, try to make a list of simple actions:
Check the connection of the interface cable to the motherboard and SSD connector. Connect the device again (newfangled cables with metal latches are far from guaranteeing a 100% connection, even if you hear a click, and ordinary ones even more so);
Use a different SATA cable, (“tested” change to a new one, new to “tested”), especially if it was somehow twisted, wrapped, and so on;
Try connecting the device to nearby SATA ports;
Remove the solid state drive from the 2.5″\3.5” bay;
Make sure in System BIOS the board is set to AHCI mode for the controller to which the drive is connected;
Try disabling third-party SATA\eSATA\IDE controllers in the BIOS menu of the motherboard, and as a result, other drives ( hard disks, optical drives) leaving the SSD as the only drive connected;
If the system was transferred to an SSD using special software, which can often be found bundled with some drives, rearrange the system again, from scratch;
Update controller drivers for Windows (Intel Rapid Storage Technology Driver or AMD AHCI Driver, or third party controller);
Install Windows 7 (if Windows XP was installed).
step two
Make sure your motherboard BIOS is up to date. Usually the version is specified at computer startup, in shells like UEFI - often written directly into them. On the Windows operating system, you can download, for example, a small and free utility CPU-Z, open the "Motherboard" section and see the BIOS version there.
Attention!: when searching BIOS updates, download them ONLY from official sites, ONLY for your motherboard model.
Step Three
It is highly desirable that the SSD be connected to the motherboard's native SATA ports. Each motherboard has native ports, that is, those supported by the existing set of logic, and also, on a number of devices, there are additional SATA ports implemented by third-party controllers. Make sure that the SSD is connected exactly to the right ports, they usually differ in colors and have a priority serial number (SATA_1, SATA_2) in case they are implemented by additional controllers or operate at lower interface speeds, on the contrary, they are at the end of the list (SATA_5, SATA_6).

To find out exactly which connectors and what they refer to, look for this information in the user manual of your motherboard, if you do not have a paper version of the manual, you can always download it from the vendor's official website in electronic format.
Step Four
Many users follow new firmware released for solid state drives because they often improve performance, but do not forget that the main reason for the release of new firmware is to fix errors in the SSD controller logic. Therefore, it is also worth making sure that your SSD has the latest firmware installed.
Attention!: When looking for firmware updates for SSD, download them ONLY from official sites, ONLY for your SSD model. Also keep in mind - this can (and most likely) completely destroy all information stored on the SSD.
Step five and final
If you have already done everything from the above, double-checked, rearranged, updated a hundred times, but the problem remains, you should look for information on the SSD manufacturer’s website, after all, who better than him should be aware of all the problems associated with their products. Moreover, it would be preferable to read foreign vendor forums on this topic. The fact is that this situation indicates the following probable causes:
The problem of your computer's incompatibility with a specific SSD;
Some problems known to the manufacturer, on a fix, which, of course, he is working on;
Manufacturing defects.
Despite the fact that all technologies are striving for standardization and unification, SSD is still a young storage system, so cases from the “should work, but don’t work” series are known. The motherboard controller, (especially if it is old) cannot work correctly with the SSD controller, conflicts, which causes failures. In this case, as well as in the case of marriage, it remains only to check the device on a completely different computer or laptop. In those cases when the problem is more or less widespread, the developers try to solve it as quickly as possible, and post specific tips on how to fix problems on their forums.
After purchasing a solid state drive (SSD), many people do not think about advanced settings systems, for Optimal operation of the SSD requires 12 steps to unlock the full potential of your SSD. In this article, we will analyze all 12 steps, let's get started!
1. Enable AHCI mode
Extended controller host interface ( AHCI) is a paramount feature to ensure that Windows will support all the features of the SSD in the computer, especially the TRIM function so that the SSD does not directly access the affected sectors / pages on the drive.
To turn on AHCI, you need to log into the computer and turn it on somewhere in its settings. I can't tell you exactly where, in every BIOS it might be in different place. Most likely this is enabled by default on newer computers. It is recommended to enable this feature before installing the operating system, although you can enable it after you've installed Windows.
2. Enable TRIM
We have talked enough in the previous section about TRIM. This command gives a big increase in speed and stability.
Open command line and enter the following command:
fsutil behavior set disabledeletenotify 0
3. Disable System Restore
This is not required but be aware that your SSD has a write limit and a space limit. System Restore slows down performance and requires space on the SSD. Why don't you just get rid of it?
Click the Start menu, right-click "Computer" - "Properties" and click the "System Protection" button:

Once in the window, click the "Customize" button, like so:

Click the "Turn off system protection" button. Click "OK" and you're done!
4. Disable indexing
A large part of your SSD speed consumed in index files for Windows Search. This can be useful if you store everything on an SSD, there is a slowdown in speed after reindexing, which happens every time you add new data to the disk. In order to disable indexing on SSD do the following:
Click the Start menu and select "Computer". Right click on the SSD drive and click "Properties". Uncheck "Allow the contents of files on this drive to be indexed in addition to file properties" and click OK. After you do this, the operating system will apply this to all files and folders on the drive. If you see a dialog box saying it can't remove the file from the index, click Ignore All. This will streamline the process and ignore all errors.

5. Disable scheduled defragmentation
SSD is solid state hard drive, with no moving mechanical parts, so there's no need for offline disk defragmentation. That's why we're going to turn it off!
Click on Start, select "All Programs", "Accessories", click "System Tools", "Disk Defragmenter", and then click the "Schedule Settings" - "Disk Defragmenter" button:

Uncheck "Run on schedule". Click OK.
6. Windows paging file
The Windows page file refers to a file on disk reserved for storing application components that would otherwise fit into physical memory. It's like a form of hard disk storage. Disabling the swap file on the solid state drive will greatly increase system speed. Don't do this if you only have one SSD drive. If you pair an SSD with an HDD, then you can easily configure the HDD to handle the swap file. The most ideal solution if you have two SSDs, on the first one, run the swap file on the other for Windows startup and for file storage.
The process for setting up the swap file varies depending on the settings, so I'll show you how to get to the configuration window.
Right-click "Computer" in the Start menu and select "Properties". Click the button Extra options system" on the top left side of the window and click the "Advanced" tab. Click the "Options" button in the "Performance" section: 


Go to the "Advanced" tab and click the "Change" button, uncheck "Automatically choose the size of the paging file" and select "No paging file"
7. Disable sleep mode
Hibernation takes up at least 2 GB. If you want to save this volume, write on the command line:
Powercfg -h off
8. Disable Prefetch and Superfetch
Windows places information in physical memory and virtual memory owned by programs you don't currently use but use very often. This is known as "Prefetch" and "Superfetch." It is possible to disable this through the registry editor:
HKEY_LOCAL_MACHINE\CurrentControlSet\Control\SessionManager\Memory Management\PrefetchParameters
as two values: EnablePrefetcher and EnableSuperfetch. Set both values to zero (0)!
9. Setting up caching
Disk caching for many users can affect in different ways, check how your computer will work without caching, then with caching, this feature is turned on very easily:
To get to the configuration window, right-click "Computer" in the Start menu and select "Properties". Click "Device Manager", expand "Disk Drives", right-click the SSD, and click "Properties". Select "Policy". In this tab, you will see an option labeled "Enable device write caching."

Compare your SSD with and without the option.
10. Disabling services for Windows Search and Superfetch
Even with the aforementioned registry tweak and index removal, your computer may still be loading your hard drive. Press "Win + R" and see "services.msc" press the "Enter" button. Find both services mentioned in the title of this section and disable them.

11. Disable ClearPageFileAtShutdown and LargeSystemCache
An SSD runs on flash memory, which makes it easy to write data to the drive. Thus, the files should not be erased when the computer is turned off. This will make the Windows shutdown process much faster. LargeSystemCache, on the other hand, exists primarily in versions windows server, and tells the computer whether to use the large page cache on disk.
Both of these options can be found in the Registry Editor under
HKEY_LOCAL_MACHINE\CurrentControlSet\Control\SessionManager\Memory Management
Set them to 0.
12. Set "High Performance" in Power Options
Perhaps you notice when, after a long absence from the computer, the system slows down a bit, for this you need to set high performance throughout the entire session.
To toggle power settings, click the System and Security button, and then click the Power Options button. Select "High Performance" from the list. You may need to click the Show More Schemas button to find it.

Hello! Decide to prepare an article in which to talk about how to properly install Windows 7 on an SSD drive, and how to configure Windows 7 on an SSD drive after installation so that it works for a long time and without problems. I recently bought a laptop, took an Asus K56CM and immediately bought an OCZ Vertex 4 128 GB SSD drive for it, I really wanted to feel all the speed that an SSD gives.
In our case, the laptop / computer model and SSD drive does not matter, my instructions can be said to be universal. I will write what needs to be done immediately after installing an SSD drive into a computer and how to configure the operating system after installing it on an SSD.
If this is your first time with SSDs, then you are probably wondering why there is so much attention to setting up the operating system for these drives compared to conventional hard drives. I will now explain everything in simple terms.SSD drives have a limited time to failure compared to hard drives. Simply put, they have a certain number of rewrites. Now I will not say what this number is, it is different and what is true and what is not, it is difficult to understand. For example, for my OCZ Vertex 4, it was written in the specifications that the time to failure was 2 million hours. And the operating system during operation writes a lot, deletes and writes again various temporary files, etc. Services such as defragmentation, indexing, etc. serve to speed up the system on ordinary hard drives. And they only harm SSD drives and reduce the lines of their service.
In fact, installing windows 7 on ssd almost no different from installing on a hard drive. But after installation, you will need to make some settings in the work of Windows 7, but there is nothing complicated there either, we will do everything using the utility SSD Mini Tweaker 2.1.
What should I do before installing Windows 7 on an SSD drive?
Well, first you need to install an SSD drive in a laptop or on a computer, it doesn’t matter. I will not describe this process. There is nothing complicated in this, and this is a topic for another article. Let's say that you have already installed a solid state drive, or it has already been installed.
If you use a regular hard drive next to the SSD drive in your computer, then I advise you to disable it during the installation of Windows 7, this is so that you do not get confused when choosing a partition for installing the OS, but this is not necessary.
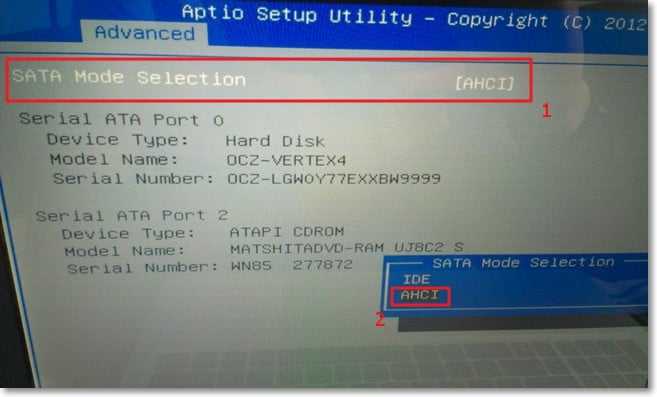
All that needs to be done before installation is to check if our solid state drive is working in AHCI. To do this, go to BIOS, if you don’t know how, then read the article. Next, go to the tab “Advanced” and choose the item SATA Configuration.

Select the item, a window will open in which we select AHCI(if you had another mode enabled). Click F10 to save the settings.
Now you can start Windows installation 7. Installing to a solid state drive is the same as installing to a hard drive. I just want to give you one piece of advice:
Try to install the original operating system image Windows systems 7, or Windows 8. I advise you to install only one of these operating systems, because only seven and eight can work with SSD drives. Do not use different assemblies, and if you install the assembly of Windows 7, or Windows 8 downloaded from the Internet, then try to choose an image that is close to the original.
Installing the operating system. You may find the following articles helpful:
After the operating system is installed, you can proceed to Windows setup for SSD.
Setting up Windows 7 to work with an SSD drive
More precisely, Windows 7 will work anyway, our task is to make sure that our solid state drive lasts as long as possible and without various errors.
As I wrote at the beginning of the article, for Windows optimizations for a solid state drive, we will use the SSD Mini Tweaker utility. You can disable all unnecessary options manually, but in the SSD Mini Tweaker program, all this can be done in a few clicks. Manually, you will need to disable only the indexing of files on local drives.
We need to download SSD Mini Tweaker first. Download version 2.1 from the link below:
The program does not need to be installed, just extract from the archive and run.
Launch the SSD Mini Tweaker utility.
You can mark all the items with checkmarks, more precisely it is not possible but necessary. I checked all the items, except that you can leave only SuperFetch, disabling this service can increase the startup time of programs. Check the boxes for the required services and click the button. "Apply Changes". Almost everything, in the same utility there is an item “Manually”, which means that you need to manually disable services. There are two of them, scheduled disk defragmentation and indexing the contents of files on the disk.

If scheduled defragmentation turns off automatically after the changes we made, then file indexing on the disk must be turned off manually on each local partition.
We go to "My computer", and right-click on one of the local drives. Select "Properties".
A window will open in which you need to uncheck the box. “Allow the contents of files on this drive to be indexed in addition to file properties”. Click "Apply".
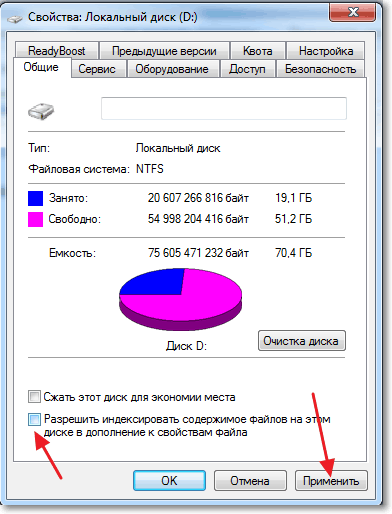
Another window will appear, click "OK".

We are waiting for the completion of the process.
When you do this procedure on drive C, then most likely a message will appear stating that you do not have rights to modify system files. I just pressed “Skip everything”, I think that eli skip a few files, then nothing bad will happen.
That's all, Windows setup under the solid state drive is finished. You know, many say that these are different myths, you don’t need to turn off anything, etc. Maybe so, but if it was invented, then it means it is necessary and I think that in any case it won’t hurt.
It seems that he wrote everything he wanted, if you have additions, comments, or something is not clear, then write in the comments, we'll figure it out. Good luck!
More on the site:
Updated: February 7, 2018 by: admin
The advent of solid state hard drives or abbreviated SSD, of course, can be considered a breakthrough in the development of technologies for creating devices for recording and storage digital information. The first SSDs that entered the market, with the exception of the high speed of access to arbitrary blocks of information, were in many ways inferior to traditional HDDs. Not only could their volumes, without exaggeration, be called more than modest, they also had low fault tolerance and cost a lot of money.
What's wrong with SSD?
High speed, silent and low power consumption solid state drives served as good drivers for their development. Modern SSD drives are lightweight, very fast and mechanically quite reliable devices used in tablets, ultrabooks and other compact devices. The price of SSDs has also dropped significantly. However, they cannot be called perfect. All SSDs have a significant drawback - a limited number of write cycles.
The flash memory of most SSDs is of the MLC type and allows data to be written approximately 3 to 10 thousand times, while conventional USB exhaust their resource in 1000 or less rewriting cycles. There are also such SSDs, for example, with the SLC memory type, which can withstand several hundred thousand rewrite cycles. There are many nuances, so it is not surprising that just this feature of SSD drives raises a lot of questions from ordinary users regarding their operation, and most importantly, extending their service life. Is SSD optimization necessary in Windows 7/10 or is it just another myth created by manufacturers and commercial software developers themselves?
Basic training
Yes, you can leave everything as it is on a PC with an SSD, and you might be right, but if you really care about your drive and want it to last as long as possible, it's worth considering tuning it. Let's start with whether you bought a computer with an integrated SSD, or just the drive itself, with which you want to replace the HDD by transferring Windows from it. In the first case, you can limit yourself to setting up the system. If you install the SSD yourself, be sure to check if the AHCI connection mode for the SATA controller is enabled in the BIOS.
There are two points here: after enabling AHCI and Windows Migration on SSD system may not boot, as it does not contain the appropriate drivers. Therefore, either install the drivers ahead of time, or run reinstalling windows from scratch. Second. The BIOS of older PCs may not have AHCI mode. In this case, the BIOS will have to be updated. Now for the SSD controller firmware. Owners solid state drives people often ask if a drive will run faster if you install the latest firmware. Yes, it will be, but if you decide to update it and in general, if the need arises, it is better to contact the maintenance service for help.
System settings. Disable defragmentation
For HDDs, defragmentation is a useful thing, but for SSDs, on the contrary, it can damage it, so Windows usually disables it automatically. However, it's worth checking to see if it's actually disabled. Run command dfrgui disk optimization utility and click "Change settings".

Make sure the "Run on schedule" checkbox is unchecked. If it's there, be sure to remove it.

Enabling TRIM
The TRIM mechanism optimizes the SSD drive by clearing memory cells of unnecessary data when they are removed from the disk. The use of TRIM ensures uniform wear of the disk cells and increases the speed of its operation. To check if TRIM is active on your system, run the following command from an administrator command prompt: fsutil behavior query DisableDeleteNotify.

If the value of the returned parameter DisableDeleteNotify will be 0, then everything is in order and the trim function is enabled, if 1 - it means it is disabled and it should be enabled by the command fsutil behavior set DisableDeleteNotify 0.
This SSD setting only applies to Windows 7/10, while Vista and XP do not support it. There are two options: either install a newer system, or look for an SSD drive with hardware TRIM. Please also note that some older SSD models do not support TRIM at all, however, the likelihood that they are still sold in digital equipment stores is very small.
In the process to the hiberfil.sys file on system drive a significant amount of data can be recorded, comparable to the volume random access memory. We, in order to extend the life of the SSD, need to reduce the number of write cycles, so it is advisable to disable hibernation. The disadvantage of this SSD setup is that you will no longer be able to save open files and programs when the computer is turned off. To disable hibernation, run the command in a running with administrator privileges powercfg -h off.

Restart your computer and make sure the hidden system file hiberfil.sys is removed from drive C.

Disabling Search and Indexing of Files
What else can be done to properly set up an SSD drive for Windows 7/10? The answer is to disable indexing of the contents of the disk, because the SSD is already fast enough. Open the properties of the disk and uncheck "Allow the contents of files to be indexed ...".


But here's the thing. If you have a HDD in addition to an SSD, then you are unlikely to want to disable indexing on it. What will come of it? By default, the index file is located on drive C and data from drive D will still be written to the solid state drive.
If you do not want to disable indexing on the user volume, you will need to move the index file from the system SSD to the user HDD. Open by team control /name Microsoft.IndexingOptions indexing options.

Now click "Advanced" and specify your index location, having previously created a folder on the user's drive.


If your PC only has an SSD, you can completely disable indexing and search by opening the Services.msc snap-in and stopping the Windows Search service.

Disabling system protection
Controversial moment. By disabling the creation of system shadow copies, on the one hand, you will reduce the number of write cycles, on the other hand, you will increase the risk of getting a non-working system in the event of some unforeseen failure. The use of rollback is one of the most effective and simple ways to return Windows to a working state, for this reason we would not recommend disabling this feature, especially since points are created infrequently and they do not take up so much space.
It does not recommend disabling system protection for its Intel SSDs, the same opinion is shared by Microsoft. However, it's up to you. If you are using other means Reserve copy eg Acronis true image, system protection can be disabled. To do this, go to the system properties, on the "System Protection" tab, select the SSD drive and click "Configure". Next, in the recovery options, activate the "Disable system protection" radio button, move the slider to zero and click the "Delete" button.

Disable or not paging file?
An even more controversial solution is to disable the swap file. Someone advises to transfer it to the HDD, someone completely disable it, but not everything is so simple. The paging file is necessary to optimize the performance of the system and programs that require significant RAM resources. Disabling swap can indeed reduce disk usage, but the resulting effect will be very small. In addition, this disabling can significantly reduce the performance of your computer.
There is little point in moving the paging file to hard disk drive neither, since it is many times slower than an SSD, and the constant access to it by the system will slow down its work. Disabling, or even better, reducing the paging file is permissible only in one case - if your computer has more than 10 GB of RAM, and at the same time you do not use resource-intensive applications. And so, of course, it is better to leave everything by default. You can perform all manipulations with the paging file in the performance parameters window called in the "Run" window by the command system properties performance(hereinafter Advanced - Change).

Prefetch and Superfetch
In theory, it is also better to leave everything by default here. The function does not affect the durability of SSDs in any way, as it does not produce any writes. Moreover, when you install Windows on an SSD, the system automatically turns it off. Want to make sure it's disabled? Go to Registry Editor at HKEY_LOCAL_MACHINE/SYSTEM/CurrentControlSet/Control/Session Manager/Memory Management/PrefetchParameters and see the parameter value EnableSuperfetch. It should be set to 0. You can also disable it through the Services Control snap-in.

As for Prefetch, its writes to disk are so insignificant that it can be ignored. However, you can turn it off, nothing bad will happen. To do this, in the same registry key, set the value of the parameter EnablePrefetcher 0.

The same can be said for turning off additional function Prefetch ReadyBoot, a logged application boot process. The volume of records it produces in a folder C:/Windows/Prefetch/ReadyBoot is negligible, but if you want to disable them as well, set the Start parameter in the key to 0 HKEY_LOCAL_MACHINE/SYSTEM/CurrentControlSet/Control/WMI/Autologger/ReadyBoot.

Programs for optimizing an SSD drive
Almost everything that was shown in the examples above can be done using special utilities. How to set up an SSD under Windows 7/10 using third party programs? Very simple. Most of them have an intuitive interface, represented by a set of options that can be enabled or disabled. There are many SSD optimizers, but we will focus only on the most popular ones.
SSD Mini Tweaker
The most convenient portable program for optimizing solid state drives. The utility supports work with the functions of defragmentation, hibernation and system protection, Trim, Superfetch and Prefetcher, management of the paging file and Layout.ini, indexing, cache file system and some other settings.

The SSD Mini Tweaker interface is represented by a window with a list of functions available for management. You may need to restart your PC after applying the new settings.
Shareware utility for optimization and performance tuning SSD drive. There is no Russian language in Tweak-SSD, but there is a convenient step-by-step wizard that offers optimal settings. Features of this program include disabling file indexing, program compatibility assistant, hibernation, paging file, defragmentation, last file access time recording, working with TRIM, increasing the file system cache, removing the NTFS limit on memory usage, as well as removing the kernel in memory instead of unloading parts of modules to disk.

SSD Fresh Plus
Another SSD optimizer. Unlike analogues, it supports working with S.M.A.R.T. With Abelssoft SSD Fresh Plus, you can disable defragmentation, the use of abbreviated names for folders and files, timestamps, Windows log, prefetch services.

In total, the utility supports nine different settings that optimize SSD work. Additional features programs include viewing detailed disk information. Distributed in paid and free editions.
Conclusion
On this, perhaps, everything. There are also other SSD optimization recommendations, but for the most part they are either dubious or harmful. In particular, it is not recommended to disable write caching for the SSD drive and the USN journal of the NTFS file system. You should also not transfer programs and temporary Temp folders, browser cache and so on, because then what's the point in buying an SSD drive? We need to speed up the work of programs, transferring them to the HDD, you will only slow down the system.
And finally, here's some good advice for you. Don't bother especially with SSD optimization. To develop a resource even for a budget solid state drive 128 GB, you will need at least a decade, unless you write and delete terabytes of data daily. And during this time, not only the disk model, but also the computer itself will become hopelessly outdated.
By size, SSD drives can be divided into two unequal groups: 2.5” and 3.5”. 3.5-inch ones are almost never found in stores (only hybrid solutions). You can additionally purchase a special container for installation in the case system block computer or just put it neatly inside and fix it with 2-sided tape wherever you want: the SSD drive does not heat up, does not vibrate, and the working position does not matter to it. You will also need a SATA interface cable to connect the device to motherboard. To power an SSD drive, a standard flat connector on the power supply (SATA Power Connector) is usually used. Description of power supply connectors.
The method for transferring the operating system (OS) from an old HDD to a new one is described. In the link to the article, our option is also considered: transferring the OS from the IDE or SATA drive to an SSD drive using a special Paragon programs Drive Copy 11 Professional and its included Paragon Migrate OS to SSD 2.0 (there is a link to the program), it is necessary, since most utilities for creating backups saves the clone in accordance with the old logic of sectors (in next paragraph Considered preparing an SSD drive for OS transfer alternative way if you don't want to use Paragon Drive Copy 11). After transferring the system to the SSD, you will have to change the boot sequence in the BIOS. We set the SSD as the second device, and the CD / DVD as the first. After that, the operating system should boot. If you plan to install the operating system from scratch, then you will not need to transfer the OS.
Preparing an SSD for OS Migration (Alternate Method)
Acronis Disk Director - this program will help you perform any of the hard disk operations described below. (Attention! A small feature of this program is that you must press the "perform operation" button after changing the disk settings [marked with a finish flag]).
First you need to initialize the SSD in order to create an MBR (master boot record). You can do it with the above program. Next, you need to partition the SSD drive and create an active partition on it. On Windows 7 active boot partition can include as little as 100 MB. So we'll use the section you just created. In the next step, you will need to reduce the original size of the partition to 100 MB (and not a byte less). It will be quite difficult to do this using Disk Management, so I again recommend Acronis Disk Director 11.
In the free space of the hard disk, you need to create partition C, which will host the operating system. This partition must not be active and must not be primary (because the previously created 100 MB partition already includes the operating system loader). After that, from the remaining disk space create drive C. It can be a simple logical partition. Also, your old HDD may have more than one partition, but several, which imposes certain restrictions due to discrepancies in free disk space. Some information, including the factory reset section, can simply be burned to DVD.
After all the preparatory procedures are completed, you can proceed directly to copying the operating system. Next, we will work with the hard disk image (system image). There are many programs for image processing (choose) or you can use standard windows tools 7 - (pretty easy, but a little more time). Control Panel\All Control Panel Items\Backup and Restore - Create a system image (in the left column).
Now you need to copy the system image to an external HDD(you will probably have to assign a drive letter to the 100 MB partition so that the program can identify it), and then to the SSD (using boot program for processing disk images). Restore section by section. Thus, you will have to do the recovery for the 100 MB partition and the C drive.
Attention! Majority free programs imagers are not able to reduce the size of the original partition in order to rewrite it to the allotted space on the SSD, which has a very limited amount of data, even if the amount of data written corresponds to the allotted space. In this case, the C drive on the HDD must be reduced to the appropriate size. For this work, I again recommend Acronis Disk Director, since it is more difficult to achieve the same effect using only the seven.
The amount of data on your HDD on the C drive must not exceed the capacity of the created C drive on the SSD. If the original partition contains a lot of user data, then you can simply try to transfer it to another partition hard drive or even write them down optical drives. When the system is written to the SSD, right-click on the user folders on the disk and include them in the appropriate library. With this approach, you will not need to deal with copying your folders later.
Now change the boot sequence in the BIOS (Boot section). We set the SSD as the second device, and the CD / DVD as the first, or vice versa. After that, the operating system should boot.
Attention! Before booting the operating system from the SSD, it is recommended to set the BIOS to AHCI mode. It is better to do this before you change the device boot sequence, and then set the appropriate settings in Windows 7.
Defragmenting partitions on an SSD does not make any sense and moreover: it is very harmful. In the case of a laptop, go to Services, find Disk Defragmenter in the list, right-click on the entry, the Properties window will open. In it, just disable this service.
In case of desktop computer you can disable defragmentation only for the SSD drive so that those working in HDD system did not lose speed.
As long as the defrag service is disabled, you will not be able to resize the partition. This process requires this service to work.
Hibernation - Most of us do not use hibernation, but prefer standby. However, the file still takes up precious space on your SSD, and its size depends on the amount of RAM in your computer. To get rid of this misunderstanding, enter the following at the command line:
powercfg -h off
If you need to return everything to initial state, then enter:
powercfg-h on
Copying user folders to the hard drive
This process is very simple. Create a partition on the HDD. Create appropriate folders on it (Documents, Music, Photos, and so on). The name can be anything, the system will rename them anyway.
Open File Explorer and right-click on, for example, the My Documents folder on the left. Go to properties and click on the Location tab. Click Move and select a folder on the HDD where you would like to store your documents.
Attention! You need to select a folder directly on the partition. You cannot select the root directory, otherwise there will be confusion.


