In the previous lessons, we have already sorted the button menu Start . Today we will repeat what we went through and learn how to set it up. let's consider appearance (interface ) menu. The menu is divided into two columns. The left column is divided into two parts: constant commands - above the dividing line (above), and the most frequently used commands - below the line (below). Permanent commands remain on the menu. Start until you delete them yourself. Right column menu Start serves to access folders, settings Windows , supporting information and search function. You can change the appearance and functions of the Start menu, as well as add shortcuts to access programs, files and folders.
Looking for the latest sports news? You will find only outdated news. Obviously, this is a tool that needs to be customized. But basically it is the same content, but with a more beautiful interface. Hardware support. But it also means that outdated equipment will not work with the new system. The New Devices and Printers folder may ultimately facilitate hardware management.
There is also a new folder called “Devices and Printers” that can ultimately facilitate hardware management - although it is also a backup platform. The folder will display icons representing each device; Icons can be created by the device manufacturer so that it actually looks like the device that it represents. But it will become really useful if manufacturers do their job. For example, when you right-click on a computer in your network, a new item appears in the menu - the ability to make a remote connection of the workspace to this network so that it can be controlled via remote control access.
Choosing a Start menu style.
1. Click on the button Start The properties .
2. Select a menu style Start or Classic Start Menu .
3. Click To apply then OK .
Did you know?
In the Start menu, you can change the arrangement of objects. To do this, click Startselect All programs, find the object to move, then move it. A thin black line indicates the new position of the object.
Now you can customize your backupby selecting to include or exclude specific drives and folders. You can also easily create system images. However, not all new additions are interesting. But you have flaws in the most basic functions, such as searching for your notes. Also worth noting are features that are missing. However, both can be downloaded for free. The application is also designed to facilitate the management of remote machines.
Consumers will also be able to fulfill this function, but due to equipment limitations and a not-so-simple configuration, this function is more suitable for business. Considerations It is noticeably faster, much easier to switch between tasks, in addition to improving performance and launch. However, much work remains to be done.
Pin the program to the Start menu.
1. Press the button Start , select a program.
2. To fix the program in the menu, right-click on it, select Pin to Start menu (Pin to start menu ).
3. To cancel fixing the program in the menu, right-click on it, select Remove from Start Menu (Unpin from start menu ).
First make sure your equipment accepts it. Icons with several frames show that the program is opened several times, for example, you opened 2 websites at the same time. Unshared icons refer to software that is not currently open. You can easily place icons in this bar so you can access them whenever you want. This is called pinning the program.
Calling programs to the taskbar
This will allow you to keep the same when it is not open. That way you can quickly open it later. Make one with the right button on the icon corresponding to the program you want to display.
- A menu will appear.
- Click “Link this program to the taskbar."
- When you close this program, the icon will remain on the panel!
Start menu settings.
1. Click on the button Start right click select The properties , then click Tune .
2. On the tab Are common click on the icon size selection function.
3. Use the arrows to set the number of recently used programs for the menu. Start .
But then what is the difference between these icons and the signs of the previous zone? The main difference is that the programs launched in zone 1 are the ones that you use, and those that run in the notification area are used and placed here so as not to bother you. Here are some examples to better understand.
When many programs are active "in the background", they are hidden behind a small arrow to avoid excessive expansion. Just by clicking on this arrow, you will see these icons in the bubble. Hidden programs in the notification area. You can also set the date and time by clicking on the time in the lower right corner. Automatically switches to summer and winter time without any intervention on your part.
4. Click the tab Additionally .
5. Check the box. Expand menu on hover and hold (Open submenu when I pause on them with mouse ).
6. Check the box. Highlight recently installed programs (Highlight newly installed programs ).
7. Check the boxes next to the commands that you want to add to the menu. Start .
Did you notice this little rectangle in the lower right corner? With one click you can reduce and hide everything to display. This turns out to be very convenient when you have a multi-screen, and you need to get a file located on the desktop.
Advertising - Advertising space allows you to finance the site. A button that appears pressed relative to others indicates that this software is currently active in the foreground. Have you finished reading the course? Then click here to continue.
Press the Start button, - enter the first letters of the software you are looking for. It appears immediately in the Start menu - press the Enter key to start it. This is the part that is at the bottom of the screen. Everything is available with one click. Right-clicking allows you to access certain functions.
8. To display documents in a submenu Recent Documents (My recent document ), check the box Display a list of recently used documents (List my most recently opened documents ).
9. Click OK .
10. Click To apply then OK .
Did you know?
You can add a shortcut to the Start menu with a link to the object. Right click on an object, select Submit/ Desktop. Move the shortcut to a new position in the submenu All programs.
My page. The Start menu is displayed by clicking on the Start ball. The Start menu is divided into several parts. Right: top: user folders and computer down: control panel, devices and printers, default programs. Left: top: programs attached to the Start menu below: programs recently opened.
Click "Start", "All Programs." Left: a list of programs installed on the computer. Right: Top: User folders in the middle: the “Games” and “Computer” folders. Down: control panel, devices and printers, default programs, help and support.
| Comments (0) | 06:54 | 30.03.2010 |
Taskbar customization
Hello dear users Windows XP ! In today's lesson we will continue to study settings for taskbars and tools according to your requests. Originally task bar located at the bottom of the desktop. Most often it is used to switch between programs. And you can customize it, like many other objects Windows : for example, you can change the size and location of the taskbar, customize its appearance, add or remove toolbars to perform the tasks you need. If you need additional screen space to display the window, use the function (Auto-hide the taskbar ) in order to hide the taskbar, which is not used. If the icons in the information area are hidden and you want to see them, you can configure the information area so that it always displays the necessary elements.
You can add entries at the bottom or change the display. Right-click the Start button, select Properties. - “Start” menu tab, - click “Customize”. The taskbar is the bottom bar of the screen, divided into several parts: - the Start menu, - program icons, - notification area.
Default icons
Connect the program to the taskbar
You can point the program to the taskbar :. - open the program, - right-click the program icon on the taskbar, - select Pin this program to the taskbar. The program is now present on the taskbar and is easily accessible.Customize the taskbar.
1. Right-click on an empty area of \u200b\u200bthe taskbar and select The properties .
2. Go to the tab Task bar .
Hide taskbar automatically (Auto-hide the taskbar ), if you do not need it, and you want to hide it. The taskbar will be displayed if you place the mouse cursor on it.
The notification area is located in the lower right corner. It includes: - icons of "resident" programs and - some configuration icons. The notification area displays some unwanted or resource-intensive programs. It is best to know the usefulness of each icon present in the notification area.
Constantly display the menu bar
To access the properties of the Start menu :. - Right-click the Start button. - select "Properties". Therefore, it is always visible. It combines the main functions in one menu. To constantly display the menu bar, right-click on an empty area of \u200b\u200bthe tab bar. Select the menu bar in the context menu.
4. If you want to see the taskbar all the time, check the box next to the field Display taskbar on top of other windows (Keep the taskbar on top of other windows ).
5. To group similar windows by buttons, check the box Group similar taskbar buttons (Group similar taskbar buttons ).
6. Check the box next to the field Display Quick Launch (Show quick launch ) to display the quick launch bar.
If you notice the disappearance of files, editing and viewing, it is usually because the menu bar is hidden, or because it is in full screen mode, or because the file that contains information about the toolbars is damaged. This article explains how to fix the problem.
View the menu bar again
This article describes how to solve this problem.
Disable full screen mode
To disable full-screen mode, follow these steps: Toolbars and corrupt controls. Note: When using the restore function, bookmarks, history of visited pages and open windows, tabs, passwords, cookies and autofill information from the modules are saved in the form of bookmarks. However, themes and extensions will be deleted, and settings will be completely reset.7. Click OK .
Setting the information area.
1. Right-click on an empty area of \u200b\u200bthe taskbar, select The properties .
2. Go to the tab Task bar .
3. Check the box next to the field Display clock (Show the clock ).
4. If you want to hide rarely used icons in the information area, check the box next to the field Hide unused icons (Hide inactive icons ).
The Quick Access Toolbar is a customizable toolbar containing a tab independent of the tab currently displayed on the ribbon. This is possible in one of two possible positions and adds buttons for the most frequently used commands.
How to add commands to the quick access toolbar
The contents of most lists, such as return and distance values, as well as individual styles that also appear on the ribbon, cannot be added to the quick access toolbar. For example, you can create custom tabs and groups containing all the most commonly used commands. 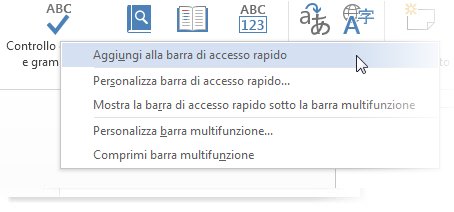
- Only commands can be added to the quick access toolbar.
- But it can be based on your needs.
Add a command that is not on the ribbon in the quick access toolbar
Delete a command from the quick access toolbar. Reorder commands on the quick access toolbar. In the Customize Shortcut panel, click a command to move, and then click the Up or Down arrow.Group teams by adding a separator between each team
In the Select Commands list, select Commands Not Available on the Ribbon. . You can group commands using a separator to display the quick access panel as if it were divided into sections.5. Press the button Tune (Customize ).
6. Indicate those buttons that should be displayed constantly, which should not be displayed and which should be hidden if they are inactive.
7. Double tap OK .
Did you know?
You can move the taskbar. Unlock it, then move the empty area on the taskbar to a new position on either side of the desktop.
Right-click on the shortcut bar and select "Customize shortcut" in the context menu. In the Select Commands list, click Additional Used Commands, and then Add. To place the separator at the desired point, click the Up or Down arrow. . If you do not want the shortcut bar to appear in your current location, you can move it to another location. If you think that the default location next to the application icon is too far from the workspace, you can move it Closer to make it more convenient.
| Comments (0) | 06:43 | 30.03.2010 |
Manage toolbars.
Toolbars simplify access to common tasks. Windows XP comes with a set of toolbars that you can use to access programs, folders, documents and web pages from the taskbar. You can change the order and size of the toolbars, as well as move them according to your preferences. When moving the toolbar, you can fix it on one of the sides of the desktop or make it “floating”, i.e. allow her to move freely around the desktop.
How to move the quick access toolbar
The position under the tape partially overlaps with the work area. Therefore, if you want to make the most of your workspace, you should keep the Quick Access Toolbar in its default location. Video: move the quick access toolbar.
Customize the shortcut using the Options command
You can add, delete and reorder commands in the quick access panel using the "Parameters" command.Restore default access panel settings
In the "Customize Shortcuts" window, click "Reset", and then click "Reset Quick Access Toolbar Only."
Export custom shortcut bar
- In the help, click "Options."
- Click Shortcut.
- Make the necessary changes.
Display toolbar.
2. From the drop-down list Toolbars Select the one that is not checked. If the panel is checked, it means that it is already displayed.
3. We will discuss additional information on setting up the taskbar with you in the next lesson.
Did you know?
You can display hidden buttons on the toolbar. D to do this, click on the double arrow at the end of the toolbar.
You can display the buttons on the taskbar. To do this, click on the upper or lower arrow on the taskbar to scroll through the list of buttons on the panel.
Toolbars on the taskbar.
| Toolbar | Description |
| Address | Displays web pages, network drives, files and folders using a string Address programs Internet explorer . |
| Languages | Allows you to switch between languages. |
| Desktop | |
| Launches programs Internet explorer , Outlook express and Windows Media Player . Also allows you to minimize all the windows on the desktop. |
Lock toolbar.
1. Right-click on an empty space in the taskbar.
2. Select Pin taskbar (Lock the taskbar ):
· If there is a checkmark, then the toolbars on the taskbar are locked;
· If there is no checkmark, it means that the toolbars on the taskbar are unlocked.
Moving toolbar.
1. Right-click on an empty space in the taskbar, if necessary, select Pin taskbar .
Not all the characters that we want to use in documents are placed on the keyboard.
Suppose we need to insert such a symbol, or such ?, and maybe such?, But they are not on the keyboard ... What should I do? But you really need it! In such cases comes to the rescue special program table of symbols (Character map ) It contains absolutely all the characters of all the fonts installed on your computer.
Insert a special character.
- We perform the following actions: Start All programs Standard Office (System tools ) table of symbols .
- Choose a font in the drop-down list Font (Font ).
- Double-click on the symbol that we want to insert. To enlarge to view a symbol, click on it once.
- Push button Copy to put the character on the clipboard.
- Close the table.
- We click on the document in the place where we want to place the symbol.
- On the menu Edit choose Embed .
Clipboard (eng. clipboard ) - intermediate data storage provided by software and designed to transfer or copy between applications or parts of the same application.
An application can use its own clipboard, available only in it, or the general one provided by the operating system or other medium through a specific interface.
The clipboard of some environments allows pasting copied data in various formats depending on the receiving application, interface element and other circumstances. For example, text copied from a word processor can be pasted with markup into applications that support it, and in plain text into the rest.
Glipper
- clipboard manager for GNOME
As a rule, when copying information to the buffer, its previous contents disappear. But, for example, a buffer in Microsoft Office can store several pieces of information at the same time. Some desktop environments include a program for logging the latest buffer values \u200b\u200band retrieving already overwritten ones.
| Comments (0) | 00:51 | 12.11.2009 |
- On the menu Insert choose An object .
- Next we choose Create from file (Create from file ).
- Overview
- Link (Link ).
- Push OK .
Did you know?
Edit (Edit ) choose Special insert then Paste link (Paste link OK .
Updating the linked file.
- Save .
- Close the source program.
- An object will be updated automatically.
- On the toolbar, click Save .
Did you know?
Edit / Communications (Links ) / Manually (Manual ) Then we can close.
For your information.
Open source file (Open source ) in the dialog box Communications menu Edit Communications Change Source (Change source Edit / Object Properties (Object properties ) / Communication / Break the connection (Break link ) / Yes / OK . Tab Communication in the dialog box Object Properties
| Comments (0) | 00:30 | 10.11.2009 |
Linking and updating information
In this lesson, we will learn how to create a relationship between documents and how to update related documents.
We can create a link between the source document and the destination document. In this case, information stored in one document (source) will be displayed in another document (final file). We can edit the linked object from any file, and the changes will be saved in another of them. The resulting file displays only a copy of the object. Any changes will be made in the final file, regardless of whether we opened it in the final file or in the source program.
Creating a linked object in several programs.
- We place the cursor in the place of the document where we want to place the object.
- On the menu Insert choose An object .
- Next we choose Create from file (Create from file ).
- In the dialog activated by this action, select Overview . In the file selection window that opens, we find the file that we want to insert and double-click on it.
- Set the checkbox in the box Link (Link ).
- Push OK .
Did you know?
To add part of the file, we can use the Paste Special command. We select and copy the information, click on the place in the document where we want to add the link. On the menu Edit (Edit ) choose Special insert then Paste link (Paste link ), specify the format and click OK .
Updating the linked file.
- Open the file in the source program.
- We edit the file using the commands of the source program.
- On the toolbar, click Save .
- Close the source program.
- Open linked file using the destination program. An object will be updated automatically.
- On the toolbar, click Save .
- After that, we can close the destination program.
Did you know?
We can change the link to update manually. Select the object in the destination program, and then perform the following actions: Edit / Communications (Links ) / Manually (Manual ) Then we can close.
For your information.
Search, change and delete the connection between objects.
We can open the source file from the destination file using the button Open source file (Open source ) in the dialog box Communications menu Edit . This function allows you to find and open the source file of a related object. After the changes are completed, we can return to the final file. Dialog window Communications tracks the location of the source file. Using function Change Source (Change source ) we can change the source. If we want to change the link to a regular copy of an object, select the related object in the final file, and then perform the following actions: Edit / Object Properties (Object properties ) / Communication / Break the connection (Break link ) / Yes / OK . Tab Communication in the dialog box Object Properties we can also open or modify the source file and update it for the selected object.
The toolbar in Windows 7 (and in other versions of Windows) is needed to quickly call a program or file. There are enough panels in Windows 7, you can do without additional ones for years. But sometimes such a need arises.
What options are there in Windows 7?

When is an additional panel needed?
- If you are missing the Windows 7 taskbar to place shortcuts to all the programs you frequently use.
- If you need fast opening of all documents of a certain folder.
- To get to several hundred shortcuts on the desktop, you need to minimize or close all windows, which is not always convenient.
- As a temporary fixture. While you often access certain files or applications, they are in front of your eyes. When the need is gone, you can delete the folder. All that remains is the taskbar with those programs that are always needed. It will be required - you can create a new toolbar.
- In new versions operating systems new functions are added to replace the old ones. Often users who are used to the XP interface complain that Windows 7 is no good. That everything is improperly located in it, and there are no previous convenient options.
What does Windows offer?
By default, the toolbar in Windows 7 is not reflected, but it is not difficult to create it.
- Right-click "Start", select "Properties". The settings menu for the Start button, taskbar and tools opens.
- You can adjust the settings for the "Start" and "Tasks", but now we are interested in the third tab. It is proposed to create five toolbars: Desktop, Address, Tablet Input, Links and Bluetooth Remote Control. Now there is not a single bird against them, but if you need something from here, then you can put a bird.

Is required fast access to other applications

How to delete?
- Right-click "Start", select "Properties", "Toolbars", remove the bird.
- Right-click the taskbar, “Panels”, under “Language” you will see yours. Remove the bird.
When you get used to the Windows 7 interface, you will.


