I thought for a long time where to start today's topic "How to restore factory settings on a laptop." After all, they resort to this procedure for different purposes. Some because the computer starts to slow down due to a heap installed programs, half of which were also deleted incorrectly. Others because Windows is already so infected by viruses that it makes no sense to somehow restore everything. Or it simply does not load. The third case is when the equipment is returned to the store under warranty from the store, and maintenance personnel need to reset Windows 10 to the factory settings.
In the end, I decided to start without entry and go straight to the point.
How to restore the laptop to factory settings
The whole action is essentially not complicated, and now you will see for yourself. In the article I will try to mention all the major manufacturers. I hope not to forget anyone.
Acer
The process can be implemented directly from Windows. To do this, you only need to install special program « Acer Recovery Management«.
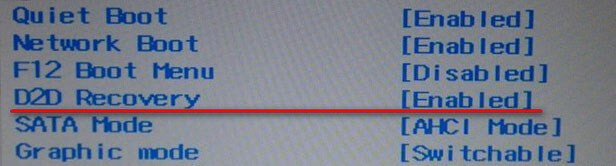
We go into the BIOS, go to "Main", where you need to make sure that the "D 2D Recovery" function is enabled (Enabled).
We reboot, and at the same time press the hotkey combination Alt + F 10 until the application window opens.
Now select the option highlighted below in the screenshot. In other operating systems, say, (8 / 8.1), the phrase may have a different meaning, “Return the initial state».
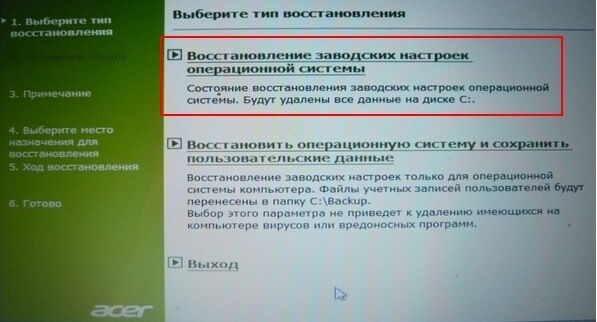
We confirm our actions and wait for the end of the work.
This video is in case you have an English version of the utility.
Asus
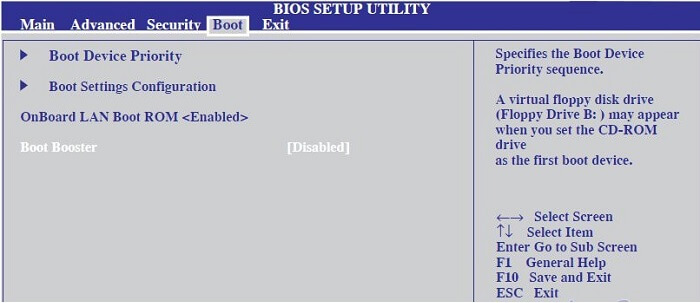
I want to note in advance if the recovery asus systems If it happens for the first time, first you should deactivate the “Boot Booster” in the BIOS.
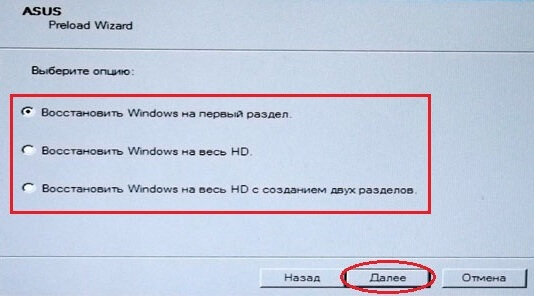
Now you can start. We start the laptop, press the F9 key. The button can be released after the “Boot Manager“ window appears. Press Enter on “Windows Setup”.
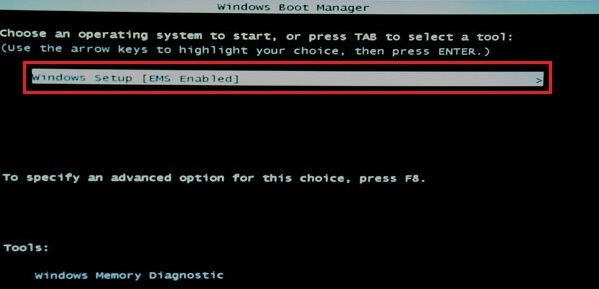
We answer the very top line, as shown in the figure below.
And we are waiting for the end of the process.
Dell
Reset laptop to factory settings This company is also not difficult. For example, through “Computer troubleshooting,” as in the Toshiba variant described below.
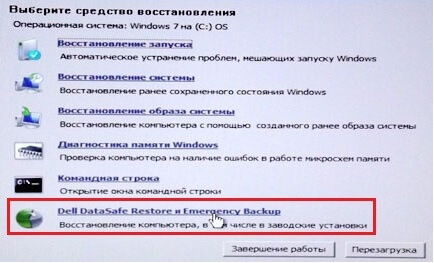
In order not to repeat, I will describe another way. An internal utility will be involved here - Dell DataSafe.
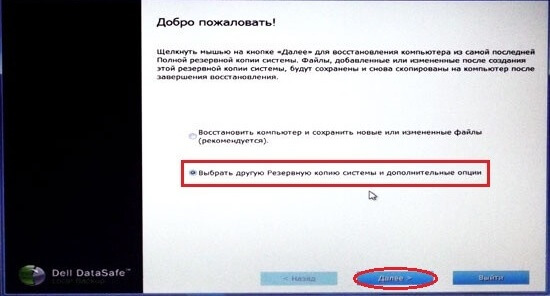
a) Run it. Select "Select another backup and additional options."
b) We mark the item “Restore My Computer”.
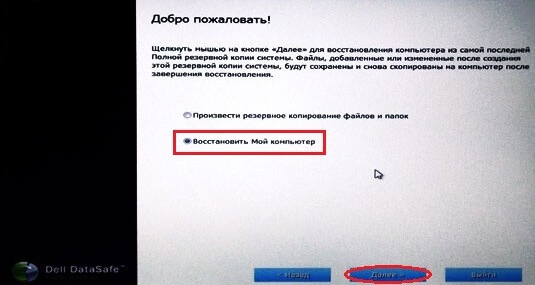
c) We set the value "Restore without saving ..."
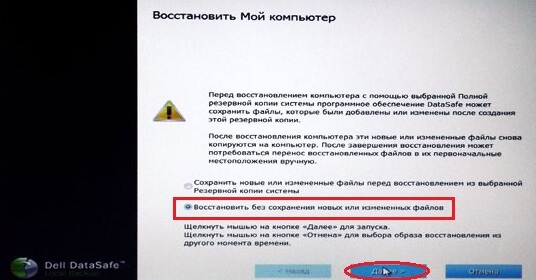
d) We confirm our actions and expect the end.
Toshiba
First we need to turn off the laptop. Then, holding the “0” (zero) button, turn it on. You need to release the key only after when you hear a characteristic squeak! Next, follow the instructions on your computer screen.
But what if you have an outdated laptop model?
Turning it on or restarting it, press the F8 button on the keyboard and select the very first value.
In the list, click " Toshiba HDDRecovery"And then" Shutdown. "
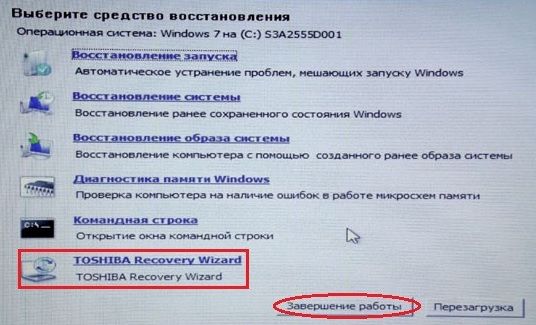
And again, follow the instructions on the screen.
Samsung
Here, too, is not difficult.
a) Turn on the PC and click on F4.
b) Go to the “Recovery” tab (if you need to accept the license agreement).
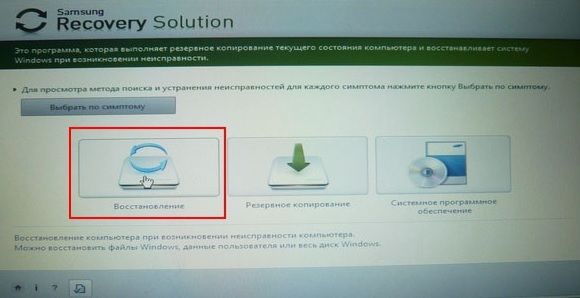
d) Activate " Full recovery". Do not forget to specify a backup.
e) We are waiting for completion.
Lenovo
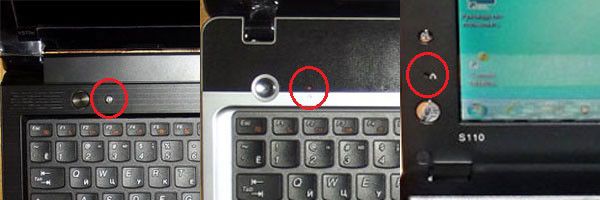
Examine the laptop keyboard for “OneKey Rescue,” an invisible little button. Usually it is located in the upper left corner next to the "On".
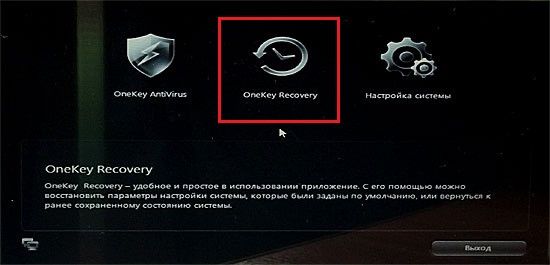
Choose the option of the same name in the utility.
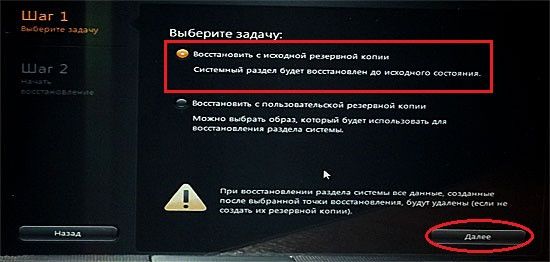
We mark the item shown in the picture below.
In conclusion, the work should reboot.
Msi
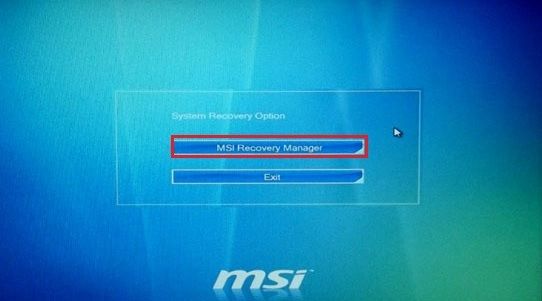
We start the PC and press the F3 key on the keyboard until the familiar Windows Boot window appears Manager. " As with Asus, activate Windows Setup.
In the menu we find "MSI Recovery Manager" and click on "OK".
Fucked for a long time, rummaged through a bunch of forums but everything turned out to be simple
And so the initial parameters are given acer Aspire V5-551 laptopThe native recovery partitions are corrupted. Target restore on laptop Acer system windows 8 to factory settings.
To restore the factory settings, we need several tools:
1. Recovery Image USB-flash for Acer Aspire V5-551/ Windows 8 (x64) can be taken or weighs ~ 12 GB
2. Program Acronis True Image home we also take (de jure this software product is paid, you can also download it from the official site and use the trial version for 30 days) weighs 216 Mb
3. And the last thing we need is flash drive larger than 13 GB
Please note, if you have any files on this flash drive, copy them to your computer, as during installation, the flash drive will be formatted.
It will also be formatted and your hDD (ALL will be removed from it too)
Stage 1 Preparing Recovery USB-flash for Acer Aspire V5-551
1. After installation True image run it on the second tab “ Backup and recovery ”click restore and using the“ search backup”Find the downloaded file.
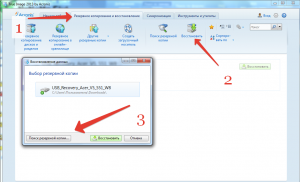
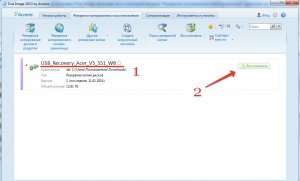
2. On the “Backup and recovery” tab, we have a field with the name “USB_Recovery_Acer_V5 ...”, from the right of the field there is a “Restore” button, click it.
3. A new window opens, in it we check that from the top right it says “Switch to disk mode”, if it says “Switch to partition mode”, then click on this line. Next, click on the “Show MBR” button from the left, put checkmarks everywhere and select a USB flash drive in each drop-down list (focus on the volume of disks).
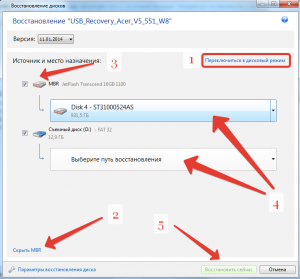
4. Click the “Restore Now” button and wait about 15 minutes until the data is written to the USB flash drive.
Stage 2 Configuring BIOS to restore Windows 8 system on Acer
When repairing the system for the first time, I came across an error, when choosing the item “Reset to the initial state” (restoration to the factory settings), the error came out: “ The disk on which the windows system is installed is locked ...“. I tried to overwrite the USB flash drive, changed the BIOS settings, fought on the Internet, etc., in general, arranged dances with a tambourine until I paid attention to one line in the acer BIOS
Secure boot: Enable
Moreover, in order to turn off this function, I had to look for information.
I write immediately all the settings that need to be done in BIOS for a successful launch recovery windows 8 from a flash drive
1. To enter the BIOS, immediately after pressing the power button, press the F2 key (for those who do this for the first time, advice: press and release it as quickly as you can until the BIOS window appears). Moving on BIOS is done by arrows on the keyboard.
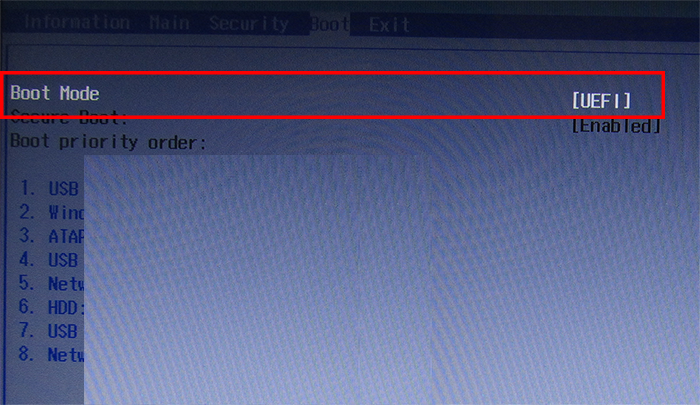
2. The first thing we do in BIOS is to check which boot mode of the operating system we have installed. On the Boot tab, boot line mode must contain a UEFI value. If so then everything is fine, but if it says the Legacy BIOS, change this value by pressing the Enter button on it, select UEFI.
If you changed the value of the parameters. then you need to save the changes
Boot Modes:
UEFI - for installing and working with Windows 8
Legacy BIOS - for installing and working with Windows 7 and earlier

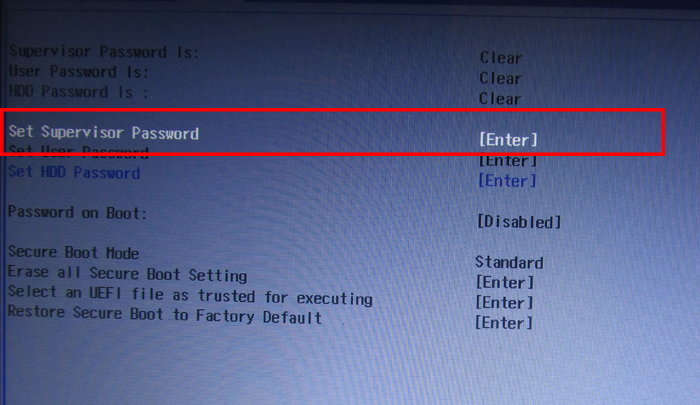
4. In order to disable the Securety Boot parameter, it is necessary to set the supervisor password from the beginning. On the Securety tab, select the line Set supervisor password and press enter, enter any password twice.
5. Go to the boot tab again and set the disable value to secure boot
Hello. I am sure that most of you were in an unpleasant situation, when the OS crashed, it began to restart on its own. This can happen for various reasons: damage to system files, exposure to viruses, or technical malfunction of hardware. One of the troubleshooting methods is to reset Windows 7 to the factory settings, which will be discussed in this article.
You do not have to be a computer genius to do the following: It is enough to follow the instructions, and then you will succeed.
There are three most effective ways to solve the problem. Now I’ll tell you more about them.
The easiest way to help you get your system back in a few minutes.
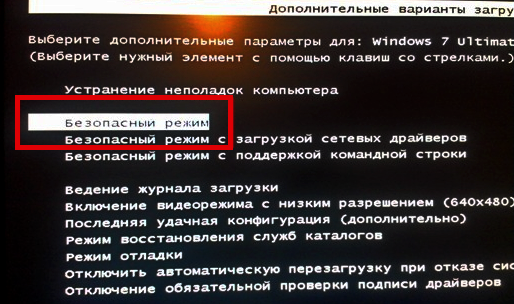
- First you need to restart your PC and during startup press F8 to display the boot menu:
- Select the section "Last successful configuration";
- Windows will try to recover corrupted files and set the default settings, followed by a restart.
It is worth noting that for laptops different manufacturers Reset mode entry keys may vary. Often, this is F8, but maybe F9-F12. On Lenovo, you can sometimes find a special button “One Key Rescue”, clicking on which will open the “rescue” menu.
Immediately, I note that the above method can solve minor problems associated with defective drivers or parameter failure. You need to start with it, and if it does not help, then go to the next instruction.
Windows Recovery
I think you know that the system independently creates rollback points before installing applications or updating drivers. Thus, the working state is fixed, which you could then return to.
You can create such points in manual mode, using the following built-in utility:
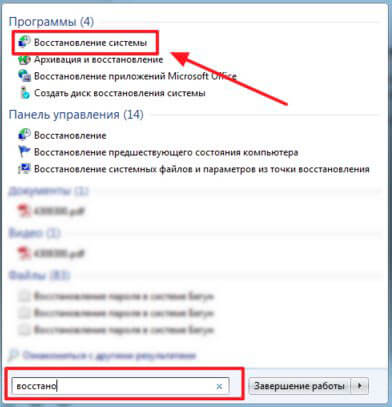
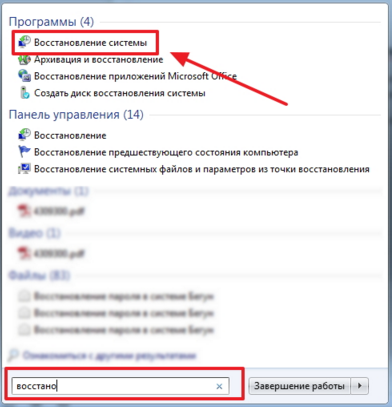
- IN search bar “Start” we enter the query “Recovery” and select the option that suits us from the results:
- You can go the other way: in the "Control Panel" go to the "System" section. A window will open, where on the left you should click on the link "System Protection". A window with the "Create ..." button is displayed:

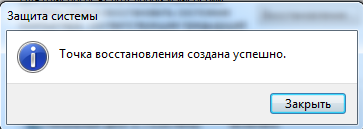
- Having specified the name (description) of the point, click "OK" and wait for the end of the backup creation process.
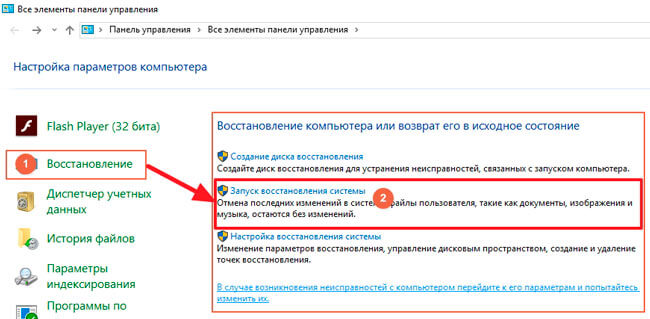
- Done! Now, in order to perform the recovery, you should select the appropriate section in the “Control Panel”, and then from the proposed options go to the “Launch ...” item:
- A “wizard” will be launched, which will guide you step-by-step throughout the procedure. Initially, you should select the point to which you want to return to from the list. By default, the last saved configuration is selected.
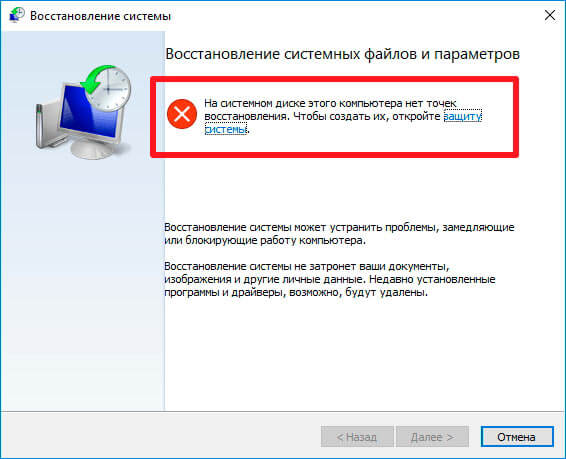
- At the end, you will be prompted to continue the process after restarting the PC. It remains only to hope that the solution will be workable. Alas, system recovery is not always activated, so you may not have rollback points:
So you have to resort to the most radical and relatively complex solution.
We use a boot disk
I have already talked about this procedure. But reset windows 7 to the factory settings is slightly different. Therefore, keep the instructions for the "seven".
This method is most effective if the system is deeply affected by viruses, does not load at all, or constantly displays failures (blue screen).
- In the BIOS settings, select the boot method from removable media (flash drive, DVD) on which the image is recorded. Of course, previously it was necessary to create it (or ask friends). in a separate publication.
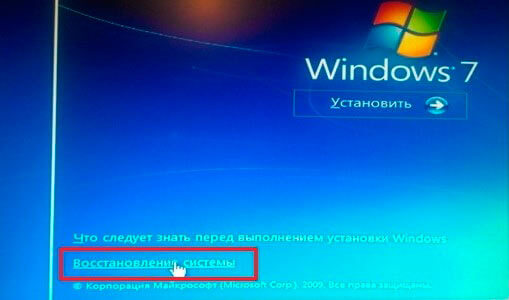
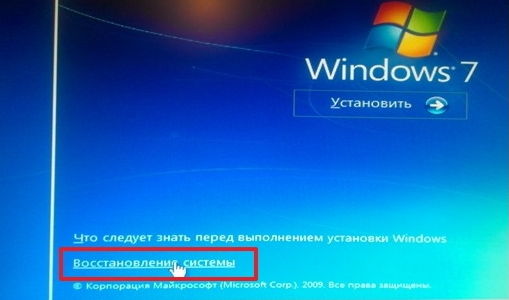
- When the window with the "Install" button loads, do not rush to click it. Below is the “Recovery ...” link that we need:
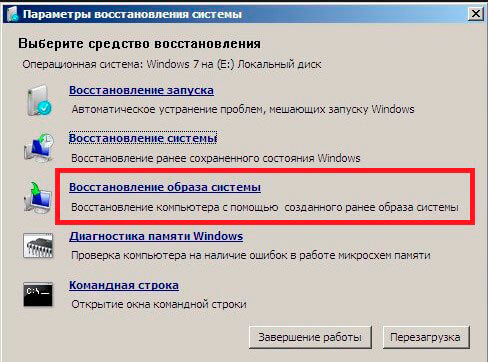
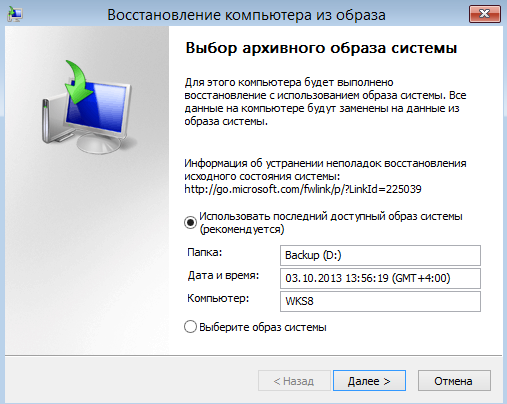
- Next, several options will be suggested. You must click on the item pointing to the image:
- Now just follow the instructions of the "wizard". You just need to click “Next” several times, and then wait for the procedure to complete.
Total reset
There is another way that is relevant for laptops that have a reserved partition with an OS image and factory settings. Almost every self-respecting laptop manufacturer equips its products with this feature.
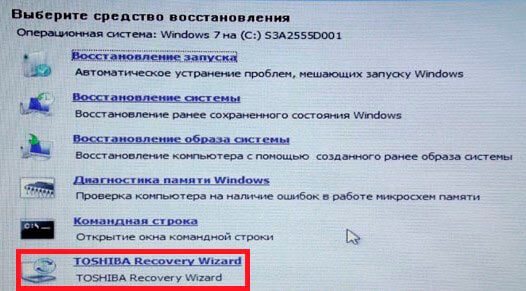
To give detailed instructions by this method I can’t, because it will be different for different models. But, often, there is a special button on the case with the image of an arrow pointing to a point or something similar. Or, when starting the recovery menu (see above), an additional item may be displayed, indicating the brand. Here is an example for Toshiba:
Just run the proprietary utility and carefully read what it offers. If you have questions, it’s best to ask Google Yandex or write me a comment. I will try to help understand the situation.
Sincerely, Victor!
Every PC user was faced with a problem when the operating system started to malfunction and often rebooted. This happens due to the loss of system files, a large number viruses or technical hardware problems.
It is especially unpleasant to get into a situation when Windows stops loading. This can lead to loss of data: valuable documents, music and photos.
Basic System Recovery Methods
In most cases, you can reset the system to factory settings or restore Windows to work with working system files on the computer. For this, it is not necessary to have a special education or in-depth knowledge of software. Just use the tips below. The following methods are considered the most effective:
- Download the last successful configuration;
- Built-in " Windows System Restore»;
- Using a system boot disk.

In different situations, one of the above methods will help to return to the previous state. Each user should be able to do system debugging, so let us dwell on ways to restore Windows in more detail.
Download last successful configuration
This option is considered the simplest, it allows you to quickly return the working state of the system. First you need to switch to Safe Mode. For this during windows boot you need to press the F8 key and select " Last successful configuration". Then the system will restore the previous working settings and system files, then the download will go again.
In different laptop models, the input to safe mode to further reset or restore the system is carried out using system utilities. The following are combinations to run some of them:
- ASUS - F9;
- Dell XPS - F8;
- Lenovo ThinkPad - F11;
- Lenovo IdeaPad - a special key OneKey Rescue;
- Toshiba - F8 or 0;
- Sony VAIO - F10 or ASSIST key;
- HP Pavilion - F11;
- LG - F11;
- Rover - Alt (hold);
- Samsung - F4.
On the latest PC models with UEFI, in order to switch to safe mode, you will need to change the default values \u200b\u200bwhen choosing an OS. More detailed information can be found in the technical documentation.
With the last successful configuration, you can roll back latest versions drivers that you might have installed incorrectly. Or return working system files affected by malware software. This method of returning to the previous configuration will help with minor bugs and freezes that have appeared with the latest changes in the system. With more serious breakdowns, it may be useless and you will need to try other ways to return the files.
Windows System Restore
It is usually used after the previous method, which did not give results. The operating system has the ability to make several recovery points that fix the status of all programs at a certain point. You can make such points yourself or adjust the frequency of autosaves.
Before creating a recovery point manually, it is better to close running programs. We go to " Control Panel"And select" System". Next, go to the menu " System protection", In the window that opens, select" Create a recovery point"And indicate its name. After the procedure is completed, a system message will be displayed - "The recovery point was created successfully."
To start the recovery procedure, go to the menu " Start", Click on" Control Panel", Go to the item" Recovery “Launching system recovery.” In the window that opens, you can select the last point or see all available. By clicking " Search for affected programs", You will see the entire list of applications that will be changed. It is usually enough to select a point 3-4 days before the occurrence of malfunctions and failures. After selecting a recovery point and confirming it, the computer will restart.
In the same menu, you can restore using a pre-made image. It is pre-stored on a DVD media, flash drive or external hard disk. Today, most often they restore parameters from an image via a usb connection - this is quick and convenient.
For inexperienced users, it is better to leave all the proposed settings to default, after several transitions we confirm the reset process by clicking Finish. It is worth noting that if you created a backup with errors or the media with the image was damaged, then the system startup may be interrupted. In this case, it is better to install a new environment on a computer with a preliminary formatting hard drive.
Using the system boot disk
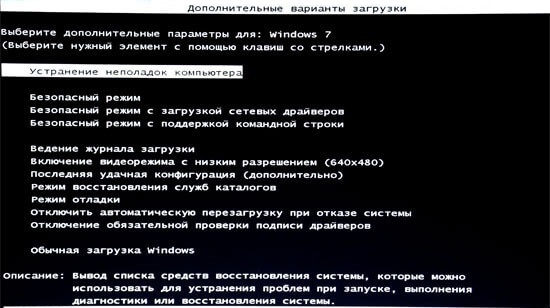
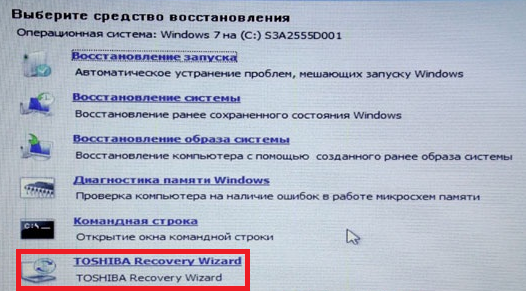
In case of serious violations in windows operation or strong exposure to viruses may be required boot disk. With it, you can reset the system or roll it back to working condition and the desired settings. In safe mode, select " Computer troubleshooting", After that we insert the disk into the DVD drive and in the window that opens, click on the" "button.
The program offers us a choice of several ways to set default parameters:
- Startup recovery - search for major problems that prevent Windows from starting;
- System Restore - search for a restore point with working settings for reset;
- System image recovery - using a backup made earlier;
- Diagnostics windows memory - check system memory;
- Command line - work with files through a text line.

The recovery process is the same as with the built-in application. But working with a disk, you eliminate the possibility of harmful effects on the operation of viruses and other third-party software.
Full reset to factory settings
If the above recovery methods have not yielded results, you can try to produce full reset to factory settings. For this, some models of laptops and PCs have a hidden system partition with copy of windows in basic condition.

Manufacturers offer users special utilitiesThanks to which the reset process will become simple and understandable. The principle of operation of such programs is similar and even inexperienced users will be able to understand them. You can start the utility using a special key or through safe mode during computer startup. If such a utility is provided by the developer, then its name will be displayed at the end of the list of recovery options.
In the window that opens, we need to select the first item - “ Restore to the state at the time of purchase". After the work is completed, the computer will be rebooted, it will roll back to the factory settings (you will need to select the default language again and create an account).
![]()
It is worth noting that all files that were previously on the hard drive will be deleted permanently. Therefore, we recommend that you save everything you need on a flash drive or other medium in advance.
Related videos
Windows crashes quite often. The system is clogged unnecessary programsthat interferes with the normal operation of the laptop. You can reinstall Windows with the drivers and necessary programs, but it is much easier to restore the factory settings than reinstalling the drivers.
Most laptops come with an installed OS. There is a department on the hard drive where the image of the OS with drivers and programs is stored, so you do not need a disk to reinstall the system. To free up space on your hard drive, many users delete this section, but someone does not know about it. The folder where all the information is stored is called "Recovery". You can resume the system when you restart the laptop or from the operating system. It should be remembered when recovery in progress factory settings network adapter must be connected to the device. The factory settings for the laptop are located in a hidden section called “Recovery partition”. To enter it, you must go to "Computer Management", then to "Disk Management". In Toshiba laptops, in addition to the section "Recovery", there is a folder " HDD Recovery", Located on drive D. Both of these folders cannot be deleted, otherwise it will be problematic to restore the factory settings.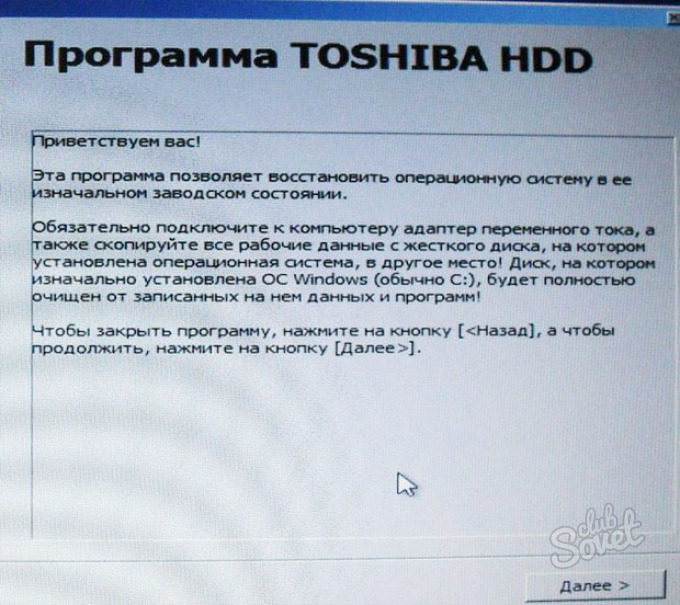

- Samsung - “F4”;
- MSI - “F3”;
- Acer - “Alt + F10”;
- Fujitsu Siemens - “F8”;
- LG - “F11”;
- Toshiba - “F8”;
- HP Pavilion - “F11”;
- ASUS - “F9”;
- Packard Bell - “F10”;
- Sony VAIO - “F10”;
- Dell inspirion - “Ctrl + F11”;
- Lenovo ThinkPad - “F11”;
- Dell XPS - “F8” or “F10”.


When the laptop is restored to the factory settings, all the information stored on the hard drive will be lost. Therefore, all programs will have to be reinstalled.


