All windows versions By default, some files are hidden, mainly those that are responsible for the health of the system. This measure allows you to protect system files and folders from the inappropriate actions of an inexperienced user. After all, deleting them can lead to Windows malfunctions, and sometimes an NTLDR is missing system boot error.
However, malware and spyware also create invisible files, which makes them difficult to detect and delete. Therefore, opening access to them has its advantages and helps in fixing problems caused by unwanted invisible files.
How to access hidden data through Explorer
There are several options to open hidden files and folders in Windows XP / 7/8/10. To do this, in Windows XP, click on the My Computer icon, select Tools and open “Folder Options”, and then go to the “View” tab and check the box “Show hidden files”.
In Windows 7, almost everything is the same. Go through Start to the "Control Panel" window and select the "Folder Options" section. Then go to the "View". Find the line “Show hidden files” and set the checkbox. To save changes, click on the "Apply" button. All hidden data will be shown on the screen. To hide the folder again, follow all the same steps, and then uncheck the Show hidden files line.
To show hidden data in Windows 8 or 10, press Win + E. In the Explorer window, select "View", then "Show and Hide." Check the box next to "Hidden items."
If after the above steps the invisible folder still does not appear, try unchecking the "Hide system files" line. But here you should be careful, as system drive (in most cases in C :), all system hidden files will be displayed, deleting or changing them can cause a lot of problems in the operating system. Before you delete anything on this drive, you must first hide them, or if you clean it manually do not mark the deletion of translucent files and folders.
There is another method to show invisible data on a computer through the registry editor, but this method is more suitable for advanced users who are better versed in the operating principles of operating systems.
How to make a folder invisible
Often there are situations when you need to close access to your personal information. For example, you do not want to show some of your data at work. It can also come in handy for home computerif your family members use it. And if everything is quite simple in the familiar Windows XP, then in Windows 7/8/10 there are some nuances.
Many users store personal data on a computer that they do not want to show to anyone - any materials from work, personal notes, collections of photographs, videos and more. In order to hide your personal information, you should set the status to hidden on the folder.
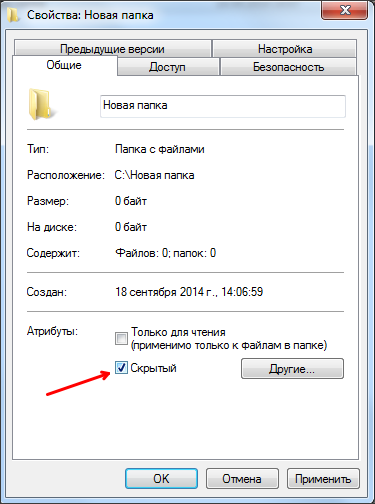
The hide procedure itself is not complicated and takes a little time. To hide a folder, right-click on it and select "Properties" in the drop-down menu. In the window that opens, pay attention to the "Attributes" section. Select the Hide attribute checkbox and click Apply. After that, the folder will disappear.
In this way, we hid the information, so that now it will not be available to anyone, unless, of course, no one knows about its existence.
To show the hidden folder, go through the items listed above in this article.
Now you know how to hide or show hidden information on examples of Windows XP / 7/8/10. In general, this is not as difficult as you might think.
In this article I would like to show you how to see hidden files and folders in windows 7. In windows given the function is disabled by default. The fact is that users can inadvertently change the contents of a file or even delete what is hidden and allows the OS to work, as a result of which the windows may not work.
For system security, this is useful, however, this function is used by cybercriminals to write malicious programs that harm your computer and prevent their detection. But we will talk about this a bit later. From this we can conclude that the visibility of hidden files and folders has its advantages. And even more so if your computer has your hidden folder, you need to learn how to enable the hidden one.
There are several ways to get to the folder settings where you can enable hidden files and folders in windows 7, let's look at them.
Open My computerclick on the dropdown menu Sort\u003e Folder and Search Options
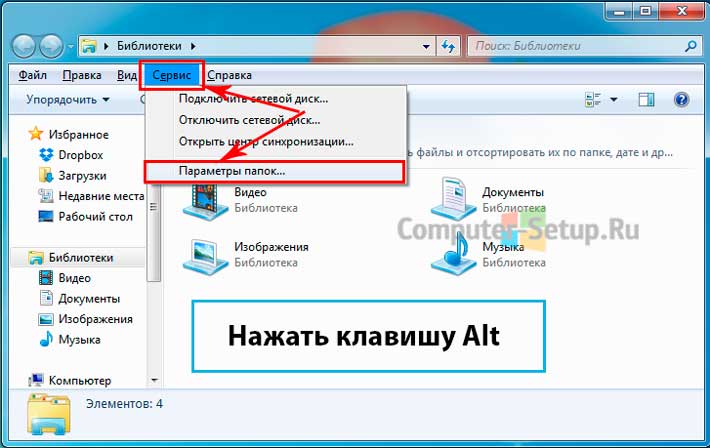
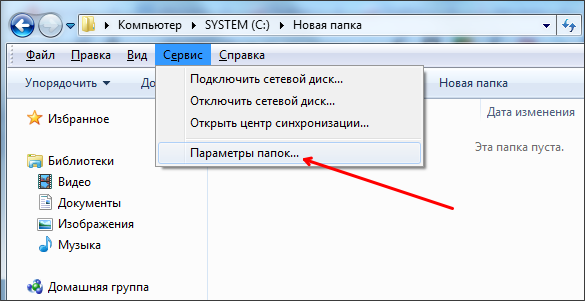
In the open window My Computer, press the Alt key and select from the context menu Service and further Folders settings
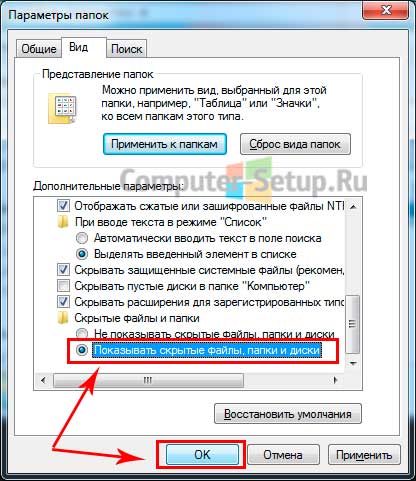
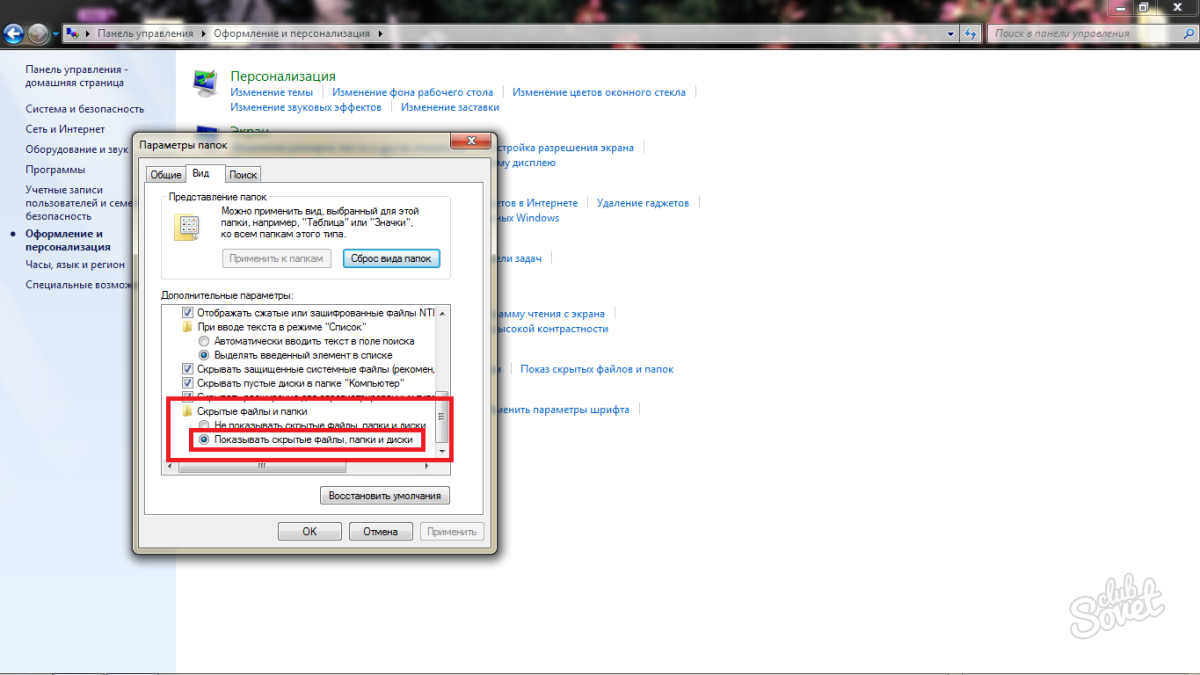
In the opened Folder Options window choose View, from the list Additional parameters go down the list, look Hidden files and foldersput a tick on the item Show hidden files, folders and drives and click OK.
Folder settings through the control panel
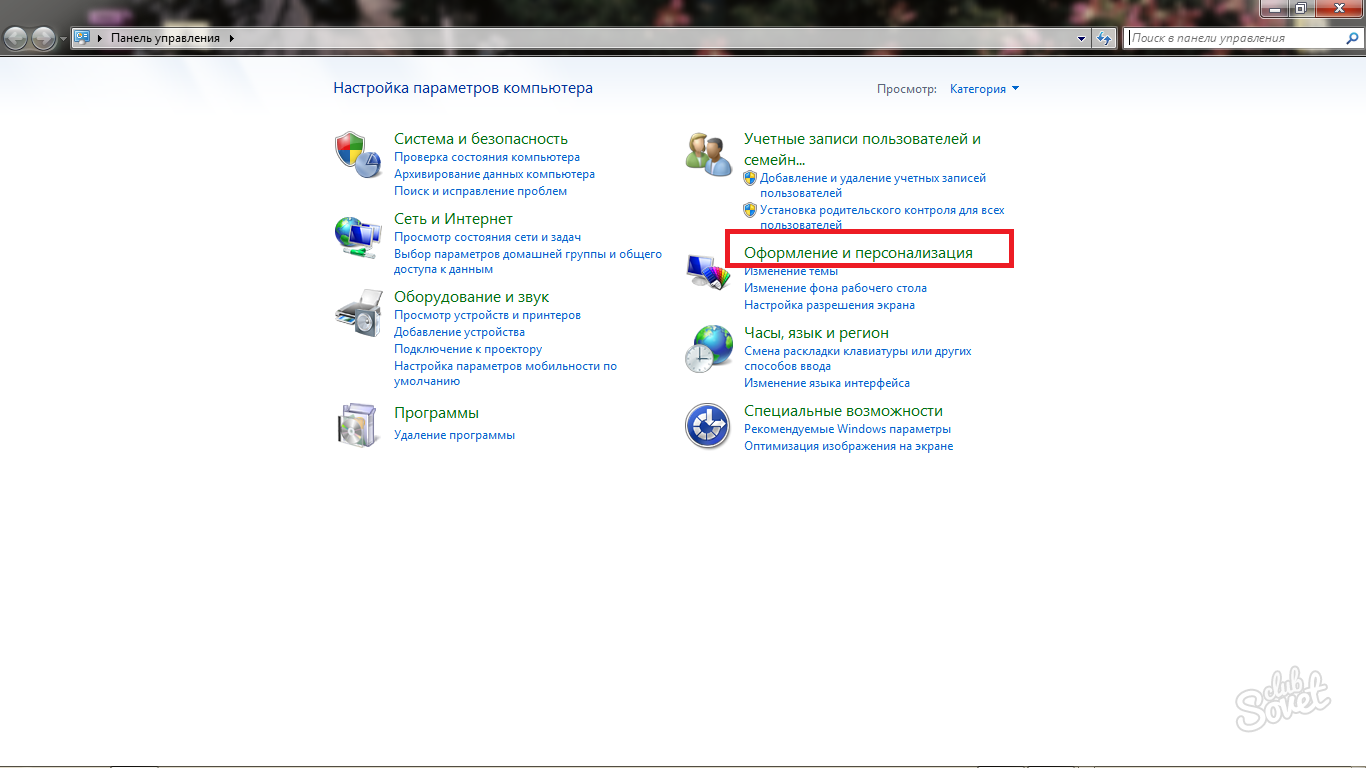
Push Start\u003e Control Panel, Further choose Design and personalizationfollowing select Show hidden files and folders

The Folder Options window opens, in this window you also need to go down the list, find hidden files and folders, and check the box next to Show hidden files, folders and drives and click OK.
Having done the specified manipulations, hidden files and folders will be displayed on your computer.
show system files in windows 7
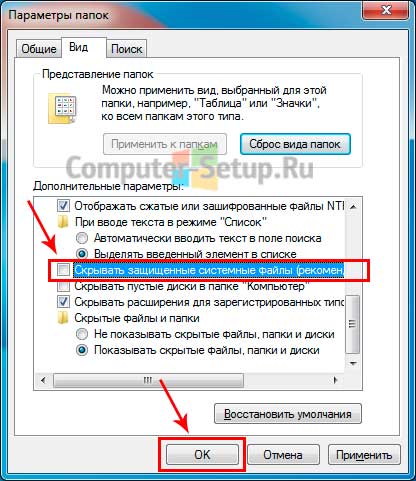
In order to show system files you need to uncheck the box next to the item in the folder options window Hide protected system files (recommended).
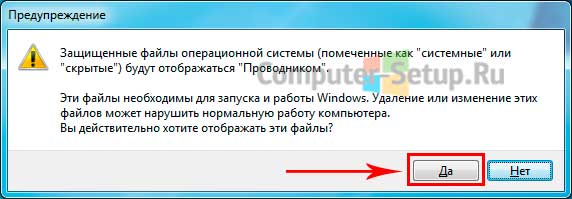
WARNING: For stable operation of the windows 7 operating system, this checkmark makes sense to remove only experienced users. Otherwise, you run the risk of disruption by accidentally deleting system files or system folders.
After you try to uncheck the show system files box, you will immediately see a windows warning. If you still decide to see hidden system files, click YES in the warning window, otherwise there is NO to cancel. Next click OK.
If you have unchecked this checkbox and you see all hidden OS files, it is recommended to set it so that windows 7 hides system files.
In contact with
Hidden folders have the Hidden attribute, so they are not visible in Explorer. In order to see them, you will need to change some OS settings. The question is especially important for beginners in Windows 7, since the previous XP axis has significant differences. The solution is simple and quick.
This article discusses the following four ways to show hidden objects in Windows7 Explorer:
- Display invisible files using "Folder Options";
- View protected system objects;
- View invisible files using the "Registry Editor";
- Enable display of protected system objects.
The developers of Windows 7 took care of the invisibility of some directories to users in order to protect the functioning of the system from the users themselves.
But there are times when you need to see hidden OS data to ensure normal work windows 7, an example is the operation to remove malware that has infected a computer.
Method number 1
To display invisible directories and files using the "Folder Options", you should go through the following algorithm of actions:
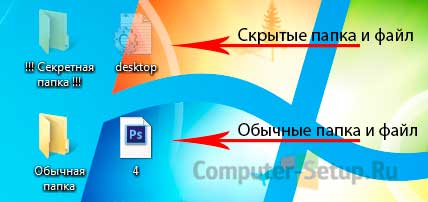
You can check the effectiveness of this technique by going to section “C” and if the “ProgramData” directory is present in it, then the procedure was successful and hidden data is available to the user. They will differ from ordinary ones in a lighter shade.
Method number 2
This technique helps to solve the question “How to see protected system objects?”. To do this, do the following.
These are folders for which the Hidden attribute is set. Usually folders with this attribute do not appear in Explorer. In order to hidden folders began to appear need to make changes to the operating system settings. In this article, you will learn how to show hidden folders in Windows 7.
In order to make the Windows 7 operating system show hidden folders, we need to open any folder and press the ALT button on the keyboard.
After pressing the ALT key, under address bar a number of drop-down menus will appear: File, Edit, View, Service and Help. Here we need to open the "Service" drop-down menu and select the "Folder Options" item.
After that, you will see a small window called “Folder Options”. In this window, you can configure all the basic parameters that relate to the display of folders, files and disks in Windows Explorer 7.

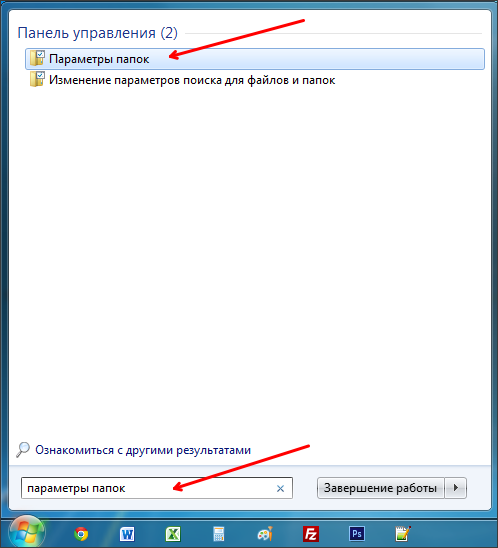
It should be noted that if you cannot open the "Folder Options" window through the drop-down menu, then you can use the search in. To do this, open the start menu and enter “Folder Options”. After that, Windows 7 will find desired program and will offer to open it.
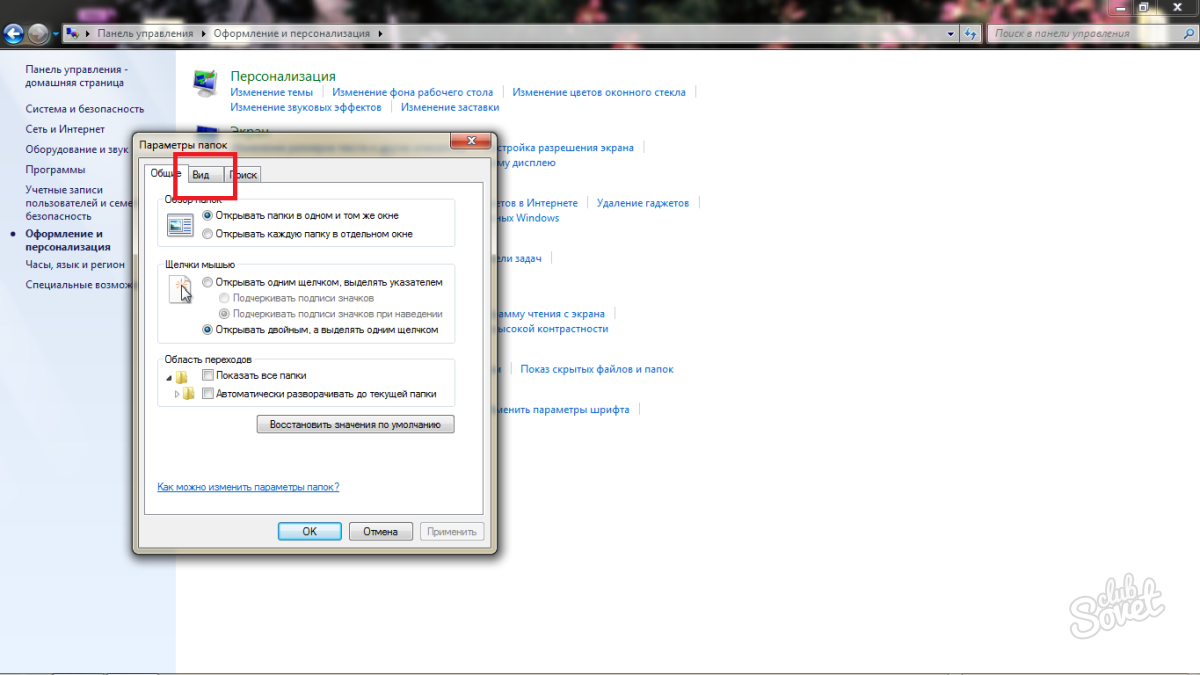
So, you have opened the "Folder Options" window, in order to show hidden folders in Windows 7 you need to go to the "View" tab and find the parameters that are responsible for displaying hidden folders.
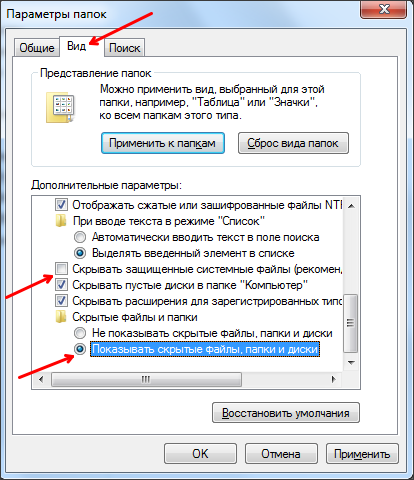
You need two parameters:
- “Hide protected system files” - it must be disabled;
- "Show hidden files, folders and drives" - it must be enabled.
After making changes, close the window by clicking on the “OK” button to save the changes. After that, you will be able to see hidden folders and files. Now, if there is such a need, you can remove the “Hidden” attribute and the folder will become normal. To do this, right-click on the folder and select "Properties". After that, turn off the “Hidden” function and close the window.
After you have removed the “Hidden” attribute, the display of hidden folders can be turned off. Further, this folder will be displayed in any case.
In some cases, the user just needs to see the hidden folders of the system. This happens when installing various add-ons for games, changing programs, or simply deep cleaning the system. If you need to go into the system folder only once or twice, it is better to hide it after that. So you protect yourself from accidentally deleting important system files, changing them and moving them: all these actions are fraught windows errors 7. Try to customize the display of hidden folders by following the simple and clear instructions in this article.
Go to the control panel. To do this, click on the Start icon in Explorer, then select the “Control Panel” line on the right side of the menu that appears. Customize your display by category, not icon. This option is in the upper right corner of the window.Click on the “Appearance and Personalization” section.
![]()
- Parameters for their opening and overlay.
- The reaction of the system to clicks on folders.
- Display folders.
In addition, in this tab, you can immediately return everything initial settings folders set by default by the system.
You need to go to the “View” tab.
Click OK and then Apply.

So just you can configure the display of system folders on your computer or laptop with operating system Windows 7. If you have later versions of the OS, then this algorithm applies to them. You need to follow exactly the same path, however some line names may differ, along with the new system interface.


