In Windows operating system, data recovery exists. The system automatically makes backups of variable parts, with the possibility of restoring them.
Some PC users do not know that there is such a recovery, and there are good chances to restore deleted file. This recovery otherwise called the rollback of the system, i.e. the system, all data relating to it and changed, is returned for the period for which you restore.
It should be noted that not on all computers it is possible to roll back the system, but only on those for which operating system automatically does backups. An additional few gigabytes are required to store these copies. free space on drive C.
Also, the rollback of the system is possible not until any time earlier, but during the last 2 weeks, the recovery points of the operating system are saved.
What is recovery for?
Recovery may come in handy if you deleted a file from drive C and now you need to return it. Recovery also helps when your computer is infected with viruses, roll back the system to the day when there were no viruses and that’s all - your computer is clean again.
Many people use recovery if they break something on the computer. This naturally means the program. For example, some program worked for you and suddenly something happens to it and it stops working. You can fix this by rolling back the systems until the date when your program was functioning properly.
What negative consequences can occur after system recovery?
No adverse effects after recovery have ever been observed. According to Microsoft, system recovery does not affect the user's personal files. In any case, after the applied recovery, you can cancel the recovery and return the system to the form in which it was.
How to restore the system?
1 . Go to Startthen select Run. This component is in the right lane.
In the window that appears, enter rstrui.
If u can not find the button Run, run the recovery program manually. The recovery file is located at your address C: \\ Windows \\ System32 \\ rstrui.exe. It is recommended that you copy this path and paste it into address bar conductor click Enter.
In the event that for you both points are impossible, difficult, go to Start >> Control Panel >> Recovery. In the window that appears, select Start recovery.
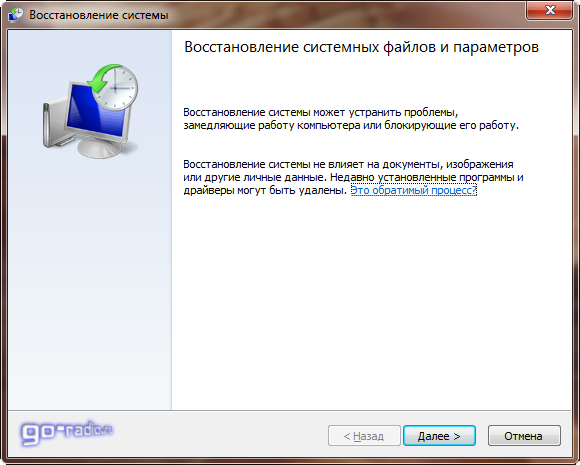
2 . You should get a window System Restorepress Further.
3 . The window will display all available recovery points. You can choose any of them. Also select and by clicking " Search for affected programs"you will look at what programs changes will occur after system recovery.
4 . On this screen you will be shown which local drives undergo post-recovery after recovery. Click Further.
5 . This is the last recovery step. Click on the drive in the list and click Finish.
A system restore will take place which can take from 5 to 15 minutes.
During recovery, the computer is rebooted, this is normal.
If you don’t like the changes, as it was written above, you can return everything back, in the same window System Restore.
Probably, every lamer has at least once encountered a serious system failure, after which you want only one thing - to go back a couple of hours and not do what was done (that’s because, in ninety percent of cases, the human factor is to blame for the failure, if this is not so, then system recovery is unlikely to help). Fortunately, there is such an opportunity on modern operating systems - yes, an almost divine power that turns back time. But each user knows that under Windows (and in other cases) this in practice works with a creak.
Safe mode
We have a whole section about what is safe mode, and how to get there. The bottom line is that some of the drivers do not load, but the worst case is when the video card stopped working after the software update. Then you need to use safe mode with a minimum screen resolution. Or, if there is such an opportunity, switch to another signal source:
- Built-in motherboard adapter.
- External 3D accelerator.
The drivers for these devices are different. But what if the video card failed? Try to remove it, if possible, from the Dispatcher, and then stock up on a complete disk and start the installation. There is another way - rollback the video driver from command line. Unfortunately, the authors cannot give the necessary command here because of the great difficulty for remembering. But it was a very long line, full of different brackets. If you find this on the network, write to the admin to improve the text.
As for other drivers, they are easily rolled back or work out of safe mode.
What to do with a laptop
If any laptop crashes, then there are two ways:
- Create installation media current operating system.
- Use the recovery section of the laptop itself.
The first is necessary if the factory equipment of the operating system does not suit you, or if the software is completely absent. The second option is good because it will guaranteed to work, but:
- Usually all user data is deleted.
- Installing Windows updates on low-power netbooks can take days.
Each manufacturer has its own troubles. For example, Lenovo laptops have a dedicated recovery button. You need to press it while the power is off and hold it for a while to start the utility.
For reference. The notebook is turned on by the Power button. System recovery without this will not begin.
Acer, after loading, enters the factory restore mode when Alt + F10 is pressed, and the system backup is performed in advance from Acer Care Center. Each laptop has its own secrets:
- Command + R - Launch MacOS Recovery.
- F9 - ASUS.
- F8 - Fujitsu, Toshiba.
- F4 - Samsung.
- F3 - MSI.
- F11 - some Lenovo, LG, HP.
- Ctrl + F11 - Dell Inspiron.
After the start of the recovery process will begin new installation operating system. Windows bootloader allows you to leave user data or format the disk. A pleasant surprise is that the operating system is installed without a hitch, without requiring the conversion of media from one format to another (MBR and GPT).
Why backup does not work
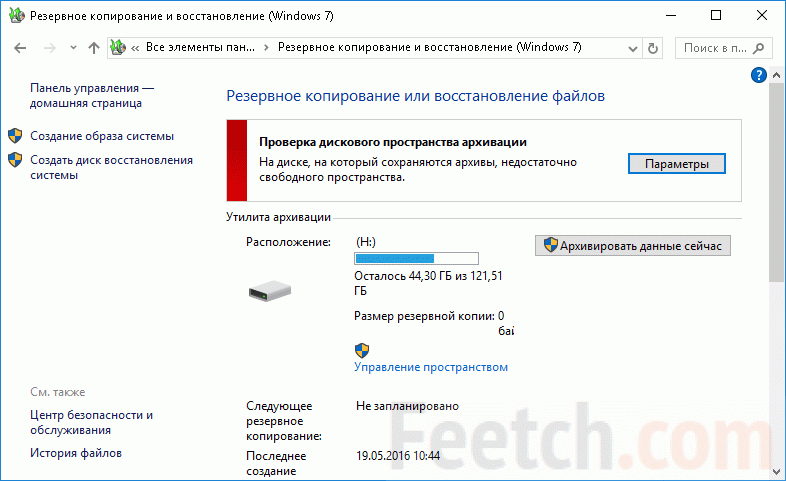
Life is arranged in such a way that there are some oddities in it. In the case of operating system backup windows systems 10 this is manifested in the fact that the archive takes up more space than the source. Yes, it is, although it is difficult to say why this happened. For example, with the weight of the entire system drive 40 GB (even if you add a page file here), you can’t get 60 GB. But they are typing! Moreover, every day this archive grows a little further, although there are no visible actions like installation software not undertaken. This slows down the computer, loads the hard drive, reducing its service life, and travels around the ears constantly during operation. That is why users, unlike lamers, usually do not use system backup.
As for the recovery points, then not everything is as smooth with them as it looks in the description. If one day it is noticed that the operating system already weighs 130 GB, although on the eve it was three times less, then you need to carefully monitor its size. Usually this disgrace is caused ... as many have already guessed correctly, the included system recovery. What exactly it is going to restore there is difficult to say, but this disgrace can be removed only by turning off all of these options so praised by lamers. This is especially noticeable on laptops, since many are too lazy to break the hard drive into logical partitions. And then the performance over time due to lack of space for the swap file will greatly decrease. And now, if readers still want to know about all these joys, we proceed to a detailed examination.
And one more thing: those who want to free up space on another section by transferring information to system diskwill be unpleasantly surprised: the new file will also be archived.
System Restore for Windows
No matter what new Microsoft releases, today Windows 7 remains the most popular system from this manufacturer - eight out of ten Windows users use this version. Actually, therefore, system recovery will be described on its example - for more modern versions, as well as for older ones, this process will differ only in some details. The seven has such a useful function as a restore point - during its creation, user files are selected that must be saved.
To start this process, you just need to clearly follow the instructions:
- Through the Start menu, start recovery. If you don’t know where it is, just enter in the search. If the computer has multiple users, enter the administrator password.
- Select the desired recovery point (if the computer is at least a year old, then there can be a lot of them).
- Follow all recovery wizard instructions clearly.
Actually, this process for the mentioned OS version consists in precisely following the instructions - it is good that Microsoft does not overestimate its users, and creates a database detailed instructions for all occasions.
How to start a backup
Despite the fact that backup is one of the worst methods of maintaining the system, it allows you to restore the computer completely, because the archive contains all the files. For this, a separate hard drive is used. Otherwise, the system will not allow the backup to start.
Through the Control Panel (for Windows 10 - right-click on the Start menu) you need to go to the Backup and System Restore window. Here:
- Control disk space allows you to specify the path to create the archive.
- Change Archiving Settings - a wizard to create a system image. With a selection path, a list of stored data, etc.
- Restart archiving - work according to the specified parameters.

Through the menu reserve copy You can schedule the task and create a system recovery disk. it removable media DVD used in critical situations when the system does not boot at all. It can be used, among other things, to roll back the system to a recovery point or completely overwrite the operating system files from an existing archive.
Backing up is often done on magnetic tape. Because this ensures maximum durability of the recorded information. Archives are stored separately in a safe place and see the light only in the case of preventive maintenance and repair. Digital information in this form it is difficult to damage, although the bitrate leaves much to be desired. For this reason, writing large amounts of information to tape is inefficient. In truth, these techniques are more relevant for servers.
How to restore a poppy?
This is only possible if the operating system of your laptop is not older than OS X Lion. This is installed on all modern models of macbooks, and therefore there should not be a problem - the firmware on older models also changes quite quietly in service centers.
So how to recover your computer on macOS? Actually, the set of recovery utilities even offers several options:
- Restore one of the backups through the Time Machine service.
- Check all connected drives.
- Help online through the Safari browser.
- Reinstalling the entire system.
To boot your Mac from the recovery partition, you need to hold down the Command + R key combination at the time of reboot - already upon power-up.
After a large apple lights up on the screen, you can let go. After starting the computer, a window with the above utilities will be displayed on the desktop. If there is no such window, restart the computer again and press the keys again. The desired action is selected in the window, and clicked. If you need to reinstall the system, you will need an Internet connection - through the list wireless networks select the one you need, enter the password and login, and start the recovery.
How to restore the device on Android OS?
Naturally, no one gives guarantees for the perfect operation of the operating system. Needless to say, users of tablets and smartphones with a green droid on the screen also sometimes want to turn back time. It is for this that the developers made several ways to restore the system - they differ in form, in complexity, but not in result.

The easiest way is to restore the settings through the Android system itself. To do this, go to the "Settings" menu, and then find the "Restore and Reset" submenu. It would be reasonable to check before that whether there are backup copies of the data - by the way, everything that is written on the memory cards will not change, only the device settings will be reset to the factory settings.
After resetting the settings, if the gadget remains with you, you need to return synchronization with your Google account. To be able to do this, when starting recovery according to the first option, it is necessary to check the items “Copy data” and “Recovery” in the menu with checkmarks. With successful synchronization, the system will begin to upload your data.
If it’s impossible to restore in this way - the screen freezes, a hard reboot does not help, and the device refuses to work due to software problems, then you need to use the “ Android system recovery ". It is undesirable to use it, since all user information is erased completely - only if there is no other choice, or before selling the gadget.
To enable such a menu, you need to press the power button and the “-” volume on the device turned off - you need to hold it until the device is turned on. Some devices require a different combination - you can find out in the instructions or on the manufacturer’s website. After that, on the screen you need to find the line "wipe data / factory reset", go through it, and confirm the decision by clicking on the inscription "Yes - delete all user data". After rebooting, the device will return to the factory settings. Some smartphones allow you to choose a language where, among other things, there is Russian. Which greatly facilitates the task.

Linux recovery
Linux is restored using system utilities and common applications like TimeShift and Systemback. On the left side of the Systemback window is a list of recovery points, if any. Otherwise, the fields are empty. To create a new restore point, click Create New.
In addition, the utility allows you to reinstall the system, repair files, upgrade Linux, and even create a system image in the form boot disk. This is useful when transferring data to a virtual machine. Recovery points are deleted if necessary. Windows users will appreciate that the directory for storing information is directly specified.
However, here it is not without problems. Users report that is not created boot image Linux Mint, no password is entered (double characters are printed). According to some reports, sometimes setting the XNeural layout switch helps. As a result of the observed phenomena, many users refuse to backup the system using Systemback.
TimeShift is different appearancereminiscent of Windows. Recovery points are stored in the folder of the same name. A noticed drawback is eating free space. Subsequent removal of the program and its system archives does not lead to anything. Moreover, Nautilus and the system monitor see one thing, but something else is discovered through the properties. So, Linux also appeared " hidden opportunities"Described above?
How to restore Windows without reinstalling
The operating systems Windows XP, Vista and Windows 7 have a wonderful feature - system recovery. In fact, this function has some features of the "time machine", in any case, it may seem so when you first use it.
When can the system recovery function help? Real world example.
Imagine a situation where you are installing a program that emulates virtual diske.g. Daemon Tools or Alcohol 120%. Those who like to play games are certainly familiar with these programs.
And here, after installation, you see that the virtual disk is not only not created, but the icon of the real DVD drive that is installed in the system also disappeared. Removing the program does not help, rebooting is also inefficient, nothing comes of it. The system "does not see" the DVD drive! What to do and how to be? Is it possible to fix the problem of "little blood", without reinstalling Windows? Can. You need to use the system recovery function.
The system recovery function, as it were, takes the system back in time and restores it as it was before the installation of the ill-fated program, due to which a crash occurred - the DVD drive disappeared.
The essence of recovery is that before installing new programs or in certain time the system saves the so-called recovery point. The recovery point creates a system impression, saves registry data, basic system parameters, drivers, etc.
When a failure occurs, you can use this recovery point and roll back the system to its previous working state.
What does it look like. If the recovery function is enabled on your computer, the system automatically writes to hDD "Recovery points." Let's see how it looks with an example.
Click the button " Start"then select" All programs" - "Standard" - "Office"and we see the item". "We select it. A window appears in which briefly describes the recovery function. It should be noted that the recovery function does not know how to recover deleted programs. We are directly told about this in the first window:" Recently installed programs and drivers can be removed".
The reason for the creation may be the installation of the program, components windows updates, driver installation, scheduled recovery point.
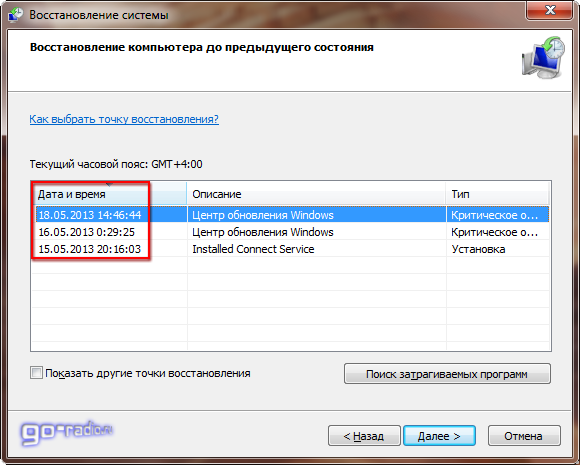
As you can see in the screenshot, 3 recovery points are shown. All of them were automatically created before installing updates on Windows 7. The number of recovery points depends on the amount of memory that is reserved for data storage. If the reserved space on the hard disk is not enough to create a new point, the oldest restore point is deleted, and its place is taken by a new one.
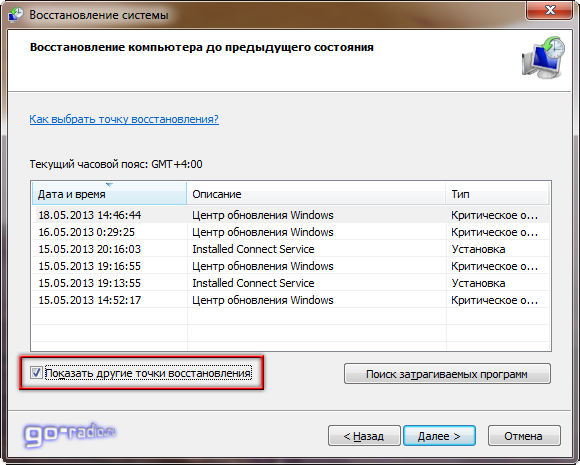
If there are few recovery points in the list, then you can put a "daw" in the "" checkbox. In this case, the number of points may increase. Take a look.
Which recovery point to choose?
It is recommended that you select the closest recovery point whose creation date precedes the failure or malfunctioning system. Thus, we restore the system before the failure. If you select a recovery point from the list, as shown in the screenshot above, then I would select the first or second line from the top ( 18.05.2013 and 16.05.2013 dates). So, we select, click further. The final window appears, in which we will be asked to confirm our choice.
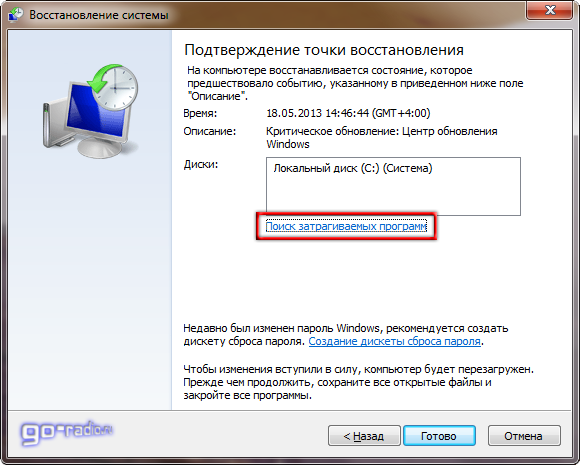
After we click the " Done"the recovery process will start, which may take some time (always in different ways). Usually this process takes no more than 15 - 20 minutes, but there may be exceptions, so plan to spend about half an hour on this beforehand.
During recovery, a progress bar will be displayed on the computer screen, according to which you can control the process. After the recovery is completed, the computer will reboot and a window will appear on the screen with a message stating that the recovery is completed or not completed. Yes, it happens. But this is a rarity. If this happens, then you should consider a general system check or reinstalling windows (last resort).
Before starting the recovery process, it will not be out of place to find out which programs will be affected during recovery. This means that program files that will be affected during recovery can be deleted. Naturally, after this the programs will not work, only the folders with some files that were created during the installation of the program will remain. You can find out which programs will be affected by clicking the " Search for affected programs". A new window will open, the scanning process will begin.

After a few seconds, a new window will open in which a list of programs and components that will be affected by the recovery will be given.

In this case, no affected programs were found, since after creating the selected recovery point no third-party programs and drivers were installed.
Can I cancel system recovery?
One of the nice features of the recovery function is the rollback recovery. That is, if the recovery failed or it did not fix the problem, it can be undone. This will reverse the procedure. You can only start recovery cancellation after the recovery process is over and the computer restarts.
If recovery does not help, then you can roll back the recovery and choose another recovery point. Perhaps it will fix the failure. If recovery fails, then the matter can be much more serious, and you will have to resort to reinstalling the Windows system.
01.04.2015
Failures in the Windows 7 operating environment are not uncommon. To overcome the problems leading to failures of the operating environment, the user can use the recovery tools of Windows 7.
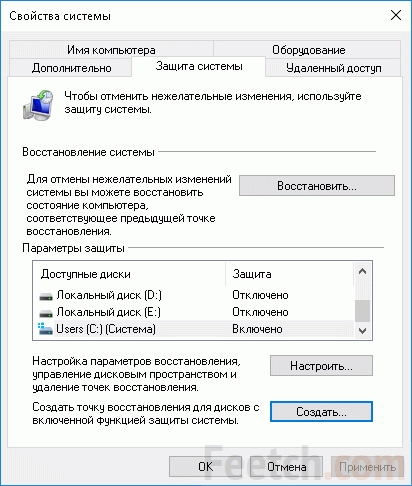
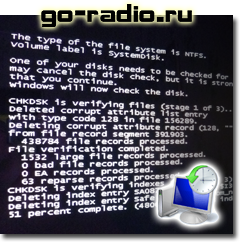
Developers from Microsoft in Windows 7 have offered a number of tools through which the user can restore the normal operation of their operating system. One such tool is recovery from critical points. To do this, use a tool called System Protection. This component constantly monitors a disk that is formatted in file system NTFS. By default, it is turned on in Windows 7 and creates so-called recovery points on a weekly basis.
Each recovery point contains status information. system files, registry settings on the date the point itself was created. Also, system protection saves previous versions Modified files that become part of the recovery point. Creating such a critical point requires a certain amount of disk space - this is, in fact, the only minus of critical points. Such points are created not only weekly, but also before each significant event: updating the system, installing drivers, installing custom applications.
The system recovery application built into Windows 7 uses critical points of system protection in its activities. This software component takes information about system files and settings. system registry from a critical point and restores it to the system. At the same time, the component’s actions do not affect the user's personal files, and therefore they remain unchanged.
Another way to restore Windows 7 is to recreate the system settings from an exact copy of the disk, which is created in advance and stored in a network location or on another hard drive. This method is called recovery from a system image. Also, they restore the system registry settings from the last successful configuration.
Why restore Windows 7
The question of restoring Windows 7 system arises when the operating environment starts to work unstably with a large number of errors. The reasons for this work are rooted in damaged registry settings, system file data. In turn, the causes of damage to the registry or system files can be very different. System files infected with viruses, incorrectly installed drivers, and even ordinary updates of the system itself may be responsible for the unstable operation of the environment. That is why before installing programs, updates, drivers, it is strongly recommended to create critical points to protect the system from unforeseen failures.
The mechanism for restoring system parameters from critical points allows you to restore system file data, registry data for the period of creation of the restore point, which means to restore the system’s performance during the creation of a critical point. If failures, for example, began after installing the driver, then recovery from a critical point before installation will allow you to return the system to this event.
Windows 7 System Recovery from a Critical Point
 System Properties Window, System Protection Tab
 To restore system parameters from a critical point, the user must perform a number of simple steps. First you need to find the "System Protection" component. You can go to this component in different ways, but one of the easiest is to go first to the "Computer" link in the Start menu to bring up the context menu of this item. In this menu you need to find the “Properties” item, which will open the system window, in the left field of which the “System Protection” link is displayed. It will lead us to the window of the system properties, to the tab of its protection.
In the tab that opens, you can find the "Recovery" button, which we need. With it, we can launch the Windows 7 recovery tool. This tool will detect all critical points existing on the PC, but by default it will display only one, the most recent. If necessary, the user can freely choose from other points the one he needs. Clicking on the “Next” button will allow you to proceed to confirm the selected point. During the reboot, the operating system will perform all necessary operations to restore the system settings and files. After a reboot and recovery, it will either confirm that the system has been restored, or it will report a failure of the recovery attempt.
Restore Windows 7 from an image
Recovery from critical points is not the only way to return to an earlier state with workable parameters. Sometimes, reconstructing data from critical points does not help - the system, as it worked with failures, continues to produce a large number of errors. Therefore, they resort to reconstructing the system from a copy of the disk, which is prepared in advance.
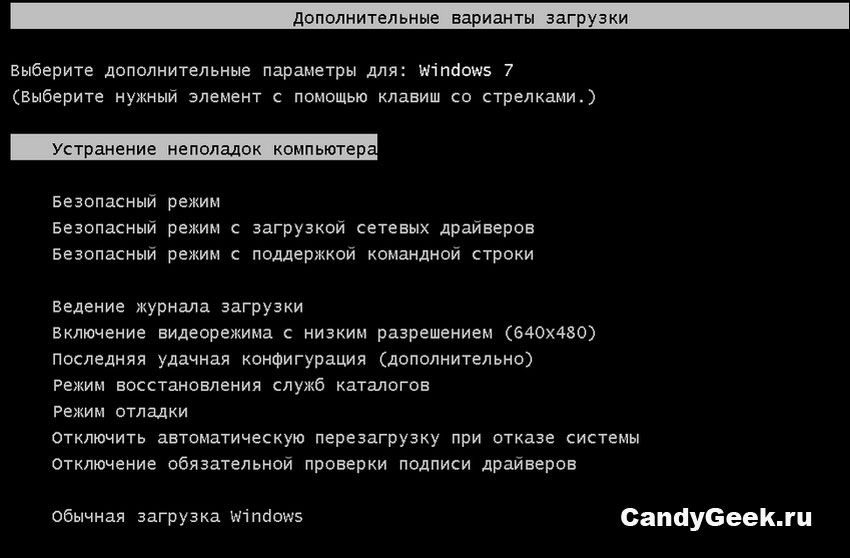
To open the Windows 7 recovery tool from the image, you need to enter the boot selection menu by pressing the F8 button. In this menu, the user must select the item titled "Troubleshooting the computer", after which, after a couple of steps, a list of possible options restore system performance. We need the link “System image recovery” there. Selecting this option allows you to start the recovery tool from a copy of the disk.
If the image is located in the location of the restored computer, the tool will quickly detect it. However, if the image is located in a network location, you will have to perform a couple more steps to connect to the network and to the workstation where the image is located. The further steps concern only the confirmation of the choice made with some warnings. When the recovery tool finishes working, the computer will restart and the user will be able to use the already fully functional environment.
Differences between the system recovery component in different versions of Windows and Windows 7
The recovery component appeared in Windows ME. With the advent of subsequent versions, this component has evolved, therefore, it differs in different versions of the Windows operating environment. So in XP user interface The system protection component provided a convenient slider for adjusting the amount of space on a hard disk that could be occupied by critical points. In Vist, he disappeared and reappeared already in the "seven", from where he migrated to the "eight."
In Windows XP, recovery points could occupy a maximum of 12% of the disk space. By default, each critical point lived for 90 days, after which it was deleted from the system. This period was configured in the registry using the value of the RPLifeInterval parameter. But Vista already required to preserve the points of a larger volume, and therefore later versions already set the default value of 15% of disk space.
In the last windows versions monitoring is carried out only on disks formatted in the NTFS file system. The system no longer supports FAT32 monitoring and can no longer be applied to discs less than 1 GB in size.
Also, it should be said that the technology for creating critical points, starting with Vista, has changed a lot. In new windows versions, including Windows 7, system recovery is built on the technology of shadow copy volumes, which works at the block level of the file system.
Windows 7 Recovery - An Important System Protection Tool
The System Protection component is an integral part of the Windows operating environment. System Restore Utility uses critical points in its work, which creates this component in the process of monitoring disks. The technology for creating such points and restoring the working state of a PC has evolved along with the operating environment itself, and therefore has great differences in different versions of Windows.
However, the technology for restoring the PC’s operational state from critical points was not the only way to return the operating environment working condition. Another such tool is restoring a system from an image.