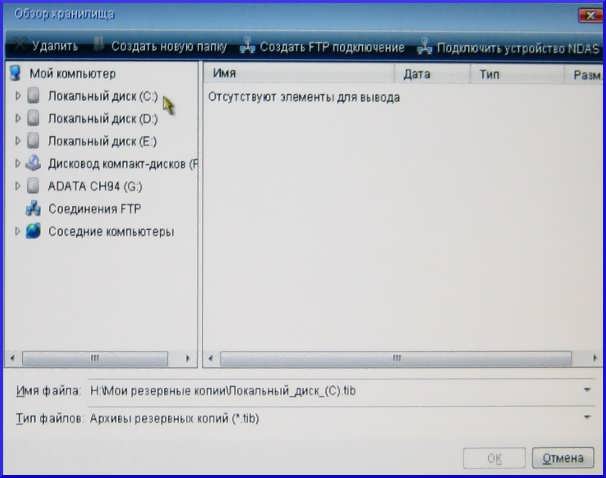
If the damage to the operating system is so great that the download became impossible, and you did not activate Boot Recovery , you can restore the system from bootable media with a standalone version of the program Acronis True Image Home 11 created with Bootable Disk Wizards if you, of course, took care of this in advance. A boot disk will help restore the system from a previously created image on your computer’s hard drive or from a saved image on a DVD recorded in UDF format. To burn the archive to DVD, you must have installed the DVD writer in UDF format, for example, Nero (Nero Burning ROM).
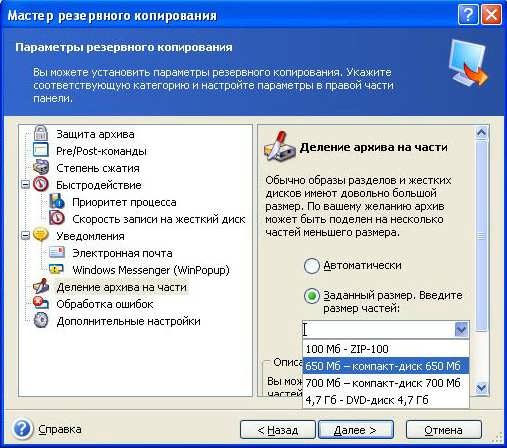
Sometimes an image created on the local disk of the computer and intended for recording on a DVD disc, exceeds the disc capacity. In this case, it must be broken into parts during the image creation process. When choosing backup options, select the "Set options manually" switch.
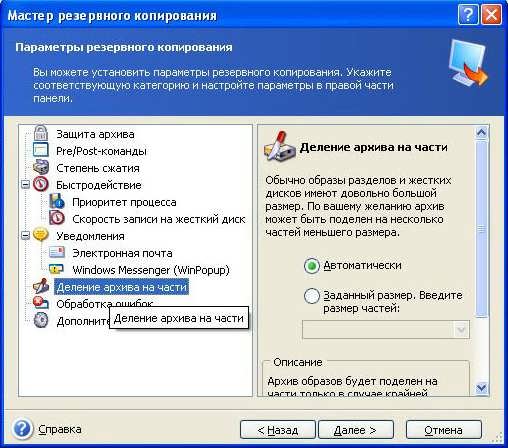
After the backup procedure is completed, there will be several files of the created image on the hard disk of the computer.

When restoring data from the created image from the drive device, you must first put the disc recorded last, and then insert the discs, following the instructions of the "Data Recovery Wizard".
To use a boot disk, you must have an idea of \u200b\u200bwhat the BIOS is. If you previously installed the operating system yourself, then it will not be difficult for you, if you did not do this, then it is better to contact a specialist.
But not everything is so scary. Everyone does something for the first time.
To download the program Acronis from bootable media, you need to configure your computer so that it boots from the CD-ROM drive, not from hard drive. Most modern motherboard have a boot selector that can be opened by pressing a specific key or a key combination during computer startup, for example, F11 ( F8, F10, F12, Esc) , depends on BIOS version. The boot options menu allows you to select the device to boot from the list of boot devices without changing the BIOS settings. You can determine the key or key combination during boot, when the equipment is being tested (Boot Menu).
If the motherboard does not have a selector with download options, you need to open the built-in Setup utility BIOSwhich is intended for initial setup computer to configure the required settings. To do this, turn on the computer boot. In the first seconds of loading, at the moment when testing the equipment, press
or
///
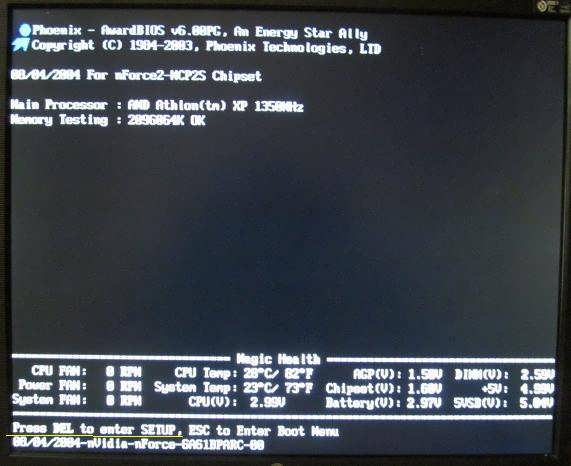
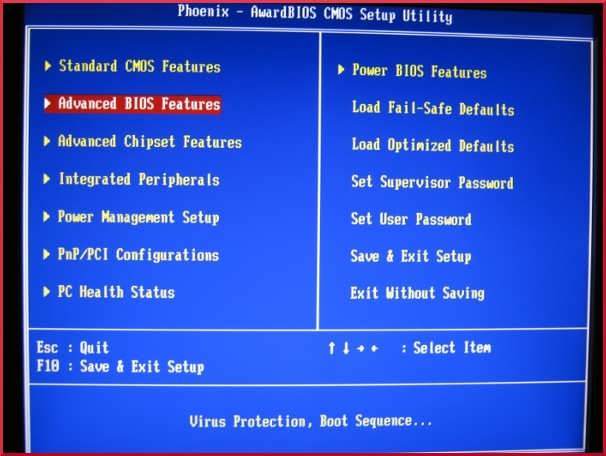
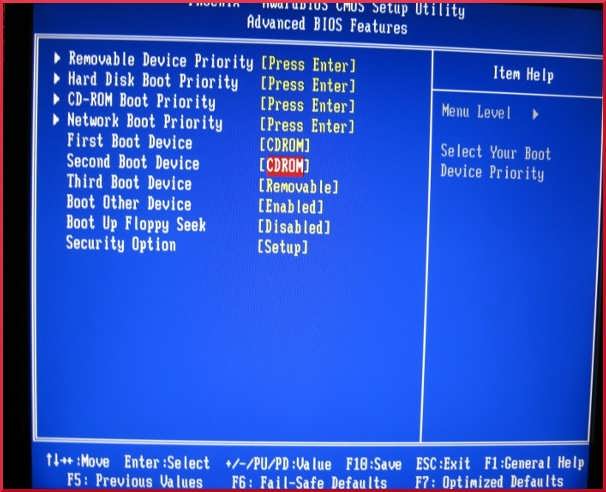
A window will appear BIOS. You BIOS may be different, but the meaning of the actions is the same.
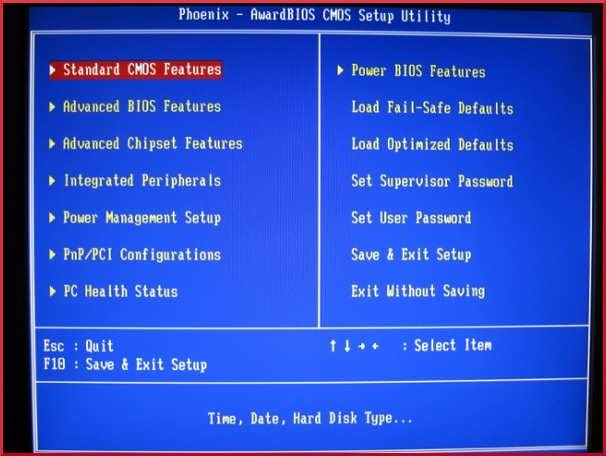
To change the priority of loading, the cursor control key does not work; the mouse moves to Advanced bios features. To enter the menu of this item, press
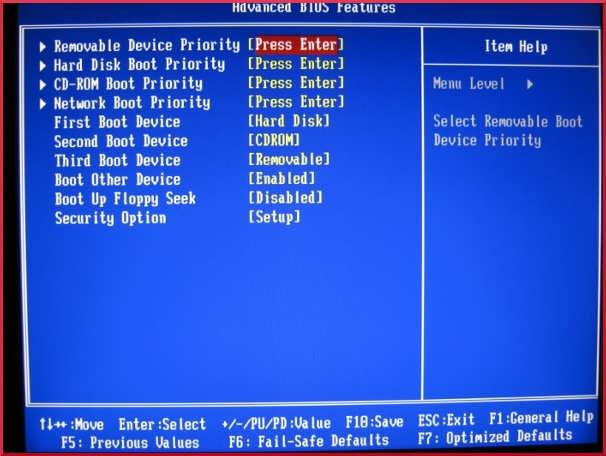
We move to the item First boot device (first boot device, Hard Disk).
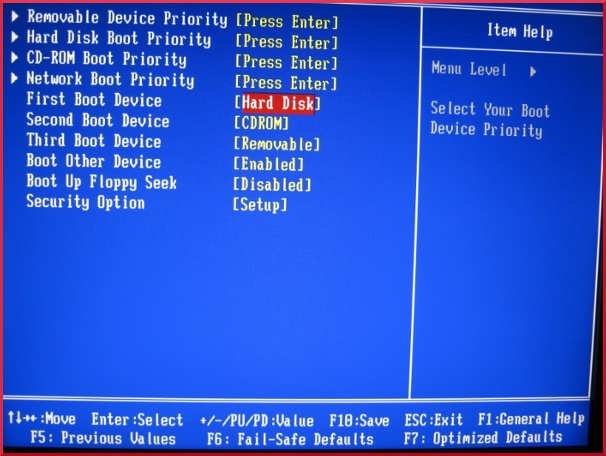
To change the setting, press the key
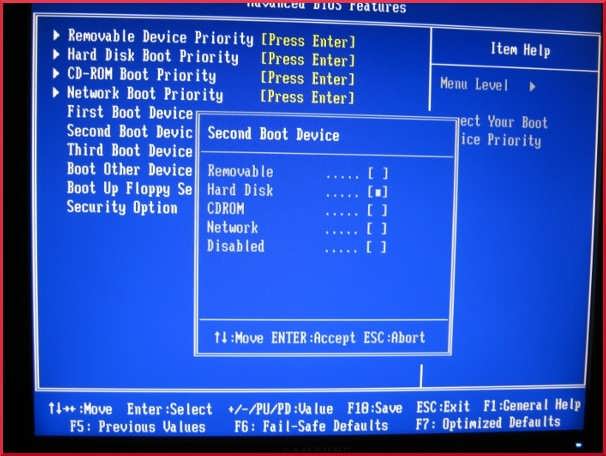
We move to the line CD-ROM.

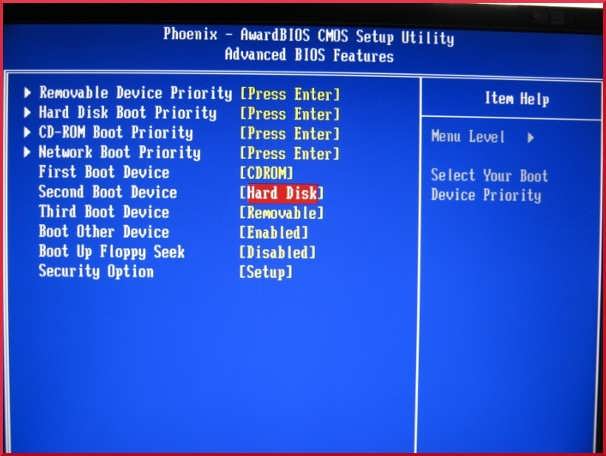
Press the key
Press the key
We move to the line Hard disk.
Press the key
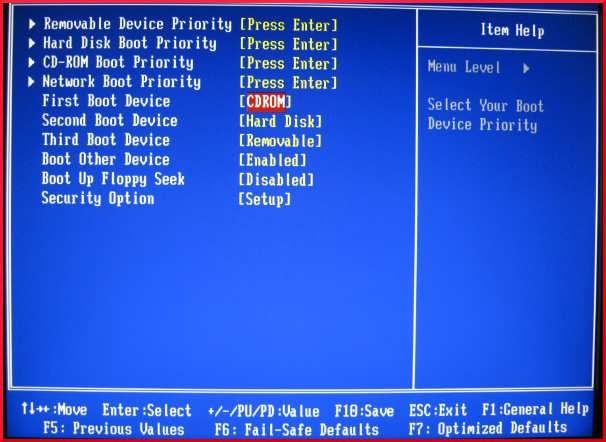
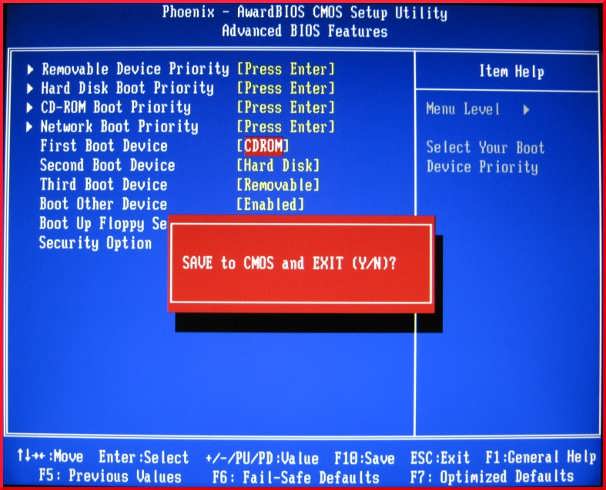
And to start downloading the program - the key
After booting from the boot disk, you will see the boot disk menu.
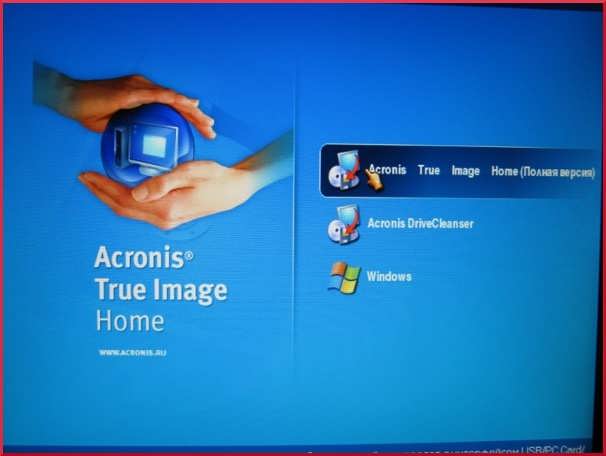
Choose Acronis True image Home ( Full version) if there are other utilities on the boot diskAcronis
Acronis is fully hosted in random access memory computer, therefore, after downloading the program, you can remove the disk and insert the disk (s) with the archive or start the procedure for recovering data from a previously created image on local drive computer, or from the Security Zone Acronis ", or from the Archive Repository.
After completing the recovery procedure, restore the previous BIOS settings.
Note.
Sometimes it may happen that after downloading Acronis True Image Home 11, the data recovery wizard will display the message: Error E000101F4: No hard drives were found.
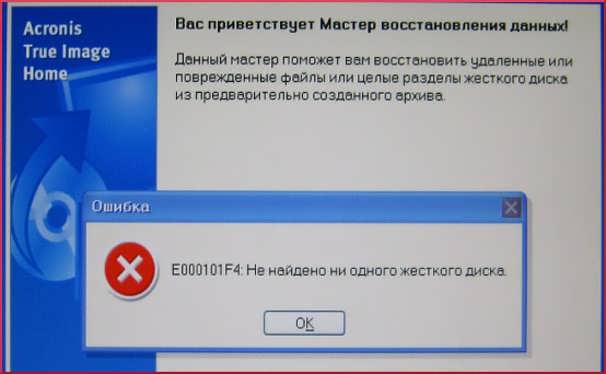
It means that current version programs, unfortunately, does not support your hDD.
Let's try connecting another hard drive, for example, external hard drive ADATA CH94 and download the program again.
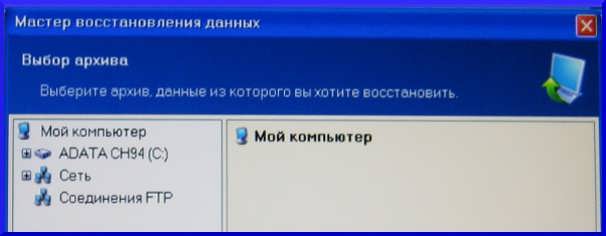
An external hard drive is detected. And now the same computer, but with Acronis True Image Home 2011.
All hard disks program found. However, keep in mind that the versionAcronis True Image Home 2011 requires more resources and disk space to host it, and updating a license is not always the only and mandatory solution to a problem.
Writing and reading backups using optical media takes a little longer than using a hard drive. But the best copy is one that is outside the computer. I was lucky to see this when I experimented with the Norton Ghost program. Then Norton Ghost hurt me file system on drive D of my laptop, where the backup was stored.
By the way, the time to restore the OS with DVD discbut it takes no more than from a hard drive, if it is the only one in the system.
Before starting a backup or restore.
Introduction.
I have an old laptop, in which the drive cannot write DVD discs, but can read them. The size of the hard drive is small, and I would not want to spend precious space on backup storage. So I decided to make a backup copy of the OS for this laptop on a DVD drive, and even with the startup of the BackItUp Image Tool. It would be convenient to take such a copy with you on the road in case the Axis falls.
A boot disk with the BackItUp Image Tool program would make such a backup in half an hour, but only if there was a DVD burner in the system.
The easiest way, in my situation, this operation would be done as follows. First back up directly to Laptop HDD, then using a flash drive to transfer it to a desktop computer and already there to burn it to a DVD disc. http: // site /
But, I didn’t really want to torment the USB flash drive from the camera every time I needed to backup, and it was interesting to check how the BackItUp Image Tool cope with the transfer backup OS over the network to Winchester remote computer.
Saving the image and restoring the OS over the local network using the BackItUp Image Tool.
I always wanted to know how system administrators install the OS from a disk located somewhere on the server, and then I had the opportunity to see how this happens. I must say right away that with the BackItUp Image Tool, it turned out to be much easier to do than I could imagine.
I was afraid that the program would require to register names, paths and other network attributes. You probably also found yourself in a situation where the network is down due to a single error in this data.
Surprisingly, the BackItUp Image Tool determines and addresses all the addresses and paths by itself, however, it takes some time (about 30 seconds) for this.
To transfer backup files to a remote computer by local area network, you must first connect the two computers with a network Ethernet cable, and then configure the remote computer to work on the network.
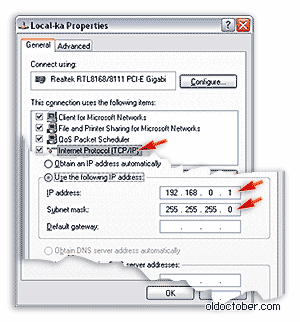
In the network settings of the remote computer, more precisely in Internet Protocol (TCP / IP), you need to write the following:
IP: 192.168.0.1
Subnet mask: 255.255.255.0
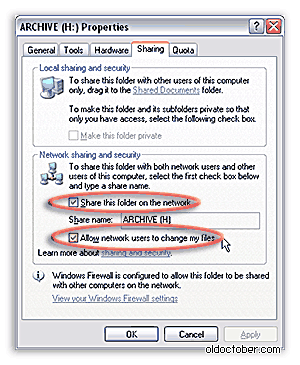
Now it remains only to open access to the disk of the remote computer (share the disk), on which the backup will be stored.
After that, you can start saving the OS image to the disk of the remote computer.

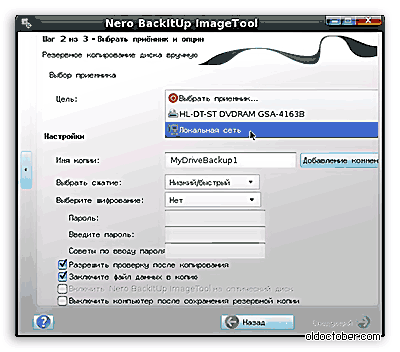
If there are several active network adapters (cards) in the computer where the BackItUp Image Tool program is running, you will have to select the one you need network adapter.
First, click on the button, pos. 1, to open the side settings panel. Then we press the “Options” button, pos.2.
In the window that opens, select the “Network” tab and the desired network adapter, item 3.
The switch should be in the "Network setup with DHCP" position.
Typically, the program itself selects the desired adapter if a single active network is connected to it.
Before you start burning backups.
Before making experiments with restoring the OS stored on DVD discs, be sure to create the same copy on the hard drive. If the reading of one of the disks fails, then the OS recovery will be impossible, and the OS over which the recovery was done will be lost!
My first attempt to burn a desktop OS image to DVD + RW discs using the BackItUp Image Tool was unsuccessful. Even while recording, the program showed an error. The reason was the low-quality discs used for recording on an external drive. Erasing a disk completely (formatting) on \u200b\u200bthe target drive fixed this error. Reading of these discs was also successful.
When trying to restore the OS on a laptop using a DVD + RW disc recorded on the drive of the dectope under running windows, the BackItUp Image Tool showed a read error. Here we managed to solve the problem by replacing the blank with a higher-quality blank, which the drive could read at high speed.
I believe that reading errors are due to the fact that the BackItUp Image Tool program is not able to quickly control the read speed of the drive. This is even noticeable by ear. For example, a disk that was not read by the BackItUp Image Tool was tested without a single error on the same drive, but under Windows. True, the reading speed kept near x1.5, and the drive worked silently. But when reading in the BackItUp Image Tool, it was well audible that the disk in the drive spins very fast. However, this phenomenon is familiar to those who tried to create bootable disks on RW (rewritable) media.
In general, if the backup is not written on a one-time disc, then you need to be more careful about the quality of the recording. This is especially important when recording is done on one drive and reading on another. It does not hurt to expose, wherever it is recorded, DVD ± RW disc to complete erasure (formatting). And even better for these purposes, buy a DVD ± RW disc of a well-known brand in a separate box. Such blanks, as a rule, are of higher quality than blanks of little-known manufacturers sold on spindles.
Save the OS image to DVD discs.
I tried to save an uncompressed OS image on four DVD + RW discs and I can report that this procedure requires remarkable patience. Even saving the image with subsequent verification on two DVDs takes about an hour. Therefore, I recommend that, before recording a backup, minimize the size of the OS.
To reduce the backup volume by a few gigabytes, you can turn off the Data Recovery System on system drive a computer.
Having a backup makes the use of Windows XP Recovery System meaningless.
Whoever dealt with this system knows well that it often does not cope with its task or creates additional difficulties when using a restored copy of the OS.
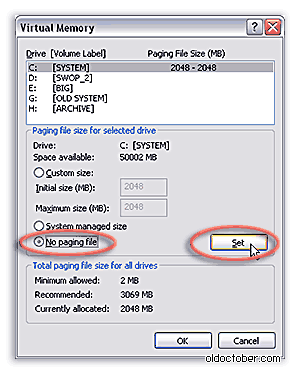
The size of the OS can be reduced by a few more gigabytes, if you temporarily disable virtual memory before recording a backup. To do this, go to Control panel\u003e System\u003e Advanced\u003e Performance\u003e Advanced\u003e Virtual memory. (Control Panel\u003e Advanced\u003e Performance\u003e Advanced\u003e Virtual memory).
Before installation, many bulky programs, such as Microsoft Office, Photoshop, Dreamweaver, Fine Reader and others. Unpack their installation packages on your computer’s hard drive. If you find and delete all these directories, then the backup size can be reduced by a few more gigabytes.
Of course, it is advisable to empty the Recycle Bin and delete files from other temporary directories that the OS creates.
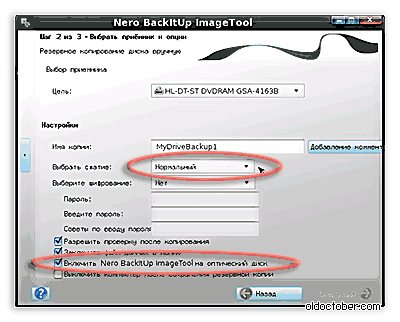
Use at least an average (“Normal”) compression level to reduce the backup size. If the discs are written at x4 speed, and the processor is modern, then there will be no delay due to compression. Medium compression allows you to reduce the backup size by almost half.
If you check the box “Include Nero BackItUp Image Tool in an Optical Disk”, then the BackItUp Image Tool program will be placed on the first blank along with the OS image (or part of the image), and the disk will become bootable. The boot portion of the disk is about 32MB.
All this taken together can allow you to burn an OS image along with the BackItUp Image Tool to two DVD discs.
I was able to write an OS about 12.5GB in size (the size is specified after minimization) to two DVD discs at a strong ("High / Slow") compression level. In this case, the last disc still remained free place. Backup time at x4 speed along with data verification 1 hour 10 minutes.
It should be noted that at the beginning of the recording, the program does not report the required amount DVD discs, as Norton Ghost, for example, does, which can be written into program flaws.
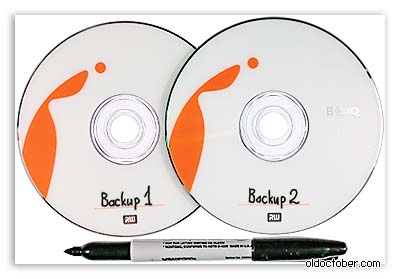
The process of writing an image to discs is no different from writing to a hard disk. The only difference is that the blanks must be pre-numbered if it turns out that more than one blank is required.
When verifying the data, the program will offer to insert the first disk, and after its verification the next one, and so on, until all the disks are checked. The disk will need to be specified manually in the window that appears.
Restoring the OS from a backup saved to DVD.
When restoring the OS, you will need to insert disk No. 1 into the drive if it has the BackItUp Image Tool program, and if it does not, then you must first insert it, and then disk No. 1. Recovery takes place in the same way as with, with the only difference being that you need to select a DVD drive as the source.
Download from external media may be useful in cases where operating system it doesn’t boot on the device, or there is a fear that its loading and working (recording a swap for example) will reduce the likelihood of successful data recovery. And if connecting the storage medium to another computer for any reason is inconvenient, it remains only to use a Live CD or Live USB.
We will need:
- Live CD image. Pay attention to the fact that the selected assembly during the boot process does not write anything to the hard drives (yes, some write).
- UltraISO program. The program has a demo version that allows you to record images whose sizes do not exceed 300Mb. Therefore, it is better to choose images Windows live CD of the appropriate size.
- Two (in the case of Live USB) or one (in the case of Live CD) flash drives with a size of at least 512Mb and 4Mb in the first case and 4Mb in the second case. Also, if you chose the option with a Live CD, you naturally need a CD or DVD disc.
- Data recovery program, for example,
Bootable flash drive or bootable disk?
The first step will be creating live CD or Live USB. In modern reality, when almost a third of all laptops do not optical drive, and a flash drive is in almost every pocket, the second case seems to be the most popular. But, just in case, if for some reason the option with optical media is more suitable for you, we will describe both methods.
Creating a bootable flash drive
You can save recovered data directly to the USB flash drive from which R.saver is running. But it is worth remembering that then the size of the flash drive should be larger than the minimum voiced previously 4Mb and correspond to the size of the restored files.
Reprints or quotations are permitted provided that the direct reference to the original is retained.
Compulsorily containing an antivirus tool on board and designed primarily to combat malware, professional resuscitation live disks have a different purpose and, accordingly, a little wider scope. Such boot disks disaster recovery designed for use, if not by professionals, then at least by experienced users who have basic skills with command line and console programs (with text user interface), and knowledge of English leaves much to be desired.
Professional rescue boot disks are used for software and hardware failures in the computer. Such disks are not intended primarily to combat Winlockers and other malware that prevents launch windows. Some of them, of course, can be understaffed with anti-virus bootable media from developers of protective software, but the essence of the existence of professional resuscitation disks in the software market is to identify and solve problems with booting windows, with the performance of the hardware of the computer and in extreme cases, the extraction of important data before reinstalling the operating system or before replacing the hard drive. Disaster recovery disks are an indispensable tool in the process of testing computer devices when they are purchased, especially in the secondary market. They can be used to bypass the password set as the input to accounts Windows and BIOS level.
Below we’ll look at the top five free emergency disks. recovery windowscontaining on board various functionality for almost all occasions.
Review participants:
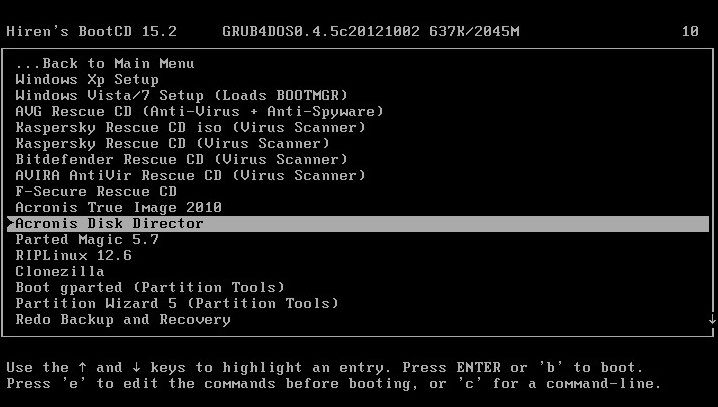
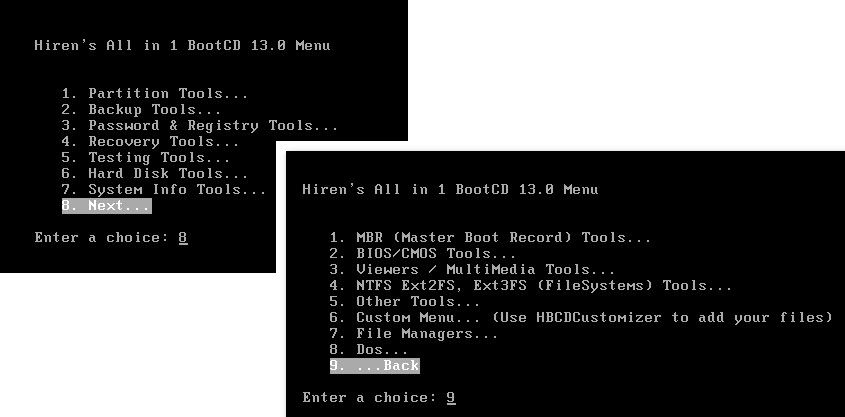
Hiren’s BootCD is a disk that contains portable operating systems Windows XP (stripped-down build) and Linux, as well as many different programs, including those running in DOS mode. The Hiren’s BootCD package includes not only the ISO image of the boot disk itself, but also a utility for burning it to the optical disc, as well as the HBCDCustomizer utility for creating boot disk images with user-defined content. Having loaded with Hiren’s BootCD, we will see the boot menu, where in the first three positions access to the further launch of the mentioned windows systems XP and Linux, as well as a selection of DOS-programs.
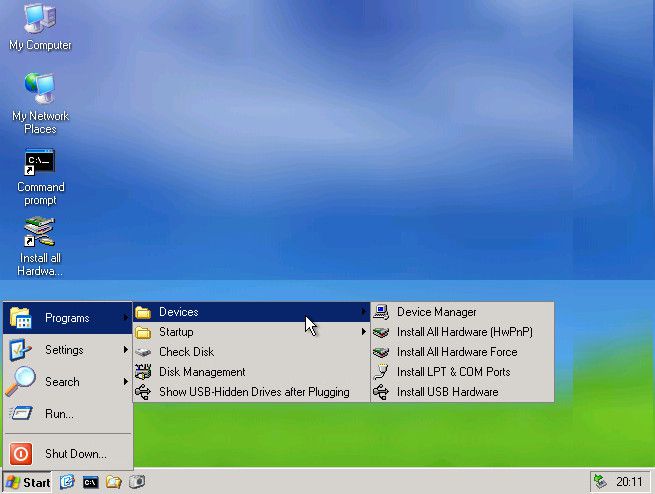
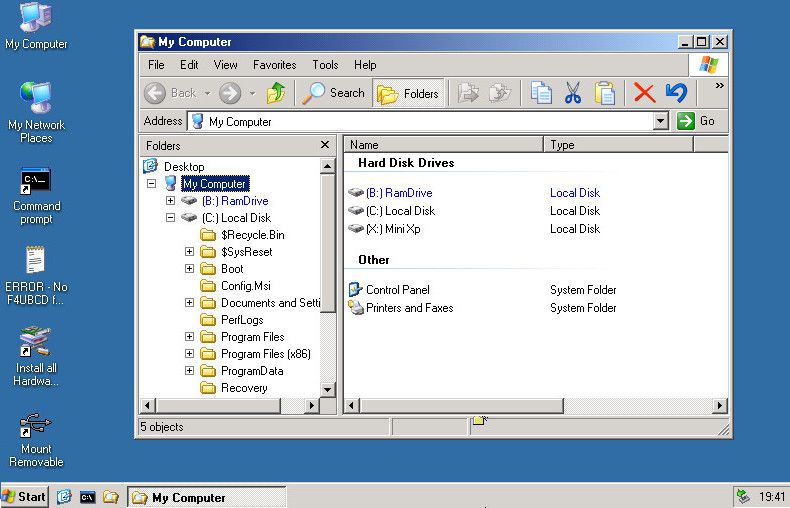
Portable mini Windows XP is a Live-disk environment for Microsoft operating systems used to working with instrumentation. Here you can configure the network to access the Internet, if the computer is not connected to the router, work with Windows Explorer, the command line, device manager, management and disk verification utilities, etc.
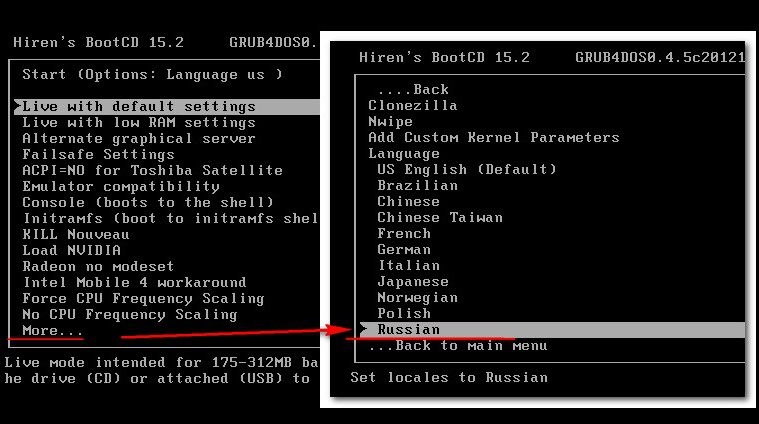
Portable Linux has additional startup options for specific cases: settings for low RAM, fault tolerant settings, choice of system interface language.
In the arsenal of the Linux Kernel distribution, we find more software tools for testing and resuscitating a computer, as well as saving data.
Utilities for distributing disk space, backing up and restoring the system, obtaining system data, testing computer components, changing the password, and setting up tools were included in the set of DOS programs on the Live Disk boot sectorBIOS, network, console file managers, etc.
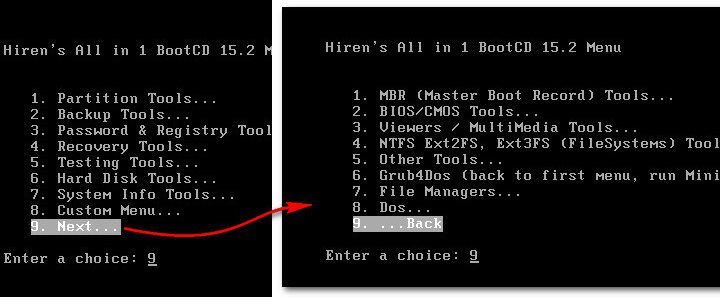
Below the top three positions in a separate list, access to such utilities as:
- Windows Memory Diagnostic and MemTest86 + for testing RAM;
- Offline Password Changer for password reset in Windows systems;
- Kon-Boot - A Workaround windows password;
- Seagate Disc Wizard - a free edition of Acronis True Image for computers with Seagate hard drives;
- Plop Boot Manager for booting from USB devices computers that do not support this feature in the BIOS;
- Alternative bootloader Smart Boot Manager;
- Tool to solve problems with the NTLDR file;
- Darik "s Boot and Nuke to completely erase data from disk.
More options when working with Hiren’s BootCD can be found in the “Custom Menu” section. Here will be available those programs and bootable mediathat have been previously added to the live disk using the HBCDCustomizer utility.
An alternative to customization using the HBCDCustomizer utility is the use of ready-made Hiren’s BootCD assemblies with additional software from customizers. The fruitful products of the latter can be found on the Internet. There are customized builds of Hiren’s BootCD with support for the Russian language.
Download Hiren’s BootCD from the official website:
http://www.hirensbootcd.org/download
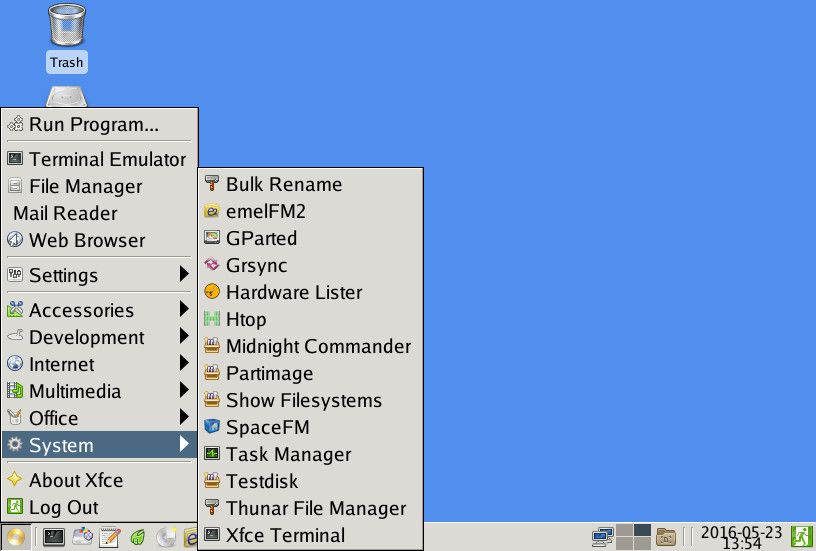
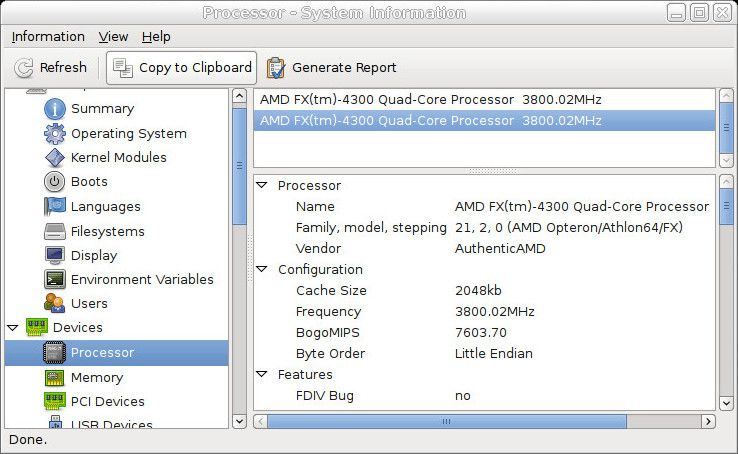
The emergency disk Ultimate Boot CD is mainly focused on working with the computer hardware and peripherals. It has collected many different utilities for testing, optimizing and restoring computer components. Utilities are grouped into separate types of components.
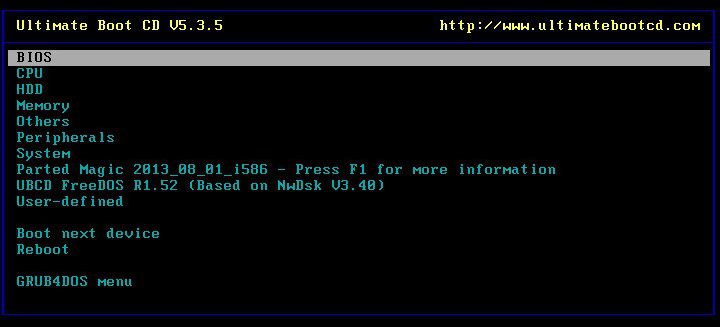
The "BIOS" section contains utilities, respectively, for working with the BIOS, offering such features as: saving and restoring settings, resetting the password for entry, returning the settings to default ones, etc. The “CPU” section contains utilities for displaying data about the processor and conducting its tests, in particular, under stress testing when the maximum temperature is reached. In the “HDD” section we find a selection of utilities for diagnostics, cloning, partitioning hard drives, as well as data recovery and their complete erasure. Among other tools - utilities for testing RAM, drive, video card, monitor, as well as other hardware and peripherals.

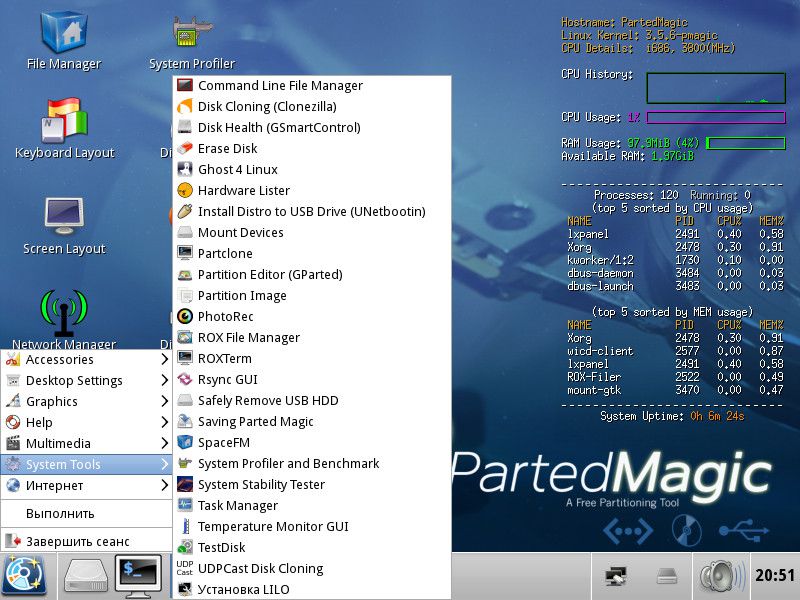
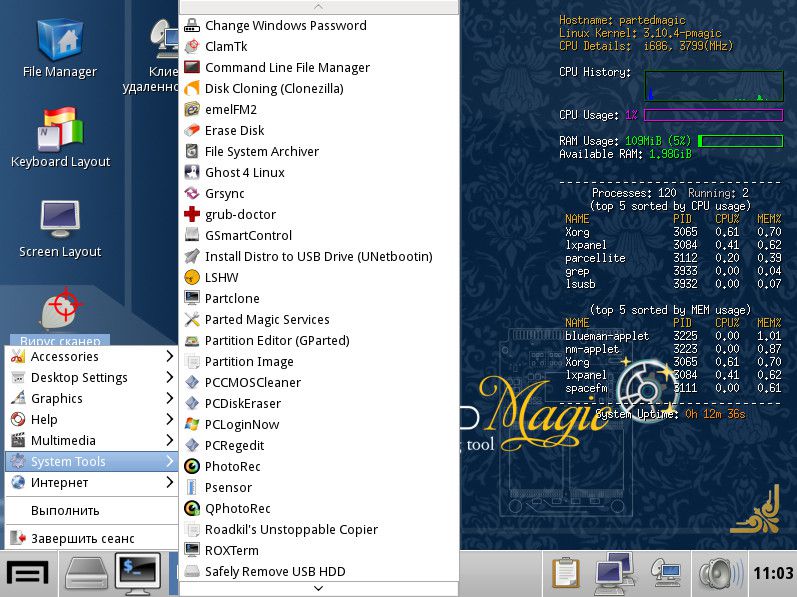
The Ultimate Boot CD comes with Parted Magic, a Linux Kernel-based live-drive, a portable network-capable operating system equipped with a host of GUI tools as an alternative to console utilities. Parted Magic features include access to the Internet through mozilla Browser Firefox remote access, programs for determining the health of a hard disk, its cleaning, cloning, distribution of disk space, as well as a large list of other system utilities.
Download Ultimate Boot CD from the official website:
http://www.ultimatebootcd.com/download.html
Following boot disk Windows Disaster Recovery - SystemRescueCd, built on the Linux Gentoo distribution. The first boot window from this Live-disk offers various launch options. Among the first seven points, we find, in particular, the ability to run Linux with caching files in RAM, with the choice of various graphical shells, without a graphical shell and with a high resolution console, etc. In addition, information on the proposed download tools can be obtained by pressing the F2-F7 keys in accordance with the serial number of the launch option. The first point is “SystemRescueCd: default boot options” - an option for most cases is to start Linux with standard parameters.
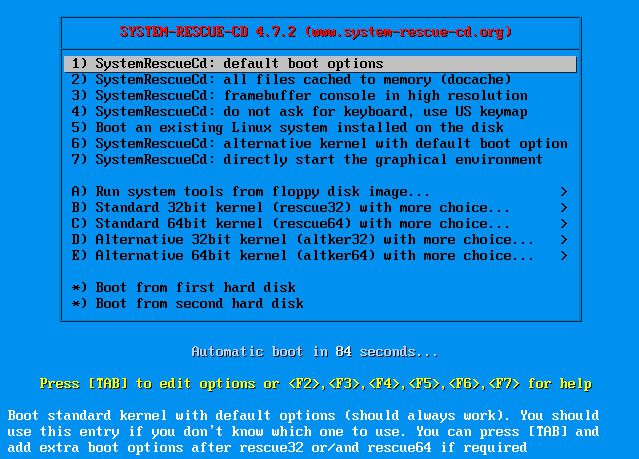
Startup options marked paragraphs B-E - This is the ability to run Linux using 32- and 64-bit system cores. Rescue32 is the default kernel, the altker kernel is an alternative if there are problems loading rescue32. Point A is the launch of console utilities to determine and test the hardware of the computer, reset the Windows password, delete data, low-level diagnostics of hard drives, etc.
Inside running Linux, we get access to the Internet, file managers, programs for allocating disk space, testing hardware stuffing, backing up and restoring data, etc. Portable Linux as part of SystemRescueCd also includes rootkit search and anti-virus tools.
Download SystemRescueCd from the official website:
http://www.system-rescue-cd.org/SystemRescueCd_Homepage
Knoppix is \u200b\u200ba Linux distribution built on Debian with its own set of programs. Among the mass of other Linux distributions, it differs in that as emergency disk for resuscitation, Windows is used more often than it can be found installed on computer devices, Linuxoids. Knoppix in the portable version supports many computer components, automatically detects them and configures them. And most importantly - all this happens quickly: in less than a minute, the portable operating system will be ready for use. Another plus of this Linux distribution is that it can save changes to files, system and software settings, using RAM, a hard drive or a USB flash drive to store data.
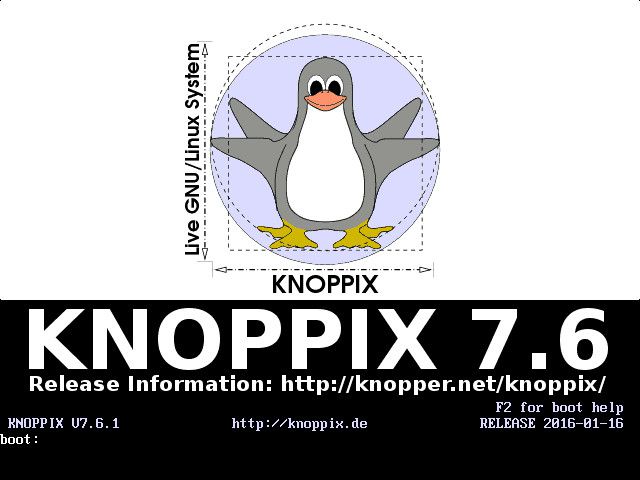
Knoppix is \u200b\u200bnot only an operating system for solving computer problems, like other Linux distributions included in the delivery kit of resuscitation and antivirus LiveCDs. In addition to administrative software packages, server software, a development environment and Internet access, on board Knoppix we also find the Wine application for installing Windows programs on Linux, the OpenOffice office suite, and an impressive selection of multimedia software, and even a game. There is an anti-virus scanner ClamAV Virus Scanner and a local firewall Knoppix Firewall.
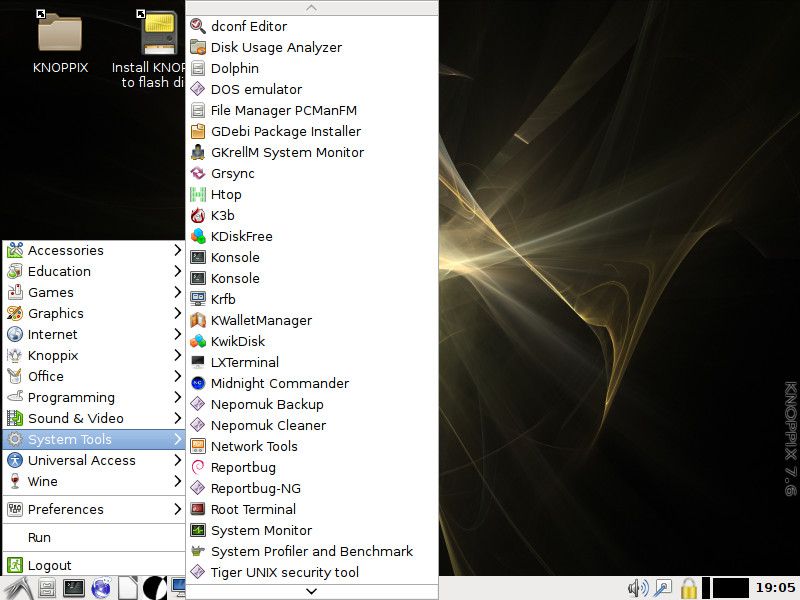
Among the system utilities of the Knoppix distribution: network configuration, disk space analyzer, DOS emulator, monitoring of system resources, backup and information recovery, obtaining data on computer components, their testing and other features.
Download Knoppix from the official website:
http://knoppix.net/get.php
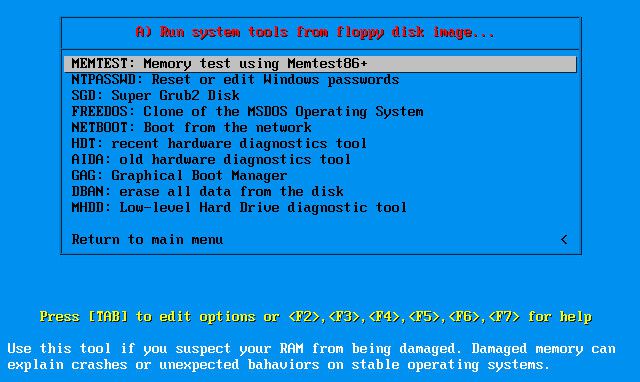
Finally, the latest LiveCD disaster recovery distribution is FalconFour’s Ultimate Boot CD.
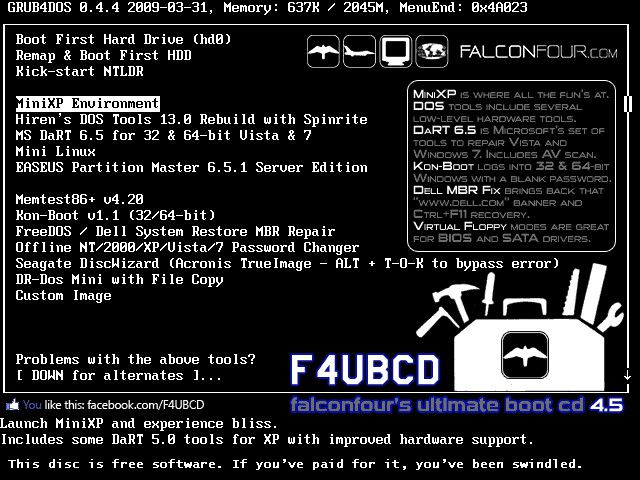
It is not just similar in functionality to the first member of the review - the Hiren’s BootCD Live-disk, it contains Hiren’s DOS-programs.
As part of the FalconFour’s Ultimate Boot CD, we also find portable stripped-down assemblies of Windows XP and Linux,
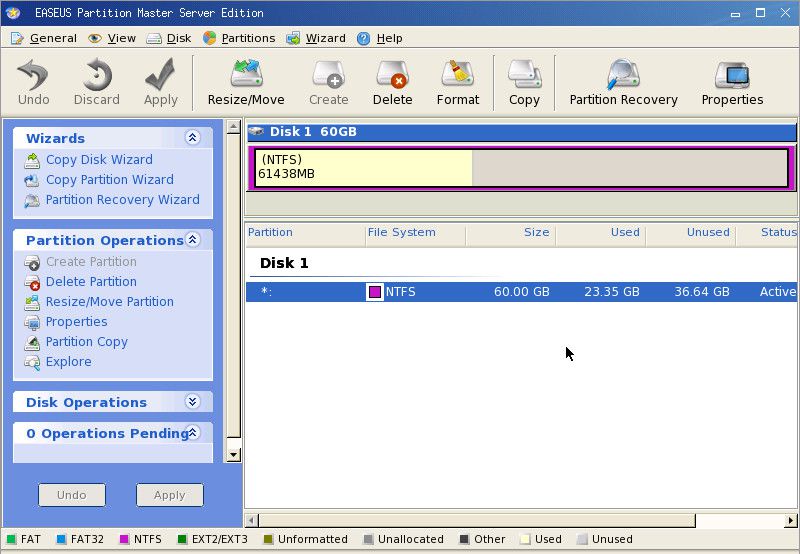
bootable media with a work manager disk space Easeus Partition Master,
utilities for checking Mentest86 + RAM, Windows Kon-Boot password bypass, Offline NT / 2000 / XP / Vista / 7 Password Changer password reset, FreeDOS / Dell System Restore MBR Repair boot recovery and others.


