Start automatic recovery
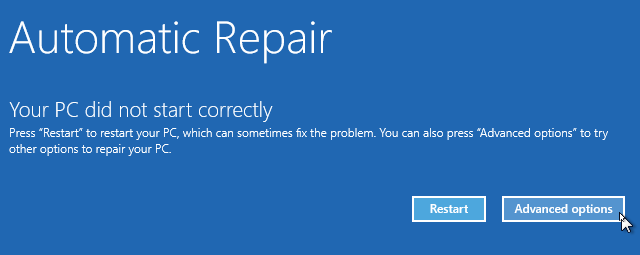
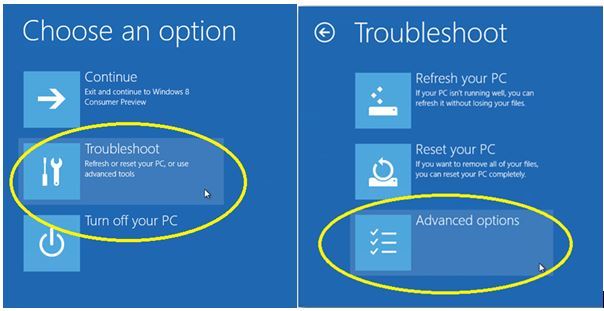
Starting automatic recovery from a recovery disk is very simple. After booting the system from disk, go to the Diagnostics | Additional options ”(Troubleshoot | Advanced options). A screen opens with a list of additional parameters (Fig. A), including automatic recovery.
Figure A. The Advanced Settings screen shows four Windows recovery tools.
When selecting automatic recovery, the screen shown in Fig. B.
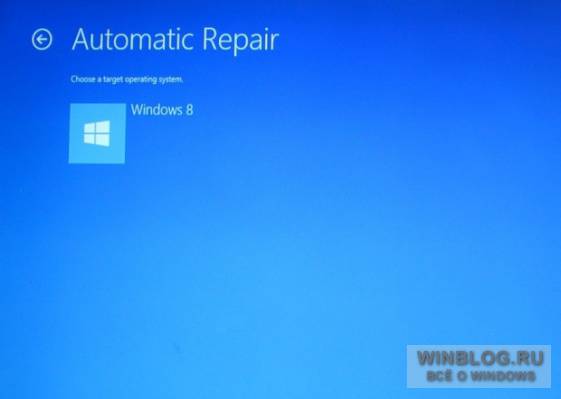
Figure B. Auto Recovery - The first tool to resort to if Windows 8 does not start.
When you start the automatic recovery tool immediately starts to search for errors (Fig. C).
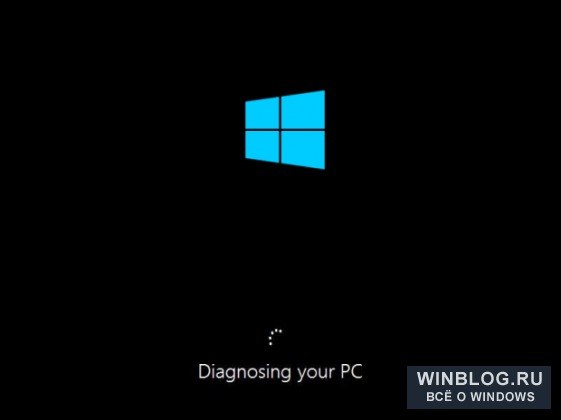
Figure C. In the first step, the automatic recovery tool looks for errors.
During the diagnostic process, the utility scans the system, analyzes settings, configuration parameters, and system files looking for errors and damage. The following issues are searched:
Missing / damaged / incompatible drivers;
missing / damaged system files;
missing / damaged bootloader settings;
corrupted registry settings;
corrupted disk metadata (main boot recordpartition table, boot sector);
incorrectly installed updates.
If any of the listed problems is detected, the utility tries to fix them automatically (Fig. D).
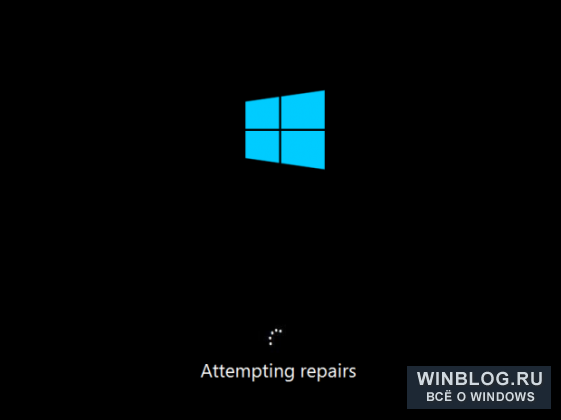
Figure D. Having detected problems, the automatic recovery tool tries to fix them.
If the utility can fix errors, it will do it on its own and then reboot the system into a normal working environment.
Serious problems
If the automatic recovery tool is not able to solve the problem, the screen shown in fig. E. In this case, the utility creates a log where it writes detailed information, and offers to return to the menu of additional parameters, where you can select another diagnostic and recovery tool.

Figure E. If the automatic recovery tool is not able to solve the problem, this screen appears.
Before using other utilities, you should familiarize yourself with the magazine. There is Notepad on the recovery disc, which you can use to view it. To do this, remember the path to the log file and its name. On the Advanced Settings screen, select Command Prompt.
In the command prompt window, enter the drive letter on which the log file is stored (in my case it is “D”). Then use the CD command to go to the file folder. After that, enter the name of the Notepad executable file and the name of the log file.
In my example, the command set looks like this (Figure F).
D: cd \\ Windows \\ System32 \\ LogFiles \\ Srt notepad.exe SrtTrail.txt

Figure F. You can start Notepad from the command line to view the log file.
In the notebook, you can see the contents of the file "SrtTrail.txt" (Fig. G). At the end of the log, information about some unsuccessful test, which is useful for further diagnostics, will probably be found.
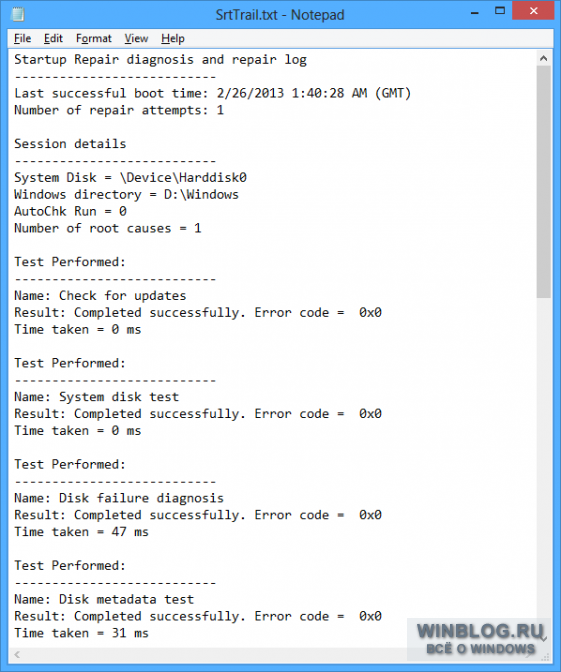
Figure G. Information in the SrtTrail journal may be useful for further diagnosis.
If the recovery disk is created on a flash drive, you can save the Notepad file directly to it, connect the USB flash drive to another computer and print the log so that the necessary information is at hand. Then do not forget to return the recovery disk back to the problem computer.
If the recovery disc was created on optical media, the file cannot be printed, so you will have to write useful information manually.
Looped Auto Recovery
Recently, my friend faced the fact that his laptop under running windows 8 stuck on automatic recovery: the system was recovering, rebooting, restarting recovery again, and so on in a circle. Starting the laptop from the recovery USB drive, we decided to try several BootRec commands on the command line, which at one time helped us fix the seriously damaged Windows 7.
In our case, using BootRec in conjunction with ChkDsk worked. Other computers with Windows 8 suffering from similar problems, I have not seen, so I can not say how reliable this method is. However, I heard that other users were able to solve their problems with it. So you can try before taking on other recovery tools.
In a command prompt window, run the following commands one after another:
Bootrec / FixMbr bootrec / FixBoot bootrec / RebuildBcd chkdsk / r
Switch / FixMbr writes a new master boot record (MBR) to the system partition, / Fixboot - a new boot sector, and / RebuildBcd scans all drives for availability windows installations and suggests adding them to the boot configuration data (BCD). Command Chkdsk with switch / r looking on disk bad sectors and restores data that it can read.
When ChkDsk shuts down, disconnect the recovery disk and restart the computer.
What do you think?
Have you ever used the automatic system recovery feature in
Recovery at boot or startup repair win8 and 10
Auto recovery when booting windows 8/10 is a detailed description.
Startup repair or Automatic repairIs the same recovery utility Windowsbut differently named according to windows version. So in Windows Vista and Windows 7 it is called " Startup repair", And in Windows 8 it is called" Automatic repair", And in Windows 10 it is again called" Startup repair».
This article is for Windows 10 and Windows 8, if you need windows 7 or Vista startup recovery,
So, now the questions we usually ask:
- What is it: restoring windows 10 startup?
Both functions are the same, and it is a very useful and effective tool for recovering Windows. The main work of this function is to restore Windows when something interferes with startup. operating system .
- What does “Startup Repair” or “Auto Repair” actually do on Windows?
Startup or Automatic repair - This is the only recovery tool that you have, since Windows, which requires immediate recovery, runs it. This tool is designed to recover only certain glitches, such as missing or damaged system files, which were mainly used to boot the Windows operating system.
- Why does “Repair at boot” or “Auto repair” write “ unable to fix«?
Indeed, this function cannot show you what creates a problem for windows to start. It will not help you recover personal files and documents. It also cannot detect or eliminate hardware failures and does not help in the fight against virus attacks and their damage.
How to use "Startup Repair" and "Auto Repair"?
When you turn on your computer and it displays the screen of your logo BIOS, quickly press the " Shift»And press the key several times F8.
This may not work the first time. Just restart your computer and try again. As a result, you will enter the recovery mode and you will see the next step described below.
If you cannot open it with the Shift and F8 keys, the only option is to use Windows Disc or Windows USB Pendrive. It will also help if windows 7 startup repair does not start.
To open startup or auto repair from a Windows disk:
Use only a boot disk that matches your current operating system. For example, use installation disk Windows 8 if you installed Windows 8 on your computer. Use installation windows drive 10 if you are using Windows 10.
First, you will need to boot your Windows drive or USB stick using the priority of the boot sequence. If you do not know how to do this, follow the link below. restore windows 7 startup through command line (win 8/10):
- Immediately after the download has been completed, you will be able to see the first item on the setup menu, and in this you need to click " Further", Then click" Restore computer»To start the restore function at startup.

- After that, you will see three options. It will be necessary to choose the second, called " Troubleshooting"And then right under the troubleshooting menu, select the third option" Additional parameters».
A final click will start the Windows 10 rollback procedure. After successful completion, the system will start in normal mode.
A few important points regarding recovery in this way:
- It is impossible to stop a process running through the console in safe mode;
- Changes that have entered into force cannot be undone;
- After the rollback is completed, the desktop will appear text Document, in which all affected (deleted) files will be described. The names are presented in the form of links, clicking on which you can quickly recover lost data.
If the black screen or the eternal preparation for automatic system recovery does not allow you to enter safe mode computer, then go to the rollback system using the BIOS tool.
Recovery of Windows 10 through BIOS
It’s worth mentioning right away that this method can only be implemented if the user has a disk or flash drive with the distribution kit of a licensed operating system, otherwise you can skip the option.
First of all, you need to configure the BIOS to read the disk when the computer starts. For this:
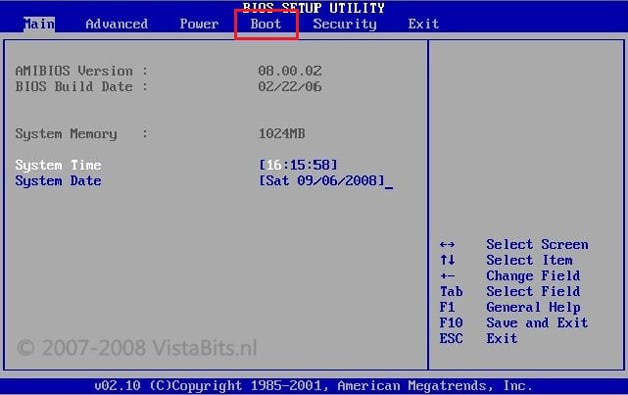
BIOS is configured. Now just insert the external device on which the distribution is stored.
Useful tips when working with the environment:
- You can find the correct key to enter BIOS in the instructions for the computer or on the manufacturer’s website. Most modern PC models use the Delete button;
- On laptops, the keyboard shortcut ctrl + alt + esc can be used to enter the BIOS;
- In addition to the standard Boot, the 1st Boot Device section can be in the “Boot Device” or “Boot Device configuration”.
Now directly windows recovery 10. After the external device has been inserted and the computer is running, a window will appear in which, instead of “Install,” click on the “System Restore” screen in the lower left:
An action selection window will appear in which you need to select the diagnostic section:
It is worth noting such a tool as "Recovery at boot." This function initiates a computer scan for errors and corrects them during detection. You can try to run the utility, but you should not rely on it. In most cases, after a short search, a message appears stating that the computer could not be restored.
If the BIOS failed to start
Situations when, when the preparation process for automatic updating freezes, it is impossible to enter the BIOS, they are quite common. Many users do not understand what to do in this situation, but there is a solution - resetting (resetting) the BIOS environment.
There are three relatively simple and safe ways to reset to zero:
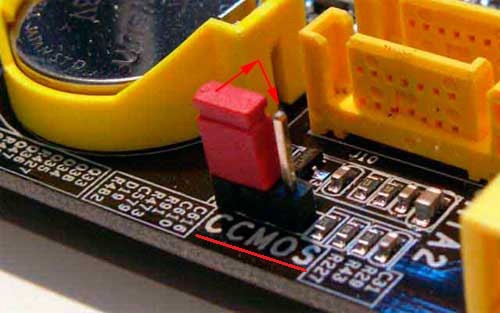
After using any of the methods, the user will be able to enter the BIOS and configure it to perform Windows 10 recovery.
Hard drive issues
An error in which Windows 10 does not load correctly may be due to crashes or critical errors on the hard drive. It is impossible to solve this without buying or repairing the “hard”, but to calculate the presence of problems without complete launch windows 10 is still possible.
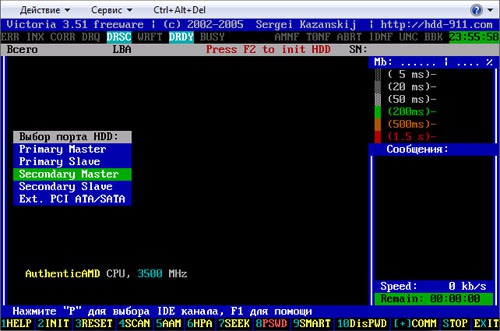
In the right corner, you can see the values, like 5ms, 20ms, etc. They represent the period of access to each sector. hard drive. An ideal value would be 5ms, and the more such sectors, the better.
The defects tab displays bad sectors (places where recording and reading is not possible):
If defects were found, then hDD corrupted and the reason why Windows 10 boots incorrectly lies precisely in this. There are two ways to solve the problem, both of which are not encouraging:
- Completely replace the "hard" with a new one;
- Cut off bad sectors by reducing the volume of the hard drive (the process is quite time-consuming and requires certain knowledge).
Quite often with various changes, installing new software, drivers, etc. Windows for one reason or another refuses to boot. At the same time, sometimes even secure login to Windows by pressing F 8 is not possible. Experienced users know that in such a situation, user data (including the My Documents folder) must be stored on any logical driveexcept system. The problem in this case was solved by reinstalling Windows without losing data, but with a significant investment of time in reinstalling the system and software (for active users, the number of software packages and utilities reaches 200).
Manual recovery methods
System administrators and the most advanced users know other ways out of this situation - use "Rollback" of the system (system utility System Restore) to operating state, attempt to boot with the latest working configuration. And only if these measures do not help, they resort to restore system from image. Form - This is an exact byte or sector-by-sector copy of the partition (s) or the entire disk, saved as a binary file with compression.
Recovery can be performed as Microsoft system tools (using Recovery Consoles), and third-party programs to create images.
In the first case, you need to have a Windows boot disk and when booting from it at the right time, press F 2 and enter the recovery console and then restore the system from a pre-prepared image.
Better and much more functional than system toolsare considered programs Symantec Norton Ghost and Acronis True Image. They create an image in IMA, IMG, GHO, TIB formats either directly from under Windows or using the appropriate boot disks from the same software companies.
By launching these programs from under Windows, they offer to make an image and save it to another logical partition or disk, or burn the image to a bootable DVD disc, which can be used when booting a PC from it to restore the system.
Also, system administrators use the best bootable CD at the moment - Hiren’’s Boot CD, booting from which you can use a large number of useful utilities to diagnose the system, check the hardware and restore the system. There are both Symantec Norton Ghost and Acronis True image DOS versions. An image can be created or a system can be restored from an image directly from there, without using Windows and without installing these programs.
Creating an image takes 7-20 minutes, and recovery - from 5 to 10, depending on the number of files on the system partition. When using maximum compression, the image will weigh about 2 times less occupied place on the saved section. Acronis True Image works somewhat faster and provides more recovery functions in new versions than Norton Ghost, however, it only understands its proprietary tib image format. But this program allows you to save and restore images over the network and the ftp protocol, which is useful for installing the OS on the same office computers from the server.
In any case, all these methods are manual and require a bootable CD or DVD and a saved image on any medium to recover a crashed OS.
Auto Recovery
Recently, the Russian company Acronis for a long time worked on orders from Russian manufacturers of computers and laptops and proposed a system to automatically restore the OS from an image that is stored on a hidden partition in the hard drive. At the same time, the Master Boot Record (MBR) is changed in the 1st sector 0 of the HDD track on which Windows is installed. This technology is now used to restore licensed Windows on branded computers Depo and Kraftway.
After making changes when booting from the HDD before transferring control to boot partition with Windows, the message: "Press F 11 to enter the System Restore mode." If the user clicks F 11, then the automatic recovery of the OS will start from a separate partition on which the system image lies.
This separate section on Acronis terminology is called the Acronis Secure Zone and is created in the Windows version of Acronis True Image Home 11.0. This section is formatted in the FAT 32 file system; accordingly, it is fully and without special drivers available from under DOS.
Creating Acronis Secure Zone is simple:
- After starting Acronis True Image, select Backup and Restore
- Click on the Backup Data operation in the Backup and Restore window or select the menu item Actions -\u003e Create Backup. You can also start a backup directly from the Windows Explorer window by right-clicking on the desired drive and choosing Create in the context menu. Then the program itself will select the type reserve copy My computer.
- In the next step, you need to select the type of archive to be created:
- My computer - select this type of backup if you want to create an image of an arbitrary set of disks / partitions or back up the system status. A disk archive is less compact and longer in creation time than a file archive, but it allows you to restore the system in minutes after software or hardware failures. You can back up either disks and partitions, or system state data that includes boot files, registry, protected system windows files and a COM + class registration database. A backup of the System Status allows you to restore system files, drivers, etc., but not files and data folders that you use when working with a computer. In our case, it is this option that interests us.
- My data - select this type of backup if you plan to back up individual files and folders. The file archive is more compact in size and faster to create in time, but to create backup the entire system must use a disk archive.
- My programs - select this type of backup if you need to back up individual applications.
- My email - select this type of backup if you need to back up applications to work with by email (MS Outlook, MS Outlook Express, Windows Mail). During the backup process, you can specify specific settings for archiving: accounts, folders, contacts, calendar, etc.
- In the next window you need to select disks and / or partitions for archiving. To select a drive / partition:
- check the box next to the drive / partition name. When you select a disk, all its contents (all partitions) will also be automatically selected
- It may sometimes be useful to back up all hard sectors drive. For example, it is possible that you mistakenly deleted some files and want to create a disk image before trying to restore them using a suitable utility, because sometimes recovery may break file system. To back up all sectors, select the Create sector-by-sector image check box. Keep in mind that due to copying both used and unused sectors of the hard disk in this mode, the processing time increases and usually the result is a larger image.
- Next, you need to specify the location of the backup on the storage device. The “farther” you place the archive from the copied folders, the higher the likelihood that it will survive in the event of data corruption in these folders. For example, saving the archive to another hard drive will protect it in the event of damage to the original drive. Data copied to a network drive, FTP server or removable media will survive even if the entire computer fails.
- If you select an existing full archive file, its contents will be overwritten with a request for confirmation of this operation. Overwriting a complete archive means that you discard the entire archive and start creating a new one. In this case, all incremental and differential archive files added to the old full archive will be unusable. It is recommended that you delete these files.
- If you intend to add an incremental or differential archive to an existing archive, select any of the archive files as the target. If the files are stored in the same folder, it does not matter which file to choose, because the program considers all the files as a single archive. If you saved files on several removable drives, insert the disk with the most recent archive file, as otherwise there may be problems with restoring data from the archive.
- You can also store archives in Acronis Secure Zone or in Archive Vaults. In this case, you do not need to enter a file name. We choose this option.
- Next, select the section, free place which you want to use to create a hidden partition.
- In the next window - Set parameters manually - select this option to configure the backup parameters manually.
- Select the maximum compression ratio in the dialog box settings and start the process.
Multiple images can be stored in one Security Zone.


