Quite often with various changes, installing new software, drivers, etc. Windows for one reason or another refuses to boot. At the same time, sometimes even secure login to Windows by pressing F 8 is not possible. Experienced users know that in such a situation, user data (including the My Documents folder) must be stored on any logical driveexcept system. The problem in this case was solved by reinstalling Windows without losing data, but with a significant investment of time in reinstalling the system and software (for active users, the number of software packages and utilities reaches 200).
Auto repair will play a little and then say. Additional options include the recovery console, a command line for troubleshooting with a few useful commands, and file access. System recovery may be a lifesaver, but in this case it was mysteriously disabled.
It saves data, but prohibits applications and other settings. You may need to find the installation media, if one exists, in cases where there is no recovery partition. Then you have the task of trying to reinstall your applications, which means finding configuration files, convincing sellers that you are allowed to reactivate, and so on.
Manual recovery methods
System administrators and the most advanced users know other ways out of this situation - use "Rollback" of the system (system utility System Restore) to operating state, attempt to boot with the latest working configuration. And only if these measures do not help, they resort to restore system from image. Form - This is an exact byte or sector-by-sector copy of the partition (s) or the entire disk, saved as a binary file with compression.
So now the questions we usually ask
In the best case, this is time consuming; in the worst case, you will never get all your applications back. Your data will be blocked, as well as applications. Summary. However, if each reboot simply returns to an automatic repair and another failure, it is frustrating. The answer, it turned out, in this case was to look at the log file.
To open startup or auto repair from a Windows disk
Why then is the wizard so limited? In this case, for example, the “boot critical file” was from a third-party; the wizard just had to have some logic that says maybe it’s worth trying to download without it at least once.
Recovery can be performed as Microsoft system tools (using Recovery Consoles), and third-party programs to create images.
In the first case, you need to have a Windows boot disk and when booting from it, press F 2 at the right time and enter the recovery console and then restore the system from a pre-prepared image.
At the first stage of its operation, automatic repair diagnoses the problem
This is the only way to get real information about what is going wrong. In some cases, you may need to upload to the recovery console with installation mediabut if your hDD generally works, it should be possible to view these files. After auto repair diagnosed a startup problem, he will try to repair it. If auto repair can solve the problem, he will do it without any intervention. Then it will reboot the system and boot normally.
Better and much more functional than system toolsare considered programs Symantec Norton Ghost and Acronis True Image. They create an image in IMA, IMG, GHO, TIB formats either directly from under Windows or using the appropriate boot disks from the same software companies.
By launching these programs from under Windows, they offer to make an image and save it to another logical partition or disk, or burn the image to a bootable DVD disc that can be used when booting a PC from it to restore the system.
If Auto Repair cannot restore your system, it will display this screen.
Before using one of the other recovery options, you should examine the log file and see what details it provides. First, pay attention to the path and name of the log file. When you return to the Advanced Options menu, select Command Prompt. When the window appears command line, enter a drive letter to change drives.
How to use "Startup Repair" and "Auto Repair"?
This is the set of commands that you would use to access the log file, as shown. You now have a hard copy of the log file that you can use as an aid for further troubleshooting. After you printed the log file, make sure of this and return the USB flash drive to the diseased computer.
Also, system administrators use the best bootable CD at the moment - Hiren’’s Boot CD, booting from which you can use a large number of useful utilities to diagnose the system, check the hardware and restore the system. There are both Symantec Norton Ghost and Acronis True image DOS versions. An image can be created or a system can be restored from an image directly from there, without using Windows and without installing these programs.
Hard drive issues
If you booted the system from an optical disk, you cannot print the file, but you can scroll through it and take into account any details that, in your opinion, are crucial. I have another piece of information regarding auto repair, but it contains a disclaimer.
About the cycle "Preparation for automatic repair"
The process was endless and very frustrating. When the command prompt window appears, enter the following set of commands one by one. Using the automatic recovery tool from the recovery disk can help you return the system to a bootable state. If this is not possible, you can use the log file as additional help for further study. If so, has your system returned to boot state? But in some cases, it does not work and puts users in infinity.
Creating an image takes 7-20 minutes, and recovery - from 5 to 10, depending on the number of files on the system partition. When using maximum compression, the image will weigh about 2 times less occupied place on the saved section. Acronis True Image works somewhat faster and provides more recovery functions in new versions than Norton Ghost, however, it only understands its proprietary tib image format. But this program allows you to save and restore images over the network and the ftp protocol, which is useful for installing the OS on the same office computers from the server.
Stuck on the screen "Preparing for automatic repair" and never moved on, this is one of the typical symptoms of this problem. In the "Preparing automatic repair" window, press and hold the power button 3 times to force the machine to turn off.
Other troubleshooting steps to fix the Prepare for Auto Repair cycle
When you start here, you can easily complete the process by following the instructions in the wizard. If the problem still exists, we recommend reinstalling the operating system. Start by hard resetting, remove the battery and AC adapter, then press and hold the power button for 20 seconds and check if it boots up normally.
In any case, all of these methods are manual and require a bootable CD or DVD and a saved image on some kind of media to recover a crashed OS.
Auto Recovery
Recently, the Russian company Acronis long time worked on orders of Russian manufacturers of computers and laptops, proposed a system for automatically recovering an OS from an image stored on a hidden partition in the hard drive. In this case, the Home boot record (Master Boot Record, MBR) in the 1st sector 0 of the HDD track on which Windows is installed. This technology is now used to restore licensed Windows on branded computers Depo and Kraftway.
Finally, follow the instructions in the wizard to enter safe mode. Try disabling automatic startup at startup. The only way to interrupt the cycle is to turn off the power of the computer, but the same thing happens the next time the computer boots up, making it virtually useless. However, there are several solutions that have proven that they can solve this problem for users who have experienced this in the past, and if you suffer from the same problem, you should definitely try it.
This is displayed on the message screen, and the manual that comes with your system. You need to know how to download and change the download order, as it is necessary to fulfill the solutions below. If this is not the case, you should try the following solution. for reference.
After making changes when booting from the HDD before transferring control to boot partition with Windows, the message: "Press F 11 to enter the System Restore mode." If the user clicks F 11, then the automatic recovery of the OS will start from a separate partition on which the system image lies.
This separate section on Acronis terminology is called the Acronis Secure Zone and is created in the Windows version of Acronis True Image Home 11.0. This section is formatted in the FAT 32 file system; accordingly, it is fully and without special drivers available from under DOS.
Solution 2. Expand the system backup section of your computer
The cycle “Preparation for automatic repair” can also be born if the section “Reserved computer” is smaller than it should be. If so, you need to. This works in most cases when a problem arises due to systemic corruption.
Solution 3: Perform System Restore
This will create 250 megabytes unallocated space. Restart your computer and see if the problem is resolved. Customize your language and other settings. Select the operating system you want to restore. Follow the on-screen instructions to restore your computer to an earlier point in time.
Creating Acronis Secure Zone is simple:
- After starting Acronis True Image, select Backup and Restore
- Click on the Backup Data operation in the Backup and Restore window or select the Actions -\u003e Create Backup menu item. Also backup You can start directly from the Windows Explorer window by right-clicking on the desired drive and choosing Create from the context menu. Then the program itself will choose the type of backup My Computer.
- In the next step, you need to select the type of archive to be created:
- My computer - select this type of backup if you want to create an image of an arbitrary set of disks / partitions or back up the state of the system. A disk archive is less compact and longer in creation time than a file archive, but it allows you to restore the system in minutes after software or hardware failures. You can back up either disks and partitions, or system state data that includes boot files, registry protected system files Windows and the COM + class registration database. A backup of the System Status allows you to restore system files, drivers, etc., but not files and data folders that you use when working with a computer. In our case, it is this option that interests us.
- My data - select this type of backup if you plan to back up individual files and folders. A file archive is more compact in size and faster to create in time, but to back up the entire system, you must use a disk archive.
- My programs - select this type of backup if you need to back up individual applications.
- My email - select this type of backup if you need to back up applications to work with by email (MS Outlook, MS Outlook Express, Windows Mail). During the backup process, you can specify specific settings for archiving: accounts, folders, contacts, calendar, etc.
- In the next window, you need to select the disks and / or partitions for archiving. To select a drive / partition:
- check the box next to the drive / partition name. When you select a disk, all its contents (all partitions) will also be automatically selected
- It may sometimes be useful to back up all hard sectors drive. For example, it’s possible that you mistakenly deleted some files and want to create a disk image before trying to restore them using a suitable utility, because sometimes recovery may break file system. To back up all sectors, select the Create sector-by-sector image check box. Keep in mind that due to copying both used and unused sectors hard drive In this mode, the processing time is increased and usually the result is a larger image.
- Next, you need to specify the location of the backup on the storage device. The “farther” you place the archive from the copied folders, the higher the likelihood that it will survive in the event of data corruption in these folders. For example, saving the archive to another hard drive will protect it in the event of damage to the original drive. Data copied to a network drive, FTP server or removable media will survive even if the entire computer fails.
- If you select an existing full archive file, its contents will be overwritten with a request for confirmation of this operation. Overwriting a complete archive means that you discard the entire archive and start creating a new one. In this case, all incremental and differential archive files added to the old full archive will be unusable. It is recommended that you delete these files.
- If you intend to add an incremental or differential archive to an existing archive, select any of the archive files as the target. If the files are stored in the same folder, it does not matter which file to choose, because the program considers all the files as a single archive. If you saved files on several removable drives, insert the disk with the most recent archive file, as otherwise there may be problems with restoring data from the archive.
- You can also store archives in Acronis Secure Zone or in Archive Vaults. In this case, you do not need to enter a file name. We choose this option.
- Next, select the section, free place which you want to use to create a hidden partition.
- In the next window - Set parameters manually - select this option to configure the backup parameters manually.
- Select the maximum compression ratio in the dialog box settings and start the process.
Multiple images can be stored in one Security Zone.
Decision 4
After the system recovery is complete, restart the computer and it should go through the "Preparing for automatic repair" screen and not get stuck on it.
Create a standard recovery disk
Here's how to do it: use “Start Search”, find the recovery and select “Create Recovery Disc” from the results.Once you download the file, unzip it to your desktop. Then copy the contents of the folder that you simply did not compress to the recovery drive. But you must know how to do it. You do not want you to screw something when you really need this tool.
In this, used to backup and restore system files and settings. In addition to standard backup and data recovery capabilities, this utility supports Automatic System Restore (ASR). Auto Recovery The system goes through two stages, which allows the user to restore a damaged copy of Windows XP using a backup copy of configuration data for this purpose operating system and disk configuration information stored on a diskette. Next, you will learn how to use ASR to restore Windows XP.
Insert one of the recovery discs. Provides an automatic repair that is performed at startup if there are problems with the operating system. Even with optimally installed operating systems, random crashes or similar crashes can occur.
Ideally, an automatic repair starts, it works for several minutes, and then everything works correctly again. Unfortunately, sometimes the case arises that an automatic repair begins, but does not end even after an hour of use and continues to work. Also read how you should behave if. If the message appears regularly, you should check your computer with an expert as soon as possible, or at least use the built-in diagnostic programs to look for possible errors.
Before describing the steps to restore the system, it should be noted that ASR is not an alternative to backing up data. When using ASR, application files and user data are not saved. During the recovery process damaged system hard disk partition with installed copy of windows XP will be formatted, so all program files and user data located, for example, in the Program Files folder, will be deleted. In fact, ASR is the last resort resorted to in the hope of restoring the system. Before using ASR, try using the recovery console or recovering from an image created using a program such as Acronis True Image or any other.
Manual recovery methods
The commands are identical and disable automatic recovery. The beginning of the gallery. Only if there is no time for a long time or if the repair is interrupted to no avail, or if you hang up, you must act. Follow these steps.
- You can find all the information here.
- As we show here.
Some products may not be available in your country or region. Solution 3: Disable Quick Start. Disconnect unnecessary programs launch. Solution 5: perform a disk cleanup. Disk cleanup can delete temporary files and system files, empty the trash, and delete everything you probably don't need.
Preparing for Windows XP Recovery
The operating system must be prepared for automatic recovery. As a rule, the backup of system data is copied to a file that is written to the hard drive. You should also prepare an empty formatted floppy disk.
Run the Data Archiving utility by selecting the command Start\u003e All Programs\u003e Accessories\u003e Utilities\u003e Data Archiving. Click on the link Advanced modethen the window will open Archiving Wizard (Advanced Mode).
Additional information. Solution 6: Optimize your hard drive. Defragmentation combines data on a disk or storage device so that it can work more efficiently. Solution 7. Identify hardware problems. Select the search box on the taskbar, enter the memory and select in the results. Go to the “Tools” tab and select “Check” in the “Error Checking” section. Solution 8. Restore or discard your surface.
Enabling XD-bit in BIOS
Update the application or reinstall it. Check for updates for the application and, if necessary, uninstall and reinstall the application. Contact the application editor. Additional Information For additional information tap or click the app support link. This link opens an email in which you can contact support, or it will direct you to the support website. Find the application and select it. . Before starting the troubleshooting procedure, do the following:
In the window that opens, click on the button Master disaster recovery the system, after which the System Prepare System Recovery wizard will be launched. Click on the button in the wizard window Further.
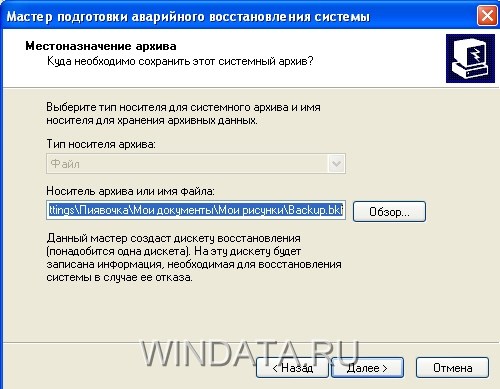
In a new window, you need to specify the type of media on which data will be backed up, and also specify the path to the backup. In field Archive Media Type type will be selected by default File. If your computer has a tape drive, select the device in the box. Media type. Now enter the full path to the backup file in the field Archive medium or file name either click on the button Overview.
Preparing for Windows XP Recovery
Unplug the power cord from the electrical outlet, remove any objects that may be attached to your surface, and, if necessary, remove the surface from the dock.
- Disconnect everything that is related to your surface.
- The screen remains blank when you turn on your surface or wake it up.
- The surface does not charge.
Solution 4: Disable Quick Start
On the Home tab, select a scan option, and then click or Scan Now. Press or select Save Changes.
Solution 5. Use the two-button shutdown procedure
Solution 6. Disable programs for which you do not want them to start in the background or activate when they start. If you have questions about a specific application or program, visit the program’s technical support page for more information.Solution 7: perform a disk cleanup
- Swipe the right edge of the screen, and then tap Search.
- In the search field, enter the power button.
- Change the behavior of the power buttons.
- Press or select Change settings that are currently unavailable.
- If the Enable quick start checkbox is checked, disable it.
- Perhaps you need to click or click "Details" in the lower left corner.
- Commissioning.
In a new window, click on the button Done.
The Data Backup utility will begin scanning your system and make a list of files that you need to include in the ASR backup. Then a window will appear on the screen. in which the backup process will be displayed.

When the backup process is completed, the ASR preparation wizard prompts you to insert a blank, formatted diskette into the drive that will save information about your hard disk configuration, including volume information, computer hardware configuration, and a list of files to be restored. Upon subsequent recovery of Windows, this data will be read from the recorded floppy disk.
When the backup is complete, the wizard prompts you to mark the floppy disk as a disaster recovery disk and save it to safe place. To view the report on the backup progress, click the Report button in the Backup progress window.
The backup is ready. Now we learn how to use it to automatically windows recovery.
Windows Recovery Using ASR
You can start disaster recovery of a damaged copy of Windows XP from the operating system installation program. So, to perform disaster recovery, in addition to the created ASR backup file and floppy disk, you will need the Windows XP installation CD. In general, the disaster recovery process resembles the automatic installation of the operating system and practically does not require user participation. During recovery, the hard drive configuration will be recreated using the data stored on the ASR diskette, then the system partition will be formatted with the installed copy of Windows XP to be restored, after which Windows XP will be reinstalled and the operating system configuration information will be restored from the backup. Despite the fact that this sounds rather confusing, it is actually not at all difficult to carry out a disaster recovery procedure.
Now, let's take a look at the step-by-step process of recovering Windows XP using ASR. Do not forget to prepare an ASR diskette with computer configuration information, a Windows XP installation CD, and ASR backup media that may reside on another hard section disk, and on a magnetic tape in case of use of the corresponding drive.
- Run windows program Setup. The easiest way is to restart your computer and start the installation process of Windows XP from the installation CD.
- Press any key when the message “ Press any key to boot from the CD ...” .
- When the Windows installer starts, wait for the message “ Press F2 to start automatic system recovery (ASR)”And press the key
. - Insert the ASR diskette into the drive. The following message appears on the screen: “ Preparing for ASR, click
to cancel “.
At this stage, you can still refuse to restore the system by pressing
If you intend to continue the procedure, do not respond to the offer to press the key
If ASR determines that it is necessary to restore another partition of the hard disk, its data may be lost.
After formatting and completing the verification of all partitions, ASR will display a list of files for copying and will offer you to insert media with ASR backup. If in preparation for recovery backup copy saved in the hard disk partition as a file, this step will be skipped. Further, ASR will actually conduct an automatic install windows XP with the restoration of the system configuration of the operating system.
As you can see, ASR is significantly different from the previously considered system recovery service, which saves only certain, sequentially created sets of system configurations. In contrast, ASR backs up all operating system files in the selected partition and provides a cardinal means of recovering a damaged system.
If, together with ASR, you back up files of programs and documents, the result is a fairly reliable way to restore the system. However, such a recovery can still be quite laborious and time consuming. Do not forget that ASR is a last resort, and before resorting to this tool, use the recovery console and other available means.


