In the Windows operating system, you can connect to a shared folder on a local home network to exchange data between computers using shared folders. It is very comfortable and quick way for transferring files according to a computer-to-computer scheme, without using external media (flash drives, external hard drives, memory cards, etc.).
In this article I will talk about creating local area network on the example of the operating windows systems 10. Creating and configuring a local network in Windows 8 and in Windows 7 occurs in a similar way, this instruction is universal.
The following option for using shared folders on a local network is considered in the article: several computers connected via cable and connected to the router wireless network Wi-Fi connected in a home network. A shared folder is created on each computer, access to shared folders is available to all computers in this local network.
On computers connected to the home LAN, can be installed operating Systems Windows 10, Windows 8, Windows 7 (different operating systems, or the same operating system) connected to the router via Wi-Fi or cable.
Creating and configuring a local network takes place in four stages:
- the first stage - checking the name of the workgroup and network card settings
- the second stage is the creation and configuration of local network parameters
- third stage - connecting a shared folder to a LAN
- fourth stage - data exchange over a local network
First you need to check the workgroup settings and network card settings, and then create a local Windows network.
Check network card and workgroup settings
On the desktop, right-click on the icon “This computer” (“My computer”, “Computer”), select the “Properties” item in the context menu. In the “System” window, click on the item “Advanced system parameters”.
In the "System Properties" window that opens, open the "Computer Name" tab. Here you will see the name of the workgroup. By default, in Windows 10, the workgroup is given the name "WORKGROUP".
On all computers connected to this LAN, the workgroup name must be the same. If the workgroups have different names on the computers connected to the network, change the names by selecting the same name for the workgroup.
To do this, click on the "Change ..." button, in the "Change computer or domain name" window, give a different name for the workgroup (write a new name in capital letters, better in English).
Now check your network card settings. To do this, in the notification area, right-click on the network icon (Internet access). Click on the "Network and Sharing Center" item. In the "Network and Sharing Center" window, click on the "Change adapter settings" link.
In the window " Network connections»Select a network card, Ethernet or Wi-Fi, depending on how your computer connects to the Internet. Next, right-click on the network card, in the context menu, click on "Properties".
In the network card properties window, in the "Network" tab, select the "IP version 4 (TCP / IPv4)" component, and then click on the "Properties" button.
![]()
In the window that opens, the properties of the Internet protocol, in the "General" tab, check the IP address and DNS service settings. In most cases, these parameters are assigned automatically. If these parameters are inserted manually, check the appropriate addresses with your Internet provider (the IP address on computers connected to the network should be different).
![]()
After checking the settings, you can go directly to creating a local area network in Windows.
LAN creation
First, configure the local network settings in Windows. Go to the "Network and Sharing Center", click on the "Change advanced sharing options" item.
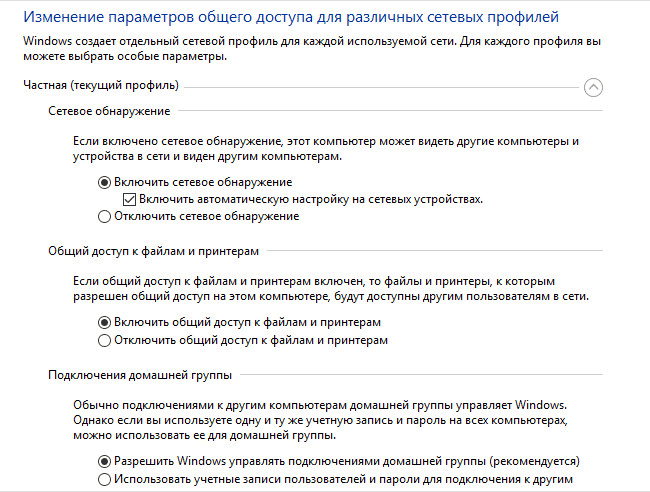
In the "Advanced sharing settings" window, you can change the sharing settings for various network profiles. The Windows operating system for each network used creates a separate network profile with its own special settings.
There are three network profiles available:
- Private
- Guest or public
- All networks
In the private network profile, in the Network Discovery option, select Enable Network Discovery.
In the “File and Printer Sharing” option, activate the “Enable File and Printer Sharing” option.
In the "Connect to a home group" option, select "Allow Windows to manage home group connections (recommended)."
After that, open the “All Networks” network profile. In the option "Sharing public folders", select "Enable sharing so that network users can read and write files in shared folders."
In the option “Connect file sharing”, select the option “Use 128-bit encryption to protect shared connections (recommended)”.
In the "Shared with password protection" parameter, activate the "Disable sharing with password protection" item.
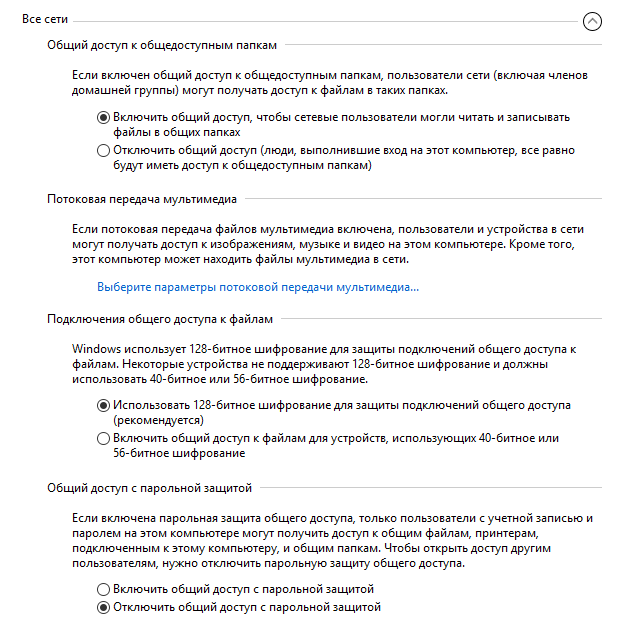
After completing the settings, click on the “Save Changes” button.
Repeat all these steps on all computers that you plan to connect to your home LAN:
- check the name of the workgroup (the name must be the same)
- check network card settings
- in the sharing options enable network discovery, enable file and printer sharing, disable password protected sharing
How to enable folder sharing
In this case, I created a folder with the name "General". Right-click on this folder, in the folder properties window, open the "Access" tab.
Then click on the “Advanced Settings” button.
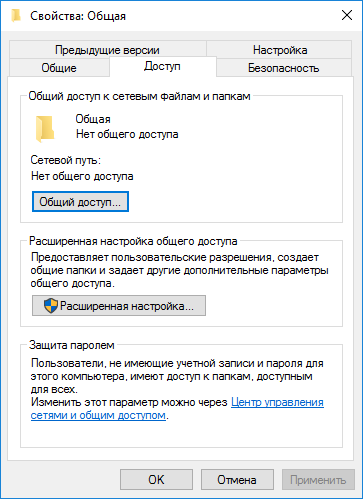
In the "Advanced sharing settings" window, activate the option "Share this folder", and then click on the "Permissions" button.
![]()
Select permissions to use public folder data from another computer. There are three choices:
- Full access
- Change
- Reading
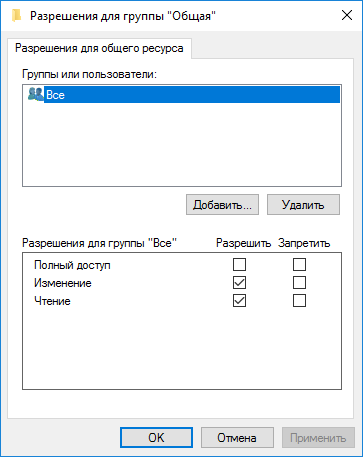
To save the settings, click on the "OK" button.
Re-enter the folder properties, open the "Security" tab, and then click on the "Change ..." button.
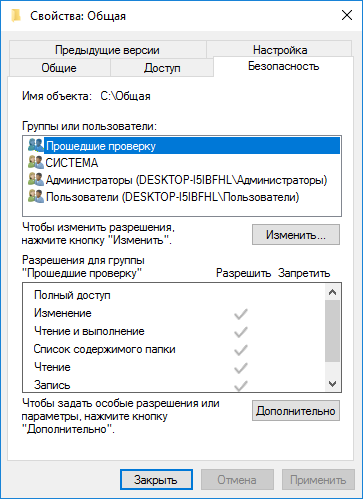
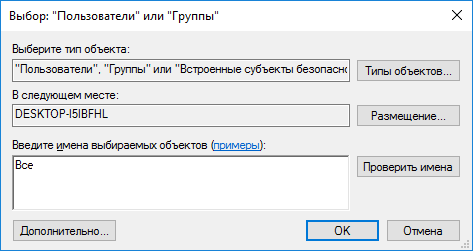
In the window that opens, enter the name "All" (without quotation marks) in the "Enter the names of the selected objects" field, and then click on the "OK" button.
In the folder properties window, in the "Security" tab, configure the permissions that you previously selected for the shared folder.
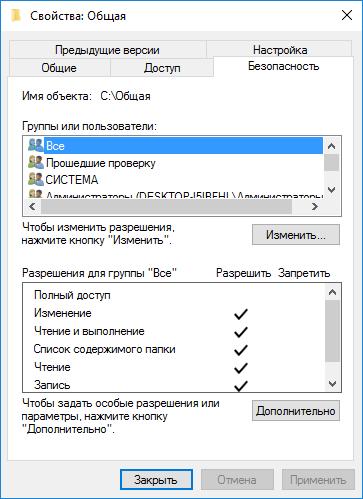
To change the permission for the Everyone group, click on the Advanced button. In the "Advanced security settings for the shared folder" window, select the "Everyone" group, and then click on the "Change" button to change permissions.
Windows LAN setup is now complete. In some cases, you may need to restart your computer for all changes to take effect.
Entrance to the local home network
Open Explorer, in the "Network" section you will see all available computers connected to the local home network. To enter another computer, click on the name of the computer, and then click on the name of the shared folder in order to access the files and folders located in the shared folder.
The local network in Windows 10 is created and configured.
Troubleshoot some network issues
Sometimes, after setting up the network, there are problems with accessing folders on the local network. One of the possible problems may be the wrong network profile. I myself came across this on my computer. After reinstalling the system, I created and configured a local network, but my computer did not see two laptops connected to this network. From the laptop it was possible to enter the shared folder of my computer without problems, and the computer did not see them at all.
I checked all the settings of the local network several times, and only then noticed that the public network was working on my computer, and not the private (home) network, like on laptops. How can I solve this problem?
Go to the "Network and Sharing Center", click on "Troubleshooting". Select the "Shared Folders" section, run diagnostics and troubleshooting. At the very end, the application will offer to configure the network as private. Apply this hotfix, and then restart the computer. After performing this operation, my computer gained access to shared folders on laptops on the local network.
Often problems arise due to incorrect network settings. In Windows 10, it is possible to reset the network settings to the default settings. Go to “Settings”, “Network and Internet”, in the “Change network settings” section, click on “Reset network” to apply the network default settings.
Other problems may arise, look for their solution on the Internet.
Conclusion
In Windows, you can create a local private (home) network between computers, to organize data exchange using shared folders, and access the printer. On computers on the same network, different or the same operating systems can be installed (Windows 10, Windows 8, Windows 7).
To use this feature, you must account Microsoft Exchange Server 2000, Exchange Server 2003, or Exchange Server 2007. Most personal accounts email Do not use Microsoft Exchange. Additional credential information microsoft records Exchange and determining the version of Exchange that the account connects to, see the links in the See Also section.
Shared folders are effective method collecting, organizing and providing information for sharing within the organization. Typically, shared folders are used by project teams or user groups to share information in a specific area. These folders can be managed from Microsoft Outlook. Shared folders can contain Microsoft Outlook folder items, such as messages, appointments, contacts, tasks, diary entries, notes, forms, files, and notes.
Creating a shared folder and providing general access to information in it is carried out in several stages ..
Intended action:
Create a shared folder and select access rights, views, forms and rules
To create shared folders, you must have the right to create folders in any existing shared folder. For information on obtaining such rights, contact the administrator.
On the menu File highlight item Create and select team Folder.
In field Name enter the name of the folder.
In the list Folder contents select the type of folder to create.
In the list Put folder in select folder location.
Quickly start a public folder with existing items.
In the folder list, in the navigation area, click the folder that you want to copy.
On the menu file select item Folder and click folder name Copy.
Select the location in the list where you want to copy the folder.
In the Folder List in the Navigation Pane, right-click the shared folder that you want to share and select The properties in the context menu.
You must have owner permission for the shared folder to set permissions for the shared folder. You can set permissions for only one folder at a time.
Go to tab Permissions.
Press button Add.
In field Name Enter the name of the user to whom you want to grant sharing rights.
Press button Addand then the button OK.
In field Name select the entered name.
In Group Permissions Select the required options.
Note: To assign the same rights to all users who have access to the folder, click the value Default in field Name.
Creating a view from scratch
On the menu View select team Current viewand then the command Define performance.
Press button Create.
Enter a name in the field New view name.
In the list View type Select the type of presentation you want.
To indicate where this view will be available, select the appropriate radio button in the group Can be used.
Press button OK.
To further customize the view in the section Description press the button and highlight the desired parameters.
After completing the selection, click OK.
To immediately use this view, click To apply.
Go to the view from which you want to create a new view.
On the menu View select item Current viewand then paragraph Customize Current View.
For all kinds of changes in the section Description press the button and select the required parameters.
When you are finished making changes, close the dialog box. View customization.
On the menu View select team Current viewand then the command Define performance.
In field views for the folder folder_name select item Current view.
Press button Copy
Enter a name in the field New view name.
To indicate where this view will be available, set the switch in the group to the appropriate position Can be used.
Note: New views are added to Current view submenu (in the menu View select item Sort by).
The properties in the context menu.
Go to tab Control.
If the tab Control missing, that means you do not have the permission "Owner".
In the list Source view Select the view that should be displayed when opening the folder.
By default, items of this type in Microsoft Outlook use the view Usual.
In the Folder List in the Navigation Pane, right-click the shared folder and select The properties in the context menu.
Go to tab Forms.
To add a form to the list Associated folder formspress the button Organize, then select a form.
Press button Close.
To limit the list of forms available to other users of the folder, select the corresponding switch in the group Allow use.
In the Folder List in the Navigation Pane, right-click the shared folder for which you want to create or modify rules, and select The properties in the context menu.
Go to tab Control.
Press button Folder Assistant.
Perform one of the following actions:
To create a rule, click Add.
To modify an existing rule, click it in the list and click Edit.
Normal response
"Thanks. Some folders and discussions are scanned to determine whether to share them. In these cases, there may be a delay before the message becomes available for general viewing. ”
Set switch own and press the button Template. Enter your response text.
Facilitators do not receive these responses when they put messages in a folder.
Create a shared folder
Set access levels.
Creating a presentation for organizing and searching data.
Perform one of the following actions.
Creating a View Based on a Standard View
Change the view used in the default folder.
To change the default view of a shared folder, you must have the rights of the owner of the folder and define at least one user view that is accessible to everyone.
Specify the forms available to other users when placing information in a shared folder.
To add a form to a private shared folder or to a shared folder, you must have the rights of an editor, responsible editor, or owner. The owner of the shared folder can restrict access to forms for users of the folder.
Create rules for processing items placed in a folder.
You must have owner permission for the shared folder to create or modify rules for it.
Enter the conditions for performing an action for this item. To set additional conditions, click Additionally.
In Group Follow these steps select the necessary actions.
Note: The created rule becomes active by default. and press the button OK.
Add meetings and events to the folder.
Sharing your contact list
Folder contents value Contact type elements.
In the list Put folder in click folder Contacts and press the button OK.
Add contacts to the folder.
Note: The list of shared contacts is displayed in the Contacts source in the Microsoft Outlook address book.
Sharing a list of tasks
Create a new folder and select from the list Folder contents value Task elements.
In the list Put folder in click folder Tasks and press the button OK.
Add to the task folder.
Note: Although the task list can be copied to a shared folder, orders cannot be copied to and created in the shared folder.
Putting data in a shared folder
Open the shared folder where you want to put the data.
To place data using the standard form, select File the team Createand then the command Note in folder.
Enter the information that you want to put in the folder on the form.
Press button Put in folder.
Create a managed shared folder
To assign a managed folder, you must have owner permission for the shared folder.
In the Folder List in the Navigation Pane, right-click the shared folder and select The properties in the context menu.
Tab Control press the button Managed folder.
Check the box Set folder as managed.
In field Forward new messages enter the name of the user who receives the incoming messages, or the name of another public folder in which the messages are saved for viewing. The manager who views the messages is set in step 6.
(Optional.) To automatically send notifications when new mail arrives to the presenter, select the required option in the group Reply to new posts.
Select one of the following radio buttons.
Custom answer
To add or remove a presenter, click Add or Delete.
(Optional.) To view the properties of the selected presenter, click The properties.
Note: Disclaimer regarding machine translation. This article was translated using a computer system without human intervention. Microsoft offers these machine translations to help users who do not speak English learn about Microsoft products, services, and technologies. Since the article was translated using machine translation, it may contain lexical, syntactic, and grammar errors.
And we connected all our computers to it, we will figure out how to share and exchange files between computers. This is very convenient, you will not need to carry a document on a USB flash drive from computer to computer, you can also watch movies and listen to music located on another computer on the network.
To build a network, you need a router (router) or a switch (switch). The differences between these two devices are that in addition to networking, the router also distributes Internet to everyone and can manage connections. That is, it is possible for certain computers on the network to restrict access to sites or ports. The switch is used when only a network is needed.
After connecting all computers to a router or switch, you need to configure all computers. To do this, go to the settings of your adapter (LAN - wired or Wi-FI wireless, depending on the type of current connection). And give each computer on the network a unique IP (IP) address (you can read how to do this). If the address of your router is 192.168.1.1, then the computers on the network must have the addresses 192.168.1.2, 192.168.1.3, etc. If the DHCP server (Enabled) is enabled in the router settings, then the settings can be set automatically. If you put it manually, make sure that all addresses are different, otherwise it won’t work.
Also for file sharing, all computers must be in the same workgroup. You can specify which workgroup the computer belongs to in this way: right-click on my computer-\u003e Properties-\u003e Advanced System Settings-\u003e Computer Name-\u003e Change in Windows 7 and Properties-\u003e Computer Name-\u003e Change in Windows XP. Here you need to indicate the Latin alphabet unique name computer and specify the name of the workgroup ( common to all computers ):
For Windows XP, you can skip the next step and move on to creating shared folders.
For Windows 7, things are a little more complicated. In order for computers to see shared folders, you need to make some settings.
We go in Network and Sharing Center (find in the Control Panel). Then you need to click on the link Change advanced sharing options. Set the switches to the following values:
- Enable Network Discovery
- Enable file and printer sharing
- Enable sharing so network users can read and write files in shared folders
- Enable sharing for devices using 40-bit or 56-bit encryption
- Disable sharing with password protection
It is very important! Otherwise, you will not be able to access shared folders.
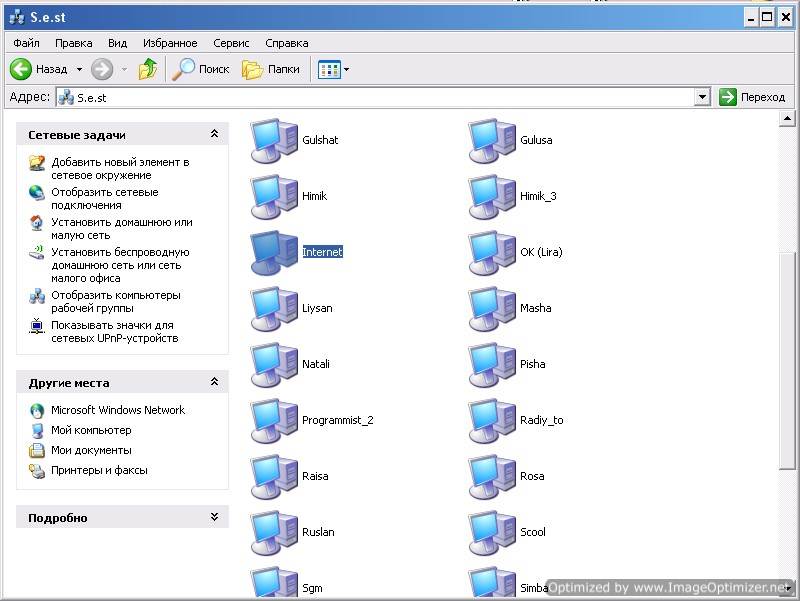
To find computers on the network, go to Network Places, select Microsoft Windows Network-\u003e Workgroup (name of our working group) -\u003e Select the name of the required computer and then go to the available public folders. If there are no shared folders, then you will not get access to the computer.
Posted byAuthorUpdated - 2017-02-15
You have created your own with access to the Internet . Now is the time to take full advantage of the network. And they are not so few. But first, we’ll look at how to create a shared folder.
You will not run with a flash drive from computer to computer. Having a local area network is already just ridiculous and inconvenient. For this, a local area network is created so that resources are shared. Can be shared hDD, but you can create a separate folder and store documents for general use in it.
You will have your own file server with file sharing. Moreover, this folder will open from your computer, and it does not need to be searched throughout the network. Everything is quite simple and does not require any, material costs. It’s enough to set up sharing of this folder .
How to make a shared folder
We have already created a small one, and now you can make a folder common to all computers.
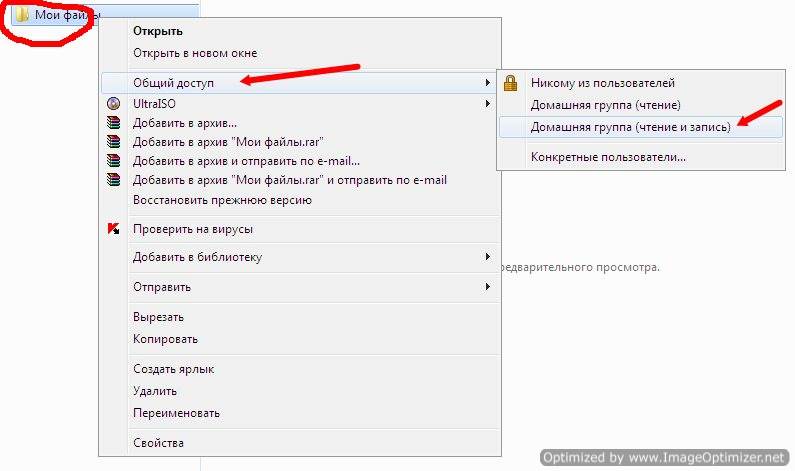
Create a new folder on any computer on the network and call it “ My files "(You can name it your own way). We right-click on this folder and select the item in the drop-down menu. Sharing and Security.
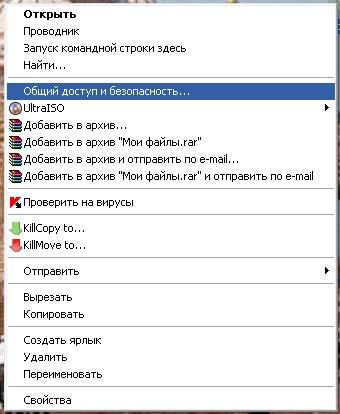
A window will open Properties: Name of your folder . Tab Access checkmark the points Share this folder and.
For Windows 7 the choice in the list will be as follows: - General access - Home group (reading and writing) -
IN WindowsXP The following window will open.
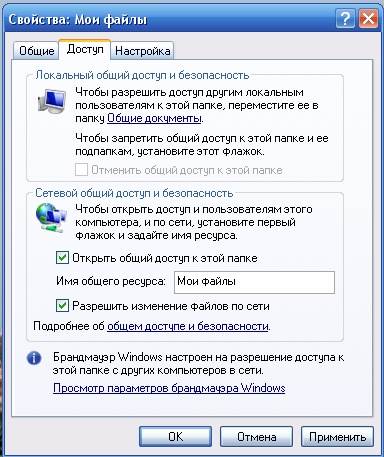
With the first paragraph, everything is already clear, but about the second I will explain a little. The fact is that if you do not check the box Allow changing files over the network , then the person who opened your folder on his computer will only be able to view files, but he will not be able to delete them and change anything in them. This feature is sometimes very useful. If you are confident in your network partner, then check this box, and if not, it is better to secure your files.
At work, I have one folder on my computer that contains the files of the programs necessary for the work. In order not to go to all rooms with a flash drive or disk. Especially if I have dVD disc, and the drive on some computer does not read it, it is very inconvenient.
And so I sit down at someone else's computer, open my folder on the network and install the necessary program. And so that someone stupidly did not delete these files, I do not have a check mark on the item Allow file changes . But you can copy these files. So - see for yourself.
Now configure so that other users on your network can open this folder on their computers. To do this, go to another computer and click on the desktop icon network .
A window will open network .
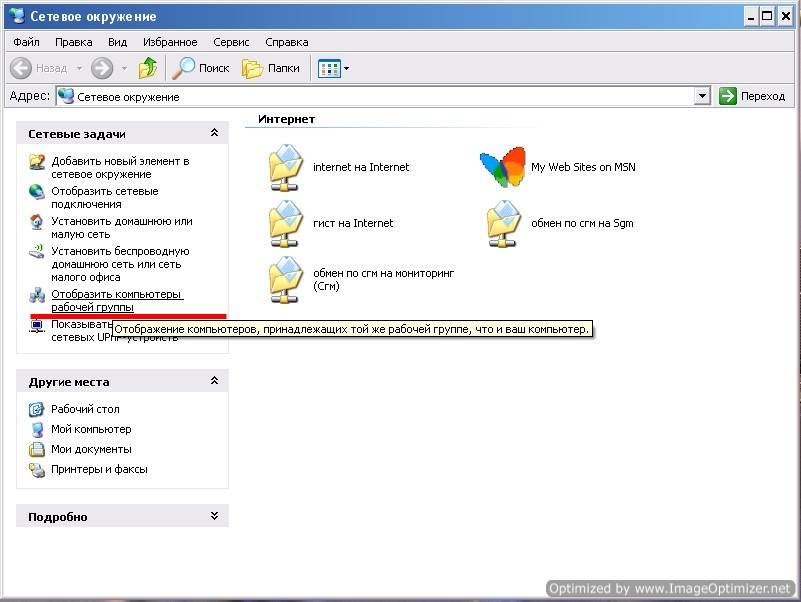
Select the entry on the left. Display workgroup computers and click on it with the mouse.
The following window will open.
Select in it the computer on which your folder for sharing files is created and open it. You, of course, will not have so many computers.

Find the network folder icon. I have it My files ". And drag or copy it to your desktop.
System administrators call this - share the folder.
Now you do not have to search the network every time. Files will be stored on the computer on which this folder is created. In the same way, you can create any folder on any computer connected to your network and share files.
So we examined the question - how to make a shared folder.
Windows 7 network folders as drives
So how to connect a network drive? We already know how to create shared network folders (and about Windows 7), but it’s not very convenient to look for the necessary shared folder in a network environment, especially if there are a lot of computers. It is much easier to display it as a separate disk, which appears on a par with your disk “C” when the system boots.
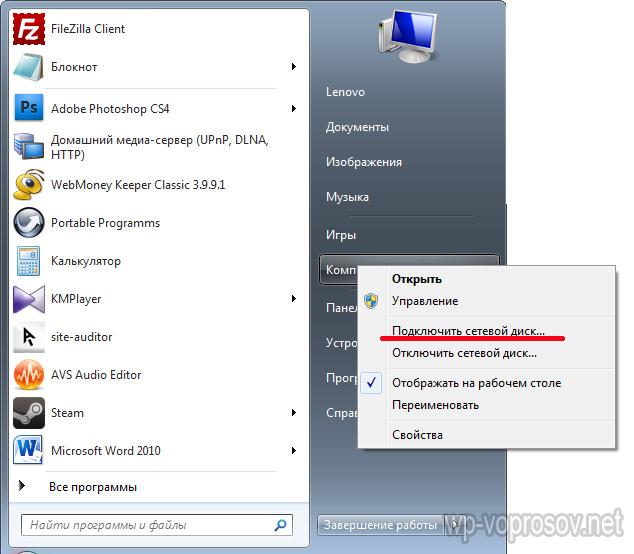
Let's start with the working windows backgrounds 7. We right-click on the “Computer” icon, which is located directly on the desktop and select “Connect a network drive ...” from the menu.
If there is no such icon, then you can call up the Start menu and right-click on the same link, or find “Computer” through Explorer.
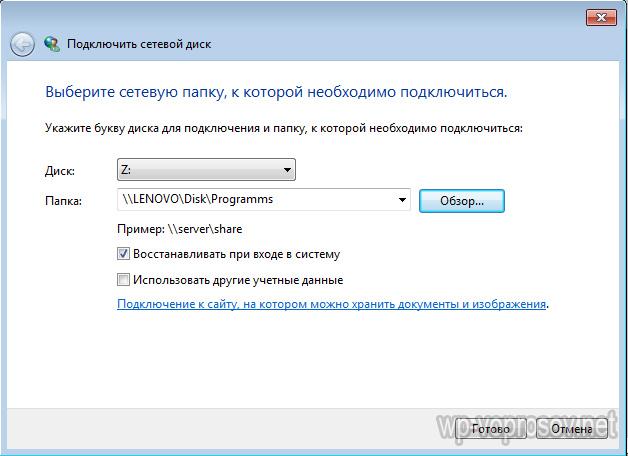
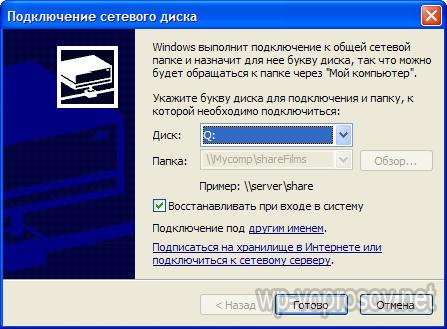
In the window that pops up after this, select the letter for our future network windows drivefor example "Z". Next, using the "Browse" button, we find on the network the folder that will be it.
Here you need to focus on the fact that to start this folder you need to share it, that is, open shared access to it so that it appears in the "Network" section inside one of the computers. I already talked about how to do this (the link was given above).
After selecting the folder, leave the checkbox “Restore at login” so that after turning off the computer each time do not create it again.
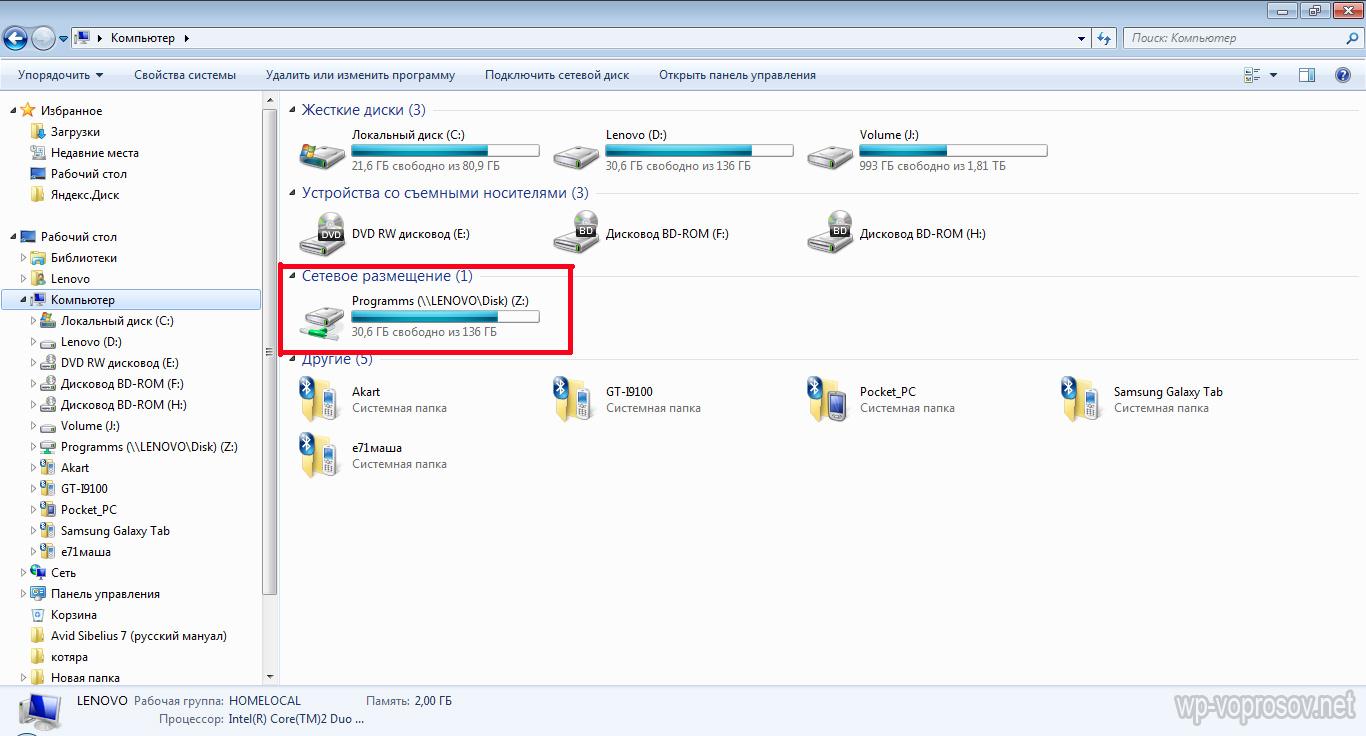
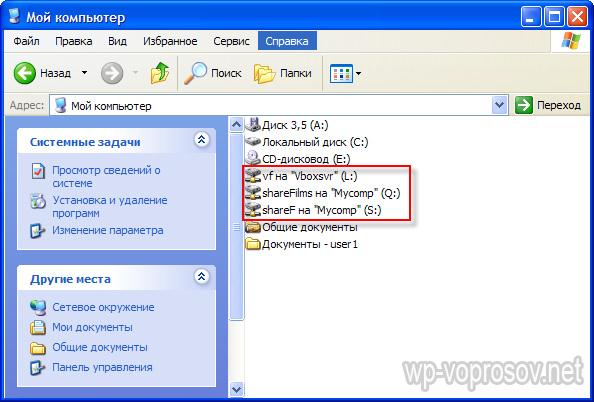
Now, when entering the “Computer” in Explorer, among others, we can see the “Z” drive in the “Network Location” section. You can get on it provided that the computer on which this network drive-folder is located is turned on.
Map a network drive on Windows XP
The technique of connecting a network drive on Windows XP is similar to that already described above. Therefore, we will describe here the connection method directly from the "Network Places" section.
We go to "Start\u003e Network Places" and find the shared folder we need on one of the computers on the local network. We click on it with the right button and select the menu item “Connect a network drive”. You can also simply select the "Service" item in the top menu and select the same section.
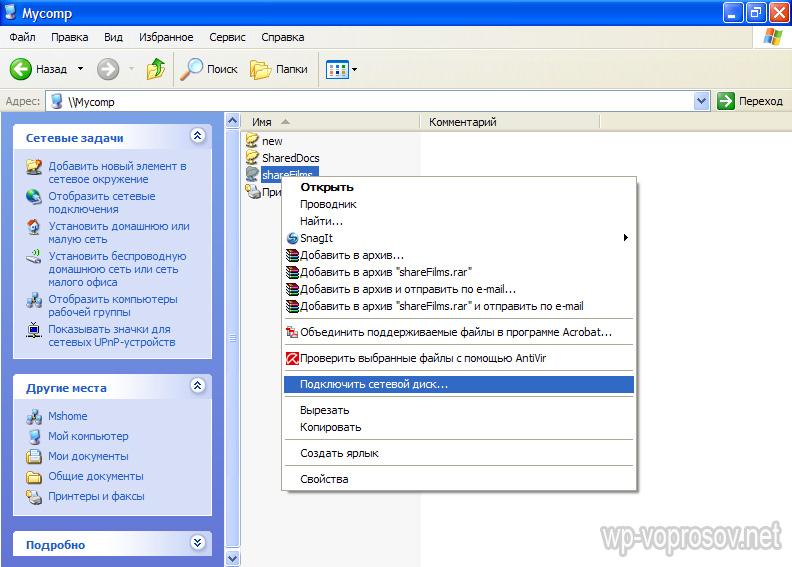
Now if you go to "My Computer", then hard disks, as well as network folders connected as network drives, indicated by separate icons.
That's all. For those who have not yet understood what, I’m citing a video:


