Explorer program
Working with the file system in folder windows is not quite convenient, but there is a more powerful tool for this purpose - the Explorer program.
Explorer - Utility Category file managers.It is designed to navigate the file structure of the computer and its maintenance. Explorer is very deeply integrated into the Windows operating system. In fact, we work with him even when we do not see him. If by right-clicking on an object we get a context menu, this is the result of the invisible work of Explorer. If, when dragging objects from one window to another, they are copied or moved, this is also the result of the correspondence activity of the Explorer. However, you can work with him in person. The program is started by the Start command. > Programs\u003e Explorer.
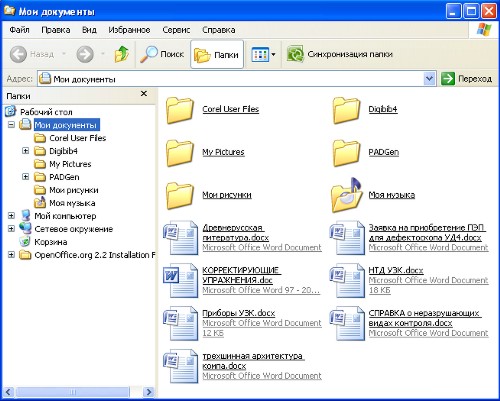
The Explorer window is shown in Fig. 5.3. As you can see from the figure, by the controls this window is very similar to the windows of folders. The main difference is that the Explorer window has not one working area, but two: the left panel, called folder barand the right panel called content pane.
Fig. 5.3. Explorer window
File structure navigation. The purpose of navigation is to provide access to the desired folder and its contents. We don’t specifically say that the purpose of navigation is searchnecessary files and folders, since there are special tools for this operation.
File structure navigation is performed on the left pane of Explorer, which shows the folder structure. Folders may be deployedor rolled upand open or closed.If the folder has subfolders, then in the left pane, next to the folder, is displayed nodemarked with a “+”. Clicking on a node expands the folder, while the node icon changes to "-". In the same way, folders are collapsed.
In order to open a folder, click on its icon. The contents of the expanded folder are displayed in the right pane. One of the folders in the left pane is always open. Closing a folder by clicking on its icon is not possible - it will close automatically when you open any other folder.
Launch programs and open documents.This operation is performed by double-clicking on the program or document icon in the right pane of Explorer. If the desired object is not shown in the right panel, you need to navigate in the left panel and find the folder in which it is located.
Create folders.To create a new folder, first open the folder in which it will be created in the left pane of Explorer. After that, go to the right panel, right-click on a place free of icons and select the Create item in the context menu > Folder. A folder icon with the name New Folder appears in the right pane. The name is highlighted, and in this state it can be edited. After the folder is created, it will be part of the file structure displayed in the left pane.
Copy and move files and folders.The folder from which the copying is called source.The folder in which the copying is called the receiver.Copying is performed by dragging the object icon from the right pane of the Explorer to the left.
The first task is to find and open the source folder so that the copied object is visible in the right pane. The second task is to find the destination folder in the left pane, but you do not need to open it. Next, the object is dragged from the right panel to the left and placed on the destination folder icon. This operation requires accuracy, since getting one icon to another exactly is not always easy. To control the accuracy of the hit, you must follow the name of the destination folder. At the moment when the pointing is done correctly, the caption under the icon changes color, and the mouse button can be released.
If both the source folder and the destination folder belong to the same drive, then when dragging and dropping, it moves, and if it is different, then copying. In cases where you need the opposite action, perform special drag and drop with the right mouse button pressed.
Delete files and folders.Work begins with navigation. In the left pane, open the folder containing the deleted object, and in the right pane, select the desired object (or group of objects).
There are several ways to uninstall. The classic way is using the File »Delete command from the menu bar (if no objects are selected, this command is not activated). A more convenient way is to use the command button on the toolbar. It is even more convenient to use the context menu. Right-click on the object to be deleted and select Delete from the context menu. However, the most convenient way to delete a selected object is to use the DELETE key of the keyboard.
Create shortcuts to objects.Shortcuts to objects can be created in two ways: using the special drag and drop method (manually) or using a special wizard (automatically). We are already familiar with the special drag and drop technique. The object is selected on the right panel of the Explorer and dragged with the right mouse button pressed on the icon of the desired folder in the left panel. When the button is released, a menu appears on the screen in which you need to select the Create shortcut item.
The second method (using the wizard) is less obvious, but in many cases more convenient. Mastersin the Windows system are called special programs that work in dialogue mode with the user. The dialogue is built on the principle of "request - response." If all the requests from the program are answered correctly, the program will automatically do the rough work.
1. In order to start the Create Shortcut Wizard, you need to right-click in the window of the folder in which the shortcut of the object is created.
2. In the context menu that opens, select Create > Shortcut - the wizard will launch.
3.In the wizard’s dialog box, there is a command line in the field of which you should enter the access path to the object for which the shortcut is created, for example
C: \\ Windows \\ Calc.exe - access path to the standard program Calculator.
Of course, the user cannot remember the access paths to all necessary
objects, therefore, the input address is automated. To do this, the team
Browse button.
4. When you click the Browse button, the Browse dialog box opens. This is the standard way to establish an access path to an object.
In the Folder field, select the desired drive on which the desired file is located - in our case, it is C: drive.
In the workspace, select the folder in which the file is located - in our case, this is the \\ Windows folder. Expand this folder. If the folder is opened by mistake and it does not contain the object you are looking for, you can go back one step by clicking the Up one button.
After finding the desired object, select it and click on the Open button. The access path to the object is automatically entered on the command line of the shortcut wizard.
5. Go to the next dialog box of the wizard by clicking on the Next command button.
6. In the next window, the wizards enter the name of the shortcut, for example: Calculator. If this is the last window of the wizard, then the Next button is replaced by the Finish button. Clicking on this button executes the specified operation.
Calculator is a system program, and its operating system icon is well known. Therefore, the Create Shortcut Wizard does not ask a single question on choosing an icon and uses the standard Calculator icon for the shortcut. If a shortcut is created for an object unknown to the system, the wizard continues its work and offers to select an icon from the collection of icons available in the system.
We briefly reviewed the Windows file organization. Now let's get acquainted with the file system management tool - Windows Explorer.
Windows Explorer is a file manager built into the Windows system itself. It loads automatically during the installation of the operating system. To start it, do the following:
- left-click on the button " Start"in the lower right corner of the desktop;
- in the menu that appears, hover over the option " All programs", a menu with installed programs on your computer will appear (initially there will be much less of them than in the figure);
- hover over " Standard";
- in the menu that appears, left-click on the item " Conductor";
- you will see the Windows Explorer start page.
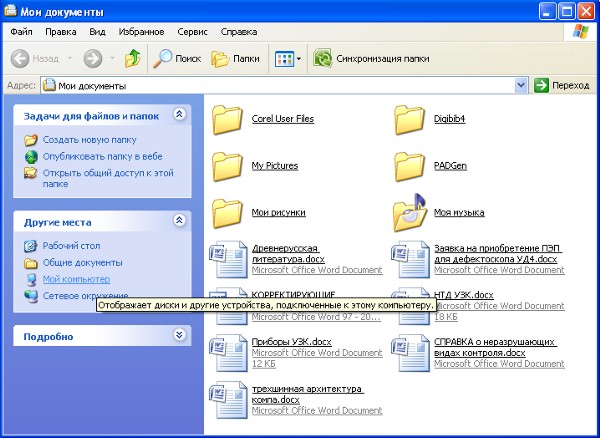
By default, usually the " My documents":
The conductor window consists of the following parts:
Deal with the principle of the Explorer, I think, will not be difficult. The developers tried to do everything as clear and graphic as possible. Let's see what is included in the information field of our computer. To do this, left-click the "Folders" button in the toolbar, and then click the "My Computer" link in the left window:
At the very top of the window are folders in which documents created by the user are saved by default (first of all, this applies to documents created using Microsoft Office).
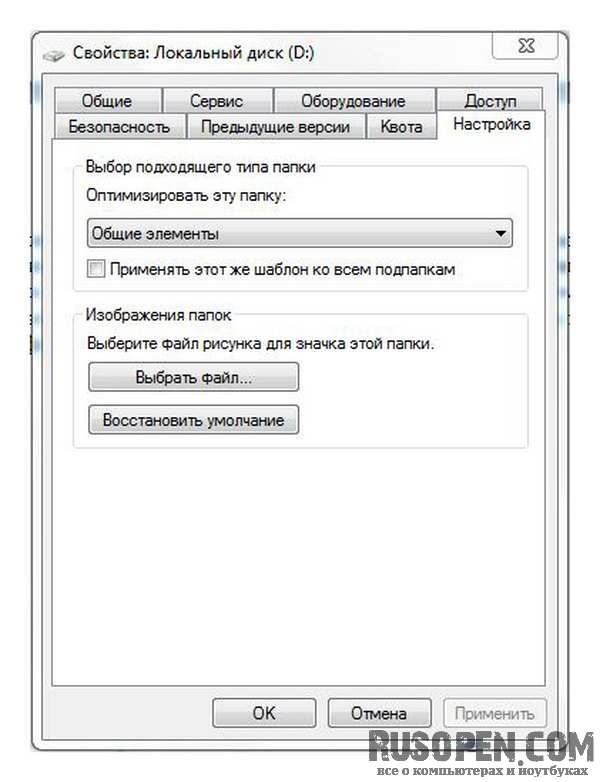
The following is a list of logical hard drives that are present on the computer. Formatting the hard disk is performed during the installation of the operating system, as a rule, two logical drives are created: C and D. In this case, drive C is called system drive for the simple reason that the operating system is installed on it. In order to see information about a logical drive, you need to right-click on it and select "Properties" in the context menu.
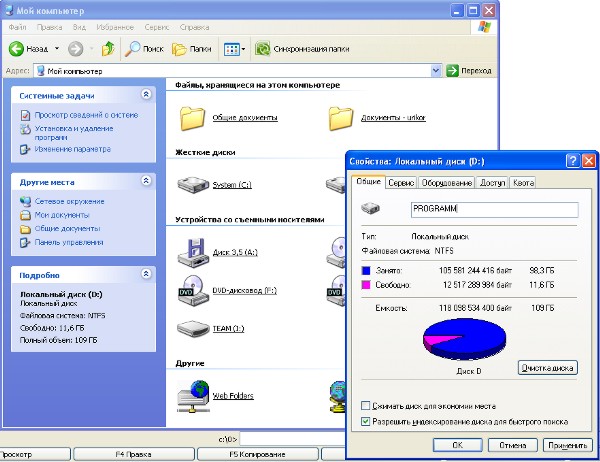
Below is a list of connected removable drives: floppy drives (outdated); card reader for connecting removable flash media; CD drive if a removable USB flash drive is installed in the computer, it is also displayed. In short, ALL media connected to the computer are currently displayed here.
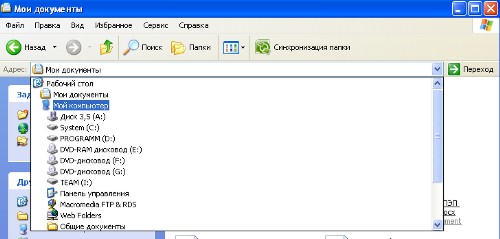
You can get from the "My document" window to the "My computer" window in another way - using Address bar. To do this, do the following:
- Click on the Navigation Bar the leftmost green arrow with the inscription "Back", and again you will be returned to the previous window "My Documents";
- In the Address line, left-click on the small arrow located at the right edge of the line;
- In the list that appears, select "My Computer."
On this, the first acquaintance with the Explorer can be considered complete. Next, we will analyze how the navigation through the computer information space is carried out and learn how to perform basic actions on files and folders.
Windows Explorer is a file manager and Windows shell. To start the file manager, select the menu command Start \u003d\u003e Computer. You will see the Explorer window.
Explore it. At the top of the window is a menu containing various commands for managing files and folders. A little lower is the main panel that controls the display of files and folders (the Organize menu button), which opens additional windows (system properties, the program removal window, the network drive connection window and the control panel). To see the commands for connecting a network drive and calling up the control panel, click the \u003e\u003e button next to the Delete or change a program button.
In the left part of the window there is a places panel: it displays your favorite folders, libraries, local (Computer) and network (Network) drives. In the center is a list of drives. Disks are divided into categories: Hard drives, Devices with removable media, etc. A summary is provided for each drive: total size and amount of free space. If you click on the disk, you will also see the file system of the partition (at the bottom of the window).
There can be so many partitions (logical drives) that you yourself can forget where and what you store. It's much easier to name a disc, for example, VIDEO and know that movies are stored here. This can be done using disk labels (labels). Right-click on the name of the drive, select Rename, and enter a new name for the drive. The system will inform you that you need administrator rights to rename the disk, click the Continue button. But that is not all. Again, right-click on the name of the disk, select the Properties command, and in the window that appears, go to the Settings tab. Select the value Video from the list Optimize this folder (of course, if you plan to really store movies on this disk).
The new disk name will now be displayed in the Computer window.

We seem to have sorted out the disks, now let's talk about working with files and folders. Go to your home folder by choosing Start \u003d\u003e<Имя пользователя>. If you are interested, then on the disk user profiles (personal folders) are stored in the C: Users folder<Имя пользователя> or C: / Users<Имя пользователя> (in the Russian version of Windows 7).
Look at the picture.

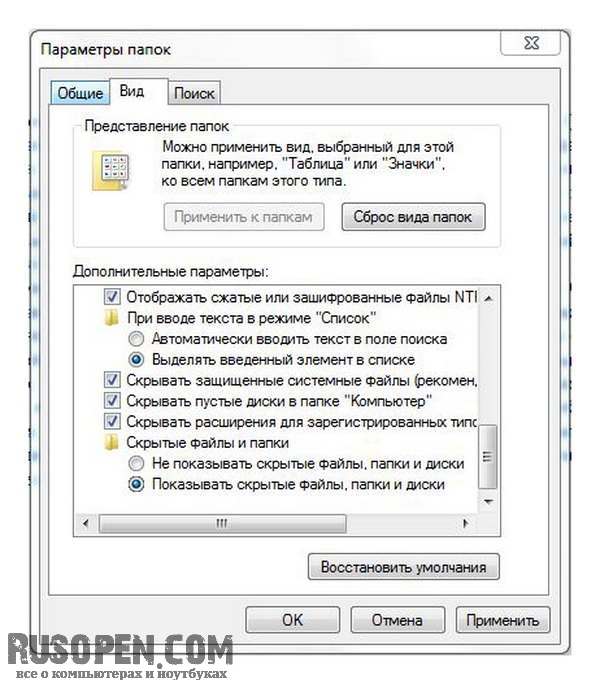
This is the contents of my home directory. Please note that the AppData folder is as if faded, in any case not as clearly displayed as everyone else. This means that it is hidden. For any file and any folder, you can set the Hidden attribute, as a rule, such an attribute is set for system files and folders to hide them from the eyes of a novice user. To enable the display of hidden files, you need to select the command Service \u003d\u003e Folder Options and in the window that appears, go to the View tab. In the Advanced Settings area, find the Hidden files and folders option, select the Show hidden files, folders and drives option.
Whether or not to show hidden files and folders is up to you. For example, I like it when I see all the files and folders, and hidden folders interfere with someone.
- In your personal directory you will find the following folders:
- Downloads - all files downloaded by the browser, programs for downloading files, Torrent clients are placed in this folder.
- Favorites - your online bookmarks are stored here.
- Images - a folder for your images.
- Contacts - contacts of other users are stored here.
- My videos is a folder for storing videos.
- My documents - here you can store all other files that are not music, image or video.
- My music is for storing music.
- Searches - contains the conditions of the last searches.
- Desktop - used to access the desktop using the Explorer window (all objects stored on the desktop are actually stored in this directory).
- Saved games - you can continue the previously saved game.
- Links - links that are displayed in the Favorites area on the left side of the Explorer window are stored here. By default: Downloads - link to the Downloads folder, Recent places - link to the most recently used objects (files, disks, folders) and Desktop - link to the Desktop folder.
You can create a file or directory in any of the folders of your personal directory. As you noticed, the terms “folder” and “directory” are one and the same, I use them equally to increase the “readability” of the text, since frequent repetition of the same word (“directory” or “folder”) is considered bad form.
METHODICAL DEVELOPMENT
for students I Faculty of Pharmacy
to practical occupationon this topic
“Explorer program. Work with files and folders »
1. Scientific and methodological substantiation of the topic:
Currently, the most widely used operating systems are Windows 98, 2000, XP, Vista, and there is a tendency towards the growth of Windows 2000 and XP, as they have a wider range of capabilities, support all the latest information technologies.
This chapter will focus mainly on Windows 2000. It is worth noting that all operating systems of the Windows family, starting with version 95, have basically the same user interface. This means that the skills to work with one of them can be successfully applied when working with the other, so much of what will be said below applies to the whole Windows family.
In the framework of this lesson, the basic concepts, methods and techniques related to working in the program explorer, help and search systems Windows.
2. Brief theory:
Explorer program
The most convenient program for working with the file system Conductor. Conductor - category related utility file managers.
It is designed to navigate the file structure of the computer and its maintenance. Conductor very deeply integrated into the Windows operating system. In fact, we work with him even when we do not see him. If by right-clicking on any object we get a context menu, this is the result of invisible work Conductor. If, when dragging objects from one window to another, they are copied or moved, this is also the result of the correspondence activity of the Explorer.
Program launch Conductor carried out by a team Start Programs Standard Conductor . After starting, a program window similar to the folder windows appears (Fig. 1).
The difference is that the window Conductor It has a second workspace - the folder window (left window), and on the right is the contents window of the current folder, similar to the workspace of the folder window. From the names it is clear that the left window is used to display the tree structure of folders on the disk, the right window displays the contents of the current folder. Wherein Conductorallows you to perform all basic operations on files and folders. Consider the main ones.

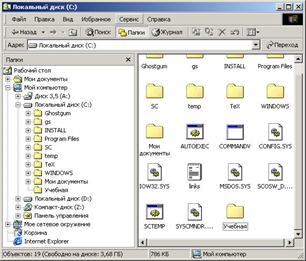
Fig. 1. Window of the program "Explorer"
2. Navigation by file structure. The purpose of navigation is to provide access to the desired folder and its contents. We don’t specifically say that the purpose of navigation is search necessary files and folders, since there are special tools for this operation.
Navigation through the file structure is performed in the left Explorer window, which shows the folder structure. Folders may be deployed or rolled up , and disclosed or closed . If the folder has subfolders, then in the left pane, next to the folder, is displayed node marked with a “+”. Clicking on a node expands the folder, and the node icon changes to “-”. In the same way, folders are collapsed.
In order to open a folder, click on its icon. The contents of the opened folder are displayed in the right window. One of the folders in the left window is always open. Closing a folder by clicking on its icon is not possible - it will close automatically when you open any other folder.
Launch programs and open documents. This operation is performed by double-clicking on the program or document icon in the right Explorer window. If the desired object is not shown in the window, you need to find the folder in which it is in the left window and open it.
3. Create folders. To create a new folder, you need to select the pack in which a new one will be created in the left window and open it. After that, in the right window, you need to right-click on a place free of icons and select the item in the context menu Create Folder . A folder icon with the name New Folder appears in the right window. The name is highlighted, and in this state it can be edited. After the folder is created, it will be part of the file structure displayed in the left window.
4. Copy and move files and folders. The folder from which the copying is called the source . The folder in which the copying is called receiver . Copying is performed by dragging the object icon from the right window of the Explorer to the left.
The first task is to find and open the source folder so that the copied object is visible in the right window. The second task is to find the destination folder in the left window, but you do not need to open it. Next, the object is dragged from the right window to the left and placed on the destination folder icon. This operation requires accuracy, since getting one icon to another exactly is not always easy. To control the accuracy of the hit, you must follow the name of the destination folder. At the moment when the guidance is completed correctly, the caption under the icon changes color to blue, and the mouse button can be released.
If both the source folder and the destination folder belong to the same drive, then when dragging and dropping, it moves, and if it is different, then copying. In cases where you need the opposite action, perform special drag and drop with the right mouse button pressed.
5. Delete files and folders. First, you need to find and open the folder containing the deleted object in the left window, and select the desired object (or group of objects) in the right window.
There are several ways to uninstall. The classic way is with the command File Delete from the menu bar (if no objects are selected, this command is not available). A more convenient way is to use the command button on the toolbar. It is even more convenient to use the context menu.
Right-click on the object to be deleted and select Delete from the context menu. However, the most convenient way to delete the selected object is to use the key DELETE keyboards.
6. Create shortcuts to objects. Shortcuts to objects can be created in two ways: using the special drag and drop method (manually) or using a special wizard (automatically). We are already familiar with the special drag and drop technique. The object is selected in the right window of Explorer and dragged with the right mouse button pressed on the icon of the desired folder in the left window. When the button is released, a menu appears on the screen in which you need to select the Create shortcut item.
The second method (using the wizard) is less obvious, but in many cases more convenient. Masters in the Windows system are called special programs that work in dialogue mode with the user. The dialogue is built on the principle of " question answer". If all the questions of the program are answered correctly, the program will automatically do the rough work.
1. In order to start the Create Shortcut Wizard, you need to right-click in the window of the folder in which the shortcut of the object is created.
2. In the context menu that opens, select Create Shortcut - the wizard starts.
3. In the wizard’s dialog box, there is a command line in the field of which you must enter the access path to the object for which a shortcut is created, for example C: \\ Windows \\ Calc.exe - access path to the standard program Calculator. Of course, the user cannot remember the access paths to all the necessary objects, so entering the address is automated. To do this, use the command button Overview .
4. When clicking on the button Overview a dialog box opens Overview .This is a standard tool for establishing the path of access to an object.
In field Folder they select the desired drive on which the file is located - in our case, it is a drive FROM :.
In the workspace, select the folder in which the file is located - in our case, this is the folder \\ WinNT . Open this folder and after finding the desired object, select it and click on the button Open . The access path to the object is automatically entered on the command line of the shortcut wizard.
5. Go to the next dialog box of the wizard by clicking on the command button Further.
6. In the next window, the wizards enter the name of the shortcut, for example: Calculator. If this is the last wizard window, then the button Further replaced by a button Done. Clicking on this button executes the specified operation.
7. Receptions of increase of efficiency in work
with file structure
The techniques described here are system-wide. They apply not only to Conductor, but also to all folder windows and most application windows.
Using the clipboard to work with objects. Windows creates and maintains on a computer an invisible memory area called clipboard . This area can and should be able to use. At any given time, only one object can be stored in it.
The principle of working with the clipboard is very simple:
1. Open the source folder. Select the desired object by clicking.
2. Copy or take away object to buffer. In the first case, the object remains in the source folder and can be propagated. In the second case, it is deleted from the source folder, but can be stored in the buffer for some time. The last operation is also called cutting an object .
3. Open the destination folder and place the object from the clipboard in it.
4. Three indicated operations ( Copy, Cut and Embed ) can be done in many ways. The classic trick is to use the item Edit in the menu bar, but it’s more convenient to use the command buttons of the toolbar.


