Software recovery with R.Saver
The article describes the principles and methods of software data recovery for users who do not have special knowledge.
If the value of the information is very high and / or the storage medium has physical damage - It is worth thinking about contacting specialists. In this case, the probability full recovery data will be the highest.
Be sure to check your drive for errors after each failure of your computer or program, as this is the most common cause of errors. Currently, a program is also being searched for physical errors on the hard drive. Once they are found, the program will automatically try to fix them. It is highly recommended that you periodically check this type of test, even if the test takes significantly longer.
Now check both options. To start the process, click the "Start" button. Progress of data carrier verification. Verification starts now if you have closed everything open programs Before and no longer have access to these volumes in the background. If so, read the instructions below. You will see the progress of the process throughout the review, which is divided into five stages.
In case of independent data recovery, it is worth taking into account the following information:
- Writing to a partition with recoverable information can reduce the likelihood of data recovery, since data can be written over existing ones. This also applies to installing programs for data recovery and saving recovered files.
- It is advisable to minimize all work with the source drive to increase the chances of recovery. Good practice is to create a sector-by-sector copy of the drive and use various methods restore to copy.
- If the storage medium has physical damage (first of all, it concerns hard drives), then any effect may aggravate the situation. You should continue to restore yourself only if the cost of the data itself is lower than the cost of its recovery by specialists.
- Check disk for errors windows tools will create additional difficulties for data recovery, up to the complete impossibility of their recovery.
Disk structure
For a better understanding of further actions, we will talk about logical structure disk and file systems. If you are not interested in the theory and you need to quickly restore the data, you can skip the section and go directly to the algorithm of actions.
Message about the completion of the volume check. Once the fifth stage is completed, you will receive a message about this. To view the viewing report, go to "System Control" in the "Start" menu. Select the Performance and Maintenance category. If you are in the classic view, click on the "Administration" icon, and then on "Display Results." The window you will receive will be described below.
The Performance and Maintenance category on the control panel. Now click on the heading "Administration". The Administration category in the Performance and Maintenance category on the control panel. To go to the next window, double-click the Result icon.
MBR
Master Boot Record - Home boot record - is in the zero sector of the disk, contains part of the executable code, as well as data on four partitions and which partition is bootable.
If the MBR is good, then after receiving control, the code contained in it reads the partition table and transfers control to the code contained in the first sector boot partition (VBR - Volume Boot Record) if it contains a 55AAh signature at the end of the sector.
Checking the volume for errors
Click “Application” on the left side of this window. Double-click this file to go to the next window. Data Carrier Check Report. Here you can see the report on possible mistakes. A message stating that the disk is still in use. If the volume to be checked for errors is still in use, error checking cannot occur at this time. This is the case when programs are still open, when the operating system is running on this hard disk or partition, or when programs such as antivirus software access the hard disk in the background.
Otherwise, an error message may appear, for example: “Reboot and select a proper boot device” or “Invalid partition table” or “Missing operating system”. All of these messages can occur due to a malfunction in the MBR or VBR, as well as for other reasons (incorrect boot disk selected, etc.).
To recover a damaged MBR or boot partition, there are specialized utilities such as testdisk (Windows) and gpart (Linux), you can also use the "Recovery Console" with installation disk Windows Their use will not always give a positive result when restoring data, since in addition to damage to MBR and VBR, there may be other malfunctions, therefore, these options will not be covered in the article. And although there are enough instructions on the network to fix such malfunctions, it is recommended that you first restore important data from the drive, and then try to restore its correct operation.
If you agree with this, just click the "Yes" button. You should periodically check your drives for errors so as not to lose valuable data. Hard drives are the most important part of your computer because you can lose all your data with one error. However, you must remember that hard disks - These are mechanical devices that do not work after prolonged use. Statistics show that 60 percent of hard drive failures are mechanical errors and are returning to misuse.
Here are some reasons for disk failures. The filter in the fan becomes clogged or does not work properly, which leads to an increase in heating, causing hard failure drive. A sudden power failure while working with a file can also lead to a hard disk failure. Physical damage that occurs when a computer crashes. . Failure does not mean that you have lost all your data. If hDD still in good physical condition, you can repair it yourself. Here are five ways hard recovery drives.
File systems
Any section containing a file system consists of the following parts:
- The bootloader area (VBR), which contains information about the structure of the partition, as well as executable code.
- A data area that is divided into equal parts called clusters, with each cluster having a unique number. Cluster size is set during formatting.
- Service Data Area file system, which can store information about folders, files, their names, attributes, as well as information about which chains of clusters a particular file occupies.
The locations of parts as well as copies of service data depend on the type of file system.
Route 1 - Check the hard drive and repair automatically
Learn how to fix and fix a problem with hard drive. Be sure to close all running programs. Start your workspace. Right-click the hard drive that you want to check. Go to options by right-clicking.
When the window opens, go to the "Tools" tab and check for errors. This will require administrator rights, so make sure you have them. Confirm or enter the password to enable the operation. Select “Automatically fix file system errors” to fix errors and fix them automatically.
Let us consider in more detail the most popular file systems on user computers: FAT and NTFS.
NTFS
The structure of the NTFS file system is shown schematically in the figure.
The section begins with the boot area, which contains information about the section, as well as executable code. A copy of the bootloader is most often found at the end of the section.
Route 2 - The connection between the hard drive and the motherboard
Scanning starts automatically. Depending on the size of the disk, this may take several minutes. This troubleshooting method requires you to open a computer or laptop to check the connection between the hard drive and motherboard. A loose or poor connection may result in an error. Before we begin the process, make sure that the power is off to avoid accidents. Open your computer case and follow these steps to check the connection between the hard drive and the motherboard.
The next area is the main MFT (Master File Table). It stores information about directories, files and their attributes. Usually, under MFT, a disk area of \u200b\u200b12.5% \u200b\u200bof the partition size is reserved. The size of the reserved area can vary (both up and down), and the table itself can be fragmented.
We work with the command line console
Follow the cleaning procedure and connect the black cable. Turn on the computer and see if the problem is resolved. If you do not know how to open the computer, consult a specialist. Route 3. Backing up data to external hard drive and formatting a failed hard drive. Formatting - good way repair damaged disk in the initial state. However, before you can format it, make sure that you back up all your data. You certainly do not want to lose important files.
In addition, in a certain area of \u200b\u200bthe section contains a copy of the first 4 service records of the table.
The user data area occupies the entire remaining space of the partition.
When deleting a file standard OS tools in the file record only put a mark that the file is deleted, and the space it occupies is marked as free. If after deleting the file no recording was made to the disk - the file remained in place, and its recovery is possible.
You can execute backup entire computer to an external hard drive and transfer it back after formatting your computer. Now go to the Start menu and open the system control. Now go to the "System and Security" section.
Then go to “File History” and find “Save backup copies of files with file history.” It scans a usable drive to backup all your data. Select an option and click on it. This will save your important data to another hard drive.
When formatting a section a new MFT is created in place of the old one. Initially, the size of the new table is quite small (several hundred MFT records), so some service records of the previous file system can still be restored. The more files were written to a formatted partition, the less likely it was to successfully recover data.
Open the system control on your computer and go to the "System and Security" section. Click "Administration" and open "Computer Management." In the left column, select “Disk Management” in the “Data Warehouse” section. You will see your hard drive. Go to the hard drive and click "Format".
This will format the disk. You can restore your hard drive at any time using the created backup. Remove both cables and make sure they are clean. If possible, use an aerosol to remove dust. Now connect it to the disk. Select the hard drive in the left pane, and then click Restore Volume.
In this case, the data physically remains in place, part of the information about them stored in previous version MFT. Using standard OS tools, these files cannot be read.
Sometimes full formatting is called low-level formatting, which is a mistake. Low-level formatting is a technological operation that is performed during the manufacture of a drive, and it is impossible to implement it using software methods.
Your computer will restart and check if the disk error has disappeared. This method will solve some problems, but if there is a problem with the hard drive, it is better to consult a technician. You can replace the board on your hard drive if it is too old, damaged, or malfunctioning. They are offered by the manufacturer of hard drives.
To do this, you need four information: model number, part number, firmware, and tag number. You can check the above shortcut with barcode. Read the manual for relevant information. Once you know which chip you need to change, change the board. This requires some experience in soldering and some tools. Remove the old chip and solder the new chip to the board. This is a small technical aspect, so make sure you read the replacement instructions.
In fact, only two types of high-level formatting are available from the operating system: full and fast. Quick formatting simply forms a partition table, and with full formatting, the entire drive is first checked for availability bad sectors. In Windows XP, this check is performed using a read operation (that is, the data remains in place, which means that in the recovery issue this situation does not differ from the quick formatting discussed above), and in Windows 7 sectors are checked by writing, while the data is permanently deleted, and there’s no way to restore them.
How to recover data after hard drive recovery?
Install a hard drive and see if it works on your computer. Once you have fixed the hard drive, you can recover lost data with software, a highly reliable and efficient data recovery tool. You can recover data in three steps.
Connect the hard drive to the computer. Click the Restore button lost files". On the next screen, select the hard drive from which you want to recover data, and click "Start" to start scanning. On the next screen, you will see a list of files that can be restored, select the files you want to restore, and then click “Restore”.
Fat
The structure of the FAT file system is shown schematically in the figure.
At the beginning of the section is VBR, its copy is usually located across 6 sectors. After a certain number of sectors, the FAT (File Allocation Table) table itself is located, followed by a copy of it.
The file table only stores information about the chains of clusters that occupy the files. File names and attributes are stored in directories located in the user area.
It is somewhat simple ways hard recovery drive. Now you no longer need to worry if there is an error on your hard drive! It may happen that hardware components suffer from slow and creeping death. After a moment, you can copy the data to your hard drive and use it in normal mode. The next moment you get random errors, timeouts, crashes or the target volume just disappears in the middle of the backup, the viewfinder hangs, etc.
“The backup was canceled because the volume activation path was changed.”
Instead, you should dig a little deeper, exclude individual components, replacing, etc. To identify the defective part. This is a pretty sharp end to your backup, but there are other possibilities.
“The backup was canceled because the file system is not responding”
Troubleshooting instructions. Repeat the backup after each containment attempt and stop when the problem resolves the problem.The user area in FAT begins with the root directory, all other directories and files are located in it. Directory entries point to the first entry in the file table, which contains information about the file clusters.
When deleting a file the first character of the file record is changed to a special code, which means that the file is deleted. Clusters are also marked as free and information about the chain of clusters occupied by the file is deleted, which complicates the procedure for recovering fragmented files. The data area remains unchanged, that is, files can still be restored.
Please note that this mainly applies only to the acute problem of a hanging file system. Even if the hard drive seems to be working again after connecting, problems can appear at any time. File system issues are not uncommon and can be fixed quickly. When writing zeros in each sector, bad sectors are detected and deactivated. If none of the previous steps resolve the problem, the hard drive is malfunctioning or not working. We often hear these questions, and we usually answer: "Do not blame the messenger."
When formatting a new file table and root directory are formed, the size of the table is indicated at its beginning. The data itself, in general, remains on disk. What follows on the disk after the newly created table remains untouched (that is, information about the location of the files that were on the disk before formatting). As new files are written, the data in the directory structures and files are replaced by new ones, reducing the likelihood of restoring existing information.
We are happy to help you read this diagnosis to determine if it is a hardware or software problem. The hard disk utility is good at detecting structural problems with the file system, but cannot detect hardware defects that cause the file system to stop responding. Do not assume that your hard drive has no hardware defects.
And although these tools do a great job of diagnosing such problems, the inability of these tools to detect problems with the cable, connector, or housing leaves quite a bit of space to fill in the most old-fashioned way by troubleshooting like try to do.
Data Recovery Methods
Exist as pure software methods data recovery, and hardware and software. The latter requires special expensive equipment, relevant experience and knowledge, while software recovery using automated utilities is available to almost any PC user. This method will be described later.
Recover Deleted Files
To restore files deleted by standard means of the operating system, you need to read the service data, bypassing the file system interface. In this case, you can get information about the location of files that are marked deleted.
If the subsequent recording to disk was not performed, then at this location it will be possible to read the desired file.
Reconstruction of a damaged file system
This method is used when the file system has been damaged or formatted. To reconstruct the file system, it is necessary to scan the entire section to find the remnants of service data, on the basis of which the file table will be reproduced and, if successful, access will be granted to the files and folders stored in the section.
Recovery after changing the partition structure of a disk
Specialized utilities scan the drive for file system structures that are on the disk. Based on the scan, a list of possible file systems with a preliminary assessment of their status is built. The next step is to check the found systems for the availability of the necessary data.
Signature Recovery
RAW-recovery - restoration by signatures, used in cases where other methods did not give a satisfactory result. In this case, sector-by-sector scanning is performed for known signatures (a unique set of characters specific to a particular type of file).
For the found files, neither names, nor logical location, nor attributes are known. In case the files are fragmented, this method recovery will be ineffective.
If the signature of the beginning of the file was found, then the next task is to find the end of the file. Usually, any next known signature is used for this, which may give an unsatisfactory result. Modern programs use methods that use the remnants of data about the file system and its features to improve the result. In some cases, such algorithms can help restore even a fragmented file, which is impossible using standard algorithms. For example, the IntelliRAW algorithm used in programs of the UFS Explorer family works in conjunction with file system reconstruction algorithms and uses the information obtained to determine the end of files. This implementation allows you to achieve better results than when using simple methods Signature Recovery.
A rough recovery can give a good result if the files on the drive are arranged sequentially, without offsets and fragmentation. For example, when restoring files from memory cards of cameras, camcorders, etc.
Data recovery algorithm
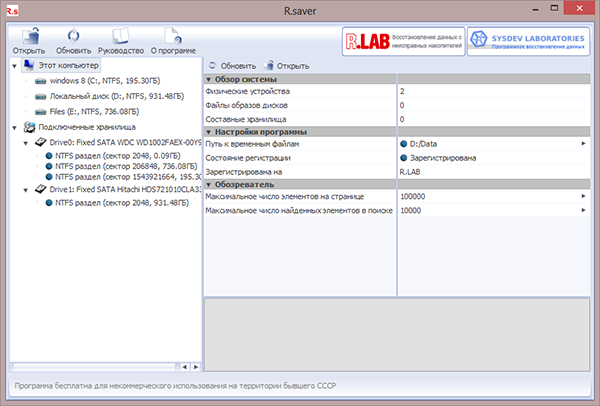
We will give an algorithm as an example free program R.saver, which is available for non-commercial use in the former CIS. It is compact, easy to use and does not require installation. It uses the algorithms of commercial software UFS Explorer, gives results at the level of professional utilities. Supported file systems are NTFS, FAT, and exFAT.
You can download it from the support page on the official website: http://rlab.ru/tools/rsaver.html.
The archive with the program must be unpacked to a section different from the one from which the recovery will be carried out. If the system has only one partition, the best solution would be to connect a disk with recoverable data to another computer. If this is not possible, you can unzip the program to external storage (if it is sufficient to save the recoverable data).
Section selection
After unpacking the program, you must run it. In the left part of the main window, you can see the drives connected to the system and partitions on them. If the desired section was automatically found and displayed in the list, select it and go to the next item.
If the desired partition is not in the list (for example, the drive was formatted or partitions were resized), you can start searching for the lost partition or set it yourself (only if you know the exact parameters of the partition). You can select these functions in the context menu of the drive or on the toolbar.
Consider the search function of the lost section in more detail:
After its launch, a new window will open, in which you must click on the button "Find Now", which will launch a search on the disk of known file systems. As they are found, the list will be supplemented with information about the sections found. The most likely options will have a blue icon, which means a good state of the section. If the icon is yellow or red, then the found section is either very badly damaged or found incorrectly (some types of files can give such an effect).
From the list of sections it is necessary to tick off those that most correspond to the parameters of the section you are looking for: start (in sectors), size (in sectors and megabytes), label, file system type.
If the value in the “size” column is less than the value in the “start” column, then most likely this section is not valid. Typically, these “wrong” partitions are disk images stored on the drive.
To continue, click the "Use Selected" button.
Scanning
If you selected a section with a file nTFS system, then a choice will be offered: run full or quick scan.
The scope of the quick scan is to search for files deleted by standard means of the operating system. With such a scan, only service records in the file table are read and analyzed.
Full scan is used in most cases. In this case, the search for the remnants of service records in the file table, virtual reconstruction of the file system and sector-by-sector scanning using the IntelliRAW technology are performed. It gives an excellent result, but takes more time.
For FAT16 / FAT32 and exFAT file systems, only full scan mode is available. This is due to the fact that, due to the characteristics of these file systems, in many cases a quick scan is not enough for efficient data recovery.
Saving Results
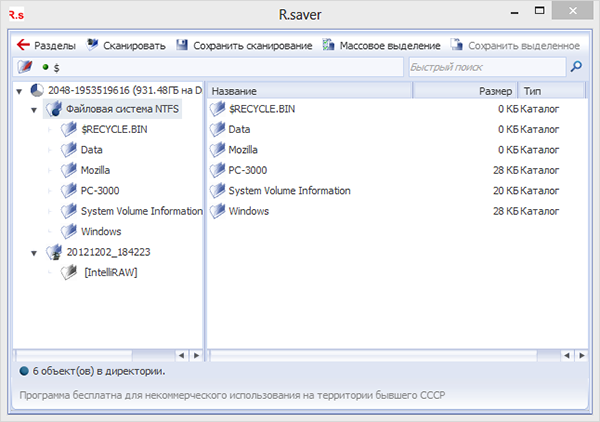
After the scan is completed, the program will show the result of the reconstruction in the form of a tree of files and folders that could be found.
Blue icons display elements that are visible by standard means of the operating system, red - those that have been deleted or lost and are not accessible by standard means of the operating system.
In addition, service folders will be available:
- contains files and folders whose location could not be mapped to the root directory
- contains files sorted by type found using signature recovery (with IntelliRAW technology)
To save the recovered data, either in the item’s context menu, select the option “Copy to ...”, or click the “Mass Selection” button on the toolbar, then select all the necessary elements and click the “Save Selected” button.
Recall that it is only necessary to save the recovered data to a partition that is different from the one from which the recovery is performed - otherwise the data may be damaged.
. You may get this error when working in Acronis Disk Director, which is a partition manager hard drive.An error may occur when performing various operations in this program, but most often if you increase the space of one disk due to another, for example, increase the disk space C: due to D: on a laptop and simple computer. The cause of the error does not always lie in the damage to the hard disk file system, and checking the hard disk partitions for errors may not give results.
File system damaged
Hello friends! The reason for writing this article was comments on my other article. After working with Acronis Disk Director in “Disk Management”, some users experienced the following situation - when separating space from disk D :, this space disappeared to nowhere, while the Acronis Disk Director, in turn, showed that the operation was successful and drive D: has become smaller and drive C: larger.At work, I also often had to deal with such a task and she has a solution.
Interestingly, such a “File System Corrupted” error may not exist, you just work in Acronis Disk Director, then reboot and are very surprised to enter “Disk Management”, one disk will become smaller and the other will remain as it was.
Last time I encountered such an error like this. At work, a system administrator neighbor came up to me and said in a whisper: “Listen, I’m having some kind of mysticism, like I didn’t drink yesterday. On a laptop with an installed operating windows system 7, you need to increase the space of the C: drive by Acronis Disk Director, take the space from the E: drive and attach it to C :, and after rebooting this space disappears nowhere, the C: drive remains the same, and the E: drive becomes smaller with each by my attempt.
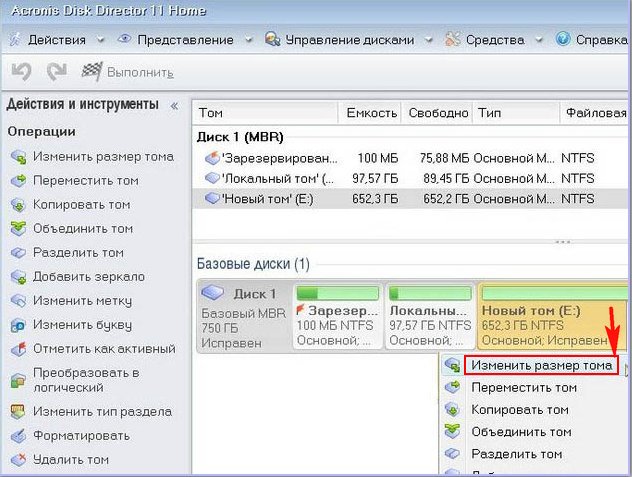
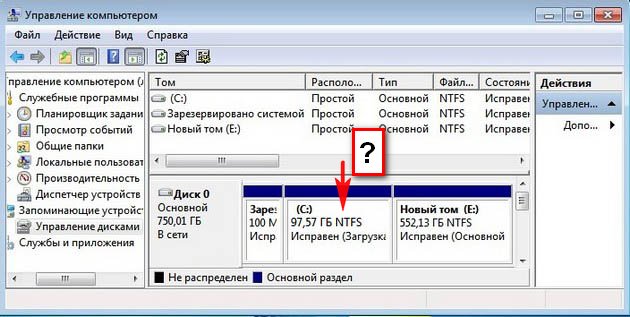
In the "Disk Management" of this laptop there was such a picture, drive C: occupied a capacity of 97 GB, and drive E: 650 GB. The letter D: was occupied by the drive, so we will work with C: and E: drives.
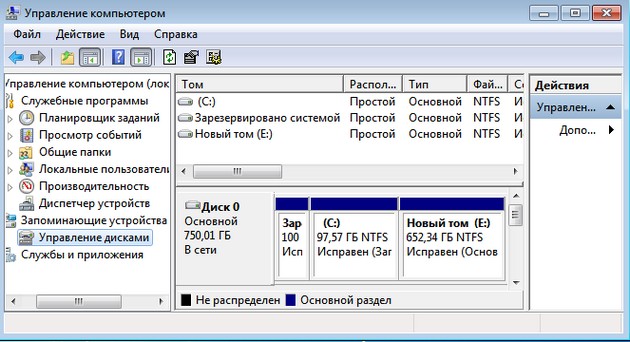
The task was set to take 100 GB from the E: drive and attach it to the C: drive to make it approximately 200 GB.
In this situation, using the tools of the operating system itself, you won’t perform such an operation, so I decided to use the Acronis Disk Director program,
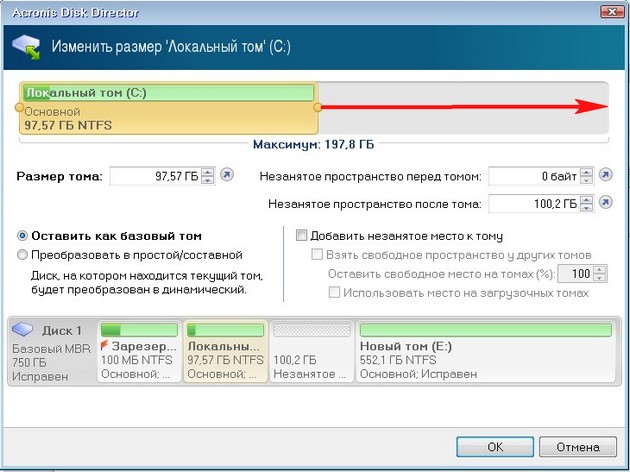
Booted from boot disk I first pinched the program from the E: 100 GB drive. Right-click on drive E: and select "Resize Volume" from the menu
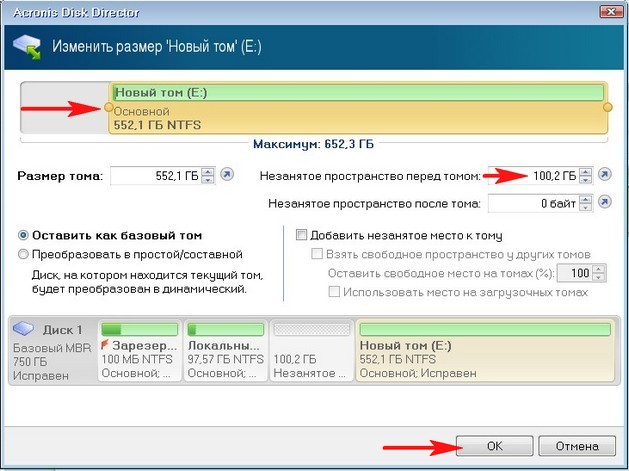
such a window will appear. Change the size of the selected volume (E :) to a smaller side so that the unallocated space is in front of the volume (E :) and after the disk (C :), put 100 GB, then add the free space to the disk (C :) and it will become 100 GB more.
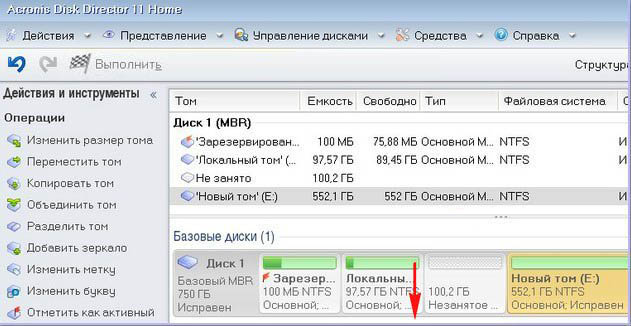
We cling with the right mouse to a kind of delimiter and move it to the right, thereby reducing the disk space E: by 100 GB and click OK. An unallocated space of 100 GB appears.
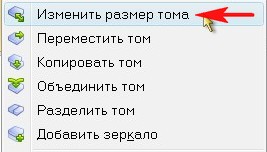
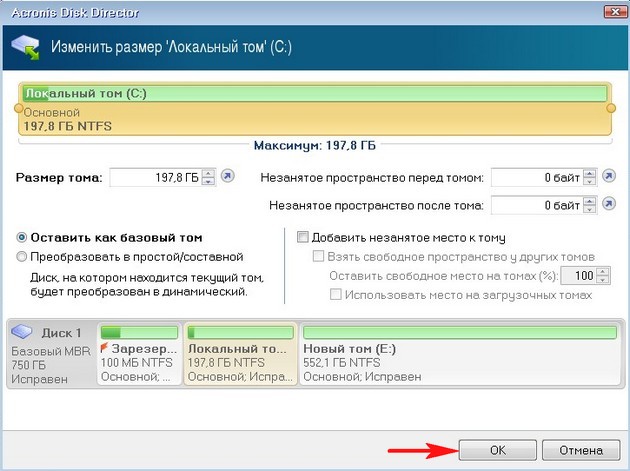
Now we right-click on the C: drive and select "Resize Volume" in the menu
The following window will appear. In it, we lead the delimiter to the right to the end, thereby increasing the C drive: by 100GB and OK.
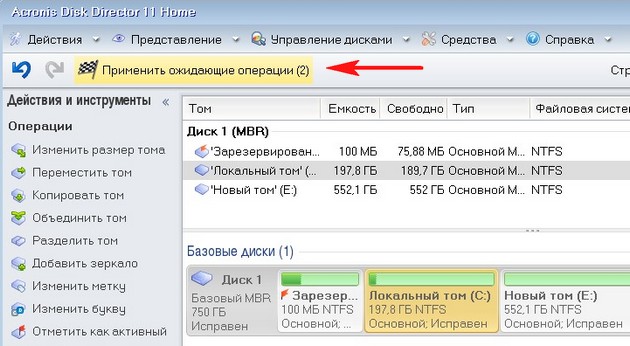
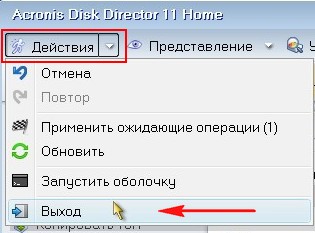
Our program works in the pending operation mode and for all our actions to work, you need to click the "Apply pending operations" and "Continue" buttons.
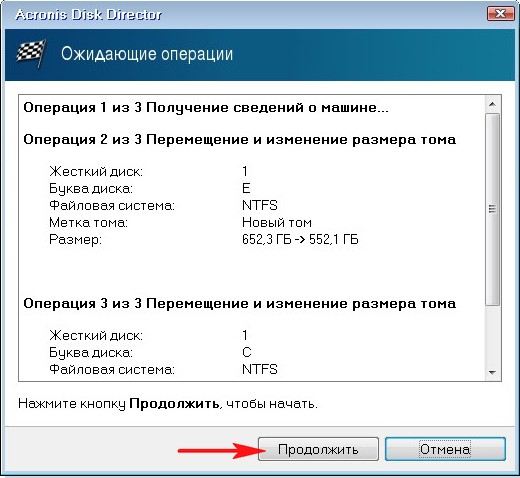

Here is the attention of friends, sometimes an error may occur " The file system is corrupted. Use the verification tool to detect and fix file system errors". What to do? I tell further.
We exit the Acronis program and reboot.
After the reboot, we immediately enter Disk Management and see a strange situation. Drive C: what was the volume of this and remained 97GB, and drive E: became less than 552, 13 GB.
At this time, you begin to fire me and my article and the Acronis program, while in the meantime I start hiccuping accordingly.
Again, boot from the Acronis Disk Director program disk. Let's do this. Nip off C: or D: a small piece of space and leave it unallocated, then boot into operating system and attach it back to the C: drive, but with utility program Windows "Disk Management".
Right-click on the C: drive and select "Resize Volume" from the menu


