Recently, when I turned on the computer, Ubuntu “pleased” me that it decided not to boot and “fell” into busybox at the time of user space initialization (userspace) it is initramfs. A little dumbfounded began to understand. It turned out that my old hDD gave a small glitch, and spoiled the superblock of the file system. However, it turned out that this is not fatal, and this problem is quite simply and quickly solved.
A superblock is a part on a disk reserved for service information of a file system. It stores information about the section: file system type, size, status, and information about other metadata structures. In case of loss of information from the superblock, there is a great risk of losing all the information from the section. Therefore, Linux stores several copies of this information - i.e. several superblocks.
Before proceeding, I must warn that the reason is not required in the superblock. Such a problem can also arise for other reasons, which can only be established with a certain experience, or experimentally. In any case, the whole point of the steps below is only to check the disk for errors, so at least it won’t hurt.
For recovery we need boot disk or flash drive with Linux. We boot, and launch the terminal. In the terminal we write:
sudo fdisk -l | grep Linux | grep -Ev "swap"
As a result of the command, a list of all sections will be displayed:
/ dev / sda2 371306496 976771071 605464576 288.7G 83 Linux
In my case, it was one section. In this list you need to find the desired section, and remember it. We will need it further. Next, see the list of available spare superblocks:
sudo dumpe2fs / dev / sda2 | grep superblock
In the command above, / dev / sda2 must be replaced with the previously received, the desired partition. As a result of the command, a list of all super blocks will be displayed:
Primary superblock at 0, Group descriptors at 1-19 Backup superblock at 32768, Group descriptors at 32769-32787 Backup superblock at 98304, Group descriptors at 98305-98323 Backup superblock at 163840, Group descriptors at 163841-163859 Backup superblock at 229376, Group descriptors at 229377-229395 Backup superblock at 849201, Group descriptors at 884737-884755 Backup superblock at 1605632, Group descriptors at 1605633-1605651 Superblock at 2654208, Group descriptors at 2654209-2654227 Backup superblock at 7962624, Group descriptors at 11239424, Group descriptors at 11239425-11239443 Backup superblock at 20480001-20480019 Backup superblock at 23887872, Group descriptors at 23887873-23887891 Backup superblock at 71663616 , Group descriptors at 71663617-71663635
From the list of spare superblocks, select any other than Primary and run a disk check with a spare superblock:
sudo fsck -b 32768 / dev / sda2 -y
The -y parameter is necessary so that fsck does not ask what to do with each error found, but instead corrects it automatically if possible. After fsck finishes, the result will be something like this:
fsck 1.40.2 (23-March-2016) e2fsck 1.40.2 (23-March-2016) / dev / sda2 was not cleanly unmounted, check forced. Pass 1: Checking inodes, blocks, and sizes Pass 2: Checking directory structure Pass 3: Checking directory connectivity Pass 4: Checking reference counts Pass 5: Checking group summary information Free blocks count wrong for group # 241 (32254, counted \u003d 32253) . Fix? yes Free blocks count wrong for group # 362 (32254, counted \u003d 32248). Fix? yes Free blocks count wrong for group # 368 (32254, counted \u003d 27774). Fix? yes .......... / dev / sda2: ***** FILE SYSTEM WAS MODIFIED ***** / dev / sda2: 59586/605464576 files (0.6% non-contiguous), 3604682/605464576 blocks
Original: "Ubuntu Hacks: Chapter 8 - Administration"Authors: Kyle Rankin, Jonathan Oxer, Bill Childers (Kyle Rankin, Jonathan Oxer, Bill Childers)
Publication Date: June 2006
Translation: N. Romodanov
Date of translation: October 2010
Tip # 81: Restoring a System That Does Not Boot
If you are a little overdoing the settings of your new Ubuntu system and it no longer boots up, then in this section you will learn several ways to return your computer to working condition.
If you are reading this advice, then accept our condolences. If your system does not boot, then this can lead to stress and you can be very upset. We are sure that right now you are thinking about all the files for which you wanted to make backups (we know that it’s inappropriate to give advice now, but when your system is restored and working, you can refer to the " Backup of your system "[Tip # 79]). Of course, we have come across a similar situation many times, but so far we have managed to bring our systems back to life. Although it’s impossible to cover all the scenarios in which the system cannot start the computer, we’ll tell How to fix the problem installation disk Ubuntu CD is in recovery mode, and we will describe some typical recovery scenarios.
Recovery mode boot
First, find the Ubuntu CD from which you installed your system and reboot in order to open the screen first bootstrap. Among the various options is the option "Recover a broken system". Choose this option, and Ubuntu will start working so that at first glance it might seem that this is a normal installation of the system. You will be prompted exactly how, as during the installation, to select the language and network settings, but this only happens during the initial setup of the recovery environment. Notice that the message "Rescue mode" appears in the upper left corner of the screen.
Fig. 8-11. Root Device Selection Dialog Box
How to choose the right one? If you are not too familiar with the placement of partitions on your hard drives, then this may require several attempts, but the basic rules are as follows:
- If you installed Ubuntu as the only system and Ubuntu overwrote everything on the current drive, your root file system is probably the first section on the list.
- If you installed Ubuntu in a dual-boot configuration from Windows, your root file system is probably the second section of the list.
After you choose the root file system, Ubuntu will try to mount it, if the attempt is successful, it will go to the next dialog box. If the attempt fails, you probably selected the wrong partition, so try again.
Common recovery scenario
In the next dialog box, you will be asked to select various recovery options (see Fig. 8-12). The action that you choose here will depend significantly on the symptoms that appear when you boot your system, so instead of describing all these parameters, we will describe several common recovery scenarios and indicate what you need to select in this dialog box to fix the problem .

Fig. 8-12. Select recovery mode
The system cannot exit the boot menu, or there are errors in the menu
This is a typical symptom of a system that cannot be loaded. Maybe if you used dual boot, you reinstalled Windows or another operating system. Regardless of the reason, the default boot menu of GRUB currently has errors and needs to be restored.
In the menu for selecting recovery operations, select "Reinstall GRUB boot loader" boot loader"). The next window that appears immediately may remind you of the window that you used at the time ubuntu installations. It asks where you want to install the GRUB bootloader. If you don’t remember where exactly the GRUB bootloader was installed, then with a higher probability it was installed on your first hard drive in the main boot record (Master Boot Record). If so, type (hd0) and move on. The recovery mode will reinstall GRUB and you will return to the "Rescue operations" menu. Select "Reboot the system", and, we hope, a standard boot menu should appear in front of you.
The system exits the boot menu, but there is no access to the root file system root
This symptom may be the most unobvious, as it can be caused by a wide variety of problems, ranging from damage to file systems and ending with the use of new problematic kernels. Before continuing to use recovery mode, first try rebooting and selecting a different kernel option in the boot menu. If this kernel boots, then there is probably some kind of hardware support issue in your latest kernel. When you boot the working kernel, check if there are updates for your new kernel. If you have the same problems when choosing the boot menu of the various cores, then go to the next steps.
In case of problems of this kind, troubleshooting must be done directly from the rescue CD, so select the option "Execute a shell in the installer environment". After that, you will be taken to the BusyBox shell, where you can perform some basic diagnostic and recovery operations:
Test the root filesystem - Test the root file system
First, check and see if you can read from the root file system. CD recovery mode during boot will mount this file system on / target. Dial:
~ # ls / target
and see if you received a list of files similar to that shown in Fig. 8-13 and which was issued by the command df. If Ubuntu was installed with the default settings, your root file system will probably be located on / dev / discs / disc0 / part1.
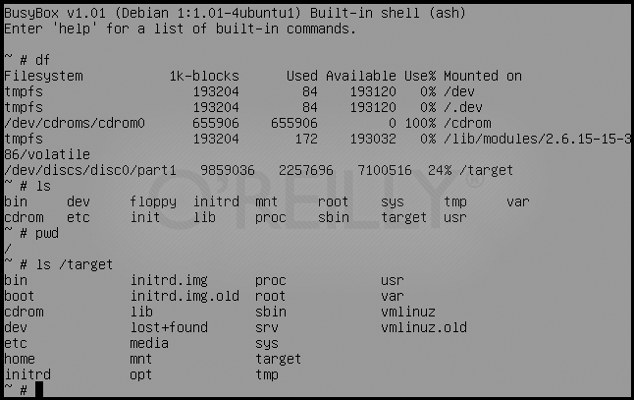
Fig. 8-13. Diagnostic example in the BusyBox shell
Repair the filesystem - Repair the file system
Now use the command fsck to try to restore your file system. First, you need to unmount the partition / targetif it is currently mounted:
~ # umount / target
There are fsck utilities for file systems only in the recovery mode environment ext2, ext3 and jfs, therefore, if you selected a different file system during installation, you will have to use a different rescue disk. Ubuntu uses the file system by default ext3, so if you performed the installation by default, then in order to check and restore your disk, enter the following command:
~ # / sbin / fsck.ext3 -f / dev / discs / disc0 / part1
Replace fsck.ext3 with fsck.ext2 or fsck.jfs if you have partitions with ext2 or jfs, respectively, and also replace the partition with your specific root partition. Upon completion of work fsck mount the partition again / target and try to access it with the ls command:
~ # mount / dev / discs / disc0 / part1 / target ~ # ls / target
If you see a certain number of files and directories, congratulations, your device has been restored! Type exit to exit the BusyBox shell, reboot and see if you can successfully boot your system.
The system boots and goes through part of the boot process, but freezes on a specific service
Be it because of a poorly written script init or due to some other error, in some rare cases the script init may stop and refuse to continue the download process. When this happens, you will not be able to enter the shell and solve the problem, so you must resort to the rescue CD. Remember which service is skidding and boot from your Ubuntu CD in recovery mode.
To solve this kind of problem, you actually need to go to the shell in your root file system environment, so in the Ubuntu recovery menu, select the option "Execute a shell in / dev / discs / disc0 / part1" ("Run the shell in / dev / discs / disc0 / part1 "). This name option may be slightly different if you have a different partition as the root file system.
As a result, you will be taken to the shell of your own root file system. You can navigate this file system and run commands as if you were actually loading your file system. Now you need to find a service initdue to which you are having problems and disable it. The “Service Launch Management” section [Tip # 77] contains instructions on how to find and disable services that start at boot from the command, so read this tip for specifics. If Ubuntu was installed by default, you will probably find your service either in /etc/rc2.d, either in /etc/rcS.d. After you find the problem service, rename it, replacing S with D at the beginning of the file name.
When the script init will be disconnected, type exit and exit the shell, and then restart your computer and try to boot back into your Ubuntu system. Disabled script init Now it should not cause problems, so you should now get a login screen.
Conclusion
These are just some of the possible problems that can make the system unbootable. If you tried all of these recovery options and still couldn't restore the system, don’t give up! Read the Get Help section [Tip # 2] and find out how you can get support from other Ubuntu users.
This is a very unpleasant phenomenon. But it can happen with every system. You turn on your computer in the hope of working or playing your favorite game for Linux, and then a black screen. Ubuntu has no safe modeno tools for auto recoveryused by users in such situations windows systems. But there is a system recovery mode in which you can do everything with the help of the terminal to make your computer work, as well as the ability to reinstall the system without losing programs and user data.
Ubuntu black screen
First, let's look at why a black screen can occur in Ubuntu and at what stages of the system boot process.
First, hardware problem - if you have not seen BIOS greetings, or how often is done in modern laptops - screensavers of the manufacturer of the laptop or motherboard, if at the same time you cannot enter the BIOS setup menu using the F2, Del, F8, Shtift + F2 keys or other keys of the same purpose, then the problem is hardware and you will not find a solution in this article. Here you need to carry your device for repair or try to check it yourself if you understand.
Second, the grub problem - the BIOS splash screen has passed, but you do not see the Grub menu, there are only labels similar to the Minimal bash like interface or Resuce Mode. This means that the bootloader is damaged, it is described in detail in the article - how to restore the Grub2 bootloader.
Third, a black screen when loading - you selected the desired Grub menu item, the system started loading, but then either everything hung, or a black screen with a terminal appeared. The black screen when loading Ubuntu can mean damage to the file system, the absence of any important package, incompatibility of drivers.
Fourth, the black shell screen - the system booted, you entered the username and password, but instead of the Unity shell or any other, you see a black screen with a cursor. The problem in the graphical shell, its configuration or cache, may occur in KDE, after the update.
Black screen when installing Ubuntu
Most errors like the Ubuntu black screen during installation occur because the image was either downloaded incorrectly or recorded on the media incorrectly.
md5sum ~ / ubuntu.iso
The resulting value should match the value of md5, which is indicated on the site from which you downloaded the image:

If the values \u200b\u200bdo not match, the image will have to be pumped. Next, check also md5, for the media on which the image was recorded, for example, a DVD disc:
And this value should coincide with the previous two. If not, you have found a problem - the image needs to be rewritten.
You can also check the disk for errors by selecting Check disk for errors in the disc menu:

If the problem still has not been resolved, the system may not boot due to incompatibility of the free driver and your hardware. Fortunately, there is a solution. You must use the nomodeset kernel parameter. It is used to enable a special driver mode. In order to do this, click on the F6 installer menu and select nomodeset from the drop-down list.


Then you can start the installation of Ubuntu. Ubuntu black screen after installation, may be caused again by hardware incompatibility, you will have to repeat all the steps described above, and then install the necessary drivers.
Ubuntu black screen on boot
Ubuntu's black screen at startup can be caused by various reasons, for example:
- System update
- Damage to the file system due to unexpected disconnection from the network
- Video card driver incompatibility
- Lack of necessary initialization programs
We have already described how to solve the problem: the Ubuntu black screen at startup, if the cause was hardware incompatibility. Let's consider now in more detail.
Incompatible equipment
If your hardware is not compatible with the free graphics driver, you can try using the nomodeset parameter to start the system and install the proprietary driver.
To change the kernel parameters in Grub, just set the cursor frame to the desired item and click e:

To continue downloading, press Ctrl + X. Now the system will boot, and you can install the proprietary drivers necessary for the normal operation of the system.
Ubuntu black screen with encryption
If you used encryption hard drive LVM or LUKS during the installation of Ubuntu, then maybe the black screen of Ubuntu 16.04 means that the system just asks for your password, but you do not see it. Try switching between virtual terminals using Alt + right or Alt + left. This may return the password request back.
You can also just try entering your password and press Enter. If all is well, the system will boot.
Non-Proprietary Graphics Driver
Incorrectly installed proprietary graphics driver NVIDIA or AMD can also cause a black Ubuntu screen at boot time. Such a driver needs to be removed, and then install it correctly, or install another driver.
In such cases, the system usually boots up normally, but cannot start the X server. Therefore, we go to the first virtual console using the keyboard shortcut Ctrl + Alt + F1,enter your username and password. Then you will see the familiar command line prompt.
For removing nVIDIA drivers run:
sudo apt-get purge nvidia *
sudo apt-get purge fglrx *
Also, some drivers, for example, NVIDIA, make modifications to the /etc/X11/xorg.conf file, so you may need to update the X server configuration:
sudo dpkg-reconfigure xserver-xorg
It remains to reboot the system:
Now, if you really installed the proprietary driver before this, the system will start and will work fine. As you can see, there’s nothing wrong here, black nvidia screen ubuntu is solved quite simply.
Damage to the file system or drive names
Usually the file system, even if damaged, is restored automatically, but if this does not happen, a black screen of Ubuntu 16.04 will appear. You can try to restore everything manually.
For this we need a recovery mode. To do this, usually select the second item Grub, the name Ubuntu and version, and in brackets Recovery mode.
The system will boot into the console, where you can perform all the necessary actions.
To restore the file system, do:
fsck -y / dev / sda1
Here / dev / sda1 is your root partition.
Also, boot errors can be caused by resizing the root partition using gparted or any other operations to change the root partition metrics. The thing is that the disk partitions in the Grub configuration file are determined by the UUID, and this parameter can vary depending on the size, position and other parameters of the partition. So if it changes, then the system will not be able to find the desired section. To fix this, you need to update the Grub configuration file in the same recovery mode:
Now you can reboot the system.
Ubuntu black screen after upgrade
As practice and comments on the forums show, the black screen of Ubuntu after updating is not as rare as we would like. This can cause various package installation errors, package incompatibilities, and incorrect settings for the new system.
The easiest way to reinstall Ubuntu is in this case. In installation ubuntu drives It is possible to reinstall the system while saving user files and all programs. If the installer detects already installed by ubuntu suitable version, an option will appear Reinstalling Ubuntu.In this case, all your personal data, programs and settings will be saved. The program will erase all system settings and return them to the default value, this will fix all problems associated with wrong configuration system and its components.
Grub will also be reinstalled, which means that any problems with the bootloader will also be resolved.
If you are worried about important files and data, you can start the disk in the Ubuntu try mode, here you can open the file manager, connect the disk with the home folder and copy all the necessary data from there to external USB disk.
Black screen shell
Sometimes after major updates, we can get a black Ubuntu screen after logging in and loading the shell. This is due to the incompatibility of the old shell settings and its new version. And the easiest way to solve this problem is to simply delete the settings and cache files. Rather, it is not advisable to delete files, it is better to rename them just in case.
First go to the virtual console using the keyboard shortcut Ctrl + Alt + F1. Then enter the username and password.
To reset Unity, a few commands are enough:
dconf reset -f / org / compiz /
You can also try deleting Compiz settings:
mv ~ / .config / compiz-1 / compizconfig ~ / .config / compiz-1 / compizconfig.old
Then restart the graphics server:
sudo service lightdm restart
If you use KDE, you need to move the files manually:
mv ~ / .kde4 ~ / kde4.old
Gnome has the same story:
mv ~ / .gnome ~ / .gnome.old
conclusions
In this article, we looked at several situations in which a black screen may occur in Ubuntu 16.04 or earlier, as well as how to fix it. Now you are armed and ready to deal with problems in your system. If I missed something, write in the comments!
If you forgot your password, accidentally deleted important files or decided to restore Ubuntu, then all these operations can be performed using the built-in system tools or simple utilities.
Password reset
If you have forgotten the password on Ubuntu, then to restore access, reset it and install a new security key.
If you forgot the username, you can see it using the command "cat / etc / passwd". As you can see, no additional tools are needed, Linux systems are quite easy to learn.
Rollback system
Ubuntu does not have a System Restore button, clicking on which will launch a rollback to an earlier state, so each case has to be considered separately. Let's see the most common errors, after which Ubuntu needs to be restored: incorrect system update and damage to the GRUB bootloader. 
If the system does not start, then try to restore the bootloader using the boot-repair utility. Connect the USB flash drive from Ubuntu to the computer, start the system and open the terminal. Run a few commands to install the boot-repair program:
- sudo add-apt-repository ppa: yannubuntu / boot-repair.
- sudo apt-get update.
- sudo apt-get install boot-repair.
After closing the console, run the boot-repair utility. Select the Recommended Recovery Method mode for the program to find and fix the error. 
If the failure occurred during the system update, then you can eliminate it as follows:
- Run root mode, as in password recovery.
- Enable the recording with the command “sudo mount -rw -o remount”.
- Use the “sudo dpkg –configure –a” command to start the Package Manager to update and rebuild the data packets,
It will take a long time, 30-40 minutes. But after the completion of the procedure, the system will start without errors, already being updated.
File recovery
Another useful feature on Ubuntu is recovery deleted files. To recover lost data, use Photorec or TestDisk. They work approximately the same, allowing you to recover most of the files deleted from the system.

You will find the recovered files in the folder that you specified through the file manager. Some data may turn out to be broken, but usually recovery is performed well if you did not overwrite the files with other information after the deletion.
Any operating system may stop working due to certain reasons. In the process of the user’s work with the system, new utilities, updates, various files are installed, which in the end can lead to a conflict within the OS. In this article, we will examine in detail what to do if Ubuntu does not start. So let's get started.
Ubuntu startup error can be easily fixed.
There is a way to solve a similar problem in Linux Ubuntu. More on this later in the article.
First of all, you need to find the Ubuntu disk from which the installation was performed. Insert a disc and reboot so that the boot screen appears. In the menu that opens, click "Recover a broken system". After this, the Ubuntu recovery process will begin, at first you would think that the usual installation of the system began, since, like during the installation, you will need to select the language and set the network settings. Pay attention to the inscription “Rescue mode” that appears in the upper left corner of the screen.

To choose the right one, you need to know the location of the sections on hard drives PC. If this is not your case, you may need several attempts, however, there are some tips that will help you make the right choice:
- If Ubuntu was installed as the only OS, then Ubuntu rewrote the entire contents of the current drive. Most likely, the root partition is the first partition.
- If Ubuntu was installed in a dual-boot configuration with Windows, select the second section from the list.
After choosing the root file system, the process of mounting it will begin, in case of successful completion, you will go to the next window. If this does not happen, then the section was selected incorrectly.
Common recovery scenario
Going to the next window, you will need to specify the recovery option. The choice depends on the symptoms that appear during OS loading.
- The system cannot go further than the boot menu, or there are errors in it.
A common system problem that fails to load. Perhaps the reason is that when using dual boot, you accidentally reinstall Windows or another OS. To resolve this issue, you must reinstall GRUB. To do this, go to the recovery operation selection menu and select “Reinstall GRUB boot loader”. The next step is to choose where to install GRUB, if you forget where the GRUB boot loader is located, it is most likely that you installed it on the first hard drive. That is, it is most likely that this is "hd0". After reinstalling GRUB, you will return to the operation selection menu. Click “Reboot the system” to go to the boot menu.

- The system manages to leave the boot menu, but there is still no access to the root FS root.
Such a symptom is perhaps the most unobvious, since it can be caused by many different malfunctions. First, try rebooting and selecting a boot with a different kernel. If the selected kernel boots, then the problem lies in the hardware support in the last core. After loading the working kernel, check for updates for the new kernel. If similar problems appeared during the selection of various kernels in the boot menu, proceed to the next steps.
If you encounter problems of this kind, you should troubleshoot directly from the disk. To do this, select “Execute a shell in the installer environment”. Next, you will be taken to the BusyBox shell, where you can perform certain diagnostic and recovery operations.
Checking the root FS
First of all, make sure that you can read from the root FS. At boot time, disk recovery mode mounts this file system on / target. Write the command:
If you installed Ubuntu using the default options, your root file system should be on / dev / discs / disc0 / part1.
File system recovery
~ # umount / target
In recovery mode, fsck utilities are available exclusively for the ext2, ext3, and jfs file systems, so if you select a different file system during installation, you will have to use a different installation disk. By default, ext3 FS is used in Ubuntu, so if you performed the installation by default, you will need to enter:
~ # / sbin / fsck.ext3 -f / dev / discs / disc0 / part1
replace fsck.ext3 with fsck.ext2, or fsck.jfs if you have partitions with ext2 or jfs, respectively, and also change the section to your specific root. When fsck completes, mount the partition again on / target and try to access it by writing the ls command:
~ # mount / dev / discs / disc0 / part1 / target
If several files and directories are displayed on the screen, then your device has been restored! Use the exit command to leave the BusyBox shell. reboot your computer and see if it can boot now.

In case the system boots, but hangs on some service, go to the shell in the environment of your root file system and select the item “Execute a shell in / dev / discs / disc0 / part1” in the recovery operations menu. This name may differ slightly if you have selected a different partition as the root FS.
Next, you will fall into the shell of your own root FS. There you can navigate through the FS, as well as execute commands as if you really loaded your file system. Next, you need to find the init service, which is the cause of the problem. Deactivate it. In the section "Managing the launch of services" there are instructions on how to find and disable services that start at startup. If Ubuntu was installed by default, you will most likely find your service either in /etc/rc2.d or in /etc/rcS.d. When you find a problem service, change its name by replacing the letter “S” with “D”.
After the init script is deactivated, write the exit command and leave the shell, and then restart the computer. Try to boot into your Ubuntu system again. A deactivated init script will no longer cause problems, so nothing should prevent it from loading successfully this time.
Now you know what to do if Ubuntu does not boot. Write in the comments if you coped with this task, share your experience with other users in solving such problems, and ask questions on the topic of the article if you have any.


