Any operating system may stop working due to certain reasons. In the process of the user’s work with the system, new utilities, updates, various files are installed, which in the end can lead to a conflict within the OS. In this article, we will examine in detail what to do if Ubuntu does not start. So let's get started.
Ubuntu startup error can be easily fixed.
There is a way to solve a similar problem in Linux Ubuntu. More on this later in the article.
First of all, you need to find the Ubuntu disk from which the installation was performed. Insert a disc and reboot so that the screen appears bootstrap. In the menu that opens, click "Recover a broken system". After this, the Ubuntu recovery process will begin, at first you would think that the usual installation of the system began, since, like during the installation, you will need to select the language and set the network settings. Pay attention to the inscription “Rescue mode” that appears in the upper left corner of the screen.

To choose the right one, you need to know the location of partitions on your PC hard drives well. If this is not your case, you may need several attempts, however, there are some tips that will help you make the right choice:
- If Ubuntu was installed as the only OS, then Ubuntu rewrote the entire contents of the current drive. Most likely, the root partition is the first partition.
- If Ubuntu was installed in a dual-boot configuration with Windows, select the second section from the list.
After choosing the root file system, the process of mounting it will begin, in case of successful completion, you will go to the next window. If this does not happen, then the section was selected incorrectly.
Common recovery scenario
Going to the next window, you will need to specify the recovery option. The choice depends on the symptoms that appear during OS loading.
- The system cannot go further than the boot menu, or there are errors in it.
A common system problem that fails to load. Perhaps the reason is that when using dual boot, you accidentally reinstall Windows or another OS. To resolve this issue, you must reinstall GRUB. To do this, go to the recovery operation selection menu and select “Reinstall GRUB boot loader”. The next step is to choose where to install GRUB, if you forget where the GRUB boot loader is located, it is most likely that you installed it on the first hard drive. That is, it is most likely that this is "hd0". After reinstalling GRUB, you will return to the operation selection menu. Click “Reboot the system” to go to the boot menu.

- The system manages to leave the boot menu, but there is still no access to the root FS root.
Such a symptom is perhaps the most unobvious, since it can be caused by many different malfunctions. First, try rebooting and selecting a boot with a different kernel. If the selected kernel boots, then the problem lies in the hardware support in the last core. After loading the working kernel, check for updates for the new kernel. If similar problems appeared during the selection of various kernels in the boot menu, proceed to the next steps.
If you encounter problems of this kind, you should troubleshoot directly from the disk. To do this, select “Execute a shell in the installer environment”. Next, you will be taken to the BusyBox shell, where you can perform certain diagnostic and recovery operations.
Checking the root FS
First of all, make sure that you can read from the root FS. At boot time, disk recovery mode mounts this file system on / target. Write the command:
If you installed Ubuntu using the default options, your root file system should be on / dev / discs / disc0 / part1.
File system recovery
~ # umount / target
In recovery mode, fsck utilities are available exclusively for the ext2, ext3, and jfs file systems, so if you select a different file system during installation, you will have to use a different installation disk. By default, ext3 FS is used in Ubuntu, so if you performed the installation by default, you will need to enter:
~ # / sbin / fsck.ext3 -f / dev / discs / disc0 / part1
replace fsck.ext3 with fsck.ext2, or fsck.jfs if you have partitions with ext2 or jfs, respectively, and also change the section to your specific root. When fsck completes, mount the partition again on / target and try to access it by writing the ls command:
~ # mount / dev / discs / disc0 / part1 / target
If several files and directories are displayed on the screen, then your device has been restored! Use the exit command to leave the BusyBox shell. reboot your computer and see if it can boot now.
In case the system boots, but hangs on some service, go to the shell in the environment of your root file system, and select “Execute a shell in / dev / discs / disc0 / part1” in the recovery operations menu. This name may differ slightly if you have selected a different partition as the root FS.
Next, you will fall into the shell of your own root FS. There you can navigate through the FS, as well as execute commands as if you really loaded your file system. Next, you need to find the init service, which is the cause of the problem. Deactivate it. In the section "Managing the launch of services" there are instructions on how to find and disable services that start at startup. If Ubuntu was installed by default, you will most likely find your service either in /etc/rc2.d or in /etc/rcS.d. When you find a problem service, change its name by replacing the letter “S” with “D”.
After the init script is deactivated, write the exit command and leave the shell, and then restart the computer. Try to boot into your Ubuntu system again. A deactivated init script will no longer cause problems, so nothing should prevent it from loading successfully this time.
Now you know what to do if Ubuntu does not boot. Write in the comments if you coped with this task, share your experience with other users in solving such problems, and ask questions on the topic of the article if you have any.
Original: "Ubuntu Hacks: Chapter 8 - Administration"Authors: Kyle Rankin, Jonathan Oxer, Bill Childers (Kyle Rankin, Jonathan Oxer, Bill Childers)
Publication Date: June 2006
Translation: N. Romodanov
Date of translation: October 2010
Tip # 81: Restoring a System That Does Not Boot
If you are a little overdoing the settings of your new Ubuntu system and it no longer boots up, then in this section you will learn several ways to return your computer to working condition.
If you are reading this advice, then accept our condolences. If your system does not boot, then this can lead to stress and you can be very upset. We are sure that right now you are thinking about all the files for which you wanted to backup (we know that it is inappropriate to give advice now, but when your system is restored and working, you can refer to the " Backup of your system "[Tip # 79]). Of course, we have come across a similar situation many times, but so far we have managed to bring our systems back to life. Although it’s impossible to cover all the scenarios in which the system cannot start the computer, we’ll tell , how to fix the problem, use the Ubuntu CD installation disk in recovery mode, and describe some typical recovery scenarios.
Recovery mode boot
First, locate the Ubuntu CD from which you installed your system, and reboot to open the boot screen. Among the various options is the option "Recover a broken system". Choose this option, and Ubuntu will start working so that at first glance it might seem that this is a normal installation of the system. You will be prompted exactly how, as during the installation, to select the language and network settings, but this only happens during the initial setup of the recovery environment. Notice that the message "Rescue mode" appears in the upper left corner of the screen.
Fig. 8-11. Root Device Selection Dialog Box
How to choose the right one? If you are not too familiar with placing partitions on your hard drives, then this may require several attempts, but the basic rules are as follows:
- If you installed Ubuntu as the only system and Ubuntu overwrote everything on the current drive, your root file system is probably the first section on the list.
- If you installed Ubuntu in a dual-boot configuration from Windows, your root file system is probably the second section of the list.
After you select the root file system, Ubuntu will try to mount it, if the attempt succeeds, it will go to the next dialog box. If the attempt fails, you probably selected the wrong partition, so try again.
Common recovery scenario
In the next dialog box, you will be asked to select various recovery options (see Fig. 8-12). The action that you choose here will depend significantly on the symptoms that appear when you boot your system, so instead of describing all these parameters, we will describe several common recovery scenarios and indicate what you need to select in this dialog box to fix the problem .
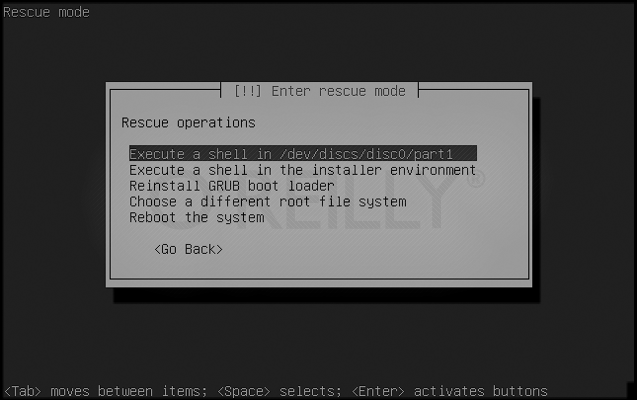
Fig. 8-12. Select recovery mode
The system cannot exit the boot menu, or there are errors in the menu
This is a typical symptom of a system that cannot be loaded. Maybe if you used dual boot, you reinstalled Windows or another operating system. Regardless of the reason, the default boot menu of GRUB currently has errors and needs to be restored.
In the menu for selecting recovery operations, select "Reinstall GRUB boot loader". The next window that immediately appears may remind you of the window that you used at the time ubuntu installations. It asks where you want to install the GRUB bootloader. If you don’t remember where exactly the GRUB bootloader was installed, then with a higher probability it was installed on your first hard drive in the main boot record (Master Boot Record). If so, type (hd0) and move on. The recovery mode will reinstall GRUB and you will return to the "Rescue operations" menu. Select "Reboot the system", and, we hope, a standard boot menu should appear in front of you.
The system exits the boot menu, but there is no access to the root file system root
This symptom may turn out to be the most unobvious, as it can be caused by a wide variety of problems, ranging from damage to file systems and ending with the use of new problematic kernels. Before continuing to use recovery mode, first try rebooting and selecting a different kernel option in the boot menu. If this kernel boots, then there is probably some kind of hardware support issue in your latest kernel. When you boot the working kernel, check if there are updates for your new kernel. If you have the same problems when choosing the boot menu of the various cores, then go to the next steps.
In case of problems of this kind, troubleshooting must be done directly from the rescue CD, so select the option "Execute a shell in the installer environment". After that, you will be taken to the BusyBox shell, where you can perform some basic diagnostic and recovery operations:
Test the root filesystem - Test the root file system
First, check and see if you can read from the root file system. CD recovery mode during boot will mount this file system on / target. Dial:
~ # ls / target
and see if you received a list of files similar to that shown in Fig. 8-13 and which was issued by the command df. If Ubuntu was installed with the default settings, your root file system will probably be located on / dev / discs / disc0 / part1.
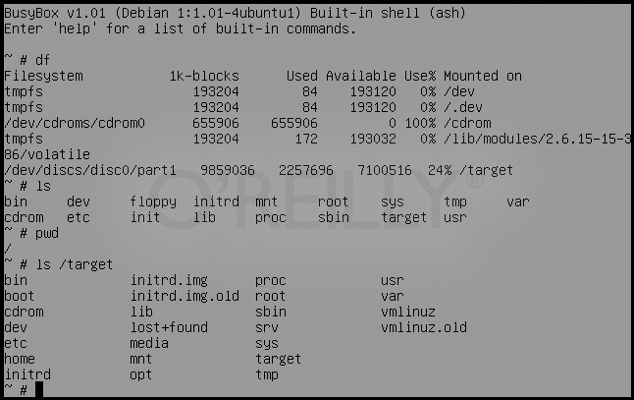
Fig. 8-13. Diagnostic example in the BusyBox shell
Repair the filesystem - Repair the file system
Now use the command fsck to try to restore your file system. First, you need to unmount the partition / targetif it is currently mounted:
~ # umount / target
There are fsck utilities for file systems only in the recovery mode environment ext2, ext3 and jfs, therefore, if you selected a different file system during installation, you will have to use a different rescue disk. Ubuntu uses the default file system ext3, so if you performed the installation by default, then in order to check and restore your disk, enter the following command:
~ # / sbin / fsck.ext3 -f / dev / discs / disc0 / part1
Replace fsck.ext3 with fsck.ext2 or fsck.jfs if you have partitions with ext2 or jfs, respectively, and also replace the partition with your specific root partition. Upon completion of work fsck mount the partition again / target and try to access it with the ls command:
~ # mount / dev / discs / disc0 / part1 / target ~ # ls / target
If you see a certain number of files and directories, congratulations, your device has been restored! Type exit to exit the BusyBox shell, reboot and see if you can successfully boot your system.
The system boots and goes through part of the boot process, but freezes on a specific service
Be it because of a poorly written script init or due to some other error, in some rare cases the script init may stop and refuse to continue the download process. When this happens, you will not be able to enter the shell and solve the problem, so you must resort to the rescue CD. Remember which service is stalled and boot from your installation disk Ubuntu CD in recovery mode.
To solve this kind of problem, you actually need to go to the shell in your root file system environment, so in the Ubuntu recovery menu, select the option "Execute a shell in / dev / discs / disc0 / part1" ("Run the shell in / dev / discs / disc0 / part1 "). This name option may be slightly different if you have a different partition as the root file system.
As a result, you will be taken to the shell of your own root file system. You can navigate this file system and run commands as if you were actually loading your file system. Now you need to find a service initdue to which you are having problems and disable it. The “Service Launch Management” section [Tip # 77] contains instructions on how to find and disable services that are launched at boot from the command, so read this tip for specifics. If Ubuntu was installed by default, you will probably find your service either in /etc/rc2.d, either in /etc/rcS.d. After you find the problem service, rename it, replacing S with D at the beginning of the file name.
When the script init will be disconnected, type exit and exit the shell, and then restart your computer and try to boot back into your Ubuntu system. Disabled script init Now it should not cause problems, so you should now get a login screen.
Conclusion
These are just some of the possible problems that can make the system unbootable. If you tried all of these recovery options and still couldn't restore the system, don’t give up! Read the Get Help section [Tip # 2] and find out how you can get support from other Ubuntu users.
Recently, when I turned on the computer, Ubuntu “pleased” me that it decided not to boot and “fell” into busybox at the time of user space initialization (userspace) it is initramfs. A little dumbfounded began to understand. It turned out that my old hard drive crashed a bit and messed up the superblock of the file system. However, it turned out that this is not fatal, and this problem is quite simply and quickly solved.
A superblock is a part on a disk reserved for service information of a file system. It stores information about the section: file system type, size, status, and information about other metadata structures. In case of loss of information from the superblock, there is a great risk of losing all the information from the section. Therefore, Linux stores several copies of this information - i.e. several superblocks.
Before proceeding, I must warn that the reason is not required in the superblock. Such a problem can also arise for other reasons, which can only be established with a certain experience, or experimentally. In any case, the whole point of the steps below is only to check the disk for errors, so at least it won’t hurt.
For recovery we need boot disk or flash drive with Linux. We boot, and launch the terminal. In the terminal we write:
sudo fdisk -l | grep Linux | grep -Ev "swap"
As a result of the command, a list of all sections will be displayed:
/ dev / sda2 371306496 976771071 605464576 288.7G 83 Linux
In my case, it was one section. In this list you need to find the desired section, and remember it. We will need it further. Next, see the list of available spare superblocks:
sudo dumpe2fs / dev / sda2 | grep superblock
In the command above, / dev / sda2 must be replaced with the previously received, the desired partition. As a result of the command, a list of all super blocks will be displayed:
Primary superblock at 0, Group descriptors at 1-19 Backup superblock at 32768, Group descriptors at 32769-32787 Backup superblock at 98304, Group descriptors at 98305-98323 Backup superblock at 163840, Group descriptors at 163841-163859 Backup superblock at 229376, Group descriptors at 229377-229395 Backup superblock at 849201, Group descriptors at 884737-884755 Backup superblock at 1605632, Group descriptors at 1605633-1605651 superblock at 2654208, Group descriptors at 2654209-2654227 Backup superblock at 4096000, Group descriptors at 4096001-4096019 Backup superblock at 7962624, Group descriptors at 7962625-7962643 Backup superblock at 11239424, Group descriptors at 11239425-11239443 Backup superblock at 20480001-20480019 Backup superblock at 23887872, Group descriptors at 23887873-23887891 Backup superblock at 71663616 , Group descriptors at 71663617-71663635
From the list of spare superblocks, select any other than Primary and run a disk check with a spare superblock:
sudo fsck -b 32768 / dev / sda2 -y
The -y parameter is necessary so that fsck does not ask what to do with each error found, but instead corrects it automatically if possible. After fsck finishes, the result will be something like this:
fsck 1.40.2 (23-March-2016) e2fsck 1.40.2 (23-March-2016) / dev / sda2 was not cleanly unmounted, check forced. Pass 1: Checking inodes, blocks, and sizes Pass 2: Checking directory structure Pass 3: Checking directory connectivity Pass 4: Checking reference counts Pass 5: Checking group summary information Free blocks count wrong for group # 241 (32254, counted \u003d 32253) . Fix? yes Free blocks count wrong for group # 362 (32254, counted \u003d 32248). Fix? yes Free blocks count wrong for group # 368 (32254, counted \u003d 27774). Fix? yes .......... / dev / sda2: ***** FILE SYSTEM WAS MODIFIED ***** / dev / sda2: 59586/605464576 files (0.6% non-contiguous), 3604682/605464576 blocks
If you forgot your password, accidentally deleted important files or decided to restore Ubuntu, then all these operations can be performed using the built-in system tools or simple utilities.
Password reset
If you have forgotten the password on Ubuntu, then to restore access, reset it and install a new security key.
If you forgot the username, you can see it using the command "cat / etc / passwd". As you can see, no additional tools are needed, Linux systems are quite easy to learn.
Rollback system
Ubuntu does not have a System Restore button, clicking on which will launch a rollback to an earlier state, so each case has to be considered separately. Let's see the most common errors after which Ubuntu needs to be restored: incorrect update systems and damage boot loader.
If the system does not start, then try to restore the bootloader using the boot-repair utility. Connect the USB flash drive from Ubuntu to the computer, start the system and open the terminal. Run a few commands to install the boot-repair program:
- sudo add-apt-repository ppa: yannubuntu / boot-repair.
- sudo apt-get update.
- sudo apt-get install boot-repair.
After closing the console, run the boot-repair utility. Select the Recommended Recovery Method mode for the program to find and fix the error. 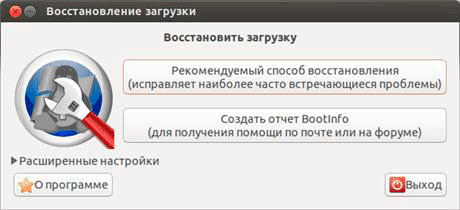
If the failure occurred during the system update, then you can eliminate it as follows:
- Run root mode, as in password recovery.
- Enable the recording with the command “sudo mount -rw -o remount”.
- Use the “sudo dpkg –configure –a” command to start the Package Manager to update and rebuild the data packets,
It will take a long time, 30-40 minutes. But after the completion of the procedure, the system will start without errors, already being updated.
File recovery
Another useful feature on Ubuntu is recovery deleted files. To recover lost data, use Photorec or TestDisk. They work approximately the same, allowing you to recover most of the files deleted from the system.

You will find the recovered files in the folder that you specified through the file manager. Some data may turn out to be broken, but usually recovery is performed well if you did not overwrite the files with other information after the deletion.
None of the operating systems is not without flaws. Ubuntu and Linux Mint are no exception.
In this section, you will find descriptions of solutions to some common Ubuntu and Linux Mint problems (as well as the applications that come with Ubuntu and Linux Mint).
1. Unable to boot the system from the installation DVD: using a computer with a central processor without support for PAE technology
Does your computer have an old CPU without PAE technology? In many CPUs without support for PAE technology from the Pentium M and Celeron M series, PAE support can be manually activated. After that, they will work perfectly with modern versions of Ubuntu and Linux Mint.
You can activate PAE support for such a central processor by selecting "Start with PAE forced" DVD boot menu. In order to make this boot menu item visible, you have to interrupt the automatic download process using the key "space" in the countdown process.
2. The computer does not start at all after installing Ubuntu or Linux Mint
After seemingly hassle-free installation of Ubuntu or Linux Mint, some computers generally refuse to boot. I will describe solutions to two possible problems.
A. You can see the following output on a black screen during the boot process:
error: unknown filesystem
grub rescue\u003e
In this case, you probably used a USB flash drive to install the system (Live USB). Sometimes a system associates a flash drive with a device file sda, and the device’s file to the hard drive sdb. Moreover, in the process of configuring the system bootloader, a similar identifier is used hard drive!
After the installation process is complete, the GRUB bootloader will be configured to boot from the device corresponding to the file sdbthat will simply disappear: after disconnecting the USB flash drive, the device file will correspond to the hard disk sda. Thus, in this case, the system installer correctly configures all components, all components of the operating system ... except for the GRUB bootloader.
In this case, it is enough to redirect the system bootloader to the disk corresponding to the device file sda, in the following way. The easiest method is to use the installation ubuntu drive or Linux Mint, because in this case, after starting the Live session, the file name of the hard disk device is guaranteed not to change from sdb on the sda.
If you don’t have the ability to use the installation disk, you can try to use the Live USB Xubuntu 14.04 LTS, which is not affected by the described problem (at least I did not encounter it).
B. A completely different situation is accompanied by the output of one of the following error messages during the system boot process on a black screen during the system boot process:
error: invalid arch independent ELF magic.
grub rescue\u003e
error: file "/boot/grub/i386-pc/normal.mod" not found.
grub rescue\u003e
In this case, most likely, the Ubuntu or Linux Mint installer installed the wrong bootloader type. More specifically, GRUB for EFI / UEFI (grub-efi) instead of the regular version of GRUB for BIOS.
In particular, this often happens when installing the system on a Lenovo B570e laptop. Despite the fact that this laptop comes with UEFI firmware, not BIOS, its UEFI firmware is configured by Lenovo in such a way that it is very difficult to distinguish it from the BIOS. For this reason, for the correct boot of the laptop, the GRUB BIOS bootloader is required.
The fix for this problem is also quite simple: you should install the GRUB system bootloader for the BIOS using the Ubuntu or Linux Mint installation DVD.
3. After dual boot, only Windows 8.x or 10 boots.
In some cases, after apparently installing Ubuntu or Linux Mint successfully next to Windows 8.x or 10, only Windows 8.x or 10 can boot onto your computer as if no other system was even installed. In this case, the boot menu, in which you can choose Ubuntu or Linux Mint, may simply not be displayed.
The reason for this behavior may be the incorrect priority of boot devices in UEFI. In this case, you can resort to the following correction (see section 2.2).
4. The installation process for Ubuntu or Linux Mint does not complete: it stops in the middle
The installation process for Ubuntu or Linux Mint may end abruptly, especially on older computers. The reason for this behavior may be a slideshow.
During the installation process of Ubuntu or Linux Mint, you will see a slideshow with beautiful illustrations that demonstrate the capabilities of your new system. But in some cases, this slideshow creates problems: the graphics card may simply not cope with it due to the lack of the necessary driver, as a result of which the installation process will end.
In this case, you can deactivate the slideshow as follows: open the terminal and transfer the following command to it using the copy / paste functions:
sudo apt-get remove ubiquity-slideshow- *
To execute the command, press the key Enter. After removing packages softwarerelated to the slideshow, you can run the installer again.
5. Excessive use of the swap partition (excessive swappiness): Ubuntu or Linux Mint is too slow and often uses a hard drive
The use of the swap partition is especially noticeable when working with computers with a relatively small volume random access memory (1 GB or less): when working with Ubuntu or Linux Mint, performing various operations is slower over time, while the operating system itself provides constant access to the hard drive. Fortunately, this effect can be minimized.
There is a separate partition on the hard drive for storing data stored in RAM, which is called the swap partition. In the event that Ubuntu or Linux Mint uses the swap partition excessively, the computer slows down significantly.
The intensity of the kernel using the Ubuntu or Linux Mint distribution of the swap partition can be changed using a special system configuration parameter. The smaller the numerical value of this configuration parameter, the longer the waiting period, after which the kernel of the Ubuntu or Linux Mint distribution starts to use the swap partition. The value should be in the range from 0 to 100, and the default value is 60. This value is much too high for a desktop computer, but great for servers.
A detailed description of the mechanism under consideration is available on the page by the link (if the link does not work, you can download a PDF file with the contents of the page).
Now consider the mechanism for changing the value of the configuration parameter in question:
1. First, check the current value of the swappiness configuration parameter. To do this, open the terminal. After that, enter the following command in the terminal (use the copy / paste functions in order to avoid typing errors):
cat / proc / sys / vm / swappiness
After entering the command, press the key Enter. As a result, a numerical value will be displayed, which will probably be equal to 60 .
2. After that, you need to make sure that you set the necessary application configuration parameter values, such as gksu and leafpad, to change. To do this, enter the following magic command into the terminal window (use the copy / paste functions in order to avoid typing errors):
sudo gpt-get install gksu leafpad
Enter Enter.
3. To set a more acceptable value for the swappiness configuration parameter, enter the following command into the terminal (use the copy / paste functions to avoid typing errors):
gksudo leafpad /etc/sysctl.conf
After entering the command, press Enter. Scroll the contents of the configuration text file to the end and add your swappiness parameter value to it, which should be used instead of the default value. Copy and paste into the configuration file following lines:
# Reducing the value of the intensity parameter of the use of the swap partition to a more acceptable
vm.swappiness \u003d 10
4. Save the configuration file and close the text editor. After that you will have to restart your computer.
5. After the computer restarts, check the value of the swappiness configuration parameter again. To do this, as before, you will have to open a terminal. In the terminal window, enter (using the copy / paste functions) the previously considered command:
cat / proc / sys / vm / swappiness
After entering the command, you still need to press the key Enter. As a result, the value should be displayed. 10 .
Note: your machine can perform better even if the swappiness configuration parameter is reduced significantly. When decreasing the value of this configuration parameter, you should use the following rule: when using a computer with a RAM capacity equal to or greater than 1 GB, set the swappiness value to 10 , and when using a computer with less than 1 GB of RAM, set the swappiness value to 5 .
6. After installing the proprietary driver for the NVIDIA graphics card, the incorrect screen resolution is used
Note: this tip applies only to NVIDIA graphics cards that work with a proprietary driver.
A. Firstly, make sure that applications like gksu and nvidia-settings are installed on your system. You should open the terminal and enter the following command into it (use the copy / paste functions):
sudo apt-get install gksu nvidia-settings
After completing the command, press the key Enter. When prompted for a password, you must enter your password. The characters of your password will not be displayed in any way, even with dots, and this is normal. After entering the password, press the key again Enter.
B. After this, enter the following command into the terminal (also use the copy / paste functions):
gksudo nvidia-settings
After completing the command, press the key Enter for its execution. Now you can take advantage running application from NVIDIA to set the correct screen settings. This is done as follows.
First, select "X Server Dispaly Configuration" (in the upper left part of the window). After that, go to the tab "Display" (on the right, it will probably be already open). Now you need to use the drop-down menu "Resolution" and instead of value "Auto" select the desired screen resolution. Finally, click on the button “Save to X Configuration File”, after which - to the button "Save and exit". To apply the changes, you must restart the computer. After reboot, the set screen resolution should be used.
7. Incorrect operation of tools for installing and updating software
Sometimes tools for updating a system or installing software (Update Manager, Program Manager, Ubuntu Update Center, Ubuntu Application Center) cease to function correctly even though there is a working Internet connection. This is usually due to problems with source lists of software packages.
In this case, an error message is usually displayed in which, in addition to all the others, the following lines are present:
E: encountered a section with no package: header
E: problem with Mergelist / var / lib / apt / lists
You can fix this problem as follows.
Linux Mint: the problem is solved quite simply - just make the transition within the main menu of the system “Menu - System - Application Sources”, in the window that opens, click on the button "Service"then press the button "Fix Package List Issues".
Ubuntu: solving the problem is more complicated. Firstly, you will have to open the terminal and enter the following command into it (use the copy / paste functions):
sudo rm / var / lib / apt / lists / * -vf
After completing the command, press the key Enter. When prompted for a password, you must enter your password. The characters of your password will not be displayed in any way, even with dots, and this is normal. After entering the password, press the key again Enter.
Now you should get new lists of software packages from the Internet by entering the following command in the terminal (also use the copy / paste functions):
sudo apt-get update
After completing the command, press the key Enter for its execution. The problem must be resolved.
8. Inability to reboot the system
Some laptops do not restart after the corresponding command in Linux. Usually, after executing the reboot command, the laptop simply “freezes”. In the vast majority of cases, the problem is BIOS or (U) EFI firmware. You can, you can fix it as follows.
A. Firstly, make sure that applications like gksu and leafpad are installed on your system. To do this, open the terminal and enter the following command into it (use the copy / paste functions):
After completing the command, press the key Enter. When prompted for a password, you must enter your password. The characters of your password will not be displayed in any way, even with dots, and this is normal. After entering the password, press the key again Enter.
B. Now you should enter the following command in the terminal (also use the copy / paste functions):
gksudo leafpad / etc / default / grub
As a result, a text editor opens with the GRUB bootloader configuration file. You will have to find the following line in it:
GRUB_CMDLINE_LINUX \u003d ""
And replace it with the following line:
GRUB_CMDLINE_LINUX \u003d "reboot \u003d efi"
After finishing editing the bootloader configuration file, save it and close the text editor.
C. Now you should enter the following command into the terminal to update the system bootloader configuration (as before, use the copy / paste functions):
sudo update-grub
After completing the command, press the key Enter. When prompted for a password, you must enter your password. The characters of your password will not be displayed in any way, even with dots, and this is normal. After entering the password, press the key again Enter.
Now you should turn off the computer (and not restart!). After turning on the computer again and logging in, you can try to restart it. The computer must restart correctly.
9. Incorrect operation of sleep and hibernation modes
The sleep and hibernation modes, unfortunately, still do not work correctly on some hardware configurations, and there is no acceptable solution to this problem, because manufacturers of BIOS and UEFI firmware do not always comply with the standards for implementing energy-saving modes. Based on this, the best solution is to deactivate the corresponding energy-saving modes within your system if they do not work correctly.
Hibernation mode (with saving data to disk) is the most aggressive energy saving mode, which is more problematic than sleep mode (with saving data in memory). In that case, if the sleep mode in your case works correctly, of course, do not deactivate it.
In Ubuntu, hibernation mode is disabled by default, and sleep mode is activated. I think this is a very reasonable compromise. In Linux Mint, however, hibernation and sleep modes are activated by default. To guarantee the correct operation of the system, I recommend deactivating the hibernation mode in Linux Mint anyway. You can do it as follows.
9.1. Deactivate hibernation mode (suspend-to-disk)
You can deactivate hibernation mode ("suspend-to-disk") as follows. First you need to open a terminal. After that, copy the following command into the terminal window in order to avoid typing errors (this is one line):
sudo mv -v /etc/polkit-1/localauthority/50-local.d/com.ubuntu.enable-hibernate.pkla /
After completing the command, press the key Enter. When prompted for a password, you must enter your password. The characters of your password will not be displayed in any way, even with dots, and this is normal. After entering the password, press the key again Enter.
Using this command, you transfer the configuration file that allows you to use hibernation mode to the main directory of the file system / (which is called the root directory). Thus, given file will no longer be used to change the system configuration. On the other hand, he moved to safe vaultfrom which it can be retrieved again if you want to activate hibernation mode again. You should now restart your computer. Hibernation mode should disappear from the system shutdown menu. If using a laptop, it is recommended to check the settings of the power manager: you will have to choose alternatives to the hibernation mode for events such as closing the laptop cover ...
I believe that the problem hibernation mode should not be activated in Linux Mint. If you agree with me, please help improve Linux Mint by supporting my idea: http://community.linuxmint.com/idea/view/5482.
9.1.1. Hibernate recovery
Would you like to reactivate hibernation? Fortunately, the actions described above are easily reversible. First you have to open a terminal. Now you need to copy and paste the following command into the terminal window (this is one line):
sudo mv -v /com.ubuntu.enable-hibernate.pkla /etc/polkit-1/localauthority/50-local.d
After completing the command, press the key Enter. When prompted for a password, you must enter your password. The characters of your password will not be displayed in any way, even with dots, and this is normal. After entering the password, press the key again Enter.
Now restart your computer. The hibernation mode should again appear in the system shutdown menu.
9.2. Deactivate sleep mode (suspend-to-ram)
You can deactivate the sleep mode ("suspend-to-ram") as follows (you should deactivate it only if it does not work correctly, because in some cases it can come in handy). First you need to make sure that applications like gksu and leafpad are installed on your system. To do this, open the terminal and enter the following command into it (use the copy / paste functions):
sudo apt-get install gksu leafpad
After completing the command, press the key Enter. When prompted for a password, you must enter your password. The characters of your password will not be displayed in any way, even with dots, and this is normal. After entering the password, press the key again Enter.
Do not close the terminal window yet. Instead, copy the following command into it in order to avoid typing errors (this is one line):
sudo touch /etc/polkit-1/localauthority/90-mandatory.d/disable-suspend.pkla
After completing the command, press the key Enter for its execution.
Now you should copy another command into the same window of the terminal (I also recommend using the copy / paste functions in order to avoid typing errors):
gksudo leafpad /etc/polkit-1/localauthority/90-mandatory.d/disable-suspend.pkla
And again, to execute the command, press the key Enter. As a result, an empty configuration file will open in a text editor, into which you will need to paste the following text:
Identity \u003d unix-user: *
Action \u003d org.freedesktop.upower.suspend
ResultActive \u003d no
ResultInactive \u003d no
ResultAny \u003d no
Identity \u003d unix-user: *
Action \u003d org.freedesktop.login1.suspend
ResultActive \u003d no
Identity \u003d unix-user: *
Action \u003d org.freedesktop.login1.suspend-multiple-sessions
ResultActive \u003d no
After inserting the text into the text editor window, save the changes in the configuration file and close the text editor. You should now restart your computer. Sleep mode should disappear from the system shutdown menu. If you are using a laptop, it is recommended that you check the power manager settings: you will have to choose alternatives to sleep mode for events such as closing the laptop cover ...
9.2.1. Sleep Recovery
Want to reactivate sleep? Fortunately, the actions described above are easily reversible. First you have to open a terminal. Now you need to copy and paste the following command into the terminal window (this is one line):
sudo rm -v /etc/polkit-1/localauthority/90-mandatory.d/disable-suspend.pkla
After completing the command, press the key Enter. When prompted for a password, you must enter your password. The characters of your password will not be displayed in any way, even with dots, and this is normal. After entering the password, press the key again Enter.
Now restart your computer. Sleep mode should again appear in the system shutdown menu.
10. Constant clicks of the laptop hard drive
Some hard disksinstalled in laptops have a serious problem: they constantly click, stop and restart. Of course, this does not apply to everyone. hard drives for laptops: usually only certain models behave this way hard drives some manufacturers. The problem is directly related to hard drive sewing: manufacturers often implement excessively tough power-saving modes. Of course, this mode of operation adversely affects hDD, significantly reducing its resource. Some operating systems have a special mechanism to work around this error made at the hard drive firmware level, but many Linux distributions simply do not have such a mechanism.
The solution to this problem is not overly complicated. First, you should open a terminal. After that, enter the following command into it (use the copy / paste functions):
sudo hdparm -B 254 / dev / sda
After completing the command, press the key Enter. When prompted for a password, you must enter your password. The characters of your password will not be displayed in any way, even with dots, and this is normal. After entering the password, press the key again Enter.
After executing this command, annoying clicks should stop. With the help of it, the hard drive’s power saving mode is not completely turned off, but its intensity is reduced to a minimum. Thanks to this command, you can also achieve a positive third-party effect: your laptop will work a little faster. The price you pay for this optimization is to increase power consumption, and, consequently, reduce the battery life of the laptop. But this increase will be almost imperceptible.
The effect achieved with this command will last until the next reboot of the laptop. If you want to make it infinite, you will have to perform several additional manipulations.
First of all, make sure that applications such as gksu and leafpad are installed on your system. To do this, open the terminal and enter the following command into it (use the copy / paste functions):
sudo apt-get install gksu leafpad
After completing the command, press the key Enter. When prompted for a password, you must enter your password. The characters of your password will not be displayed in any way, even with dots, and this is normal. After entering the password, press the key again Enter.
Now you should enter the following command into the terminal (use the copy / paste functions):
gksudo leafpad /etc/hdparm.conf
After completing the command, press the key Enter for its execution. As a result, the configuration file of the previously used hdparm utility will be opened in a text editor. The following text should be added to it (use the copy / paste functions in order to avoid typing errors):
After inserting the text into the text editor window, save the changes in the configuration file and close the text editor.
Unfortunately, this utility will not be automatically activated after exiting sleep and hibernation modes, therefore it is also worth deactivating these modes (see).
This problem is associated not with flaws in the Linux kernel, but with flaws in the firmware created by manufacturers for their devices. Situations in which the operating system should correct the errors of device firmware manufacturers are rather unpleasant, but, unfortunately, not uncommon.
11. The wireless adapter locks when the Bluetooth adapter is activated
On some laptops, the wireless network adapter (Wi-Fi or 3G) is blocked when the Bluetooth adapter is activated. In this case, you can resort to enough simple solution: temporarily disable the Bluetooth adapter by clicking on the corresponding icon on the panel or using the control center. After disconnecting the adapter, restart the computer. After loading the system, the Bluetooth adapter should be turned off, therefore, you should be able to create a connection using a Wi-Fi or 3G adapter.
If the Bluetooth adapter automatically activates after a system reboot, you can try to deactivate it at the BIOS level of your laptop.
12. PDF documents with a large number of pages do not print completely
By default, the Ubuntu, Linux Mint, and Fedora distributions use the Evince application to read PDF documents. In some cases, Evince cannot correctly process PDF files with large quantity pages, resulting in incomplete printing. To print such documents, you can use a similar application called xpdf. Unlike Evince, xpdf perfectly processes and prints documents with any number of pages.
You can install the xpdf application using the Ubuntu Application Center, the Linux Mint Program Manager or the GNOME Application Center, as it is present in the standard repositories of all distributions.
13. Adobe Flash Player: Invalid color rendering and browser crashes
This problem is not related to the components of the Ubuntu, Linux Mint, or Fedora distributions, but it’s very annoying: on some computers, when watching a video using Adobe flash Player observed incorrect color rendering: The video has an easily distinguishable blue, violet or pink tint. In addition, the Firefox web browser often crashes when using the Adobe plugin Flash player.
The reason for this problem is to activate the hardware accelerated video decoding functions at the Adobe Flash Player plugin level: the corresponding mechanisms do not work correctly when using some graphics cards. Fortunately, there is a simple solution to this problem: just turn off the hardware acceleration features at the level of the Adobe Flash Player plugin.
Note: to correctly change the value of the corresponding configuration parameter, it is recommended to temporarily disable visual effects (this is not relevant for distributions with the Xfce and LXDE desktop environments).
You should go to the website http://moodstream.gettyimages.com (or any other website with Flash content, but not Youtube, as this website uses a different type of content). After that, you should wait until the website has finished loading. Finally, use the right mouse button in the content area of \u200b\u200bthe web browser, open the tab "Settings" and remove the check box "Enable hardware acceleration". Please note the screenshot below.
After you finish changing the values \u200b\u200bof the plugin configuration parameters, click "Close".
14. Inability to install the Adobe Flash Player plugin
Installing the Adobe Flash Player plugin is usually not associated with any difficulties. But when working with some old computers, the plugin simply does not work, as their central processors do not support the SSE2 instruction set. Support for this set of instructions is essential for functioning. latest versions Adobe Flash Player plugin for Linux. You can check whether the central processor of your computer supports the SSE2 instruction set by opening the terminal and entering the following command into it (use the copy / paste functions):
cat / proc / cpuinfo | grep sse2
After you finish entering the command, press the Enter key to execute it. The output should contain the name of the SSE2 instruction set. If you have not received any output, you, unfortunately, will not be able to use the Adobe Flash Player plugin on this machine. However, you can still watch videos on Youtube thanks to the support of HTML5 technology by all popular browsers, and in some cases, support for this technology should also be activated on the next page of the Youtube service: http://www.youtube.com/html5.
Note: in some manuals, in a similar situation, it is recommended to install one of the older versions of the Adobe Flash Player plugin, which does not require support for the SSE2 instruction set. In no case do this! The Adobe Flash Player plugin is one of the most frequently attacked software components. A large number of malicious software distributed through various websites exploits vulnerabilities in the Adobe Flash Player plugin. In view of this, the use of older versions of this plugin is an extremely unsafe practice both on Linux and other systems.
15. Uncontrolled increase in the volume of log files from the directory / var / log
Fortunately, the described problem is quite rare, but still deserves attention: in case of certain malfunctions, large log files are created in the system, due to which the available disk space. If you encounter a similar problem, you should, of course, fix the problems that led to an uncontrolled increase in the size of the log files as fast as possible. It is better not to use a regular text editor to read the contents of giant log files, since it is most likely not able to handle large files. Instead, use a special command.
First, open the terminal and use a similar command:
tail -100 / path-to-logfile / logfile\u003e disk_eater.log
After completing the command, press the key Enter for its execution. So you create a small text file With name disk_eater.logwhich will contain the last 100 lines of the log file. This file will be located in your home directory. You can use the usual double-click to read its contents. This way you can figure out the causes of the problems. For example, if you want to read the latest 100 file lines syslog, you can use the following command:
tail -100 / var / log / syslog\u003e disk_eater.log
You can also limit the maximum volume of log files for troubleshooting. To do this, back up the logging system configuration file in your root directory using the following command (use the copy / paste functions):
sudo cp -v /etc/logrotate.d/rsyslog / rsyslogbackup
After completing the command, press the key Enter. When prompted for a password, you must enter your password. The characters of your password will not be displayed in any way, even with dots, and this is normal. After entering the password, press the key again Enter.
After that, make sure that applications such as gksu and leafpad are installed on your system. To do this, enter the following command into the terminal (also use the copy / paste functions):
sudo apt-get install gksu leafpad
After completing the command, press the key Enter for its execution. Next, enter the following command (and again use the copy / paste functions):
gksudo leafpad /etc/logrotate.d/rsyslog
After completing the command, press the key Enter for its execution. As a result, the logging system configuration file will be opened in the leafpad text editor. You will have to delete the entire contents of this configuration file and replace it with the following text (in this case, you just can not do without copy / paste functions):
/ var / log / syslog
rotate 1
maxsize 10M
hourly
missingok
notifempty
delaycompress
compress
postrotate
reload rsyslog\u003e / dev / null 2\u003e & 1 || true
endscript
)
/var/log/mail.info
/var/log/mail.warn
/var/log/mail.err
/var/log/mail.log
/var/log/daemon.log
/var/log/kern.log
/var/log/auth.log
/var/log/user.log
/var/log/lpr.log
/var/log/cron.log
/ var / log / debug
/ var / log / messages
rotate 1
maxsize 10M
hourly
missingok
notifempty
compress
delaycompress
sharedscripts
postrotate
reload rsyslog\u003e / dev / null 2\u003e & 1 || true
endscript
)
After inserting the text into the text editor window, save the changes in the configuration file and close the text editor. This configuration allows you to limit the size of each log file. 10 megabytes, and the number of created backups - 1 a copy. Log files will be rotated every hour.
Finally, you should restart your computer.
Have you already found and fixed the cause of the problem? In this case, you can simply delete the file /etc/logrotate.d/rsyslogrename file / rsyslogbackup in / rsyslog and move it to the directory /etc/logrotate.d.
16. The system takes a very long time to boot
When using some hardware configurations, especially on laptops, the system boot process can take too long (up to several minutes!). The reason for this behavior may be incorrect work Services for managing broadband wireless modems (not related to Wi-Fi). If this is the case, you can get involved in reducing the system boot time by deleting this service, of course, if you do not use broadband modems. To do this, open the terminal and enter the following command into it (use the copy / paste functions):
sudo apt-get purge modemmanager
After completing the command, press the key Enter. When prompted for a password, you must enter your password. The characters of your password will not be displayed in any way, even with dots, and this is normal. After entering the password, press the key again Enter.
After the corresponding software package is removed as a result of executing the command, you can restart the computer in order to make sure that the system boot time is reduced.
Note: in some cases, uninstalling the software package associated with this service may cause system boot problems, for example, after updating the software package with components for connecting to protected wireless networks WPA Supplicant. If you encounter such problems, you must reinstall the software package with the service components for managing broadband wireless modems with the following command:
sudo apt-get install modemmanager
17. Low-Power Graphics Card: Deactivating Hardware Acceleration in Firefox, Chrome, and Chromium
Some legacy or low-performance graphics cards may render elements of web pages slowly, since Firefox, Chrome, and Chromium web browsers use hardware acceleration by default to render page elements. If you are faced with the poor performance of these web browsers (delays in entering text or problems with showing the video), you can deactivate the corresponding mechanism:
Firefox: click on the button with three horizontal lines in the upper right corner, click "Settings", Choose a section "Additional" and uncheck “Use hardware acceleration whenever possible”. After that, close the settings tab and restart the web browser.
Chrome / Chromium: click on the button with three horizontal lines in the upper right corner, select the menu item "Settings", follow this link Show advanced settings on the page that opens and uncheck the box “Use hardware acceleration (if available)” In chapter "System". After that, close the Chrome / Chromium web browser and start it again.
18. Official Ubuntu and Linux Mint Error Lists
Check out the official Ubuntu and Linux Mint error lists (pay attention to the “Known issues” and “Known problems” headers):
- Ubuntu 16.04 Error List
- Xubuntu 16.04 Error List
- Lubuntu 16.04 Error List
Want to learn about other Linux system settings and tricks? This website is hosted a large number of similar materials.


