Instruction manual
Storage media such as removable flash drives (flash drives) and compact discs (CD or DVD) are best suited for storing photo archives. It is very simple to work with them, it is only important to adhere to the correct sequence of actions.
To copy photo files to a CD, first prepare a blank recording medium. Please note that among the wide variety of compact discs, there are read-only discs for single (CD-R) and multiple (CD-RW) recordings. Choose the last option, i.e. CD-RW. You can also stop on DVDs, the capacity of which is much larger (standard size 4 GB.).
Well, have you ever started copying a large number of files and later found out that he stopped in the middle of the copy due to one damaged file? Or what if the network connection dies in the middle of the copy and you want to resume work from where you left off? Once everything is completed, you can fix the problems and restore only the problem files. To get started, you simply drop and delete the files you want to copy into the program window.
As soon as you select the destination folder for copying or moving, the process starts immediately and you will see the results in the list. If the file was copied or moved correctly, you will see a green checkmark on the left. At the top you will see a brief description of the processed files, errors or missing files. The only time you get a popup dialog is when the file already exists in the destination directory, and you need to manually decide what to do. The computer does not matter much for the solution, because it has no idea about your files.
Insert the cooked disc into optical drive computer and make sure that the system "sees" it and can open it. To do this, open the “My Computer” folder on your desktop and look at the “Devices with removable media” section. If the name of the new disc is displayed on the DVD-RW drive tab, then everything is in order. To be sure, click on it with the mouse and make sure that the computer can read it.
The buttons below are intended only for moving files to a new folder. When it starts copying another folder, a dialog box will reappear. The buttons on the right side store the files in the same folder as the source directory, but either overwrite them or rename them. You can also choose to skip, which will not copy the file.
If you uncheck the box “Show this dialog next time”, then it will remember what you have chosen and use this copier next time. Check out my previous post and how to disable it. Our company has developed a new technology that has proven that data can be transmitted over the Internet at an incredible speed. Our data transfer is much faster than competing solutions.
Open the folder on your hard drive where you store the photos, and select among them the ones you want to copy. To select several photos at once, press the “Ctrl” key and, holding it, click on all needed files. Then, without releasing the “Ctrl” key, press the letter “C” to copy the files to the clipboard.
File processing support
The data transfer machine allows you to work with files and folders on the local and remote side. Copy and move files and folders :. from a local computer to a remote or even on one computer - from one folder to another. Change file and folder attributes.
Opening documents and running executable files
- Delete files and folders.
- Rename files and folders.
- Create new folders.
- View file and folder properties.
Open the folder where you want to place the copied photos on the removable CD, then right-click and select “Paste” in the context menu that opens. Photo files are copied to a CD. Or, holding down the “Ctrl” key, press the letter “V” to insert.
If the folder is on removable drive it’s not important for you, you can do it easier. Collect all the copied photos on the hard drive into one folder, then click the right mouse button. In the context menu, select the “Send” line and specify the drive in the DVD-RW drive as the address.
Resuming copying after a network failure
All you have to do is double-click the file. If the executable file is running, you can also execute special commands. Data transfer allows you to recover a network failure while copying data - exactly at the moment when the transfer failed, and not from the very beginning. If you want to continue copying the file, after reconnecting, drag the file to the same place. The program informs you that the partially copied file already exists and offers you to either repeat the copy or restart everything from the very beginning.
Modern USB-drives, including flash drives, can store more and more information. Unfortunately, if there is a certain file system, it is impossible to write a large file to the USB flash drive in the usual way.
You will need
- - 7-Zip.
Instruction manual
There are several methods to solve this difficulty. The reason is that the FAT32 file system, which is most often found on USB flash drives, does not allow you to write files larger than 4 GB on these devices. Try changing the file system format using functions operating system Windows
Compress data quickly before transferring it
This property is very useful when copying large files. If they must leave their office, they can pause copying and copy the next day from where the pause was inserted. Is our software compresses files before transferring them between computers. A very fast compression algorithm is used, which does not slow down the program and has a good compression ratio.
Our data transfer machine is quite high: it “knows” most familiar compressed file extensions, and they are not compressed again, so that meaningless time for further compression is not lost. The compressibility of our software makes the difference between our competitors. Typically, data transfer algorithms cannot compress files before transferring them over the network. Network transmission can be very time consuming, especially with low bandwidth. At the same time, our data transfer machine compresses files, and thus, file transfer is significantly accelerated.
Plug the USB flash drive into the USB port of your computer or laptop. Wait for the system to detect the new device. Open the My Computer menu. To do this, press the Start and E keys at the same time. Now right-click on the icon of your flash drive. Select "Format".
Dynamic adaptation of the data buffer to speed up the transfer
Our data transfer machine continuously monitors the connection speed. The result is a dynamic change in the size of its own data buffer and, therefore, the maximum data rate to achieve. According to our tests, our file transfer algorithm is faster than most of the programs of our competitors.
As a rule, our competitive programs use a fixed size for the data buffer. This is inefficient, because if its communication speed is high and the buffer is small, the maximum transmission speed cannot be achieved. On the other hand, our software dynamically selects the size of the data buffer depending on the connection speed and other parameters.
In the window that opens, uncheck the "Fast (Table of Contents)" checkbox. In the "File System" menu, specify the type of NTFS. Now click the “Start” button and wait for the formatting operation of your flash drive to complete. Be sure to save important files first, because this flash drive will be cleared during the formatting process.
Other competitor programs transmit each file via a separate network message, and they must first wait for the receipt to be confirmed. If you want to transfer a large number of small files, the transfer is very slow, as well as confirmation of receipt for each file from a remote location. Our software works in a different direction. It can send multiple files simultaneously in a single network message, and then wait for a single delivery confirmation for the entire group of files.
Any number of small files in a single network message can be transmitted in the size of a data buffer. High bandwidth networks have large data buffers. Performance is greatly accelerated by reducing the number of individual network messages sent over the network.
If this method does not suit you, then divide the file that you want to write to the USB flash drive into several parts. To do this, install the program 7z. Open the "My Computer" menu and the file that you want to write to the USB flash drive.
Right-click on it and select 7-Zip. In the pop-up menu, select the "Add to archive" option. A new program window will open. Select an archive format, such as Zip. In the “Compression level” column, set the “No compression” option.
Distributing folders is not a safe practice. They have full access to files on a remote computer, but do not have a single network environment. Unfortunately, you have to say: This cannot be! There are many solutions, but no one works great, so you need alternatives. Here are some of the alternatives.
Here you can search for media servers on your home network. The following options are the simplest. It should definitely work with you with these programs. You do not need much about it, in principle, this is enough to start. There you can see the Streaming menu. Music and films are possible here. Just run the program, drag and drop the files into the window. The setting must be set to Real.
Now find the Split into Volume menu. Enter the size of one volume, for example 3,500,000 bytes (3.5 GB). Click the OK button. As a result, you will get several Zip archives. Copy all these files to your USB flash drive. To combine the file into a single whole, select all zip files, right-click on one of them and select the option “Collect archive”.
It turned out that you see your shared files and can easily copy them. Entry posted. Select "Add to file" in the menu that appears. Select "Add to file" in the menu that appears next to the file. Click “OK” in the menu below. This menu allows you to configure compression settings. The rest of the default settings work fine, so there’s no need to change anything else. The compressed file will appear in the same folder as the original.
The time taken to complete the file compression depends on the file size. The copy did not complete successfully, and another unexpected obstacle appeared. What to do, little grasshopper? First of all, your hand drive does not work properly - the only reason you have to complain and kick it until you fix the hardware failure.
Compact drives are a convenient means of storing and transferring information. Copying files to them from computer can be carried out both by regular capabilities of the operating system, and using third-party applications.
After a few seconds, the command line appears again: this means that the inverter has completed the operation. Still, you cannot copy a file larger than 4 GB. Is it damaged? In a few minutes you will see an invitation again command line: this means that the converter has completed its work. If the converter could not change file system at this time, he should ask you to fix the problem after restarting the computer.
There are no compatibility issues in the long run. We also select one of the available links. . Now we turn to the consideration of the two phases of the operation that interests us, that is, the separation of the file and the subsequent redistribution. File department. In the drop-down menu we must indicate that we want broken files were great. The duration of this will naturally vary depending on the size of the file. When the operation is complete, we will have all the parts that make up the source file. All of them will have the same size, except for one, which is essentially a "rest". The procedure that we are now seeing.
- We click "Divide."
- For convenience, we put "MB", and then specify the value.
- We are waiting for the completion of the procedure, and we will have our original file.
- Again, this will create a new file, leaving the parts as they are.
Instruction manual
Insert a disc into the drive computer. After that, open the folder in which you can find filesto be copied. Select them with the left mouse button, then right-click on them, select the "Send" menu item and specify the drive into which the disk was inserted. You can also right-click on the selected files and select the “Copy” item, then open the disk folder using Explorer and, right-clicking, select “Paste”.
How to copy files and folders from a computer
You can also find and download the file. Note. Before you can upload or create files in the library, your administrator must grant you permission to collaborate in the library. In addition, some types of files in the library are blocked for security reasons. In the Types of files that cannot be added to a list or library section. 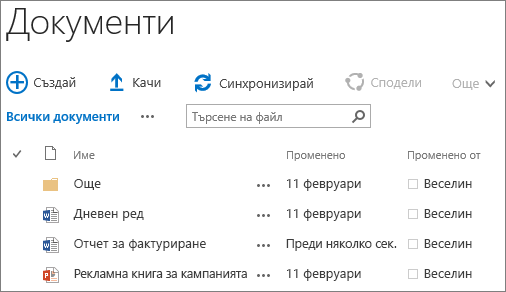
Notes.
It is possible that "Open in Explorer" and "Browse in Explorer" does not work or is missing. Instead, use the New Document or Download Options option. . Uploading large or multiple files to the library. The steps you can take to avoid these errors include. When downloading files and folders, you should know the length of the path and file names.
On the toolbar of the Explorer window with the disc folder, click on the link "Burn CD". Specify a name for the recordable disc, and then click the "Next" button. Wait for the process to complete. When recording is completed, the drive tray opens - the disc is recorded, you can remove it.
Copy files from computer You can burn to disk using specialized programs designed for burning (for example, Ahead Nero, Small CD-Writer, Ashampoo Burning Studio, etc.). Insert into drive computer drive, select one of the applications to burn and run it.
Site owners can set up the library to require you to extract files before editing them. If your library requires extraction, the file will be downloaded to you when you download it for the first time. You need to get the file back so other people can edit it. To learn more about extracting, check out, insert, or reject changes to files in the library.
Approve submitted content. Site owners can customize the library to require content approval before it becomes visible to others who use it. As an author, you can see the file and work with it, but no one else can. For example, the legal department may require approval before documents become publicly available. Require approval for items in a list of sites or libraries.
In the "File" menu of the program, select "Create." In the settings of the new project, specify the CD or DVD will be used for recording. If necessary, select one of the additional data types for the recordable disc.
Specify recording settings: multisession or not, recording or simulation, data verification, recording speed. Set the file system type of the disk, its name, and additional settings if necessary. After that, click the "Create" button.
Using the open program window, copy the necessary files into the recording project. To do this, use the file manager of the application: select the device, directory and filesprepared for recording. Left-click on the desired file and, without releasing the button, drag it into the project. If you need to copy several files, select them and drag them in the same way.
After that, click the “Record” button located in the program toolbar. In the window that appears, check the previously specified parameters and click the “Burn” button. Wait for the process to complete.
Related videos
Instruction manual
You must copy the folder names. You can do this in many ways. If there are not too many folders, copy and paste into text document the name of each folder separately. To do this, move the cursor to the folder icon, right-click on it and select the Rename command from the drop-down menu. As an alternative to this command, you can use the F2 key.
The name of the folder will become editable. Do not enter any printable characters or left-click on the folder name. Press the key combination Ctrl and C or right-click on the folder name and select the Copy command in the drop-down menu.
Open a text editor and paste the folder name from the clipboard using the keyboard shortcut Ctrl and V. Alternative options: right-click in the document and select the "Paste" command from the drop-down menu or click on the corresponding thumbnail button on the editor toolbar. Repeat the steps for the name of each folder.
If there are a lot of files, naturally, you need another way. Run the Total Commander program and go to the directory that contains the folders you need. In the left part of the application window, select the folders you need using the commands from the "Selection" section of the menu bar. After you select the folders, select the "Tools" item on the menu bar and the "Copy file names" command.
Go to the text document and paste the folder names you just copied from the clipboard. If necessary, edit the text: delete the slash (slash), select the document style, assign serial numbers to your folders, and so on.
Each of us probably faced the problem of copying large files, especially when they need to be transferred to external drive or even to another computer. In fact, the problem is solved quite simply, you do not even need to cut a large file into several small ones.
Instruction manual
In order to facilitate the transfer of large files from one folder to another in Windows, install the small RichCopy utility developed by Microsoft back in 2001. The utility allows you to speed up file copying by starting multiple streams, pause and restart copying, timer copy, and pre-check the target folder. Download the executable file on hDD your computer, start it. A program shortcut will appear in the Microsoft Rich Tools folder in the Start menu. In order to copy a file, select this file, specify the destination folder and click "Start". The program will start copying. In order to set custom copy settings, go to the "Settings" section and set the settings you need.
To copy a large file to external hard drive, you may need to change the file system from FAT32 to NTFS. The fact is that FAT32 does not allow copying operations with files larger than 4 GB. So if you just need to periodically copy these files - change the system.
Copying large files is easier to do through a download manager that allows multi-threaded copying, or through the common and convenient file manager Total Commander. The latter can also be used when you need to copy files from ftp server. In Total Commander, it is easy to establish and remember a permanent ftp connection, and copy operations are much faster.
Another copy option large file: First upload the file as a link to any of the file hosting services, and then download it to that hard drive (the computer) where you had to copy the file. You can also use local area networkbut usually files They are copied faster when transferring them using a flash drive than on a local network.


