This guide will tell you how to recover information on your hard drive, even if the file system partition (including NTFS) is damaged. We will show you how to recover it and not lose your data and how to solve other possible problems associated with the loss of information on your hard drive.
If you have been working with a computer long enough, it’s no secret to you that hDD cannot be considered a reliable place to store data. Unlike CDs and other storage media, a hard disk is a mechanical device that wears out like any other mechanism during operation. In addition to mechanical failure, there are many ways to lose data on a disk, on which it is very simple and quick to change.
The solution to most problems with hard drives when working with Windows 98 and earlier systems came down to using the fdisk program and a number of other utilities that made it possible to partition and recover disks. Now the use of such utilities, even by an experienced user, sometimes leads to irreversible consequences ...
Imagine this situation: While working on an article on updating computers, when more than 10,000 characters were written and a few sentences and screenshots remained, all that was needed was to run fdisk on a computer with two Windows 98 / XP Pro operating systems and save multiple screenshots. In my article, several paragraphs described working with fdisk, warning readers not to use this program if there is no complete confidence in their actions ...
So, I needed to get only a few screenshots, but I forgot that fdisk writes data to some areas of the disk at startup, so that it wasn’t in it before. I only remembered about this when I received the copies of the screen I needed and rebooted the computer in windows mode XP, or rather, wanted to reboot ... After a rather long wait, the system did not boot.
Is the main disk partition gone?
The affected drive we are dealing with was Fujitsu 17 GB with two NTFS partitions of 5 GB each (XP Home and Professional) and 6 GB of unused space. After the incident described above, the system in both sections of XP stopped loading.
After connecting the drive to a computer with Windows 2000, I launched "Disk Management". To do this in XP or 2000, right-click on “my computer”, select “management”, and in the window that appears - “disk management”.
The main section on which my article was located was displayed as not formatted, and the operating system could not read it. The system located in the second section could not boot, but at least it was recognized as formatted and could be copied from it needed files. Unfortunately, all the data I needed was in the first section.
What to do? There are several ways to extract data, but before we look at it, we need to focus on what constitutes file system, and how it stores your data.
File systems
The file system determines the method that is used to store data on the hard drive or on any other device that is used to store information. Free space on the hard drive is divided into sections in which logical drives are created (C :, D:, ...).
Windows can work with several file systems called NTFS (NT File System) and FAT (File Allocation Table). FAT is an earlier file system used in DOS under the name FAT-16 and in Windows 9x / Me under the name FAT-32. The main difference between FAT-16 and 32 is the maximum amount of disks and files that they can work with. FAT-16 can use drives up to 2 GB. Operating windows systems 2000 and XP are fully compatible with FAT, even though they use a different storage method as standard.
Windows NT, 2000 and XP work with the NTFS file system, providing better security and reliability of data storage. In addition, NTFS allows you to define permissions for each file. All of these file systems use a partition table and boot records (MBR), which are stored in the first sector of each drive, determining which partition is bootable.
If the information in the MBR is damaged, the operating system stops loading from it, and disk partitions can be detected as empty.
NTFS Partitions
The first sector of the NTFS partition is reserved as bootable. It contains information that allows the system to work with this section; without this information, the section will be inaccessible.
A copy of the boot sector is stored in the last sector of the partition. The equivalent of such a sector in FAT is also called bootable and is stored in the first sector of the section. The difference with the FAT is that the FAT does not store copies of this information, making recovery a more difficult process ...
The first file that is stored on the disk, called the Master File Table (MFT), is a table that contains information about the location of all files, their properties and access rights. NTFS also stores a copy of this information. FAT has a similar File Allocation Table (FAT), backup copy which is also on the disk.
If a file is deleted, including from the “recycle bin”, both file systems simply mark it as deleted. Data is not really deleted from the disk, but the space that it occupies on the disk is considered free. So that all files can be restored, if only you did not write anything to disk after deleting them.
In my case, a disk with two NTFS partitions was used. When fdisk was launched, the program wrote something to important areas of the disk in both sections. As a result, the first section has a corrupted boot sector. The second section simply has a damaged area with system files, and the system does not boot from it either, but the files on it are accessible. I transferred the disk to another computer. It was at this place that we broke off.
Warning: anything described from this point on, if not used carefully, can delete drive partitions and files. If your hard drive physical malfunction, for example, it makes strange noises or smokes, nothing described below will help, turn off the computer, remove the hard drive and bring it to the service shop. Attempts to repair it yourself are likely to lead to significantly more expensive consequences.
Information Recovery
The first rule that you can’t break if you are going to recover information on a damaged hard drive is not to overwrite anything.
If you accidentally deleted a partition, do not create a new one in its place, leave everything as it is.
If you deleted files from the trash, and then realized that deleted information you need, do not write anything to disk.
The same applies to disk partitions. If you do not create a new section in place of the lost, then information about the old will still be saved.
In my case, copies of information about partitions and critical files were saved on the disk. One section is unavailable due to a rewritten boot sector, and the second is no longer bootable, but information from it is still being read. Looking ahead, I’ll say that everything (or almost all) was restored. Now let’s dwell on how to do this.
The most inconvenient option is when you have one partition on the disk, and it was he who disappeared. Then it is best to transfer the hard drive to another computer. Working on a second computer has many advantages. You do not need to make the disk bootable, you can simply achieve file readability and rewrite the necessary information using Windows Explorer.
If system files are damaged and the system does not boot, but the partition is accessible, the files are easily read on another computer, and the problem will be solved.
File recovery software
If you don’t have the ability to physically transfer the hard drive, do not be tempted to reinstall the system. There are several software tools that will allow you to boot a computer running an alternative operating system and help you recover your files.
The easiest way to access files on your hard drive is to boot the computer using the DOS boot diskette and use a data recovery program like testdisk, described below.
Keep in mind that when working with one partition, which is also not visible, data recovery becomes a much more difficult task. Many recovery programs need a place to back up recovered data. In this case, you have no guarantee that you will not destroy more than restore. If you cannot transfer the hard drive to another computer, consider connecting another hard drive to which you can install the system and the recovery program.
There are several programs, for example, "Winternals Disk Commander" and "ERD Commander", which will boot your computer running DOS or another operating system and begin the recovery process. Unfortunately, none of these programs is free.
If you connected your disk to another computer or connected a disk with an installed operating system to your computer, you can try to boot the computer and copy the necessary data. You will not succeed if the partition information is lost. In this case, the system simply "will not see" the logical drives.
Free software for data recovery
Existing free programs are generally less functional than paid ones. This is due to the fact that the developers understand that if the lost data is really important, then people will be willing to pay for a program to restore it.
FindNTFS is a free program that can find and repair a damaged NTFS partition. There are several different versions, among which there is one designed to work after loading in DOS mode. It can be used if Windows does not boot. In addition to finding and recovering NTFS partitions, FindNTFS has some more useful functions that we don’t need right now, and we won’t stop on them.

To use findntfs, boot the computer using the DOS boot diskette, with findntfs.exe recorded on it. You can get the list of files and folders on the recoverable disk by typing "FINDNTFS # 1 1 1 c: \\ recoverlog.txt files" at the command line. The # symbol must be replaced with the disk number. If you have only one hard disk, then its number will be 1, and if there are several disks, then number 1 will receive a physical disk on which the logical drive "C:" is located.
This command tells findntfs to search the NTFS files for the entire drive and list them in text file on drive C :. You can specify any file name on any drive. Just do not create it on the same drive on which information you want to recover. Once the file is created, you can view it. It should look something like this:

If everything went well, you can find the files you need in the list. The folders in which findntfs found them may not coincide with where they really were. Before proceeding to the next steps, write down the folder numbers with the necessary files.
To restore files using findntfs, you need to use the "copy" command. The limitation of the program is that it writes files to a folder in which it itself is located. So before the next step, make sure there is enough space.
Run the command "findntfs # 1 1 1 copy #" (the first character # must be replaced with the disk number, as in the previous command, and the second with the number of the desired folder). You can specify up to 10 folder numbers. If you do not specify a folder number, the program will try to copy all the files from the specified drive.
Check the recovered files to make sure they are not damaged.
The findntfs program has another significant limitation; it cannot copy files to a partition with the FAT file system. This makes recovery impossible without an NTFS partition and support for its operating system (Windows NT / 2000 / XP). In this case, it will not be possible to restore the files by booting the computer using the DOS disk. Another free NTFS reader utility can solve the problem.
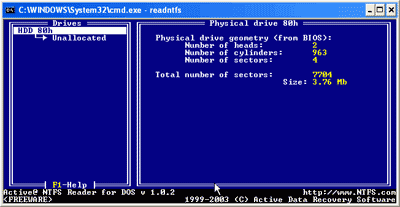
NTFS reader for DOS NTFS reader for DOS (ntfs.com) is a freeware program that allows you to copy NTFS files to DOS partitions (FAT). If booting from your NTFS partition is not possible, you can copy this program to a bootable floppy disk and rewrite all the necessary files with it.
The limitation of this program is that it cannot read data from partitions with damaged boot sectors or from disks with damaged partition tables. So before using it, you need to make the NTFS partition “readable” and after that copy the necessary files from it.
The commercial utility doesn’t have these limitations. [email protected] Partition Recovery "(http://www.ntfs.com/), which can find the lost partition and copy data from it.
These programs are designed to work under DOS, you can work with them under running windows 9x / ME, but not on Windows 2000 or XP due to disk access restrictions on these operating systems.
TESTDISK TestDisk is a program that exists in versions for DOS and Linux, which can be used to find and recover FAT and NTFS partitions. Using it, you can restore boot sectors from their copies.
With the help of this particular program, I restored my first NTFS partition, which was not “visible” at all. Working with testdisk is not very difficult, the main thing is to be careful and read the documentation (in the "doc" folder).
After starting the program, you will see a list of available physical disks:
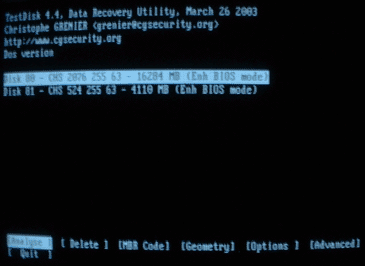
Specify the drive whose partitions you want to recover, and select "analyze".
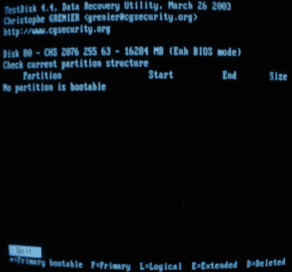
The program will display a list of currently existing partitions and, after pressing "enter", will begin its own process of searching for partitions.
After the search is complete, press enter again. Further, it is advisable to select "search!" To make a more thorough search. If suddenly you did not see a single partition at first because of a damaged partition table, testdisk should find them.
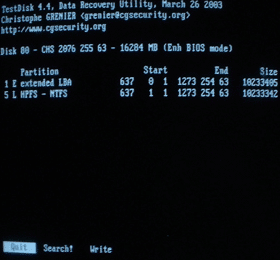
Check this information and select "write" to write new partition information to disk. If the loss of the partition was the only damage, then the recovery process is now complete for you. You will get a fully restored system. But, if the boot sector of the partition is damaged (as in my case), you will have to select "advanced", and after it - "boot".

Testdisk compares the boot sector with its copy. If they are different, then the program will ask you a question whether you want to copy a copy of it to the boot sector.
This operation made my “lost” section with the article accessible again. Testdisk is one of the most useful programs to restore disk partitions. Of course, she lacks a graphical interface and runs only under DOS, but this is not the main thing for a program that can restore the necessary information in a few minutes.
There are many different free data recovery utilities. Here are a few restoring deleted files: PC INSPECTOR (pcinspector.de) and Restoration for 9x / NT / 2K / XP (hccweb1.bai.ne.jp). If you set a goal, you can find many similar programs with their own merits, but we did not set ourselves such a goal, since everything described, in our opinion, is quite enough to solve most of the problems associated with recovering damaged partitions and deleted files.
Commercial data recovery utilities
There are many paid data recovery programs. Most of them only work under Windows. It is convenient to work with them if you managed to connect the hard drive to another computer or connect another hard drive with the operating system to the same computer. Two good examples of such programs are: "Active file recovery" and "R-Studio".
I did not conduct serious testing of commercial programs, but I had to deal with their demos, which simply tell me if there is a file on the disk and if it is damaged. An exception was the demo version of R-Studio, which allowed recovering files not larger than 64 KB. She successfully copied deleted article files.
From my experience, I can recommend "Winternals Disk Commander", but you have to take a word, since the creators of the program do not provide demos. Below we have provided a list of paid data recovery programs that you can turn to for help if the free utilities discussed in this review could not solve your problems.
Data Recovery Center is a team of highly qualified specialists with vast experience. To date, the service serves customers throughout Moscow and the Moscow region. The service is equipped with all necessary modern equipment and software to provide specialized services. Masters quickly go to the house and offices. Specialists carry out high-quality and quick recovery data from any media:
- hard drives with various interfaces (SATA, SCSI, SAS and so on);
- external hard drives;
- memory cards;
- solid state SSDs.
If there is even the slightest possibility that the data is recoverable, then experts will extract it.
Cost of data recovery services
Back call
Call back through
1 minute
In each case, the cost of data recovery is calculated individually. The master will be able to tell the final price only after diagnosing a faulty device. Usually the cost depends on:
- on the nature of the malfunction;
- reasons for the disappearance of data;
- the time spent by the master to restore information;
- the need for replacement of components.
The site contains estimated prices that will help you understand how much will be needed to recover lost files.
Free diagnostics
The center offers customers free device diagnostics. If possible, it is carried out in the presence of the client and takes no more than half an hour. Upon completion, the wizard can accurately determine the nature of the problem, the timing and cost of data recovery. If everything suits you, then the specialist will get to work. To order a service you need:
- leave a request on the site;
- chat with a specialist and tell him about your problem;
- agree with the master about the time by which it will be convenient for you to accept it.
Payment for data recovery services is carried out upon. If the result is missing or does not suit you, then you can not pay.
Trust professionals
Very often, a data recovery center is contacted by a client whose media has already passed through the hands of private masters. Unskilled intervention not only does not produce any results, but also significantly complicates the work of specialists. There are situations that due to incorrect actions of unfortunate craftsmen, data recovery becomes impossible.
If you do not want to lose your data, then contact reliable specialists. Do not experiment with suspicious software from the Internet. This, as a rule, not only does not bring benefits, but also complicates the restoration of information. Attempts at self-manipulation can lead to permanent data loss!
Confidentiality of information
On the digital media not only personal information is stored, but also files related to trade secrets. Therefore, the issue of confidentiality is very relevant. A computer service guarantees the confidentiality of your data. During the restoration of files, the possibility of their direct viewing is excluded. All information is read sector-by-sector. File integrity is not checked manually, but using machine structural analysis.
Produce complete disk compression it makes sense only in case of saving space and subject to high speed access to the hard drive and sufficient processor resources.
Since file nTFS system It has built-in compression support, compression and decompression of files occurs automatically when they are opened by programs. Thus, the compression of the hard disk is transparent to the user, however, it increases the load on the system, since compression and decompression of files (especially large files) requires significant system voltage of computer resources.
Currently prices for discs that fit in a large number of information is low, so it makes sense to increase the volume of the HDD, rather than additionally load the system with unnecessary work.
But if you still need to reduce the amount of available information to save space, then in this small instruction we will tell you how it is.
1. First, open Windows Explorer;
2. On the disk you want to compress, right-click and in the drop-down menu click on the "Properties" command;

3. In the dialog box, find the "General" tab;
4. Check the “ Compress disk to save space»And click on the" OK "button;
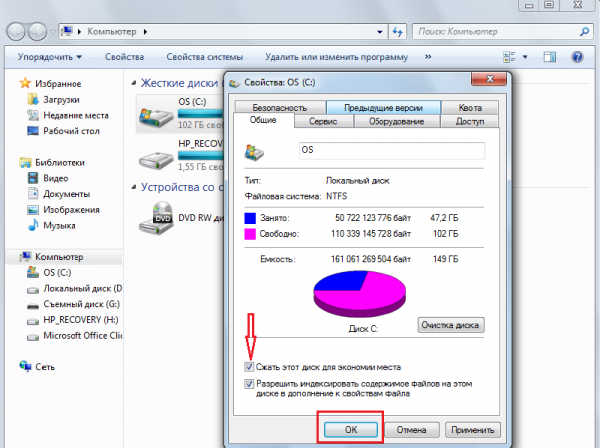
5. In the new dialog box, select the necessary switch depending on whether you want to apply compression only to the files of the hard disk or to all files and folders attached to it, too;

6. Click on the "OK" button, thereby confirming your decision.
Use command line for compression:
The following command only compresses files located in the root folder, for example, logical drive D:
In order to compress all folders and hard files drive, add the / s switch.
Good day, dear readers, admirers and other personalities. Have you ever noticed that space on your computer is disappearing?
As a rule, this is not a consequence of a virus or your carelessness, but simply a system recovery service Windows, incorrectly configured swap file and others. Often the reason for the selling place is also the high value of the browser cache or the OS cluttered with all kinds of software garbage.
How to find out the reason for the disappearance of space in Windows
As I said, there are several sources where the place may disappear.
Let's look at them in order.
Firstly, the recovery system. The fact is that Microsofttaking care of their users, made in Windowsrecovery system, which greatly affects the fact that your place disappears (although in fact it is simply "hidden").
She is engaged in the fact (if you have not changed the settings) that with some periodicity (especially in the case of installing programs \\ games \\) makes recovery points, which in case of a crash / system failure can always be used. The question is, do you use this recovery system?
For example, I hardly remember the last time I had to do this. Moreover, the benefits of it are highly doubtful. In turn, these points occupy up to 12% places on each hard drive, which, you must agree, a lot (especially on large disks). Therefore, here's how to get rid (or at least reconfigure) the amount of space occupied by the restore points.
How to get back disk space on a computer
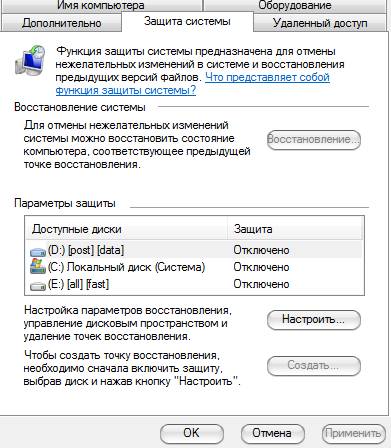
Start-> Customization-> Control Panel -> System-> System Restore
For Windows Vista / Windows 7/8/10:
Start-> Customization-> Control Panel -> System-> System protection
Here you can either completely disable system recovery, or distribute on which disks and how much space the dots will occupy.
I can’t recommend you completely disable recovery, as I don’t know how often you encounter systemic problems and resort to recovery, but I personally have it disabled, because I consider it a dubious tool that takes up a lot of space, especially since you can always use the article "" to protect and restore data.
For those who want to leave it (system recovery), but configure it as competently as possible and make it so that looking for where the place disappears is no longer necessary:
- It is advisable that they do not exist on the disk with the operating system or they take up as little space as possible;
- You do not need more 3 recovery points, i.e. you should not set a maximum percentage on several discs. It will be enough 3-6 % on one or two disks and then, in my opinion, this will be a lot.
By the way, before configuring these parameters, the system has already created a number of recovery points, so it would be nice to delete them. To do this, open " My computer", right-click on the hard drive the place where you need to clean and select from the drop-down list "Properties".
In the window that appears, click on the “ Disk Cleanup” – “Additionally” – “System Restore” – “Clear” – “Yes” – “OK“.
Or, if you have Windows 7 / Vista, You can clear the space occupied by recovery points using the " Customize - Delete"which is located on the tab" System protection"(see the path above):

This is what is called, times.
Let's go to point two.
About the swap file and where the place disappears
When operating system not enough, it starts to download programs to the page file, i.e. a file on the hard drive, which serves as a kind of RAM, but much less in speed. Accordingly, the size of the swap file may be different, depending on the amount of your random access memory.
Standard swap file size in 2-4 times the amount of physical RAM, but this size can be changed, though often at the expense of performance (especially if there is not enough RAM). He also answers the question of where the place disappears, because he is the very place and takes all his strength.
Set swap file location and size to hard drives here:
- Start-> Customization-> Control Panel -> System-> Additionally> Performance> Parameters> Additionally> Virtual memory -\u003e Edit
Still, I do not recommend disabling the entire swap file, but redistributing or decreasing it is always welcome. I wrote more about the swap file and its configuration in the article, and therefore, read it to set the correct numbers.
If you want to know more, want to learn this professionally and understand what is happening, then.
Cache, garbage and where the place disappears
During the operation of the system, programs, browsers and other differences, they constantly create the so-called cache, that is, temporary auxiliary files, which (files) they periodically forget to delete. Also, after removing various programs, trash traces from files usually remain behind them, which also, sometimes, weigh a lot.
Therefore, I recommend that you constantly clean Tempory Internet Files, browser caches, traces of programs and all sorts of other garbage. How to do this I wrote in the article "". I strongly recommend that you familiarize yourself with this, because often this frees up a lot of space.
Other manual cleaning
First, turn on the display of hidden files. To do this, go along the path “ My computer - Service - Folder properties - View - Show hidden files and folders - OK ”.
Next, open the disk with the system and find the folder there Documents and Settings. It contains your profile files and some system \\ program settings. The whole thing is that most programs, especially if you deleted them incorrectly, i.e. without using, say, they leave behind a bunch of traces and garbage that sometimes can’t even be cleaned Cleaner. I have to dig with my hands. The most cluttered folders according to my estimates are:
- C: \\Documents and Settings \\ name\\ Application Data;
- C: \\Documents and Settings \\ name\\ Local Settings \\ Application Data.
where C: \\- the drive where the system is located, and name - This is your name in the system.
Carefully dig through these folders and delete folders with the names of programs that have not been on your computer for a long time.
You can find the rest of the thick folders yourself by highlighting one \\ group of folders in Documents and Settings and checking their volume by pressing the right mouse button and selecting “ The properties“. As a rule, traveling like this, you can find a lot of all kinds of junk that was forgotten (or intentionally left) by program uninstallers.
In general, in order to make it clearer what exactly you take up how much space on which drive and how to remove it, I recommend reading this article of mine: "", a program in which you can clearly identify what gnaws the coveted megabytes from the disk.
Afterword
Something like this.
I hope that the article was useful to you and you cleared and saved heaps of valuable megabytes.
As always, I will be glad of your additions, reviews, questions, etc., which you can safely write in the comments on this entry.
PS: As a good alternative to the aforementioned Ccleaner, I can offer you to use a wonderful program for cleaning garbage and all kinds of “forgotten” differences.
The question “What takes up so much space on my hard drive?” Is sometimes confusing. It would seem - all the weighty folders with documents, music, films, as well as installed programs we know, but ... When we click on the “Properties” of the hard drive and look at the ratio of full to occupied volume, we understand that there is a clear discrepancy - several (or maybe a dozen or two) gigabytes of our precious disk space.
In such cases, you can audit the contents of user profiles, check hidden system files and folders, the size of the paging file (Pagefile.sys), the hibernation file (hiberfil.sys), the System Volume Information folder in which control points system recovery, run full-time windows utility - “Disk Cleanup” and so on. But these manipulations are not always able to shed light on the truth.
This entry lists several programs whose function is to analyze the structure and amount of information that is stored on your computer’s hard drive. For me personally, it is important that these programs are free, easy to use, and most importantly - provide reliable information. With programs that meet these conditions, I suggest we get to know each other better.

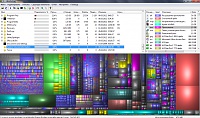
SpaceSniffer is a portable, free program, which helps you understand the structure of folders and files on your hard drive. The visualization scheme of SpaceSniffer will clearly show you where large folders and files are located on your devices. The area of \u200b\u200beach rectangle is proportional to the size of this file. You can double-click on any sector to get more detailed information about it. If you are looking for certain types of files, such as Jpg files, or files older than a year, use the “Filter” option to select your conditions.
The program has many settings, but its interface is in English. The information that she gives out seemed to me not very convenient for visual perception and, as a consequence, for their evaluation. But in principle, it works quickly and efficiently. In any case, getting used to, rummaging through the settings it is quite possible to use.
WinDirStat collects information from the selected disk and presents it in three forms. Directory list that resembles a tree structure Windows explorer, is displayed in the upper left corner and sorts files and folders by their size. The extended list that appears in the upper right corner shows statistics about different types of files. The file map is located at the bottom of the WinDirStat window. Each colored rectangle is a file or directory. The area of \u200b\u200beach rectangle is proportional to the size of the files or subtrees.
The program is not portable, but it has a Russian-language interface. I didn’t go deep into its settings, but one nuance immediately caught my eye - the System Volume Information folder, in my opinion, was empty. In fact, this is not so, System Restore is turned on and a little more than 3 GB is currently used for it. So the program has lied.
Treeseize free

Not portable, a choice of two languages: German and English. Certified by Microsoft. Allows you to start the program in the usual way or from the context menu of a folder or disk. This is a very convenient feature, in my opinion. The program shows you the size of the selected folder, including subfolders. The results are presented in the form of a Windows Explorer tree, so you can expand the selected folder or drive and navigate to the file at each level. To analyze hidden system folders, the program asked to restart the PC.

Disktective is a free, portable utility that reports the actual size of directories and the distribution of subdirectories and files in them. The selected folder or disk is analyzed, and the result is displayed in the form of a tree and a diagram. The interface is English, information collection is fast.

The interface is English, not portable. DiskSavvy is a fast and easy to use disk space analyzer that allows you to monitor disk space usage on hard drives, network drives and nAS servers. The main window shows the percentage of disk space used by each directory and file. You can also easily view pie charts showing the results in graphical format. It has a large number of settings.
DiskSavvy is available as a free version, as well as a full, Pro version that provides additional features and technical support. Free version allows you to scan the maximum number of files - 500,000, with a maximum hard drive capacity of 2 TB. It supports long file names, unicode file names and allows you to copy, move and delete files directly inside the program. Cool program, I liked it.
For each selected folder or drive, GetFoldersize displays the total size of all files in this folder or drive, as well as the number of files and subfolders in them. You can use GetFoldersize to scan an unlimited number of files and folders on internal and external hard drives, DVDs, and discs. network resources. This program supports long file and folder names and unicode characters and has the ability to display file sizes in bytes, kilobytes, megabytes and gigabytes. GetFoldersize allows you to print a folder tree and save the information in a text file.
GetFoldersize versions are available in both portable and installable versions, so you can carry it with you on a flash drive or external usb drive. However, if you install GetFoldersize, the launch option from the context menu in Windows Explorer will be added to all its capabilities, which will allow you to start scanning the volume of a folder or disk by right-clicking on them. Interface English, a good choice settings.

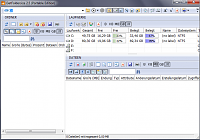
RidNacs is a fast disk space analyzer that scans local drives, network drives or individual directories, displaying the results in a tree and a histogram as a percentage. You can save the scan results in several formats (.TXT, .CSV, .HTML, or .XML). Files can be opened and deleted directly in RidNacs. During installation, you can add the option to start the program in the context menu of Windows Explorer. When scanning a folder, it is added to the list of favorite drives. You can also change appearance histograms by installing special skins (shells). The program is not portable, it has 2 interface languages \u200b\u200b- English and German. She could not analyze some folders, as can be seen in the screenshot.

The portable Scanner program shows a pie chart with concentric rings to display the use of space on the hard drive, external hard drive, network drive. Moving the mouse over the segments in the diagram allows you to display the full path in the object at the top of the window, as well as the size of the directories and the number of files in the directory. Right-clicking on a segment provides additional options. It is possible to delete selected directories to the Trash directly from the program. In the archive with the program there are 2 reg-files, one of which serves to add a scanner to the context menu of Windows Explorer, and the other to delete it.
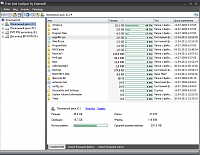
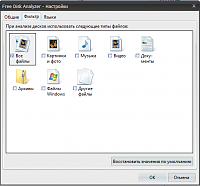
I liked Free Disk Analyzer more than any other program. During installation, a choice of 5 languages \u200b\u200bis offered, Russian is present. A free disk analyzer displays disks in the left part of the window in the likeness of Windows Explorer, which allows you to quickly navigate to the desired folder or file. The right side of the window displays all the subfolders and files in the selected folder or disk, the size and proportion of the disk space that the folder or file uses. Tabs at the bottom of the window allow you to quickly select and view the most large files or folders. You can manage your files directly within the program just like in Windows Explorer. Of the additional features, it is worth noting the launch of the program removal tool, as well as the settings menu that allows you to filter only certain files:
If you previously had problems with the "loss" of disk space, tell us how and with the help of which programs (or actions) you solved them.


