One of the daily tasks of any user is installing programs. Despite their huge variety and some differences in installation, the overall process and the main points are the same. Let's take a look at the installation process using Winamp, one of the most popular music file players, as an example.
Stage One - Download the File
To start installing the program, you need to "get" executable file, that is, containing a program that may be executed by computer. Normally executable files have .exe.In most cases, the first launch of such a file opens the installation program, and not the program itself immediately, but it also happens that installation is not required.
In our case, we download the Winampa executable from one of the first links received in the search engine for “winamp”. It is usually easy to distinguish the program itself from its installer by the icon of the.exe file. In the first case, the icon contains only the logo, and in the second case, this logo is on the box or other similar element. Compare the two icons, which one portends the installation?
Stage Two - Launch and Installation
Installing programs for the user is a series of dialog boxes, that is, those that require the user to participate: agree with something or disagree, select the necessary installation items, etc. Many, without reading, always click Next, and then they are surprised that they have third-party programs on their computer, often malicious ones.
Do not make common mistakes - watch the installation process, do not click thoughtlessly “ok” and “next”
1. Often programs need access to important system folders of the computer, which by default are not provided to them. For correct installation, this must be done manually - run them as administrator. There is nothing complicated about it - just right-click on the executable file and select the corresponding item in the list, it will be marked with an icon with a shield

2. After that, a dialog box pops up asking if this program can be changed, in other words, are you sure you want to install it? Click "Yes" if you have not changed your mind

2.a The following dialog box does not appear in all programs and not always at this stage: language selection

Having chosen the language you need from the drop-down box, click “ok” - this confirms your agreement.
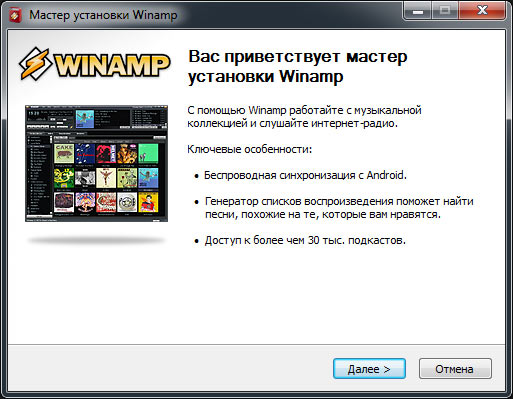
3. After agreeing to make changes, the welcome window of the installed program opens. It describes what kind of program or recent innovations it is. In our example, the window looks like this:
4. Accept the license agreement. Let's not be naive - almost no one reads this item, everyone accepts the terms and conditions, possibly selling their souls to the devil! But if the conditions are not accepted, the program will not be installed, so the choice is small.
 The “accept” button or the like is not always active immediately as above, sometimes you need to check or drag the slider from the right down, simulating an attentive reading.
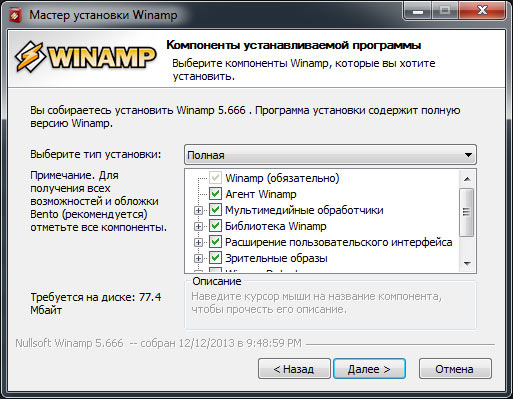
5. Choosing an installation location. A standard item in any installation program. By default, the installation goes to the program folder, which is located on your system drive (on where the operating system is installed). However, it is not always convenient to install it there (for example, there is not enough space)

By clicking the "Browse" button, you can select any other computer folder. After selecting the folder, the installation itself occurs, that is, all files are unpacked and everything is prepared for further work.
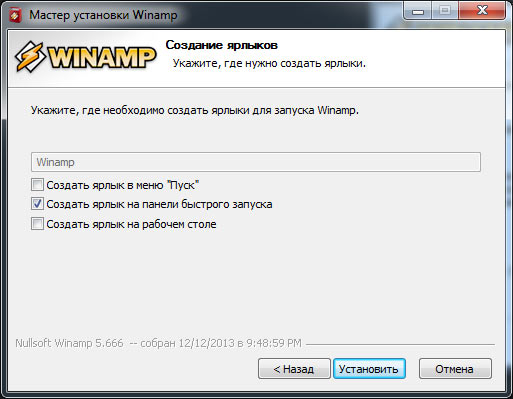
6. Create shortcuts. You are prompted to create shortcuts for quick start programs: in the start menu, on the taskbar or on the desktop. Choose the items that are convenient for you
7. Select file types. A special point that is typical for software programs is the choice of playable file types. If you do not know what you need specifically, leave the default values.
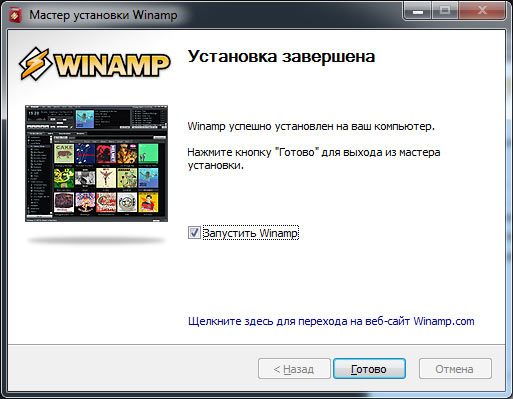
8. The installation completion window. All! The program is installed. Some require a computer restart in order for all changes to take effect, but usually you can use it right away
Carefully follow the installation points!
Under the recommended installation, unwanted programs are often slipped. Here is a great example, installing the AudioMaster program (for recording sound) and with it palm off Yandex.Bar (a strip of tools in the browser changes start page and Yandex search is set by default), moreover, imperceptibly, making the name of the installed one gray.

You have to manually not only change the type of installation, but also uncheck all the flags of the proposed components

There is nothing complicated in installing programs, the main thing is to be careful and follow the various unpleasant tricks of developers and advertisers who want to slip their product quietly.
Varez. Varesey are sites with hacked pirated software from which you can download programs for free. Try to avoid downloading from such sites, as you can never be sure that along with the program you will not get a “gift” in the form of a virus, trojan, etc. Also avoid sites offering anything to download “Free at high speed”, this is usually scammers write. The same goes for tray discs in the markets.
3 step
Installation. Type in search engine name of the program you need, find the official site in the list and download the program. Always scan the program with antivirus before installation, because the developer's site cannot be insured against hacking. Always click on the “Save” button, and not on the “Launch” (see picture). You can run the installation program only from the folder in which it is saved. I will not describe the installation process, because this operation is simple and slightly different for each program.
Batch download programs- this is something that until recently only select advanced users knew. Previously, it was possible to download software from different developers using English-language services, known mainly to system administrators and geeks. Now we have InstallPack, a Russian-language application for batch downloading programs designed for users of any level.
Questions:
How to install several programs at a time?
How to install all the necessary programs on several computers at once?
Advise software to install free programs
Other InstallPack Questions
Step 1
Download the InstallPack application. You can do this from our website or from the official site: https://installpack.net/.
Step 2
We launch the application and get acquainted with the interface. In the main window - a list of programs available for download. They can be sorted alphabetically by clicking on the “Name” tab, or by category - by clicking on the “Category” tab, respectively. The latter option will certainly help when you know what the program is for, but don’t remember what it is called. Opposite each of the applications, you can also see its rating, price, size and a brief description.
Step 3
We’ll review ready-made program sets by going to the dropdown, where “TOP-100” is selected by default. It is worth paying attention to the "Must have" package - it will be especially useful after reinstalling windows. In the Patriot package you will find software from Russian developers. As for the rest, their names speak for themselves.
Step 4
For convenience and time saving we will use search barlocated in the upper left corner of the interface. It is enough to start typing the first letters of the program, and you will immediately see it at the very top of the list. For example, if you set out to find opera browser, type latin "op" on the keyboard - this will be enough.
Step 5
The programs we need are ticked. You can also put a tick in front of the “Silent installation” inscription - this way we will save ourselves from notifications, which, as a rule, come from the installation wizard during installation. Programs will begin to be installed in order to minimize the impact on the processor load.
Step 6
Finally, close InstallPack and make sure that the application shortcut is saved on the desktop. Just in case, we recommend saving InstallPack to a USB flash drive as well - since the application runs without installation, it can also be used as a portable version. We will be able to quickly and conveniently install several programs at once in various situations, whether reinstalling the system, buying a new computer, or working on a new project.
Instruction manual
If the computer where you want to install the program is included in local network, then you can use the disk reader of another computer on this network. To do this, you must first open access to the CD / DVD drive for network users on the computer where it is installed. Then, if you are using Windows, then right-click the “My Computer” icon on the desktop of the computer without an optical drive and select “Map a Network Drive” from the pop-up menu. The connection wizard will start, in which, using the dialog that opens by clicking the "Browse" button, you need to specify the desired device on the network. If the installation disk is already placed in the device, then after the wizard finishes, the menu program recorded on it will immediately start with a set of options for further actions, including installing the program.
Use the file containing the “image” of the installation disk if there is no access to the disk reader over the network either. It is similar to a regular archive, but it contains not only copies of files, but also an exact copy of the structure of their placement on the source disk. This allows using a special emulator program to use the file in the same way as a regular optical disk. If you do not have a finished file with a disk image containing desired programthen you have to create it yourself.
Install on your computer an application that can create images and restore them from files (“mount”). For example, it may be Daemon Tools Lite - a free version of the program that can be downloaded from the manufacturer’s website (http://daemon-tools.cc/eng/products/dtLite). You need to install it on the computer on which the disk image will be created, and on the one where you want to install the program without using the disk. After installing the application, selecting the “DAEMON Tools panel” item in its menu, open the control panel and click on the “Create Image” button. Following the instructions of the program, create an image of an optical disk in any convenient way (via a flash drive, mobile phone, mp3 player, Internet, etc.) copy it to the computer where you need to do without the installation disk.
Right-click the Daemon Tools icon in the notification area of \u200b\u200bthe taskbar of the second computer, go to the Virtual CD / DVD-ROM section of the pop-up menu and select the "Mount image" line in the "Drive 0" subsection. The emulator will open a window in which you need to specify a file with a disk image and click the "Open" button. After that, you can use the virtual installation disk of the program in the same way as a regular optical disk.
For ease of use, program distributions, as a rule, are assembled into one installation, it is also installation filethat deploys when the program starts on the user's computer. Today, the creation of installation packages is automated and not difficult.
Instruction manual
Now select files to be included in the intralator.
Assemble installation file.
Related videos
Virtual image drive is a complete copy drive-carrier from which the image was actually created. With way drive You can perform exactly the same operations as with regular disk, i.e. install programs or games. But in order to work with virtual drivemi, on the computer must be, respectively, virtual drives. Only then can you use images disks and install programs from them. To create virtual drives, you need the appropriate applications.

You will need
- - A computer;
- - Daemon Tools Lite
Instruction manual
Very comfortable and fully free program to work with images Drive is Daemon Tools Lite. Download the program and install on your computer. During the installation, a dialog box appears with the items "Free license" or "Paid license." Check the first item. After installation, restart your computer. Run the program. After its first start, wait while it creates virtual drives. After that, you will be taken to the Daemon Tools Lite main menu. As you can see, the Image Catalog window is still empty. To get started, you first need to add the image to the directory.
Bottom on the toolbar, click on the image drive. In the window that appears, specify the path to the image drivefrom which to install the program. Click on image drive left mouse button, and then click "Open" at the bottom of the window. The image will be added to the catalog.
Now in the main menu of the program, in the image catalog, right-click on the added image. In the context menu that appears, select "Mount", then - virtual optical driveto mount the image on drive. By default there will be only one virtual drive.
Now go to My Computer. There is now, in addition to the physical drive, also virtual. Click on the virtual drive icon with the right mouse button. In the context menu that appears, select “Install or Run the program from drive". The "Program Installation Wizard" starts. Further, following the prompts of the "Wizard" install the program. The further installation process is no different then installing the program from the usual drive.
If the “Program Installation Wizard” does not start this way, open the image drive and in the root folder find the autorun file. Double-click on it with the left mouse button, after which the "Program Installation Wizard" will launch for sure.
To work with disk images, you must use a certain software. Naturally, it is necessary to have the necessary skills in order not to make mistakes in the process of working with this software.

You will need
- - Daemon Tools Lite;
- - Total Commander;
Instruction manual
Connect to the Internet and go to http://www.daemon-tools.cc/eng/products/dtLite. Download Daemon Tools Lite by selecting “Download for Free.” Open the downloaded exe- file and select "Free license." To perform most of the necessary ISO manipulations images it’s not necessary to buy full version programs.
Restart your computer and open Daemon Tools. It usually starts automatically when you log in to Windows. Locate the utility icon located in the system tray (lower right corner of the screen). Right-click on it and select Mount’n’Drive.
In the menu that opens, click on the "Add file"(Icon drive with a plus sign). Select the required ISO file or image drive in a different format. Now right click on the name filea, which is displayed in the program’s working menu.
Select "Mount" and specify the desired virtual drive. After a while, the disk is detected by the system. Open the My Computer menu and browse to the contents of the new virtual drive.
Run the necessary programs or just copy the necessary files on hDD a computer. If you do not need to use ISO file as a virtual drive, and you just need to extract information from it, then use the Total Commander program or the 7z archiver.
Using these utilities, open ISO file and copy the necessary information to your computer’s hard drive or other media.
note
Programs such as Daemon Tools are wiser to use to create a copy of a disc using ISO images or to emulate a real game disc. Sometimes this allows you to bypass some protection systems.
To install the operating system, you must write disk, which will be loaded before entering the operating system. To create such a disk, it is recommended to use various utilities.
You will need
- - a computer with a DVD drive;
- - blank disk;
- - image of the installation disk.
Instruction manual
First, download the image of the installation disk with the files of the desired operating system. It is best to use an ISO image. Now download the ISO File Burning program. This is a free utility designed specifically for burning images to disk.
Install the program. Insert a blank DVD into the drive. Launch ISO File Burning and configure the image recording settings. First select the desired drive. Click the Browse button and select the downloaded ISO image.
Set the minimum recording speed. This will allow you to run given disk on relatively old drives and will reduce the likelihood of errors during burning. After setting up the program, click the "ISO Record" button.
Check the recorded files. To do this, restart the computer and hold the F8 key. In the window that appears, select DVD-Rom and press Enter. Wait for a while until the OS installation program starts.
Sometimes to installation disk add programs and utilities. This allows you to store a complete set of files on one medium. If you have such a need, use the Nero program to record the blanks. Run the specified utility and open the DVD-Rom (Boot) menu.
Select the ISO tab and specify the image file. Now click the "New" button. Find in the right window running menu files you need and move them to the contents of the disk.
Click the Record button. Go to the tab of the same name. Select a disk write speed, set additional parameters, for example, error skipping.
Now press the “Burn” button and wait for the files to be copied to the disk. Check the quality of the recorded data. Remember that boot disks are created with a closed session. Those. you cannot add files in the future.
Related videos
operating system Windows 98 is updated version OS Windows 95. This system is based on MS-DOS 7.1 and is a hybrid product with a resolution of 16/32. Installing Windows 98 can be done using the appropriate installation disk.

Instruction manual
To install the system from scratch, you must create the main partition hard drive and set on it file system. Windows 98 runs on FAT 16 and FAT 32 systems, which differ in maximum partition sizes. You can use the Fdisk program to create disk partitions.
Install the Windows 98 boot diskette and reboot the PC.
Select the menu item “Start the computer without CD support”, press Enter, the command line will open, enter the fdisk command and press Enter. If the disk has a capacity of more than 512MB, then a message appears about the support of larger disks, press Y to install the FAT 32 system and, accordingly, support for large disks.
The Fdisk program menu appears. Using the items “Create a DOS partition, either logical drive DOS ”and“ Create a primary DOS partition ”create disk partitions. To the question “Use under the main DOS partition all available space?” Press Y, then Enter. Press the Esc key twice.
Restart your computer. Again, select the menu item "Start computer without CD support", press Enter.
Type format c: and press Enter. A message appears stating that all data during the formatting process will be destroyed, press the Y and Enter keys. Format all partitions in this way.
After partitioning and formatting the disk, you can proceed with the installation of the system.
Install the Windows 98 bootable floppy disk and restart the computer, select the start with support for devices and disks, press Enter.
Insert windows drive 98 in command line type x: \\ setup, where x is the label of the CD drive.
Press Enter and follow the on-screen instructions.
Related videos
note
A Windows 98 boot diskette is included with the product.
Sources:
It is difficult in our time to find a user who would not have to install computer programs. They can be downloaded from the Internet or found on discs. Programs can be in the form of an installation file, packaged in an archive, or run without installation at all. Setting any programs on the a laptop will not be any different from a similar procedure for a conventional desktop computer.

Instruction manual
To install the program correctly, you need to make sure that there is free space on your computer’s hard drive. But don’t worry - not every program is capable of filling everything with itself. free place on modern hard drives of large volume. Your device configuration must also meet system requirements. programs. For example, powerful graphic editors or programs for video processing, they will be able to work normally only on sufficiently productive computers.
If the program in front of you is in the form of an installation file, launch it and follow the instructions of the Installation Wizard. By default, the Installation Wizard offers the most optimal parameters and you just need to click the "Next" button in a timely manner and wait for the installation to complete. After performing these simple steps, a shortcut will appear on your desktop. programsBy double-clicking on it, you can start it.
Today, on the Internet you can find almost everything: images, music, videos, texts and applications. If you are just starting to learn how to use a computer, you may need to know how to download, and then install and run a program downloaded on the network.
P&G placement sponsor Related articles "How to run a downloaded program" How to find out which flash player you have How to hide a program in the taskbar How to install a game using Alcohol
Instruction manual
After you find the program you need, click on the Download button located in the immediate vicinity of the application name. If there is no such button, perhaps the name itself is a download link. In this case, click on the link bar with the left mouse button. The action described in the first step can lead to one of two results. First option: download will start immediately. In this case, specify the directory to save the file, click on the "Save" button and wait for the download to finish. The second option: you will be redirected to the resource where the file is stored. Find and click the Download button, then follow the steps described above in this step. After the download is completed, go to the directory in which the file was saved. If installation file packed in an archive, unzip the data using the WinRAR program (7ZIP or any other archiver program). Remember the directory that you specified when unpacking the file. In the desired directory, find the setup.exe or install.exe file. If there is no such file, be guided by the extension, find the file with the name of the downloaded program, which will have an “ending” .exe. Left-click on it to start the installation of the program. If you do not install the program on your computer, it simply will not start (but, of course, there are exceptions). Most programs are installed automatically. When the "Installation Wizard" window opens, specify the directory in which it will save the files necessary for the application to work. Next, follow the instructions of the "installer" until the installation process is completed. Restart your computer if necessary. Look for a startup file installed application in the directory in which you installed it or in the "Start" menu. Programs can also create shortcuts on the "Desktop" and on the quick launch bar of the "Taskbar". Click on the program icon with the left mouse button - it will start. How simple
Other related news:
Each file has its own format, which is opened using the corresponding application. So, for example, files with the extension .doc open in microsoft program Office Word, .obj - MilkShape 3D or 3ds Max. So that the program can read desired fileit must first be installed on
In the case when you install applications on a working computer for your own needs, you can use special programs that allow you to hide running program in tray. P&G placement sponsor Related articles "How to hide the program in the taskbar" How to disable automatic
To work with files of a certain format, a program must be installed on the computer that recognizes this format. To start the game, the computer must know where to read the necessary information from. In most cases, applications require installation on local disk. P&G Sponsor
Text documents, images, three-dimensional objects - these are all files various types. In order to open them, an appropriate application must be installed on the computer, capable of recognizing the file type by its extension and reading. To install the program, you must perform a series
Avira AntiVir is an antivirus program provided by Avira. Personal is a free product that protects against worms, trojans and various viruses. The Premium version offers advanced protection against viruses, it is distributed for a very nominal fee.
Pdf is a format that is used to scan books and magazines, it contains instructions for equipment and programs, it is used to save drawings and diagrams. To view this format there is special programs. P&G Placement Sponsor
The Witcher is a game with gorgeous graphics and fascinating fighting styles. Of course, besides this, the game has many other advantages and advantages, but in order to learn them and taste all the joy of the game process, you must still be able to start the game. To start the game “The Witcher”, you must complete


