But Explorer is just the “parent” of all browsers, and using it, many users began to acutely feel the need to improve it. Some optimized its work with various "tricks" in its configuration (you can configure some options for this article), others created their own programs that allow faster, easier and more efficient use of Internet resources. Appeared and successfully developed such browsers like Opera, Mozilla Firefox, and Google Chrome.
In this article we will figure out how to work even more efficiently in these programs using unknown options.
Opera
Famous Norwegian product became an excellent replacement for a regular Windows browser, embodying many wishes of various users. The browser was paid (however, it is now in the free-zone) and perfectly replaced braking and crashed IE. However, many users did not know even half of the interesting options for working with the program. In this article, we will try to figure out how effectively you can use the tools of the Opera browser.1) Off bookmarks! In Opera, now you should not go into the point Bookmark Menu, everything is much simpler - just put your favorite site on Express panelto get quick and easy access to it. This is done like this - a new tab is created, opens Express panel. Click on the plus sign on it, and, depending on whether this page is open / saved, select either the already saved one or fill in the data yourself. For ease of use, Opera will load part of the page to make it easier for you to navigate.
2) Accidentally closed the page? And then it happened again, again and again many, many times? Tired of it? It doesn’t matter - you can either lock tabs (right-click on the tab and Lock tab) or go to Settings - Advanced - Move and tick Confirm exit. Now the browser will constantly ask you whether it is worth closing the current window, or if you made a mistake.
3) Have a good Internet connection and want to increase the speed of your browser? You do not need to download specialized programs for this - just go Settings - Advanced - Network and increase the number in points of the highest total number of connections and the largest number of connections to the server two or more times.
4) If you need to be anonymous, or simply do not want to reveal your personal data to others, go Tools - Delete personal data and clicking on Details, select exactly what you do not want to see on your computer.
Of the additionally downloaded add-ons that are installed through the Extensions item, you can advise AdBlock, which will save you from annoying contextual advertising. The utility is very well organized - few sites do not work with this extension, basically everything is fine.
Mozilla firefox
This is California rival Opera browser and a good replacement for regular IE program..Fire Fox is the first multi-platform browser - it can be found both on a Windows PC and with free software (Linux, UNIX). The browser was created on a free basis, that is, again, Linux is optimized for Windows, although it was originally created specifically for free software. The settings for this browser are pretty unusual - it's an open source browser. So, the settings are stored in a separate file, access to which can be opened by entering about: config in the address bar. Let's look at what exactly can change us a given item of settings.
1) browser.download.manager.scanWhenDone - this item gives the program permission to scan files downloaded from the Internet using the antivirus. The parameter has two parameters - false and true, prohibiting and allowing verification, respectively.
2) browser.tabs.closeWindowWithLastTab - Often you had to swear that after closing the last tab the browser itself was closed? Change the parameter to false and the program will create when you close the last tab just a new tab.
3) general.warnOnAboutConfig - when you open the configuration window, you receive a message that you must be careful? The false parameter at this point removes this window.
4) plugins.click_to_play - How long have you seen a window with flash content that you did not need? Set the parameter true and windows with such content will turn on only after an additional click on it.
Of the additions here you can advise the same Adblock to hide contextual advertising, but it works a little worse than in Opera.
Google chrome
Another replacement for Explorer - development of the famous search giant Google, a convenient browser with open source code (which, by the way, many people noticed, having created its own browser on its basis, for example, Yandex.Browser - the settings described here will help in that program). Chrome has made a lot of add-ons, and the extension store is one of the largest. However, we will only consider standard configuration methods. It’s easy to get to them, although many were confused at first - there is a button with three horizontal stripes to the right of the address bar, click on it, then click Settings. Everything, you are already in the settings of Google Chrome.1) The first thing to do is enter your personal account. In the program, this means Sign in to Chrome. It would seem that we are already in the program, why enter it again? In fact, this is a convenient feature that allows you to save your settings not only on a computer, but also on a Google server after registration and login. This means that you can access your usual browser interface from any computer in the world, simply by clicking the Sign in to Chrome button and entering the data. Data from the browser is stored in your mail, that is, you only need to log in, as in Gmail.
2) Appearance. The Chrome window can be either ordinary white or beautiful with a superimposed image or other color scheme. Here you can choose what your browser will be like.
3) If you are reluctant to search after downloading, where did the file go, then you can not fool around with the search for the loaded object - just drag it to the desired location with a simple click and then drag it to the desired folder.
4) Basic Settings - Search. Here you can choose any search engine that you like.
5) chrome: // flags - if you like experiments, then enter this line in the address bar of your browser and go to the experimental Chrome options. It should be borne in mind that not all options are absolutely safe - you will use a lot at your own risk.
6) chrome: // memory - Shows the RAM occupied by browsers, and not only mine, but also Firefox, also gives information about which extensions use "RAM" and which ones do not.
All of the above settings can be used in Yandex.Browser - The settings for this browser are the same as for the one, since they are on the same engine. In addition, Yandex.Browser offers to copy all data from Chrome, and does it as efficiently as possible.
Internet explorer
This browser has long been a talk of the town.. There are legends about his unstable work, and many call him "a program for downloading browsers." However, you can work quite successfully in it if you apply several small but useful settings. Most of them, however, are hidden from the user in the registry, so open the registry editor (Start - Run ... type regedit and press Enter) and get ready to search for the necessary registry entries.1) If you want to use Explorer in full screenyou can press F11 and use it in full screen. If you need the browser to constantly open in this mode, find the HKEY_CURRENT_ USER \\ Software \\ Microsoft \\ Internet-Explorer \\ Main parameter Fullscreen and select Yes. After that, the Explorer will start in full screen mode.
2) Service - Add-on Management. Remove all unnecessary add-ons in this window, and the browser will become much more stable. As a rule, various “bars” and add-ons load up the already slow Internet Explorer.
3) If you accidentally close a tabTo open it is not a problem, just right-click on the tab and select Restore closed tab.
That’s probably all. We wish you good luck in setting up your browsers, and remember that you do all the settings at your own risk.
TrustedBitrixLogin: Version 8.5
User's manual
Introduction 3
Browser Settings 4
Configure Microsoft Internet Explorer 4
Google Chrome 5 browser setup
Installation of cryptographic information protection system Crypto PRO CSP 7
Reader Installation 8
Installation of agribusiness CryptoTree 11
Admission by certificate to the Bitrix 21C 1C portal
Introduction
The guide is intended for users, administrators and editors of a site based on systems "1C-Bitrix: Site Management", "1C-Bitrix: Corporate Portal", "1C-Bitrix: Portal of Government Authorities". The guide describes the basic steps for installing and configuring the TrustedBitrixLogin module to interact with TrustedTLS software.The solution using the TrustedBitrixLogin module is recommended for companies that have a wide local network and do not use certified cryptographic protection, while employees should have access to remote web resources (for example, Bitrix 1C portals), which are logged in strictly according to GOST certificates.
Important! Work with the authentication module requires the installation of additional software on the client workstation - the cryptographic provider CryptoPro CSP, if necessary, using GOST algorithms. CryptoARM, CryptoPro CSP and TrustedTLS products must be installed on the server.
Browser settings
Important! Currently, the developers of the solution for authentication and protection of the information channel support two types of browsers - Microsoft Internet Explorer and Google Chrome. If these browsers are installed on the client workstation and the portal is logged on with a certificate, the solution guarantees the correct operation of TLS according to GOST algorithms provided by CryptoPro CSP CIP. The user can usually log on to the portal (by login / password) using any of the available browsers.Configure Microsoft Internet Explorer 
To configure the Microsoft Internet Explorer browser, do the following (instructions are for version 8 of the browser):
Find the bookmark in the menu bar Serviceand select Internet Options. A window should appear on the screen. Internet Options.
Go to the window Internet Optionsto bookmark Additionally and make sure that the item in the list of browser options is checked TLS 1.0 (Fig. 1.1):

Fig. 1.1 Enabling TLS Support in the Browser
Google Chrome browser setup 
Follow these steps to configure Google Chrome browser (instructions are for browser version 5):
Open menu Customization and select Parameters (fig. 1.4)

Fig. 1.4 Enabling TLS Support in a Browser
In the window that opens ParametersGoogle Chome on the tab Extended turn on the mode UseSSL 2.0 (Fig. 1.5):

Fig. 1.5 Enabling TLS Support in the Browser
Installation of cryptographic information protection system CryptoPro CSP
Download and install the CryptoPRO CSP distribution kit
To install CryptoPro CSP CIP at the workplace, follow the steps below (the instructions are for CryptoPro CSP 3.0 version):
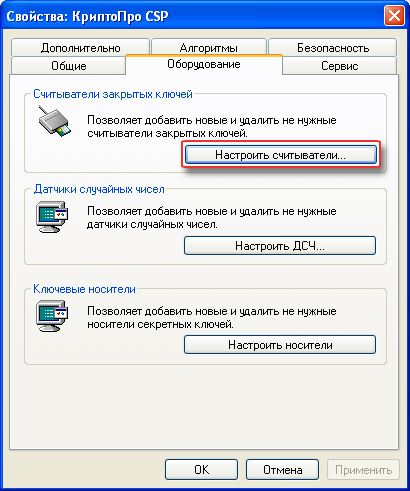
Reader Installation
For CryptoPro CSP 3.0 to work with key media, you must configure these media in the CryptoPro snap-in. When setting up CryptoPro, it is necessary to install the media on the workstation.For work, it is assumed to use several types of media:
eToken / ruToken (key information carrier);
Flash disk ("flash drive");
Diskette.
Setup is done using the control panel ( Start, Settings, Control Panel) In the window Control Panel choose the icon “CryptoPro CSP” (Fig. 2.9). As an example, instructions for connecting the eToken key carrier are discussed.

Fig. 2.9 Access to CryptoPro CSP CIP settings
Installation of the agro-industrial complex "CryptoTree"
In the event that the user plans to use EDS at the workplace, it is better to install a single hardware-software complex containing components in a single distribution kit: CryptoPro CSP, CryptoARM and an alienated media driver (in this case ruToken). In order to start working with the system, it is necessary to install software acquired in the Asset company at the client’s workplace. To do this, the following actions are performed:
Insert the software CD into the drive.
Then you need to run the installation file Crypto3.36.Rus.v.1.00.00.0005.msi, located in the root directory of the CD. The following window will appear:

Fig. 2.20. The initial window of the installation wizard of the APK “CryptoTree”
After checking the hardware configuration and the presence of previously installed software components, the wizard will offer to start installing the software (Fig. 2.21). The user is required to press the button Install.
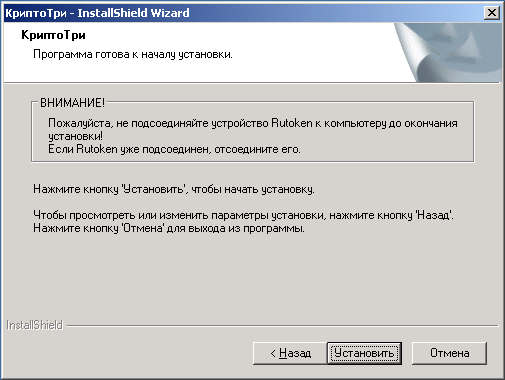
Fig. 2.22. Installation Confirmation
At the push of a button Install The CryptoPro CSP installation wizard starts (Fig. 2.23). The user needs to click on the button Furtherto confirm the installation and registration of the crypto library at their workplace.

Fig. 2.23. The initial window of the CryptoPro CSP CIP setup wizard
At the next step of the CryptoPro CSP cryptographic information protection installation wizard, the user is invited to read the text of the license agreement on the use of the software product (Fig. 1.4). The user is required to accept this license agreement and click on the button Furtherto continue the installation.

Fig. 2.24. Familiarity with the license agreement for the use of cryptographic information protection
Further, the user will be required to indicate the serial number of the license for CryptoPro CSP CIP (Fig. 2.25). If you skip this step and do not enter the serial number of the license, the product will function in full mode for three months, and after their expiration - in limited mode (only to check the digital signature). You can also enter the serial number directly through the CryptoPro CSP application dialog after installing it.

Fig. 2.25. Entering a license for CryptoPro CSP CIP
At the next installation step, it is proposed to choose one of the two installation modes of the software product components (Fig. 2.26). In the normal installation mode, all the necessary components are installed to work with the CryptoARM application in the document management system. Installing additional components (Fig. 2.27) is not required when organizing the user's workplace.
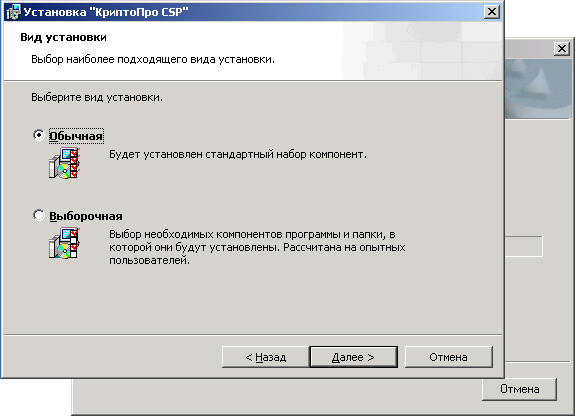
Fig. 2.26. Select application installation mode

Fig. 2.27. Software component custom installation mode
At the next step of the “CryptoPro CSP” installation wizard, the user will be required to note those media of the private key container that will be used when performing the operation with signature and encryption at the user's workplace (Fig. 2.28). To continue the installation, the user is required to click on the "Install" button.
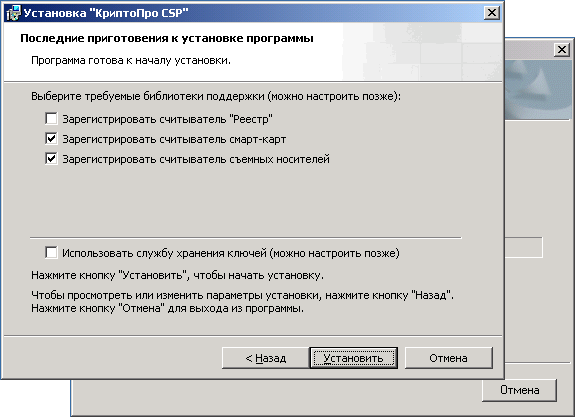
Fig. 2.28. Select a list of registered readers
After the installation of the CryptoPro CSP cryptographic information protection installation is complete, you need to click the Finish button (Fig. 2.29) and without the user’s participation, the installation of drivers of the alienated ruToken media will begin immediately (Fig. 2.30).
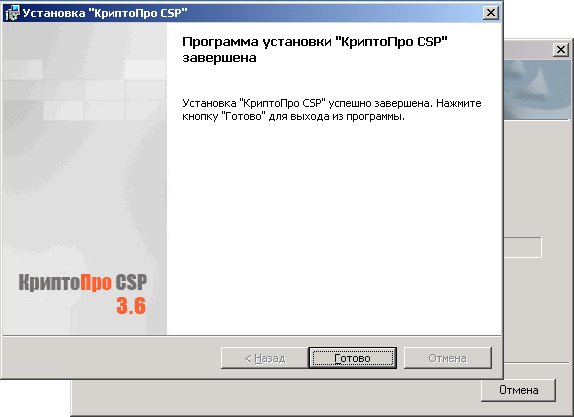
Fig. 2.29. The final window of the CryptoPro CSP installation wizard

Fig. 2.30. Installing ruToken Alienated Media Drivers
After the driver installation process is complete ruToken, the cryptoARM application installation wizard will start (Fig. 2.31). The user needs to press the button Further.

Fig. 2.31. The initial window of the CryptoARM installation wizard
At the next step of the wizard, the user will be required to select the application installation option (Fig. 2.32). The installation of the CryptoARM Start application involves the use of the CryptoPro CSP cryptographic information protection system only for verification of the signature. The application has full functionality when performing operations with digital signatures and encryption using cryptographic providers pre-installed in the system (Microsoft). Entering a license for this version of the installation is not required. Work with GOST CryptoPro CSP CIPI is supported only in signature verification mode. Installing the CryptoARM Standard and CryptoARM StandardPRO applications requires a license to activate a fully functional version. When entering the license, work will be ensured with the CryptoPro CSP installed in the cryptographic information protection system. If the user does not have a license for CryptoARM software, he should not interrupt the installation of the product and continue the installation without entering a license. After obtaining a license for the product, it can be entered through the application dialog box.

Fig. 2.32. Entering a license for a fully functional version of "CryptoARM"
To continue installing the application, the user is required to read the text of the license agreement and accept it. To go to the next step of the wizard - you need to click on the button Further.

Fig. 2.33. View license agreement on the use of CryptoARM software
To install the application only for a specific user (current account), you need to select the "only for me (User)" mode. Otherwise, the application is installed for all users of this computer (all accounts) (Fig. 2.34). After selecting a mode, press the button Further.
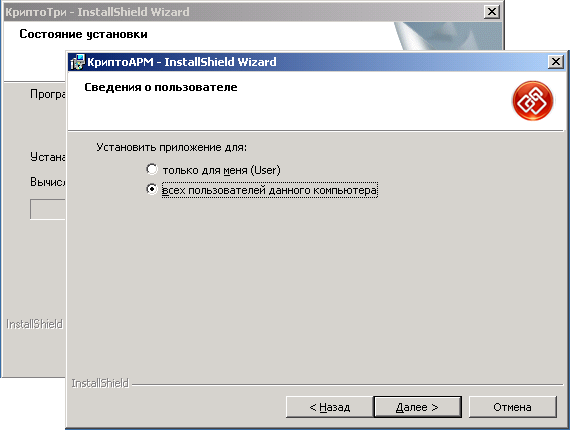
Fig. 2.34. Choosing an installation option in the system
At the push of a button Install (Fig. 2.35), the application components are installed on the hard drive, and the CryptoARM shortcut is created on the desktop. The whole process takes place without user intervention.

Fig. 2.35. Confirmation of the installation process of the CryptoARM software
After the installation of the CryptoARM software is completed, the following dialog box should appear on the screen (Fig. 2.36); the user will need to click on the button Done.

Fig. 2.36. Completing the installation of the CryptoARM application
Upon completion of the installation of the last component - “CryptoARM” software, which is part of the “CryptoTri” workstation, the final window of the distribution installation wizard appears with a proposal to reboot. To complete the installation, the user needs to restart the computer for the registration of the crypto library and CryptoARM software modules to take effect.
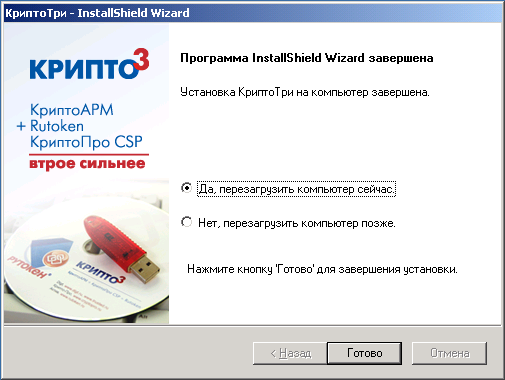
Fig. 2.37. The final window of the CryptoTri installation wizard
Entrance by certificate to the 1C Bitrix portal
To enter a certificate on the portal’s main page, click on the “Certificate Login” link in the authentication form (in this case, top right), a window will appear with a certificate selection, you need to select a certificate and click the “OK” button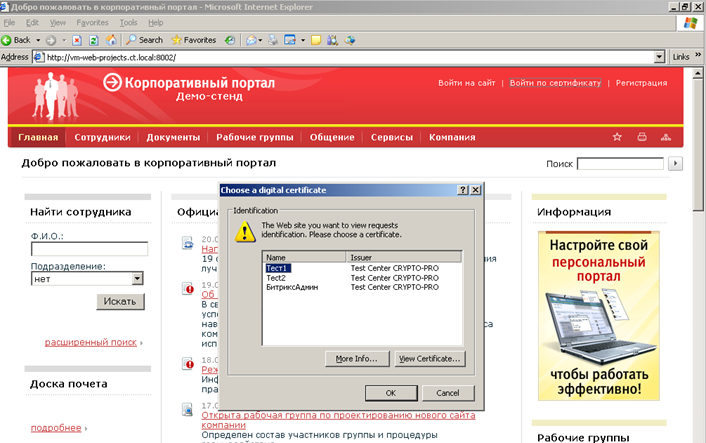
Fig. 3.1 Choosing an authentication certificate
If authentication is successful, the main portal window and user panel will appear.
To be able to view various Internet resources, you need a special program - a browser. There is a fairly large selection of such solutions, sometimes very significantly different from each other. It is impossible to say which browser is the best, since each of them has a number of features that make it popular in certain circles of users. So, from Microsoft it is convenient in that it is part of the Windows operating system; has the greatest compatibility with old and new standards; Firefox is characterized by low memory consumption, etc.

Experienced users know that before starting to use the browser must be configured - this will solve some issues even before they arise. Today we’ll talk about the basic configuration of a very convenient browser - Opera.
Opera browser setup
There are two branches of the development of this program, one of which ends on version 12.16, and the other is already represented by version 19.0. Consider the first one performed on the Presto engine, since the browser settings in subsequent versions are similar to Google Chrome. If there is only one user, we recommend making a small change to the configuration file, thereby making the Opera portable. This setting of the Opera browser will allow you to save all data when reinstalling the operating system and immediately continue to work. Of course, the program folder should not be deleted. We believe that this is one of the most important points when setting up "for yourself." In the directory with the installed program you need to find the operaprefs_default.ini file, open it in notepad and add a block
Further browser settings are as follows. In the working program, you need to press the combination Ctrl + F12 and choose which page to open at startup (if there are no special requirements, then specify SpeedDial). In the "Advanced" tab, the "Downloads" item is of particular interest, where you need to specify the desired folder. Here, unchecking the hiding types and double-clicking on the desired extension, you can select the application that will be launched from the "Opera". For example, it is so convenient to link torrent files with a client program. In the next tab - "Programs" - the settings are made by checking the checkbox next to the check item, you can tell the system to open all links using this application.
 Remember everything ...
The History tab allows you to set the size of the cache: the larger it is, the fewer requests the browser sends to frequently visited pages, as part of the once downloaded data is stored on the computer. When setting up, it is worth paying attention that when the number of addresses is more than 1000, malfunctions can occur. On weak computers, the "Cache in memory" item should not be set too large: it is preferable to leave it in automatic mode. Of particular interest is also the Security tab: here the user can enable or disable the protection algorithm against fraudulent Internet resources. Disabling this feature is not recommended. Here you can select the browser update mode.
Additions
But choosing the "Extensions" program main menu, you can get to the page for selecting and loading additional modules that expand the capabilities of the browser. We recommend not ignoring this feature, but carefully studying the list of offers and adding the necessary modules to the program.
Reset to initial settings
Sometimes, for one reason or another, it becomes necessary to return all the settings to their original form. To do this, delete the operaprefs.ini file. Its placement can be determined by opening the menu item "Help - About the program".
Almost every user who constantly works with one browser had to access his settings. With the help of configuration tools, you can solve problems in the work of the web browser, or simply adjust it as much as possible to your needs. Let's find out how to go to Opera browser settings.
The easiest way to go to Opera settings is to type Alt + P in the active browser window. There is only one drawback with this method - not every user is used to holding various combinations of hot keys in their heads.
Go through the menu
For those users who do not want to memorize combinations, there is a way to go to the settings is not much more difficult than the first.
We go to the main menu of the browser, and from the list that appears, select the "Settings" item.
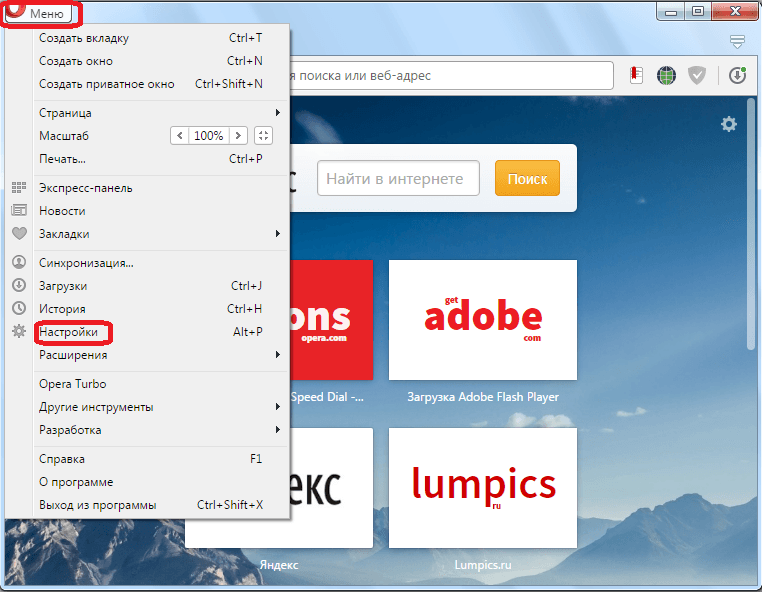
After that, the browser moves the user to the desired section.
Settings Navigation
In the settings section itself, you can also make transitions to various subsections through the menu in the left part of the window.
In the "Basic" subsection all general browser settings are collected.

In the Browser subsection, there are settings for the appearance and some features of the web browser, such as language, interface, synchronization, etc.

In the “Sites” section, there are settings for displaying web resources: plugins, JavaScript, image processing, etc.

In the “Security” subsection there are settings related to Internet security and user privacy: ad blocking, auto-completion of forms, connection of anonymity tools, etc.

In addition, in each section there are additional settings that are marked with a gray dot. But, by default they are invisible. In order to enable their visibility, you need to put a check mark next to the item “Show advanced settings”.

Hidden settings
Also, in the Opera browser, there are so-called,. These are browser settings that are still only being tested, and open access to them through the menu is not provided. But, users who want to experiment, and feel the presence of the necessary experience and knowledge to work with such parameters, can go into these hidden settings. To do this, simply type in the address bar of the browser the expression “opera: flags”, and press the Enter button on the keyboard, after which the experimental settings page will open.

It must be remembered that when experimenting with these settings, the user acts at his own peril and risk, as this can lead to browser crashes.
Settings in old versions of Opera
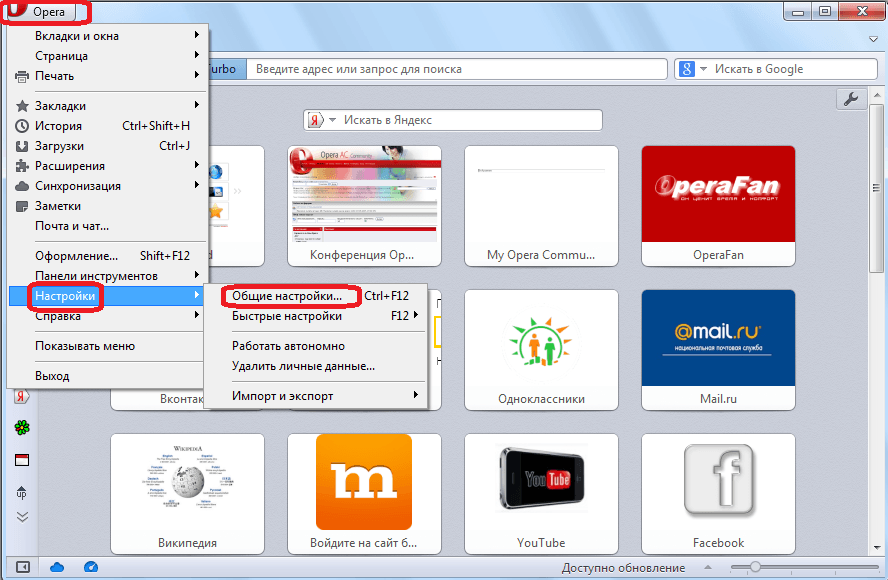
Some users continue to use older versions of the Opera browser (up to 12.18 inclusive), based on the Presto engine. Let's find out how to open the settings for such browsers.
To do this is also quite simple. In order to go to the general browser settings, just type the key combination Ctrl + F12. Or go to the main menu of the program, and go sequentially to the "Settings" and "General Settings" items.
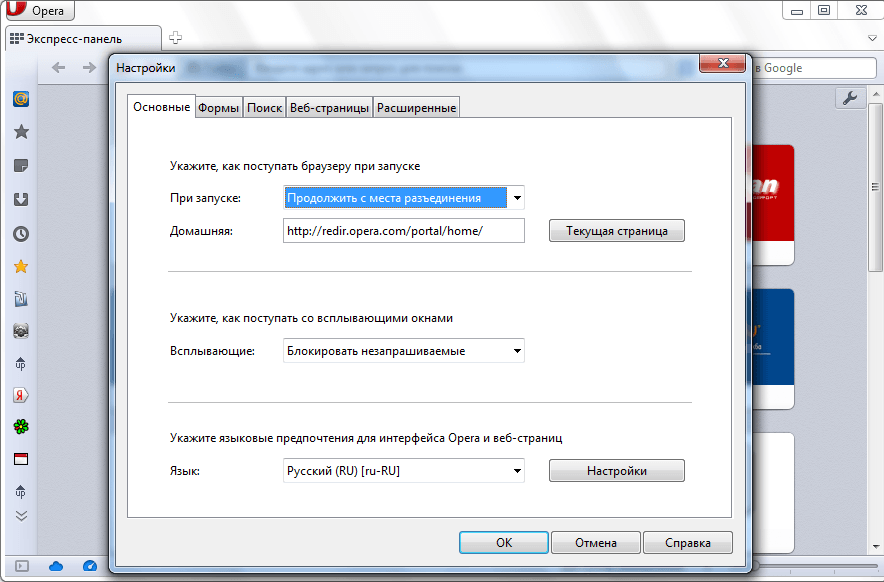
There are five tabs in the general settings section:
- Basic;
- Forms;
- Search;
- Web pages
- Extended.
To go to quick settings, you can simply press the F12 function key, or go through the menu items "Settings" and "Quick Settings".
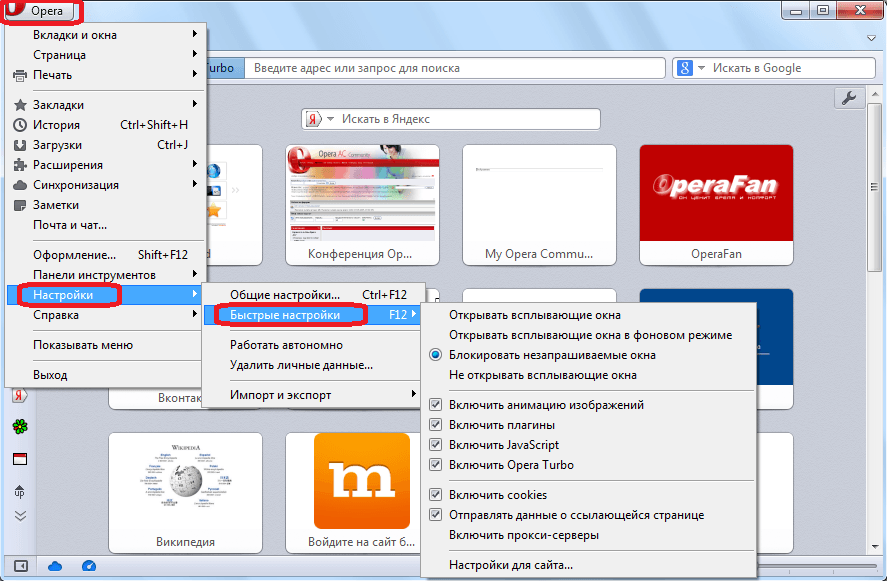
From the quick settings menu, you can also go to the settings of a specific site by clicking on the "Site Settings" item.

At the same time, a window opens with the settings for the web resource on which the user is located.

As you can see, switching to the Opera browser settings is quite simple. It can be said that this is an intuitive process. In addition, advanced users, if desired, can access additional and experimental settings.


