To save important information, users use external media. Usually this is a flash card where the necessary data is stored. The disadvantage of this option is the limited memory that the medium has. Therefore, many users prefer to use the second. However, another problem arises here: Windows does not see the second hard drive. Faced with such a situation, do not rush to carry the computer for repair or refuse such a convenient way of storing information. The problem is completely solvable on its own, you just need to help the system find the second hDD. And we will tell you how to make the hard drive visible.
It happens that the system does not see the 2nd hard drive, let's figure out what to do in this situationThe main reasons and possible solutions
The situation when the computer does not see the second hard drive usually occurs after reinstalling or updating the system. The reason may lie in software crash or mechanical damage. We will analyze the situation with specific examples.
- If 7 is not visible, the connection port channel in the BIOS may be inactive. To check, go to the BIOS and check the status of the ports. The activation mode for SATA and USB is indicated by ENABLE.
- The hard disk is not distributed, therefore invisible to the operating system. To perform this action, download the Acronis Disc Director program. If you do not want to install third-party software on your computer, you can designate the partitions when install windows. When partitioning, do not mix up the discs.
- System error. Problem caused motherboard, to fix it, you need to update the drivers.
- BIOS does not see the new hard drive due to technical problems with the connection. The reasons lie in the connecting cable or contacts. In this case, the disk does not work, this is determined by the absence of characteristic noise during unwinding. If the hard drive is spinning, but an extraneous noise or knock is heard, the media is damaged. The solution in these cases will be the replacement of the damaged element.
- The BIOS sees the hard drive, but the system does not. If the operating system not found message appears on the monitor when the system boots, it means that the problem lies in the incorrectly prioritized loading of the media. To troubleshoot, you need to reconfigure the download.
- Windows 7 does not see SSD drive when overloading the system. The reasons are a large number connected to the ports of external devices. To eliminate it, you need to disconnect all unnecessary from the computer and connect external HDD after booting the system.
Having figured out the reasons why the computer does not see the second hard drive, consider other options for solving the problem.
How to "register" a second disk in the system?
If the computer stops seeing the hard drive, the built-in application responsible for managing media will help. This utility is present in Microsoft products from the "seven" and older. You can get to the desired section by pressing the R + Win keys simultaneously. This command will open a dialog where the command Discmgmt.msc is entered. After entering, press the action key (Enter).
As a result, the control section opens digital media. In the window that opens, pay attention to the following points.
- Lack of media information. This indicates that disk initialization is needed.
- Media sectors marked as unallocated.
- The complete lack of data on the hard drive, but there is a RAW section. This suggests that the media is not assigned a letter designation, respectively, the conductor does not see it.
If the external HDD is not initialized, perform the following procedure:
- Right-click on the non-displayable media. A menu will appear where you need to select the initialization section of the hard drive. The system will offer to structure partitions, and will offer two options: MBR / GPT. Please note that the "seven" may deprive the user of the right to choose. Accordingly, the above options for structuring will not appear.
Important! The choice of partition structure depends on the operating system and hardware capabilities. The GPT option is suitable for Windows 8/10, provided it is installed on a modern hardware. The MBR version is used for the "seven" or subsequent software versions installed on older computers. If you are unsure of the capabilities of the computer, choose MBR.
After the initialization process, workspace media will be displayed as unallocated. To fix the situation, right-click on the unallocated section, select the creation item in the menu that appears simple volume.Then, following the instructions of the setup wizard, a drive is assigned a letter and a file distribution system is selected. Here we recommend giving preference to the NTFS system.
Please note that sections external drive can occupy all the free space of the media. In this case, you need to choose the size of the partitions yourself. To do this, you need to specify an arbitrary partition size, provided that it is less than the total memory. Repeating actions depends on the number of sectors required.
After performing these steps, the problem when the second hard disk is not displayed will be resolved.
Use the command line
If the system does not see the second hard drive, you can solve the problem with command line. This method is suitable if the physical disk does not have dynamic partition extensions.
Advice! If you have little idea of \u200b\u200bhow a computer works, the command line is not for you. Such a radical intervention in the operating system can provoke a system failure.
Open the command line (R + Win). In the window that appears, the following commands are entered: discpart and list disc. Note that the commands are entered sequentially in the order shown here. The first command is applied when the hard drive is not displayed in the BIOS. The second - if one or more sections are displayed as unallocated. We remember the lettering of the medium that is not displayed in the system. Then enter the additional command select disc A. Note that the symbol A stands for “invisible” media. In our case, this letter is replaced by the literal value that you assigned to the external drive.
- Clean Specified command will delete all the information available on the hard drive.
- Create partition primary. The command sets the size of the partitions, if you need a breakdown of the media by sector.
- Format FS \u003d NTFS quick. Enter if fast formatting of removable media is required.
- Assign letter \u003d A. This command assigns a letter index to an external hard drive. Instead of the letter A, indicate any character to indicate the medium.
- Exit. Shutdown in a command window with saving results.
WATCH THE VIDEO
It is worth noting that when the disk disappeared after installing Windows, that is, the media was used earlier, and there was important information on it, you do not need to use the above commands. This is guaranteed to lead to data loss. In this case, we recommend renaming the media and using partition recovery utilities. The methods given here are not the only ones, but they can be used at home, without even having special skills and knowledge.
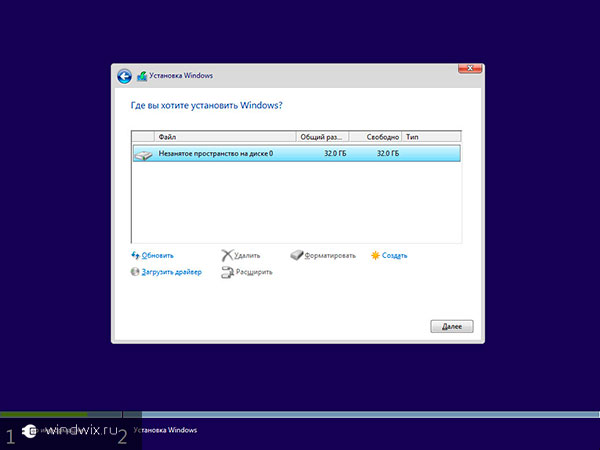
One of the rare but very unpleasant problems when installing the operating system is the inability to determine hard drive setup program. Often, if, users simply do not know what to do next and where to look for the roots of this problem. Usually the question arises - Can do that? We want to say right away that everything is not always so serious and as a rule this situation is completely solvable, and with minimal computer skills you can cope with it on your own. So, why doesn’t you see the hard drive when installing Windows 7?
No hard drive connection
The first reason may be that the hard drive is not connected to the computer. Perhaps, before installation, the user for some reason turned off the power to the hard drive and simply forgot to reconnect it, or the plug did not fully enter the connector. This version, of course, is banal, but you should never discount the human factor. Therefore, first of all, it is worth checking the correctness and reliability of connecting cables coming from motherboard and power supply to the hard drive.
Hard Drive Failure
The second reason is the failure of the drive. You can confirm or refute this option if you go to Computer BIOS (by pressing Del, F1, F2 or other keys - it depends on the specific motherboard) and see if the hard drive is detected there. If the drive you are looking for is not in the list of connected drives, then it most likely does not work. If in the BIOS, but the Windows setup program does not see it, then you need to move on to other methods of solving the problem.
Hardware conflict
The third reason is a hardware conflict on the motherboard side. In this case when installing Windows 7 does not see the hard drive and asks for a driver. To fix such an error, you need to download SATA / RAID drivers for the motherboard on another computer (accordingly, having learned the exact name of its model) and write them to the media where it is located windows distribution. After that, in the installation window of the operating system, when the window for selecting the hard drive appears (where, of course, it will not be displayed), you must click the link Download and specify the path to the SATA / RAID driver.
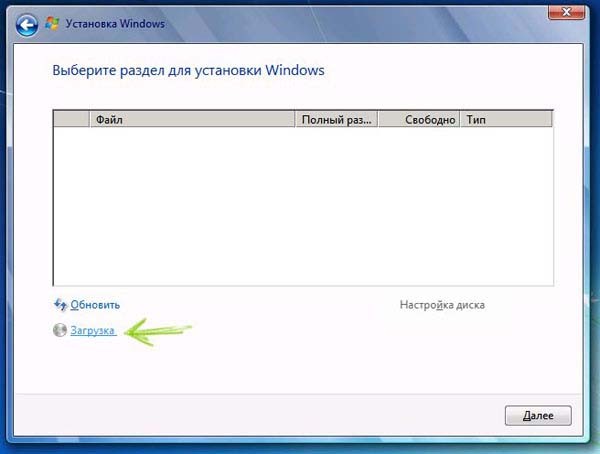
The driver will install, after which the installation program will be able to identify the hard drive.
The same problem can be fixed in a slightly different way: write the driver to a floppy disk or USB flash drive, insert the drive into the appropriate drive and press the F6 key during the installation of the operating system. After that, the installation program will see the hard drive without any problems.
You can also use an unofficial build of Windows with integrated drivers and applications. Such an assembly will download all the necessary drivers on its own and recognize the hard drive when installing the OS.
AHCI Connection
The fourth reason - the hard drive is connected in AHCI mode. Because of this, in some cases, the computer does not see the hard drive when installing Windows 7. To fix this situation, you need to go into the BIOS (by pressing Del, F1, F2 or another key) and go to the section responsible for managing drives. There you need to find a menu that allows you to change the connection modes of the hard drive - it can be, for example, Configure SATA As, SATA Mode, AHCI Mode and so on. Here you should switch the mode from AHCI to another available one, and then restart the computer.
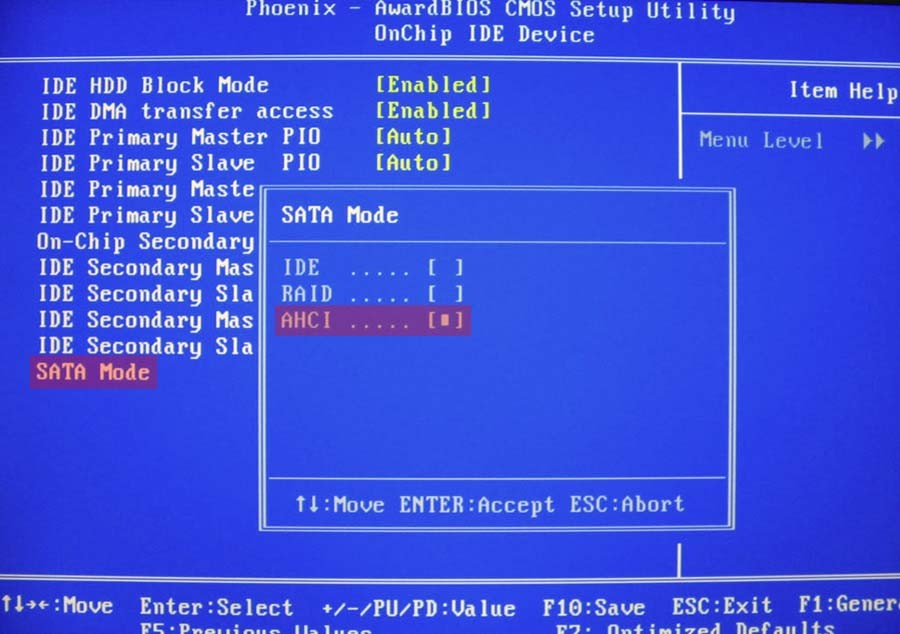
If everything is done correctly, the installation program will determine the hard drive and will be able to install the operating system. The problem the user is facing if when installing Windows 7 does not see the hard drive, in most cases, enough easy solvable. Having corrected it by the methods described above, you can proceed with the further installation of the operating system.
By the way, if you want to install the system not from the disk, but from USB drive, we suggest reading the article. This article covers 3 top programs for these purposes, and also demonstrated the process of creating a bootable flash drive.
Windows does not see the hard drive - what should I do?
Hard Drive hard disk drive, HDD ”is one of the most reliable and fastest storage devices. With the help of the "hard drive" we can transfer terabytes of data from one computer to another if there is no possibility to use network technologies. But, like any other device, there may be some problems with the hard drive. What to do if Windows does not see the hard drive. We will try to answer this question in our article.
Note!!!
Reasons why the operating system may not detect the hard drive:
- The drive is not connected.
- Winchester is in the wrong mode.
- Lack of logical drives.
- The “gathering” of the file system.
Let's try to analyze each problem and find a solution for them.
1.Disk is not connected to the computer.
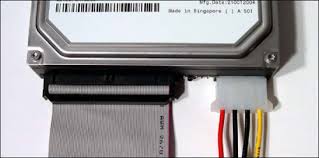
The reason is quite banal, but it is very common in life, the reason for this may not be the end of the power cable or Data cable.
Proper connection of SATA cables.
Correct connection of IDE cables.
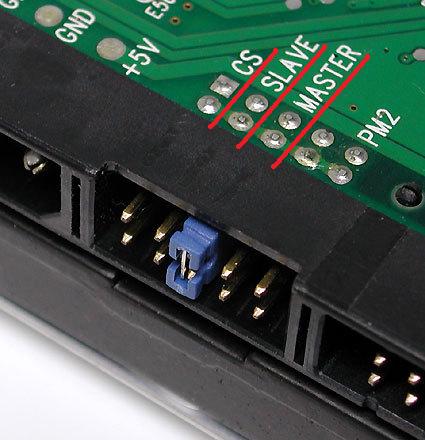
2. Winchester mode is not set correctly.
An incorrectly selected mode of operation of the hard drive can become a problem when loading and determining the hard disk in the system. You need to carefully study the jumpers (jumper) on the hard drive and select “Master”, on the one which is the main (from which the operating system is loaded) and “Slave”, on the one which is the disk for transferring information.
3. Lack of logical drives.
In the case when a new hard drive was connected, partitions may not exist at all in it, and it will simply have free space. At the same time, in the BIOS and the “Device Manager” we will see the “screw” as a device, but we won’t be able to save anything to it. Programs like Partition Magic and Acronis Disc Director will help us deal with this problem. These programs allow you to create, delete and resize the hard drive partition. An analogue of these programs in the environment of the operating system Windows 7 and higher is the Disk Management utility as part of computer management programs.
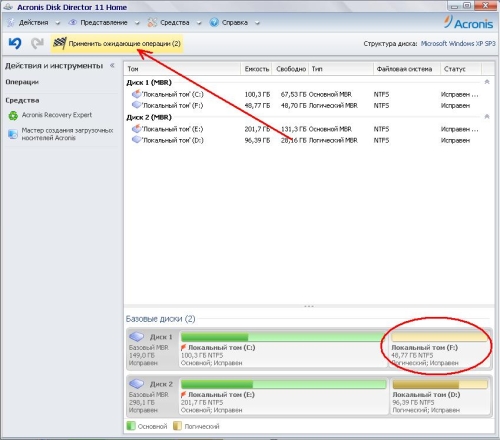
For example, let's try to create a partition on the hard disk using Acronis Disk Director
When the utility starts, we will see a window in the right part of which our hard disks, and in the left operation, which we can perform with them.
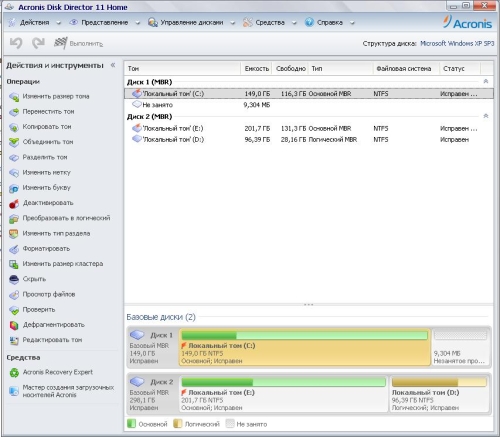
We select a hard drive on which we are going to perform an operation and try to create a logical volume with the size we need. To do this, select unallocated space and click Create Volume.
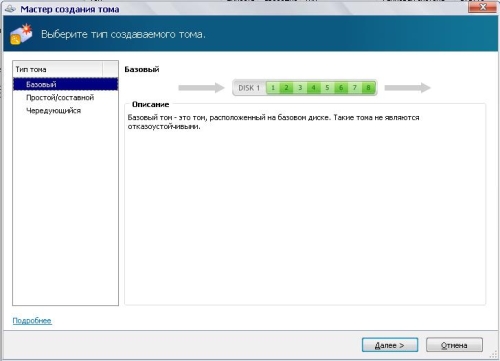
The launched "Volume Creation Wizard"; will offer to take us a couple of steps to create a local disk, in which we will need:
Select the type of volume to create.
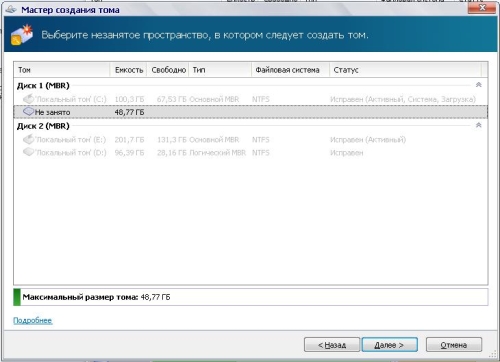
Select the unallocated space in which to create the volume
Specify the size of the volume to be created
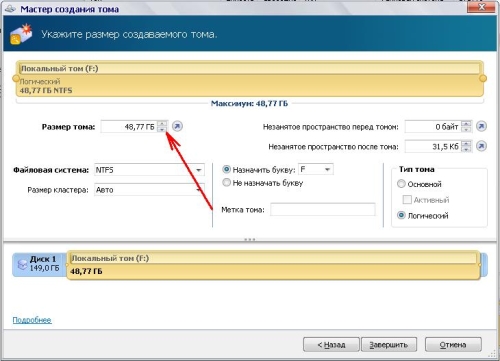
After completing these steps, click "Finish" and in the main window of the program we can see how our sections will look after creation. Click “Apply pending operations” to create our section.
4. Restoring the file system of the hard drive.
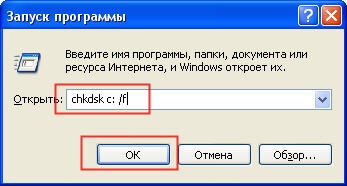
The “gathering” of the file system on the hard drive is one of the most difficult software errors. The cause of the occurrence may be both incorrect transportation during the transfer of the hard disk, and the malware robot. But opportunities for recovery do exist. To help us with this, we come up with a standard utility in the Windows operating system family - CHKDSK (check disk-disk check). The work of this program is to check our disk for errors and fix them.
To run this utility, you need to write the following command in the "run" window: chkdsk c: / f, where C: is the drive to be checked.
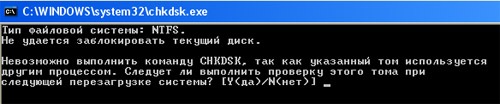
In this case, the program will remind us that verification is possible only with an unused partition, and will carry it out at the next reboot.
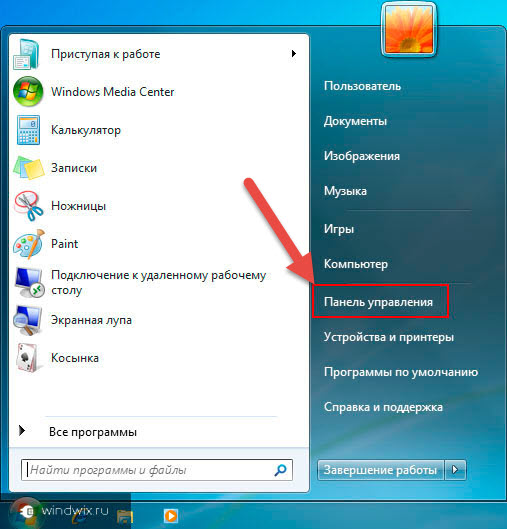
If you use the operating room windows system, then surely you had to install a second hard drive on your computer. And often in this situation, after you open my computer, you don’t see the second hard drive. How to be, it just worked on another computer, and after connecting here it simply is not visible in Explorer. But don't panic right away. That's because it still needs to be configured.
Just in this article I will tell you what to do. There is a computer that does not see the second hard drive, to be more precise when the system does not see the second hard drive. This can be done with the built-in tools of your operating system. In principle, there is nothing complicated, be careful and have a little patience. Consider several options, for example, if you bought a second new hard drive or if you connected a previously used hard drive.
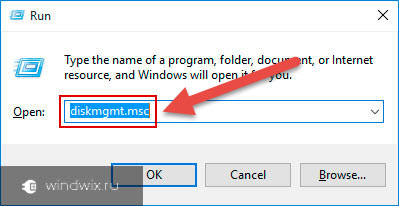
- Open the window Runby clicking Win + x and execute the command diskmgmt.msc.
- Next we find desired drive and press the right mouse button and select Change drive letter or drive path.
- In the window that opens, set the free drive letter.
After these steps, a new one will be displayed in your explorer local disk. If it does not help, see the second method.
The computer does not see the new hard drive
When connecting a second or new hard drives sometimes it is necessary to configure the hard drive.
And you can also watch the video instruction on what to do if the computer does not see the second hard drive:
In principle, that’s all. In this article, we figured out what to do if the system does not see the hard drive. Well, or the hard drive does not appear in Explorer. As always, this can be done using the command line or Windows PowerShell. But I did not show this method, since using the Disk Management program is much easier. I hope the article was useful to you and helped to figure out why the hard drive is not displayed in Explorer. And also write how you solved this problem and whether one of the ways helped you. Do not forget to share the article in social networks and subscribe to updates.
Greetings, dear readers.
Sometimes users are faced with a situation where the computer can not determine the hard drive. Moreover, this situation is accompanied by various symptoms. Today I will try to tell why Windows does not see the hard drive under certain conditions.
Sometimes computer users are faced with a situation where the device does not see the HDD when installing Windows. The problem is mostly due to the lack of the necessary drivers. This usually manifests itself when in Explorer"There is no desired partition, but the BIOS sees what is needed. There are several options for solving the ailment:
After installation( )
Sometimes memory may not be shown after installing the OS. Or as a result of connecting to a new computer. In this case, the first thing to check is the correct connection.
In addition, the second hard drive can often simply be turned off in the system to speed up work. To change the situation, you need to do a number of actions:
In the first case, click RMB on the name of the disk. Choose " Initialize". Specify the structure GPT or MBR (not always). It is recommended to use the latter. At the end, the “Not distributed” area will be obtained.
Then again, right-click on this segment and select " Create a simple volume».
Follow the prompts of the wizard.
After this, the second hard drive should appear in the conductor. Sometimes a reboot is required.
The last option is solved by pressing RMB on the desired area and selecting " Format". Assigning a letter can sometimes help.
In AHCI mode( )
The mechanism itself is intended for devices connected via the SATA protocol. It gives you the opportunity to use additional features that speed up the work.
Sometimes there are situations in which the device is in AHCI simply not determined. Moreover, in case of shutdown, everything starts to function normally.
There is a solution to the problem, although it can be somewhat painful for many users. For this we need installation disk with windows 10 or others latest versions OS from Microsoft. So, we need to do a series of actions:
External device( )
Many users stumble upon a situation where their system for some reason does not perceive external hard disk. As usual, this can be for various reasons.
So, for example, often HDD-USB, just purchased at the store, simply may not be formatted. The solution is simple - using built-in or third-party utilities we produce everything you need.
In addition, drivers can also become a problem. You can find this out simply - try connecting the equipment to other units. If everything is fine on them, then the solution is simple:
To do this, right-click on the item and select the desired line. If the system could not automatically find what it needs, we go to the official website of the removable device or motherboard. We find the right one software and install it.
You can also use special programwhich in auto mode Finds and installs everything you need. I already mentioned and talked about her in previous articles more than once.
Another, albeit cardinal, but effective method is to reinstall Windows.
Moreover, it is worth noting that it is better to find a clean image, without any additions. This often helps when using components with large amounts of memory, for example, 3 terabytes.
( )
I would like to separately tell you that similar problems often arise among users who, in addition to Windows, also use Mac OS. The fact is that in the last operating system interaction with different manufacturers hard drives. But at the same time, for constant stable operation, only certain ones need to be used. And unfortunately, this situation cannot yet be resolved differently.

Well, I hope now you will know what to do when suddenly the hard disk is no longer detected on your computer.
Subscribe yourself and share the blog with others.


