Working with the BIOS requires great care, as incorrect settings make the computer stop turning on or correctly detect connected equipment. You can reset BIOS settings using three proven reset methods on your PC and laptop.
Reset BIOS
If you can get to the interface of the basic input-output system, then there is a chance to reset the BIOS through the appropriate item in the "Exit" section. This is one of the simplest options that does not require opening the computer system unit. So, to restore the BIOS and return standard settingsfollow these steps:
This method works on a laptop and is suitable for a computer. After rebooting, the BIOS settings will be set to default. All changes made by the user after the purchase of the computer will be canceled.
Jumper Reset
The first method works if you have access to the BIOS. To reset the BIOS to the factory state, if you forget the password, you will have to disassemble the system unit and use the mechanical jumper, the change of position of which interrupts the current supply to the CMOS battery. The battery is responsible for storing BIOS settingstherefore, if you temporarily de-energize it or pull it out, the parameters will be reset to factory defaults.

To finally discharge the remaining voltage, hold the system unit power button for 10-15 seconds. The computer is de-energized, so nothing will happen. Then return the jumper to its original position and assemble the system unit. Factory settings are set, now all parameters in the BIOS are set to default.
Removing the CMOS Battery
Speaking of the jumper, we already mentioned the CMOS battery, which is responsible for storing BIOS settings. Accordingly, if we extract it from motherboardand then paste it back, then you can restore the settings that were set by default. The algorithm of actions is the same as when using the jumper.

After resetting, insert the battery into place and assemble the system unit. After turning on the computer, there will no longer be any password on the BIOS, and all parameters will return to the factory state.
Reset on a laptop
If the system unit is easy to disassemble, then when resetting the BIOS on a laptop, you may encounter some difficulties. It’s good if you can enter the BIOS and restore the default settings by selecting the appropriate mode in the “Exit” section. If a password is set on BIOS, you will have to disassemble the laptop. Turn the laptop backside towards you. See if the laptop has a small hole labeled “CMOS”. 
If you find it, insert something sharp into the hole - for example, a paper clip. Hold for 30 seconds to reset the BIOS on the laptop. If there is no hole, you will have to remove the back cover and look for a CMOS battery or JCMOS pins on the motherboard.
- Disconnect the laptop from the network, disconnect the connected devices (mouse, speakers), remove the battery.
- Remove the back cover (on some models it is enough to remove the protection random access memory and hard drive).
- Remove the RAM strips and hard drive.
Under the RAM strips there should be two pins that are signed as "JCMOS". They need to be closed with a screwdriver. 
- Connect the power cord to the laptop (you do not need to insert the battery).
- Turn on the laptop. Wait 20-30 seconds. All this time the contacts should be closed.
- After 30 seconds, turn off the laptop.
Now you can insert RAM strips and hDD into place and cover them with a protective panel. After these difficult manipulations, the BIOS settings will be reset to factory settings.
On some laptop models, instead of two contacts on the motherboard, you can find three pins with a jumper or a special reset button.
In order not to suffer with the search for a suitable element, read the laptop manual, everything is described in detail there.
Greetings!
BOIS stores information and manages the basic equipment that is installed on your computer. The BIOS is also responsible for the correctness of the time displayed in the operating system.
Why reset BIOS
It may be necessary to reset the BIOS to the initial settings in the following situations:
1) You installed some additional equipment in your PC, but refuses to be detected by the operating system, or there are problems with its operation: the equipment disappears from the system from time to time, the system freezes, etc.
2) In attempts to “overclock” the computer, you set the parameters in the BIOS, which are actually not supported by the equipment installed in your PC. As a result, the computer completely stopped turning on.
3) You have updated the BIOS, and in this situation, it is recommended to reset the settings.
4) There was a need to reset the password that is requested when the computer is turned on (before the actual loading of the installed operating system).
This material will be described in detail and demonstrated on specific examples how to reset BIOS settings to default (default) on a personal computer and laptop. We will consider resetting the settings both from the BIOS itself and directly switching the contact \\ battery on the computer’s motherboard, which feeds the BIOS chip and does not "forget" the saved settings.
BIOS reset via the corresponding menu item
The simplest and most logical way to reset BIOS settings is to use the menu item that is available in the BIOS settings.
It should be noted that this item is available in almost all BIOS versions and variants, however its name and location may vary.
In order to guide you, I will show with a concrete example the location of this item in a typical BOIS.
To enter the BIOS settings, you must right away after switching on (even before the operating system is loaded), press the key several times Del on the keyboard of a personal (stationary) computer, or another key, if it is a laptop. Most often, the key is used to enter the BIOS on laptops. F2.
In the once popular and ubiquitous BIOS version, this item was located in the main menu:

Load Fail-Safe Defaults - reset BIOS parameters and settings to the default option. In this mode, all components of the computer will pass a full test. It is recommended to resort to it before installing the operating system and if it is suspected that some component is working intermittently, for example, a RAM card.
Load Optimized Defaults - if you select this item, the BIOS settings and parameters will also be reset, but with a bias on optimization. IN this mode some components will pass the "stripped-down" test, so that the computer will boot faster.
If we talk about laptops, then everything is somewhat more complicated. In them, the BIOS menu interface can be greatly redesigned and stylized as a company brand.

For example, in a laptop HP BIOS looks as follows. Here, the settings are reset by selecting Restore Defaults.
The name of the item resetting the BIOS may be different, namely: Load Setup Defaults, Load Optimized Defaults, Reset to default, Factory default, Setup defaults and consonant. The location may also vary, most often this item is in the tab Exit.
Based on the foregoing, you will need to find this item in your BIOS version (including UEFI) and click on it. BIOS navigation via keys arrows, and select with Enter.
After resetting the settings, the computer will either restart, or you will need to exit the BIOS while saving the settings that were reset to the default option.
If you do not have access to the BIOS due to the password set, or the computer refuses to turn on after “experimenting” with the BIOS settings (as an option, in an attempt to overclock the computer), then the following method of resetting the settings is suitable for you.
BIOS reset via a jumper on the motherboard

Most computer motherboards have jumpers that physically consist of pins and, if necessary, are shorted using nozzles (jumpers). By closing / opening certain jumpers, the configuration of certain PC parameters is carried out.
By closing the jumper, which refers to the BIOS, the settings will be reset to the default option.
To reset the BIOS by using a jumper, do the following:
Unplug your computer by unplugging the cord from the electrical outlet. Then you need to arm yourself with a screwdriver and unscrew the screws that hold the side cover of the computer.
After gaining access inside, you will need to find a jumper on the motherboard located there, which is responsible for resetting BIOS settings and parameters. This jumper in most cases is located near the battery, which feeds the BIOS and does not let you forget the settings.
As a guide, the jumper is often signed accordingly: BIOS RESET, CMOS RESET, CLEAR CMOS, and the text can be shortened, for example, CLR_CMOS.

The jumper itself can consist of either two pins or three. If there are three pins, then rearrange the jump to the next pair of pins, and if there are two, you should borrow the jump from a different place on the motherboard. Only before taking a jumpik, remember, or rather take a picture of its original position.
After that, you need to hold the power button for about 10 seconds. The computer, of course, will not turn on because completely de-energized, just this procedure necessary to reset BIOS settings.
Having done this, return the jump to its original position, and then put and screw the computer cover back on, connect the power.
Done, the BIOS has been reset. Now you can re-configure the BIOS settings, or use the ones that were set by default.
BIOS reset method with battery removed
The BIOS reset jumper is usually located next to the battery. This is due to the fact that the chip in which the BIOS settings are stored is not non-volatile. This battery just feeds the BIOS, allowing you to save the user-defined settings, as well as maintain the built-in clock during the period when the computer is de-energized.

Pulling the latch, carefully remove the battery for several minutes, and then return it to its place - the BIOS settings and parameters will be reset.
It should be noted that in rare cases the battery is non-removable. Take this fact into account if you see that the battery is very thoroughly seated in the slot.
Brief summary
Now you know in which cases it is worth resorting to resetting the BIOS, and how to do it. The first method is universal, and the second and third are more suitable for stationary personal computers. Notebooks also have a battery that powers the BIOS, but getting to it is often significantly more difficult.
If after reading the material you still have questions, do not hesitate to state them in the comments.
In this video instruction, I will show how to restore or restore the factory settings of any laptops myself and there are no beeches.
I will show this using the Lenovo G570 beech as an example, but this also applies to other laptop models:
Asus, Acer, Hewlett-Packard, Samsung, Lenova, Sony Vaio, RoverBook, Fujitsu, Dell, Toshiba, Packard Bell, DNS.
Resetting or restoring bios to factory defaults means resetting it to default or default settings.
To reset, the first thing we need to do is enter the BIOS of our beech.
Each laptop can have its own keys.
I will list the most common keys for entering the bios of books.
These are F2, f10, DEL, FN + F2.
They must be pressed immediately after the start of the laptop, on many beeches at the start it is written below that you need to press to enter the BIOS.
After you and I got into the BIOS of your laptop, we must go to the tab Exit.
The reset is done, precisely, through the EXIT BIOS tab.
And there we get up on the default setup default setups for loading the BIOS by default.
In English, it will look like this: Load Default Settings or Load Setup Default.
On different laptops in different ways, but the words loud and default should be present.
We need to stand on this inscription and press Enter twice.
The first time you press enter, the question will appear whether we want to load the factory BIOS settings exactly.
Select Yes (usually it is immediately highlighted) and press enter again.

After that, BIOS settings are loaded by default, which come from the factory.
To do this, we tear out the item labeled Save (save) if we want to save and stay in the BIOS.

Sometimes after loading the factory BIOS, the beech refuses to load, and writes that the device from which it is loaded was not found.
Then you need to re-enter the BIOS and configure the BOOT menu, indicating to your book from which device or hard drive to boot.
Such dumps should be done if problems of a different nature begin with a beech, laptop, notebook.
Suspension, hovering, brakes.
The reason may be incorrect BIOS settings.
Below, see the video instruction on how to reset the Lenovo g570 beech to factory settings.
How to reset the BIOS - for sure, this question has repeatedly raised an edge for many users personal computer. A procedure such as resetting BIOS settings can be extremely useful in cases where the computer does not help reboot and, as it seems, it can no longer be revived by the user, and the only way to restore the PC to work is to visit the repair shop. Since resetting the BIOS to factory defaults, this method often helps solve problems associated with a malfunctioning PC.
There may be a need to reset BIOS settings for various reasons. For example, it may happen that you conducted experiments with computer equipment as part of overclocking the processor, and as a result, your computer just stopped loading. Or you need to reset a password that prevents you from entering BIOS. In short, the reasons may be different. Methods for resetting BIOS can also vary, and not every method can be applied in any situation. But it’s better about everything in order.
All BIOS reset methods can be divided into two main categories: hardware and software. The most famous methods at the moment include the following:
- Reset BIOS to default settings using BIOS Setup.
- Reset by installing special jumpers on the system board.
- Reset by removing the system board battery.
- Reset by closing specific BIOS chip pins.
- Reset using port programming.
Let's consider these options in more detail.
Reset BIOS to default settings using BIOS Setup
The easiest way to complete the BIOS reset procedure is to start with this particular software method. For its implementation, it is enough to enter Setup (usually by pressing the Delete key on the keyboard when the computer boots up), find the appropriate section, select the option you need and restart the computer. After the reboot occurs, the factory default settings are activated in the BIOS. The option to load default BIOS settings is available in almost every BIOS version. Usually it is called Load Defaults or something like that.
Everything seems to be simple, but there are some limitations. The thing is that it will be difficult for you to apply this method in the event that you can not enter the BIOS Setup - for example, when your computer does not boot at all. A similar situation occurs when entering the Setup or continuing to work with the computer after loading is prevented by an unknown password. Thus, the functional utility of the described method is limited.
Reset BIOS by installing special jumpers (jumpers) on the system board
Naturally, many motherboard manufacturers foresaw the possibility that the user would not be able to clear the BIOS memory using Setup and load standard factory settings in a similar way. Therefore, solutions were built into the circuit board design that allow you to reset the BIOS settings in hardware.
Most often, for this purpose, you can use a special jumper. Of course, finding a small jumper on a large motherboard is not always easy. Therefore, it is usually most reasonable to look for it in the manual for your motherboard.
If you do not have a manual with you, you should remember that quite often this jumper is indicated on the motherboard as Clear CMOS (and therefore this type of jumper is often indicated by the term Clear CMOS).
Clear CMOS jumper on motherboard
In addition, the jumper can most often be found near the battery that supplies the CMOS memory. However, this rule is far from always respected, therefore it is more reliable to use the motherboard circuit to search for a jumper.
Normally, the Clear CMOS jumper closures are enough to clear the CMOS memory. For reliability, it is worth holding the jumper closed for a while. As a rule, after a few seconds, the BIOS is erased, and after that you can turn on the computer again.
We hope that all readers know the following principle, but still recall it again: all operations to install jumpers must be carried out on a computer completely disconnected from the network, otherwise the results can be disastrous for the motherboard.
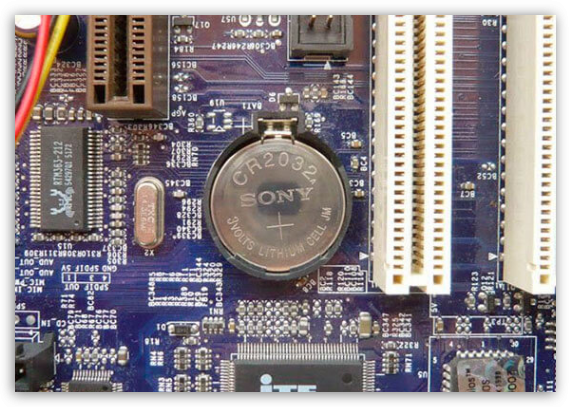
Reset BIOS by removing the CMOS battery from its slot
In the event that there is no corresponding jumper on the motherboard (or you could not find it), but there is a CMOS battery on the board, you can try to reset the BIOS memory in the following way - just remove the battery from your socket. However, this method is not always as effective as it might seem at first glance. The fact is that CMOS memory usually does not require a lot of energy to work, and therefore BIOS data located in this type of memory can be stored in it long time even in the absence of food. Therefore, in order to make sure that you managed to completely clear the BIOS memory, you need to hold the system unit without a battery for a while. Usually, after a day, the CMOS memory is completely cleared, although very often a shorter period of time may be sufficient for this.
The CMOS battery is usually quite easy to find on the motherboard - as a rule, it is made of shiny metal, and its surface has the shape of a circle with a diameter of 1 cm. To remove the battery is also quite simple - just click on the special latch that holds the battery in the slot.
Like the jumper installation operation, removing the CMOS battery can only be done on a computer completely disconnected from the network.
However, it should be borne in mind that the battery is not always carried out in a removable form. Quite often, especially on a laptop, it is simply impossible to remove the battery without damaging the system board. In this case, the only way out for the user is often going to the service center.
Other BIOS reset methods
If none of the above methods helped you, and you don’t know how to clear the BIOS, then in some cases you can try other methods. However, they are not as reliable, and you can use them only at your own peril and risk.
First of all, it is worth noting that such a frequently mentioned BIOS reset method, such as closing the BIOS battery contacts, is unlikely to help you. Moreover, if you apply it, then this will be fraught with failure of the motherboard.
However, for some BIOS chips, a positive result sometimes brings closure of certain contacts of these chips. Below we provide a list of the relevant chips and the procedures that must be performed with them to reset the BIOS:
- P82C206 Chip - short circuit of contacts number 12 and 32 (or 74 and 75).
- F82C206 Chip - short circuit of contacts 3 and 26.
- Dallas DS1287A, DS12887A, Benchmarq bq3287AMT - short circuit of contacts 12 and 21.
- Motorola MC126818AP, Hitachi HD146818AP, Samsung KS82C6818A - closing pins 12 and 24 (it is also possible to pull the chip out of the socket).
- Dallas DS12885S, Benchmarq bq3258S - short circuit of contacts 12 and 24 (or 12 and 20).
When performing actions to close the contacts of microcircuits, you should follow a few simple rules. First of all, it is worth remembering that all operations with microcircuits should be provided only when the power of the computer motherboard is turned off! In addition, often simply closing the contacts may not be enough to reset the BIOS, so it is best to keep the contacts closed for several seconds.
In addition to BIOS reset hardware, as well as reset using the Setup program option, there are also purely software methods based on writing a specific set of data to computer ports. First, you can use special utilities. But if you do not trust the programs downloaded from the Internet, then you can create a similar program yourself. The easiest way to do this is to use the Debug utility included with MS Windows. To carry out a BIOS cleaning operation from AMI or AWARD manufacturers, just run the Run program and enter the following set of commands:
After entering these commands, a computer restart is required.
Features reset BIOS for laptop
How to reset BIOS - this question arises for users working on a laptop no less often than those users who use a desktop PC to work. However, on a laptop, this operation is usually somewhat more difficult. In many cases, you can use the same methods on a laptop as on a desktop PC. Often, however, on a laptop, the user may encounter enhanced BIOS data protection, especially on a top-class laptop. In this case, to perform a BIOS reset operation on a laptop, it is best to contact specialists.
Conclusion
Any user may find useful information on how to reset BIOS settings. If your computer does not show signs of life, it malfunctions, or you cannot load it because you do not know the password, then in this case, do not despair. Resetting the BIOS contents to the factory settings in most cases will allow you to restore your computer.
There are many ways to reset BIOS settings, and the most reliable and universal of them are hardware methods, such as setting jumpers on the motherboard or removing the CMOS battery.
The BIOS is the most important component of the computer, which takes on many important tasks: it is responsible for checking the devices of the computer, determines basic settingsprepares and launches operating system. In the event that there are problems with the BIOS, the most rational way to resolve them is to perform a full reset.
The user may need to reset the BIOS for various reasons. For example, you visited the BIOS settings and made many changes that did not affect the computer’s performance for the better. In addition, there are times when the BIOS refuses to start, so the first thing to do is to perform the procedure, which will be discussed below.
Perform a BIOS reset
Resetting the BIOS will allow it to return to the factory state, depriving all user and other settings. Often, this step allows you to solve many problems with your computer.
There are three ways to go to the factory settings: through the BIOS menu, through the computer’s motherboard, and using the battery of the motherboard. Each method will lead to the same result, but their implementation is fundamentally different.
Reset BIOS through its menu

Reset BIOS through the motherboard
This method is suitable if the BIOS does not start in your case. It is not particularly difficult, however, here we already need to look under the body of the system unit.

Reset BIOS through a battery on the motherboard
The third way to return BIOS to factory settings, which will also require "implementation" under the body of the system unit.
Each of the presented methods is guaranteed to cope with the task. How to use it is up to you based on the type of problem, your skills and preferences.


