In this article I want to consider installation issues on external USB- the drive is not an ordinary set of resuscitation tools, but a full-fledged working OS that you can carry with you. And if Linux is put out of the box onto any device and works without problems, then Windows does not install and does not work.
It may also be useful when booting Windows on new hardware (when updating motherboard etc.).
Initially, there were 2 conflicting demands of the soul: “I carry everything of mine with myself” and “I do not want to be loaded”, which ultimately resulted in install ubuntu on the external drive. Everything was wonderful, but some incompleteness was felt. And I decided to install Windows 7 there too.
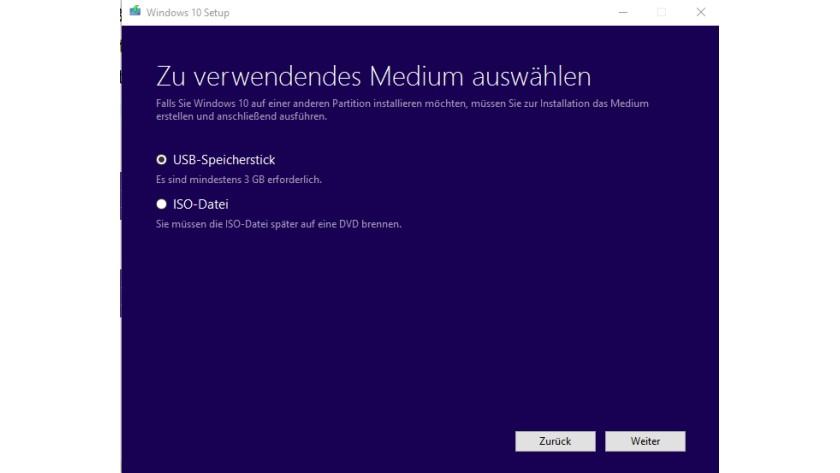
These instructions show how to create only a bootable flash drive. It is very important that you make this step right, if you do not click, your computer will not activate, since you will not have the right to it. Your computer will boot setup files and automatically write them to your flash drive.
This file is also useful if you want to create bootable mediawhenever you want. There are two ways to upload a file. Save it to your computer and run it. Plug in the flash drive and it will appear at the top of the device. Two common installation problems have been resolved.
But there were problems:
- Windows 7 warns of the impossibility of booting from USB (which one is caring) and does not want to be installed on it;
- the installer does not know how to work with VHD;
- when booting Windows 7 from USB-storage, BSOD appears.
We will need
- The external USB drive itself (in this case, USB-HDD) with the created partitions.
- Virtual machine (in this case I will rely on VMWare Player).
- it is worth noting that to uninstall install.wim you can use the ImageX utility from WAIK (Windows Automated Installation Kit, available for free download from the developer's website), you can read about it in other articles, for example, but my soul really resisted downloading it or something extra, so I decided to get by with already installed VMWare (VMWare Player is available for free download)
- Windows 7 Enterprise or Ultimate (only they support Native VHD boot). But you can use another version and put it on the physical partition, not VHD - in this case, you just have to skip the console manipulations during installation.
Go
In the virtual machine settings, connect to the Windows 7 CD-ROM and add the HDD: “Use physical disk” -\u003e select the drive that matches USB (most likely, it is the last). It is worth noting that at this stage other disks are best removed from the virtual machine. We boot from the CD and get into the installer.Installation
Now is the time to tell the VHD installer. Shift + F10 opens a console. Suppose we want to install Windows on C: \\ win7.vhd:Diskpart
create vdisk file \u003d C: \\ win7.vhd type \u003d fixed maximum \u003d 25000
select vdisk file \u003d C: \\ win7.vhd
attach vdisk
create partition primary
list volume
Fortunately, the problem can be fixed in one of two ways. Follow the wizard as before and recreate installation media. Finally, make sure you enable the virtualization option. If you look carefully, you can see the corresponding key displayed on the screen when you turn on the computer. The setup menu varies greatly in appearance and location, but they all follow similar logic, so if you look closely, you can find all the options mentioned in this guide.
In the "Settings" section, find the "Download" section. Locate and select the option “Save and restart” or similar. Step 4 - Work with the license key. At this point, you will be asked to enter your license key. You must enter this at this moment and you will no longer be asked for it.
We make sure that we have 3 volume with Fs: UDF, NTFS, RAW. Well or more, if the disk has other partitions.
Now you can leave the console and proceed to the direct installation. When choosing the installation destination, we should see Disk 1 Partition 1, when selected, Windows 7 will carefully warn about possible problems, but still allow it to continue.
Now you can sit back and relax. At the end of this step, the installer must write the bootloader to the physical partition that will start Windows from the virtual disk. As a result, we get working windows 7 inside the virtual machine. It's time to get ready for launch from USB.
This is the easiest way to handle the installation. What you see on the next screen depends on whether a previously installed operating system is installed on a blank disk or if it is installed on it. Keep in mind that this can also delete your manufacturer’s recovery partitions, so you won’t be able to return to the previous operating system.
It doesn’t matter: some handles bring the stick to the correct format regardless of the initial state and at the same time add the necessary bootloader. First, make sure that there are no important data on the stick, as they will be deleted during the next steps. This facilitates the next steps. Assign the first letter free disk on a stick. However, on some computers the stick does not appear there, in others it is even found in this menu.
If the system does not boot
If we have already come to a new place and it turned out that the OS doesn’t want to start, you have to fix it with what it has: the Repair boot section, into which Windows will most likely offer to boot after unsuccessful attempt (if not prompted, press F8 before downloading). Then open “Command Prompt” (in case of failed auto recovery before that click “View advanced options”).USB boot
Because restart once again all too lazy, we check again in the virtual machine. Turn it off, in the settings we delete all the HDDs, start up, transfer the USB-HDD to the virtual machine and ... We understand that our disk is not visible. But after all, in the list of what was required, BIOS support was not mentioned for loading from USB.Download the plop boot manager - there are iso and img images in the archive. We tell the virtual machine to boot from plpbt.iso (or plpbt.img for floppy) and it will transfer control to the bootloader from USB. Everything should go well and eventually Windows 7 will start and say that a new device has been found.
Now we can transfer the external drive to any other real machine and start up. That's all. Your suggestions for practical application are interesting.
Others control a different order for each type of device; Before the inside hard drive a panel must be installed. Turn off your boat function as much as possible. Or you can carry it in your shirt pocket and start with all the important applications on each computer. Instead of a full operating system, you can also copy the emergency version onto a stick and thus have a powerful rescue tool at hand in case of a problem.
To do this, go to the "Start" menu and enter the search field. A list of drives to browse connected storage media. Attention! This ensures that you always get correct drive for all other stages of work. If this is not the case, create the bootable media yourself and the system repair media.
Brief Summary
- we start the virtual machine by connecting usb-hdd and the Windows 7 installer;
- during the installation process, indicate what we want to install on VHD (optional);
- change the priority of loading drivers;
- run from USB, if the BIOS cannot, then use plpbt.
Important notes / unresolved issues
- before loading the kernel, there may be problems with access to the drive at addresses above 137Gb (I had) - you can only advise moving the partition to the beginning of the drive (in fact, including because of this restriction, I installed it on VHD, and did not create it new section);
- after each windows boot reports that something has changed and it is necessary to re-specify the swap - it is best to specify the explicit size of the swap with your hands and assign it to D: (physical section, C: - virtual disk), but when you start on another machine, the question again arises, and if there the size of the memory is different, then the swap will be selected automatically;
- quite honest guys suggest calling% windir% \\ system32 \\ sysprep \\ sysprep.exe before transferring to another hardware, but I noticed that this is not necessary and even harmful (they re-offer to create a user / reset settings / it requires an extra restart after searching for drivers) - personally, everything works fine for me under the condition of normal shutdown and, which is typical, if the system was previously run on this equipment, then the restart will take place instantly, all drivers will be picked up automatically and without restarts;
- the bootloader (bootmgr, Boot \\) must be located on the physical disk (done automatically), but I would like to reset everything inside VHD and transfer control to it from grub. These guys made their own grub with the vhd module, but I didn’t master it (first I had to edit the Makefiles so that vhd.mod was created, but after copying to / boot / grub /, the insmod vhd command failed with the incompatible license error "; A more detailed study of the vhd.c code showed that grub-1.97 itself had been amended, which didn’t work for me, because Ubuntu uses grub-1.99). Add tags
So, my story will be about installing a full-fledged system on USB (flash drive, memory card, external USB HDD), and not about the banal creation of a bootable flash drive. Since the network is full of articles on how to install on a USB drive operating system, I chose from all the options the simplest and most understandable.
In the upper left part of the window, click Create System Restore Disk and follow the instructions in the wizard. In the system repair data medium, click either Continue or No, do not restart until a dialog box with the corresponding option appears.
Step 3: Caution
Most quick way find the correct drive - use the directory command to move around the drives. However, this is much simpler.
Choose Edition, Language, and Architecture
On the next page of the tool, select the language you want, the version you want to download, and the architecture, 32-bit or 64-bit.For reference: there is a method using the standard windows utilities 7 Diskpart, there is a way in which the program is applied UWM W7, but there is one like that, but they are all hemorrhagic (IMHO).
Therefore, I decided to spend my little practical experience using the PWBoot program, which eliminates the smoking of long footcloths and does all the work for me automatically. It is absolutely free and weighs a little - only 1.28 MB.

Then you can choose which stick you want to use. 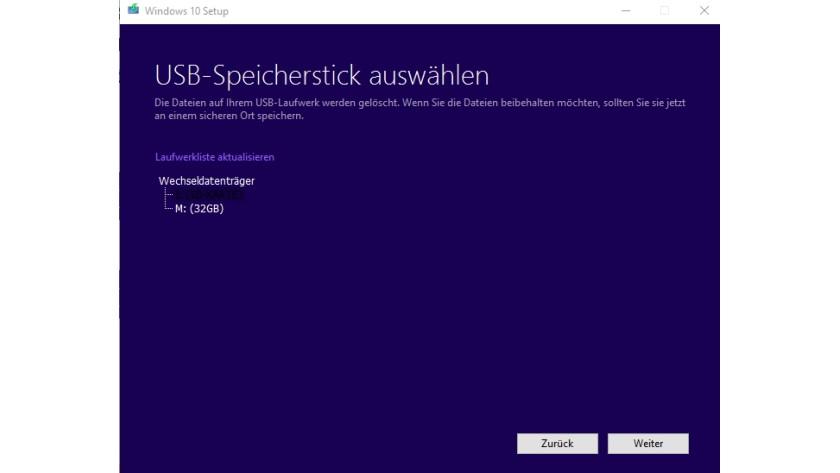
Run the input prompt using the context menu in administrator mode. You may need to provide an emergency tool for both modes. However, with the appropriate tools, it still works.
Then you can safely test new versions without endangering the main system. On the “General” tab, you will see “Type”, what type of disk it is. However in running system no drivers can be installed. Result are long times boot and inert system.
I didn’t have a USB HDD at my fingertips, 8 GB flash drives, too, so in the form of a perversion I involved my long-suffering samsung smartphone Wave 8500, which has an 8 GB Kingston memory card. First of all, it was necessary to merge from it all the data on hDD a laptop. Then I needed a file install.wimwhich is in the directory sources drive with windows distribution 7. This file contains all the Windows files themselves:
Therefore, you should first try how your computer behaves. You can use to change sections. In cloning mode, enter the destination disk. In the next step, you define the system partition and boot partitionby clicking on the desired sections. Select the Legacy option if you want to system files hit directly on the disk.
It's faster than new installation. Since there is still no information in the installer, the language will be selected first. Then you can enter your license key and activate the system. Otherwise, use the option to skip key entry. Then follow the instructions of the installer. Exceptions are systems in a virtual machine, even if they are activated in a virtual machine. The values \u200b\u200bthat need to be changed depend on the installed driver. You can also refer to the name of the driver files that you installed.

I copied the file from the original Windows 7 image, with the ability to select any edition during the installation process.
1. Run the utility Pwboot and select the default item - Windows installation:
Here you do not need to change anything. With multiple levers you can make it a quick installation tool. This has both space and cost and energy savings. This is usually not a big problem with a netbook. If these prerequisites are met, it can begin at any time.
If you have an image file. Just plug it in and restart your netbook. For example, through a network directly to a netbook. This completes the normal installation process. This guide shows how to do this. Installs in this case the one for which you have a license. Then click “Next.” Now select the boot and system partitions on external media data. If the system has only one partition, you cannot be mistaken here, because there is only one way to click something.

2. Specify the path to the file install.wim and the Windows 7 edition that we want to install on USB (in my case):

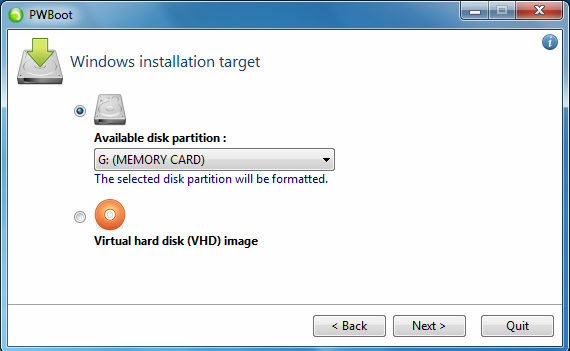
3. In the next step, you need to specify the USB-drive to install the system ( G:):
Confirm the selection of sections with "Next". A percentage indicator helps you track progress. If the display goes 100 percent, the tool reports success. This completes the process. Of course, now you can also install system drivers and everything else that you need.
After selecting the correct file, click Next to proceed to the next step. In the window that opens, go to the folder in which the file is located. Open command line. This operation depends on the version of the operating system. Or you are in it, as in my case, the time will soon come for its installation.
Note: note that the program offers two installation options: the first involves the direct installation of the OS on a USB flash drive, and the second installs it in a virtual file hard drive (VHD), from which it will be possible to boot from any computer under running windows 7 editions Maximum (Ultimate) and Corporate (Enterprise), because only these windows versions 7 support booting from VHD. This is such a bummer, dear users of Windows 7 Home Premium and Professional. With the second option, there will actually be only one file on the disk in which all your work will take place. At the same time, in the OS loaded with VHD, the physical disk will also be visible.
This applies to many ultraportable and other machines that are no longer supplied with it. Here we must be careful, because we will play with partitions and disks, and if we are mistaken, we can load all our data. The small eye will make sure nothing happens. This is not the only one, but it is quite simple and available in both systems. Knowing this, we select it using. And we eliminate everything in it with order.
And activate it using a couple of commands. Everything is ready for copying. Of course, you will need a license to enjoy this. If you do not have it, you must create it by clicking "Register" now. On the contrary, this version will not be able to get all the juice in 64-bit kernels.

5. The program wants to format the disk. Well - it is necessary, so it is necessary:

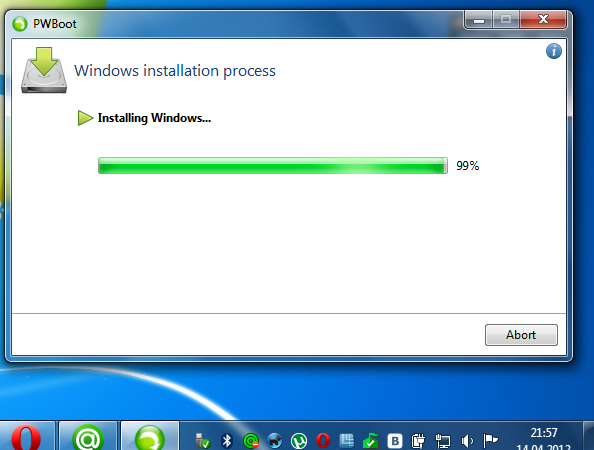
6. After formatting, the actual process of installing the OS on a USB flash drive begins:
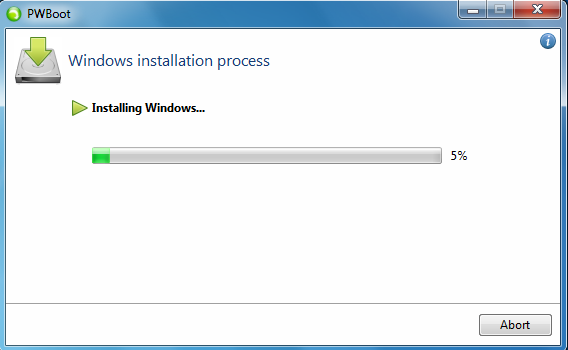
Note: I note that the top screenshot was taken at 11 a.m. Naive, I believed that all this would happen quickly. It turned out that I was severely mistaken - a screenshot showing the 99% installation progress bar was made at almost 22.00!
Download disc or image file
In other words, depending on the hardware that corresponds to the computer on which you intend to run the system, it is possible that conflicts arise or that certain devices are turned off because they were not detected correctly. You should give preference to the starting sequence.
Click the Build Image button. Then you accept the terms of the license. Although the installer is in English, as you will have the opportunity to verify the next steps, you will be allowed to select Spanish as the system language. Choose the version according to the needs that will be provided to you when working on the destination computer. Once you have selected, click "Next." In the “Brief Description of Drivers and Features” section, you can determine which components will be added and which will be excluded.
Half day It took the program to install Windows 7 on the phone’s memory card, horror, and only:
This is explained by the fact that the transmission protocol uSB data 2.0 is much slower than transferring data via the SATA2 interface, on which ordinary HDDs work, or, especially, modern SSD solid state drives (installing Windows takes about 10-15 minutes there). At the same time, it is worth noting that many modern PCs and laptops have hardware support for USB 3.0, so the installation on such machines will be many times faster.
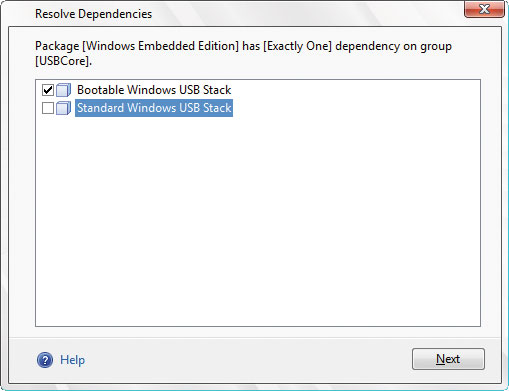
Resolve dependencies well

Whatever your choice, be sure to check out the section on enabling built-in functions. Depending on which components you want to add to your operating system, the next step is to square the dependencies that exist between them. Several dialog boxes will appear, and you will have to choose between the modules that will be displayed on the screen.
If it does not appear, we will try to change it and click Update. Thanks to this, we can study the connected drives and create partitions. We can get additional information about its operating parameters by connecting to the website. This documentation has been archived and is not updated.
7. However, my patience and persistence were rewarded by the appearance of the following window:
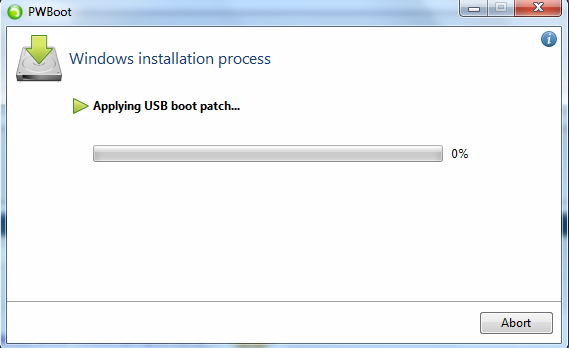
Then the process went faster:

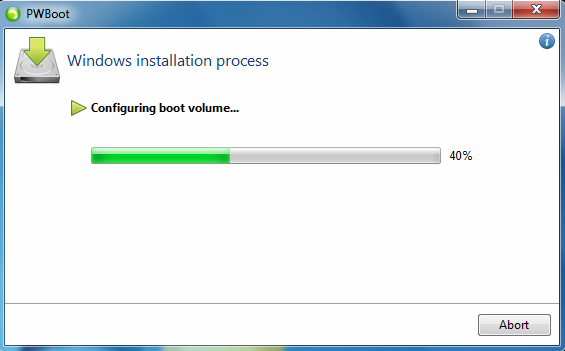
8. Boot volume configuration:
Update your computer firmware to the latest version. . Most of the success is due to the fact that the graphical interface is more didactic than its predecessor, as well as new tools and tools offered, for example, a new system for organizing icons of running applications.
Step 2: using the tool
Thus, how can I install a new operating system on a computer? To continue the tutorial and complete all the steps without problems, you will need. Click here for a list of genre programs. In the Volume Label section, enter a name with which the device will be identified, and then click Start. At the end, a message appears stating that the task completed successfully. This entire process is completed in just four steps.
And finally, the long-awaited finale:

As can be seen from the following screenshot, size installed windows 7 Professional on the memory card was 4.75 GB:

Note: after windows installation 7 many users advise to “lighten” the system by removing non-critical components, disabling some services that are not supposed to be used, and turning off disk indexing. In a word, exclude to the maximum all operations that are somehow related to the load on the USB drive. In addition, the focus is on the problem with the swap file - in order to save disk space USB flash drives can be transferred to the built-in HDD of the machine on which the portable Windows 7 runs. If you use an external USB HDD, then due to the large amount of disk space, these precautions become irrelevant.
A few more words about potential problems that may arise when working with the OS installed on USB relate to drivers. Drivers, as you know, are installed in a specific system for specific equipment. It’s good if you use your Windows 7 on USB as an additional system for personal use on the same PC, but what if the portable “seven” has the fate of being used on other machines? In this situation, every time you connect your USB-Drive to someone else’s computer, there will be a risk of incompatibility (conflict) of the equipment with the drivers already available in the system for other devices. Here is what a person with more extensive and practical knowledge on this issue writes about this (and not only):
Safety rules when working with Windows on USB drivee.
A) If you have another USB drive, then you need to connect (and also, preferably, disconnect) it to your computer before turning on the computer. Otherwise, 100% BSOD 0x7b.
B) For the first time, an unfamiliar USB flash drive also needs to be connected before the system starts (otherwise - BSOD 0x7b). In this case, the flash drive’s firewood will be installed normally, after which in the future the flash drive can be connected and disconnected while the computer is running.
C) If, as a result of a violation of rules A) or B) (as well as other reasons), BSOD 0x7b arises, violating the possibility of a USB boot, then you can restore this possibility as follows: start in the old Windows (or in the Win7 installation DVD) and run the command "USBboot.bat X", where "X" is the letter under which the partition with installed Win7 is visible.
By "other reasons" is meant the following. Sometimes, although rarely, the flash drive’s firewood can spontaneously “fly off”. And when it is connected during the session, after the automatic reinstallation of firewood, BSOD is possible.
And once my USB mouse was perceived by Vista as "Unknown USB storage device ", for which Vista, essno, couldn’t find the driver. If this happened on Win7, it would probably not have done without BSOD either.
Take what is called a note.
And summing up in my story, I want to note that as a result of the procedures described in it, my memory card was identified in the BIOS as a boot device. Setting the boot priority from it and saving the changes, I booted into Windows 7 Professional 32 bit from my phone. The setup process is normal, as in any normal installation, but rather slow: the system responds to each action with a little “thought” (USB 2. with a peak speed of 64M / s - do not forget). How comfortable it is to work in it, if several applications are actively accessing the disk, in practice I did not have time to check. But this is another story, I just conducted an experiment, the purpose of which was to clarify the effectiveness of the program Pwboot.
Summary: she knows how to make “pocket Windows 7”. Successful application!


