As you know, after the release of Windows 10 in the release, Microsoft proposed to switch to it for free and even without boot disk or flash drives. To do this, it was only necessary to click on the corresponding icon that appeared in the lower right corner. Many people immediately took the opportunity to try out Microsoft's innovations. But the point is that not everyone liked them.
That is why this article will tell you in detail how to restore the previous one. windows versions. This process can be divided into several stages and carried out various methods, up to the cardinal. Therefore, it is better to enlist, so to speak, instructions and do everything on it in order to avoid irreversible consequences.
Rollback through the system
Perhaps few people know, but after upgrading to Windows 10 exactly one calendar month is given to refuse and return everything back. Just now, we will consider the option when after installing the OS you did not like it, and the allowable rollback period has not expired.
Many probably noticed that as soon as Windows 10 appeared in front of my eyes, on my hard drive, or more precisely, on drive C, a daddy called Windows.old was formed. Familiarized persons are aware of why it is necessary, and we will now enlighten those who do not know.
So to speak, just in case, the operating system saves its previous version just in order to return, if necessary. This past version remains in the Windows.old folder. It is stored there for exactly a month. That is why it was said above that a rollback from Windows 10 to Windows 7 can be carried out if the deadline has not expired. How to do this?
Now we will go directly to how to restore previous version Windows:
You should have a desktop in front of you. Press Win + I at the same time. The "Parameters" section opens.
We need the fourth line in the list - “Recovery”.
Now before my eyes there are various variations of further actions. We are only interested in the "Return to Windows 7" item.
Feel free to click the "Start" button. After that, they will ask you why you decided to restore the previous version of the OS.
Point out any option to choose from and move on. Even before my eyes, the possible consequences of the rollback and recommendations will be shown. Ignore it.
It remains to wait for the completion of progress, and after a while the seventh Windows will be your main OS.

As you can see, restoring a previous version of Windows is not such a complicated matter. However, now the simplest scenario was presented, and it is also possible that an attempt to restore a previous version of Windows might not work correctly. Therefore, we move on to the next method.
Image recovery
The method that will be presented now is extremely rarely used, but not because it is not effective, but because it is little known. Nevertheless, it is worth mentioning, since this is another way how you can restore a previous version of Windows. It’s hard to say how long it takes, it all depends on how you prepared, but everything in order.

It’s worth mentioning right away that rollback from Windows 10 to Windows 7 will now be considered, although this method Suitable for other versions of operating systems. And the main thing you need to know is that you need to record the image at a time when you still have Windows 7:
First of all, you need to enter the "Control Panel" and select "System and Security".
There, on the left is the line "Create a system image." Click on it.
Now you need to insert the USB flash drive into the USB connector.
In the window before your eyes are three options for how to record the image: on hDD, on the removable media or online. Choose a removable media.
After selection, a window will appear where you need to put a checkmark in front of your flash drive.
Now, to restore a previous version of Windows, you need to insert a USB flash drive into the computer and roll back through the BIOS.
Reinstalling system
If after you switched to the “top ten”, a month has already passed and you did not burn the Windows 7 image, as mentioned above, the only way out for you is to completely restart Windows. This is an extremely radical method, but there are no more options.
The fact is that you will need to initially create a bootable USB flash drive or disk. You can do this on any OS, we will just record Windows 7. So, now we will consider in detail what needs to be done.
Create a bootable USB flash drive
To create a bootable flash drive, you must download the program. It is called Rufus, no matter which version. It is also necessary to download an image of Windows 7 on the Internet. Make sure that the file format is exactly “.iso”.
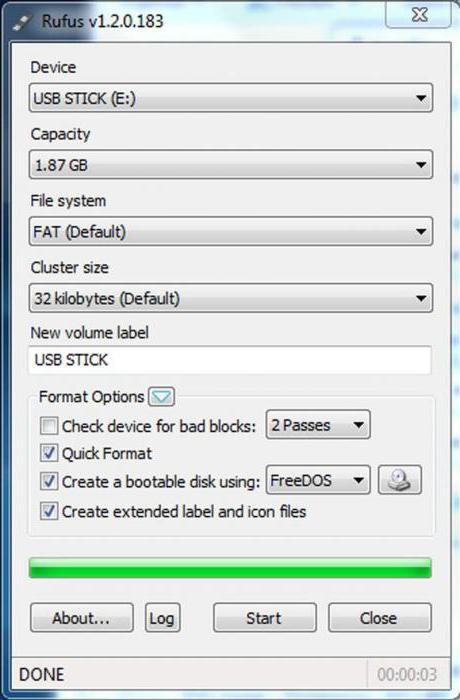
Now insert the USB flash drive into the computer and run the program. You will see a small window.
Click on the disk icon in the lower left corner. You will see a window in which you need to pave the way to the downloaded image. Once the path has been laid, click "Open."
Now at the top of the window in the first line, select the USB flash drive.
In the second line, indicate "MBR for computers with BIOS or UEFI."
IN next line must choose file system. Specify NTFS.
Click "Start."
That's all, after the process of flash drive with the image of Windows 7 will be created.
Install Windows 7
After the flash drive is recorded, you must proceed to the installation. To do this, insert the USB flash drive into the PC and restart the computer. At boot time, press Del or F2 to enter the BIOS. After that, in the BOOT tab, you must select the USB flash drive as the first boot device. Then in the last tab we exit the BIOS, saving the settings.
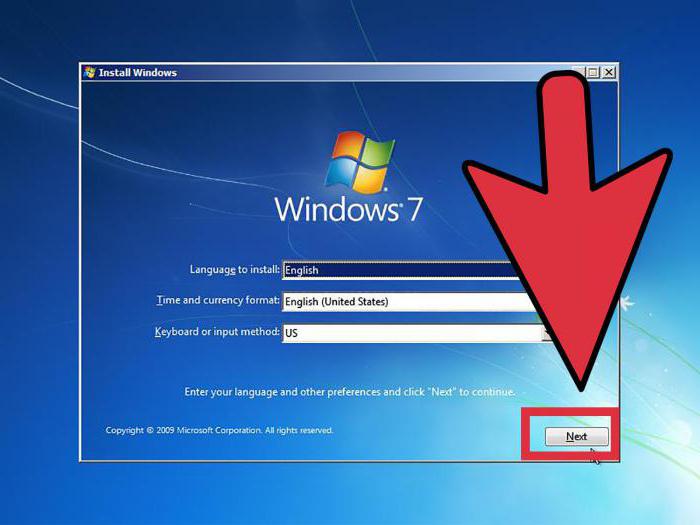
After the initial screen to start the computer, a wizard will appear in front of you windows installation. Everything is simple here. Follow the instructions, carefully read and install the OS on drive C. After the installation starts, about half an hour will pass (depending on the power of your PC) and a brand new and clean Windows 7 will appear in front of your eyes.
Conclusion
As you can see, rolling back from the top ten to the seven is not so difficult. Moreover, there are several options to choose from. Each of them is good in its own way. So, the first is not embarrassing and the easiest. The second method will teach you to burn Windows and use it in the future, and all its settings will be saved before recording. The third method will teach you how to reinstall operating systems. How to use, choose only for you.
It’s certainly not possible to return to the previous version of Skype with one click, but there are several ways in which the problem can be solved.
Method 1 - System Restore
First of all you need to delete current version Skype from your PC. To do this, click the "Start" button, go to the "Control Panel" and open "Programs and Features."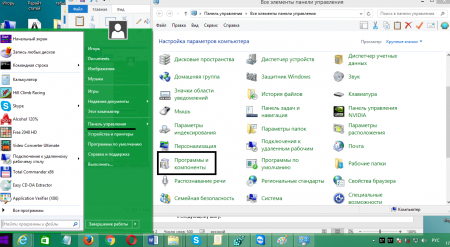
Find Skype in the list, select it and click the "Delete" button.

Another way to remove the program is through the same “Start” menu, but in this case, you need to open “All Programs” and then find and select a folder with the name Skype. Run the uninstaller program and follow its instructions.
After that, you can try to perform a system restore until the installation of the program and thus return old version Skype
Note: If the system recovery function is disabled on your computer, proceed to the next step.
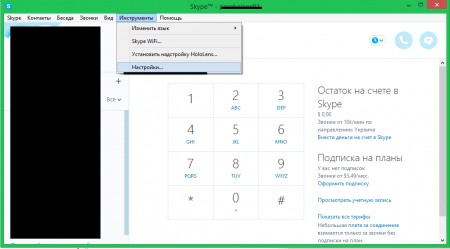
To do this, click the "Start" button, go to the "All Programs" section

and find the folder "Standard" - "Service". In it you will find the "System Restore" component.

Note: in Windows 8 and above, when you click on the shortcut, a window will open where you will need to select "Start System Restore."
Launch it and select a recovery point with a date corresponding to the Skype update (early). Click on and wait for the recovery procedure to complete.

After the process is complete, open Skype and log in to the client using your registration data. If this method did not help or you do not have a recovery point, you can try downloading the previous version of Skype from the Internet.
Method 2 - Download a previous version from the Internet
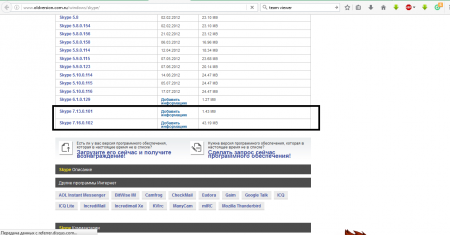
To download the previous version of the client, go tohttp://www.oldversion.com.ru/windows/skype/
And scroll to the bottom. You can safely download and install the penultimate and latest versions.
Note: you can also use search engine and enter the query "How to return the previous version of skype." The first links usually belong to the Skype community. By clicking on them, you can also find old versions of the application, but there will be no guarantee that the version you downloaded will be exactly the previous, not earlier.

If you no longer want to receive updates, you can simply disable them. There are several ways to do this:


The second way:
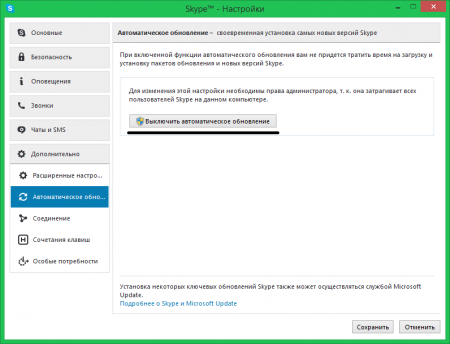
If at each start the client offers to install the update, do the following:
- Go to C: \\ Users * \\ AppData \\ Local \\ Temp (you need to enable display hidden files).
- Delete the SkypeSetup.exe file.
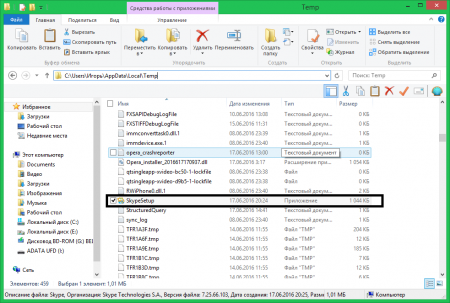
The fact is that Skype automatically downloads a new update and places it in a temporary folder until the update request is confirmed. As a result, it will issue an appropriate notification every time it starts.
In the latest version of Skype, according to users of the program, there are many shortcomings and unsuccessful smiles. This was the reason to return to the previous modification.
P&G Placement Sponsor Articles on "How to return the old version of Skype" How to log in to Skype from another computer How to update the version of Skype What is Skype and how to use it
Instruction manual
It is unlikely that you can return to the previous version of Skype with one click of the mouse, but if you dig deeper into the computer a little, the problem can be solved. For example, download the previous version of the program from the developer's site. Or, if you did not delete the previously saved installation file, use it. Then clean the computer from Skype, that is, completely remove it from the system. To do this, in the Start menu on work panel computer, find the "Control Panel" section and go to the "Uninstall or change a program" item. In Windows 7, it is located in the "Programs and Features" subdirectory. Open the "Uninstall or change a program" window, find Skype in the list. Click on it and select the “Delete” option. Another way to uninstall a program is through the same Start menu. But in this case, you need to select the "All Programs" item, in the list of which you will find and mark the folder with the name Skype. Then select an action for it - “Delete”. True, sometimes in this case the menu does not have a shortcut to remove this program. Therefore, rely only on this method is not worth it. Then you can try to use the rollback system. To do this, in the "Start" menu in "All Programs" find the folder "Accessories". Open it and select the "Utilities" section. Double-click on this folder and in the list that appears, find the "System Restore" item. Click on this inscription and roll back the system to the date when Skype was updated. After you remove latest version programs, install the previous one. Run the installation file (in the format of.exe) and then follow the prompts of the program. After the process is complete, open Skype and enter your credentials to enter. For the convenience of using the program, put a checkmark in the "Save Password" field. This will allow you not to waste your time on introducing your login and password after each Skype launch. How simple
Other related news:
Skype - free programproviding encrypted voice, video and text communication between computers via the Internet. It works if both sides have the appropriate software and equipment. You will need initial skills with operating systems
Skype is a program that allows users to exchange messages, send information, talk and play in real time, even while being on different continents. P&G Sponsor Articles on "How to put a password on Skype" How to write a review of work programs How
It often happens that the hard drive does not have enough space for some desired program or movie. In this case, you need to free up disk space by deleting unnecessary and unused programs. You will need a computer or laptop. P&G Placement Sponsor How to Remove Unnecessary
Skype is the undisputed leader in the field of software products that provide voice and video communications for Internet users located anywhere in the world. P&G Placement Sponsor Related articles "How to remove Skype" How to configure Skype How to install Skype to communicate with
More and more people prefer modern Internet technologies to their usual means of communication. A special niche in the world of communications is the voice mode of communication, for example, using Skype. You will need a computer, internet, webcam, headset / speakers and a microphone / headphones and a microphone Sponsor
The decision to return to the old version of the Skype application can be caused by a variety of reasons, not the least of which is dissatisfaction with the external feed of the program. P&G placement sponsor Related articles "How to get old Skype back" How to remove autorun programs How to remove Kaspersky databases How
Skype is a simple and convenient application for real-time communication. But if you do not wait for a communication session with another user, and the program distracts you from important matters, you can close it. To do this, you need to perform several actions. P&G Placement Sponsor How to Turn Skype Off How
Skype for Android is one of the most popular apps in the shop Google play - at the moment, it is the third custom The application has managed to reach over 500 million installations. This is not surprising, because Skype is free, allows you to make high-quality audio and video calls, allows you to send files and has a number of unique features.
But, like other applications from the Play Market, Skype for Android has one significant minus - you cannot download and install old versions from the application store. But there are times when the user is used to the old version and does not want to update yet, or in new version There is a bug that greatly interferes with the use of the program and I want to temporarily return to the previous version until the next release. It was for such cases that I decided to write a small guide that will help install old versions of Skype on Android.
The process of installing old versions of Skype on Android consists of 4 simple steps:
- Select version
So the first thing to do is find desired version Skype you need to install. A list of available versions can be found on the Skype for Android page. Each version was obtained from Google Play and downloaded on our server, which means that, firstly, we provide only official versions, and secondly, at any time you can download the version you need. The only thing you should pay attention to is that the older the version, the less function it will support and the more errors that may occur. - Download installation file
Next, you need to download the installation file (this is an executable file with the extension .apk and which, when launched, installs the application on the device). Depending on the browser, you may encounter different warnings when downloading (for example, in Chrome, when you try to download the apk file, users are warned that a file of this type may harm your mobile device) Indeed, downloading and running apk files from unknown sources is very dangerous, since it is possible to infect the device with malicious programs. But as already said, only official versions are available on our server, so we can safely download the file. - Allow installation from unknown sources
In order for you to be able to install old versions of Skype from our site, you must allow the installation of applications from unknown sources. This is done as follows: open the device’s settings → go to the “Security” section → find and put a checkmark in front of the “Unknown sources” item → carefully read about the dangers that may arise → and if we agree, we confirm our actions. - Install Skype Version
Now it remains only to run the installation file, click on the "Install" button and wait a couple of seconds while Skype will be installed. If you don’t know how to find the downloaded apk file, look for it in the “Download” folder on the SD card or phone memory.
Attention!
If you allow the installation of applications from unknown sources, your personal data and phone data will be in danger (especially if you decide to run apk files from other sources). Therefore, it is highly recommended to disable this option after installing the old version of Skype.
If you have any questions or have useful / interesting information about installing old versions of Skype on Android, write in the comments.


