Often, users are faced with situations where Windows starts to work incorrectly. Slowly loading, strange messages are issued. Slowly reacts to actions. Files unexpectedly disappear. All this may be due to errors in the disk file system and physical damage surface. The appearance of poorly read and bad blocks of sectors. Bad (unreadable) blocks are also called Bad blocks. To eliminate such manifestations, you need to do a disk check for errors. In the arsenal of facilities Microsoft Windows there is a utility Checkdisk, designed just to check and fix errors on disks. Sometimes Windows, when it detects problems on a drive or when a new drive (such as a flash drive) is connected, starts up itself when the Check Disk boots up. Some uninformed users get scared when they see a blue screen with the disk check utility running CheckDisk. Some people confuse running Check Disk with blue screen of death BSOD. If the Check Disk has started, you need to let it work, if you do not want it to

started at every booting windows. If you want to check the drives, first of all you need to check system disk, usually it’s drive "C", but not necessary. To check the system drive, the error correction utility for Windows cannot be started. You can only assign a task to check the disk, which will be executed at the next boot in DOS mode. If error correction is not set during the scan, the system disk will be checked, and the results can be viewed by going to the control panel, administration, viewing events, the application. Other disks can be checked while the operating system is loaded. windows system. You can set a check or run Check disk in several ways.
ways.
 The first method (normal, with a graphical interface):

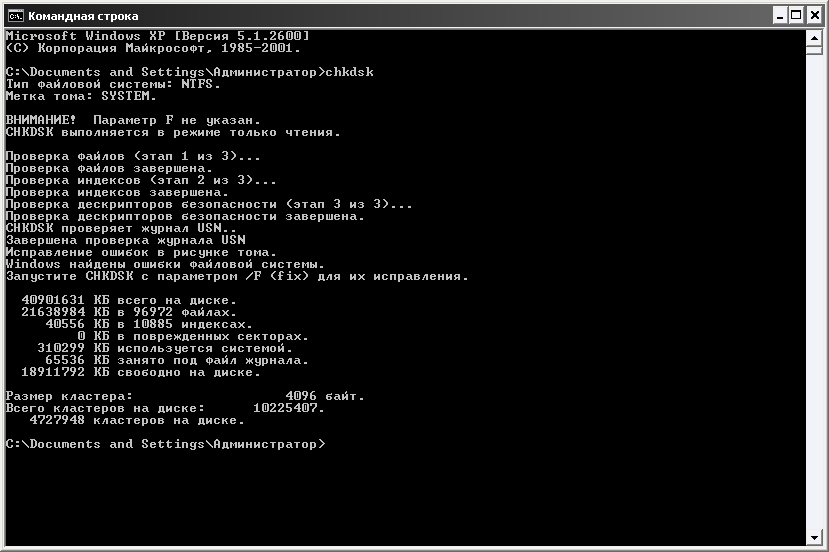
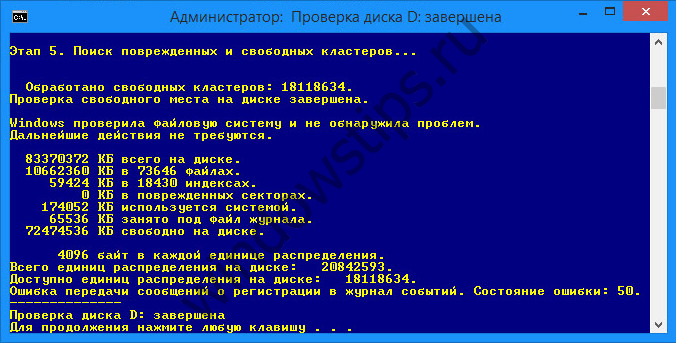
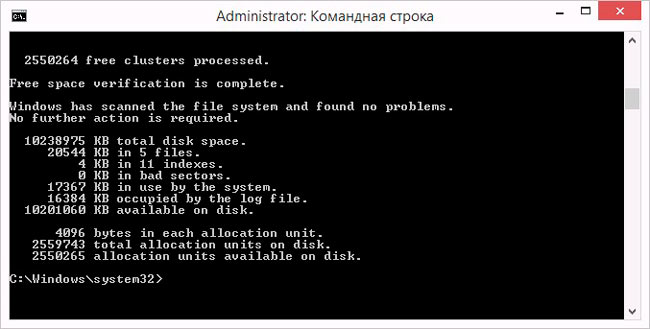
After checking the system disk in DOS mode, a report is displayed. If there are no errors, the view will be as in the presented photo. If errors are detected, entries will be added about them and their correction. Sometimes there are a lot of entries. This indicates that the state of your drive is not good. Perhaps he, as the system engineers say, “began to crumble,” and more thorough verification should be done using special programs.
![]()
The second method (in DOS mode):
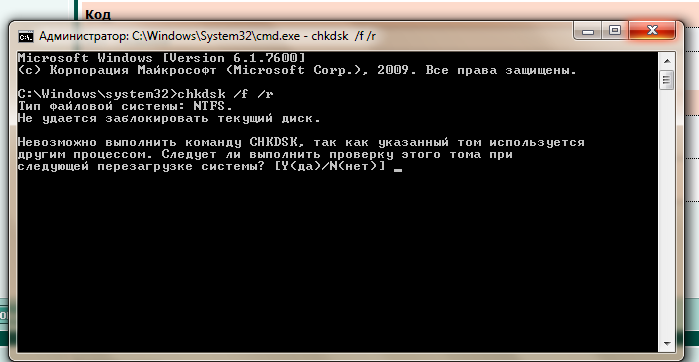
The third method (in command line mode)
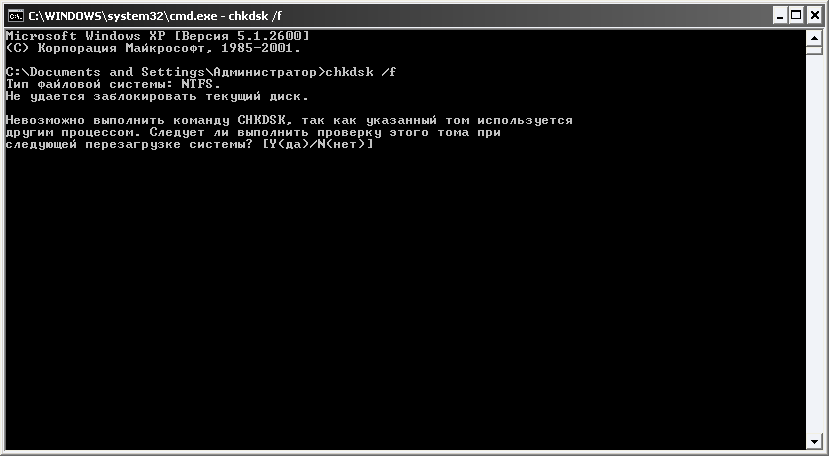
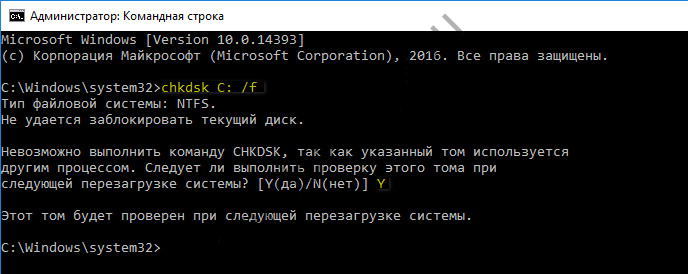
If in chkdsk team add the / f option, as in the previous method, a warning about the impossibility of verification and a suggestion will be issued, set the verification at the next Windows boot.
Check Disk Utility Settings List:
Many experts do not recommend using the Check Disk utility too often because of the danger of damage to the system and data. I personally am for the utility of such sins when working with file nTFS system not watched. It happened only on FAT32, and the negative comes sooner from here. Frequent checks, in general, are not needed. Once every six months and in case of malfunctions will be quite enough.
Note: On Vista and Windows 7 operating systems, the Start menu does not have a Run command by default. To make it appear, you need to do the following:
- Right-click on the "Start" button on the desktop and select "Properties" in the list.
- In the window that opens, on the Start Menu tab, click Configure.
- In the list of the next window, find the "Run" command and check the box opposite.
- Clicking "OK" to close the window.
Crashes in windows work, emergency power off of the computer, experiments with software for management disk space, the consequences of viruses - these and other problems can lead to the automatic launch of the standard windows utilities Chkdsk designed to fix errors file system hard drives. An incorrectly completed operation of the operating system with files leads to the appearance of file system errors, and sometimes to its damage at all. In emergency cases, the Chkdsk utility turns on before windows launch, scans disk partitions and fixes errors. However, the fact that there are problems with the file system may not be felt at all during normal use of a computer and will be revealed only when you try to manage disk space. So, for example, trying to reduce the disk partition by regular windows tools, we can get the following notification: “It is possible that the volume selected for compression is damaged. Use Chkdsk to troubleshoot, and then try to compress the volume again. ”
In this case, the disk check does not start automatically. How to start Chkdsk manually in Windows 7, 8.1 and 10? As with using chkdsk to fix disk errors, if exactly this problem caused the inability of the operating system to boot?
Inside Windows, the Chkdsk utility can be launched in several ways.
1. Starting Chkdsk using the Windows GUI
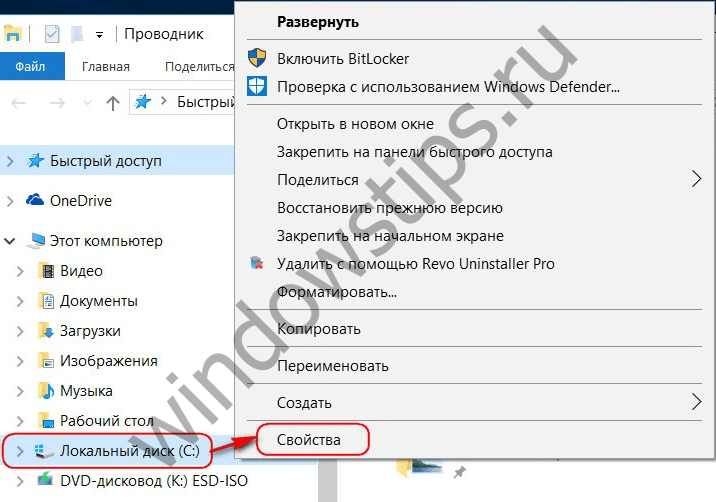
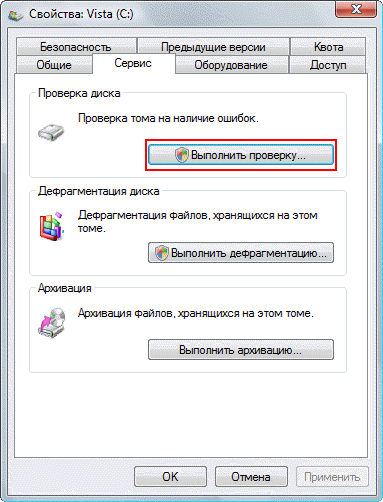
To start Chkdsk, in the system explorer on drive C, right-click and open “Properties”.
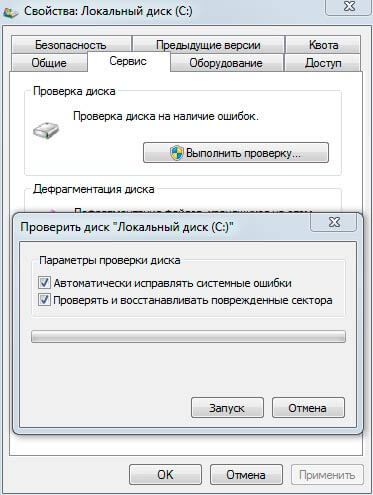
In the window of the opened properties of the disk partition, go to the “Service” tab, and in it click the “Check” button (or “Run Scan” for Windows 7).
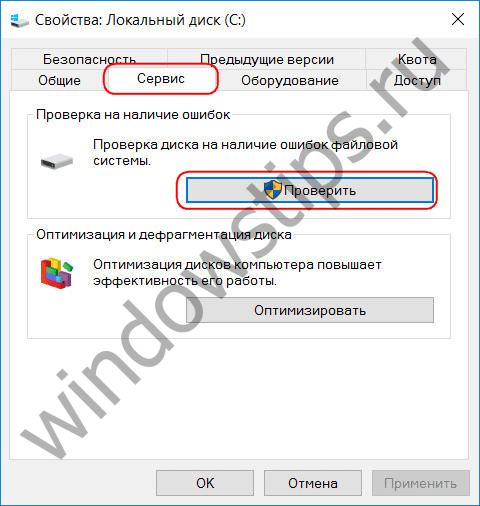
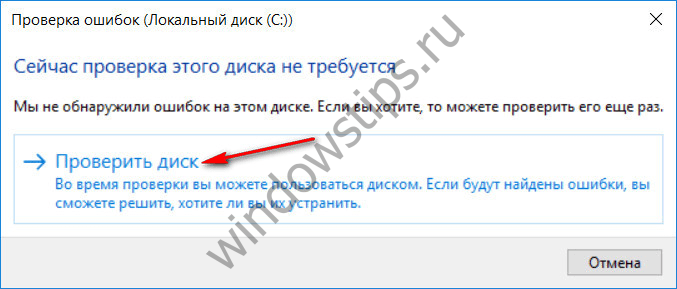
In versions of Windows 8.1 and 10, if everything is in order with the disk file system, we will see a notification in the window that appears next that verification is not required. But if you want to check the disk utility chkdsk can be started by clicking “Check Disk”.
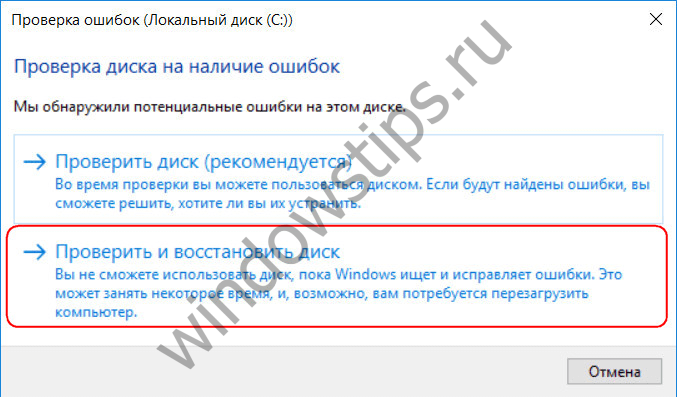
If the system suspects the presence of file system errors, a button will appear in this window to start the check and restore the disk.
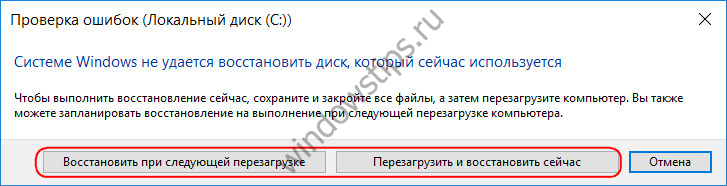
For Chkdsk to work on drive C, you must restart the computer. You can do this immediately or delay the start of the test until the next reboot.
After restarting the computer, we can observe the operation of Chkdsk.
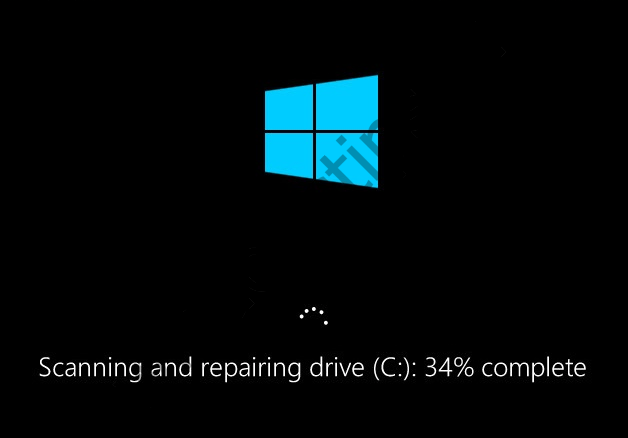
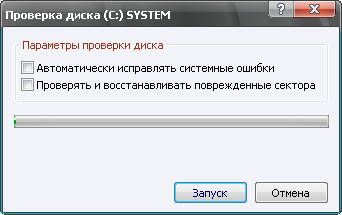
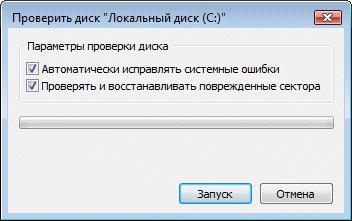
In Windows 7, starting Chkdsk is slightly different: you can add another possible option to the pre-installed automatic error correction option - checking and repairing damaged hard sectors drive. When activating this option, it is worth considering that in this case, Chkdsk may take longer to work.
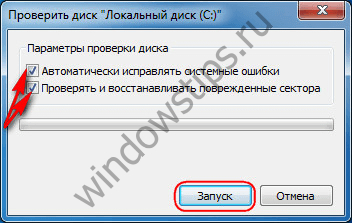
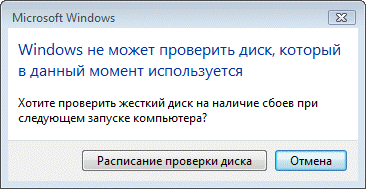
As with Windows 8.1 and 10, in version 7, system drive C cannot be verified within a running operating system. To start the test, you must restart the computer. Click "Disk Check Schedule."
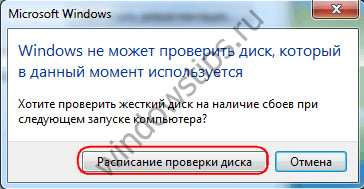
When checking a non-system partition of a disk, if it is used by some programs, the situation is simpler than with a system partition. In the window with a notification that the disk is currently in use, you just need to click the "Disconnect" button to accordingly disable this section during the scan.
2. Starting Chkdsk using the command line
To start Chkdsk using the command line, first, respectively, run the latter.
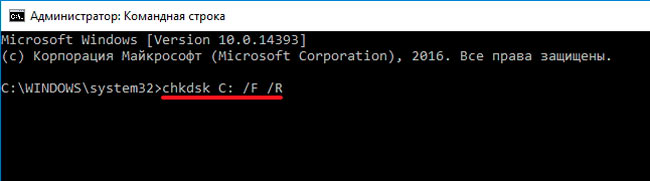
In the command line we enter the command by type:
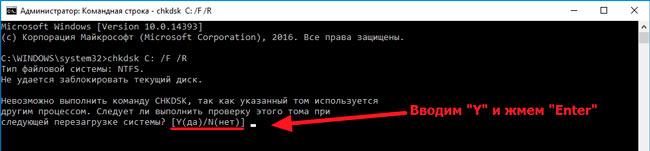
In this command, instead of drive C, each time we substitute the letter of the desired partition on which verification is required. If Chkdsk needs to check system partition C, as with the GUI, you will need to restart your computer. After the message appears in command line about the impossibility of locking the specified drive, you must enter "Y", then restart the computer.
In addition to the / f switch, which is responsible for fixing disk errors, Chkdsk can be launched with the / r switch, which is used to search for bad sectors and recover data. Based on the results of Chkdsk's work with this parameter, clusters hard drive with unreadable sectors will be listed as bad (bad blocks) with the transfer of their functions to the new cluster. Therefore, it is recommended to run Chkdsk with the / r parameter only when the usual error correction — launching the utility with the / f parameter — did not bring the necessary results. Using the example of the same C drive, the command will look like this:
3. Running Chkdsk on non-bootable Windows
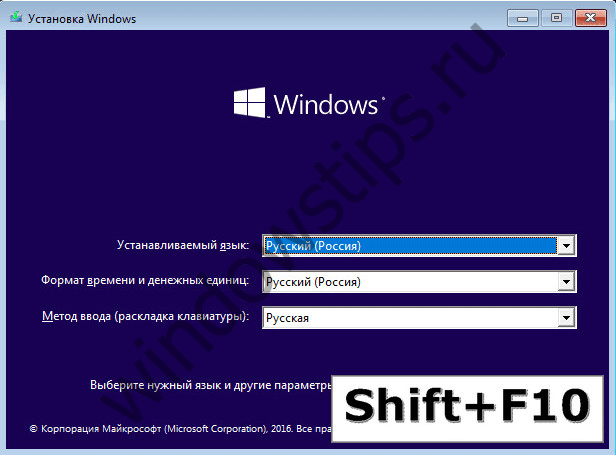
If Windows freezes at a particular boot stage, one of possible reasons this problem is file system errors. In this case, you need to start Chkdsk by booting from the rescue medium. As such, you can use the usual installation media from windows versions 7, 8.1 or 10. Using it, we will run the Chkdsk utility inside the command line. At the first stage of starting the system installation process, press the command line launch key - Shift + F10.
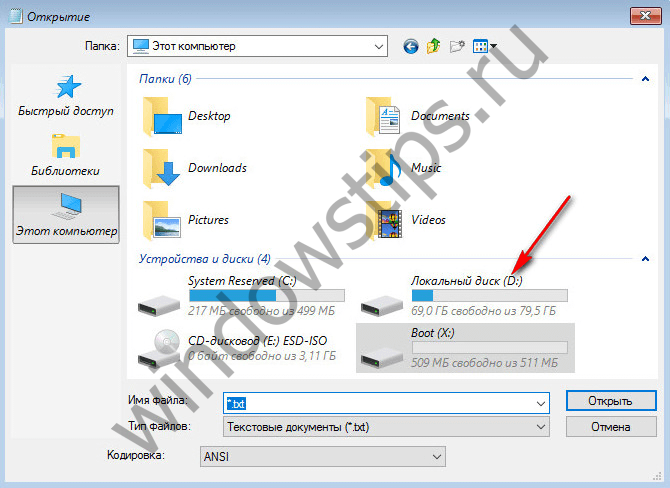
In the command line that opens, before starting the Chkdsk command, you need to specify what letters the disk partitions are defined. This is easy to do with notepad. Launches by his team:
We press the menu of the notebook “File”, then - “Open”.
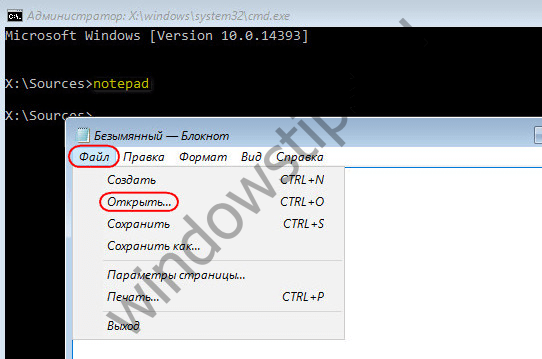
In the explorer that opens, remember the new drive designations. As a rule, in Windows 8.1 and 10, the C partition (as it is inside a working operating system) is listed as D, since the letter C is given to the first technical section of the system. And all other sections come with an offset of one letter of the alphabet.
Having decided on the letters of the disk partitions, close the notebook, then, returning to the command line, enter the command of this type:
![]()

As with Chkdsk inside Windows, you first need to try to fix disk errors by running the utility with the / f switch. And only if the problem is not resolved, only then run the command with the / r option, as indicated in the previous paragraph of the article.
For cases of Windows inability to boot, you can pre-record the emergency Live-disk with a selection of various tools to restore the operating system. Among these, for example, WinPE-based AdminPE. His image for recording to disk or flash drive can be downloaded on the official website of the project Adminpe.Ru. Using AdminPE, you can run the command line and enter the commands discussed above launch chkdsk. But in this Live-disk, the Chkdsk utility has its own interface and is launched using a script. The shortcut for launching the utility is taken directly to the desktop.
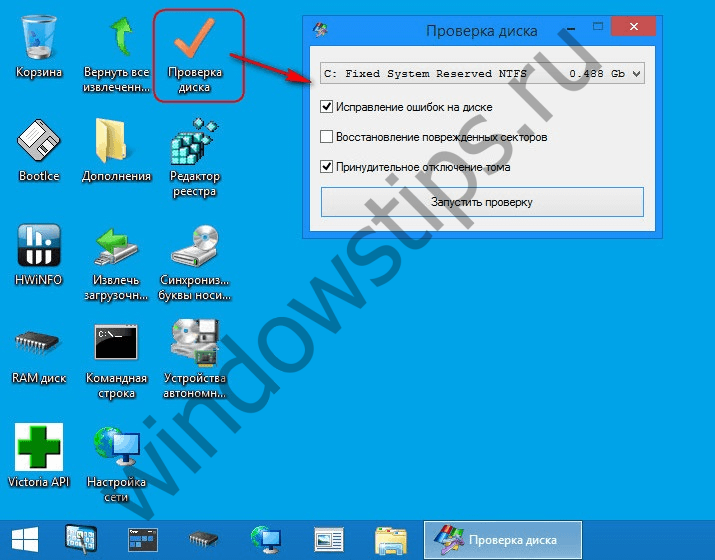
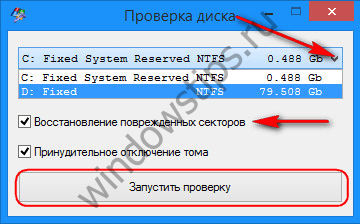
In the drop-down list to check the disk, select the desired disk partition. Next, we activate the checkboxes for recovering damaged sectors and forcibly disconnecting a partition (volume). Startups check.
Among the AdminPE tools - a number of other utilities for working with hard drives, as well as the well-known programs Hard Disk Sentinel and Victoria.
Have a great day!
Hello. It is necessary to monitor computer equipment constantly so that it does not fail for various reasons. This is especially true of the video adapter. But today it will not be about them. I will tell, how to check hDD good condition, eliminate hard drive errors in operating system Windows 10 and other versions.
Physical memory contains hundreds of thousands of files and folders that are processed by the OS and users. Nobody wants to lose important info. And if your PC is reliably protected from viruses and spyware attacks, then this does not mean that you can relax.
Over time, the disk is “flooded” bad sectorsthreatening data integrity. They need to be identified and eliminated on time. Now I will share with you a couple of secrets that will help keep the HDD in optimal condition. You will learn how to use the built-in tools of Windows - they are quite enough to eliminate most problems. Installation of additional software is not required.
If your hard drive makes strange sounds, then the situation is rather unpleasant, and I advise you to take more drastic measures to correct the situation. I will tell about them in one of the future publications.
Command line
How to check the hard drive for operability in this way - now you will find out:
- by selecting the appropriate item from the context menu of the Start button or just press the combination of Win + X:
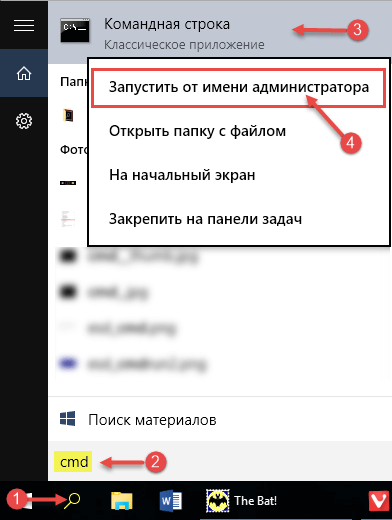
- If you use Windows 7, then it is better to use search bar, in which enter "CMD" and in the results you see the desired item. Do not forget to right-click on it, selecting "Run as administrator ...":
- When a black window appears, we write the command:
The “C:” symbol indicates the letter of the drive to be checked. If you want to scan another medium, specify the letter corresponding to it.
Other parameters mean that the program will try to fix all errors automatically, and the information from the damaged sectors will be restored.
Most likely, you will receive an error after activating the command, since the disk will be locked by the system. You will be prompted to scan the next time you restart. To do this, press Y on the keyboard (for failure, press N), and then press Enter:
Thus, you will postpone the process, but if there is no blocking message, the procedure will start immediately:
We use service parameters of a disk
About this method to check your hard drive for windows errors 10 and fix them already. It is necessary to open the properties of the necessary disk in the context menu of the “My (this) computer” window, then go to the “Service” tab and click on the “Check” button there:
The procedure is quite lengthy if, before starting, the item “Repair damaged sectors ...” is noted (for Windows 7, there is no such choice in newer versions).
Additional ways
- open the “Control Panel” using the menu that appears after pressing Win + X:
or through the search bar:
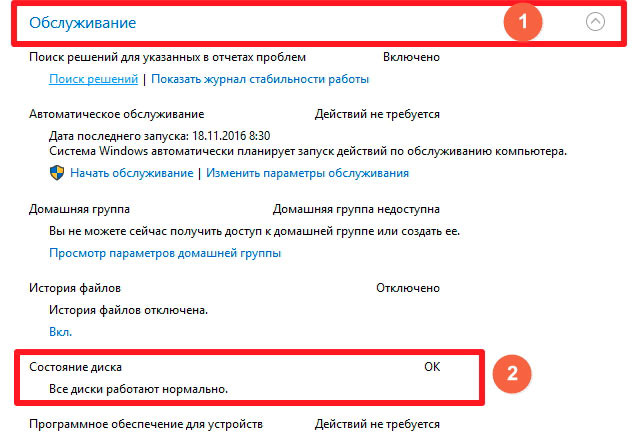
- Now select the “Small Icons” view mode and click on the link “Security Center ...”:
![]()
- We open the “Service” list to see the necessary data:
So simple!
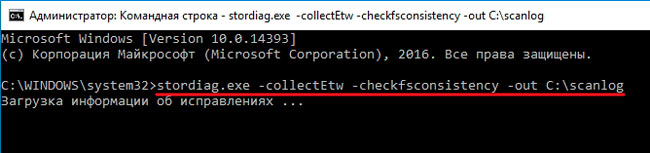
But there is another new diagnostic utility that answers the question: "how to check the hard drive for errors." It is called the Storage Diagnostic Tool and is available only in the "top ten." To use the tool, launch the console (as was done at the beginning of the article) and enter the command:
stordiag.exe -collectEtw -checkfsconsistency -out C: \\ scanlog
“C: \\ scanlog” is the folder where the report will be saved at the end of the procedure. You can specify your path to any other directory.
Check will take certain time, sometimes it will seem that the system is frozen. Do not rush to reboot or take other drastic measures. Just wait, have some tea.
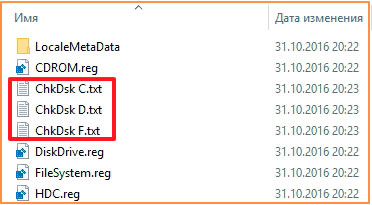
When it's over, open the location with the results and browse text files (with the extension "txt"). The errors found will be indicated there.
Frankly speaking, this utility provides a lot of information that is not always clear to beginners. But for experienced professionals, this method is very useful. Now you know several methods how to check a hard drive for serviceability.
Sincerely, Victor!
The health of the hard drive, like any other component of a computer or laptop, must be monitored so that it does not fail prematurely. In this article we will get acquainted with the built-in OS Windows utility hard check drive chkdsk. With its help, we will diagnose the HDD and correct the existing errors.
The hard drive is an integral part of the computer and careless attitude towards it can disable it, in which case everything that was on it all its working time will disappear and are unlikely to help on its own. And in order not to bring to such a case, you need to at least occasionally check the hard drive for errors. Today I will not talk about powerful utilities, such as Victoria or MHDD, about them another time. In today's article, we consider the built-in utility in the Windows operating system - chkdsk, which is designed to check the hard drive and fix problems on it.
And so, you need to open the command line. You can through Start - in the search for cmd, or use "Win + R", the "Run" dialog box will open, in the line enter - cmd and click OK. A Windows command prompt will open.
There, enter the command: chkdsk c: / f / r
Where chkdsk is the hard drive check command
c: is the letter of the hard drive, if there are several disks or partitions on the computer and you need to check another one, just enter the desired letter, for example d: or e:
/ f - sets error correction on the HDD.
/ r - fixes errors on the disk and restores some of the data that can still be read.
There are other commands, to get acquainted with them you need to enter the command: chkdsk /? Where will it be displayed full list chkdsk commands.
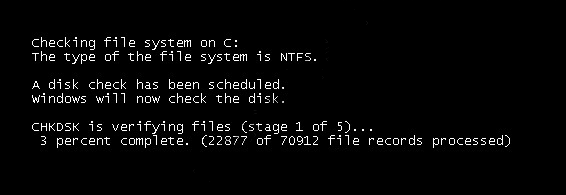
After entering the command, the utility should start scanning. As the scan ends, she will display her results. If you want to scan the system disk or partition (C), then the following message appears on the command line:
The program will not be able to scan the system disk during its operation; therefore, it is necessary to restart the computer. And in order for the scan to begin immediately before loading the OS, you need to enter Y and press Enter. The computer will restart and disk scanning will begin.
The built-in utility in Windows for checking the HDD can be run without a command line, it has a graphical mode. In order to start the scan in graphical mode, you must enter My computer, select desired drive, for example C: / right-click on it, select "Properties" in the drop-down list of the context menu. Next, on the "Tools" tab, under "Check disk", click on "Run scan."
In the window that opens, click "Run."
If you check the system drive (C), the computer will ask you to restart (Disk Check Schedule) and only then start checking before loading the OS, if you need to check any other drive or partition, the scan will start immediately.
How to disable chkdsk scan at startup?
Sometimes users encounter such a problem when chkdsk utility automatically starts scanning the HDD when the computer boots. This happens because errors are found on the hard disk and the system automatically tries to fix it. It is not recommended to disable chkdsk automatic scanning, this can damage the hard drive. If you nevertheless decided to disable it, then you can do it this way: enter on the command line - chkntfs / x c: d: and press Enter.
Where "c" and "d" drive letters (partitions). And after that, the automatic chkdsk scan at startup will be disabled.
This is an overview of the built-in Windows cHKDSK programs for checking and fixing errors on the hard drive comes to an end, if you have questions about this topic, then contact.
Thank you very much for the answer, for the response!
I wait for the verification to the end (it checks the C drive, where is Windows), by the way, the scan passes quite quickly, no more than 3-5 minutes, and after that the computer restarts and turns on normally.
"Of course it would be nice to format your entire hard drive" in the sense of the whole drive, even those partitions where Windows is not installed?
In general, there is still a problem. The computer turns on, but does not boot, freezes on the splash screen motherboard. At the same time, it can hang on the motherboard splash screen for half an hour (and nothing else happens, turn off the computer with the button), or maybe 5-10 minutes, and after that it displays Disk boot failure, insert system disk and press enter. I visited the BIOS more than once, as it began to appear, so I discovered that the BIOS sometimes does not see my hard drive. Or the situation, such a computer still boots up, Windows boots up, but after booting after some short time 10-20 minutes a blue screen pops up, errors 0x0000007A, 0x00000077.
I noticed that it all started after we installed a new video card (1 month ago). Of course, they also climbed out earlier blue screens somehow, somehow there was also a disk check at boot, but it was sooooo rare, isolated cases, so to speak, and here it has been going on for a whole month. In this case, there is no certainty, okay, one thing, or else each time in a different way, all the situations described above alternate, then one, then the other. I assumed that this was due to the new video card, because I read that there is a hardware conflict, incompatibility, they also write that after installing the video card you need to reinstall Windows (especially if you change the manufacturer, but I have it, it was nvidia, now Radeon), but I did not reinstall Windows.
(continued text)
Computer Information:
Processor QuadCore Intel Core 2 Quad Q6600, 2400 MHz (9 x 267)
Gigabyte GA-EP43-DS3 motherboard (4 PCI, 1 PCI-E x1, 2 PCI-E x16, 4 DDR2 DIMM, Audio, Gigabit LAN, IEEE-1394)
DDR2 4096 Mb Corsair 2 * 2 GB memory module
Gigabyte AMD Radeon HD 7700 Series graphics card (1024 MB). There was a GeForce 8800 GTS graphics card.
WDC WD6400AAKS-00A7B0 Disk Drive (640 GB, 7200 RPM, SATA-II)
PSU 550W
Microsoft Windows XP Professional SP3 (32-bit) operating system (installed about 1.5 years ago)
The whole computer, i.e. all the inside of the computer, is about 5.5 years old, except for the new video card.
(continued text)
The disk was already checked by Victoria. As a result, he issued 14 broken sectors (blue squares with an "x"), 1 orange and 94 green, the rest are gray. I didn’t take any action in relation to the bad sectors, I just tested the hard drive. HDD SCan SMART of the hard drive: all indicators are marked in green, and only 197 Current Pending Errors Count are marked in yellow with an exclamation mark.
I forgot to write that against the background of all the above situations that occur with the computer in the last month, it may one day turn on, boot completely fine and work all day normally,
even for several days it can happen


