Crashes in windows operation, emergency power off of the computer, experiments with software for management disk space, the consequences of viruses - these and other problems can lead to the automatic launch of the standard windows utilities Chkdsk designed to fix errors file system hard drives. An incorrectly completed operation of the operating system with files leads to the appearance of file system errors, and sometimes to its damage at all.
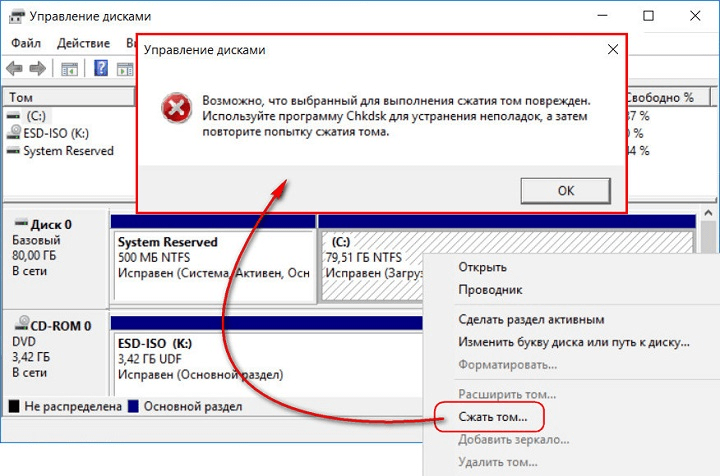
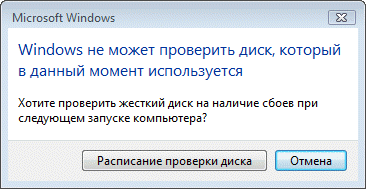
In emergency cases, the Chkdsk utility turns on before windows launch, scans disk partitions and fixes errors. However, the fact that there are problems with the file system may not be felt at all during normal use of a computer and will be revealed only when you try to manage disk space. So, for example, trying to reduce the disk partition by regular windows tools, we can get the following notification: “It is possible that the volume selected for compression is damaged. Use chkdsk program to troubleshoot, then try to compress the volume again. ”
In this case, the disk check does not start automatically. How to start Chkdsk manually in Windows 7, 8.1 and 10? As with using chkdsk to fix disk errors, if exactly this problem caused the inability of the operating system to boot?
Inside Windows, the Chkdsk utility can be launched in several ways.
1. Starting Chkdsk using the Windows GUI
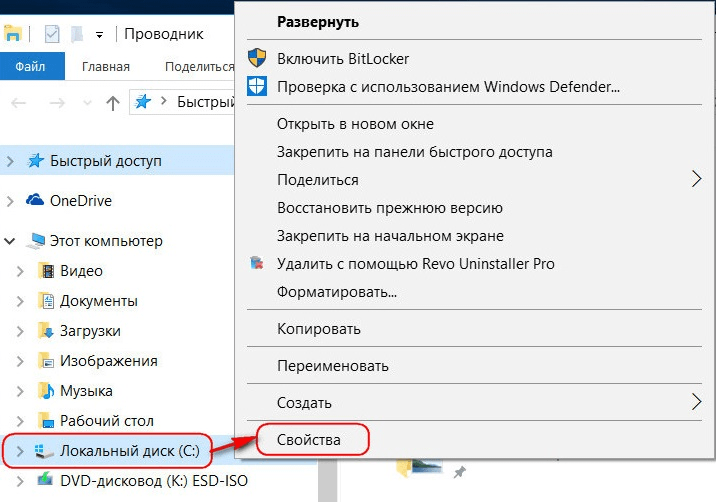
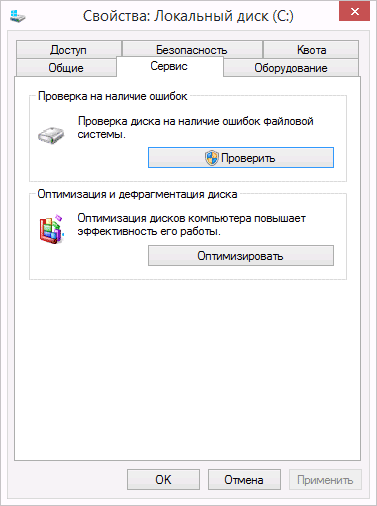
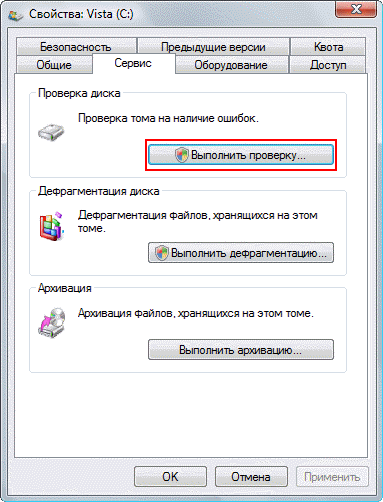
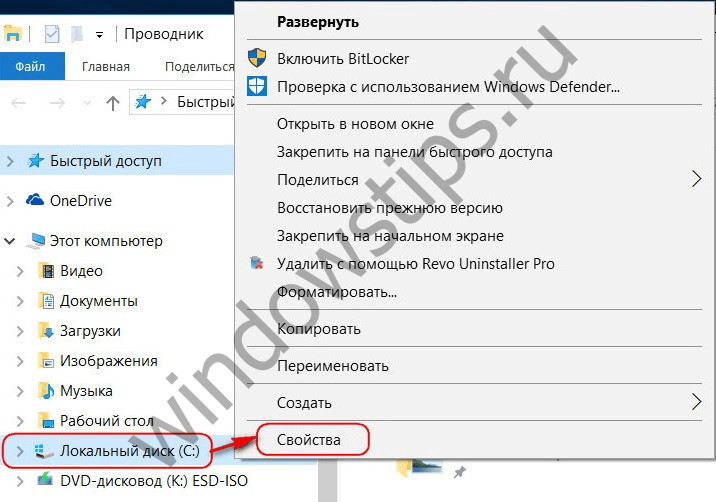
To start Chkdsk, in the system explorer on drive C, right-click and open “Properties”.
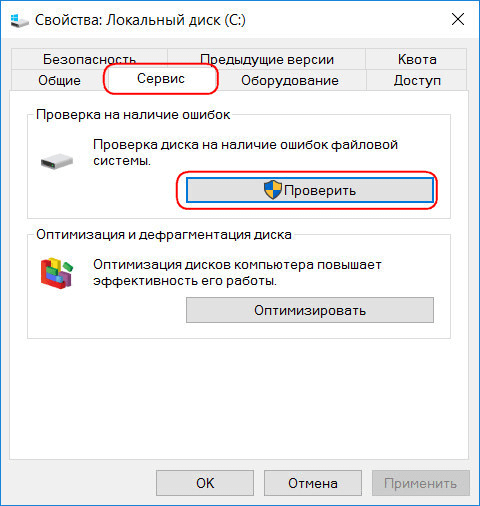
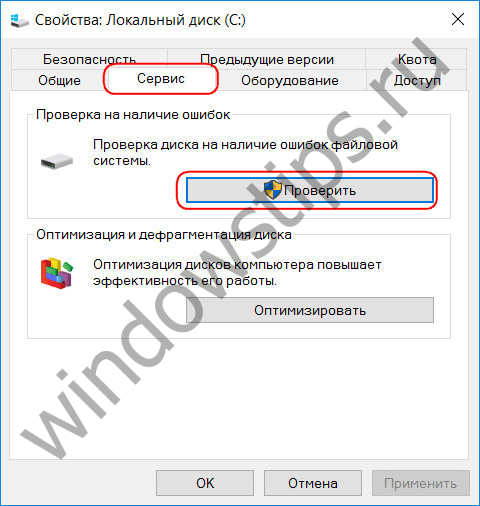
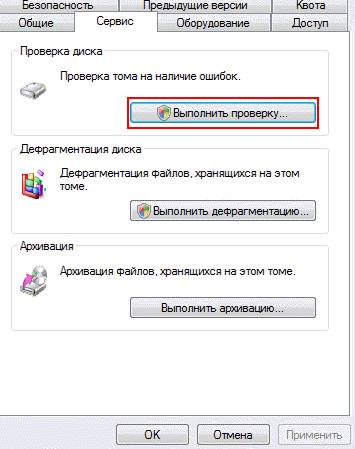
In the window of the opened properties of the disk partition, go to the “Service” tab, and in it click the “Check” button (or “Run Scan” for Windows 7).
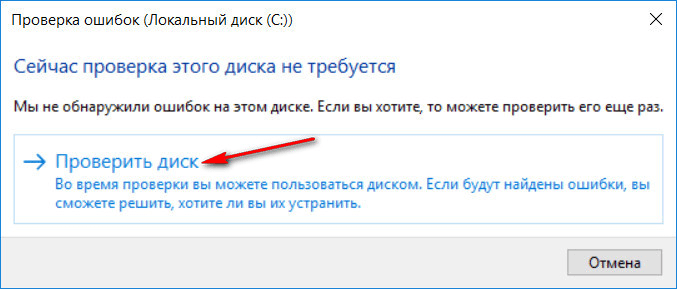
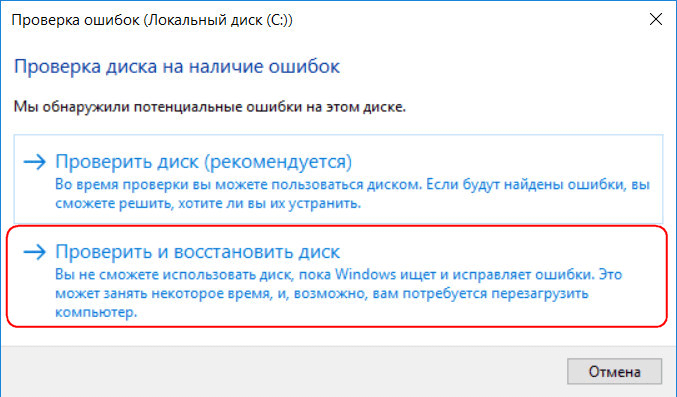
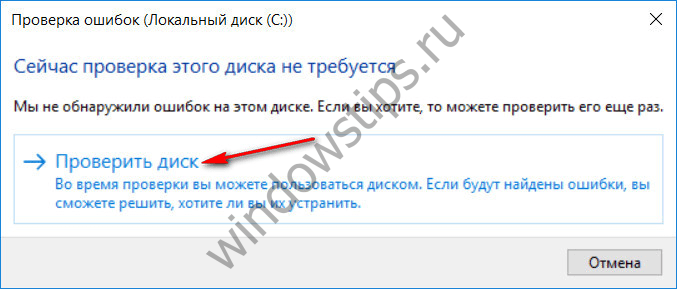
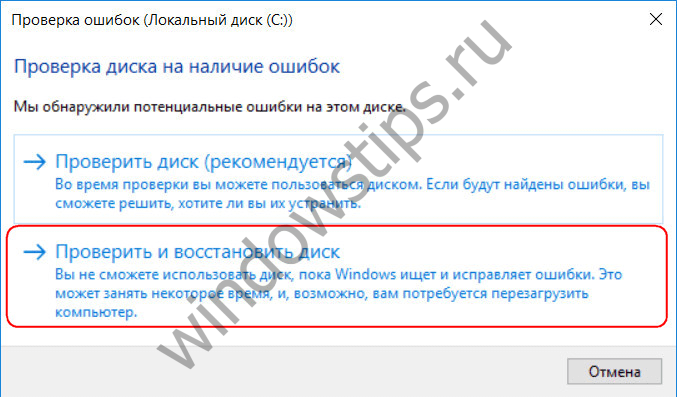
In versions of Windows 8.1 and 10, if everything is in order with the disk file system, we will see a notification in the window that appears next that verification is not required. But if you want to check the disk utility chkdsk can be started by clicking “Check Disk”.
If the system suspects the presence of file system errors, a button will appear in this window to start the check and restore the disk.
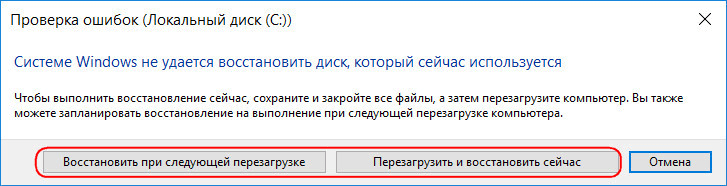
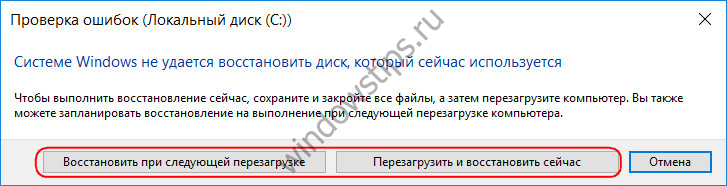
For Chkdsk to work on drive C, you must restart the computer. You can do this immediately or delay the start of the test until the next reboot.
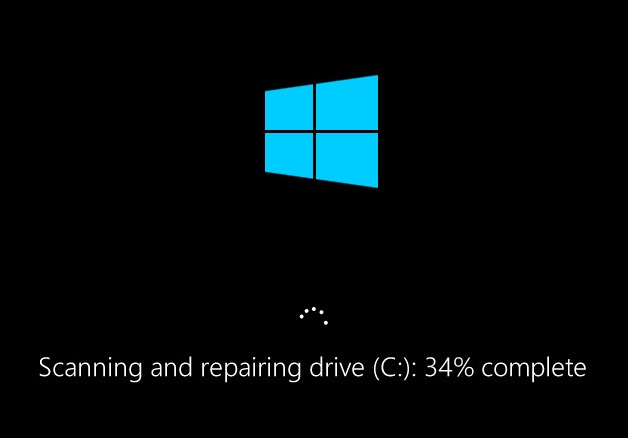
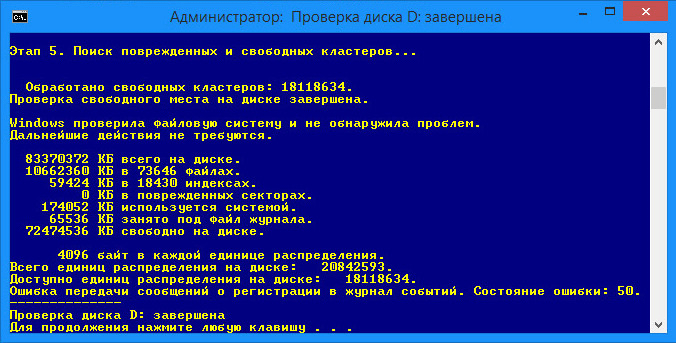
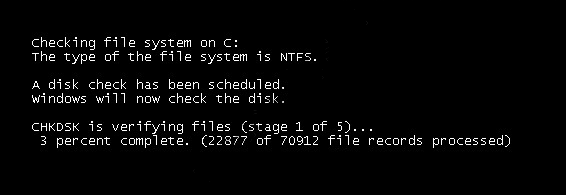
After restarting the computer, we can observe the operation of Chkdsk.
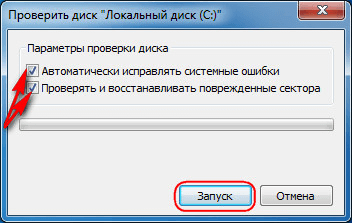
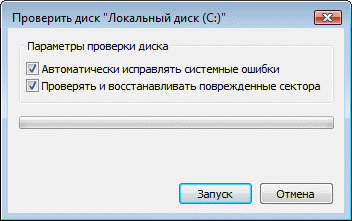
In Windows 7, starting Chkdsk is slightly different: you can add another possible option to the pre-installed automatic error correction option - check and restore bad sectors hard drive. When activating this option, it is worth considering that in this case, Chkdsk may take longer to work.
As with Windows 8.1 and 10, in version 7 system disk C cannot be verified within a running operating system. To start the test, you must restart the computer. Click "Disk Check Schedule."


When checking a non-system partition of a disk, if it is used by some programs, the situation is simpler than with a system partition. In the window with a notification that the disk is currently in use, you just need to click the "Disconnect" button to accordingly disable this section during the scan.
2. Starting Chkdsk using the command line
To start Chkdsk using the command line, first, respectively, run the latter.
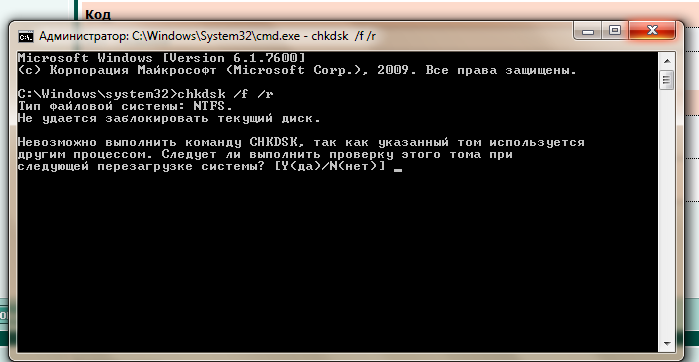
IN command line enter the command by type:
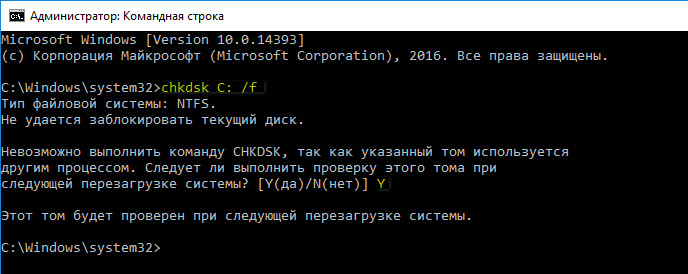
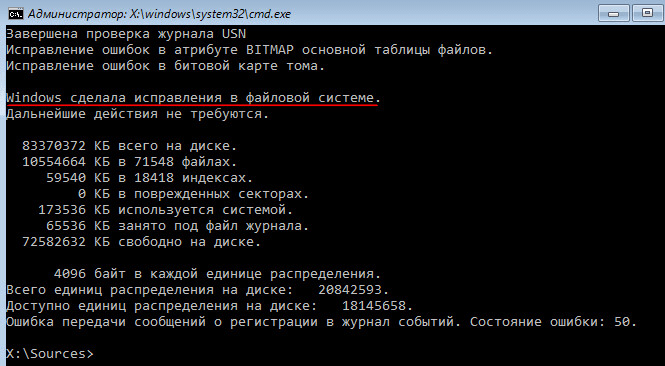
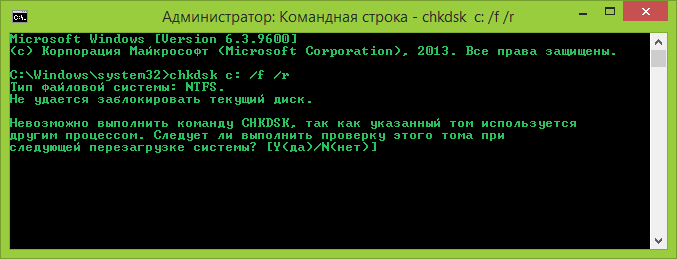
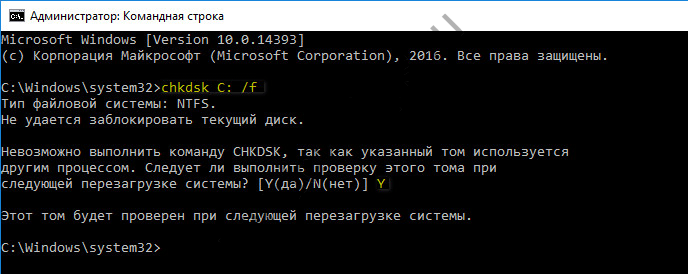
In this command, instead of drive C, each time we substitute the letter of the desired partition on which verification is required. If Chkdsk needs to check system partition C, as with the GUI, you will need to restart your computer. After a message appears on the command line about the impossibility of locking the specified drive, you need to enter "Y", then restart the computer.
In addition to the / f switch, which is responsible for fixing disk errors, Chkdsk can be launched with the / r switch, which is used to search for bad sectors and recover data. As a result of Chkdsk's work with this parameter, hard disk clusters with unreadable sectors will be listed as bad (bad blocks) with the transfer of their functions to the new cluster. Therefore, it is recommended to run Chkdsk with the / r parameter only when the usual error correction — launching the utility with the / f parameter — did not bring the necessary results. Using the example of the same C drive, the command will look like this:
3. Running Chkdsk on non-bootable Windows
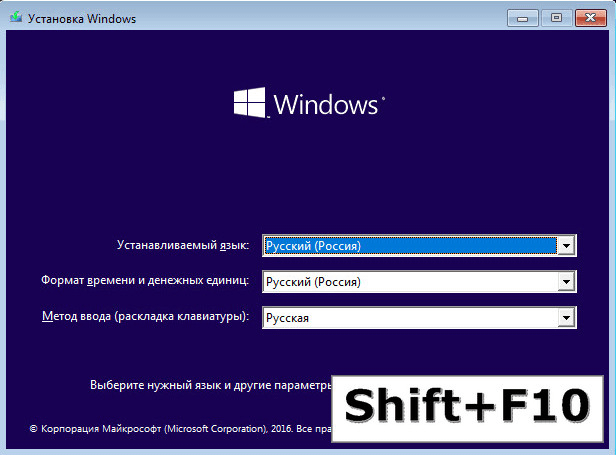
If Windows freezes at a particular boot stage, one of possible reasons this problem is file system errors. In this case, you need to start Chkdsk by booting from the rescue medium. As such, you can use the usual installation media from windows versions 7, 8.1 or 10. Using it, we will run the Chkdsk utility inside the command line. At the first stage of starting the system installation process, press the command line launch key - Shift + F10.
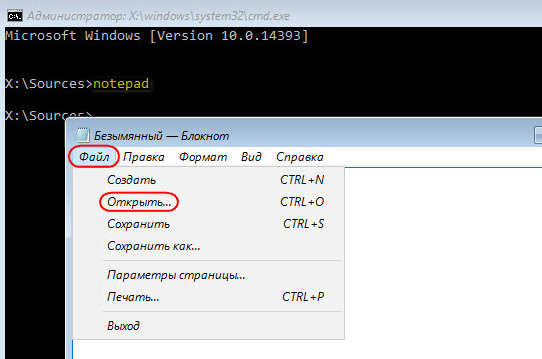
In the command line that opens, before starting the Chkdsk command, you need to specify what letters the disk partitions are defined. This is easy to do with notepad. Launches by his team:
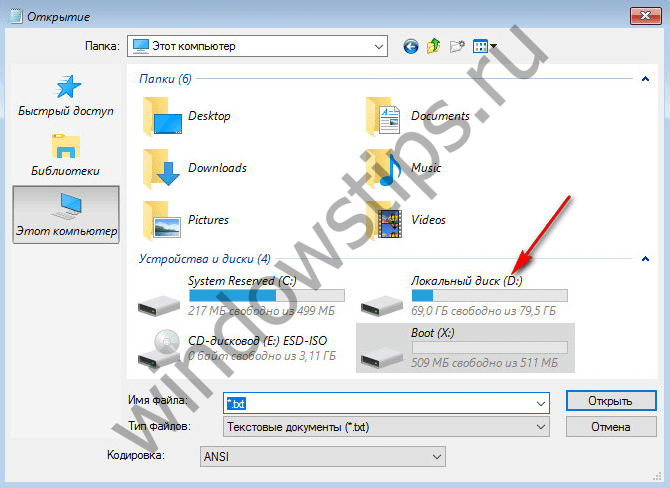
We press the menu of the notebook “File”, then - “Open”.
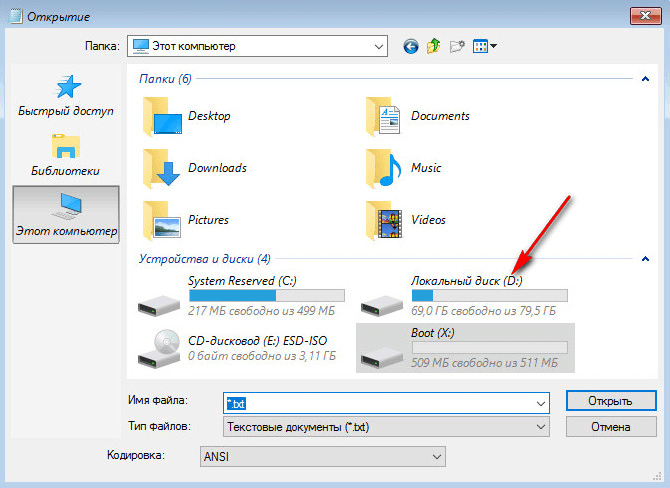
In the explorer that opens, remember the new drive designations. As a rule, in Windows 8.1 and 10, the C partition (as it is inside a working operating system) is listed as D, since the letter C is given to the first technical section of the system. And all other sections come with an offset of one letter of the alphabet.
Having decided on the letters of the disk partitions, close the notebook, then, returning to the command line, enter the command of this type:

As with Chkdsk inside Windows, you first need to try to fix disk errors by running the utility with the / f switch. And only if the problem is not resolved, only then run the command with the / r option, as indicated in the previous paragraph of the article.
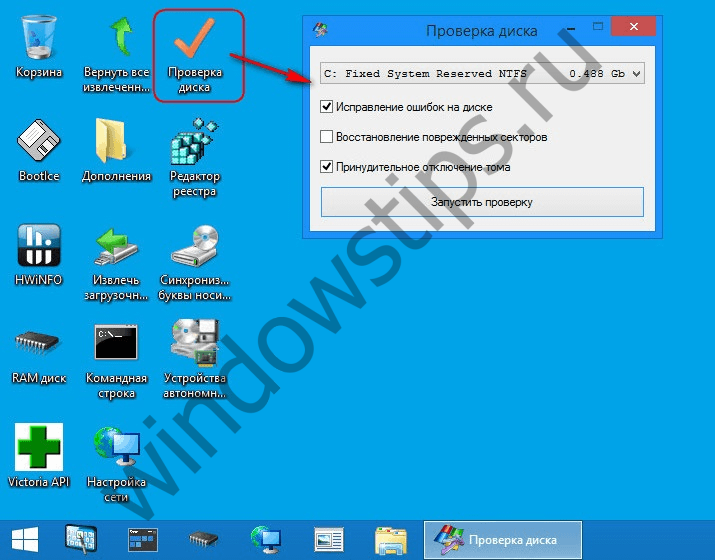
For cases of Windows inability to boot, you can pre-record the emergency Live-disk with a selection of various tools to restore the operating system. Among these, for example, WinPE-based AdminPE. His image for recording to disk or flash drive can be downloaded on the official website of the project Adminpe.Ru. Using AdminPE, you can run the command line and enter the commands discussed above launch chkdsk. But in this Live-disk, the Chkdsk utility has its own interface and is launched using a script. The shortcut for launching the utility is taken directly to the desktop.

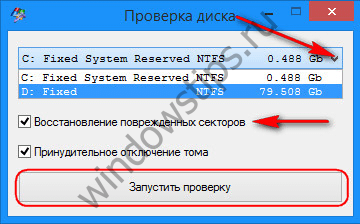
In the drop-down list to check the disk, select the desired disk partition. Next, we activate the checkboxes for recovering damaged sectors and forcibly disconnecting a partition (volume). Startups check.

Among the AdminPE tools - a number of other utilities for working with hard drives, as well as the well-known programs Hard Disk Sentinel and Victoria.
It is commonly believed that the speed of a computer depends on what equipment is installed on it. Talking about processor power or quantity random access memory, it is easy to overlook how the hard drive itself affects performance.
Checking Hard Drive Status
The speed of processing file actions and even the performance of programs depend on how well the hard disk functions. It is important to carry out a regular check of the hard drive also for the safety of all the necessary information: having learned about problems in the system, you can immediately do backups files while the drive is still running.
Surface problems can be detected using Windows or using third-party programs.
Checking disk status through Explorer
The fastest and easiest way to check the disk is through the function windows checks. To do this, take the following steps:
Alternatively, you can run the check through the command line:
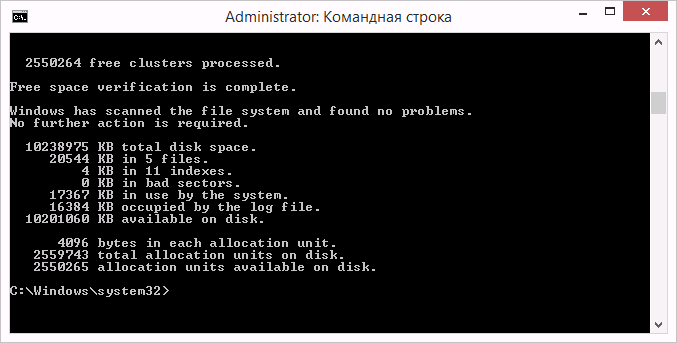
Such diagnostics will not only report the status of your hard drive, but in case of detecting problems immediately try to fix them.
If the procedure does not start under the pretext that the hard disk is busy, you can select the test option at the next computer restart.
 Set the test to run when the system reboots by pressing Y
Why the hard drive may be slow
If the check did not reveal any damage, and the hard drive is still working slowly - the problem may be that you have not defragmented for a long time. Disk defragmentation is as follows:
These actions can significantly speed up the response of your hard disk, especially if there are a lot of files on it.
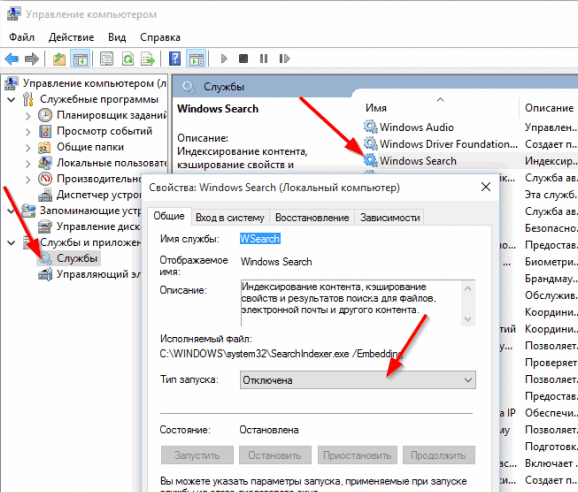
In addition, in Windows 10, file indexing can slow down disk performance.
Indexing files is necessary for using the search, but it significantly slows down the speed of the hard disk and the system as a whole, since for each existing file a separate path is added to the indexing database. Therefore, it is advisable to disable indexing. The search will still work, it just takes more time to find the requested file.
To disable indexing:
How to disable automatic hard drive scan
If the hard drive is checked automatically at computer startup, then you can easily turn it off. To do this, just activate a specific command.
Video: checking the status of the Windows 10 hard drive
Hard Disk Checker
There are many programs designed to check the hard drive. Consider several popular applications.
Seagate SeaTools
This free program optimally copes with its task. She can conduct a full check of your hard disk for errors, detect and troubleshoot. A distinctive feature of Seagate SeaTools is the ability to use it before loading Windows using a specially created boot disk. Thanks to this, you can bring back to life a system that crashed due to hard disk problems. The program is universal and works with many models of equipment.
 Seagate SeaTools - a convenient program for checking the hard disk and fixing errors
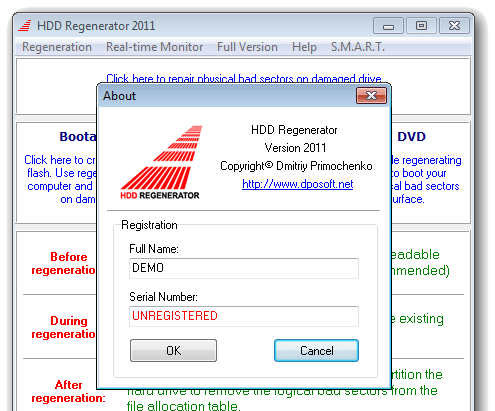
HDD Regenerator
This paid program is suitable for checking the hard disk for errors and their subsequent correction.
 Free version program is suitable for a simple check
HDD Regenerator not only conducts a qualitative analysis of most hard drives, but is also able to isolate and then try to repair damaged parts of the drive. The analysis function is also available in the free trial version.
 After purchasing the paid version, you will get full access to the useful functions of the program
Western Digital Data Lifeguard Diagnostic
This program only supports hard disksissued by Western Digital. In addition to high-quality and free analysis, it also has the ability to isolate damaged sectors.
 Western Digital Data Lifeguard Diagnostic is suitable for Western Digital hard drives
This avoids further re-writing of files to these sectors. Western Digital Data Lifeguard Diagnostic has a full format function, after which it cannot be restored deleted files, so be careful when working with this program.
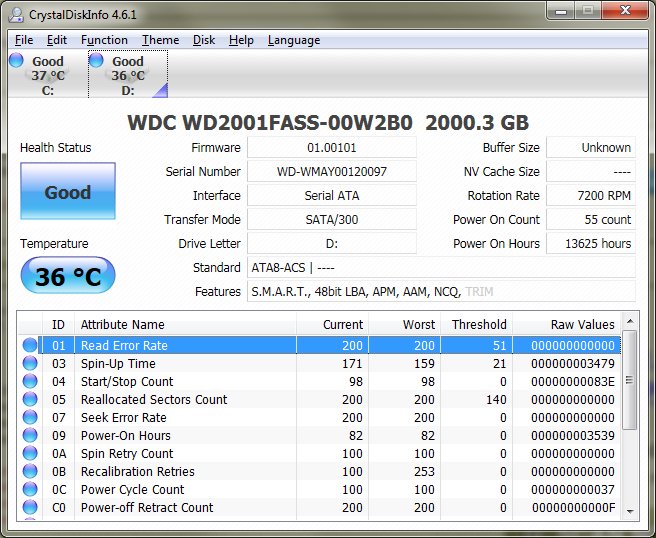
CrystalDiskInfo
One of top programs to check the status of the hard drive. Regardless of whether you use an external hard drive or is it connected to a computer standard methods, - This program may be useful to you. It conducts a detailed analysis of all mapped drives and produces the result in the form of a detailed informative summary. So you can find out the whole necessary information: from disk firmware version to system errorsencountered during diagnosis.
 CrystalDiskInfo program produces full information about hard drive
In addition, this program has the following useful functions:
- temperature output - the ability to monitor the temperature of the hard disk in real time (data is displayed in the lower right corner of the screen);
- managing the settings of the hard disk, regulating the volume of its work and the speed of interaction with the disk;
- resetting counters of damaged disk segments;
- displays the duration of the disk service and the number of computer starts.
CrystalDiskInfo does not fix disk errors, but is suitable for detailed diagnostics.
Diagnosis of the condition of the hard disk can be carried out both by system methods, and with special programs. Watch for errors on your disks, and then you will never lose important files due to technical malfunctions.
The health of the hard drive, like any other component of a computer or laptop, must be monitored so that it does not fail prematurely. In this article we will get acquainted with the built-in OS Windows utility hard check drive chkdsk. With its help, we will diagnose the HDD and correct the existing errors.
The hard drive is an integral part of the computer and careless attitude towards it can disable it, in which case everything that was on it all its working time will disappear and are unlikely to help on its own. And in order not to bring to such a case, you need to at least occasionally check hDD for errors. Today I will not talk about powerful utilities, such as Victoria or MHDD, about them another time. In today's article, we consider the built-in utility in the Windows operating system - chkdsk, which is designed to check the hard drive and fix problems on it.
And so, you need to open the command line. You can through Start - in the search for cmd, or use "Win + R", the "Run" dialog box will open, in the line enter - cmd and click OK. A Windows command prompt will open.
There, enter the command: chkdsk c: / f / r
Where chkdsk is the hard drive check command
c: is the letter of the hard drive, if there are several disks or partitions on the computer and you need to check another one, just enter the desired letter, for example d: or e:
/ f - sets error correction on the HDD.
/ r - fixes errors on the disk and restores some of the data that can still be read.
There are other commands, to get acquainted with them you need to enter the command: chkdsk /? Where will it be displayed full list chkdsk commands.
After entering the command, the utility should start scanning. As the scan ends, she will display her results. If you want to scan the system disk or partition (C), then the following message appears on the command line:
The program will not be able to scan the system disk during its operation; therefore, it is necessary to restart the computer. And in order for the scan to begin immediately before loading the OS, you need to enter Y and press Enter. The computer will restart and disk scanning will begin.
The built-in utility in Windows for checking the HDD can be run without a command line, it has a graphical mode. In order to start the scan in graphical mode, you must enter My computer, select desired drive, for example C: / right-click on it, select "Properties" in the drop-down list of the context menu. Next, on the "Tools" tab, under "Check disk", click on "Run scan."
In the window that opens, click "Run."
If you check the system drive (C), the computer will ask you to restart (Disk Check Schedule) and only then start checking before loading the OS, if you need to check any other drive or partition, the scan will start immediately.
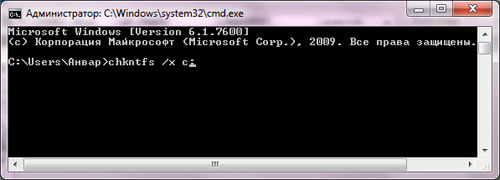
How to disable chkdsk scan at startup?
Sometimes users encounter such a problem when chkdsk utility automatically starts scanning the HDD when the computer boots. This happens because errors are found on the hard disk and the system automatically tries to fix it. It is not recommended to disable chkdsk automatic scanning, this can damage the hard drive. If you nevertheless decided to disable it, then you can do it this way: enter on the command line - chkntfs / x c: d: and press Enter.
Where "c" and "d" drive letters (partitions). And after that, the automatic chkdsk scan at startup will be disabled.
On this review built into Windows programs CHKDSK for checking and fixing errors on the hard disk is coming to an end, if you have questions about this topic, then contact.
Windows crashes, computer emergency power off, experiments with software to manage disk space, the effects of viruses - these and other problems can lead to the automatic launch of a standard utility Windows chkdskdesigned to fix hard disk file system errors. An incorrectly completed operation of the operating system with files leads to the appearance of file system errors, and sometimes to its damage at all. In emergency cases, the Chkdsk utility turns on itself before starting Windows, scans the disk partitions and fixes errors. However, the fact that there are problems with the file system may not be felt at all during normal use of a computer and will be revealed only when you try to manage disk space. So, for example, trying to reduce the disk partition using regular Windows tools, we can get the following notification: “It is possible that the volume selected for compression is damaged. Use Chkdsk to troubleshoot, and then try to compress the volume again. ”
In this case, the disk check does not start automatically. How to start Chkdsk manually in Windows 7, 8.1 and 10? How to use Chkdsk to fix disk errors, if this problem caused the inability of the operating system to boot?
Inside Windows, the Chkdsk utility can be launched in several ways.
1. Starting Chkdsk using the Windows GUI
To start Chkdsk, in the system explorer on drive C, right-click and open “Properties”.
In the window of the opened properties of the disk partition, go to the “Service” tab, and in it click the “Check” button (or “Run Scan” for Windows 7).
In versions of Windows 8.1 and 10, if everything is in order with the disk file system, we will see a notification in the window that appears next that verification is not required. But if you wish, you can start the disk check with the Chkdsk utility by clicking "Check disk".
If the system suspects the presence of file system errors, a button will appear in this window to start the check and restore the disk.
For Chkdsk to work on drive C, you must restart the computer. You can do this immediately or delay the start of the test until the next reboot.
After restarting the computer, we can observe the operation of Chkdsk.

In Windows 7, starting Chkdsk is slightly different: you can add another possible option to the pre-installed automatic error correction option - checking and repairing damaged hard sectors drive. When activating this option, it is worth considering that in this case, Chkdsk may take longer to work.

As with Windows 8.1 and 10, in version 7, system drive C cannot be verified within a running operating system. To start the test, you must restart the computer. Click "Disk Check Schedule."

When checking a non-system partition of a disk, if it is used by some programs, the situation is simpler than with a system partition. In the window with a notification that the disk is currently in use, you just need to click the "Disconnect" button to accordingly disable this section during the scan.
2. Starting Chkdsk using the command line
To start Chkdsk using the command line, first, respectively, run the latter.
In the command line we enter the command by type:
In this command, instead of drive C, each time we substitute the letter of the desired partition on which verification is required. If Chkdsk needs to check system partition C, as with the GUI, you will need to restart your computer. After a message appears on the command line about the impossibility of locking the specified drive, you need to enter "Y", then restart the computer.
In addition to the / f switch, which is responsible for fixing disk errors, Chkdsk can be launched with the / r switch, which is used to search for bad sectors and recover data. As a result of Chkdsk's work with this parameter, hard disk clusters with unreadable sectors will be listed as bad (bad blocks) with the transfer of their functions to the new cluster. Therefore, it is recommended to run Chkdsk with the / r parameter only when the usual error correction — launching the utility with the / f parameter — did not bring the necessary results. Using the example of the same C drive, the command will look like this:
3. Running Chkdsk on non-bootable Windows
If Windows freezes at a particular boot stage, one of the possible causes of this problem is a file system error. In this case, you need to start Chkdsk by booting from the rescue medium. As such, you can use the usual installation media with versions of Windows 7, 8.1 or 10. Using it, we will run the Chkdsk utility inside the command line. At the first stage of starting the system installation process, press the command line launch key - Shift + F10.

In the command line that opens, before starting the Chkdsk command, you need to specify what letters the disk partitions are defined. This is easy to do with notepad. Launches by his team:
We press the menu of the notebook “File”, then - “Open”.

In the explorer that opens, remember the new drive designations. As a rule, in Windows 8.1 and 10, the C partition (as it is inside a working operating system) is listed as D, since the letter C is given to the first technical section of the system. And all other sections come with an offset of one letter of the alphabet.
Having decided on the letters of the disk partitions, close the notebook, then, returning to the command line, enter the command of this type:
![]()

As with Chkdsk inside Windows, you first need to try to fix disk errors by running the utility with the / f switch. And only if the problem is not resolved, only then run the command with the / r option, as indicated in the previous paragraph of the article.
For cases of Windows inability to boot, you can pre-record the emergency Live-disk with a selection of various tools to restore the operating system. Among these, for example, WinPE-based AdminPE. His image for recording to disk or flash drive can be downloaded on the official website of the project Adminpe.Ru. Using AdminPE, you can run the command line and enter the above Chkdsk startup commands. But in this Live-disk, the Chkdsk utility has its own interface and is launched using a script. The shortcut for launching the utility is taken directly to the desktop.
In the drop-down list to check the disk, select the desired disk partition. Next, we activate the checkboxes for recovering damaged sectors and forcibly disconnecting a partition (volume). Startups check.

Among the AdminPE tools - a number of other utilities for working with hard drives, as well as the well-known programs Hard Disk Sentinel and Victoria.
Have a great day!
I already raised the topic service tough drives, namely wrote. Today we will talk about another tool to ensure the stable operation of your computer and the security of valuable data.
This is a tool for fixing file system errors on disk and for. As many have already guessed from the title, we will talk about the utility Chkdsk.
General description of program features
After crashes, computer shutdowns, problems with electricity, etc., before loading Windows, sometimes you can observe the following picture:

It happens that some users confuse this phenomenon with, but it's not him (even if the design here is also blue). This window means that the built-in Windows utility called Chkdsk (Check Disk), which is engaged in searching for and (or a floppy disk) file system errors that could arise during unforeseen malfunctions of the computer or the disk itself. Just this small utility will be discussed in this article.
In addition to the above properties, this joy (in operating systems Windows NT, Windows 2000 and Windows XP) can also check the surface of a hard disk for the presence of physically damaged sectors (the so-called bad sectors). Found sectors are marked as damaged, and the system no longer tries to read from these sectors or write any information on them.
Actually, the presence of this program is infinitely useful because without it, after crashes, the hard drive and file system would have been extremely tight. As a rule, an automatic launch of this one can indicate failures not just in the file system, but also in the hard disk itself, which should give you the idea of \u200b\u200bvaluable information and preparation for replacing the aforementioned device.
How to start and use Chkdsk to check
It happens that you have suspicions of the unstable operation of the hard drive (just might be a well-founded suspicion), and the utility Chkdsk did not start automatically. Then you can run the disk check yourself. There are two ways to do this.
The first (graphic):
Open " My computer", right-click on the disk that we want to check, then select" The properties" - "Service" - "Run check".
In the next window, mark both checkboxes and press the button " Launch".
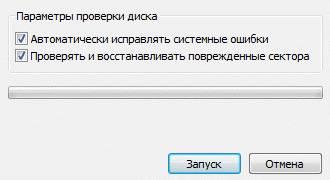
And we are waiting for the verification to complete.
In case you check the section with Windows, you can receive a message about the impossibility of verification. This is normal and a check will be scheduled for the next run, i.e. will be made when the computer restarts.
Option Two (via the console):
Choose " Start" - "Run" - "cmd" - "oK".
We will see a console where we enter the command:
chkdsk with: / f
Where chkdsk is the command itself, with: is the drive letter that we want to check, and / f is the parameter that sets the error correction on the drive. Accordingly, if you need to check another disk, for example D, then specify:
chkdsk d: / f.
As with the graphical solution, if you check the system partition, you may receive an error: "Unable to execute chkdsk team, because indicated volume used by another process. Should I check this volume the next time I reboot the system? ". In this case, click on the Latin keyboard Y(do not forget to switch the language) and press the button Enter and then, during the next boot of the computer, the utility chkdsk will check the specified disk for errors and correct them.
Afterword
Chkdsk, despite all the usefulness, you should not run it too often, or rather it is recommended to touch it in case of serious failures in order to restore the file system and restore normal hard work disk for information security. If you really want to run just "for prevention" (s), then it is better not more than once every six months.
As usual, if you have questions, I am ready to answer them in the comments, or.


