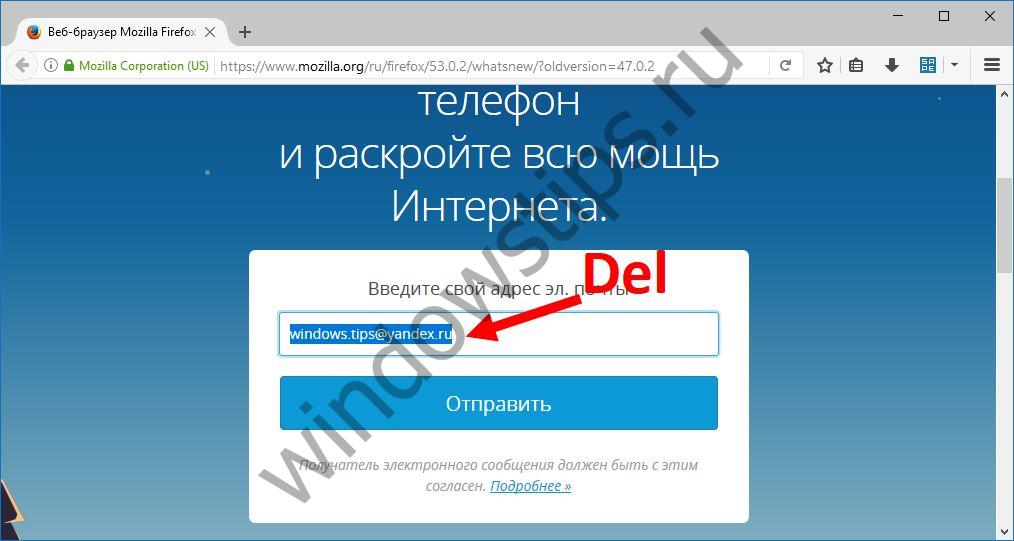
Browsers can help you fill out fields and forms by storing the data that you enter on web pages (logins, passwords, phone numbers). To prevent the browser from saving this data, disable this feature in the browser settings.
Internet explorer
Determine your browser version:
Note.To determine the version of the browser, simply go to the page or use the instructions below.
In the browser menu, select reference(Help). The menu bar may be hidden - press the key Altto see her.
In the menu that opens, select About the program (About Internet Explorer).
In the window that opens, the version of the browser used can be seen in the field Version (Version).
Internet Explorer 10
Internet Explorer 9
Internet Explorer 8
Internet Explorer 7
Internet Explorer 6
Web Form Data (Form data) and Passwords Delete (Delete).
- On the menu Service (Tools) select Internet Options (Internet options).
- Tab Content (Content) in block Autofill Parameters (Settings).
- Press button OKto complete the setup.
In the window AutoFill Settings
To delete data that the browser has already memorized, click Delete AutoFill History (Delete AutoComplete history). Then check the boxes Web Form Data (Form data) and Passwords (Passwords) and click Delete (Delete).
Disable AutoFill:
- On the menu Service (Tools) select Internet Options (Internet Options).
- Tab Content (Content) in block Autofill (AutoComplete) click item Parameters (Settings).
- In the window AutoFill Settings (AutoComplete Settings) uncheck the boxes corresponding to unnecessary data.
- Press button OKto complete the setup.
Deleting data that the browser has already memorized:
- On the menu Service (Tools) select Internet Options (Internet Options).
- Tab Are common (General) click Delete (Delete).
- In the window Delete review history (Delete Browsing History) check the boxes Web Form Data (Form data) and Passwords (Passwords).
- Press button Delete (Delete) to complete the deletion.
- On the menu Service (Tools) select Internet Options (Internet Options).
- Go to tab Content (Content) and in block Autofill (AutoComplete) click Parameters (Settings).
- In block Forms (Forms) and
- Press button OKto complete the setup.
Clear forms (Clear Forms) and Clear passwords (Clear Passwords).
- On the menu Service (Tools) select Internet Options (Internet Options).
- Go to tab Content (Content) and in the section personal information (Personal Information) click on the button Autofill (AutoComplete).
- In block Use autocomplete for (Use AutoComplete for) uncheck the boxes Forms (Forms) and Usernames and passwords in forms (User names and passwords on forms).
- Press button OKto complete the setup.
To delete data that the browser has already memorized, click the buttons in the autocomplete settings Clear forms (Clear Forms) and Clear passwords (Clear Passwords).
Firefox
Disable AutoFill:
Opera 10 and higher
Opera 10, 11 and 12
To delete data that the browser has already saved, open the corresponding forms with the buttons Manage saved passwords and Manage autocomplete settings and delete individual entries.
Previous versions of Opera only allow you to save passwords and some personal data for autocomplete. To disable this feature, follow the instructions given.
To delete data that the browser has already memorized:
Chrome
Disable AutoFill:
To delete data that the browser has already memorized:
Safari
Select the Safari settings menu (the gear icon in the upper right corner), then Settings. Go to the section Autofill and uncheck the boxes From my address book card and Other forms.
To delete data that the browser has already memorized, click on the button Edit (next to the field Other forms) In lines and click Delete, or delete the entire list at once using the button delete everything.
Autocomplete forms on the site is a great way to save time when using Internet resources. If you wish, you can use the specified option by rummaging through your browser settings.
The main opportunities for using autocomplete are the following actions with data:
- by adding;
- editing;
- by removal.
Data Storage Features
Many users do not know what data should be for autocomplete forms and what it is all about. Typically, the information that can be saved in this way includes the following autocomplete options:
- username;
- address email;
- phone number;
- name of the organization;
- mailing address.
When using the Internet, ordinary users often come across a proposal to remember data intended for authorization on various resources. And with the spread of payments in electronic form, the possibility of auto-filling on the website data related to bank card information becomes popular, although you should be extremely careful when providing access to financial information.
Program for autocomplete forms in the browser
AutoFill forms in Firefox is the possibility of a drop-down list when you start typing in a special text field on various sites. Previously used options on the site, similar to those introduced now, are provided in the form of a drop-down list. This is done automatically. You can optionally configure autofill in FireFox.
Is auto-completion of forms in Chrome different from the previous version? In principle, the main possible actions with the data will be similar. In addition, the user will be able to save passwords using the "Passwords and Forms" section, which can also be included, saved, edited and deleted. ![]() To use passwords with different devices Sync settings apply. When making purchases on the Internet, synchronization with google service Payments If you are afraid to leave confidential information related to financial issues to third-party resources, Google will partially eliminate your concerns. When switching to suspicious resources, he will warn you in advance about possible risks with information about an insecure or dangerous connection, insecure entry and insecure payment, advising you to refrain from autocomplete.
To use passwords with different devices Sync settings apply. When making purchases on the Internet, synchronization with google service Payments If you are afraid to leave confidential information related to financial issues to third-party resources, Google will partially eliminate your concerns. When switching to suspicious resources, he will warn you in advance about possible risks with information about an insecure or dangerous connection, insecure entry and insecure payment, advising you to refrain from autocomplete.
Finally, consider autocomplete forms in the domestic Yandex browser. In the section "Passwords and forms" there is an option to enable of this service with one click. You can also add the necessary information, as well as delete them or clear the entire history. 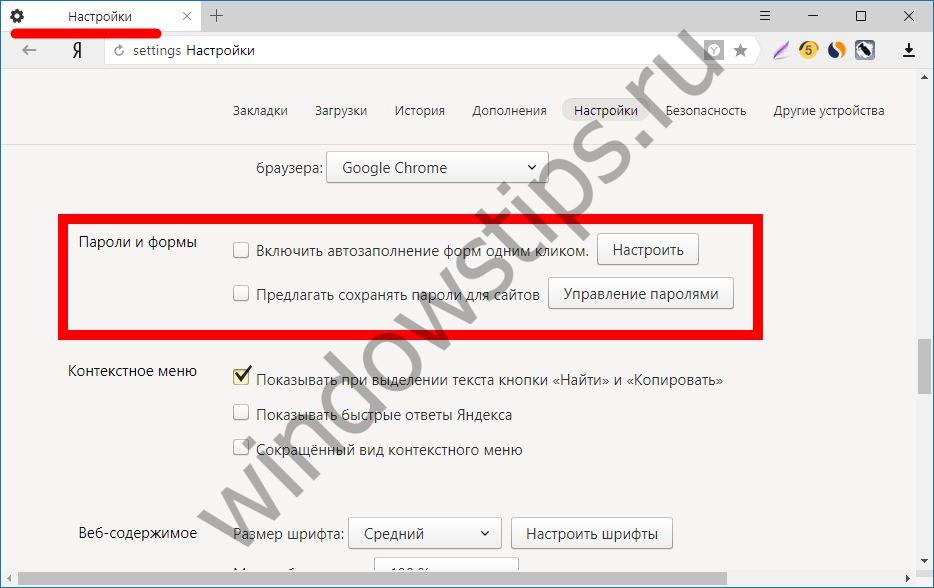 In the classical user interface, it is possible to independently set the list of addresses for which it is allowed or forbidden to use the function we are considering.
The Yandex browser stores passwords in the form of hashes in its own database and assures that it takes about a hundred years for an attacker to find the right combination. It uses additional protection against phishing and warns in advance that it is undesirable to use the same passwords for different resources. Additionally, the Yandex Help service offers users detailed instructions to disable the storage of data on the site in the main popular browsersused to date.
There is an easy way to save 5-7 minutes of your life, which you have to spend by registering on sites.
Many users do not trust and consider it unacceptable to transfer their passwords and other confidential information anywhere and, especially, to the browser.
Most likely, I belong to such incredulous users, but in some cases autocomplete is still very convenient - indeed, it turns out on any site in just 2 clicks.
If during registration on the sites you indicate the same e-mail address, first name, last name, phone number and residential address, then this method is suitable for you.
How to autofill Yandex browser
I give below step by step instructions for autocomplete browser.
1) First, open the browser settings:
- click on button 1 in fig. 1,
- a menu appears in which we click on the option "Settings" (2 in Fig. 1).
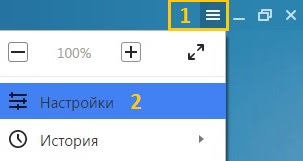 Fig. 1. Where are the Yandex browser settings
 2) A long page with browser settings will open, which you need to scroll to the end and at the end click on the button "Show advanced settings" (Fig. 2).
Fig. 2. On the way to browser autocomplete3) Among the additional browser settings, we are looking for the option “Passwords and forms” (Fig. 3).
 Fig. 3. Turn on browser autocomplete and go to settings
 If there is no checkmark, then put it in front of the checkbox “Enable auto-completion of forms with one click” (1 in Fig. 3).
In principle, this is enough. Now, when you start the first registration on any site, the browser will remember this information. Further, when registering on another site, the browser will offer to fill in the text that was entered during the first registration. This is an automatic way to create autocomplete.
I suggest doing auto-complete manually. Then it will be possible then to edit the form with auto-completion, which is often convenient.
For manual autofill, click on the "Configure" button (2 in Fig. 3).
4) The "Autofill settings" form will appear (Fig. 4).
 Fig. 4. Enter the mailing address for subsequent autocomplete
 As can be seen in fig. 4, you can "Add a mailing address ..." and "Add a map". Honestly, bank card I do not recommend adding, especially if not one but several people use the computer. Below we will fill in only the mailing address.
To do this, click on the “Add Email Address” button to auto-complete the Yandex browser.
Then, a window pops up in the browser (Fig. 5), prompting you to enter frequently used information when filling out forms during registration on sites (name, date of birth, gender, e-mail, address, city, phone number, etc.).
 Fig. 5. Fill in all the fields and click OK to save the form
 Fill in all data at your discretion (or not all - you decide). Although the residence address and phone number are not often required when registering for resources, it will be easier for you to place orders via the Internet (if you place them).
Upon completion of data entry, click “OK” to save the profile. In fig. Figure 6 shows that after this the “Hope” form appeared (1 in Fig. 6).
 Fig. 6. Hope form for autocomplete created
 If the computer has more than one user, then you can create several profiles for automatically filling out forms.
To do this, click on the button "Add mailing address" (2 in Fig. 6). The second Irina form will appear, as shown in fig. 7.
How to change or delete browser autofill form
First, look for the form in the browser, therefore:
- go to the "Settings" Yandex.Browser (Fig. 1),
- click "Show advanced settings" (Fig. 2),
- there we find the option “Passwords and forms” (Fig. 3) and click “Configure” (2 in Fig. 3),
- the “Autofill Settings” window appears (Fig. 7):
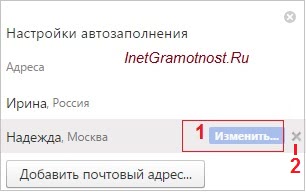 Fig. 7. You can change or delete the autofill form
 To change some data, move the mouse to the desired form, for example, “Hope” and click on the “Change” button (1 in Fig. 7).
To completely remove the form, you need to bring the mouse to it, a cross will appear (2 in Fig. 7). We click on the cross and that’s it, the browser autofill form has been deleted.
Autofill example when registering on the site
Now, when registering on Yandex sites, the browser will offer to automatically fill out the form fields. Autocomplete fields will be highlighted in yellow. This means that the browser has saved this information and offers just click on the saved options.
Yandex.Browser will fill in only the fields that are needed to register on the site: if the site does not require your phone number, it will not be entered in any other field.
We open the site where you need to register. In fig. 8 is registration on the website of the State Services.
In the name field, enter the first letter of your name. In fig. 8 during registration, I entered the letter "H". Then yellow fields appeared in which the browser automatically substituted all the information that it had saved.
 Fig. 8. Enter during registration the letter “H” in the “Name” field for auto-completion using the form “Hope”
 It remains to check whether everything is suitable for registration and click on the blue "Register" button.
It turns out registration on the site in 2 clicks:
- I entered the first letter of my name “H”, then Yandex browser automatically returned all the data from the “Hope” form.
- Clicked on "Register".
Autofill some details
You may notice that when creating the form for autocompletion, it was not proposed to enter the last name and patronymic (Fig. 5).
Nevertheless, some information is stored by Yandex.Browser after entering it into the form and sending the entered data to the Yandex server (and saving it there). Later, the browser will offer to automatically fill out this information in the appropriate fields during subsequent registrations on other sites.
How to disable autocomplete Yandex browser
- We go to the "Settings" Yandex.Browser (Fig. 1),
- At the end of the settings page, click "Show advanced settings" (Fig. 2),
- there we find the option “Passwords and forms” (Fig. 3),
- uncheck the box next to “Enable autofill of forms with one click” (1 in Fig. 3):
The screenshots in the article (Fig. 1-8) are given for the version of Yandex.Browser 16.4.1.8564.
"Passwords and forms." The first line - the inclusion of autofill with one click, designed for an accelerated registration method - is created account data and based on it, the fields in various profiles are filled in during registration. To create such a record, click on the line "AutoFill Settings".
In the window that appears, you can create a template to fill in the address or to fill in credit card information.
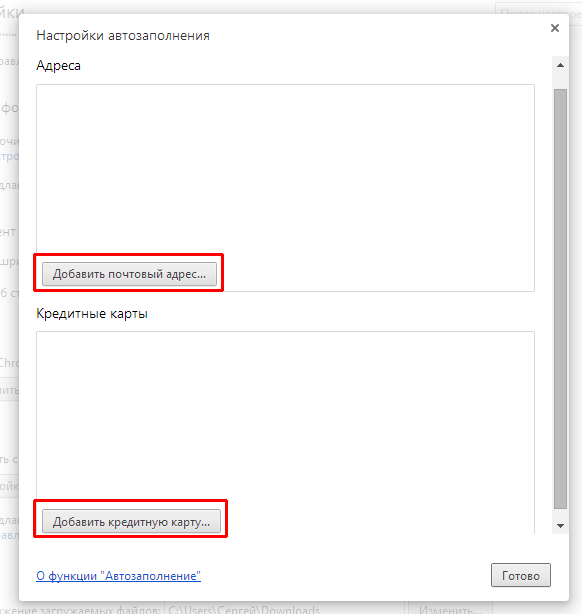
Create a template to fill in the address. To do this, click the "Add a mailing address" button. In the template filling window, enter all your data into the form. As you fill out the questionnaire, additional fields may appear. You can add multiple email addresses and multiple contact names. All fields are optional. After filling, click the "OK" button.

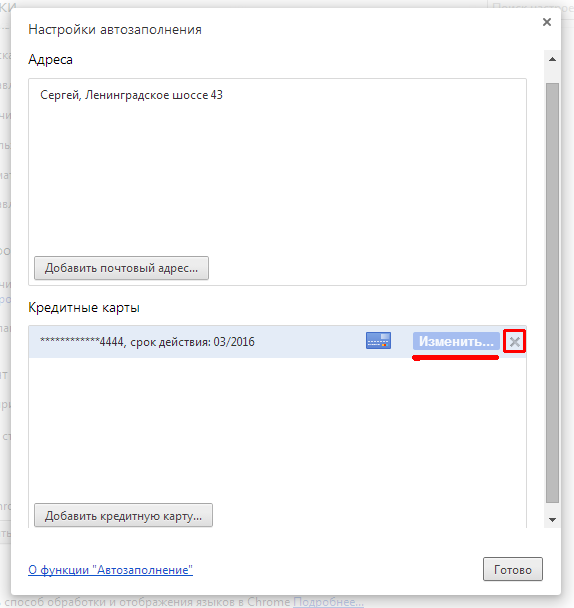
In the same way, you can add more templates to fill out profiles. Created templates can be edited or deleted, for this we hover over the desired template, additional buttons appear. Click on the desired button to delete or edit.

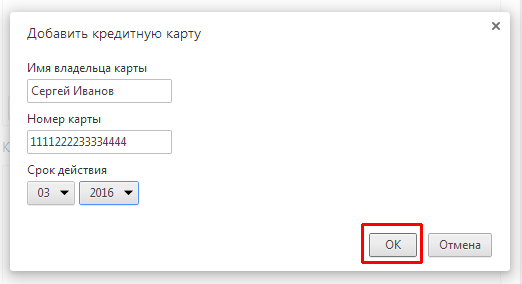
To fill in the credit card information, click "Add credit card". In the window that appears, enter the owner’s name (and surname), card number (sixteen digits) and expiration date (the validity period is indicated on the front of the card with a number). After filling, click "OK"
Other cards can be added in the same way. When you hover over a record about a card, a button appears for editing data, and a cross for deleting a record. It is not necessary to press the “Finish” button, the data has already been saved, you can simply close this window by clicking on the cross in the upper right corner.
“Suggest saving passwords for sites” - if the checkbox is selected in this line, then when entering the password on any site, you will be asked to save the password in the browser’s memory.
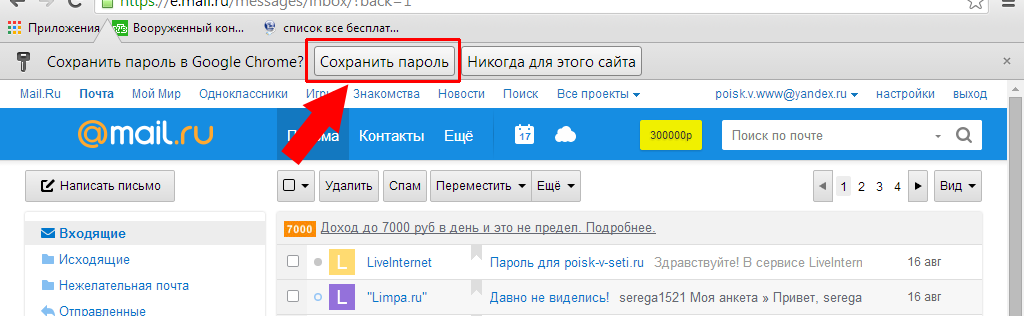
At the next entrance to this site, you can click in the login field, in the drop-down menu all saved logins for this site will be displayed. We select the one you need, click on it with the left mouse button, and the password is automatically filled in the column, that is, you do not need to enter your login and password again, just select from the saved ones.

Such conservation is not only valid.


