Damage to the bootloader is usually due to improper installation of the second system. There are several ways to fix the error that interferes with the normal loading of the system using the built-in windows tools and special software.
Recovery through the installation disk
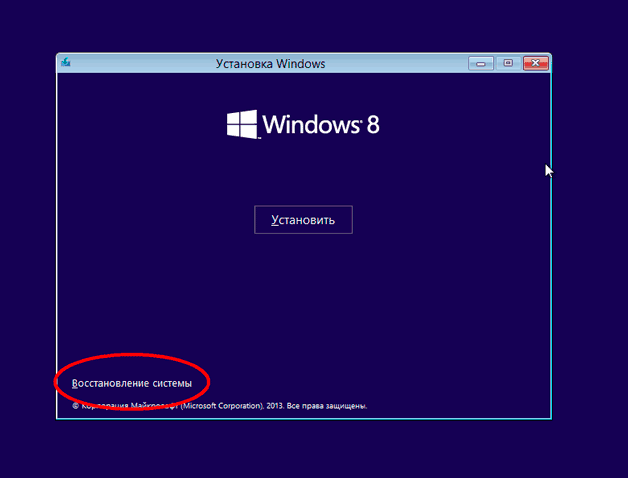
First, let's see how to recover windows bootloader 8 using installation disk. There are two options: automatic error correction and manual rewriting of the bootloader through the command line.
While in the BIOS, look at which drive was installed in first place in the “Boot” section. If two hard drives are connected to the computer, but the download starts from the one that does not have an operating system, then forget about restoring the bootloader and just put the hard disk in the first place. If you still have problems with the boot record, then try to fix them in auto mode:
If the recovery wizard detects an error during diagnostics, it will notify you of this. Click the "Fix" button and wait until the crash is resolved, then try downloading Windows 8 again.
Manual recovery on the command line
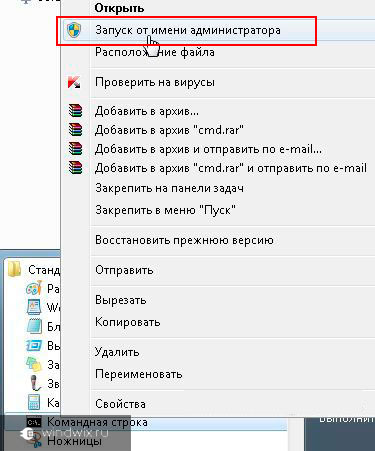
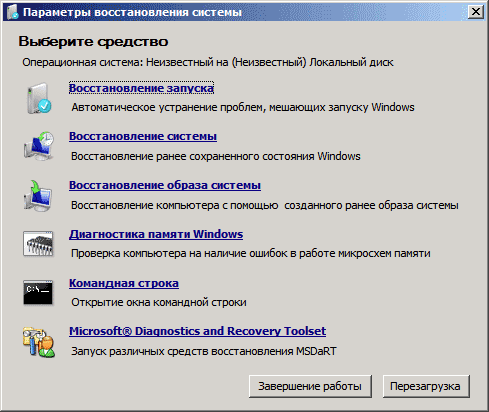
If auto recovery did not help to fix the error, or the wizard did not find the problem, you will have to do the work manually by entering the command to overwrite the boot area in the console. To launch the console, in the "Advanced Settings" subsection, click on the "Command Prompt" item. 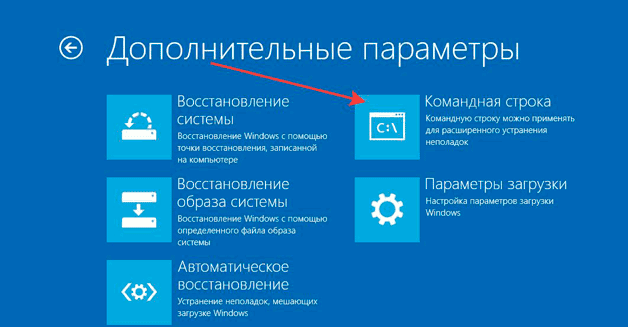
Usually, a few commands are enough to restore the bootloader:
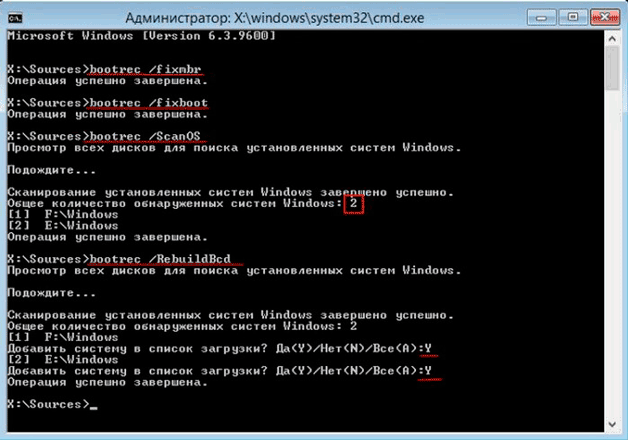
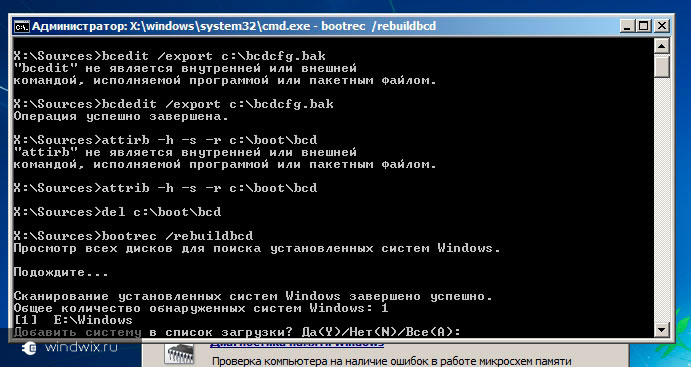
After restarting the computer, the problem is with windows launch 8 should be fixed. But in some particularly difficult cases, the execution of these commands does not help. Then you may need to completely rewrite the entire boot area or even delete and re-create the partition reserved by the system. To recreate the BCD repository:
Performance specified command will restore bootmgr and boot storage configuration files, which will allow the G8 to start normally. If this does not help, then you will have to completely delete the partition reserved by the system and recreate it.
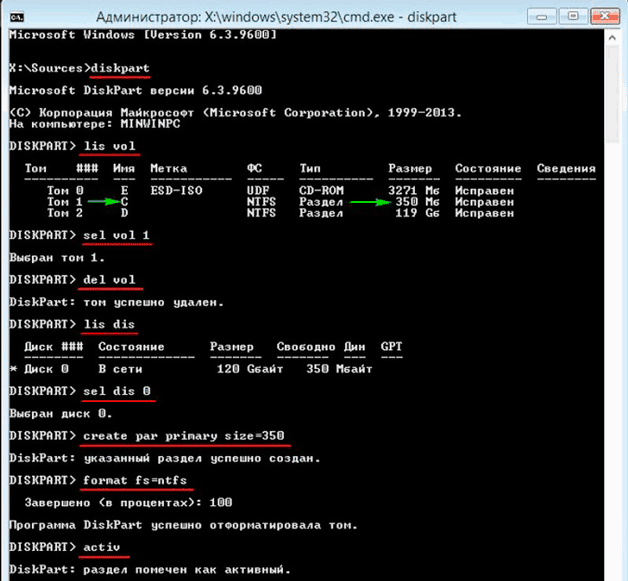
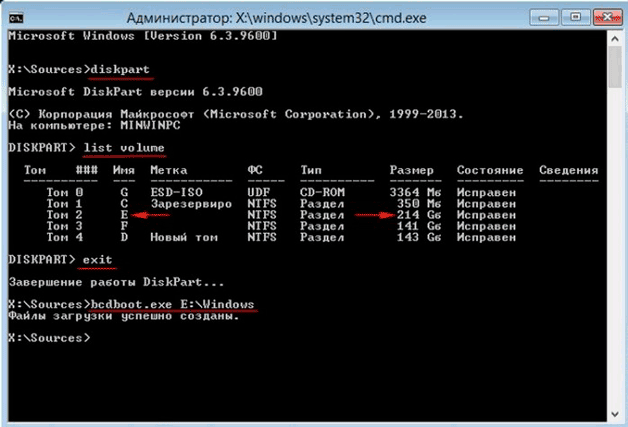
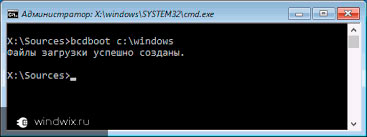
The work is almost complete, it remains to create boot files on a new hidden system partition. Enter the command “bcdboot D: \\ Windows”, where “D” is the letter of the volume you just created.
Using special software
If installation windows drive 8 no, and you don’t want to waste time downloading the distribution kit and writing it to the media, use it to restore the bootloader paragon program Hard Disk Manager, which is distributed in the Hiren’s Boot CD utilities package.
- Download and burn to a disk or flash drive Hiren’s Boot CD. Boot from the created media by changing the priority in the BIOS.
- Go to the "Launch DOS Programs" section. Open the "Disk Partitioning" subsection and run the Paragon Hard Disk Manager utility.
- Expand the Wizards menu and select Recovery windows boot».
- In the wizard window, check “Search for installed copies” and click “Next”.
- Check the box next to “Modify boot partition entry” and click “Next.”
The program will overwrite the boot record, adding information about the installed operating system to it. After reboot windows computer 8 will start without errors.
Recovery from another system
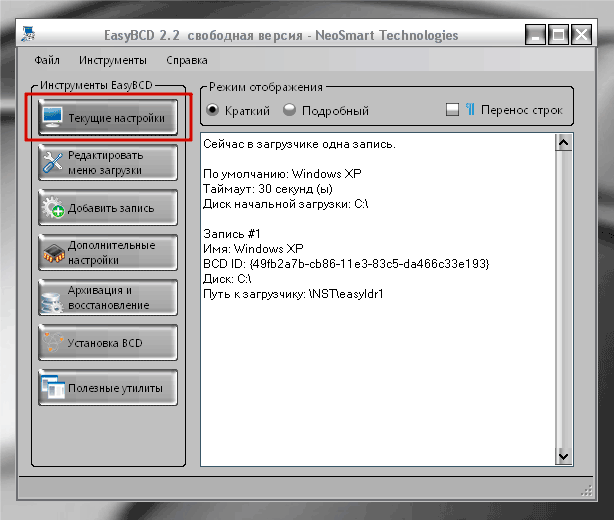
If the bootloader is damaged as a result windows installation XP, and now XP starts, but the "eight" does not, then try to fix the error using the EasyBCD utility. Managing it is much easier than typing commands in the console:
To apply the new configuration, you must restart the computer. Do this from the main program window: open the “Tools” menu and click “Restart Computer”. The recovery of the Windows 8 bootloader is completed, at startup a menu with the choice of the operating system should appear. If you do not choose which version to run, then after the time specified when creating the record, the default system will boot.
Hello dear readers.
Sometimes, as a result of various actions, it may happen that the computer refuses to enter the operating system. And in some cases, this is due to disruption of the operation of an important tool. The solution is to restore the Windows 7 bootloader.
There are several main signs that indicate the need for a "return to life" of the corresponding OS element:
Bootrec( )
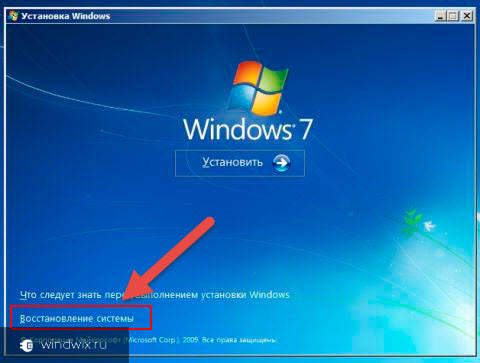
To return your computer to working condition, you need to perform a series of actions. In addition, for the procedure we need installation windows files. So without a disk we cannot cope with the corresponding data. We do the following:
This command will show all the possible parameters with which it works.
Description of Bootrec keys( )
Commands in the environment cmd.exe can be launched as standard, or with special additions. So, for example, if you write " bootrec.exe / fixmbr", The program writes the boot record to the main section. The latter is compatible with Windows 7 and Vista. This will help restore device health. In addition, this trick can be resorted to if there is a need to remove non-standard code in the corresponding segment. At the same time, the existing partition table remains the same.
In the case of using the key "", the program enters a new boot sector. It is also compatible with the above Microsoft operating systems. This option is used in several cases:
The boot file has been replaced with a non-standard one.
It is damaged.
After the seventh version or Vista, the previous build was posted. So, for example, after installing XP, the Windows NT bootloader is used.
Interesting to know! The same effect can be achieved through the use of the program " bootsect.exe". It is also located on the disk. For this, we prescribe " bootsect / NT60 SYS". A boot sector appears that is compatible with "". For detailed information you need to run the utility with the key " / help».
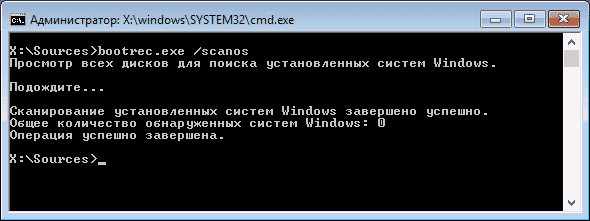
When writing " bootrec.exe / ScanOs", The application scans all available drives for OS 7 and Vista. As a result, users receive a list of all found systems that are not even registered in the data warehouse regarding downloads.
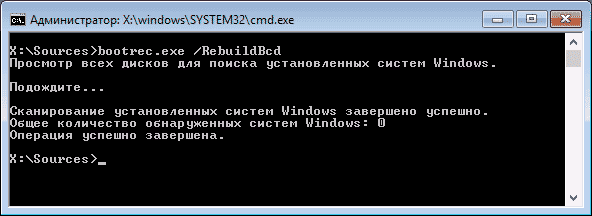
Using the key " / RebuildBcd»Will start scanning all disks for the placement of installed OSes. A list is compiled from which they can be added to the repository. In addition, this command will allow you to rebuild the base. However, before this, you must definitely delete the past data.
The above utility has wide functionality. But at the same time, it will not help if the system startup file is missing. In this case, you must resort to another tool.
It is worth noting that it works in automatic mode. That is, users only need to get to certain tools, register a command and everything will be done on their own - there is no need to do something during the process.
Bcdboot( )
This tool is designed to create or restore a bootloader located in the main section. The program also allows you to transfer files between hard drives. Even if the system is not visible on the latter.
To start work, it’s enough to register “ bcdboot.exe C: \\ windows". The operation recovers corrupted data, including storage files.
A process has several parameters:
Source - the location of the directory in which it is located windows distribution. In our case, it is a plastic disk or a USB flash drive. This parameter is required. The rest are indicated as necessary.
« / I"- sets the language of the environment. If not changed, English is used.
« / s"- indicates the drive letter where will be placed needed files. By default, this is the place that is set by the BIOS or the new system - UEFI.
« / v"- the mode of detailed accounting of work starts.
« / m"- the combination of the parameters of the existing record and just created. All this is written to the new boot area.
Return after using Linux( )
It is worth imagining a situation where you previously had an OS from Microsoft. And after linux installation suddenly the first one stopped running. This happened as a result of some mistakes.
If you have after ubuntu installations Windows does not work, do not immediately panic. The problem can be solved simply.
dd if \u003d / dev / sda2 of \u003d / linux.boot bs \u003d 512 count \u003d 1
The code above allows you to copy the download sector from the " sda2"In linux.boot.
It should be noted that in this operating system, the root element “responsible for the launch” / ". If your personal situation is not the case, first you need to find out which of the existing areas is bootable.
The entry was copied to the user folder. Therefore, we go to the appropriate directory and transfer the file to the partition where Windows is already installed.
As a result, “ Command line", In which we write only two lines and after each press" Enter»:
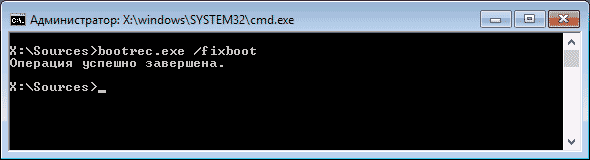
Bootrec.exe / FixMbr
Bootrec.exe / FixBoot
After that, we restart the device and see how everything works in our OS.
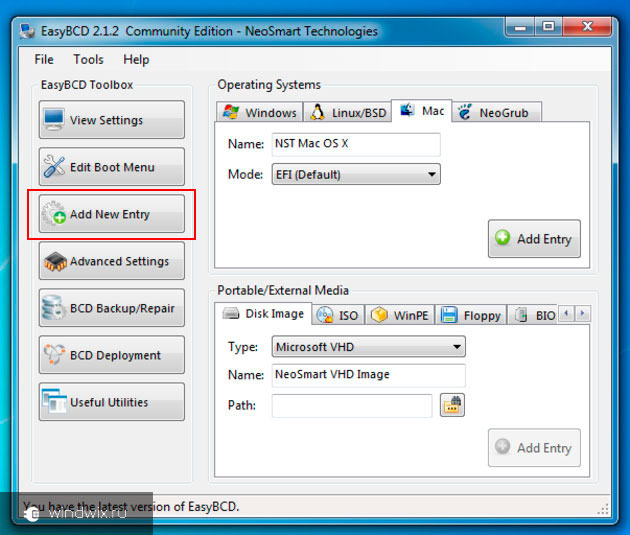
In this case, there are often situations in which users need to use Ubuntu too. For this there is special program EasyBCD. It works not only after activation, but just like that. It is enough to perform a few simple steps:
Install and run the software.
A new window will appear, in the left part of which we select " Add new entry».
Specify a name and click " Add entry».
If the program does not work, the file that we saved earlier will help us. To do this, we make several movements:
Now you will be able to choose the right OS for you at startup and the time will be 10 seconds.
I hope the article will help to cope with the problem, because the ailment is quite common. Especially when there are some errors during the installation of an additional OS.
Subscribe to the blog, and every day you can discover something new in the computer world.
If your computer does not boot, automatic correction of startup errors does not help, or you simply see one of the errors like “No bootable device. Insert boot disk and press any key ”- in all these cases, fixing MBR boot records and BCD boot configurations can help, as will be discussed in this manual. (But it doesn’t necessarily help, it depends on the specific situation).
I already wrote articles on a similar topic, for example, but this time I decided to disclose it in more detail (after I was asked about how to start it, if it was removed from the boot, and Windows stopped starting).
Bootrec.exe - Windows boot error repair utility
Everything described in this guide is applicable for Windows 8.1 and Windows 7 (I think it will do for 10 as well), and we will use the bootrec.exe startup recovery tool available in the system, launched from command line.
In this case, the command line will need to run not inside running windows, but in a slightly different way:
If you type bootrec.exe in a command line launched in this way, you can get acquainted with all the available commands. In general, their description is clear enough without my explanation, but just in case, I will describe each item and its scope.

Recording a new boot sector
Running bootrec.exe with the / FixBoot option allows you to write a new boot sector to the system partition hard drivewill be used boot partitioncompatible with your operating system - Windows 7 or Windows 8.1.
The use of this parameter is useful in cases where:
- The boot sector is damaged (for example, after changing the structure and size of the hard disk partitions)
- Has been installed more old version Windows after the newer (For example, you installed Windows XP after Windows 8)
- A non-Windows compatible boot sector has been recorded.
To write a new boot sector, just run bootrec with specified parameteras shown in the screenshot below.
Fix MBR (Master Boot Record)
The first of the useful bootrec.exe options is FixMbr, which allows you to fix MBR or the Windows boot loader. When using it, the damaged MBR is overwritten with a new one. The boot record is located on the first hard sector drive and tells the BIOS how and where to start loading the operating system. If damaged, you can see the following errors:
- No bootable device
- Missing operating system
- Non-system disk or disk error
- In addition, if you get a message that the computer is locked (virus) even before Windows starts to start, MBR and boot fixing can also help here.
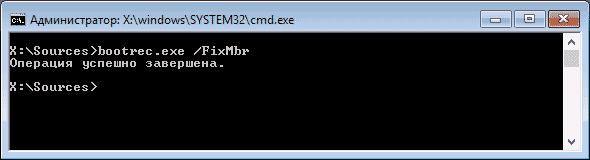
To start the boot record repair, at a command prompt bootrec.exe /fixmbrand press Enter.
Search for lost Windows installations in the boot menu
If several Windows systems older than Vista are installed on your computer, but not all of them appear in the boot menu, you can run the bootrec.exe / scanos command to find all installed systems (and not only, for example, in the same way you can add the OneKey Recovery partition to the boot menu).
If Windows installations were found on your computer, then use the recreation of the BCD download configuration repository (next section) to add them to the boot menu.
Recreating BCD - Windows Boot Configurations
In order to rebuild BCD (Windows boot configuration) and add to it all lost installed Windows systems (as well as recovery partitions created on the basis of Windows), use the bootrec.exe / RebuildBcd command.
In some cases, if these steps do not help, you should try the following commands before overwriting the BCD:
- bootrec.exe / fixmbr
- bootrec.exe / nt60 all / force
Conclusion
As you can see, bootrec.exe is a rather powerful tool for fixing various Windows boot errors and, I can say for sure, one of the most frequently used specialists to solve problems with computers. I think this information will come in handy one day.
Hello! This video is about how to restore the bootloader of Windows 10, 8 and 7. Very often, users are faced with the fact that operating system stops loading and in most cases, this is due to damage to the Windows boot loader. For example, when you try to start the system, you encounter the errors "BOOTMGR is missing", "An operating system wasn’t found", "No bootable device found", etc. The cause of the bootloader damage may be the installation of a second OS on the computer, attempts to use free space on hidden partitions of the disk or their formatting, installation failure windows Updates or other system crashes, viruses, etc. Before proceeding with the correction, check the sequence of loading disks in the BIOS or UEFI. Perhaps this is the reason for your problems with booting Windows. And so, the first way to restore the bootloader will be relevant for everyone windows versions: 10, 8, and 7 (in my case, this is Windows 10). All you need is a recovery disk either boot disk or a flash drive of the same bit depth as your system (in the case of Windows 7, you can only use a boot disk or flash drive). If you don’t have them, you can use another computer to create them (you can see how to create a bootable USB flash drive or recovery disk in my previous videos). After that, put the boot from a USB flash drive or disk into BIOS or UEFI and go into the environment recovery windows. In the recovery environment, click "Troubleshooting", "Restore at boot" (in Windows 7, this is the item "Startup Recovery"). Select the target system "Windows 10" and wait for the end this process. Upon completion, the computer will reboot into the restored system (at the same time, do not forget to change the system boot from the hard drive in the BIOS or UEFI). If you saw a message stating that the recovery failed (and this often happens), then we will move on to the second method. The second method is also relevant for Windows 10, 8 and 7. As in the first method, we go into the recovery environment, click "Troubleshooting" and run the "Command Prompt". Next, enter the command "bootrec / fixmbr", that is, overwrite Windows MBR on the system hard section drive. At the end, we see a message stating that the operation completed successfully. Using this command is not always sufficient (for example, if the reason for the bootloader failure is viruses). Therefore, further we enter the following command: "bootrec / fixboot", that is, we write a new boot windows sector to the system partition. After completion, close the command line and boot the system from the computer’s hard drive. You should not have any problems with the bootloader now. And the third method will be relevant for Windows 8 or 10. As described above, go to the command line running in the recovery environment. We enter the command "Diskpart", then "List volume" and look at the number of the hidden partition. If you have UEFI, then this section will have a FAT32 file system and a size of 99-300 Mb, if the BIOS, then the file nTFS system and the size is 500 Mb or less. In my case, this is "Volume 3", with a FAT32 file system and a size of 99 Mb. Also look at the drive letter with installed windows (in my case, this is drive "C"). After we know this, enter the command "Select volume 3" (that is, select the specified section and move the focus to it), "format fs \u003d fat32" (that is, format this section in file system, in which it was previously), "assign letter \u003d Y" (assign a letter to this drive; you can select any other unoccupied letter), finish diskpart work command "Exit" and enter the following command: "bcdboot C: \\ Windows / s Y: / f ALL" (where C is the drive letter of the system; Y is the letter of the hidden partition assigned to us) and wait for the end of this process. Upon completion, we see a report that the download files were successfully created. Again, enter "Diskpart", "select volume 3" (where 3 is the number of the hidden partition to which we assigned the letter), "remove letter \u003d Y" (that is, delete the letter of the hidden partition so that it does not appear on the system) and again shut down Diskpart using the "Exit" command. After that, close the command line and reboot the PC (do not forget to change the boot in BIOS or UEFI from the hard drive). Now the Windows bootloader should work again. If you liked this video, like and subscribe to the channel. Thank you all for your attention, good luck.


