System Restore is a function that is designed to solve problems that have arisen in the OS due to a malfunction or incorrect actions of the user. But in addition to its positive purpose, the tool has a number of significant drawbacks that make owners of Windows PCs turn off system recovery. There are three ways to do this:
There is no network support in this mode. Enable protected mode with network drivers. As before, but with support for network interfaces, access to networks is possible. Activate safe mode using the hint. Set the driver signature to off.
If you disable this feature, you can download these drivers. This option also allows malware to access your computer. This allows antivirus software to scan and possibly block any other downloaded drivers if malware is detected.
- Through user interface;
- Using Group Policy Editor;
- Using the registry.
Reasons for disconnecting
There are two main reasons why you might need to disable the rollback function:
- Viral threat.Some malware registers in the recovery environment. That is, after removing the virus without user confirmation, the OS rollback procedure is initiated at the moment when Windows was infected;
- Cost-effectiveness. The more information stored on the hard drive, the more massive the recovery point. In some cases, its volume can reach several gigabytes, but if there are several points?
If you decide to disable system recovery, it is important to remember one thing: in the event of the loss of important system files due to a virus or other failures that could seriously harm Windows, instead of rolling back, you will have to completely reinstall the OS with possible data loss.
Use this function only if you think that a driver conflict exists. Disable auto restart system error. Usually the error message went away too quickly, so you cannot see it for sure. To ensure quick publishing, Quick Tips can only provide partial solutions or workarounds that are still under development or require additional evidence to solve specific problems. Here you can follow this article to disable automatic installation of unwanted applications with ease.
Disabling OS recovery through the shell
The easiest way to disable system recovery. Ideal for inexperienced users, as the steps are quite simple.
Algorithm:
It is worth mentioning about the use of disk space. If there is little memory on the computer, then decreasing this indicator (the default is 5 GB, but if necessary, the volume automatically expands) - a great alternative to disabling system recovery. So, a gigabyte will be enough to store one or two control points to reserve.
Recommended: first back up your system and data
If you have methods to solve this problem, help me. My computer continues to download and install new application updates without asking me for permission. At back up You don’t have to suffer from data loss or system crash when trying to clean up unwanted applications. There will be no obstacles and no technical knowledge is required. Download it for free and back up your system and data.
How about these apps already exist? Follow step 3 to do it now. Then select “Clear unnecessary files". If this happens to you, we will teach you how to reactivate it. One thing worth noting: we are not talking about backing up the system.
Disabling Windows recovery through the registry
For inexperienced users, it’s better not to go into the registry, since there are a huge number of parameters important for the OS, changing which you can completely disable Windows.
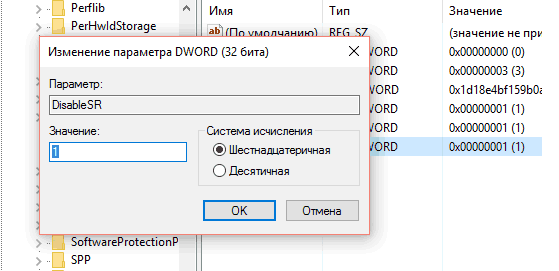
Despite the complexity, the method is worth its use. Using the registry, you can disable system rollback in any situation, even if the virus blocked the ability to enter the recovery tool through the user interface. The main thing is not to change any third-party parameters so as not to complicate the situation.
First of all, see if the system is really offline. Having purchased the screen that you see below, click "System Protection". Now select “enable system protection” and click “OK”. Base disk can contain up to 4 primary sections or 3 primary sections 1 extended section.
Be careful when using this. software, because manipulation is not without risk. If your computer already has an empty formatted partition, go to step. Your will appear hDD, as well as all its sections. The goal is to reduce the section that contains enough free space to restore this free space to create a new partition. Then in the window below you should enter the amount of space to decrease.
Disabling recovery through Group Policy Editor
This method will help if it is not possible to turn off the rollback function in the usual way through the control panel. Algorithm:
After these steps, the rollback tool on Windows 7 will cease to function.
Wait a few seconds until the section is reduced. Finally, you can see the result unallocated space. A new window will appear, a wizard that allows you to create this section. You are at the end of the creation wizard, which summarizes the parameters specified for your new volume. If you don’t like it, click “Back” and make changes.
After you finish creating the volume, as well as formatting, you can view your new partition in disk management. You can change this by clicking on the “Change default values \u200b\u200bor select other options” link at the bottom of the page. Then you get into a window with various options. Among these options you can.
Disabling automatic recovery
Automatic rollback of the OS appears, as a rule, after a power failure and a sudden shutdown of the computer. From an objective point of view, the opportunity is of little use and quite annoying, so many users would like to get rid of it. For this:
- We launch the console as administrator;
- We enter the command that disables the automatic rollback of Windows:
bcdedit / set bootstatuspolicy ignoreallfailures
In the window that opens, click the "Start" button. A warning message appears and informs you that formatting will erase all data on this drive. A window will open, in the left column click "Disk Management".
- Change the timer.
- Select a standard operating system.
- Select other options.
A warning message appears and informs that deleting a volume will delete all data contained in it. You may have to discuss a lot about the effectiveness of this function: you decide whether to use it or not, in some cases you may need to disable this option.
Pressing enter will disable the function.
Video for greater clarity, which details how to disable the rollback tool through the easiest way - the user interface:
Integrated Wizard recovery windows, usually suggests restoring the system when it detects serious errors that prevent it from loading the OS. However, when the problem appears during the restore operation, the process goes in cycles, and the system, after the restart, starts the recovery again. Reinstalling the system will help solve this problem, but in most cases this is not possible due to the loss of installed programs.
If your computer is infected with a virus, backup copy virus can be executed in the folder used during recovery. Click "Start", select "Settings", and then "Control Panel". Double-click the System icon. The System Properties window will appear.
Click "Performance" and select " System file". Click "Troubleshoot" and then "Disable System Restore." Select “Disable System Restore” or “Disable System Restore on All Disks,” as shown.
The following message appears. This action resolves all existing recovery points. Even after scanning and cleaning are complete, you can reactivate recovery by performing the reverse procedure. But what is Safe Boot, what is it, and what is it really like? This would be the most problematic aspect, but we hope that this feature will not be denied to users.
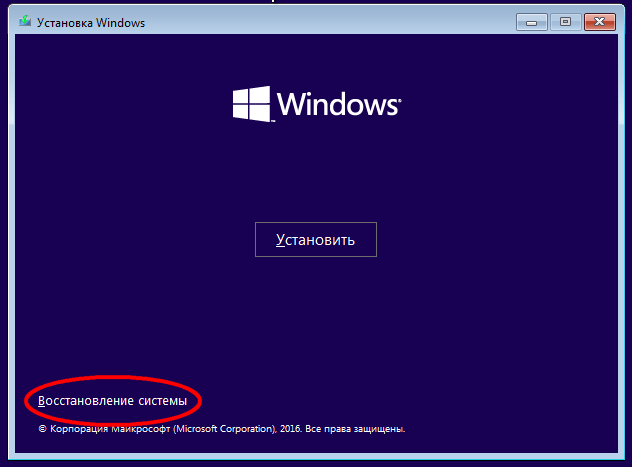
However, there is a solution. Getting the system out of the recovery cycle is possible thanks to this guide. You will need bootable media information from Windows and a little time. After loading the BIOS from an external device, insert the storage medium and start from it. You will see the Windows setup menu.
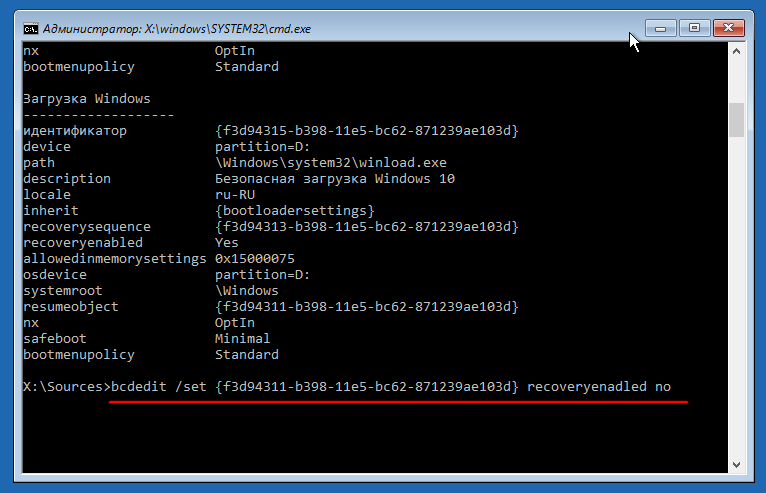
Click “System Restore” -\u003e “Troubleshooting” -\u003e “Advanced Settings” -\u003e “Command Prompt”.
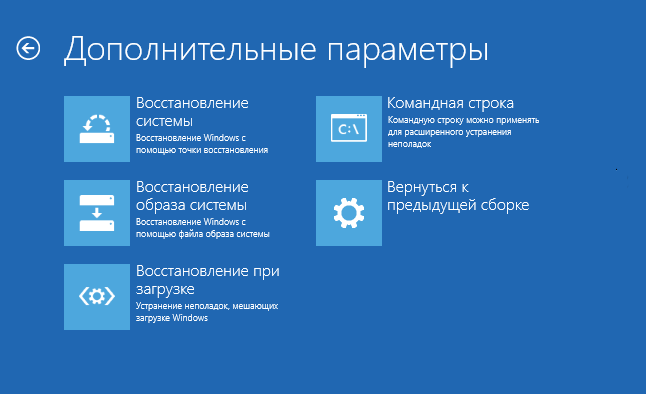
In the console that appears, run the bcdedit command.
As a result, you will see a list of loading criteria. In the block "Manager windows boot»Look for the string resumeobject and copy the identifier (GUID) opposite it.

Then enter the command bcdedit / set (GUID) recoveryenabled no, substituting the GUID copied above.
As a result auto recovery will be turned off and the cycle will end. Next, you need to eliminate the errors that caused the loop. To do this, run for verification file systemtyping in console chkdsk team / r c :.

In addition, you can enter the sfc / scannow command, which will restore system files.


