Question: Transferring Recovery Windows 7 to another hard drive
Hello!
Please, tell me, is it possible to transfer the Recovery partition from one hard drive to another and how to do it?
It is planned to replace the hard drive on the laptop.
If such a topic has been discussed or there is a written manual, please point your finger in the right direction.
Thank.
The RECOVERY section can be copied to any folder by simple copying from the root. Further, the most important point is that when creating a section, each section is assigned a unique identifier that is always different. But in the BCD and the reagent.xml file, the identifiers that were assigned to the RECOVERY section remain when we create a new one, they will not match, they will not match for all sections, so it's better to create a BCD in general from scratch than to edit it, the same situation is with reagent.xml it is configured with the command reagentc /? help output on command.
The meaning is something like this, we create as many partitions as there were on the old disk, since it happens that not only the RECOVERY partition is needed, but also WinRE or some other of which winre.wim already loads what is in RECOVERY, depends on the whim of the company whose laptop. In general, we create the same partitions and register them manually in BCD and in reagentc.
The key to which the recovery was called is set as reagentc / bootkey 4300 is for example F9, other keys, if needed, then there is a keyboard scancode table on the Internet.
The mechanism is approximately the same on almost all laptops.
Perhaps there is an easier option, it is to understand on which partition winre lies with the factory reinstallation program, for example, if only RECOVERY then we create RECOVERY on an empty disk, copy the contents there from the recovery on the factory disk, make it active bootable, then immediately at the start of the laptop without pressing the return button will turn on the factory restore system instead of the main system, it will recreate all the partitions and itself will recreate the BDC and reagent.xml. If I wrote something wrong, I don't remember exactly how it works, let someone correct me.
Hello, please help with this problem: I have 3 hard drives on my computer: 1- C-74 GB. Windows is loaded on it and loaded from it, 2-L-232 GB. Blank. Formatted., 3-H-465 GB. For software and downloads. I checked the disks using the HDDScan program. Result: L and H-state is excellent, C-problems: 7 points with yellow triangles with!, Redirected sectors 075, temperature +50. In the test: 2 blue, 4 red, 30 orange sectors. In general, from the comments on the Internet, I realized that the disk was dying. Using the Acronis True Image WD program, I copied the C drive (completely) to the L drive. The truth is now in my computer L is displayed with a volume of 100 MB and 62 of them are free. The question is: how to make Windows boot from the L drive and it would become the main and bootable (the letter can be replaced, though with the letter C - it does not work), can I use the full its volume (232 GB), should it be split into subdisks - bootable and for work, or let it remain intact? In the future, I think to clean disk C, format it, try to treat it, and use it for not very important work (if God bless him and stop the info that he takes with him). Are my intentions correct, or is it better to throw it out? Can he harm a computer by dying? Thank! I would really appreciate your help !!!
Answer: A backup is a copy of the system. May come in handy
Question: Windows is not installing on a hard drive that already has an OS
Given: Dell inspiron n5050 laptop, pre-installed OS hard drive removed from Samsung ultrabook
Find: put a new system on this disk
Background: I removed the old disk, installed a Samsung disk, launched the installation of a new system from the disk through the BIOS, the phrase "installation started" hangs on the screen endlessly, the installation does not continue.
Attempts to find a floppy disk in the BIOS and turn it off (the first thing advised in similar topics) did not lead to anything. in my BIOS on Dell for some reason there is not a word about floppy at all.
What could be the matter and how to solve the problem?
Answer: pmari, no, if the system was, as you say, "sharpened", we would most likely see Bsod, in your case I assume that the disk is not properly prepared for installation, that is, in other words, the old bootloader does not see the system and goes around in search of an OS delete. This is a 100MB hidden partition.
Question: Transferring Windows XP to another hard drive by cloning
The task is to transfer the Windows XP OS from the old hard drive to the new one. The discs are identical in size. Copying with Acronis, Disk cloning.
I get BSOD after finishing copying. I understand it is necessary to remove the HDD driver, how can this be done better? Will such a thing work ?:
Clear the registry key HKEY_LOCAL_MACHINE \\ SYSTEM \\ MountedDevices on the cloned OS
Answer: After long and persistent attempts, I found a solution. In the Windows Device Manager, I found the IDE controller and changed it to a standard one (not Nvidia), rolled the image and everything went without problems.
Actions such as removing Mounted Device, universal restore, decoupling from Paragon hardware did not give any result.
Question: Is it possible to transfer windows from one disk to another without losing data?
Is it possible to move windows from a hard drive partition to another hard drive without erasing files from other hard drive partitions? I tried to copy the volume through Acronis Disk Director, but on reboot it writes an error and does not copy.
Answer: londar, look
Question: I forgot the password on 1 hard disk from Windows 7 but I have access to it from the second hard disk
In short, I changed the password drunk and forgot it xD, I have a question - can I somehow reset it without a floppy drive, flash drive, but having access to it using another hard drive?
Answer: Rus1an, it would not hurt to clarify what kind of password, from the account or from the disk ...
but the title of the topic is not unambiguous ...
but you can remove any password
Question: Make a backup of the system and deploy it to another hard drive
I have a 32 gig stick and a laptop with Windows 10 x86 home basic. How can I make a backup in the form of a system image with all installed programs and settings, then upload this image to One Drive, and deploy it on another hard drive, and make that other hard drive bootable?
The goal is to swap disks.
Answer: persen27, and yet, do not know, if I installed acronis 2015, can I somehow make an image of this Windows directly from under it?
Added after 4 minutes
You know, forgive me for being meticulous, but I also wanted to ask, on that new hard drive I created 2 partitions today, one for system recovery, the second for files. And in the second section, I threw a few folders from work.
Do you know if I can somehow restore Windows to the first partition? Without touching the second one? To prevent the second logical partition from deleting all files?
Question: Installing Windows from a hard drive
I can't remember how this is done even approximately ... the installation disk is clean, i.e. I have to boot somehow and format it to NTFS. it is not clear from a flash drive or CD which OS should be installed on them. After booting, I have to copy the system image to this formatted disk and start the installation ...
Somehow everything is vague, where can I read more about this installation option?
Answer: Yes, no Windows is installed since 2003 XP, 7, 10 MSI board, comes and asks for firewood for the CD, maybe the bus is broken from the CD to the mother, maybe something else ... in general I would like to try (installing from a flash drive is the same trouble ) from hard, so as not to think. In general, I boot from the LiveCD, dump the image to the C: drive, shutdown, take out the disk from the LiveCD, turn off the computer, and then how to start the installation ?, where can I boot to run setup.exe or you can run without leaving the LiveCD, run installation, then with what parameters for XP?
Question: Windows 10 stopped loading after trying to insert an old hard drive into a laptop
Good afternoon, the second day I can not solve the problem with running wines 10 on a Samsung RV520 laptop. The fact is that yesterday I tried to insert an old hard drive from another laptop into the laptop. It did not work. After that I put back my own hard drive from win 10, when At startup, the download hung on the window and instead of the download circle, 1 point appeared and that's it. It waited an hour, nothing changed.
I tried to reboot, the auto system recovery started to load, but the same point appeared again and that's it. I tried to restore the BIOS settings, it did not help. I tried to start the recovery through F4. The inscription Invalid recovery area appeared. I put the hard one with Vin 10 in the hospital - everything works fine. and loads pretty quickly. I tried to make a bootloader for wines 10, and after downloading other OS versions to make a bootable USB flash drive to restore wines 10 or at least reinstall the system. did not help. when booting any wines from a flash drive, it gives a blue screen with an error or just after changing the priority BIOS, the message Press any key to boot from CD / DVD appears. I press-the window from wines 10 appears and hangs again. Help please (I broke my whole head ... and carrying it for repair is not the best option
Answer: If it is possible to get to the battery on the motherboard, then you can try to disconnect the battery and remove the battery for a few minutes or hours.
Attention! Before starting to implement anything described below, I strongly recommend making a backup using AiRecovery, as well as copying all personal information from your hard drive!
The process itself consists of several stages:
- Deployment of the extracted OS and its configuration (removal / installation of software).
To implement your plans, you will need:
- laptop with a workable Recovery partition;
- boot disk or USB flash drive Windows PE with ImageX.
After making sure that all the important information has been copied and you have a backup copy of the AiRecovery DVD, boot the laptop with Windows PE.

In the command line window that appears, enter the commands:
Diskpart list disk
The specified commands will run the utility Diskpart and will display a list of available drives. We are interested in the disk that is installed in the laptop and judging by the size - this is Disc 0

Select disk 0 list partition
With these commands, we have selected the laptop disk (Disk 0) and get information about the partitions on it (Fig. 3).

Based on the sizes of the available partitions of the selected disk, we find the partition Recovery... In this example, this is Section 1.
In order to make sure of this, let's see its properties.
Select partition 1 detail partition
Hidden section properties Recovery are shown in Fig. 4.

Let's make a section Recovery visible by changing its type and looking at its properties again:
Setid id \u003d 07 detail partition
Changed section properties in fig. five

Section Properties Recovery dynamic GPT disks will differ from those listed above. To change the type of the section, instead of the command setid id \u003d 07, you must enter gpt attributes \u003d 0X0000000000000000 In this case, the changed properties of the section will take effect only after reboot. Those. you will need to restart the laptop and boot again from Windows PE. IMPORTANT! Before changing the properties of the Recovery partition, remember the original value of the partition type (command: detail partition)
Close the utility Diskpart and launch notepad (fig. 6):
Exit notepad

Let's look at the contents of the section using notepad Recovery and copy the files with the extension * .swm... For this, in the notebook, select File=>Open… and in the newly appeared window change the file type from "Text documents (* .txt)" on the "All files" (Fig. 7). Without closing the windows "Open" go to My computer \u003d\u003e section Recovery (The typical content of this section is shown in Fig. 8) and using the context menu (RMB on the file) copy files with the extension * .swm to section Data


Deployment of the extracted OS and its configuration (uninstall / install).
At the stage of copying images, you probably noticed which letters were assigned to the sections. In this example, the section OS assigned letter "FROM", and section Data - "D".
Now let's format the section OS and deploy the OS from the copied images. Going back to the command line, enter:
Diskpart select disk 0 select partition 2
Note.
Why partition 2? As you remember, earlier, after entering the list partition command, we saw a list of partitions available on the laptop disk (Fig. 2). When copying with notepad, we also had the opportunity to observe all sections in "My computer"... A simple ratio of the size and name of the section can easily determine the desired one.
You can also alternately select the available sections with the command select partition and view their properties with the command detail partition... The section we need will have the following properties:

We format the selected section:
Format fs \u003d NTFS label \u003d "Os" quick
We deploy the OS from images (Fig. 9):
Imagex / apply D: \\ asus.swm 1 C: / ref D: \\ asus2.swm

After successfully completing the process, you need to boot the laptop from the actual disk. In this case, the OS loading will be accompanied by characteristic inscriptions about updating the registry, starting services and installing devices, identical to if the OS was restored using standard means using F9.
The loaded OS, which we deployed from images, will be launched in the mode Audit. In this mode, we can remove unnecessary software through the control panel at our own discretion, add our own. At the same time, during the process of uninstalling (installing) programs, a restart may be required. The main thing is not to change the parameters of the window shown in Fig. 10 and don't close it!

Configuring the OS to your liking in the window "System preparation program" activate the parameter "Preparing for use", value Shutdown Options change to Completion of work push OK (Fig. 11).

Creation of images of an individually configured OS.
After completing the OS configuration step, we boot the laptop with Windows PE again. But before creating an image with an individually configured OS, we will delete the previously copied "factory" version of the OS, ie. files asus.swm and asus2.swm... To do this, through the command line, re-launch notepad (notepad) and change the "File Type" delete the above files from the "Data" section.
Section image "Os" in which the configured OS is located is created by the command (Fig. 12):
Imagex / capture c: d: \\ asus.wim "Windows 7 Asus" / compress maximum

The resulting image must be divided into parts by 4Gb:
Imagex / split d: \\ asus.wim d: \\ asus.swm 4000
Thus, on the section "Data" we will get 3 files, 2 of which have the same name and extension as those that we previously copied from Recovery - asus.swm and asus2.swm(fig. 13).

Replacing OS image files in the Recovery section.
Now the resulting OS image remains (files asus.swm and asus2.swm) copy to section Recovery... Copying is carried out by analogy using a notepad. Since on the section Recovery In my case, there was enough free space, then before copying the "factory" files of the same name I decided to leave and simply renamed them. (If you plan to make a backup in the future using AiRecovery, then the old files asus.swm and asus2.swm better to remove).
Returning section properties Recovery to its original state:
Diskpart select disk 0 select partition 1 setid id \u003d 1C exit
Instead of the command setid id \u003d 1C you must enter the command: gpt attributes \u003d 0Х8000000000000001, where 0Х8000000000000001 is the initial value of the partition type Recovery.
We close everything and try to start OS recovery ( F9).
As a result, by such actions, you can get an individually configured OS with installed drivers, which can be restored at any time by standard means.
Sources of inspiration:
- www.outsidethebox.ms
- technet.microsoft.com
- support.microsoft.com
×
Attention!
Log in with your account site or Create it to get full access to our site. Registration will give you the opportunity to add news, comment on articles, communicate with other users and much more.
If you bought a new hard drive or solid-state SSD for your computer, it is very likely that you do not have a strong desire to reinstall Windows, drivers and all programs. In this case, you can clone or, otherwise, transfer Windows to another disk, and not only the operating system itself, but also all installed components, programs, etc. A separate instruction for a 10 installed on a GPT disk in a UEFI system:.
In fact, Seagate DiscWizard is a complete copy of the previous program, only to run it requires at least one Seagate hard drive on the computer.

All actions that allow you to move Windows to another disk and completely clone it are similar to Acronis True Image HD Edition (in fact, it is the same program), the interface is the same.
You can download Seagate DiscWizard from the official website https://www.seagate.com/ru/ru/support/downloads/discwizard/
Samsung Data Migration
Samsung Data Migration software is designed specifically for transferring Windows and data to Samsung SSDs from any other drive. So, if you are the owner of such a solid state drive, this is what you need.

The transfer process is performed in a wizard-like manner and consists of several steps. At the same time, in the latest versions of the program, not only full cloning of a disk with operating systems and files is possible, but also selective data transfer, which may be relevant, given that the dimensions of SSDs are still smaller than modern hard drives.
Samsung Data Migration program in Russian is available on the official website https://www.samsung.com/semiconductor/minisite/ssd/download/tools/
Important: the same utilities for transferring Windows to another disk are available from other manufacturers of SSD and HDD. Usually, from can be found by asking a query consisting of the brand and the phrase "Data Migration", so you will find, for example, Intel Data Migration Tool and similar programs for other brands of drives.How to transfer Windows from HDD to SSD (or other HDD) in Aomei Partition Assistant Standard Edition
Another free program, also in Russian, that allows you to conveniently transfer an operating system from a hard drive to a solid-state drive or to a new HDD - Aomei Partition Assistant Standard Edition.
Note: this method works only for Windows 10, 8 and 7 installed on an MBR disk on computers with BIOS (or UEFI and Legacy boot), when trying to transfer an OS from a GPT disk, the program reports that it cannot (possibly , here simple copying of disks in Aomei will work, but we failed to experiment - failures during reboot to perform the operation, despite disabled Secure Boot and checking the digital signature of the drivers).
The steps for copying the system to another disk are simple and, I think, will be clear even for a novice user:

If everything goes well, then upon completion you will receive a copy of the system that you can boot from your new SSD or hard drive.
You can download Aomei Partition Assistant Standard Edition for free from the official website https://www.disk-partition.com/free-partition-manager.html
Transfer Windows 10, 8 and Windows 7 to another drive in Minitool Partition Wizard Bootable
Minitool Partition Wizard Free, along with Aomei Partition Assistant Standard, I would classify as one of the best free programs for working with disks and partitions. One of the advantages of the product from Minitool is the availability of a fully functional bootable ISO image of the Partition Wizard on the official website (free Aomei allows you to create a demo image with important features disabled).
By writing this image to a disk or flash drive (for this, the developers recommend using Rufus) and booting your computer from it, you can transfer the Windows system or another to another hard drive or SSD, and in this case we will not be disturbed by possible OS limitations, since it is not running.
Note: I tested the cloning of the system to another disk in Minitool Partition Wizard Free only without EFI boot and only on MBR disks (transferred to Windows 10), I can’t vouch for performance in EFI / GPT systems (I could not get the program to work in this mode, despite disabled Secure Boot, but it seems to be a bug of my specific hardware).
The process of transferring the system to another disk consists of the following steps:

When finished, you can close Minitool Partition Wizard, restart your computer and set to boot from the new disk to which the system was transferred: in my test (as I already mentioned, BIOS + MBR, Windows 10) everything went well and the system booted as if what has not happened with the disconnected source disk.
You can download a free bootable image of Minitool Partition Wizard Free from the official website https://www.partitionwizard.com/partition-wizard-bootable-cd.html
Macrium Reflect
The free Macrium Reflect program allows you to clone entire disks (both hard and SSD) or individual partitions, regardless of what brand your disk is. In addition, you can create an image of a separate disk partition (including with Windows) and later use it to restore the system. It also supports the creation of bootable recovery discs based on Windows PE.

After starting the program, in the main window you will see a list of connected hard drives and SSDs. Check the disk where the operating system is located and click “Clone this disk”.

At the next stage, in the "Source" item, the source hard drive will already be selected, and in the "Destination" item, you will need to indicate the one to which you want to transfer the data. Also, you can select only individual partitions on the disk for copying. Everything else happens automatically and is not difficult even for a novice user.
Official download site: https://www.macrium.com/reflectfree
Additional Information
After you have transferred Windows and files, do not forget to either put the new disk boot into BIOS or disconnect the old disk from the computer.
One time I came to visit my friends and I was asked to transfer Windows 8.1 along with hidden partitions from a laptop hard drive to an SSD solid-state drive. But friends had to me several conditions:
1. After transferring to SSD withcovered partitions with factory settings should remain functional.
2. With Windows 8.1 activation should not fail.
Friends did not have the Internet, Acronis True Image and Paragon Home Expert were not expected either. Yes, and I had nothing with me, except for a clean 32 GB flash drive, but in an hour everything was ready.
Hello friends. I have written several articles on the topic of transferring Windows 7, 8, 8.1 from a laptop hard drive to an SSD solid state drive.
Today's article describes the easiest way, you don't even have to download and install any programs on your laptop. Truly they say that all ingenious is simple. In the next articles, everything will be a little more complicated.
- Note: read the following articles on this topic - .
- If you fail to transfer Windows 7, 8, 8.1 along with hidden partitions from your laptop hard drive to an SSD, then it's easy.
- What to do if, after transferring Windows 8.1 from a regular hard drive to an SSD, the factory rollback program stops working on a laptop, or
- If you are interested in the article, visit the special section where are collected from one storage device to another.
In a nutshell, what this transfer includes, suitable even for a novice user. We will use the built-in by the laptop manufacturer to restore the factory settings. We will create a recovery flash drive (you will need a clean 16 GB flash drive), or you can create recovery discs (you will need 3 blank DVDs), using a flash drive or disc we will transferWindows 7, 8, 8.1 along with hidden partitions from laptop hard drive to SSD solid state drive.
- In simple words,in today's article, we will rollback the laptop to factory settings, but not to the laptop hard drive, but to the SSD. As a result, non our laptop everything will work as before, but noticeably faster.
1. Hidden partitions with factory settings will remain functional.
2. With Windows 8.1 activation will not even fly off.You can return the hard drive from the laptop back at any time, that is, you do not lose anything.
In the next articles, we will use Acronis True Image and Paragon Home Expert for migration.
The whole difficulty of transferring Windows to an SSD solid-state drive (120 GB or 240 GB) is that the SSD volume is probably less than the laptop hard drive (500 GB or 1 TB), and in addition to running Windows, we need to transfer hidden partitions with factory settings, so much so that the ability to roll back to the factory settings is not violated. Is it possible to carry out such a transfer? Yes it is possible!
What prompted me to write these articles? Of course, your numerous requests to describe the transfer of all the contents of a laptop hard drive to an SSD. At first I had the idea to go the easy way - to find a detailed article on this topic on the net and post a link to it on my website, but after wandering around various forums I found only "raw" reflections on this topic that could lead an inexperienced user to a dead end.
You may ask - What to do with a simple laptop hard drive?
After transferring to a solid-state drive, the operating system Windows 7 or Windows 8.1 will work fine, the program for resetting the laptop to factory settings will also work, in short, everything on your laptop will be the same, only instead of the hard drive there will be an SSD solid-state drive. Even if your SSD is 120 GB in size, this is more than enough for the operating system, but for data storage you can use a laptop hard drive in an external box or a simple portable USB hard drive.
Many attentive users may ask - "What are hidden partitions on a laptop?"
And the question is asked correctly, if you have decided on such an operation, then you should know everything about the existing partitions on the hard drive of your laptop.
Before starting the transfer, let's find out all the information about the hard drive of my laptop, then go to the "Disk Management" of the operating system and I will explain everything to you.
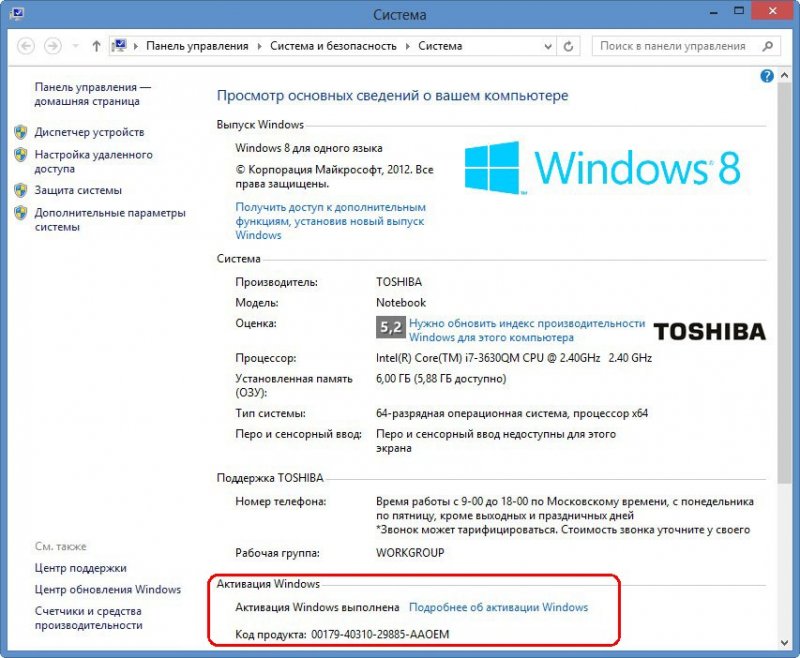
For example, Windows 8.1 is installed on my laptop. The manufacturer of my laptop is Toshiba, in the properties of the disk you can see the name of the manufacturer of the hard drive, also Toshiba.

Volumes tab. The hard disk has a GPT partition table layout format, you can see this on the Volumes tab. Below you can see the volume of the hard drive of 700 GB.

Disk Management window
If you have a different laptop manufacturer, there may be a slight difference that does not affect the overall process of migrating Windows to an SSD.
1. First hidden section letterless, 1.00 GB. Good (OEM section), this is a service section of the laptop manufacturer with a program to roll back to factory settings. The laptop manufacturer specially creates such a section, in a difficult case, if your operating system does not boot due to your careless actions or due to a virus, then you can roll back the laptop to the state it was at the time of the laptop purchase.
2. Second hidden section, 260 MB size is OK (Encrypted (EFI) system partition), it contains Windows 8.1 boot files, as well as Windows 8.1 recovery environment files.
3. The third section has the letter C, 344 GB, Windows 8 operating system installed. The C: drive, despite its 344 GB, is filled with 80 GB of files.
4. The fourth section under the letter (E :), volume 341 GB, with data files:music, movies and so on.
5. The fifth hidden section, without a letter, 10.75 GB, Good (OEM section), this section contains the factory image of the Windows 8 operating system.

Attention: If you have deletedfirst hidden section letterless, 1.00 GB andfifth hidden section, without a letter, with a volume of 10.75 GB, then transfer in the simplest way described below WindowssSD won't work and here's why.
For transferring, I want to use the built-inby the laptop manufacturer, a factory restore program calledRecovery Media Creator, which works with hidden partitions, returning the laptop to its factory state... And if you have removed hidden sections, then the programRecovery Media Creator will not work.
Creating a flash drive or recovery discs
All laptop manufacturers ship their devices with their own factory restore program. Each manufacturer has a different name for it, but they all work almost identically. For example, in Toshiba laptops, such a program is called Recovery Disc Creator or Recovery Media Creator, the laptop manufacturer Acer calls this utility, for laptops, the program is called Samsung Recovery Solution 5, for laptops, for HP laptops - HP Recovery Manager. All these programs are similar to each other and work according to the same principle. So, no matter what laptop you have, you can safely use this manual for yourself.
We connect the power adapter to the laptop so that when creating an image of the hard disk, the laptop does not turn off and the process does not interrupt in the middle.
Hover the mouse in the lower left corner and click the left button,


The program invites us to createRecovery media for system recovery, that is, we can create recovery DVDs with you, you will need several (3-5) blank DVDs, the program will ask you to insert three DVDs into the drive one by one and the entire Windows image will be written to them, by the way , the whole process is described in detail in our article .
We can also create a bootable recovery flash drive, but the flash drive must be large, with a volume of 16-32 GB.
I will choose the Kingston DataTraveler Mini stick , I have it in a volume of 32 GB (but 16 GB would be enough). 


Carefully, all data on the flash drive will be deleted.

OK. A recovery USB flash drive is being created.

The process of creating a bootable USB drive is complete.

Replacing a laptop hard drive with an SSD solid state drive
Friends, now you need to replace the hard drive in the laptop with a solid state drive. The replacement should happen without any problems, since the form factor of the laptop hard drive and the SSD solid-state drive are the same - 2.5 inches. We also have several articles on this topic.
We will also consider this issue in this article and there are no difficulties here. Usually on the back of a laptop there is a special compartment for a hard drive and to remove this cover, you just need to unscrew two screws.
The hard drive is attached to the laptop with two more screws, we also unscrew them, then pull gently by the silicone tab and the hard drive is disconnected.

But on our laptop Toshiba L50 - A - K3K, there is no such compartment, which means you have to completely remove the laptop cover.
We turn the laptop over. First of all, you need to remove the battery from the laptop, but in our case this will not work, since it is also under the cover.
- Important! : The article is given to you for review, if you have never disassembled the laptop, then do it better at the service center. Before disassembling the laptop, remove the battery, if it is not removable, then disconnect it from the laptop motherboard, this should be done in any case. When you remove the hard drive, do not touch the components located on the laptop motherboard with your hands and a screwdriver, otherwise the motherboard may fail, and it accounts for 85-90% of the laptop's cost.
Unscrew all the screws securing the back cover of the laptop (bottom), in my case 14 screws.


We take out the drive

and carefully remove the laptop lid, despite the fact that all the screws have been unscrewed, the laptop lid is removed with very light effort, since the lid is attached to the laptop case with the help of plastic clips

Neither latches nor clips can be broken into the latches on the case, because the lid will have to be put back.

Here is our hard drive

it is attached to the laptop case with two screws, unscrew the screws and remember exactly where the laptop hard drive was screwed to the motherboard.

Disconnect the hard drive carefully from the SATA connector.

The laptop hard drive is in a kind of sled, we disconnect them.


Well, then we fix the slide on the SSD solid-state drive. The hard drive form factor of a 2.5 laptop is the same as that of a solid state drive, and our SSD will fit perfectly in the place of a laptop hard drive.
Our 120GB Kingston HyperX 3K SSD


and connect it to the SATA connector on the laptop motherboard and fasten it with two screws.


We put the laptop cover and the floppy drive back, we do it carefully, the clips on the cover should fit into the plastic latches on the case.
We turn on the laptop, press F2 or Del when loading and enter the BIOS, as we see our SSD is perfectly defined in the BIOS, which means you can work with it.

Deploy Windows 8.1 from a recovery stick to an SSD
We connect our Kingston DataTraveler Mini 3.0 32GB recovery flash drive and reboot, when the laptop boots, press F2 and enter the BIOS. If you have a UEFI BIOS, then the Secure Boot option is set to Disabled.

Do not touch Boot Mode and leave it in the UEFI Boot position,

Then we change the boot priority to the USB flash drive or just press F12 enter the laptop boot menu, select our USB flash drive and press Enter, the laptop boots from the recovery flash drive.

The program window for restoring the factory settings of the Toshiba Recovery Wizard appears, select the first item and click Next.


We select the first item "Restore the software installed at the factory by default" and click Next.


The recovery process begins


We accept the terms of the license


Use standard parameters

If you have a Microsoft account, then enter its details. If you don't have a Microsoft account, then create a simple local account.

That's all

Windows 8.1 boots and works fine

We go into Disk Management and see oursSD Kingston HyperX 3K, 120GB.
Please note that the volume label C: remained the same, but it does not bother us, and if anything, it can be changed.

In the properties of the disk, you can see the name of the hard drive manufacturer

Volumes tab. The hard disk has a GPT partition table format standard.
The volume of the hard disk is 120 GB.

Output
On our laptop, everything works as before, but noticeably faster.
1. Hidden partitions with factory settings are quite workable.
2. C Windows 8.1 activation did not even fly off.
3. You can return the hard drive from the laptop back at any time, that is, you do not lose anything.
The only drawback is that you will have to install all programs on the laptop, since in fact, in today's article, we rolled the laptop back to factory settings, but rolled it back not to the laptop hard drive, but to the SSD solid-state drive.


