If your Windows 10 suddenly stopped working, do not worry, there are so many ways to recover it. For example, rollback to a previous state, a recovery checkpoint, or creating a system mirror and saving it to external media, followed by recovery via bootable USB ( this option in "Ten" it works much better than in previous versions) Below we will examine all the existing options for restoring Windows 10 and find out what errors most often occur when it starts.
For successful recovery, you need to understand how this or that option works. First you should try starting Windows in. Using it, you can perform a “clean” boot without activating additional drivers and software. Failure can occur not only in Windows itself, most likely, it is a driver error, installed later or some application. If safe mode does not solve the problem, you can proceed directly to recovery.
This feature has recently appeared in Windows 10 and has already managed to prove itself well. This is something similar to full discharge on Android smartphones (Windows returns to factory settings). There are several ways to start a process:
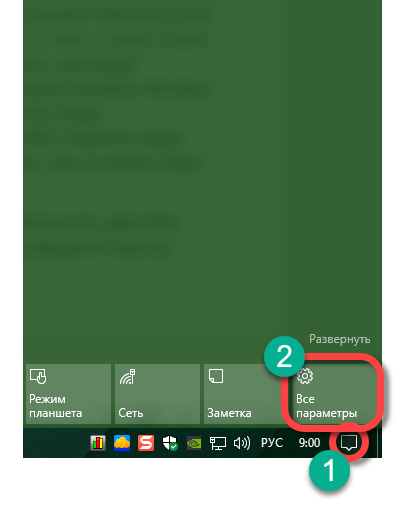
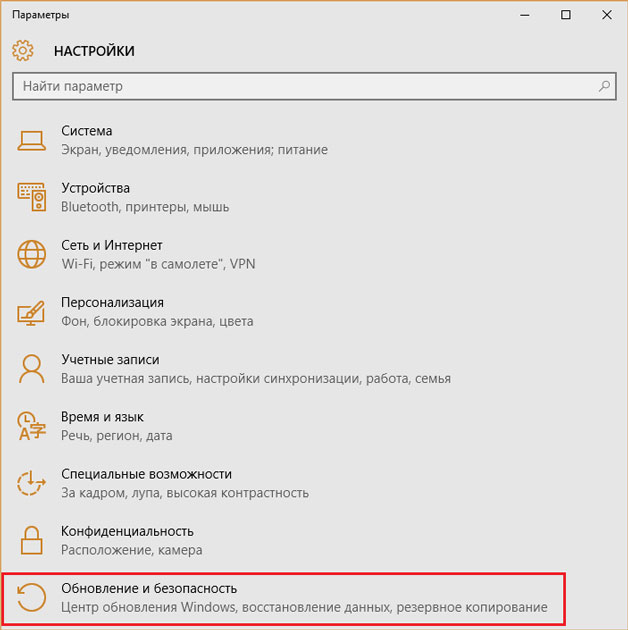
- Click on the notification icon and click on the “All Settings” tile.
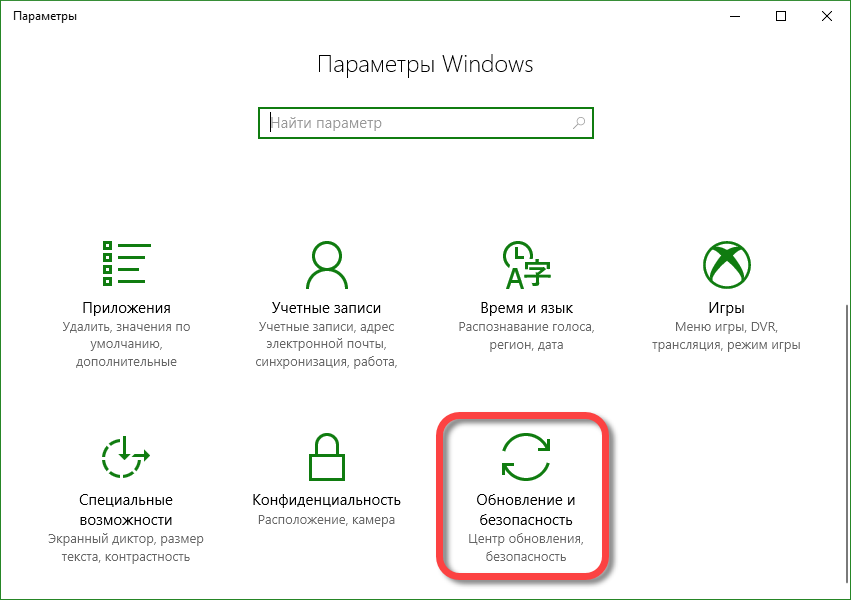
- Click on the tile "Update and Security."
- In order to return Windows 10 to the factory settings, click on the "Recovery" entry, and on the right side of the "Start" button.
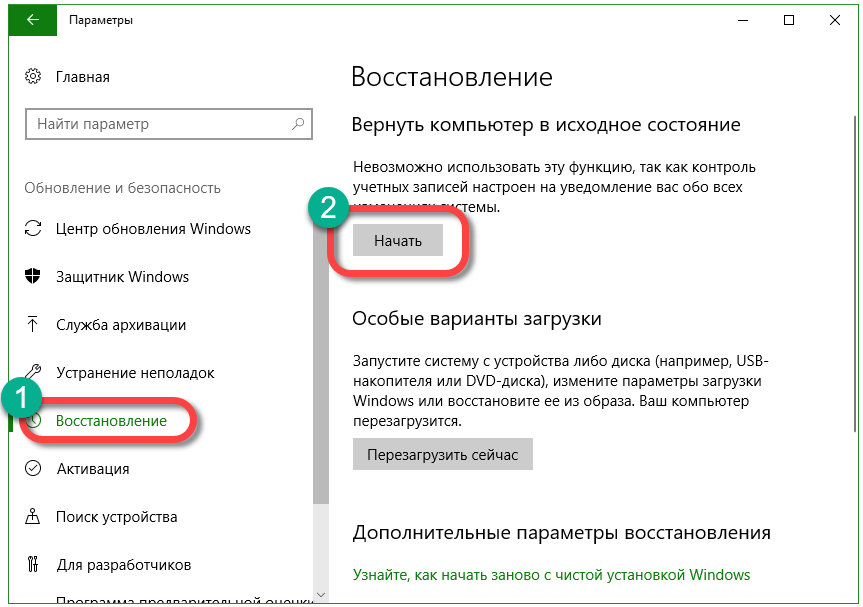
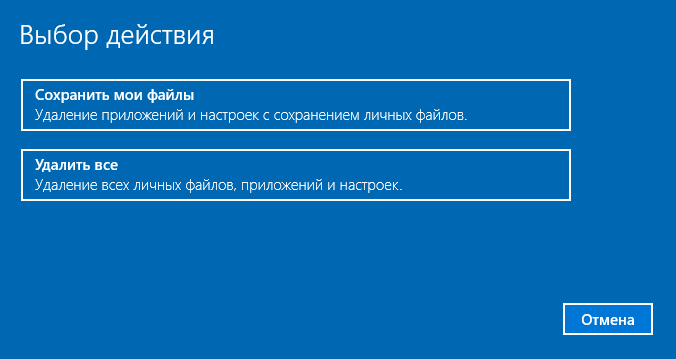
There is another opportunity to get into this menu, we'll talk about it below. There we will tell you what to do if Windows 10 does not start and you can’t get into the rollback settings. As soon as the “Start” button is pressed, you will be offered two options reset windows 10. You can return the system to its original state and at the same time save all user data, or permanently delete everything and reinstall the OS cleanly.
To get in this mode You can even without logging in. To do this, hold down the Shift button on the Windows login screen and reboot the PC.

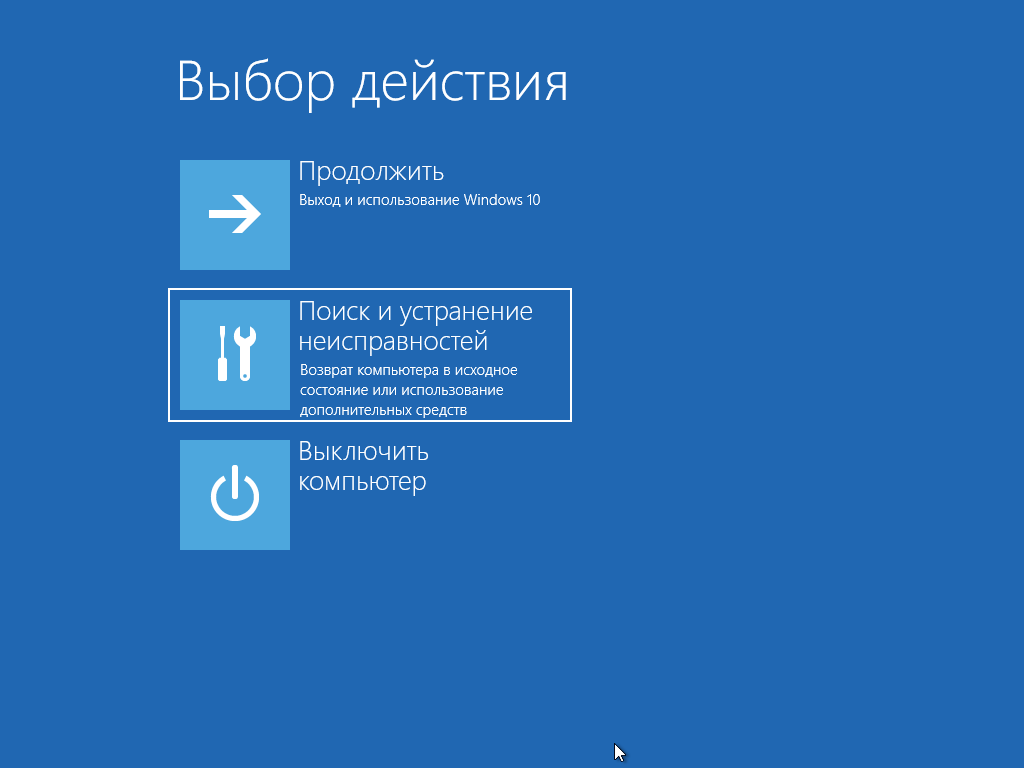
A menu will appear in which we need to select the item indicated in the screenshot.
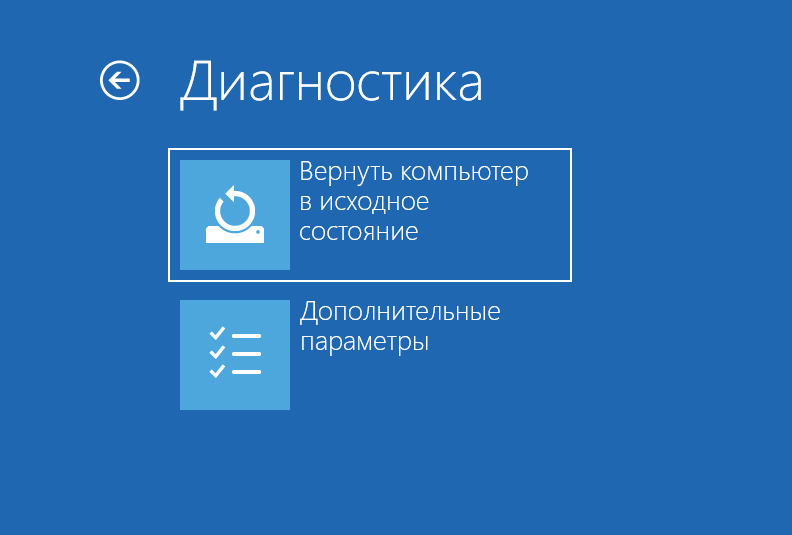
It remains to click "Return the computer to the initial state».
On the next screen, we will again be offered the choice of saving or deleting user data.

After that, our system will go to reboot, the recovery process will begin.
We just need to wait until Windows has prepared all the necessary files.

Once again we will be asked to choose a recovery option, we will do a “clean” reinstall, so click "Just delete my files."

"Ten" will notify that all data will be deleted, agree and click on "Reset."
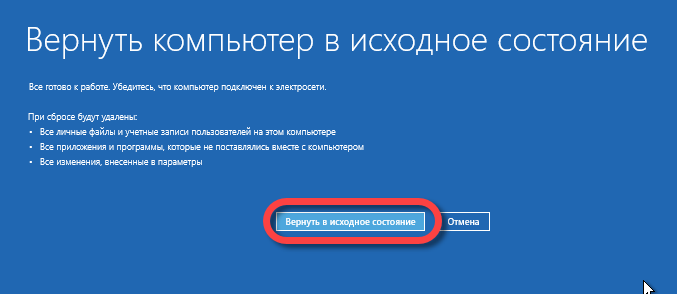
The recovery procedure may take a long time. Sometimes many times more than if we were reinstalling the system from a flash drive. By the way, you can read about how to do this.

After clicking the "Clear" button, the installation of Windows 10 will begin.
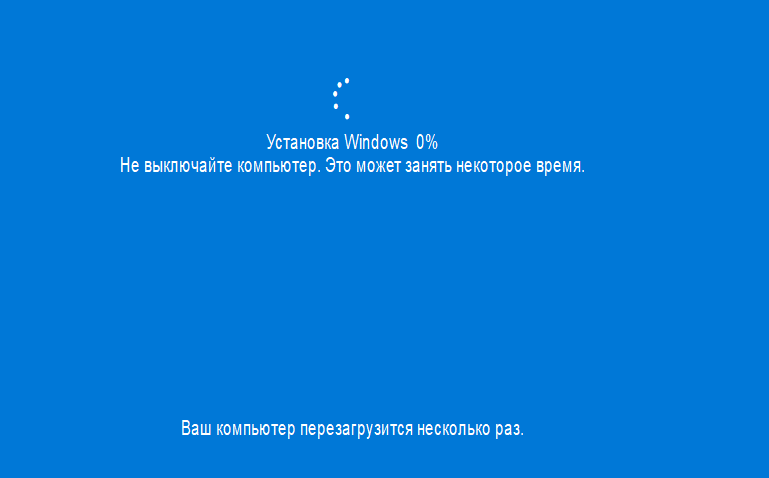
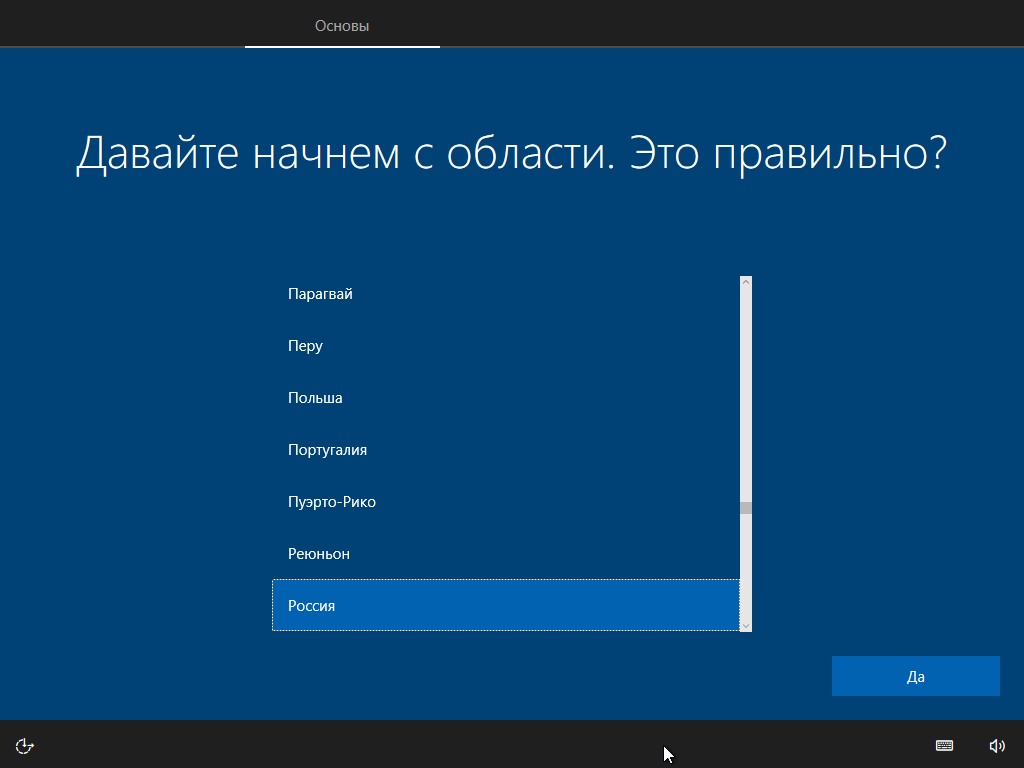
- Choose the location that we need.
- Determined with the system language.
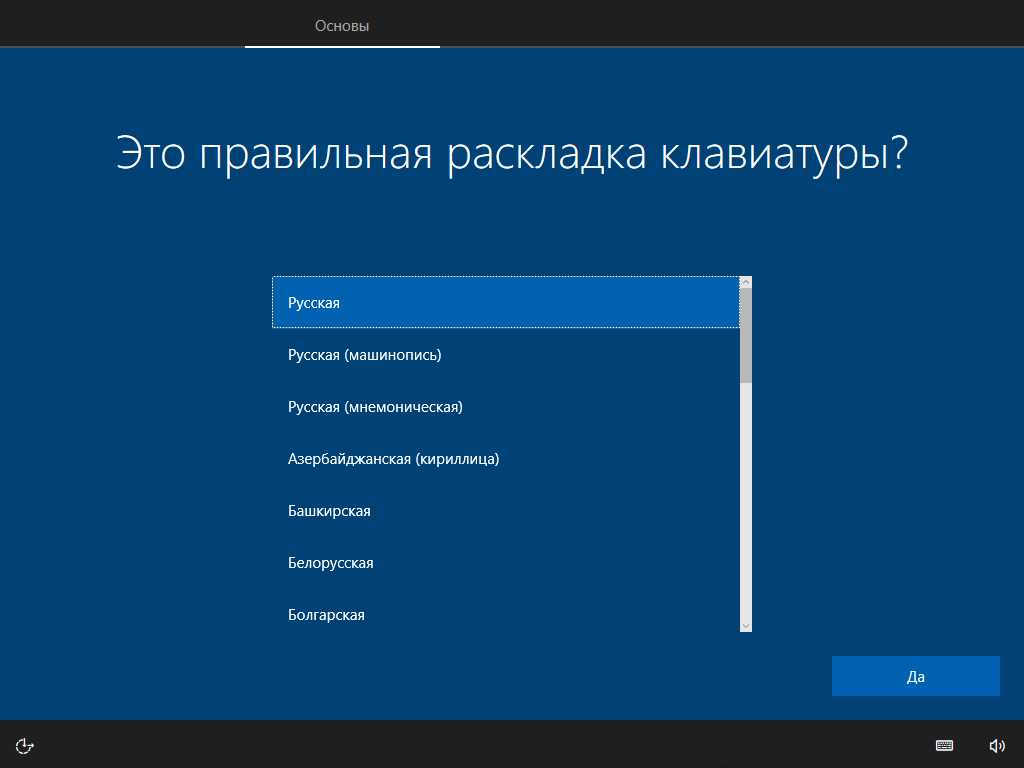
- We agree with the Microsoft license, click the "Accept" button.
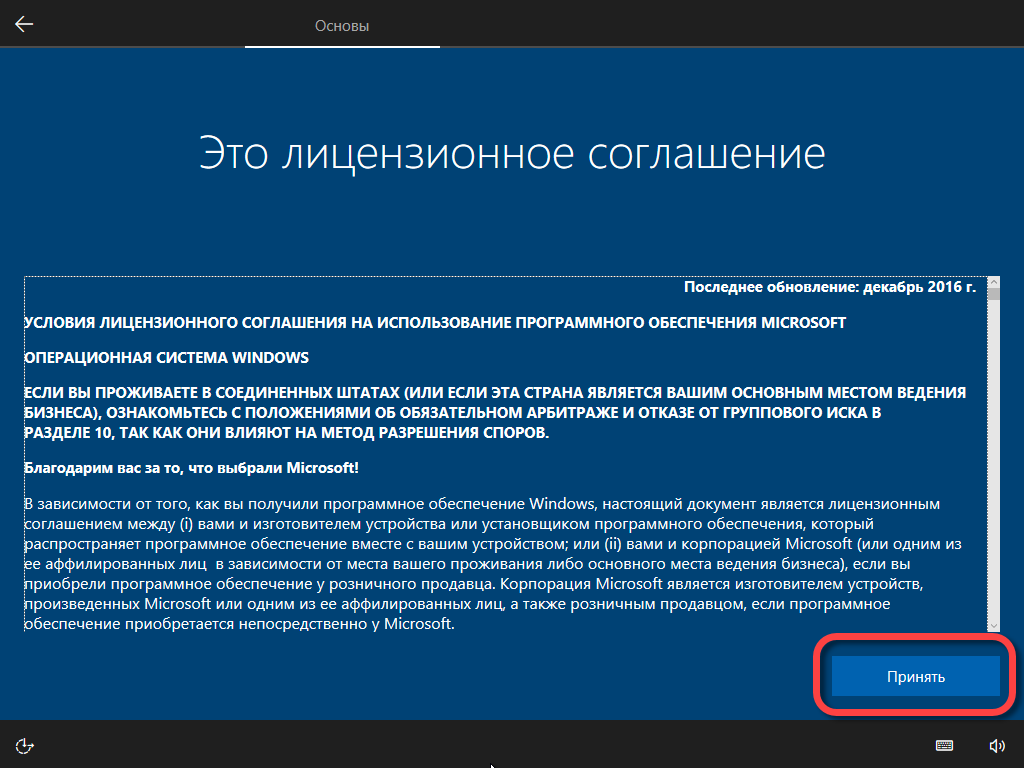
- Choose the type of system use.
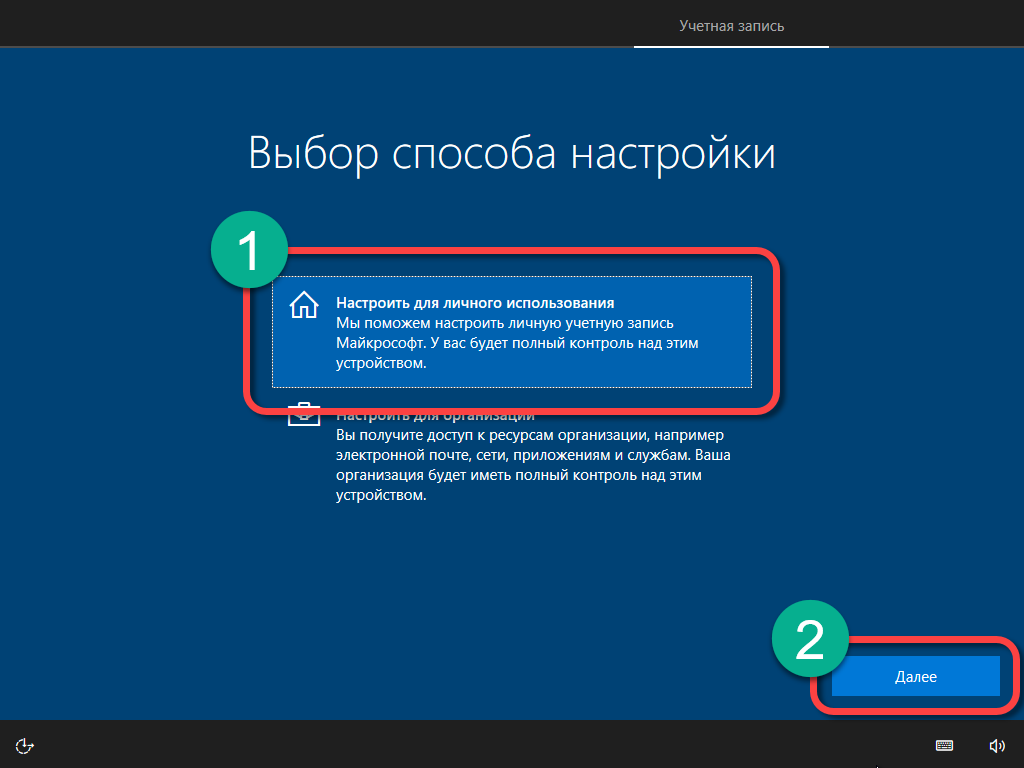
- Choose authorization method, you can use account Microsoft, register it or log in to your local account.
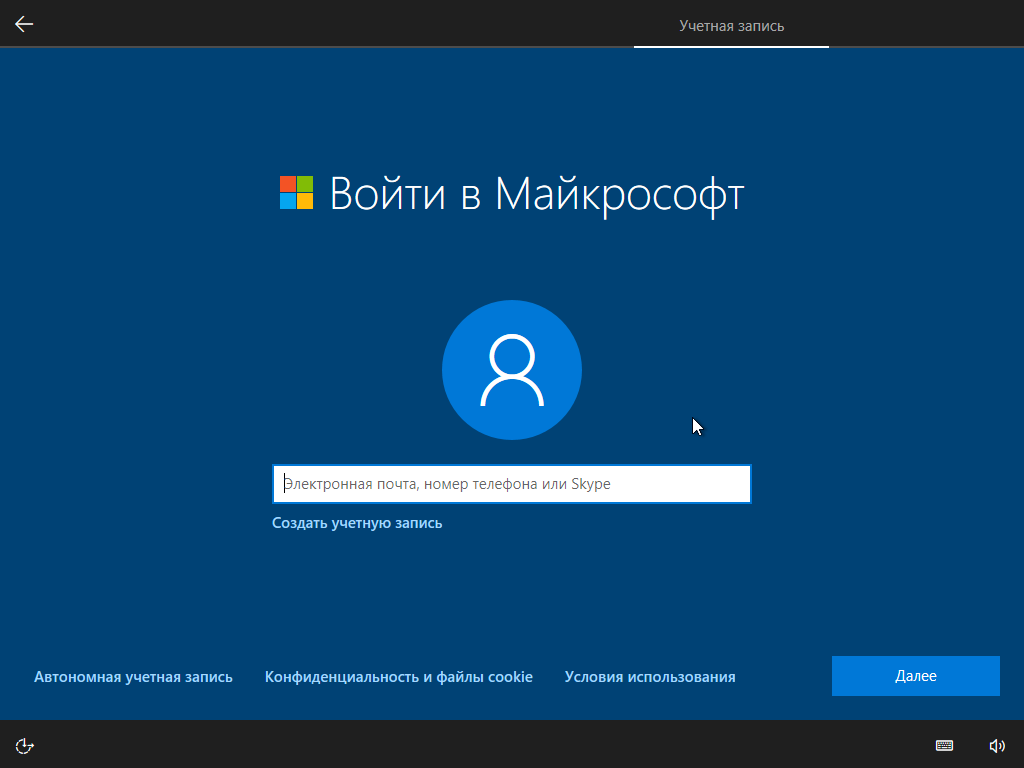
After the process is completed, the computer will be returned to its original state. In other words, it will be as if only after installing the operating system. In some cases, you may need to install drivers.
To advantages auto recovery systems include ease of use of the tool and the absence of the need for bootable media.
On laptops and computers that had out of the box installed windows 10, resetting means installing all the necessary drivers (there is a special section for storing them on disk).
How to recover Windows 10 using a recovery disc
A recovery disc is a medium that contains all the necessary data for reincarnation or full recovery OS and system files. Let's look at the algorithm for creating a recovery disk for Windows 10. Below is a step-by-step instruction with screenshots. Getting started.
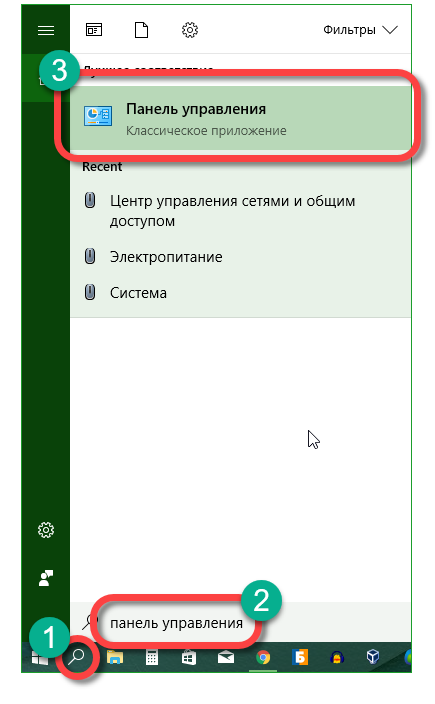
- Open the system parameters using the search tool. It is located on the left side of the taskbar. Enter a name in the search field.
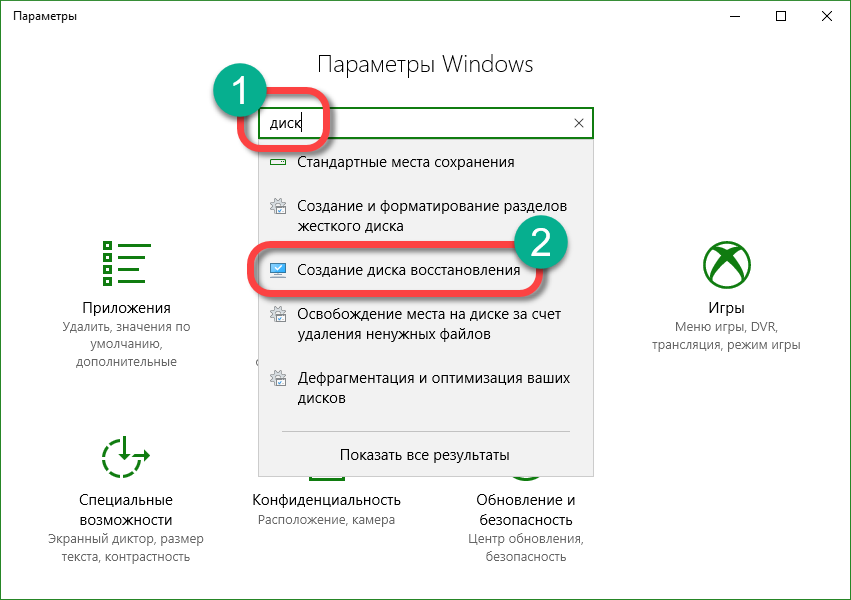
- IN search bar Windows parameters we write the word "Disk" and in the selection we select the tool we need.
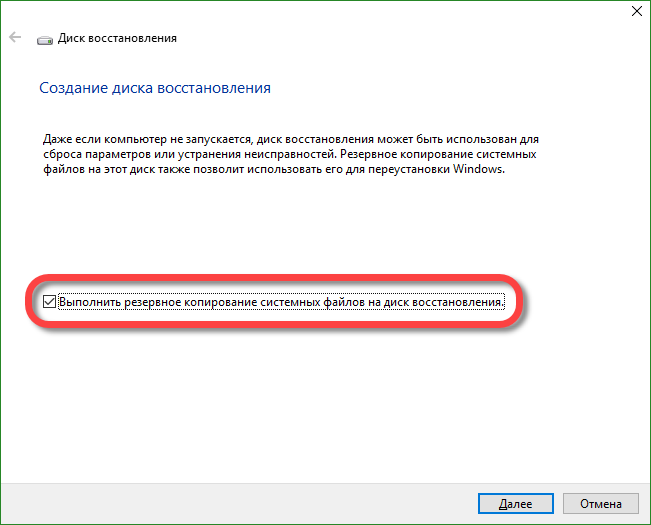
- If, when creating a disk, we put a checkmark in front of the item marked on the screenshot, in the future we can not only fix the OS, but also reinstall it again with a copy of all user data.
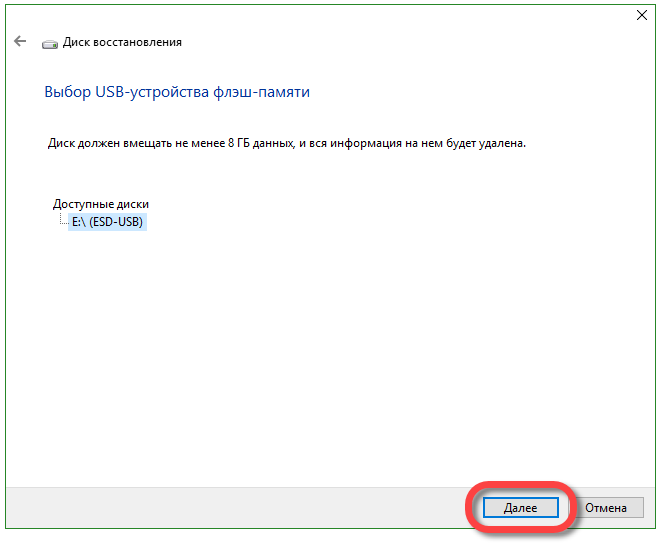
- We select a disk on which the image for recovery will be written and we click "Next".
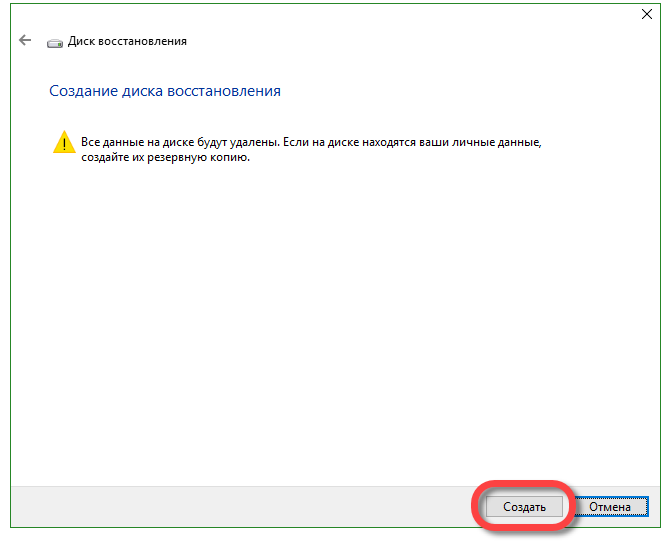
- Windows will notify us that all files on the USB flash drive will be deleted. We agree and click "Create."
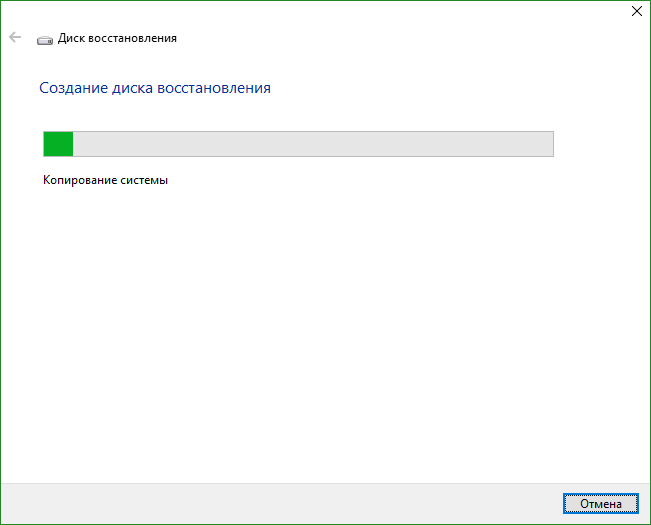
- After the automatic recovery preparation is complete, disk creation will begin. The process can take a lot of your time.
Using our recovery disc, you can do the following:
- restore the previous state of the computer using the backup;
- use rollback to restore point mode
- automatic recovery mode at system startup;
- use of the command line;
- complete windows recovery 10 from the image.
The drive, the creation of which we have described, is even more convenient than a simple installation flash drive. After all, using the latter, you need to configure Windows 10 each time, and the system restored from the copy practically does not require configuration and is immediately ready to work.
Rollback Windows 10 with a full image
In the "Ten" there is the possibility of a full backup of the entire system. Below we will look at how to create an image and how to restore the OS from it, for example, after failures that arose because the computer was not started correctly. Every stage step by step instructions for clarity, it will be accompanied by a screenshot.
This option differs from the one described above in that we create a complete cast of the existing operating system with drivers, user files, etc. Using this image, you can restore the system and immediately switch to use, no additional steps are necessary. Best done backupas soon as the system is installed, configured and, in general, brought to healthy state. But in no case when it already begins to slow down from clutter.
Let's start creating a complete image of existing Windows 10:
- Open the control panel with windows search (click the magnifying glass icon, enter a search query and click on the result).

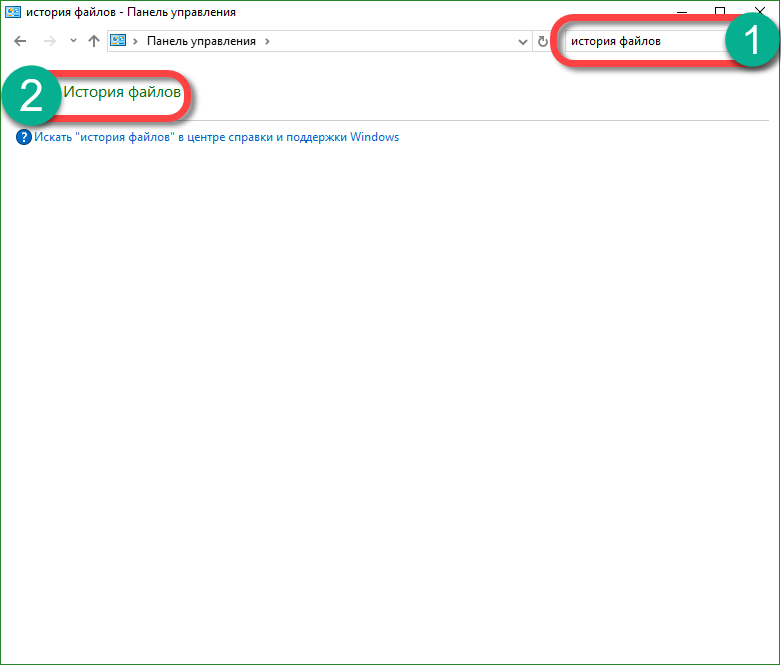
- In the search field of the control panel, write “File History” and click on the result.
- Now in the lower left corner, click on the inscription indicated in the screenshot.
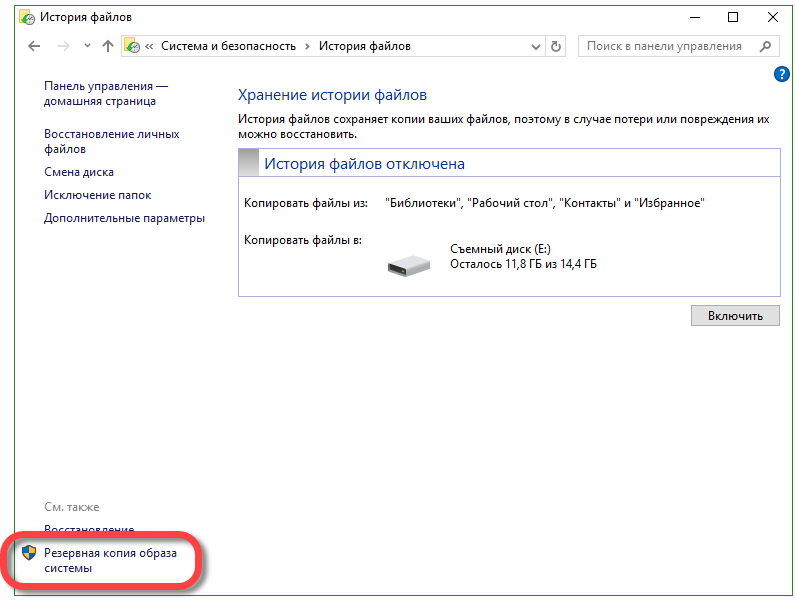
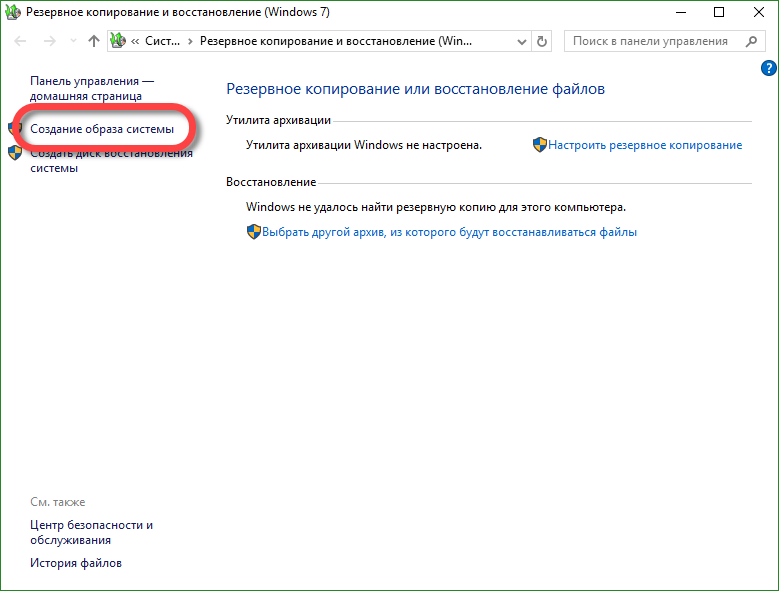
- Go to "Creating a system image."
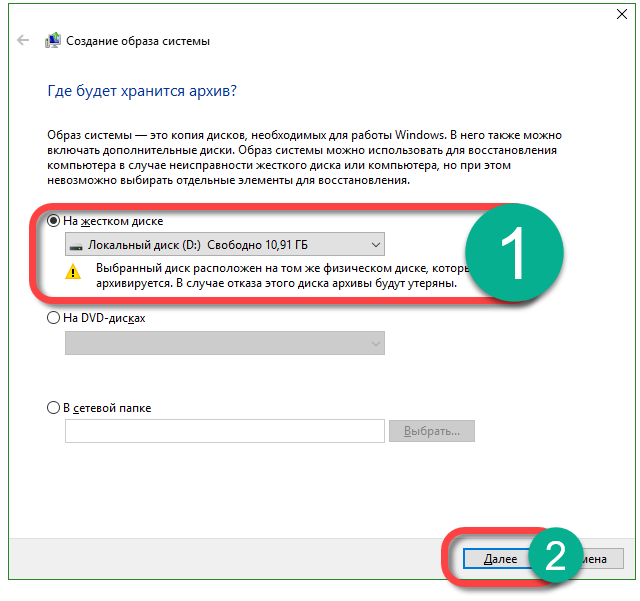
- Now you can proceed directly to creating the image. There are three options for saving it. We can record backup on hDD, split it into several DVDs or specify the target network folder. We use the first option. Click on "Next".
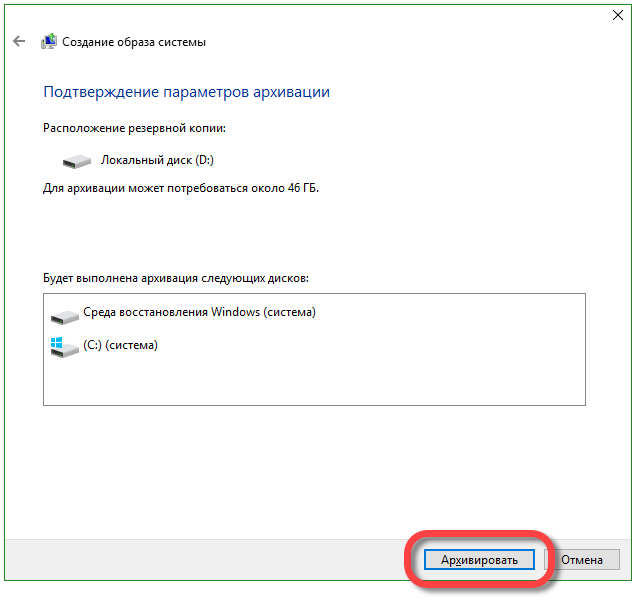
- Getting down to business, click on "Archive." The system tells us that this may require about 46 GB.
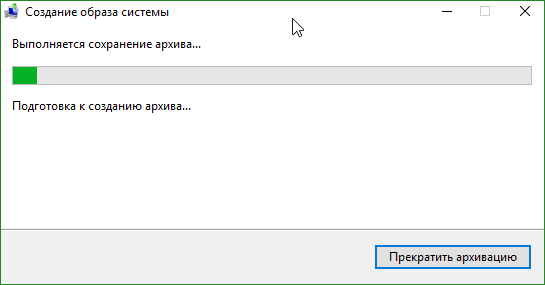
- The creation of the archive began, depending on the amount of data and the performance of the PC, it may take a different time.
- When the backup is finished, you will see the following window. Click "Close."
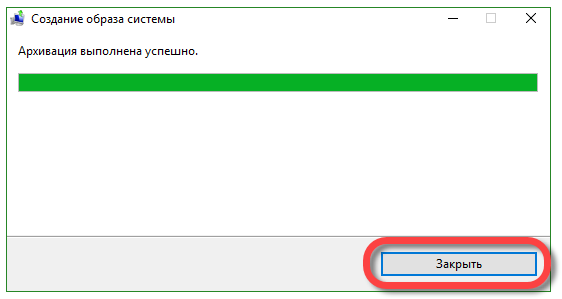
In the future, from this image the system can be restored. To do this, when OS will be installed from a USB flash drive or disk, select the recovery mode and specify the image created above. The system will unzip the archive to drive C and will be ready to work. This is much more convenient if only because the OS no longer needs to be configured, drivers installed and software, you just sit down and start having fun or work.
How to create a recovery point in Windows 10
Recovery points in Windows 10 work exactly the same as in versions 7 and 8. With their help, you can return the system to the specified moment in its life and eliminate the problem that arose after the creation of the control point. In order for us to roll back the system to the recovery point, we need to enable their creation. We do the following:
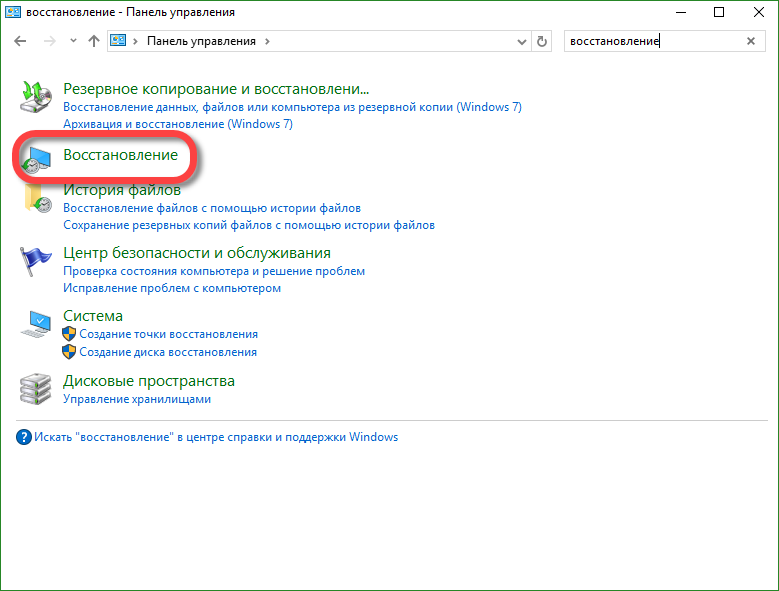
- Go to the control panel (we described above how to do this in Windows 10). Next, in the search bar, write “Recovery” and click on the result indicated in the screenshot.
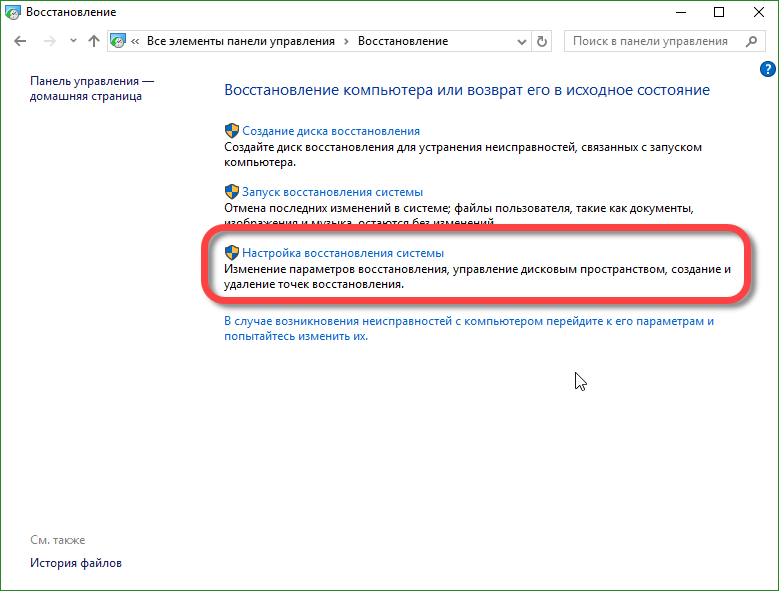
- In the next window, click "Setup" system recovery ".
- In our case, automatic creation of rollback points is disabled, let's fix this, select "Configure".
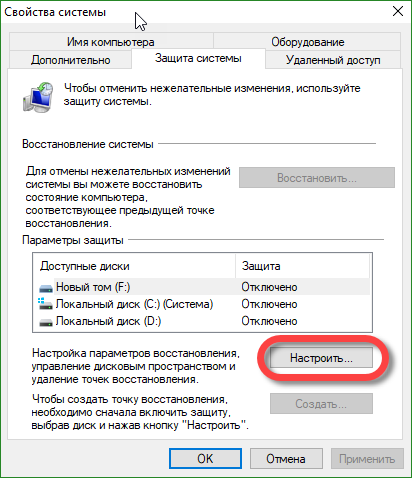
- We activate the automatic creation of control points and click OK.
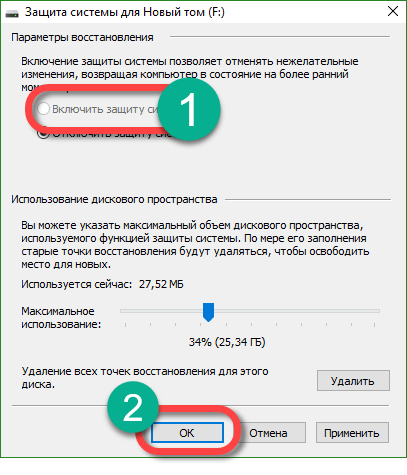
Now, with any change to the Windows settings, recovery control points will be created in auto mode. You can also make manual points here, this is necessary before any serious step, for example, installing a suspicious program.
When you need to apply one of the points and fix the system, go to the control panel, namely "Start System Restore" and restore the copy. If Windows does not start, you can use another option. Boot from the installation flash drive or disk and select the system recovery mode there.
Restore the Windows 10 bootloader using the command line
Despite the fact that working with the command line is a way more aimed at professionals, each of you will be able to use it, most importantly, follow our instructions exactly.
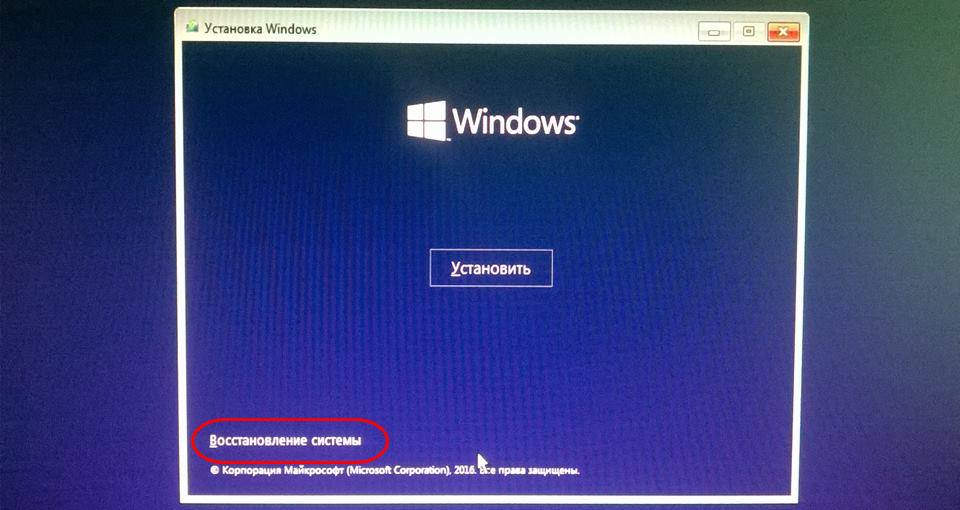
- Initially, install bootable media in the PC slot and boot from it. In the window that appears, click on the item indicated in the screenshot.
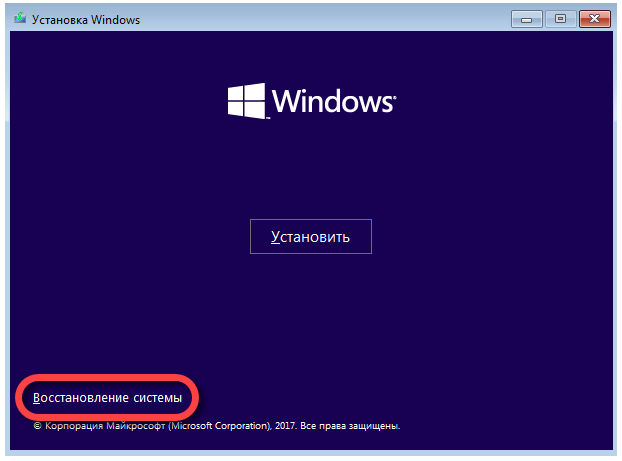
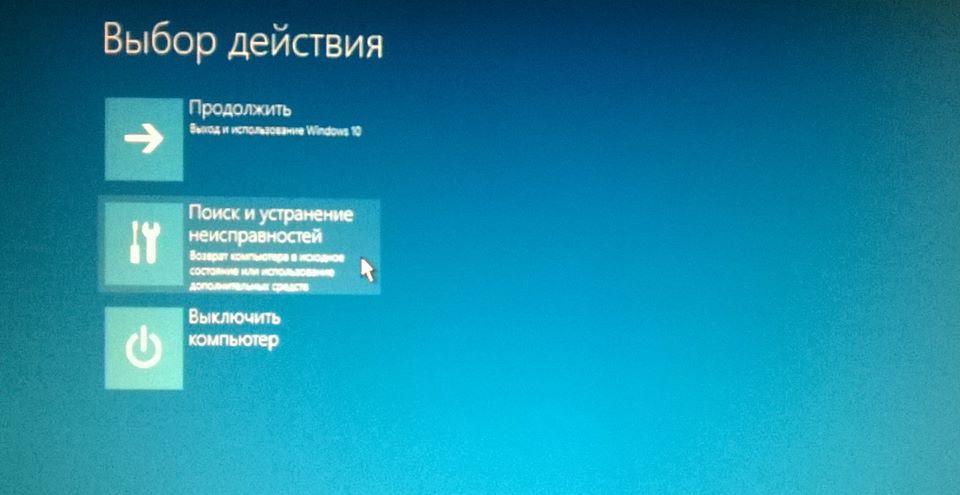
- Next, we click on the tile with the name: “Troubleshooting”.

- Select "Command Prompt."
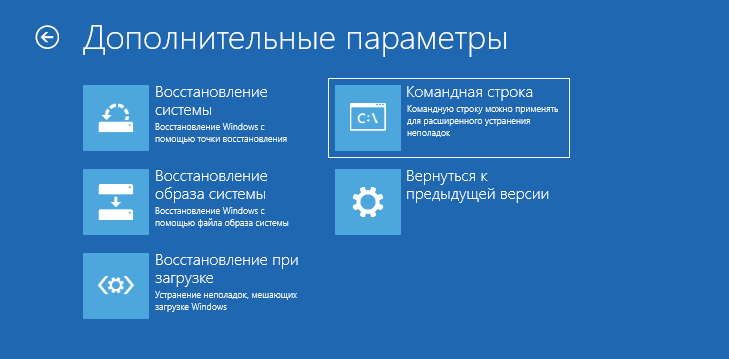
- Now you can run the utility to restore the master boot record. To do this, type bootrec.exe C: \\ Windows in the black screen (specify the drive letter on which your system is installed) and press Enter.
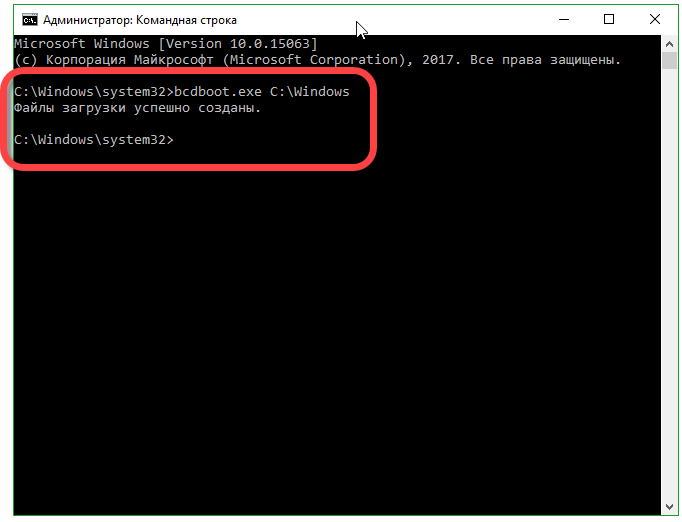
The system will inform us about the successful creation of disks, the main boot record restored.
Comment. To work correctly with operators, you need to know the name of the disks installed in the system. Such names are individual and in most cases do not match.
Windows 10 registry recovery
The registry of the operating system is periodically stored in the directory indicated in the screenshot.
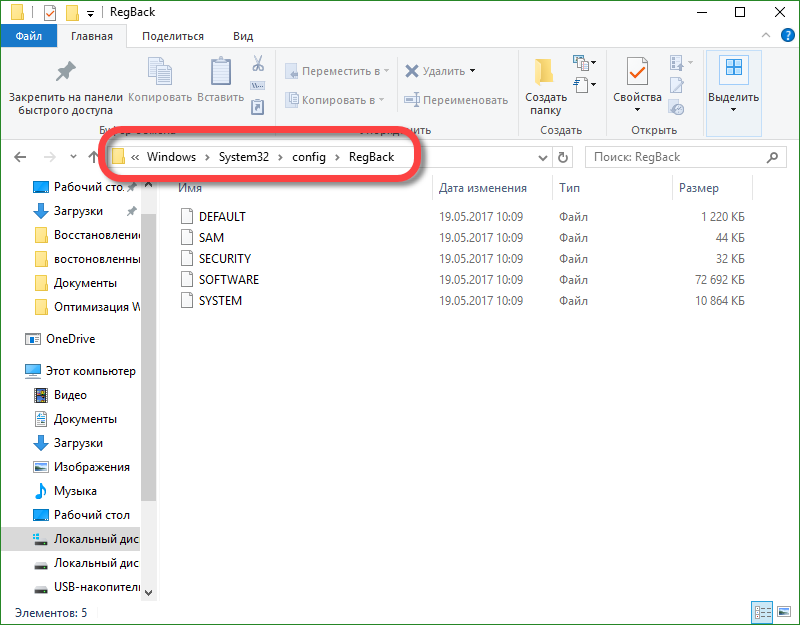
To create a copy of the registry, copy these files and save them. You can restore data by moving it back with a replacement. Naturally, for this you need to have administrator rights.
Error recovering Windows 10 system 0x80070091
Users are increasingly asking why the error 0x80070091 occurs when working with recovery points. This is due to a system update and will be fixed later in the next patch. It will not work to fix the error yourself.
To summarize
Now we know how to roll back Windows 10 and make its advanced recovery. There are many options for this and all of them are effective. When used correctly, they will be enough to fix any problem in the operation or launch of the operating system. Exist and additional programsthat can reset Windows 10 to factory settings, for example, Aomei OneKey Recovery. This may be the same Acronis, or the backup image provided by the manufacturer of the computer or laptop. But you don’t need to discount tools in Windows 10, their functionality is enough to solve any problem.
If your Windows 10 PC is slow or you regularly encounter errors and crashes, the most simple solution will reset your computer to default values, deleting all your programs, files and everything else that may cause problems. This method is especially good if all other attempts have failed, but installation disk with the OS there is no other way to return working capacity does not work. You will learn about basic PC recovery methods: using the built-in windows tool 10 through the advanced boot menu, as well as recovery using a system image so that you can return Windows 10 to its original point in the future.
Method 1: Factory Reset Windows 10
Click "Start" and enter "Recovery." Click "Reset." A reset window will open in which you can select several options. If you encounter problems that you did not have in Windows 7, 8 or 8.1, and you upgraded to Windows 10 less than a month ago, you can return to your old OS. If you want to stay on it, click "Start" in the "Reset.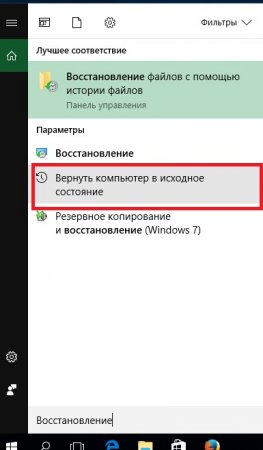
A dialog box appears with two choices.
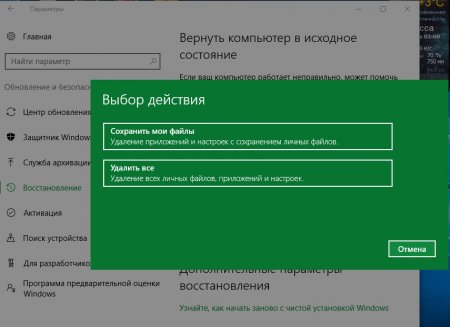
- Reset Windows 10
This option will delete all programs on the computer, but will not affect other files, such as documents and user settings. Programs downloaded from the Internet will also be deleted, but all applications that you installed from the Windows Store will be reinstalled. This is a convenient way to restore your computer to its previous state if it does not work properly and you do not want you to have to restore files.
- delete everything
NOTE: If you use any of these parameters (prohibition of the latter), you will lose the opportunity to return to Windows 7, 8 or 8.1 in the future.
Method 2. Using the OS image
If you do not want to reinstall the OS now, but think that you may want to in the future, it is worth creating a backup copy of your OS in case it generates errors in the future. Thanks to this, you will have a ready-to-install image of your files, settings and applications. This is a convenient way to restore the OS from the image to the current state at any time in the future.To do this, click the Search menu and enter Recovery. Click "Recovery" and wait for the full download. Click “Create a recovery disc” and follow the instructions in the wizard.
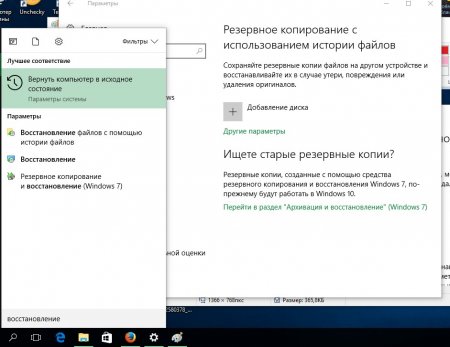
You will be given a choice of where to place this image on your hard drive, optical drive or network. When you select a drive, click Next and then Start Backup. An image will be created. Now consider how to restore Windows, if you already have it.
To use the image of your OS, return to the reset menu that we used earlier. This time, click “Restart Now” in the “Advanced Launch” section.
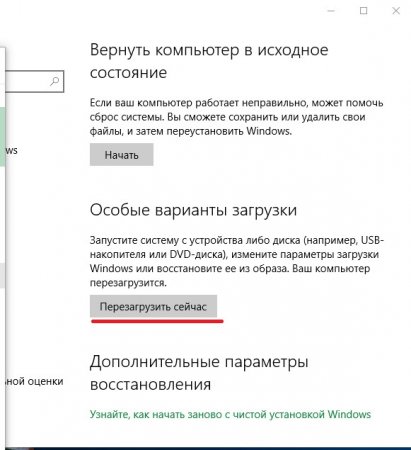
When the computer restarts, you will be given the opportunity to reinstall Windows from the system image that you created.
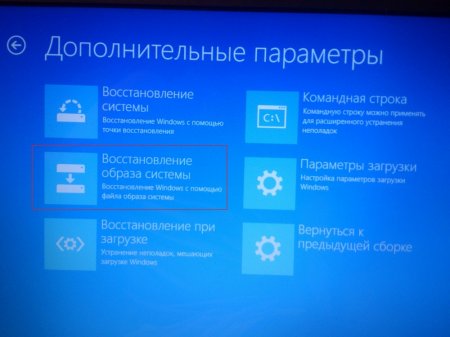
This is probably the best option, as it returns the OS to the state in which you created the image. Keep in mind that this option will delete all files created after the OS image, so before you do this, make sure that you have backup copy your information.
Using System Restore
System Restore is a way to undo changes using rollback points, allowing you to revert system files and options at an earlier point in time without affecting the user's personal files. System Restore uses a feature called system protection, which regularly creates and saves information about drivers, programs, registry, system files and settings of your PC as rollback points.If you cannot solve the problems with Windows 10, you can roll back Windows to return the system to Windows to an earlier point called a checkpoint.
Note:To roll back, you must log in to the OS as an administrator.
In the search, enter “Recovery” and select the appropriate item from the search results.
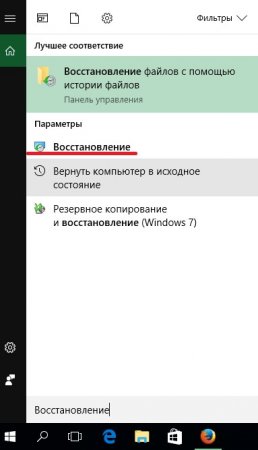
When you start the rollback process, the OS will automatically create control pointbefore proceeding so you can discard the changes if necessary.
If you downloaded Windows to safe mode, a checkpoint will not be created until the recovery continues. In this situation, you cannot cancel the rollback process.
Windows 10 System Restore at Boot
Now you will learn how to do system recovery on Windows 10 at boot time, through BIOS: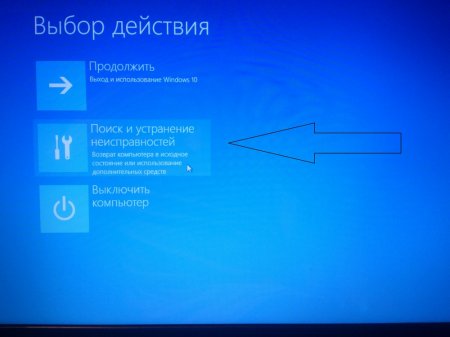 Now you know how to boot into the advanced boot mode via BIOS and start the OS recovery procedure.
How to restore Windows using a boot disk or flash drive?
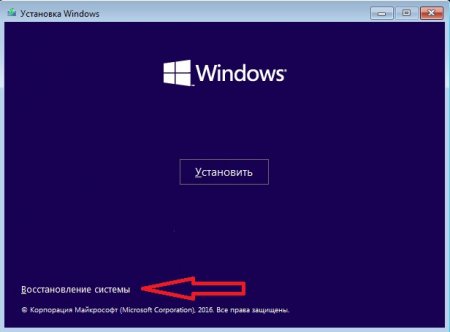
Many users know how to reinstall the OS, but how to restore Windows from bootable media - few people know.To start the recovery process, boot from installation media. After downloading, a window appears with a choice of language. Click “Next” and in the next window click on the “Recovery” link.
A similar advanced boot menu will start.
The recovery procedure for Windows 10 is pretty simple. There are several alternative ways which will be discussed in the article. You can perform recovery in the following ways:
- Rollback of the system to a control point;
- Restoring the OS using an image or distribution on an external medium.
Rollback points
The option to roll back the system using recovery points is designed to solve problems associated with a failure when installing programs, updating drivers, making changes to registry settings, and more.
The rollback mode allows the user to return the registry, system files and other parameters to one of the control points created by Windows automatically or manually by the owner.
Comment. When the system rolls back to the checkpoint, documents and other user files will not be affected.
Algorithm:
You can roll back the system to a control point even when Windows does not load at all. In this case, when the user tries to start the OS, a warning window appears: 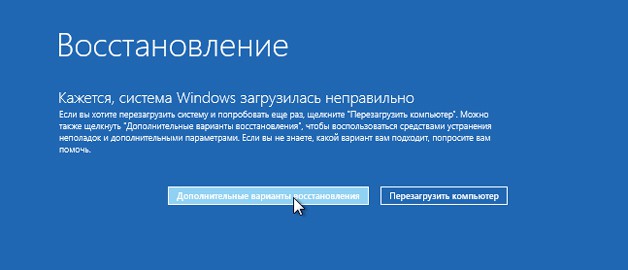
Click on additional recovery options.Run the diagnostic program by clicking on the appropriate menu: 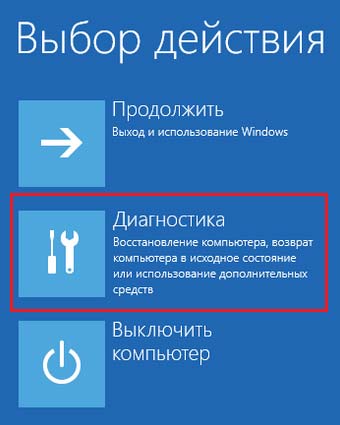
Turn on system recovery mode: 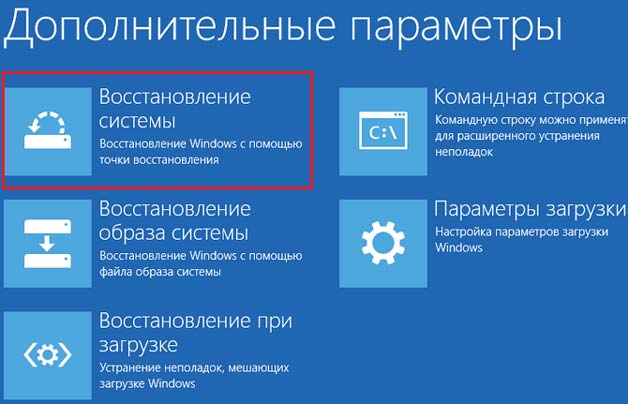
After selecting this item, a familiar window appears. It is necessary to select a control point for rollback. That's the whole answer to the question of how to restore Windows 10 using a checkpoint.
Windows rollback
If through the system recovery mode it was not possible to get rid of the problems that arose, then the function of rollback to the basic settings comes to replace it.
The initial state of the restored OS can be as follows:
- Fully saved user files and some utilities. However, all device drivers, some programs, and personal settings are reset;
- Complete deletion of all personal data of the owner. Option can be compared with the full reinstalling windows through the BIOS.
Comment. If Windows 10 is the factory computer system, a third option appears. It represents a rollback of parameters to the factory settings. In this case, absolutely everything is deleted, including files from non-system drives.
The method indicated in the note is radical and is used extremely rarely.
System rollback algorithm:
Once you have made a choice, the OS will roll back, which will last from 40 to 90 minutes. The duration depends on the number of files to be saved / deleted.
System rollback via BIOS
If the system does not start at all, then the only option is to restore Windows through the BIOS. To do this, we need a disk with an image or distribution ( installation file) OSes.
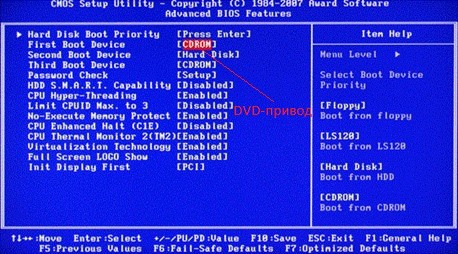
Before you insert media with the OS, you must configure the BIOS to read from a disk / flash drive. In order to enable the BIOS, the keys are: Delete, F8, F10, F12, depending on the motherboard.
Comment. In Windows 10, there is one problem: the window between directly starting the system and the ability to boot the BIOS is a few seconds. If you do not know the purpose of the keys, you will have to restart the PC several times.
Learn more about how to enable BIOS on Windows 10 in a video:
Change settings in the program:
Problem loading Windows 10 operating system can occur for a variety of reasons. One of them is damage to the standard bootloader Windows boot Manager, who is actually responsible for the launch of the “tens”. This usually happens when several OSs are installed on the computer and we unsuccessfully deleted one of them. There are other reasons. In these cases, immediately after the start screen, instead of the Windows logo, an inscription appears about the impossibility of loading the OS (for example, “An operating system wasn’t found”) and a lot of any other text on the whole screen on a black background.
If the problem is damage to the boot sector, then you can try automatically restore windows bootloader 10 using ISO media installed on a computer windows versions 10 (flash drive or DVD). There are other ways (for example, through command line again, when starting from a USB flash drive with an ISO image), but personally, in all cases, it was the simple option described below that helped me - so why look for complicated paths where simple ones can work?
To automatically restore the Windows 10 bootloader to our the operating system started up again, you need to boot from the flash drive. How exactly to do this, you need to look specifically for each computer. For example, at my start, I need to press F12, and then select a USB flash drive with a clean Windows 10 image from the list and the computer will boot from it. You can install a USB flash drive as a priority device to boot into the BIOS (or UEFI). if something is not clear, then on the Internet you can find download options from removable media for your specific model computer or laptop.
Automatic bootloader recovery using Windows 10 ISO image (from flash drive, DVD)
After starting with USB drive after a while, a screen will appear, as in the picture below. Click on it “Next”, as well as about the usual clean install windows 10.
But in the next step, we need to choose NOT “Install”, but “ System Restore».
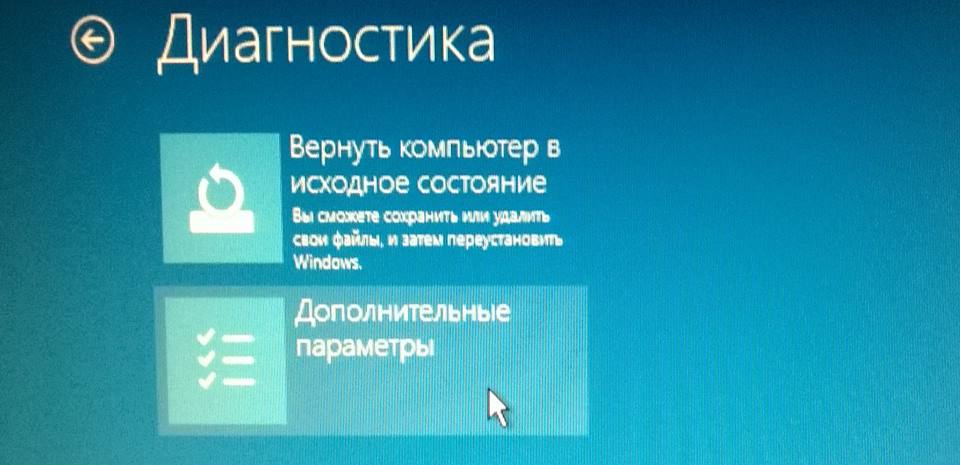
Now select the following action: " Troubleshooting».
In the next menu, go to " Extra options».
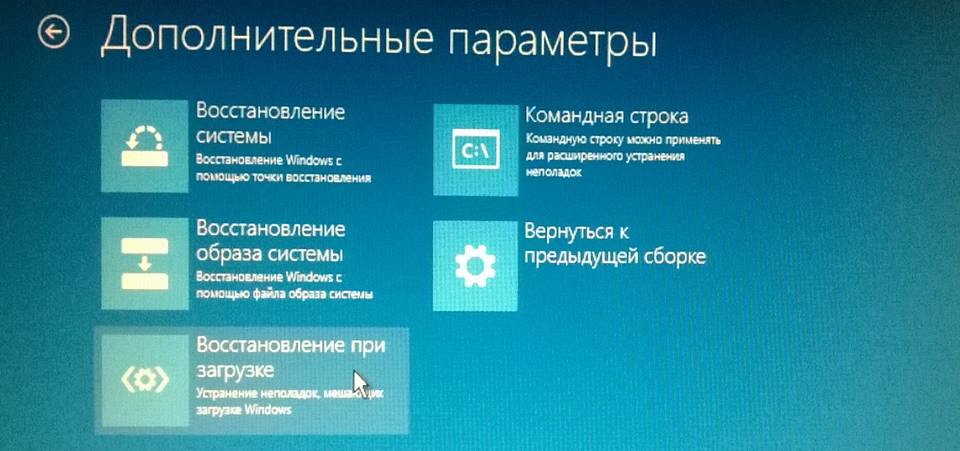
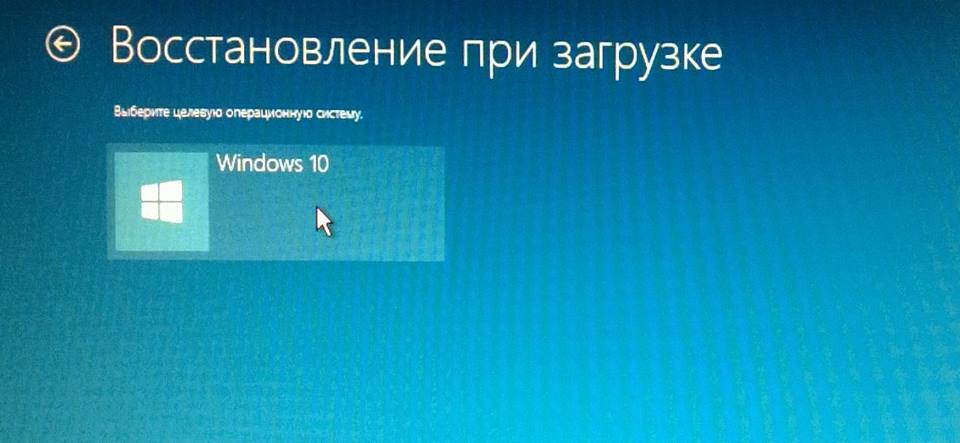
We choose our operating system (it is not always proposed to do this - sometimes recovery begins, bypassing this stage.)
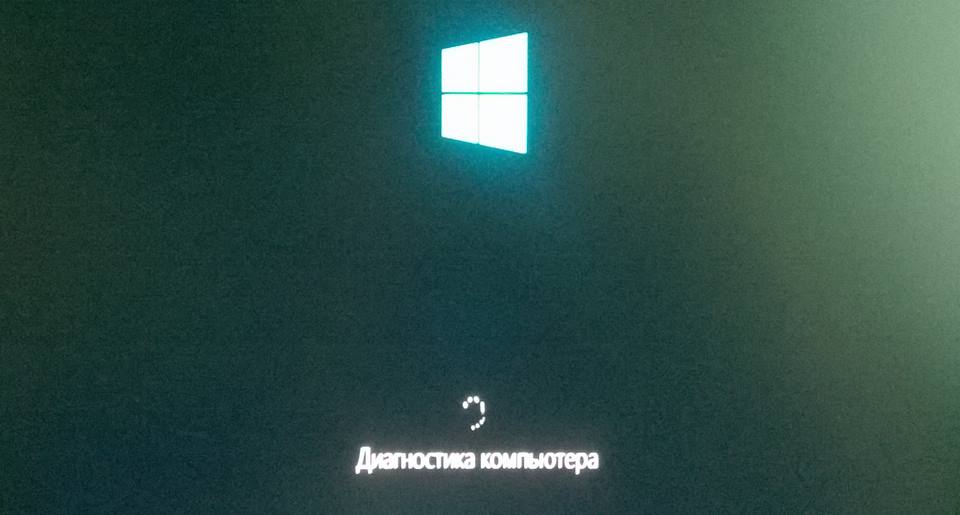
After the done operations, the computer’s diagnostics is started, by the result of which it can be restarted a couple of times.
As a rule, in the end, Windows 10 still starts as it should. And this indicates that the bootloader has been restored.
If repair Windows 10 bootloader automatically if it didn’t work, then you should try to do it using the command line.
Recently, acquaintances brought a DELL Inspirion 15 laptop, with Windows 8/10 not loading. Having booted from, checking the structure of the section for errors and file system, I came to the conclusion that the bootloader is damaged.
For starters, I tried the automatic and, however, in the first case the error popped up " The drive on which Windows is installed is locked. Unlock the drive and try again ", and in the second case, the teams simply did not apply.
The answer to the question of how to restore the bootloader, prompted Google and Yandex. As it turned out, the problem was that the configuration of the BCD bootloader installed in UEFI mode is stored on a separate hidden EFI partition that has a FAT32 file system and a size of 100 MB or more that bcdedit does not see, which is why manual or recovery from the command line did not help.
To solve this problem, you must specify the desired recovery partition, in which to recreate and copy the boot files.
So here we go, boot from the original installation DVD disc from Windows 8/10 or a specially prepared recovery disk, to the command line, then run all the commands in sequence.
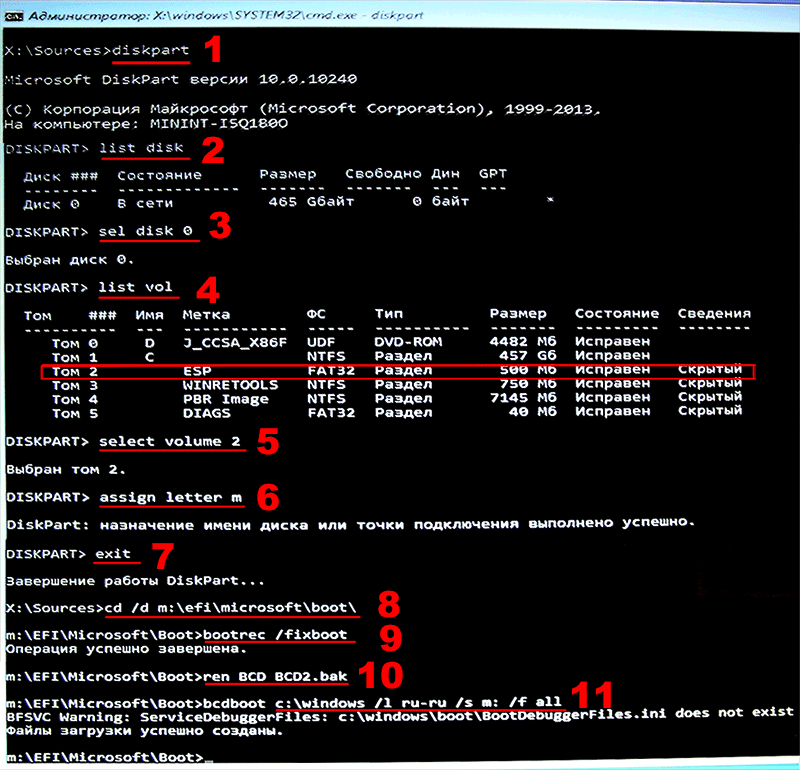
1. Run the utility
diskpart
2. Display the quantity hard drives
list disk
3. Select the desired hard drive *
sel disk 0
4. Display the number of sections
list vol
5. We make active the section we need **
select volume 2
6. Assign the letter to the selected section
assign letter m
7. Exit the utility
exit
8. Go to the bootloader directory of the hidden partition
cd / d m: \\ efi \\ microsoft \\ boot \\
9. Restore boot sector (bootloader) section
bootrec / fixboot
10. Delete the BCD file and make a copy before deleting
ren BCD BCD2.bak
11. Create a new BCD repository by copying the boot files from the system directory ***
bcdboot C: \\ Windows / l ru-ru / s M: / f ALL
* If you have multiple hard drives, select the one you want by changing 0 to 1 or more.
** Select the desired partition, as a rule, the partition has a FAT32 file system and is larger than 100 MB in size.
*** If you have an English version of the OS, then substitute "en-us" instead of "ru-ru"
After the message about the successful creation of the boot files appears, restart the computer.
The “Recovery Disc” offered for download was created in the original operating room. windows system 10 Pro.


