As you know, the life of optical discs is short-lived. A disk can stop being read for a variety of reasons - this is the appearance of scratches, physical wear, and poor-quality material from which the disk was made, etc. Data on such a disk means operating system it is no longer possible to read and copy, although the files and folders available on it are faithfully displayed in Windows Explorer. It is clear that you need to think about such situations in advance and timely worry about the presence of a certain number of backups. But in practice, often everything turns out to be completely wrong, because many of the users until the last moment postpone the backup operation to "later" (in the secret hope that everything will work out anyway). And in the end, at one point, they face the fact that super-valuable pictures, videos, music videos, and sometimes even important documents and distributions, are completely inaccessible.
At the same time, it is possible that the data can still be read using special utilities. The fact is that the OS, if it is not able to correctly read information from the damaged part of the disk, interrupts copying and deletes the already copied part of the file. And specialized utilities, using other mechanisms for reading data, can ultimately read such files and copy them (although it is clear that they do not guarantee 100% recovery of all files).
These utilities read information from CD / DVD-ROMs by direct access to them, bypassing the standard windows tools. They make repeated attempts to read the damaged part of the disk, and at the same time they can continue reading / copying information after reading errors have occurred, which often allows you to "pull" the cherished information from the disk in its original form. If this number does not work, then most of these programs, without further ado, simply replace unreadable sectors with zeros - it is natural that in this place in the file some kind of defect will appear.
It is clear that in practice, not all files restored in this way will be suitable for further use. Say in case text documents after such restoration, a couple of paragraphs will disappear, but this is undoubtedly better than the complete loss of an important document that you wrote for a whole month. In the case of audio and video data, everything can also be quite decent - it’s unpleasant, of course, if at some point while listening to your favorite melody or watching a video you hear some strange sound or see strange phantoms on the screen, but again, it will be better than completely losing the cherished materials. It is more difficult with software, but it still makes sense to try to recover the data, because the unfortunate bad sectors can also appear on some auxiliary file, which you do not need at all during installation.
CDCheck 3.1.14.0
Developer:
Distribution Size: 1.48 Mb
Spread: shareware
CDCheck is a popular utility designed to diagnose and recover information from damaged CD / DVDs (almost all formats are supported), ZIP drives, USB devices, and other media. When creating this program, the developers were guided by the principle that it is better to take timely measures to save data without waiting for a critical line. Therefore, the first of the tasks that CDCheck solves is a detailed disk check and identification corrupted filesif they are detected, the program will usually even be able to name the reasons that led to such a sad state of the disk. In the case of optical discs, the utility also provides comprehensive information about the manufacturer, type, speed characteristics, etc. The second task is to recover data from failed drives, which CDCheck also successfully copes with. In addition, the program can be used to compare the original disk with its copy on the hard disk by bit-by-bit file comparison. In general, the utility is simple to use and copes well with its task, but it processes information more slowly than the other solutions considered here - perhaps this is due to a more thorough study of the data.
The program (there is Russian-language localization) can be used by home users for free, provided that they receive a Free license on the developer's site. The cost of a license for commercial users is $ 75.
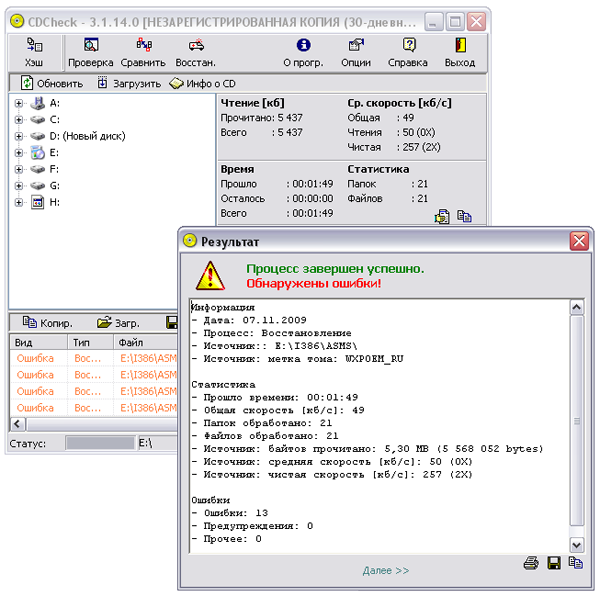
The CDCheck interface is simple - at the top there are buttons for performing basic operations, on the left is a disk tree, on the right is statistical information. First, let's try to test one of the folders of the disk, in which, according to our information, there are bad sectors. To do this, select the folder, click on the "Scan" button and, if necessary, adjust the scan settings.
When processing data by the program, one can observe detailed statistics of the process: the average speed of reading data, the estimated time of processing, the number of scanned files and folders. In addition, when a broken file is detected, its name with an error code is displayed in the bottom window.

To restore files of a specific folder or the entire drive as a whole, select the corresponding object, click on the "Scan" button and specify the folder for copying data. The recovery parameters are customizable - in particular, you can specify the number of retries for reading bad sectors and set the level of statistical correctness that you want to achieve when restoring data.

The execution of this operation is also extremely clear - the progress of the recovery is displayed, the files are listed, during the recovery of which there were problems, and the final status of their recovery is indicated.
BadCopy Pro 4.10
Developer:
Distribution Size: 869 kb
Spread: shareware
BadCopy Pro is a globally recognized solution for recovering damaged and lost data from badly read or unreadable floppy disks, CD / DVDs (including CD-R, CD-RW, DVD + R / W and DVD-R / W), memory cards, Zip drives, flash drives, hard drives etc. The program supports the restoration of all types of files and provides file recovery from scratched or damaged CD / DVD-ROMs, deleted or lost photos in digital cameras, documents from damaged ZIP-drives, etc. It can help read data from problematic multisession CDs, animate files on disks formatted by quick formatting, and recover deleted data from floppy disks.
The demo version of the program (there is no Russian-language localization) with locked saving is not limited in testing time. The cost of the commercial version is $ 39.50.
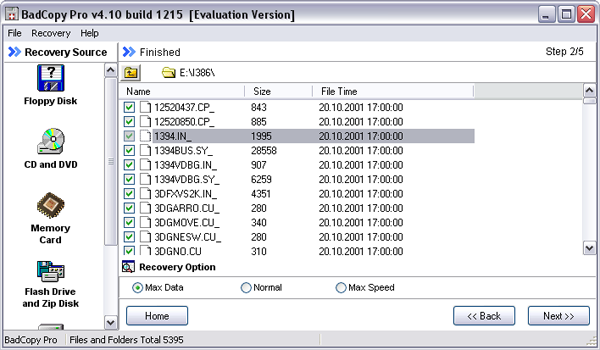
Information recovery in BadCopy Pro does not require any additional settings and is carried out under the guidance of wizards, and therefore is not particularly difficult. The program window is two-panel - through the left panel you can access the desired type of media, on the right you can configure data recovery options. In total, five media groups are presented on the left panel: "Floppy Disk" (floppy disks), "CD and DVD" (CD / DVD-disks), "Memory Card" (memory cards used in digital cameras and mobile devices), "Flash drive and Zip Disk "(Flash-drives and ZIP-disks) and" Other Media and Storage "(here the developers attributed hard disks and other media). Since we are interested in recovering data from a CD / DVD, the first step is to select "CD and DVD" on this panel, and then specify the desired drive (if there are several) and the recovery mode. The choice of the desired recovery mode depends on the problem being solved. In the case of recovering damaged data (that is, our case, when it is assumed that the files are displayed in Windows Explorer but cannot be read by the OS), the "Rescue Corrupted Files" mode is selected. The two remaining modes ("Rescue Lost Files - Mode # 1" and "Rescue Lost Files - Mode # 2") are designed to recover lost data - that is, data that is not visible in the operating system.

After that, indicate the data that you want to copy from a disk that is not read in a normal way - this is not implemented in the most convenient way for the user, since you can’t select the list of folders along with files and other folders enclosed in them, but only single files are allowed to be specified. As a result, it will be necessary to recover the information in each folder individually - long and hard. At the same step, it is easy to adjust the depth and speed of the scan through the "Recovery Option" switch. It can be installed in one of three positions: "Max Data", "Normal" and "Max Speed" - in the first position the maximum scanning depth is reached, and in the third - the maximum speed. The second option is intermediate, selected by default and is considered optimal for most cases.
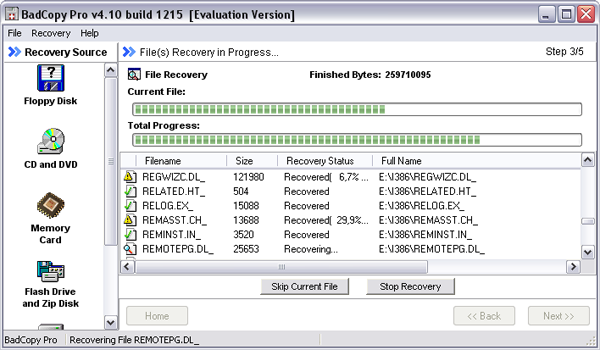
The recovery process begins immediately after clicking on the "Next" button, and the program informs about its effectiveness by displaying the files being copied, their final status (that is, the file is restored or not) and the progress of the operation.
At the end, the program will take an interest in saving the read files in a folder on the hard disk.

In the same window, you can view the recovered text files (TXT, BAT, INF, LOG) and images (BMP, JPG, GIF, PNG, etc.) by selecting the file of interest and clicking on the "Preview" button. Other files are viewed only in hexadecimal format.

IsoBuster 2.6
Developer:
Distribution Size: 5.14 Mb
Spread: shareware
IsoBuster is a comprehensive solution that provides tools for working with disk images and recovering data from crashed CD / DVD-ROM drive. It supports all standard image formats and allows you to extract data from them, as well as directly run files. The utility can also be used to recover information from broken optical media of any format, including Blu-ray and HD DVD discs, and recover data from DVD + RW discs for which Quick Erase or Quick Format operations were applied. Moreover, it is very easy to use.
The program (there is Russian-language localization) is presented in several editions - for the general user, editions: Free and Pro may be of interest. The first is free and has a basic set of features, which, however, is enough to solve the problems considered in this article. The second has advanced functionality and is offered on a commercial basis. A detailed comparison of the editions is available at the following. The Free edition can be downloaded and used completely free, the cost of the Pro edition is $ 29.95.
During the installation process, in addition to traditional questions, IsoBuster will ask about the choice of file associations - if it is assumed that the utility will be used only to recover data from damaged CD / DVDs, then it makes no sense to establish associations. Otherwise, check the boxes next to those extensions with the images of which you are working in practice.
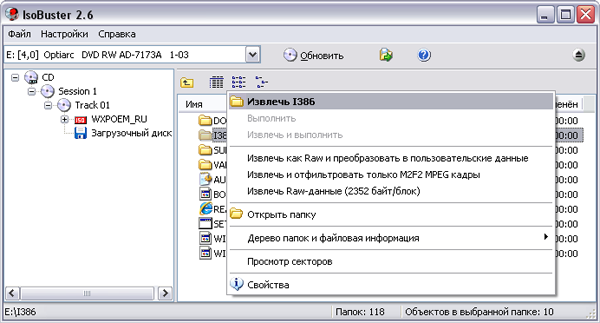
The main window of IsoBuster is two-pane - in the left pane there is a window for selecting images, sessions, disks and folders, and in the right there is a file tree. Understand how to use the program to recover data from broken drive, not difficult. Run the program and insert the CD / DVD-ROM into the drive, make sure that this disk was chosen in IsoBuster. After that, a disk layout (tracks and sessions) will appear in the left pane, and folders and files, if any can be found on the disk, in the right pane. If there are no files or they are not shown in full, the developers recommend starting the process of searching for such data by selecting the "Search for missing files and folders" command from the context menu on the track icon in the left pane.
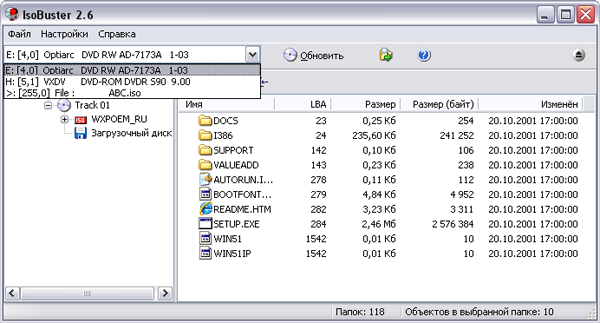
After that, to start data recovery, which can be done both for the entire disk as a whole and for individual folders and files, you need to select the restored object and call the "Extract" command from the context menu, and then specify the folder to save this data.
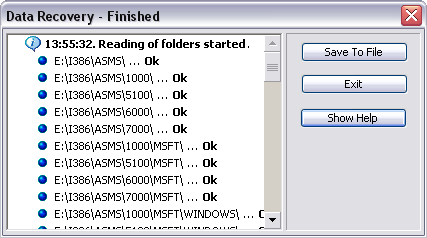
In the process of data recovery, the program reports only the file being read at a particular moment in time and the overall progress of the operation.

In case of a hit on a bad sector, which the utility finds for some reason less than other ones tested for this review counterparts, she stops and asks whether to try to read this sector again or skip it. Attempts to re-read the initially unreadable sectors, as in other programs, are often successful. At the same time, upon the first hit on a failed sector, it is possible to configure the utility to skip all such sectors in the future. In our opinion, such an obsession is tiring - developers of other solutions acted in a much smarter way, in which the user was initially asked to determine in one way or another (through the number of attempts to read bad sectors, the choice of recovery method, etc.) the data quality ratio and the speed of the operation. Although in comparison with the fact that, in general, the program recovers data quite successfully, it’s just trivia.

CDRoller 8.60
Developer:
Distribution Size: 7.07 Mb
Spread: shareware
CDRoller is an efficient and easy-to-use program for recovering data from unreadable means of Windows CD / DVD-ROM drives of various formats, including Blu-ray and HD DVD, as well as flash memory cards (SmartMedia, Memory Stick, CompactFlash, etc.) . The utility can also be used to partially restore video files with bad sectors by cutting out fragments with similar defects, for which the program first analyzes the specified VOB file, then divides it into separate fragments and allows to exclude the scene that appeared on the bad part of the disk , and write new disc with surviving data. In addition, it can be used to test suspicious CD / DVDs. As can be seen from all of the above, the data recovery capabilities (especially video) in CDRoller are impressive. But there is one “but” - during the testing process, the program behaved quite waywardly - it normally recognized the disks and performed the required operations, then it hangs tightly, and often just when it repeats the actions that it just performed normally. So the impression of this release was not the best for us - apparently, the developers obviously hurried to put it up for download.
The demo version of the program (there is no Russian-language localization) is operational for 14 days, but data storage is blocked in it and it is impossible to use the function of cutting out fragments that have fallen into bad sectors ("Split Video" function). The cost of the commercial version is $ 29.50.
The CDRoller working window is divided into three panels: one vertical and two horizontal. The left vertical panel Side Bar provides access to the basic modules of the program. The list of devices is displayed in the upper horizontal panel, and the results of the analysis of the operations performed in the lower panel. At the top of the working window are buttons for basic operations. The utility analyzes the CD inserted into the CD / DVD-ROM disc immediately upon opening and displays it automatically.

It’s easy to test any data disk that is in doubt using the Tools\u003e Test Disc command. To restore data from the entire disk as a whole, the "Recover All" operation is selected, in case of recovering a specific data folder, this folder is selected and clicked on the "Recover Selected" operation in the Side Bar.

After that, you will need to specify the folder for saving the recovered information ("Save Recovered" button) and you can adjust the data recovery settings ("Setting" button) - specify what to do with unreadable sectors (leave it unchanged or fill it with zeros), increase or decrease the number of attempts to read bad sectors (Retries) and change the scan depth (Force).

During the scanning process, the utility displays the files being viewed and the progress of the operation, and according to the results, it displays a list of files with the final verdict (that is, whether each of them was read).
In the case of DVDs, recovery options depend on whether the files in question are from correctly completed discs or not. If the disk was correctly completed, then you can try to copy it using the ISO image. To do this, after inserting the disc into the DVD-ROM drive and the appearance of the disc name in the program window with the UDF 1.02 file system, you need to click on the "Preferences" button and select the option "Read only ISO 9660 data track" in the window that opens.

After that, click on the "Refresh" button to update the data (now it will be indicated already file system ISO / Joliet) and select "Extract ISO Image File" from the "Tools" menu. As a result, an ISO image will be created, which can then be immediately burned to disk using the built-in DVD burning tools.
To recover data from incomplete DVDs recorded by digital DVD-camcorders, the developers have provided another option - through the wizard launched by the command "File"\u003e "Recover DVD Video". There are no special settings here - it’s enough to honestly answer the wizard’s questions, but you must act strictly with the instructions (otherwise, in our case, the utility began to hang stably). At the first step, indicate the desired DVD-ROM, at the second insert the disc into the drive and click on the "Next" button. Then indicate the DVD-camcorder, which was created the video, and a specific track, then activate the scanning process ("Start a new scan ..."). In the final, they try to restore the detected video (that is, a file or files in the VOB format) with the "Recover All" or "Recover Selected" commands, respectively. Similar operations are carried out in relation to other tracks.

AnyReader 3.0
Developer:
Distribution Size: 1.92 Mb
Spread: shareware
AnyReader is a convenient and efficient program for copying data from badly read or unreadable CD / DVD-ROMs of any formats, including Blu-ray and HD DVDs, ZIP-disks, flash memory cards and other media. In addition, the utility can be used to copy files over unstable LAN and Wireless LAN networks, as it allows you to continue recording after a disconnected connection. And also for repairing valuable files that can be assembled from two or more available bad copies, finding bad sectors in one copy and replacing bad ones with another.
The demo version of the program (there is a Russian-language localization) is almost fully functional, but it allows you to copy and restore only 700 MB, and is operational for 30 days. The cost of the commercial version is 840 rubles.
The program is easy to use, since the process of copying files in it is completely controlled by the wizard, and the user just needs to follow his instructions. At the first step, you need to choose what is supposed to be done with the files - due to the specifics of this article, we select the option "Copying information from damaged CD / DVD / Blue-ray / HD DVD". Then activate the option "Copy files."
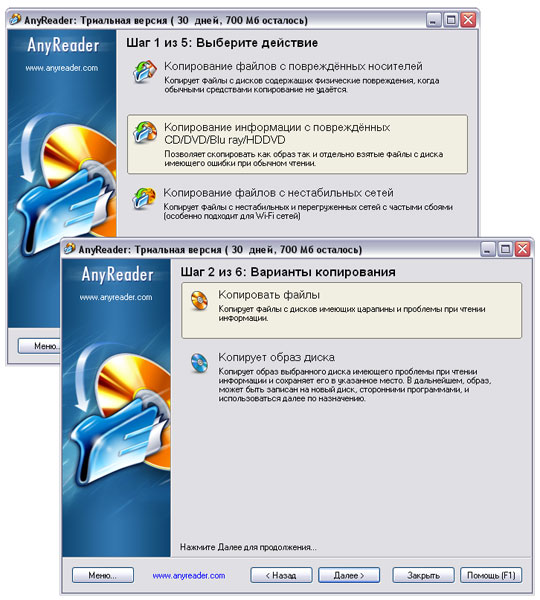
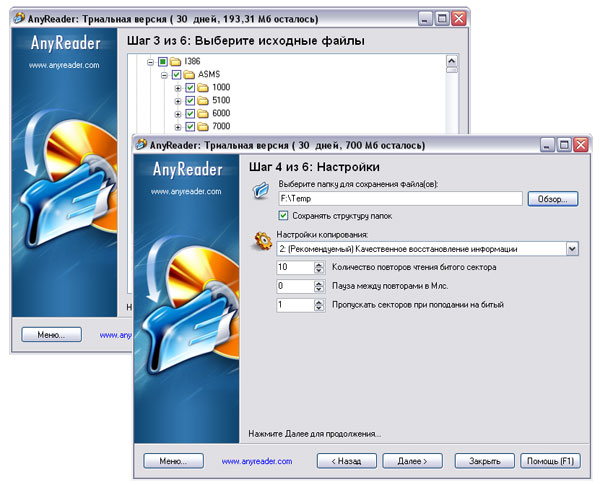
After that, we directly specify everything, or just specific files from an unreadable disk that we would like to copy, set a folder for saving files and define copy settings. In terms of settings, you can change the number of retries of attempts to read bad sectors and the length of the pause between retries, as well as specify the number of skipped sectors when hit. By manipulating these settings (primarily, the number of attempts to read files and the ability to continue reading / copying information after reading errors have occurred), you can read files from media with varying degrees of corruption.
The process of reading damaged media is informative - the program displays readable files, the presence / absence of them bad sectors and the result of copying each of the files as a percentage. It also shows the total number of files on the disk, the number of bad sectors detected, the percentage of completion of the operation, and the approximate time to complete the process. During the recovery process, it is possible to skip files that are unimportant for you, if the program obviously stalls when you try to read them repeatedly.

At the end of copying, the program will offer to see a report on the operation performed, open the folder with the copied files in Windows Explorer or start a new task.

Max Data Recovery 1.65
Developer:
Distribution Size: 1.34 Mb
Spread: shareware
Max Data recovery (formerly known as CopyRator) - simple program to recover data from damaged and unstable hard drives, CD / DVDs, floppy disks, etc. It allows you to recover all types of files (documents, films, clips, music, pictures, etc.), and recovered text files, images and media files can be viewed directly from the program. The program is extremely easy to use and quite effective.
The demo version of the program (there is a Russian-language localization) with a locked save is not limited in testing time. The cost of the commercial version for Russian-speaking users is 250 rubles.
To start the process of copying data from damaged media, first select the drive and objects for recovery, and then the folder for saving data and the recovery method. You can choose one of two recovery methods: Fast or High-quality, the developers are modestly silent about the differences between them - we believe that the methods differ in the number of attempts to read files with bad sectors.

After that, Max Data Recovery automatically starts file recovery and during this process provides detailed statistics for each of the processed files, displaying the level of damage, the degree of recovery and the final status (whether the file is considered restored and by how many percent or not restored). In addition, the program shows the total percentage of the operation.

Recovered text files (TXT, RTF, INF, LOG, etc.), images (JPG, BMP, GIF, PNG, ICO, etc.) and media files (MP3, AVI, MPEG, WAV, etc.) can be viewed. through the built-in viewer. To do this, select the file, press the "Enter" key and open the bookmark corresponding to the type of the restored file ("Text", "Image" or "Media file").

Conclusion
Alas, the Almighty has not yet invented optical discs that are scratch-resistant and have an unlimited life. Therefore, you should handle them as carefully as possible, and always have in reserve a couple of backup copies of the most expensive “lasers” for you. Well, if the troubles still did not pass you by - that is, the files in Windows do not want to be read anymore (but are still visible), then it's time to arm ourselves with one of the above utilities, the functionality and usability of which we tried to evaluate (see table. )
Which of the utilities will provide the best result in this particular case is a complicated question, and we did not even compare them in this regard, because as many situations as possible there will be so many opinions. It all depends on a lot of parameters - the files that hit the bad sectors, and the degree of damage, as well as how important these files are and what level of data recovery you need. One thing is for sure - such utilities will be able to read all files that did not fall into bad sectors without problems. And this is already very good! In relation to other files, everything is more complicated - most often they will also be restored to one degree or another, but the value of these files will be in question, and it all depends on the initial degree of data corruption and the type of information.
Table. Functionality of programs for recovering data from damaged CD / DVDs
| Packages / Features | Cdcheck | Badcopy pro | IsoBuster | Cdroller | Anyreader | Max data recovery |
| Support for Blu-ray and HD DVDs | - | - | + | + | + | - |
| Copying the entire disk or selected folders with full preservation of their structure. | + | - (selected files only) |
+ | + | + | + |
| Ability to control the reading level of bad sectors | + (directly, through the number of attempts to read bad sectors and the level of statistical correctness) |
+ (indirectly - through the depth and speed of scanning) |
+ (but in manual mode and separately for each sector) |
+ (directly through the number of attempts to read bad sectors and the scanning depth) |
+ (directly, through the number of attempts to read bad sectors) |
+ (indirectly through the recovery method) |
| View recovered files from the utility | - | + | - | - | - | + |
| Additional functionality | Detailed disk testing and detection of corrupted files | Recover Deleted and Lost Data | Opening images and extracting data from them; data recovery from DVD + RW discs after Quick Erase or Quick Format operations | Disk testing; excluding scenes with defective fragments from VOB files | Copying files over unstable LANs and Wireless LANs; repairing valuable files based on two or more available bad copies | - |
Igor Zubal,
Description of various ways to recover information from damaged CDs.
Somehow, even more than ten years ago, I saw an article in one popular magazine, which talked about the merits of the latest media at that time - laser CDs. The article seemed interesting. There was even a photograph with a recessed, I recall, in the aquarium CD-ROM. Its appearance was to illustrate the exceptional reliability of this type of media. At that time, compacts were a great exotic, especially for a computer and I certainly could not evaluate the veracity of that article. And after some time, maybe even in the same magazine, I came across another article that described a kind of miracle machine designed to clean and polish leaky CDs, audio CDs were meant ...
Appearing first in the world of music, CDs quickly gained popularity, becoming the main type external media information for the PC. None of the other types external memory has not yet received such a distribution as a regular CD. CD is good for everyone, but there are problems only with its surface. They deteriorate quite simply. No matter how it is shore, and accidents can not be avoided. Even when the disks are simply constantly shifted on the table, their surface will gradually deteriorate, become covered with small scratches, fade, and then reading problems begin. I'm not saying that if a CD falls unsuccessfully on the wrong side, a heavy object with a rough surface rests on it. Even worse, if the CD gets inside the worn drive, the head of which clings to the surface of the disk. Even seemingly carefully maintained drives can suffer. It is enough to get a few grains of sand into a pack of CDs, add vibration when wearing or driving a car, and after a while from friction of small grains of sand the surface becomes hopelessly damaged.
The problem of scratched CD-ROMs, probably, was not faced only by one who does not have them. If important information was recorded on the disk, then its loss inadvertently translates into serious problems. Considering that today almost all transferred information is written to CD-carriers, the problem of its loss is encountered all the time. The user finds out where the scratches on the surface come from, and he finds himself in a situation where certain sections of the CD are no longer readable or malfunctioning - like once in a while. The question is becoming relevant - what to do?
To get started, you should figure out how the data is located on the CD-ROM and how it can be affected. Physically, all information is recorded in the active layer of the disk, which, together with the reflective layer, is closer to the upper side of the CD (relative to the drive). A protective coating is applied on top of the reflective layer, usually varnish or paint, which protects the active layer and information from damage. Decorative paint coating enhancing appearance disk, it is also an additional protective layer that protects the data surface from damage. Although come across CD-R discs in which the upper protective coating is minimized - both of their sides shine brightly with a reflective layer. For such disks, the active layer containing information is particularly susceptible to damage. A fairly shallow scratch and a thin layer of varnish, and with it the active layer will be damaged. In such areas, if you look at the clearance, the disk is seen through through. If the surface cannot be read in such a place, then, as a rule, the data is lost forever, it is no longer possible to restore it. Thus, all information is recorded in a very thin active layer, it covers only the protective layer of paint, well, and the rest of the media is simply transparent material from which, in fact, consists of the body of the disk - polycarbonate.
Another method of damage to CD media, the most common one is damage to the transparent surface of the body of the disk - polycarbonate - i.e. scratches appear on it. When reading, this surface is illuminated by a beam. Moreover, it is illuminated twice: once, when the beam comes from the laser, the second time is the beam already reflected from the reflecting layer, directed to the photodetector. In this case, it is not the information itself that suffers in the form of pits and lands in the active layer of the medium, but the transparent surface of the disk that loses its optical permeability, which makes it impossible to access information.
In many cases, information behind a scratched polycarbonate layer can still be accessed. Since they managed to make the surface of the polycarbonate disk transparent at the factory, why not try again, mechanically, to restore its quality at home? In addition, there are purely software methods for correcting reading errors, and often information from problem areas can be completely restored, without even resorting to any correction of the surface of the disk itself. Well, the most trivial way is to try another drive - a better or newer model, with a more powerful laser. You should not expect good results from cheap or worn out, especially high-speed CD drives.
If previously a damaged disk required more mechanical recovery, since it was supposed to continue to transfer information to it, now, with the spread of CD-R / RW writers, it makes sense to talk only about removing information from a defective disk - then it can be written again to another carrier.
The way to recover information from CDs, in my opinion, makes sense to divide into three stages:
1. The software path. Often, information can be read from a slightly damaged medium using software alone, without resorting to any material costs. These include utilities that artificially slow down the speed of the drive, thereby increasing the reliability of reading. Although high-quality CD-ROMs are capable of slowing down themselves upon unsuccessful attempts to read, however, practice shows that the initially reduced speed of the program gives a much better result and unreadable sectors remain much less. But not all CD-ROM drives support forced speed limits , this refers to the cheapest and therefore the most problematic devices. Another class of utilities is those that implement a software algorithm for reading and correcting data from the surface of a CD. or it can make the drive read the damaged area dozens of times in a row, extracting information bit by bit from it and adding its disparate parts. If you can’t even read all the bits completely, then the program will try to glue the file, replacing the missing parts with zeros. For some file types, this method It’s quite acceptable, but such an implementation of data recovery usually takes a lot of time.
2. Hardware. Not all optical drive drives read disks equally well. Different drives differ in both the quality of the mechanical and optical parts, and, apparently, the laser power. Therefore, old CD-ROMs read CD-R / CD-RW disks extremely poorly, the reflective ability of the active layer of which is much less than that of disks pressed through a matrix. In addition, drive manufacturers implement special correction systems and algorithms in these devices In simplified form, it looks something like this: If the drive cannot read a certain section, then it tries to repeat the reading at a lower speed. If it fails again, then the next time it tries, the speed will be reduced even lower, and etc. Until a section is read or accepted as unreadable, however, not all drives can adjust their speeds, moreover, the set of available speeds for each model is limited by a certain number.The lower speeds are available in this set, the greater the probability of reading damaged sections In the cheapest models, error correction mechanisms are implemented very poorly, and the ability to control revolutions often does not allow switching to the minimum reading speeds.
Therefore, an attempt to hardware-solve the problem with a damaged disk simply boils down to a banal replacement of the drive with a better one. With a moderate degree of surface damage, a good drive can handle what is not available to a worn or cheap device.
3. The mechanical method. Most often, reading problems result from scratches on the transparent underside of the CD. Due to the absorption of the laser beam by these opaque grooves from scratches, access to the data of the active layer becomes impossible. Although the scratches themselves have a scanty depth, usually of the order of several microns, the maximum is hundredths of a millimeter, and, as a rule, are relatively small. The body of the transparent disk material, on the contrary, is almost a millimeter. Therefore often to recover readability optical media, it is enough to mechanically process only a very thin surface layer damaged diskthat is, polish it. The polished surface regains transparency and the laser beam can read information from the deeper active layer without hindrance. Although in practice the problem of polishing CDs is a rather difficult task. There is always the possibility of even greater surface damage already during the polishing process. We will touch upon this problem at the very end of the article.
The process has begun ...
What tools should start recovering information on a CD? Clearly with software. Firstly, with the help of software you do not risk anything, you can not spoil anything even worse. The programs presented below will not require additional financial costs, only time, sometimes very long. Using the same software, you can also determine the degree of damage to the CD, at least for how it sees a particular CD-drive. If with the help of software data recovery it was not possible to achieve the desired result, then it makes sense to repeat everything all over again, but only on another drive, of better quality. If the result is not achieved again, the last chance remains - machining. Polishing is a very responsible process, it requires special tools, skills and patience. But most importantly, when you try to restore the surface of the disk by polishing, it can easily be spoiled even more so that nothing will help. We will consider all these stages separately.
CD software
Speed \u200b\u200bLimiters. For starters, try speed limiters. This simple tool, however, sometimes proves to be very effective, even works with drives that themselves can slow down. Forced speed reduction is always preferable, even in cases where the drive itself can slow down as a result of the operation of its error correction system. Especially code read unbalanced, vibrating at high speed discs. The transition of the disk to a lower speed is also accompanied by vibration, possibly even greater than at a constant speed, the moment of inertia of the mass of the disk affects. Therefore, if the disk rotates initially at a low speed, then this will always give a much more reliable result than systematic reductions, and then speed increases as a result of the operation of the drive error correction system. The result is clearly visible on the graphs (Fig. 1), here the same disk was read at 40X and 20X speeds of the TEAC CD-540 drive. As you can see, the reading schedule at high speed is accompanied by sharp failures close to the loss of information. The graph in the 20X mode is quite normal, moreover, it cannot be said that its total speed is lower than in the 40X mode.
As utilities, you can try speed-reducing CD-drives, as well as. All of them are free and free. The most successful option among them, in my opinion, is CDSlow. After installation, CDSlow puts its icon in the system tray, where, when you right-click, a flexible system of program settings opens. The interface in Russian. First, it makes sense to check the drive for the ability to control its speeds: "Determination of speed / Full search". Not all CD-ROMs can change their speed, and the set of settings for different drives is different. Using the left button, you can change the speed from the list of available ones on the go, ASUS drives are particularly advantageous here, in which the speeds can be changed from 4X to the maximum, in one (Fig. 2). CDSlow is constantly being improved and today the program is available from version v.1.0 to v.2.1.
|
|

Nero Drive Speed, a product of a well-known developer. Its versions are constantly updated, it knows a lot of drives. When the program starts, we get the icon in the tray, with a double click on which the program window appears, from where the speed is selected (Fig. 3). The program can be installed to download when windows startup. And when you press the "Options" button, we get to the settings window, where you can select the interface language, including Russian, as well as detect the speeds available to the drive. VMenedger CD-ROM, like CDSlow, was developed in Russia.
I want to add that using these utilities is worthwhile not only to solve problems with reading, but also always when using CD-ROM’a. All of them can work from startup. By setting the CD-ROM to medium speed, you will not only extend the life of the drive and increase the reliability of reading, but also get rid of excess noise, the drive will become almost inaudible. In addition, at reduced speeds there is no risk that the disk will rip inside the drive, which is what modern high-speed CD-ROMs are famous for. Yes, and in the speed of real work, the loss can be insignificant, or even its gain can be observed if the disk is poorly read at high speed, or the data is read in fragments.
Surface check. However, if the disk is clearly damaged, then for a start it would be worthwhile to find out the degree of damage. This can be done using utilities that scan the surface of the CD for errors. The scanner test is not an absolute indicator, it is strongly tied to the hardware of a particular drive. One scanner program can find more bad sectors, the other less. At the same time, it is possible that a data recovery program can easily read all of them. And on a more reliable drive, the situation may change, up to a complete and trouble-free reading of the entire surface.
Quantification of damage with using Drive Analyser is very conditional. One block marked in red contains 1000 sectors. This may mean that in this block both one sector and the whole thousand are damaged.
Another utility that can build similar graphics for reading a CD is. The test schedule is constructed in a similar way, but the number of revolutions of the drive spindle during reading is also displayed on the grid (Fig. 6).
After checking the surface, you can judge the degree of damage to the disk. CD is important to scan on different speeds, and also, it would be nice on other drives. If during all tests the damaged areas on the graphs always remain in the same places and their number does not change or changes weakly, then this will most likely be evidence of serious surface defects, and not problems with the drive. Not only the absolute number of bad sectors is important, but also their location. It is much easier to recover data from many scattered separately damaged sectors than if all of them are concentrated in one area. The greater the number of bad sectors that a drive cannot read, the more time it will take to attempt to recover information and the less likely it will be to successfully complete the outcome.
Copy data from a CD. When copying information from a CD by conventional means, in damaged areas, copy attempts are repeated several times, if all of them are unsuccessful, then copying stops. However, there are special programs that have much better algorithms for copying and restoring data from corrupted sections of the CD. Such a program tries many times in a row to read the damaged area, all the time collecting and analyzing the extracted data, trying to recover information from the scattered parts. If even all the information cannot be read and restored correctly, then in this case the copying process does not stop, and in the end the program tries to “glue” the file so that it is suitable for use, even if some data is lost. Very often, such utilities without errors restore those areas that the above scanner utilities see only as damaged. In another case, even if the lost data exists, their number can be reduced many times, and then the file can be assembled without losing its attributes. In the case of music and video files, this method works very well. Small areas of lost information remain almost invisible here.
Utilities for copying data from a CD. The program proved to be very good in terms of recovering information from corrupted CDs, current version v.3.0.1.43. To begin with, the program is free for non-commercial use, and also supports a multilingual interface, where Russian is also present. But the main advantage of CDChck is the high probability of data recovery and the ability to collect workable files even when it is impossible to recover some of the information, which is mainly characteristic of audio and video files.
The CDCheck interface is completely visual (Fig. 8). To start recovering a file or group of files and directories, select them in the directory tree area.
In my opinion, it makes no sense to set the number of recovery attempts to more than three. After the start of recovery, the list of unreadable and bad sectors, if any, is indicated in the lower area. Here you need to make a reservation. If, say, a CD verification utility, for example, the CD-ROM Drive Analyzer finds unreadable sectors on a disk, this does not mean that these sectors will be unreadable for CDCheck. CDCheck has a much better reading algorithm, so it can copy data that seems to be lost to other programs without loss.
Before starting a recovery session, you must set the speed of the CD drive to the lowest possible value, unless, of course, its design generally provides for the possibility of adjustment. This can be done using one of the above utilities. The loss of time from a decrease in speed compared to the analysis and recovery time will not be too significant. But the reliability of information recovery will increase many times. Although many drives with read problems are capable of lowering speeds to their minimum value, experience has shown that the initial software speed limit gives a notoriously better result. CDCheck of course interacts very closely with the drive. The sector that is not read right away first tries to read the hardware-software part of the error correction of the drive itself, and with each repeated read task. Further, the drive controller already sends a response about the success or failure of the read attempt, after which the data recovery utility again takes control of the drive. Error correction systems of different drives work differently, which means it takes a different time. The TEAC error correction system works especially slowly, which in many cases makes the use of these, no doubt, excellent drives inconvenient. a large number recovery of faulty sections with TEAC "a can take a huge period of time. In addition, some sections have very long stops, possibly even freezes. You can get out of the situation here as follows - by pressing the" Eject "button on the drive itself. Disc tray it will exit, the screen will turn blue, but after loading the disk back and repeat, the program will work further, and the frozen sector will be recognized as unreadable. In the case of CDCheck this method is very reliable. ASUS "s are much faster than TEAC drives, and besides, I read almost as good. Unreadable and sectors with errors CDCheck displays as a list in the lower area of \u200b\u200bits window (Fig. 10)
CDCheck also has the ability to check the surface of the disc. However, it is of little use, since when the first error is reported, the check stops. Another function of CDCheck allows you to compare two sources, say, the original and the restored copy, to determine the differences in them.
Another program with which it is possible to copy from damaged drives -. The program was written to recover information from FDD diskettes, duplicate diskettes, as well as CDs, is also free. The data is divided into sectors of 512 kb. The interface is extremely simple - only three buttons (Fig. 11).
|
|

If the recovery program is launched and it encounters the first error, a window appears asking about options for further actions (Fig. 12). Here it is necessary to set to ignore this and all further unreadable sectors. Now, on the following bad sectors, the utility will first get stuck trying to read them, and if this fails, it will simply skip without questions, replacing it with zeros, and collect the file without them.
|
|

No additional recovery options are provided. The Skopin File Copier session takes quite a while.
Here is another program with a very extravagant name - CillCopy. I don’t know why the author decided to name it that way - perhaps to indicate the possibility of copying killed files from any drives, by the way. The program is free, its support site:.
During installation, CillCopy is implemented in Explorer (Overview). Now, when you right-click on any file or directory in the context menu, there will be the possibility of restoring it using CillCopy. When this option is selected, it immediately appears (Fig. 13) where it is proposed to choose a path for placing the copied and restored objects.
If errors are detected, different options are possible here: skip of the file is not suitable for us; promt - at the first error, it will display an additional window where it asks what to do (Fig. 15).
|
|

Here it makes sense to ask to cure all errors in the future, using the "Heal" button. It is also possible to repeat reading mode (retry), there you can even set some time in milliseconds. It is not clear what time it is. In practice, the program gets stuck on errors for a long time, on some even very, most likely forever. If you select the function to correct errors, copying is very fast, and all unreadable sectors are instantly replaced by zeros, however, the quality of recovery here is inversely proportional to speed. But we must pay tribute, the video files are launched and go to the end, only in the places of the replaced errors do serious artifacts pop up.
Also, to restore data from CDs, you can use the current version v.1,2 (Fig. 16). This utility also supports many language interfaces and is shareware.
Using IsoBuster, you can extract the file from the CD and place it on the hard drive. If bad sectors are found, the program will offer to ignore them. Although it collects a file containing ignored sectors, IsoBuster is far from the most satisfactory way. So I’ve never managed to launch a single MPEG-4 movie after IsoBuster’s recovery. Ohm. The codec has always stated that it is dealing with an unknown format. And this, unlike the three utilities above, which can recover video files without any problems IsoBuster handles music files better, they play after recovery.
So, what can be achieved using the above utilities? In the best case, the recovery program will copy information from the CD without errors, and the files will correspond to the originals. If there are still unreadable sectors, then in this case the state of the file may well suit. For example, an mp3 sound file with up to 85% of the total time remained inaudible on the music player, after restoration CDCheck acquired sound for the entire duration, it was possible to parse all the lyrics of the song, although of course there was little pleasure from such music. But sound files, which have an inaudible 15-20%, for the most part are quite normally restored without a noticeable loss in the quality of music, even if there is a certain number of disparate unreadable sectors. The same can be said of video files. Of course, with large areas of unreadable sectors, short-term artifacts are clearly visible in those places. However, now the film will no longer hang tight when viewed in these places, and it can be copied to other media. In the event of errors during the recovery of program files, there is no guarantee that they will be suitable and fully operational. One can only hope that such files can be restored without errors at all, which is sometimes achievable.
Recovery work usually takes a lot of time. So copying a movie to MPEG-4 from a damaged disc using CDCheck took 1.5 hours. At the same time, 250 unreadable and error-containing sectors were noted. Using the Skopin File Copier, we were able to copy the same disc in only 4.5 hours. We used the ASUS CD-S520 / S CD-ROM drive installed in 4X or 8X speed modes. In the case of TEAC drives, the recovery time is much longer, due to the specifics of the slow operation of the error correction system.
CD recovery mechanical method
You should resort to an attempt to mechanically restore the surface of a CD only when all other methods have already been tried and there is nothing more to lose. Because with the help of mechanical action on the surface of the disk, you can both improve its readability and completely ruin the disk, without any hope of further information recovery in any way.
Due to mechanical damage, longitudinal and transverse scratches should be separated first. So, even a very oily transverse scratch (such that it is directed along the radius, across the tracks) may not have a significant impact on the readability of the disc. And vice versa - even a slight scratch, the direction of which coincides with the circumference of the track, can make a huge portion of the disk surface unreadable. This should be noted when polishing. When machining existing scratches, there is no way to avoid the emergence of many new, albeit very small ones - arising from the action of polishing material. Therefore, you should always direct your movement during processing in a direction perpendicular to the tracks (along the radius of the disk), so that only transverse, least dangerous new scratches appear.
You can polish discs manually or with a polishing wheel mounted on the motor spindle. In the latter case, it can be a grinder, on which a soft felt circle is mounted, a lathe spindle or an electric drill clamped on a table in a clamp or vice with a felt circle clamped in a cartridge. The polishing wheel should be perfectly centered. In the case of a lathe, it is first aligned with a cutter at high speeds. With a grinder or electric drill is more difficult. Here the beating of a circle can be removed by walking along it at speed with an ordinary plane for a tree with a well-honed blade. For the same, you can use a rasp.
As a polishing compound, you can use goy paste, dissolved in kerosene or white spirit. Goi pasta is a green, rather dense substance, usually in the form of a piece resembling a green stone. It is used for polishing, and, as a rule, a circle rotating on the engine is rubbed with a piece of it. However, for finer polishing, as in our case, it is better to apply the dissolved goya paste directly onto the surface of the CD. Since it dissolves poorly, you can not completely dissolve a piece of goy paste, but fill it with a solvent, then rub it with a cotton swab and apply the substance with this swab to the surface of the disk. The paste should be applied periodically, preventing it from drying out during polishing, making sure that insoluble pieces capable of making a scratch do not fall into its composition. Polishing is perpendicular to the tracks of the CD.
Another toothpaste can be regular toothpaste, also half diluted with water. You should not save here by buying the cheapest pasta. It is important that the paste does not have large abrasive particles that can cause significant scratches. Although this will not be completely avoided. Therefore, you should use toothpaste with extreme care, orienting the CD to the polishing wheel so that the direction of the moving part is perpendicular to the tracks of the CD. Dried paste on the edge of the polishing wheel should be periodically removed with a rasp. Since the formation of small scratches during polishing with toothpaste is, in principle, inevitable, polishing with this composition for too long can have the opposite effect. So when polishing for some time, you can restore some part of the disk, and if you continue polishing it, it can already ruin it. Because gradually more and more scratches will appear there, in the end, covering the surface with an impenetrable mesh. During the polishing process, you should often check the surface of the disk with a scanner program to see in which direction the process is going.
Before you start polishing a valuable disc with the wheel, practice on some kind of unnecessary CD. This is very important, since you need to accurately calibrate the pressure. The slightest excess - and the material of the disk heats up, begins to melt, a wide, deep furrow appears on the surface, which can no longer be eliminated. The pressure should be very weak, lasting only a few seconds, otherwise the compact material will heat up and deteriorate. When the necessary practical skills are obtained, you can begin to polish responsibly desired drive. Despite all the automation, this process takes a lot of time, sometimes more than one hour, despite the fact that the result is far from always being positive.
You can manually polish it with the same polishing compounds, however, all the movements here will already have to be done with your fingers using a piece of felt or a soft cloth, rubbing the damaged surface of the CD. The polishing composition is applied to the surface of the disc in dissolved form. The disk itself rests on a soft cloth on a flat surface, otherwise its reverse painted side, and underneath the surface of the active layer may be damaged by pressing. All movements during the polishing process must be perpendicular to the concentric tracks, that is, along the radius.
In these ways, you can polish individual not too deep scratches. Often it takes a lot of time and causes a lot of inconvenience. If the disk is completely disfigured, say, sand got into the case with the disks, and you rode a mountain bike with them over rough terrain, then such disks are unlikely to be restored. Although you can try ...
Sometimes you can hear the misconception that if the surface of a scratched CD-ROM is covered with a special solution, it is also called glycerin or refined vegetable oil, then the disc will be better read. This is nothing more than an illusion. Yes, a scratched surface coated with a clear solution will indeed appear smooth and shiny. However, the scratches themselves from this will not go anywhere. Moreover, you can lubricate the drive head with glycerin or oil - then this will really be a problem. Another tool designed to improve the readability of the drives are all kinds of cleaning compounds. It looks like a disc with a brush or tampon installed on it. Usually special cleaning fluids are included. I can’t say how effective this is in terms of cleaning, but the fact that such a tool can easily ruin the drive has already been proven many times in practice. If the drive already requires cleaning, then this is done by completely disassembling it by a specialist, with cleaning not only the optical head, but also the mechanics. Often this gives the most positive results.
Free program to recover information from unreadable CDs and DVDs.
Please tell me where you store needed files? “On the computer, of course! Where else? ”You say. And the films you watched, music, programs, games, old documents, in the end? Do you really have a dimensionless hDD? !! “Well, ooh, Duc, it's all on disks :))) ...”. That's it :).
We sometimes trust very valuable information to optical storage media for several reasons: firstly, it’s low cost, secondly, it’s sufficient capacity (for example, a two-layer DVD can hold about 9 gigabytes of information), and thirdly, relative durability "Discs." But this is precisely the last reservation regarding relativity that casts doubt on the whole fairness of our judgments!
The problem is that even with the most careful attitude to the disk, after five to seven years it will still stop reading, because it is after this period that its internal structure begins to collapse :(.
Of course, we can take care of the creation in advance. backup such a disk, however, there are other situations. For example, from frequent use, optical information carriers are covered with numerous small (and sometimes quite impressive) scratches. As a result, a scratched disk starts to be misread by most drives.
If no files can already be opened from your disk, but its structure is still displayed in Explorer, that is, not all, but many files can be saved. And they will help us with this. special utilitiesdesigned to copy damaged disks. I want to introduce you to a program called File salvage.
This is a free application from the authors of the fairly well-known (and also free) Light Alloy media player. Having a size of less than a megabyte, File Salvage allows you to use several algorithms to restore files, and also constantly displays the progress of its work. In terms of the quality of data “rescue”, the program can compete even with such commercial products as the popular BadCopy Pro:
Comparison of File Salvage with the paid counterpart of BadCopy Pro
File Salvage is slightly inferior in speed to a paid analogue, but unlike it, it allows you to use several drives installed on your PC to restore. To do this, just read on one drive, and then insert the disk into the second. In this case, only unread sectors on the previous drive will be read, which ultimately will make it possible to restore more unreadable blocks.
The good news is that File Salvage does not require installation. To start working with the program, you just need to extract it from the archive.
One caveat: all recoverable files will be copied to the folder where the utility executable file is located, therefore, before extracting it from the archive, it is advisable to create a separate directory with a good supply of disk space.
File Salvage Interface
If you have already unpacked the program, you can run it:

At startup, an error will be generated that does not affect the quality of the utility, so just click “Ok” to get rid of the warning window. The window of the program itself has a rather non-standard appearance and is made in the form of a lifebuoy.
Inside this circle are located:
- file selection field (1 pc.),
- copy progress bar (1 pc.)
- and control buttons (3 pcs.: start copying, configure and turn off the program).
Disk data recovery
As you can see, everything is simple;). It’s just as easy with File Salvage to restore files. All that is required is to insert a disk, select the desired file on it (if access to the file system is still available) and click the “Start” button to start copying.

We just have to be patient and wait for the end of saving the selected file about what the progress bar will signal to us:

The speed of reading information from a disk depends on the degree of corruption, so sometimes you have to wait a long time (for example, if you want to restore a movie).
Advanced Recovery Mode
The method described above will suit everyone, in principle, however, if you want everything to be under control, then you can enable the Advanced mode:

Here we see a window already familiar to a simple user with several advanced settings. At the top is the file selection field, which works on the same principle as in normal mode. But under it are all possible installations.
In the "Direction" section, you can set the direction of reading information from the disk (direct or reverse). “Block Size” allows you to adjust the size of the blocks for reading (the smaller - the more accurate, but longer).
By default, File Salvage starts automatically reading information per megabyte, however, if the file has not been fully copied, it switches to 512 KB blocks and scans the file again, each time reducing and decreasing the block size until the entire file is copied.
Naturally, each repeated scan lengthens the save procedure, so if the disk is badly damaged, sometimes it makes sense to set a smaller block size for scanning in advance.
I also advise you to pay attention to the item "Skip small regions". Activation of this item leads to the fact that all unreadable blocks of less than 512 bytes in size will be skipped. When playing a film, the absence of such a fragment will be almost imperceptible, but it will take much less time to “save” it in this mode!
The moment of truth has come))) Press the “Start” button and wait again:

Unlike the simplified mode, here we can observe all the actions of File Salvage. In addition to the progress bar, we can observe in graphical mode the number of recognized blocks (displayed in green), and also see in the form of a list on the right which specific bytes have already been copied.
At the end of the save, in addition to the desired file, you will find in the same directory another file with the extension. BAD:

Opening it in Notepad, you can find a report on the "bad" sectors of the copied file. Recognized bytes are marked with “+”, and “-”, respectively, are omitted during copying. Putting all the “cons” together, we can get the total amount of losses. After that, the BAD file can simply be deleted.
conclusions
File Salvage provides not the fastest, but rather effective algorithm for reading damaged disks.
This program can be safely used to restore any data, however, if you want to "bring back" your favorite song or any other audio file, it is possible that in the resulting file during playback there will sometimes be pauses and all kinds of breaks.
This is due to the fact that File Salvage replaces the missing fragment with zero bytes to preserve the integrity of the saved file. But the program manifests itself as the most ideal tool when copying films, since skipping small fragments practically does not affect the quality of playback in general.
P.S. It is allowed to freely copy and cite this article provided that an open, active link to the source is provided and Ruslan Tertyshny’s authorship is preserved.
Despite the relevance and popularity of memory cards, optical discs are still very common. Here you can save large amounts of information, besides on Dvd player You can watch any movie recorded on the disc. Saying this about flash drives does not work, because not every device can boast a USB port. If you often burn documents, files, DVDs or CDs, you are well aware that their main disadvantage is damage. Scratching a CD is very easy, even a simple touch can damage important information, the recovery of which will have to suffer.
However, the output can be very simple if you download special program to recover data from disks, for example, Roadkil's Unstoppable Copier. This is a wonderful application that saved a lot of users. Using it, you can quickly and easily copy any information from a disk to a computer, regardless of its size, format and type. Roadkil "s was specifically designed to facilitate and simplify the process of data recovery, so even inexperienced users will be able to adapt to all the features of the utility.
Free CD and DVD recovery software
The principle of file recovery is very simple. First of all, the program reads all the information on the disk, simultaneously copying the available files. If some part of the document cannot be processed, then it is skipped, and later the program directs all its efforts to copying this particular section. As a rule, the restoration of documents allows you to fully save the document, but it happens that you can’t get access to the damaged sectors. In this case, the utility skips this section completely, further gluing the normal sectors on the disk.
If you copy a movie or music in this way, then you will not be able to see or hear anything in place of the missing parts. In any case, it is much better than if the movie was not copied to the hard drive at all, because losing a few seconds is preferable to not watching the whole movie. If image recovery occurs, it’s still easier, the photos will only lose a little in quality, while there will be no noticeable changes.

Roadkil's Unstoppable Copier recovery program boasts many positive features, in addition to its main function. For example, it is very easy to use, especially taking into account the Russian language support. To get started, you need to specify the file on the optical disk, after which you can only wait The speed of work is very high, in this regard, the program has almost no equal. Try it, the utility will leave the best impressions.
In this article, I briefly described the steps that can help recover data in the most common cases of CD loss and DVD discs.
So, suppose - you recorded photos from a summer vacation in the Maldives on a DVD disc, put it on a shelf, and after half a year / year decided to refresh this wonderful event by reviewing the pictures with friends. Insert the disk into the DVD-ROM, the lamp blinks, the disk picks up and slows down, but you can’t open its contents in the explorer. Or the contents are visible, but the necessary files cannot be copied.
What could lead to such a situation, and what options are possible?
Option zero, the carrier has nothing to do with
It could be the drive itself, the operating system, or the viruses. DVD drives differ among themselves in the quality of optics and the capabilities of corrective algorithms. In addition, dust and dirt could settle on the lens, which would prevent the disc from being read. Different drives may differ in the range of supported rotational speeds, and the lower the rotational speed the drive can create when trying to read TOC discs (the table of contents of the disc recorded in the Lead-in area), the root directory and the data area, the higher the probability of successful correction of media read errors .
Therefore, the first thing to try to do with an unreadable or poorly readable CD or DVD disc is to try to read it on another available computer or laptop. For the purity of the experiment, it is better not on one. There is a non-zero probability that a disk that refused to read on your computer is recognized and read on another.
You can also try special utilities that take on the function of determining the speed of the disc in the drive. It happens that the regular firmware does not quite cope with this and manual speed control can improve unstable or poor reading drive. Moreover, the slowest rotation speed will not always be the best for reading - here you need to experiment with the values. In each case, the approach to choosing the optimal reading speed may vary. The most common and easy-to-use utility for this purpose is CDSlow.
CDSlow window
Option one, it’s the most common, surface contamination
It is easy to deal with dirt, dust and fingerprints on the surface of the disc. Using a special damp cloth for cleaning office equipment, we carefully remove dirt, taking care not to scratch the coating. Then we wipe the disk thoroughly with a dry cloth and you can insert it into the drive and try to read.
It should be wiped from the center to the edge, in no case in a circular motion. If suddenly a grain of sand gets under the napkin and scratches the disc, a radial scratch will do much less harm than a concentric one.
Do not use acetone, a solvent for nail polish, kerosene, gasoline or other solvents based on petroleum products. If you want to use some kind of solvent to remove dirt from the disc, it is better to use alcohol-based solvents.
Option Two, Scratches
This also includes various forms of thermal damage.
Two ways to classify scratches come to mind:
- By the integrity of the reflective layer:
- The scratch did not affect the reflective coating, only the polycarbonate substrate was damaged.
- The reflective coating is damaged.
- By width and location:
- Narrow scratches. Due to the redundancy of the stored information, and the use of various corrective algorithms by the drive, they are not very dangerous.
- Wide scratches. Besides more corrupted data, additional problems are added, for example, the drive in this place may “lose” the track and continue to read the adjacent one. Successful reading in such cases is largely dependent on drive excellence.
- Concentric scratches are the worst kind of damage. Not only that, the correcting algorithms no longer help, because the whole sector is damaged, along with redundant information, so they still confuse the positioning system.
Particularly severe damage is clearly visible on the lumen of the CD, as in this picture:

Scratches on the polycarbonate coating prevent the laser beam of the drive from reading data from the work surface due to distortion in focusing. As a result, the laser beam either falls into the wrong direction or does not return to the read element of the head after reflection.
Such damage can be repaired by polishing.
There are different polishing methods. Starting from filling scratches with special pastes, with a refractive index close to that of polycarbonate, and ending with the removal or smoothing by heating of the damaged upper layer. The methods used in polishing lenses and other optics are quite applicable.
You can polish manually, or use home-made polishing devices made on the basis of an electric shaver with a linear drive, or use specialized tools that are available on e-bay in a variety.
The successful implementation of the above actions, in addition to the availability of special tools and materials, requires considerable experience. Therefore, if information on a problematic medium is important to you, I advise you to entrust this work to data recovery specialists. Or use the tips below, limiting yourself to wiping the disc.
On the Internet you can find descriptions of various "shamanistic" methods, such as boiling a blank, freezing it, heating it over a gas burner or incandescent lamp. All methods are designed to melt the polycarbonate so that the scratches are smoothed out or fixed. Since these techniques have a great risk of having a destructive irreversible effect on the carrier, I do not recommend them.
So, if after dealing with scratches in the ways available to you, the data is still not readable, go to
Option Three, a crack on the disk
Cracks are of two types - going from the center of the disk to the edge, and vice versa, from the edges to the center. Cracks from the center are formed from microdamages that occur on the inner radius of the disk during inaccurate handling or due to defects in the discs, and then transform into cracks at high rotation speeds. Cracks from the edges usually occur due to careless handling, but are exacerbated, especially on poorly balanced discs.
To restore data from a damaged media in this way, it is first necessary to take measures to prevent crack growth, which can lead to irreversible data loss and even to rupture of the disk in the drive. At a minimum, you should reduce the disk rotation speed to a minimum.
Methods for countering crack growth are similar to those used in auto glass repair. First you need to drill a crack. It is best for this purpose to use a thin needle heated on fire. Using a magnifying glass, make out the end of the crack and a fraction of millimeters further make a puncture in the plastic. It is best to do this not on one side, piercing the disc through, but on both sides, introducing the needle into the plastic about half the thickness of the disc.
After that, it is advisable to glue the crack along the maximum length. To do this, you can slightly spread the edges of the crack, gently smear with a thin layer of superglue, in a minimum amount, so that there is no excess on the surface. After which the edges are flattened and pressed against each other. Ensure that the surface of the seam is flat, without protrusions that could damage the drive optics.
Further actions are similar to working with scratched discs - if not readable,
Fourth option, damage to the substrate due to poor quality media selected for storing information or non-compliance with the storage conditions of a DVD or CD
According to GOST R 7.0.2-2006 for the preservation of documents on compact disks, each disk must be stored in a separate box at a temperature of 10-20 degrees Celsius, humidity 20-65% and in ambient light without ultraviolet radiation. If you believe this regulatory document, then, adhering to the above rules, CDs will live happily ever after. However, the choice of media as the future carrier of your important data is no less important. A lot of reviews have been written on this topic. I just want to note the most important points.
High-quality wheels from the ends must be varnished, in contrast to their low-quality counterparts. If the end face of the compact disc is not varnished, moisture will get in between the polycarbonate coating and the substrate, which will lead to the oxidation of the layer containing the information, and the data in such damaged places will be irretrievably lost.

The same effect may occur if the protective coating of a CD or DVD disc has been seriously damaged. The atmospheric moisture that gets on the substrate will just as well corrode everything around the damage site.


Methods and approaches to data recovery in case of such damage also do not differ in originality, the same
Fifth option, write failure or unsuccessful attempt to write to RW disk
In this case, the problems with reading user data are logical. It is difficult to give general recommendations, because failures caused by errors in the software or user actions lead to a wide variety of consequences. The most universal method is to trick the drive microprocessor.
If the error is due to attempts to re-record the session on multisession media or to an error in recording the current session, then you can try to access previous sessions using a program that can list previous sessions and extract the contents of the selected disk session and burn it to an ISO image. This feature is in the "popular" Nero Burning Rom and in many other DVD recording managers, for example, in Roxio Easy CD DVD Creator.

Option Six, rewritable disc erased or rewritten
If the so-called quick erasure, an analogue of quick formatting on the hard disk, was performed, when only the TOC - file system of the disk is deleted, then the data can be restored. Need with
If a quick erase was applied to the disc, and then the part on top was recorded new information, then you can restore only that which has not been overwritten. We remove the full dump of all available maximum capacity, then we cut off the excess and carry out recovery from the specified file headers in the remaining part.
If a complete erase was applied to the disk, then data recovery is not possible. In this case, a high-power laser pulse passed over the entire surface of the disk and heated the amorphous substance (recording material) to a temperature lower than the melting point, but higher than the crystallization temperature. The change of amorphous and crystalline regions, which the drive recognized as logical 0 and 1, disappeared. After complete erasure, the entire layer crystallizes and is ready for re-recording.
The last option, nothing is written to the disc at all
Oddly enough, data recovery specialists are faced with a similar situation quite regularly. For example, many users, especially inexperienced, do not use specialized software, but operating system tools (read Windows) to write information to DVDs or CDs. Select the necessary files and folders with the mouse, right-click on the send item to the drive, see the window on which the files “fly” to the destination and calm down. In fact, after such an operation, the files are not copied to the disk, but to a special temporary folder, and after this operation you need to call an additional Windows wizard, which will carry out the last step in the process of which, in fact, will be recorded to the media.
Here, perhaps, are all the most common data loss options on CDs and DVDs that users encounter. In conclusion, I want to advise once again the following - if lost information is of high value, leave the experiments until better times, entrust data recovery to professionals.
The application is zero. Copy and reconstruction methods
The following options are possible:
- Damage allows the drive to read the TOC and directory tree (the contents of the disk are visible), but the necessary folders and files cannot be read. To copy them, you can use programs that allow you to read the disk sector-by-sector, ignoring or intelligently processing read errors uncorrected by the drive. The most useful of and programs are described in the respective applications.
- The drive is detected by the drive, but attempting to view the contents using the OS means it freezes or displays an error message. I don’t know free programs that can effectively recover data in such situations, so refer to the use
- Drive disc is not recognized. The drive tries to read the disc at different speeds, the activity indicator flashes, after a series failed attempts read the table of contents at different speeds, the spindle stops. A preliminary sector-by-sector copy is required on a drive specially prepared for this. Then we analyze the resulting image
Application one. Hot swap
If the damage is such that the TOC cannot be read and the drive cannot be recognized by the drive, you must resort to the hot-swap procedure, the so-called hot-swap method. The thing is that the drive really needs only three main fields of TOC-a: the address of the output area of \u200b\u200bthe disk (analog of MAX LBA on the HDD), the start address of the first track (0 LBA) and the address of the next session of the disk (if a multisession disk was recorded). The starting address for all drives is the same - 00:02:00 (which corresponds to a zero LBA address). Lead-Out depends on the size of the disc (typical CD approximately 700 Mb, typical DVD 4.4 Gb).
The trick is what is taken blank disk of a similar type and size, a CD or DVD and one file is written on it for the entire logical volume - either a movie, or an image file (unpacked), or some kind of archive. Then it is specially prepared, the case is disassembled or the eject signal, drive is blocked.
For a hot swap CD operation, the drive must use the same type of donor disk as unreadable. Those. if you want to recover information from a DVD-RW disc, then to prepare the donor disc, whose TOC will be recorded in the RAM of the drive, you need to take a similar DVD-RW disc. If the disc is DVD + R, then the disc should not be “minus one” or RW, but rather “plus”. The same applies to mini-disks, for "hot-swap" here it is better not to use a full-sized disk.
The front panel is removed from the drive selected for the “hot-swap” operation, the screws holding the top cover are loosened. In general, all the conditions are prepared for replacing the disc without extending the tray. You must understand that if your drive is under warranty, then after this procedure the warranty conditions will be violated.

Prepared for hot-swap compact drive

Drive Hot Swap
In the picture, the top cover of the drive contains a clamping plastic ring with a magnet, which must fix the CD in the reader. Therefore, replacing the media with the required one, the cover must be returned to its place.
We insert the new disc with the recorded file for the entire volume into the drive, wait until the disc is recognized and the TOC is read and cached, after which we either wait for the disc to stop by timeout, or we spin spin down programmatically and change the new disc to unreadable. Now you can start and subtract the entire available amount of LBA into the dump. Then we parse the contents of the dump using the same programs. With a large number of errors, the process can take quite a while.
Some specialists use drives with modified firmware to recover data from disks having problems with TOC, which allows to bypass TOC initialization and gain direct access to the user area. In addition, its own software, which allows you to change the direction of reading (from the beginning of the disk, from the end, from any LBA) and intelligently handle situations with a reading error (repeat of reading, skipping specified areas, etc.), which can significantly improve the results of recovering information from disks, containing multiple read errors.
Appendix two. Commercial software for data recovery from DVD, CD
How to use ISOBuster
- A popular and feature-rich utility for working with disk images and recovering information on CD / DVD-media. The program allows you to view and extract files, tracks and sessions from CD-i, CD-Text, VCD, SVCD, CD-ROM, CD-ROM XA, DVD and DVCD discs.
ISOBuster supports ISO9660, Joliet, Romeo, forward (Little Endian) and reverse (Big Endian) byte order, all kinds of UDF (UDF 2.01 / UDF 1.02, UDF 1.5), Rock Ridge (Commodore), short and long file names. To recover data from damaged media in the program there is a valuable option - the ability to re-read re-read damaged sectors, which increases the chance to correctly subtract one or another problem sector.
The start window consists of two panels - on the left there is a window for selecting images, sessions, disks and folders, and on the right is an explorer. After starting the program, tracks and sessions that the utility could recognize will appear in the left pane, and files and directories found as a result of a quick preliminary scan will appear in the right pane. If necessary, you can run advanced scanning, the so-called "Search for missing files and folders."

Data recovery can be performed for the entire drive as a whole, or for individual folders and files. To do this, highlight what needs to be read from the damaged medium and use the “Eject” command.
If a bad sector is encountered while copying to the medium, the user will be presented with a window offering to try to read this sector again or skip it. Reread bad sector sometimes it is successful and its contents are read successfully.
When starting and completing content scanning optical drives, the program displays in the drop-down menu all available sessions that were recorded on the disc. In the event of a failure in one of the last sessions, ISO Buster allows you to work with a separately selected session and extract its contents as a RAW data array (as an image for further analysis by headers), or work with the selected session in Explorer mode.
ISO Buster allows you to generate a variety of reports on the directory tree, including taking into account unreadable content (data containing unread sectors).

If you are working with a hot swap drive when the TOC in the drive memory does not match the original, you can specify the range to be copied from the selected LBA to the selected one.

At the stage of reading data into the image file, you can specify the use of intelligent filtering if the data type on the recoverable medium (Video CD, Audio CD) is known in advance. In this case, ISOBuster will filter out sectors that meet the selected criteria.
Further analysis of the image file and data recovery from it is carried out similarly to working with a regular damaged CD-ROM. To do this, you must first open the image file File-\u003e open the image file.
How to use WinHex
- A popular multifunctional program for working with various carriers information. It can work with CDs both at the logical (in the understanding of the OS) and at the physical (in the same sense) level.

WinHEX program window
Winhex can remove a sector-by-sector image from a damaged disk, save the resulting dump to a file, and then parse it into components or use the data recovery function from file signatures. Unlike hard drives, there is no fragmentation on CD and DVD media, which greatly complicates such recovery methods.
Through the menu item Tools-\u003e Open Disk, the user gets to a window with options for choosing a physical or logical drive for work. If the drive does not recognize the presence of a disk in the tray (before the operation), then when you try to access the item on the list of logical drives, an error message “device is not ready”

and when you try to access the physical disk, the program will display an error message "there is no access to the device."

After correctly conducted, access to the LBA disk appears, it becomes available and you can proceed to the operation of sector-by-sector copying: Tools-\u003e Disk Tools-\u003e Clone Disk. Here you can select the options for cloning to a separate medium or to a file of the entire accessible surface or any area, the choice of the initial sector for the source disk and for the receiver disk (if copying is not performed to a file), the choice of a filler pattern for unread sectors and the size of the jump when unread sectors (if you want to speed up copying to disk with numerous uncorrectable read errors).

In our case, we need to choose copy to a file and indicate the path where to save it. We set it to zero as the initial sector, to indicate some other number, it makes sense only if we can assume the number of unreadable sectors at the beginning of the disk. Having put all the necessary marks you can start copying. The program saves the unread sectors report to a separate log file.
From the image obtained after subtraction, it is now necessary to restore the necessary data. To do this, you will have to use the so-called RAW Recovery function or file signature recovery. What does it mean? The vast majority of file types have unique character sequences, the so-called signatures by which you can uniquely determine the type of file. As a rule, it is convenient to take several characters at the beginning of a file as a signature. By setting the desired signature as the selection criterion, you can restore all files of one type or another (extension) from the resulting image.
JPEG file header
In the search process, the following algorithm is used: the software finds the selected file header and saves the entire data array until the next similar header is found, assuming that it is a single file, or the data array specified in the settings is saved from the found header (you can specify "with a margin") .
Of course, in this case the file names and directory structure will not be saved, but it is better to get the data in this form than not to get it at all. The main problem that can occur when recovering information using the RAW recovery method is fragmented data when a part of the file is located in one place and another part (parts) is in another. But in the case of recovering files from an image subtracted from the CD \\ DVD, this does not happen, since the data is written linearly.
Recovery in WinHex program of files by headers is available from the menu Tools-\u003e Disk Tools-\u003e File recovery by type. First, open the resulting image File-\u003e Open, select "restore by file type." The program displays a window with a reminder that the data needs to be saved not in the place from where everything is restored, but in a different place (if you work with the file in a way you can not worry about it) and reminds you that this option will give good results for unfragmented ones data.

The signature recovery settings window suggests choosing the type of files that you plan to extract from the image, the maximum estimated file size, the directory in which to save everything, and the search algorithm: Extensive byte-level search (the slowest and most advanced, I recommend using it), Search at sector boundaries (search from the boundaries of sectors) and Search at cluster boundaries, if possible (search from the boundaries of clusters, if possible).

If rare types of files that were not described in the “Select file type (s)” directory were recorded on the disk, then by clicking on the Signatures button, you will start a system table editor (such as Microsoft Excel), in which you can manually add the desired header.

After all the manipulations done, it remains only to click on the “OK” button and wait for the result. All files meeting the specified conditions will be saved in the selected directory.
Appendix three. Free software to recover data from DVD, CD
- the most functional, from my point of view, from free programs. It is positioned as software that can also work with flash drives and hard drives. During the installation process, it installs its own libraries into the system, which help the program better handle emergency situations with problem media. After installation, a system reboot is required.
The program window is divided into two parts: where to copy from (above) and where to copy (below). To start copying, you need to drag the files with the mouse on top or go to the folder that you want to copy completely and click "Copy". You can configure the copy algorithm by selecting the "Settings" sub-item of the "View" main menu. I won’t dwell on tuning issues, since the program contains fairly detailed reference information.


I would also like to draw attention to the fact that the utility has an EXTRA mode, which should start automatically when errors in reading CDs or DVDs are detected.
Recovery Toolbox for CD Free
Recovery Toolbox for CD Free - A utility from a well-known company Recovery Toolbox, which specializes in creating utilities for recovering data from damaged files of various types, from doc and xls to registry files and exotic databases. The only freeware program mentioned here that does not have a Russian interface. The copy algorithm is not configurable.
When starting the program, it is proposed to select the drive from which the recovery will be performed, as well as the path along which you want to save the read. After reading the TOC utility offers to mark the necessary directories and files, and the saving process begins. If in the process of copying unreadable sectors are encountered, the user is prompted to re-read or skip the sector (file). At the end of the process, you can save a report on the work performed.
DeaddiscDoctor
DeaddiscDoctor - has a minimalistic interface with beautiful pictures. Uses an original copy algorithm, which settings cannot be changed. Choose what to copy, choose where to copy, start the process.
Non-stop copy
Non-stop copy - The interface is similar to DeadDiscDoctor. The downside is that there is no way to select to copy more than one file at a time. There are minimal algorithm settings.
Reprints or quotations are permitted provided that the direct link to restore data from a DVD CD to our website is preserved.


