If you accidentally deleted vital files or formatted a hard drive that contained valuable information, then you have come to the address. In this article we will talk about how to recover deleted files on a computer or flash drive. We admit that the situation is unpleasant, but you should not panic either. Let’s tell you right away, we will restore everything! We will not philosophize much, it’s better to get down to business immediately. Reestablish deleted information using the completely free DMDE program , which you can download from the link.

Picture 1
Oh yes, I completely forgot this program It is portable and can be run on any computer without installation. It can be written to a USB flash drive and carried everywhere with you - thereby making sure that at any time you can recover any deleted files. After unzipping, run “dmde.exe”.

Figure 2

Figure 3
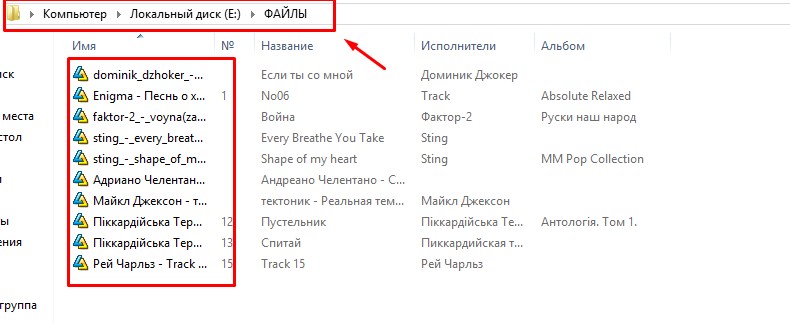
Figure 4
Then permanently delete this folder.

Figure 5
Suppose these files were very important to us, and we want to restore them. What to do? Now back to the program itself. After its launch, it will automatically detect all physical and logical devices on your computer. Then:
- The program clearly needs to indicate that the information was on a logical drive
- Need to choose one logical drive, on which were the files that we are trying to recover. You can check whether we selected the drive by size.
- Click OK

Figure 6
After that, the check of all directories and folders that were located and are on the disk begins. After finishing you will see the following window. Double click on our disk.

Figure 7
Then choose.

Figure 8
After selection, a virtual reconstruction of all disk files begins. Click “OK” and wait for the end of the process.

Figure 9
After reconstruction, in the window we can find the “FILES” folder that has been deleted (it is indicated by a red cross).

Figure 10
It will not be possible to restore the entire folder right away, since we have a free program, but we don’t care, because the information in this folder is very important (instead of music, there may be valuable documents on work or something else). To restore files, go inside the folder and restore everything individually. To do this, put a checkmark in front of the restored object and right click on this object, in the drop-down menu, select Restore Object.

Figure 11
After that, a menu opens in front of you, where you will be asked to choose the place where you want to restore the object. We strongly recommend that you DO NOT restore to the place where this object was before. There is a possibility that this sector could be overwritten or malfunctioning.

Figure 12
After recovery, this file normally played in my player.

Figure 13
The second case of critical complexity
The case that we examined above is the simplest. Let's analyze the situation when you need to restore deleted information from formatted hard drive or flash drive. I will show you how to do this using the example of a flash drive. I will tell you right away that the actions here are carried out in the same way as in the previous case (Starting from FIGURE 6 and ending with FIGURE 9). However, there are still differences. After selecting an item "All found + reconstruction" Search deleted files did not give results.

Figure 14
But we still try to conduct an in-depth search. To do this, go:
- On the "Disk Partition" tab
- Select our drive (USB flash drive)
- Click "Search NTFS"
![]()
Figure 15
After that, we are prompted to select a search area. We do not change anything here, so that the program completely scans the USB flash drive and finds all kinds of information on it.

Figure 16
Then we press the “OK” button and the scanning process starts. Its duration depends on the volume. hard drive or flash drives.

Figure 17
After the scan is completed, we are prompted to save the logo. We agree.

Figure 18
Then click "Everything found + reconstruction", as in FIGURE 8, and get a list of files to be restored. Oh yes, I completely forgot, here we will try to restore the archive with photos that were previously on a formatted USB flash drive.
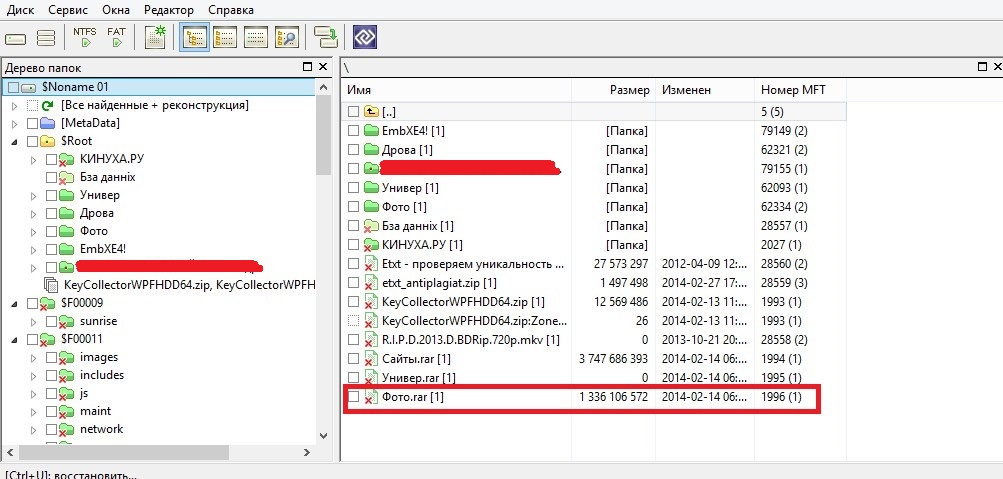
Figure 19
After that, right-click on the archive and click Restore Object

Figure 20
After you have chosen Restore Object in the same way as in the previous case (FIGURE 12), it will be offered to choose a place where to restore this object. Then the recovery process begins.

Figure 21
After all that has been done, it will not be difficult for you to recover deleted information.
Important Note:In fact, the amount of information deleted and the time it was deleted do not play any role. After all, even when formatting the hard drive, the upper level of the address is erased, that is, in a simple habitual way you will not get to this information. But if you overwrite a hard drive or flash drive (and even repeatedly), then recovering files will be much more difficult. However, all this is done in exactly the same way as we examined above. When rewriting multiple times, there is no 100% guarantee. Therefore REMEMBER:
Any computer owner can inadvertently delete important files from the hard drive. In this case, a logical question arises: "How to recover deleted files on the computer yourself?".
As a rule, all deleted documents are placed and stored in the basket until the owner himself empties it. Therefore, you must first search for files there. As you know, you can restore them from the recycle bin in one click, and they will be sent to the same place where they were before the deletion. If the necessary documents are no longer there, then this does not mean that they disappeared forever. In some cases, information can be restored.
How to recover deleted files on a computer after emptying the recycle bin? You should be aware that immediately after deleting a document, only its name disappears in the registry, and the file itself will be stored on the hard disk until it is written in its place new information. Having understood that important documents were in the basket that was just emptied, it is important not to save any information on the computer that might take the place of files deleted by carelessness.
Information recovery from the HDD is carried out using third-party programs, so it is advisable to install such a program in advance, otherwise it may supplant files that need to be found and saved when downloading. In this case, you can transfer hDD to another computer where such a program is already available, but this option is not always available.
There are many programs for recovering files from the HDD, among which there are both free and paid services. The latter are more functional and provide more features.
 How to recover deleted files on your computer for free? To do this, you need to download the Recuva utility from the Internet. This is a convenient application with a simple and intuitive interface that even a beginner can master. Using the utility you can restore photos, videos, text documents.
When the program is downloaded from the network, you need to unzip it, and then install and configure it using the Recuva wizard. After that, you can proceed to the main actions.
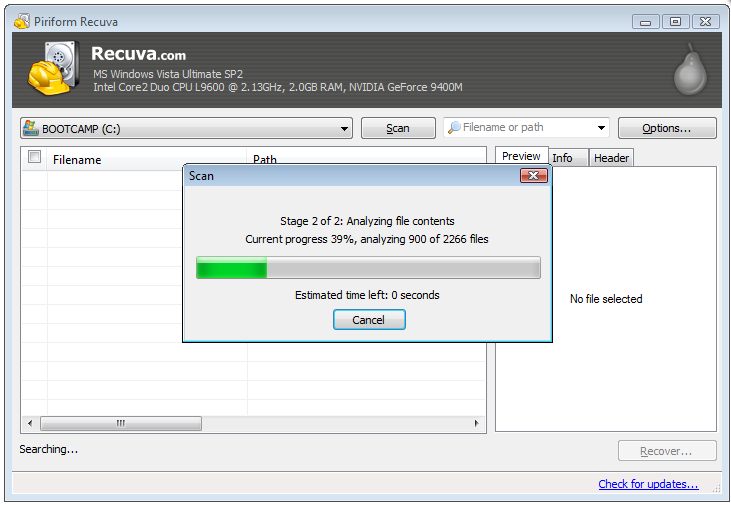
How to recover deleted files on a computer using the free Recuva utility? After the installation wizard finishes its work, you need to click the "Start" button and start searching for the necessary files. After the search process is complete, a list of files appears. On some of them will be the inscription "Viewing is not possible." This means that other information has already been written on top of these documents and they cannot be restored.
 Files that can still be saved should be ticked and click “Restore”. After that, you will need to specify the folder in which you want to save documents, and confirm by clicking “OK”.
You can recover files in Recuva in a different mode. To do this, click on the button "Switch to advanced mode." A window will open in which the found files will be arranged in a table. The contents of the document can be seen in the "View" tab, the parameters - in the "Summary" section. For you need to tick them off and start the process. Information will be saved to the specified folder.
Of course, the program will not be able to save all deleted files, so it makes sense to store especially important information on removable media.
Loss of data on a hard drive, flash drive or phone is a very serious problem that everyone has probably encountered. Therefore, data recovery after is a very urgent task, which, fortunately, there are many ways to solve it.
Why can data be lost?
Data disappears for the following main reasons:
- Accidental deletion by the user or any program that he runs.
- Due to the impact of malware or, more simply, a virus.
- Physical malfunction of the drive itself.
- Incorrect shutdown, which also leads to damage file system on disk.
The first two cases are the usual data deletion, and there will be one solution to the problem. If the disk itself is faulty, for example, its physical structure or logical table is violated, then data recovery will be more difficult.

Physical malfunction of a disk is very easy to recognize. Usually it is expressed in the disappearance of a whole section. A flash drive may not be detected by a computer at all, but if damaged disk with the system, then in the end the machine will not boot, showing on a black screen the absence of a section from which it could boot. In this case, recovering lost data will require the use of special programs and utilities, or even professional equipment.
What is forbidden to do if your data is lost
It may take some time before you start recovering lost data. During this time, to avoid the complete loss of data, do not:
- Write something to the hard drive or external media or even use it somehow.
- If the disk with the system turned out to be damaged, it is better not to restart the computer once again or not to try to turn it on at all.
- Any system suggestions for formatting, error correction, or disk defragmentation should be rejected.
- It is best to connect a disk or flash drive to the computer where it will not be used as the main
Where is the deleted data stored on the computer?
Even after deleting and formatting, the data on the computer does not disappear completely. In fact they are still long time they are physically present on the disk, they simply get the status 0 in the file table. They remain there even after the recycle bin is cleaned, exactly until something needs to be written to this place. That is why it is very important not to upload anything to the hard drive if you have lost some information. Only then, recovery of lost data will be possible. Otherwise, they will disappear forever.

When recovering lost or deleted data is not possible
There are also such unpleasant situations when recovering lost data is no longer possible. These include:
- Reinstalling the system on a formatted computer hard drives. Here formatting is done in full.
- Filling the hard drive with other data after the information has been deleted.
- A serious physical breakdown that cannot be eliminated either by software or For example, this can be a breakdown of the head of the hard drive.
Unfortunately, in this case, it is most likely impossible to recover your lost data even in the service center.

Program for recovering lost data
The easiest way to recover deleted or lost data is to use special programs at home. They are different, but they mainly work in two directions - they eliminate physical and logical errors of disks or restore data that was accidentally deleted or formatted. Programs vary in functionality, and it happens that in different cases you should use different software.
"Victoria"
This free program appreciates hard performance drive, tests it, and also performs minor repairs. Its main feature is disk verification directly, directly through the ports. Due to this, with the help of this program it is possible to bring to life even absolutely seemingly hopeless HDDs. It has many advantages:
- Free of charge.
- Effectively restores lost or deleted data.
- It works very fast.
- It starts without installation.
- It has a small size.
- It starts in AHCI mode, so BIOS settings do not need to be changed.
- Supports many different tests.
Wd
This utility from Western Digital originally only served hard recovery disks of this company. Now it can be used for from other companies. The utility allows you to restore hard disks and even store information on a separate cloud server. Unless with large hard drives, it works a little slowly.
Regenerator
This small simple utility is very easy to use. It eliminates even a large number of bad sectors, i.e physical damage. Such a serious recovery is possible because the program uses a new magnetization reversal algorithm and serial signals. What is nice when working with hard drive This utility recovers lost data very carefully, without affecting other information on the computer.
HDD Master
This small free utility does not need to be specifically installed. It allows you to recover lost hard data drive, fix most hard drive problems and do a lot of testing. Despite its small size, the program has many functions - for example, it can stop or start the HDD spindle.
Acronis
Acronis is a very large range of programs that allow you to carry out various actions with your hard drives. There are programs for partitioning disks, and tools, however, we are interested in a utility that allows you to scan and restore hard drives. Acronis is easy to learn and affordable, so many users use it today.

Seagate Program
If you use a Seagate hard drive, you can test and restore it using special programs. There are a lot of them, but the best is Seagate File Recovey. It features a simple interface and support for many different memory tests. By the way, it works with hard drives of other media, although with Seagate drives it is still more efficient.
Using the program Seagate File Recovey, you can scan the hard drive, eliminate errors and even restore information. In addition, the program supports working with memory cards and flash drives, and data for recovery can be previewed. A significant plus is the ability to read and recover even encrypted information.
The programs listed below do not cope with the physical problems of disks - they simply help to recover data that you deleted by accident or on purpose.
Recuva
This application performs data recovery after deletion, and it is very popular among users. You can download Recuva for free, but it weighs quite a bit. The program easily works not only with the HDD, but also with flash cards, as well as memory cards. This program restores data almost completely automatically, but the user is given the opportunity to choose which files to recover. For example, if you lost photos, you can mark them, and other files deleted earlier will not be restored.
Recuva recovers data very quickly, but it has several drawbacks. Usually it copes well with the task if, after the loss of the files, the medium has not been used. That is, if there after that new data was recorded, then there is a chance that you will lose your files forever. Also, Recuva does not recover data from formatted media.
UndeletePlus
UndeletePlus is simple program, which quickly and efficiently recovers lost data. It works with both HDD and external drives. For the convenience of users, the program has a special wizard that will allow you not to miss anything. It can also recover data of certain types, and even copes with information lost due to formatting.
R-studio
R-studio is a very effective program that allows you to quickly and efficiently recover lost data. The disadvantage is its payment, however, the functionality of the program is very wide. She can:
- Fully recover data from HDD, flash drives and even DVDs and floppy disks.
- Return to work RAID-arrays, including RAID-6.
- To bring to life disks with damage and logical errors.
- Restore partitions after formatting.
- Work with Mac OS, Linux, and Windows partitions, both with FAT and NTFS.
R-studio is a program for true professionals, and it even copes with cases when the system displays a message “Disk is not formatted”. Also, it is not a problem for her to recover formatted data. What is good, it can be started from a disk or a bootable USB flash drive if you suddenly do not start the system itself. True, an inexperienced user in such a complex program can get confused.
Which program is better
- For mild cases of data loss due to deletion, Recuva is suitable.
- If any errors are found in the hard drive and the drive cannot be read at all, then Victoria is a good option.
- If you need professional data recovery and disk partitioning, then you should stop at Acronis.
- If you regularly recover data and work a lot with disks or have lost some very important information, then you should resort to the help of R-studio.
Other programs in general are also very good and can help you out of seemingly hopeless situations.
Data Recovery Using Bootable Disks
If you have any problems and the system does not boot, and there is data on the system disk, then it is highly likely that they are not damaged. However, you can only remove them if you insert the disc into another device. What if you do not know how to do this or do not want to fuss too much? You can try to use boot disks or flash drives.
Bootable media is the one from which you can install the operating system. Some operating systems, for example, Linux Ubuntu, this media also allows you to boot the OS with limited functions, but with access to the hard drive. In the end, it will be enough for you to simply copy all the important data to another disk or USB flash drive.
Data Recovery on Android Devices
If you have lost data on the device running operating system Android (and it is in the device’s memory, and not on the USB flash drive), then special programs will be required for recovery. The best of them:
- Wondershare dr Fone, which also allows you to return your notes and contacts;
- 7-data Android Recovery, similar in interface to the Recuva program.
Both of them are intuitive - just install them on a computer and connect the phone via USB.
Physical recovery at home
Sometimes recovering lost flash drive data can be done at home, even if the recovery program did not help you.
Sometimes it happens that a computer or phone is simply because her contacts are dirty. In this case, it will be enough to gently wipe them with alcohol or vodka. Sometimes this method is quite effective. The main thing is not to use alcohol tinctures, perfumes and other liquids with impurities for these purposes. Even cologne would not be the best option.
Visit to a professional
If all of the above programs and methods did not help you, then the only option is professional data recovery.
Special data recovery laboratories will help you recover lost files even from badly damaged media. Moreover, this is done not using any special programs, but by physical means. For flash cards, for example, a memory chip is evaporated, and data is taken directly from it. And hard drives try to replace damaged parts, for example, reading heads, or also to extract information directly from magnetic tape.
Almost all of these methods involve a complete breakdown of the flash card or hard drive itself, but the data will be guaranteed to be returned to you, and sometimes it is much more important than any storage media.

How to avoid data loss
Instead of performing data recovery on a computer, it is much easier to try to avoid losing it. To do this, you can implement several activities:
- Try not to turn off the power of the computer abruptly - always shut down through the "Start", by completing the work.
- Be careful with your computer’s hard drive or USB flash drive. They must not be subjected to physical activity or shock, as this can easily lead to a malfunction.
- On a computer connected to the Internet, be sure to use an antivirus.
- Keep backups the most important data on several media and in cloud storageah - then even a hard drive crash will not be too scary for you.
Every day, by mistake, users delete a lot of the files they need and for some reason they cannot restore them or somehow return them. There are such cases that even recovering files from the recycle bin is a rather difficult procedure for most users. The reason for this is not interest and carelessness. It would seem that everything is written in black and white, and even in their native language. That is why this article is focused on solving the issue of how to recover deleted files. The most important thing is not to panic, pull yourself together and read this article to the end, since with the correct implementation of the simple steps you can easily restore the information you need. First you need to know that with any deletion of files they can be restored, but there are, of course, criteria under which they will not be restored.
Criteria under which deleted files can be recovered
If you have not completed the following steps, then your files can be restored:
- removed local disk and did not try to restore it by creating another;
- after cleaning any device they no longer function;
- the flash drive was no longer used after data deletion;
- did not try to recover data by other methods;
- nothing was done after removal;
Only in these cases, we guarantee 100% that the recovery of deleted files will be successful. But no one says that if you don’t follow these rules, you can’t do anything, just in this case the result is not predictable.
There are also often questions about what types of data can be recovered. Regardless of which file was deleted, it can be restored and regardless of which environment (NTFS or FAT32).
Recover deleted files from the recycle bin
With standard file deletion All your files are saved in the Recycle Bin. In order to return them you need to go to the “Recycle Bin” and right-click on the file you need, then on the “Restore” text. After this procedure, the file you deleted will be restored to the place from which it was deleted.
Method to restore files from the “Desktop”
As the title says, file recovery is done purely from the “Desktop”. To do this, you need to get into the “Users” folder - C: \\ Windows \\ Users - find the “Desktop” folder. Next, you need to go into its “Properties” by right-clicking on this folder - “Properties”.
After that, you need to go to the “Previous file versions” tab, there you will see several folders with the name “Desktop”, and each side has a date by which you can approximately determine when the file was deleted and easily restore it.

Then you find the file you need and by pressing the following keys, restore everything calmly: select desired file - right-click - “Submit” - and indicate where.

It seems like an elementary method, but I bet that most users did not know about this. Here she acts and the eternal saying: "Live and learn."
DMDE Recovery Program
DMDE is powerful, free softwareaimed at recovering deleted data from your PC, flash device. You can download it from the official site. Her ability also includes recovery deleted partitions. The main advantage over other similar programs is that it does not require installation. You just need to download it, unzip it and enjoy using it.
Here is a situation: you deleted files through the recycle bin, or already from the recycle bin. For those who do not know, this is done by simultaneously pressing the DELETE + CTRL keys. Therefore, you need to run the program. When starting, DMDE immediately asks for data upon deletion, that is, the disk from which the data was deleted, and indicate the partition (logical).

Thanks to a special algorithm of actions, this program Recover deleted files with ease. Double-click on the checked drive, thus you will go into it. Then click “All found files”. After that, the search for deleted files itself is performed. After analysis, by clicking on the file you need, click on the “Restore” button, then a menu will pop up in which you will need to set the path, select the file again and click “OK”. It should be noted that this program can recover up to 4000 files in one session.

Simpler utilities for recovering deleted files
For this procedure, a large number of different applications have been created in OC “Windows”, but not all of them are effective and easy to use. Now we will list the most reliable, according to our statistics: “Undelete Plus”, “PC Inspector File Recovery” and “Restoration”. You can also use “PhotoRec” - this program is especially good for recovering office documents and photographs. Undelete Plus is known for its intuitive interface and the presence of special filters for a more advanced search. PC Inspector File Recovery is known for a special method for finding not only deleted files, but also damaged ones. Restoration is known for its affordability. To download files, click on their names.
All these programs were taken under one section, since all of them are very accessible and easy to use. Regardless of who you are now - a teapot or a pro, you can easily master these programs. For all of the above programs, the same algorithm for finding. In order to find deleted files using the tools listed above, you must first specify the drive or folder from which the files were deleted. Then the data scanning process will start, after which it will become known whether your files were found. Then you just save it in a place convenient for you.
As we said, these processes are quite affordable for everyone. In case you have your own interesting method for finding deleted files, you can write about it in the comments and we will definitely tell you about it in the next article.
“I deleted an important file!” Stories with this beginning happen to users quite often. It is possible that some of our readers have already encountered a similar problem. Such stories always begin in the same way, but end in different ways. In this article I will tell you how to make the end of this story a happy one. Or at least do everything so that the probability of a happy outcome is higher.
1. What should I do if an important file or folder is deleted?
Well, firstly, do not panic. When you throw out the garbage, you do not immediately send it to the landfill. First a bin, then a container, and only then a landfill. This also happens on Windows. On the Del key, you first send the file to the Trash. Then, after cleaning the recycle bin, the file can be found on disk in unused clusters for some time (this is an analogue of our container from the example). And only after the area on the disk in which there were still traces of the file is occupied with other data, then the file is hopelessly lost (this is a dump).
1.1 We are looking in the basket
It will sound trite, but the Recycle Bin is the first means of protecting data from accidental deletion. At the same time, many Windows users automatically clean it immediately after placing files in it. Although, by and large, the Basket does not need to be emptied at all, because it does this automatically.
Searching for files in it is not at all difficult. Find the icon with its image on the desktop and open. If the file name is known, then simply write it in the search box. You can also sort the files in the Trash by the date of deletion and immediately find the desired file that has just been deleted.
The next time you think about using some kind of utility that in the background empties the Recycle Bin to free up disk space, think carefully about whether you should trust this responsible process to the machine. It may be easier to do it yourself at the moment when you are sure that there is nothing valuable in it.
1.2 We are looking among the shadow copies
It is not necessary to use any paid programs for this purpose. Staffing tool reserve copy in Windows 7, this system is quite suitable and turns on automatically when installing the operating system.
If “System Protection” is not manually disabled (which is often recommended by unfortunate optimizers), then recovering a deleted file from a shadow copy in Windows 7 is quite simple.
- In Explorer, locate the folder in which the deleted file was (not Recycle Bin).
- Click on the name of this folder. right click and select " The properties»
- Go to the tab “ Previous Versions"(See the figure below).
It contains information about all versions of files that were in this folder at different times.

We select the closest by date and try to look for our file in it. If it is not there, we turn to a earlier version. And so on until you find the file you want.
Thus, you can not only restore an accidentally deleted file, but also return to one of previous versions a document that has been modified and saved to disk, and then its previous version was needed.
Shadow copies of user files are created automatically by the operating system upon reboots and the installation of various programs at system restore points. Therefore, you do not need to do something separately to create them. The main thing is that the “System Protection” is not turned off, as some “experts” recommend turning it off to save resources, silent about the fact that the security of the system as a whole will decrease.
2. If regular funds did not help
2.1 Use a third-party file recovery utility
You can use a specialized data recovery utility that, after analyzing the disk, displays a list of files and folders that you can try to recover. One of these programs can be kept on disk for a fire accident.
The chances that the file will be restored without loss are not so great, but there are also good luck. Here, a very important point affecting the “success of the concession” is the minimum number of disk operations since the deletion of the file. Some sources even tell us to immediately turn off the computer and boot from a flash drive or disk. For me, this is pure paranoia. It’s much easier to follow simple rules, which I will give below, and not to risk nerves in vain.
I will disappoint the happy owners of SSDs right away - they don’t have this chance of salvation! The fact is that the system for such disks regularly performs the TRIM function, which resets sectors with deleted files.
2.2 Do not forget about the professionals
There are people who can help with recovering deleted files on disk. There is a chance to run into a charlatan or an inexperienced specialist, as in any other type of service. But if the file is really valuable, then it may make sense to pay professionals.
3. What can I do to prevent files from disappearing without a trace?
3.1 Do not turn off regular protective equipment - they are very effective
The developers of the operating system came up with a multi-level system of protection against problems associated with accidental deletion of data. Do not neglect them and turn them off, as well as empty the Trash every time immediately after deleting the document. Check that you have activated the "System Protection" and the Basket worked properly. With these system components, you can irretrievably lose a file unless specifically. To prevent data loss associated with a failed drive, use the recommendations in the following paragraphs.
3.2 Use Cloud Storage
Despite the chance of information disclosure, synchronize your important documents folder with cloud storage. I haven’t seen a user whose documents would occupy 10 GB, and that’s exactly what they’re ready to offer cloud drives is free. They also offer their own applications that will synchronize your document folder with the cloud. For example, I use. But there are still products like Google drive, Yandex.Disk and of course the famous.

Yes, it’s very important that cloud storage also has its own basket! Do not forget to look into it if the local copy of the file is irretrievably lost.

3.3 Make regular backups
If you have an operating system other than Windows 7, 8 or 10 installed, we recommend that you make backup copies (backup) with a special utility.
Windows 7
Windows 7 has its own utility for backing up versions of important files "Backup or Restore", which is located in the "Control Panel".

To create backups, you need a separate hard drive (external or internal), which has enough free space to place an image of everything system disk, and also for creating backup copies of user files.
Windows 8/10
This version of the operating system has a more advanced feature called File History, which is turned off by default. If you have really important documents, take the trouble to enable version control for them. Just type “res” in the search bar of the control panel, as shown in the figure.

Then, in the "File History" window, make the necessary settings. By default, the system suggests storing versions of all documents and drawings. If you have large folders with home photos in the documents, then it is better to backup them yourself, as I described in. And in the "File History" these folders are better placed in the "excluded".

Now you will have copies of the document for each version of the changes. Your dissertation or thesis will be preserved. Even if you mistakenly deleted an entire chapter and recorded a document.
File History requires the use of a removable drive. This is in case the main hard drive crashes. So do not spare money and buy a flash drive for a hundred or two rubles (for example, 8 GB), so that you don’t spread a thousand or two for restoring files bit by bit from the body of a dead hard drive.


