Search how to recover data hard drive Toshiba? Health problems or hard errors toshiba drive caused data loss? Are such data always lost forever or are there ways in which it can still be restored? Repair the storage medium, fix errors that cause a malfunction, and recover the lost data yourself.
If you need to restore hard or external drive (HDD, SSD or SSHD), a memory card or a USB flash drive, first of all you need to connect the device to a computer. If you want to recover data from a car recorder, phone, photo or video camera, audio player, you must remove the memory card and connect it to a desktop computer. You can try these instructions for internal memory devices, if after connecting you see your device in the My Computer folder as a USB flash drive.
Toshiba Hard Drive Repair and Data Recovery
Step 1: Toshiba hard drive recovery program
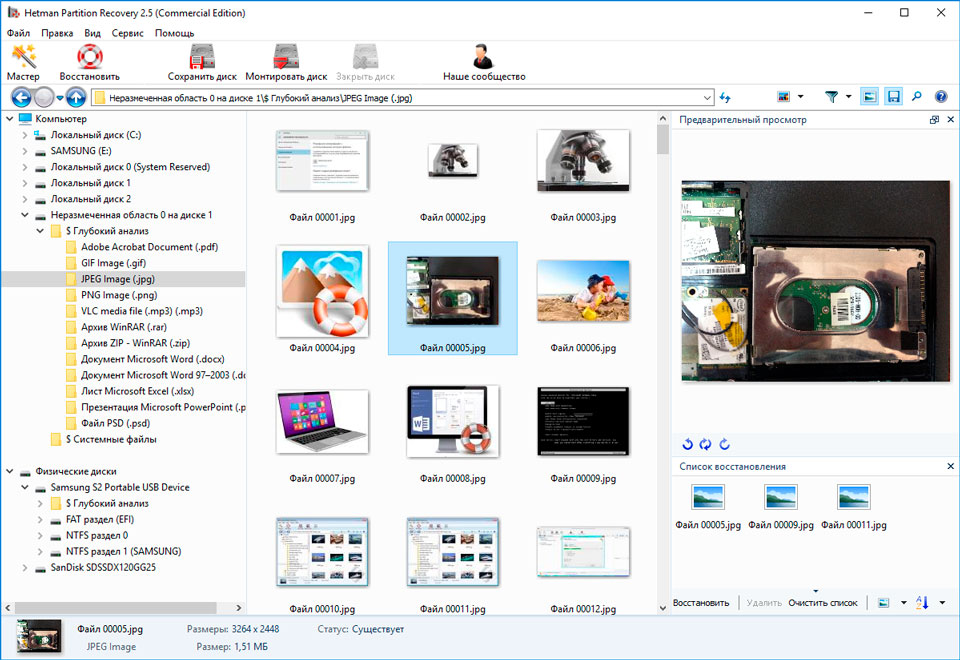
In cases when files have been deleted from the Toshiba hard drive and it is not possible to return them using standard means of the operating system, the most effective way will use Hetman partition recovery.
For this:
- Download the program, install and run it.
- By default, the user will be prompted to use File recovery wizard. Press button "Further", the program will prompt you to select the drive from which you want to recover files.
- Double click on the drive and select an analysis type. Indicate "Full analysis" and wait for the disk scan to complete.
- "Reestablish".
- Choose one of the suggested methods for saving files. Do not save the recovered files to the disk from which these files were deleted - they can be erased.
Step 2: Recover Data From Toshiba Hard Drive After Formatting or Deleting Partition
Recover files after formatting
Look for how to recover hard files Toshiba drive after formatting? Follow the instructions:
- install and run it. After starting in the left column of the main window, the program will detect and display all physical disks, as well as accessible and inaccessible partitions and areas on the disks.
- Double click on the drive or area of \u200b\u200bthe files from which you want to recover and select the type of analysis.
- Select "Full analysis" and wait for the disk scan to complete.
- After the scanning process is completed, you will be provided with files for recovery. Highlight the ones you need and press the button "Reestablish".
- Choose one of the suggested methods for saving files. Do not save the files to the disk from which these files were deleted - they can be erased.

Recover Data From Partition Deleted
Look for how to recover files c remote partition Toshiba hard drive? Follow the instructions:
- Download Hetman Partition Recovery, install and run it. After starting in the left column of the main window, the program will detect and display all physical disks, flash drives or memory cards. The list of physical devices is located after the logical drives.
- Double click on the physical devicefrom which the partition was deleted.
- Indicate "Full analysis" and wait for the scan to complete.
- After scanning, you will be provided with files for recovery. Highlight the ones you need and press the button "Reestablish".
- Choose one of the suggested methods for saving files. Do not save the files to the disk from which they were deleted - they can be erased.
Recover data from the system partition on another computer
If the system partition is lost, it is impossible to boot the computer. Therefore:
- Remove or remove the hard drive with the lost system partition from the computer.
- Plug in given HDD to another computer.
- Make sure your hard drive is correctly detected by another computer.
- Follow the steps in the previous paragraph.
Restore System Partition Using LiveCD
If it is not possible to connect a hard drive with a lost or damaged system partition to another computer, you can restore such a partition by starting the computer with using livecd - alternative portable version operating system. For this:
- Find and download the LiveCD you like on your CD / DVD or USB stick.
- Connect the LiveCD to your computer and turn it on. The computer will automatically boot from LiveCD.
- Copy files from the system partition to another storage medium (often, external hard disk).
Step 3: SMART Toshiba Hard Drive Settings
Large manufacturers hard drives include S.M.A.R.T. technology in their hard disks. S.M.A.R.T. analyzes a lot of mechanical attributes. Analysis of many of them makes it possible to fix the incorrect operation of the disk until it total failure, as well as the reason for his refusal.
But despite the fact that S.M.A.R.T. allows you to identify future problems, most of them cannot be prevented. Thus S.M.A.R.T. - This is a technology that often serves to warn of an imminent disk failure. S.M.A.R.T. Values cannot be fixed, and there is no need to waste time on this.
Each hard drive manufacturer sets a threshold for a particular operation. Under normal circumstances, such a threshold is never exceeded. Otherwise, we encounter an error.
There are 256 values, each of which has its own ID. Some errors and limit values \u200b\u200bare critical. They have no solution. The only solution is to replace the hard drive immediately after detecting such an error.
Critical SMART errors have no way to fix them. If you do not replace the hard drive, the error window will appear again and again. The only justified action in this case will be to save data from sectors of the disk that are still available. If an error warning is issued, the disk will become inaccessible to any of the programs. Therefore, steps must be taken to save your data.
Step 4: Restore Toshiba Hard Drive File System
Format storage medium
If file system it is not possible to determine the Toshiba hard drive - format the device.
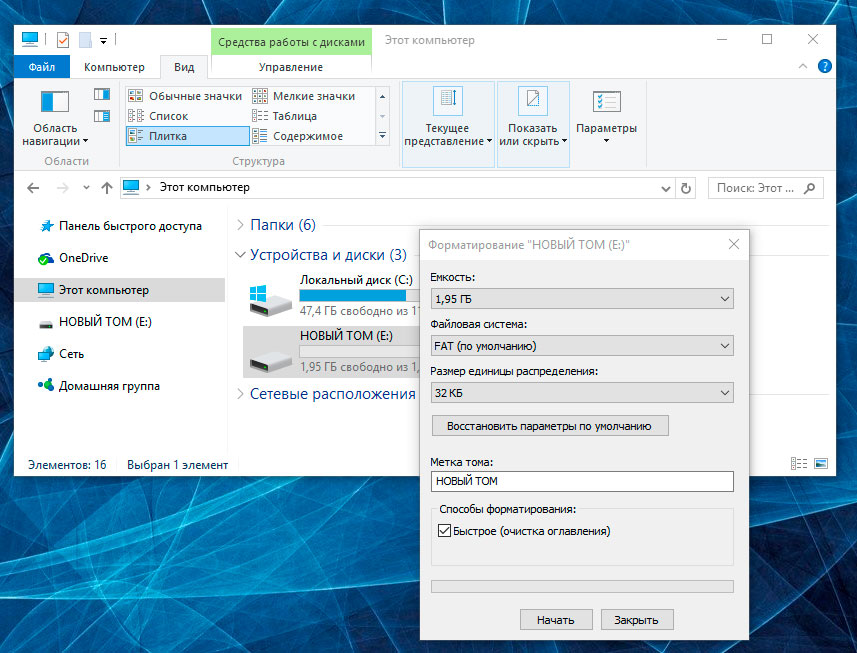
Toshiba Hard Drive File System Detected as RAW
Sometimes the operating system cannot determine the structure of the file system (for example, FAT or NTFS). If you look at the properties of such a device, then its file system will be defined as RAW. In this case, Windows suggests formatting the drive.

There are utilities that specialize in rAW recovery disk, however, we recommend stopping at a universal solution - Hetman Partition Recovery. This function is included in it as an additional one, you only need to run the program and start analyzing such a disk.
In some cases, file hard system Toshiba drive can be restored using the command Chkdsk.
- Run Command line on behalf of Administrator.
- Enter command “Chkdsk D: / f” (instead of D: - enter the letter of the desired drive) and press ENTER.
- After running the command, the process of checking and fixing errors on the disk or device will start, this can return the file system to working capacity.
![]()
Step 5:
If a USB flash drive, memory card, or any other type of storage medium does not work correctly, cleaning the disk and its partitions with the “Clean” command and Diskpart tool can be one of the ways to solve problems. This tool will correct errors if the device cannot be formatted or its size is determined incorrectly.
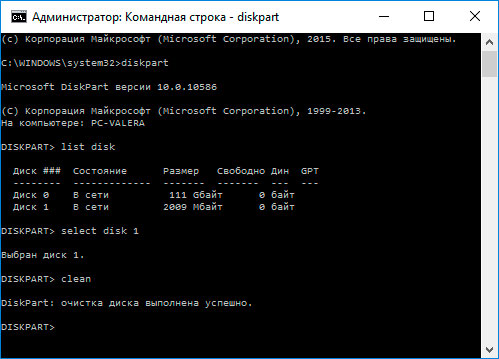
- Run Command line on behalf of Administrator.
- Run the command DISKPART.
- Display a list of drives with the command LIST DISK and determine the number of the disk you want to recover.
- Select the desired drive: SELECT DISK # (instead of # - enter the disk number).
- Run the command Clean.
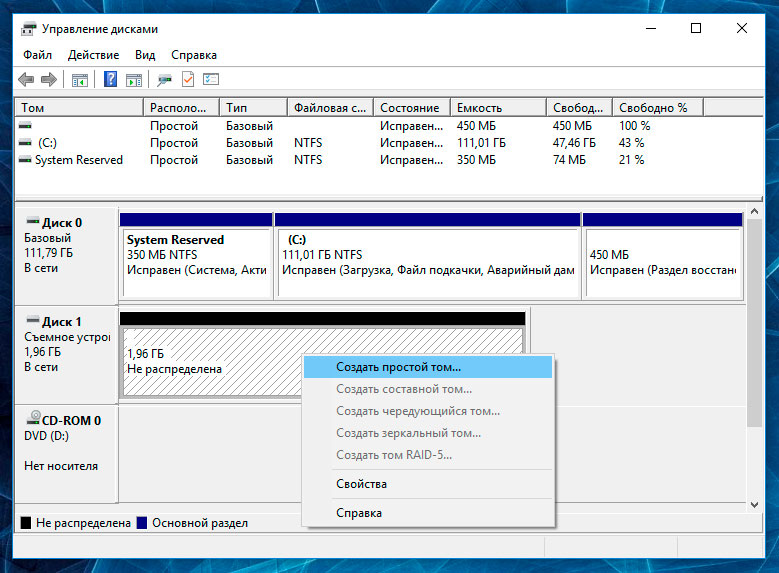
- Create a partition on the cleaned disk and format it on the desired file system.
Step 6:
Scan the disk for errors and bad sectors, and fix them
Run check all hard sections drive and try to fix the errors found. For this:
- Open folder "This computer".
- Right-click on the disk with the error.
- Select The properties / Service / Verify (In chapter Check disk for errors).

As a result of scanning, errors found on the disk can be fixed.
- Open folder "This computer" and right-click on the disk.
- Select The properties / Service / Optimize (In chapter Disk Optimization and Defragmentation).
- Select the drive you want to optimize and click Optimize.

Note. In Windows 10, disk defragmentation / optimization can be configured in such a way that it will be performed automatically.
Step 7: Toshiba Hard Drive Repair
It is important to understand that any of the solutions hard errors Toshiba drive is just a virtual fix. It is often impossible to completely eliminate the cause of the error, since the device needs repair.
You can go to a service center to fix the breakage or replace parts or microchips of a Toshiba hard drive. The cost of work in this case will be many times higher than the cost of a failed disk or memory card. It makes sense to do this only if it is necessary to restore important data.
Step 8: Backup Toshiba Hard Drive
There are several solutions for backing up data:
- Built in operating system applications. Microsoft Windows provides ways reserve copy data that involves storing files and data on external or built-in storage media. All modern windows versions already include the ability to create backup necessary files or the entire hard disk, if necessary. Provided by Windows features are complete and independent, and are aimed at ensuring that you do not need to use third-party services or programs.
- Manual data copying. You can always use the old proven way to back up data - manually copy data to external media information. This is a long time, but if you work with a small amount of data, such a solution may be quite acceptable for you.
- Online Services. IN lately The most modern way of data backup is gaining popularity - these are numerous online services. Companies that back up your files directly to the Internet. A small background application installed on the computer creates copies of the necessary data and stores them on a remote server. However, the volumes provided by such companies for storing your files in free version Do not allow to use them as an integrated solution. Often the space offered for data backup does not exceed 10 GB, so talking about creating a backup copy of the entire hard drive is not necessary. Such services are more likely to back up a single number of files.
- Create a disk image. This is the most complete solution for creating a backup copy of data that is used by advanced users. This method involves the use of a third-party program to create an image of the entire disk, which can be deployed, if necessary, on another storage medium. With this solution, in a short period of time, you can access all the data that was on the disk at the time of its backup: documents, programs and media files.
Hello friends, in this article we decided to tell how to restore laptop factory settings. Let's start with the manufacturer Toshiba (who are interested, you can read a separate article -), the second is a Sony laptop, the third HP pavilion. Separate articles are written for laptops, and,. Well, then we will try to supplement the article with information on products of other manufacturers, judging by your letters, this topic is interesting to many of our readers.
- Good day, I wanted to ask you how to restore the laptop to the original factory settings? I know that these settings are located in a hidden section of the hard drive, but I inadvertently deleted this section and now I get an error when I try to roll back to the factory settings. Disks dVD recovery I didn’t create it at all, I’ve never been able to restore a laptop to factory settings. What is the way out of my situation?
- Hi admin, please explain how to be. Toshiba laptop, it has a hidden partition, another C: drive and D: drive. I didn’t touch the hidden partition, but on drive D: I deleted everything and now I can’t go back to the factory settings, they say Toshiba laptops use the hidden partition and some other HDD RECOVERY folder located on the drive to restore the factory settings D :. What should I do now?
- I bought a Toshiba laptop, the instructions for the laptop say, if you want to roll back to the factory settings, press the F8 key, the recovery program will start. I clicked, but Additional download options start and that's it ... And then what to do? And another question, the first time you got a message - We recommend that you create a resuscitation medium on a USB flash drive or DVD-ROM drive, using the Recovery program, it will help you restore the contents of your computer to its original factory state, even in case of serious damage to the computer. Explain how to use this resuscitation medium in case of problems?
- Hello, tell me how to restore the factory settings of a Hewlett-Packard (HP) laptop if the beech does not load at all. When Windows starts, it fails.
- Admin, answer such a question. All laptop manufacturers complete their special rECOVERYlocated in a hidden section, using this program you can roll back the laptop to the factory settings in case of serious problems with the operating system. Question - Is there any alternative to this program?
How to restore the laptop to factory settings
When does it occur to us to restore our laptop to factory settings? That's right, when we no longer understand what is happening to him, and most importantly, the laptop itself does not understand what is happening to him, due to the dozens of unnecessary partitions created on it, four installed operating systems, thousands of different programs and three antiviruses.
- Note: Before you roll back to the factory settings, you can copy all the data from the C: drive and the desktop using.
Many users may notice that in such a situation, you can reinstall the "Windows" with all programs, drivers and all. But I in turn will notice restore factory settings to laptopInexperienced user, much easier. Then you don’t have to worry about finding and installing drivers on all devices, you just need to reinstall it desired programs and that’s it. The only thing that confuses many in this situation is that many have never in their life started this very restoration of the laptop to factory settings. To acquaint you with this restoration and the purpose of our article, I hope after reading it, you will better understand how this can be done.
I have to restore factory settings on various laptops quite often and I want to say that the recovery mechanism on all laptops is almost the same, but of course there always are nuances that you should know in advance.
The first rule. When restoring factory settings, network adapter The power must be constantly connected to the laptop.
You reboot the laptop and when loading press a certain key on the keyboard, then the program for restoring factory settings starts, here you need to be careful. The factory restore program may offer you to restore only the C: drive or restore the entire hDD. If you select the C: drive, it means that only it will be restored to the factory settings, and the remaining sections with your data will remain untouched. If you choose to restore the entire hard disk to the factory settings, then all the partitions you created, with all your files, will be deleted and your laptop will be in the same condition as at the time of purchase.
Where is the laptop factory settings program located?
Usually in a hidden section of a laptop called the "Recovery Partition", the volume is up to 20-plus gigabytes. You can see it if you go to Computer Management-\u003e Disk Management. It is advisable not to delete this section, otherwise you will not be able to restore the laptop to the factory settings.
Owners of a Toshiba laptop need to know that in addition to the hidden RECOVERY partition, they also have the HDD RECOVERY folder located on the D: drive, it cannot be deleted either.
Note: Friends, if hidden sections on your laptop are not deleted, but the factory restore program does not work, read our article -.
Why create laptop recovery DVDs?
As soon as we bought a laptop and turned it on, on the screen, immediately after the appearance of the working windows backgrounds, the laptop manufacturer’s service window appears with a proposal to create –DVD laptop recovery discs. That is, we will create the same hidden partition with the factory settings, but on DVDs. This is done in case the hidden section of the laptop, for some reason (often due to the fault of the user) is damaged or completely deleted.
To create recovery DVDs, you usually need 3 blank CDs. In case of serious problems with the laptop, for example, you cannot load the operating system at all, and the hidden section is deleted, we can restore factory condition laptop using previously created recovery DVDs.
Keyboard shortcuts for factory resetting laptops
ASUS - when the ASUS splash screen appears on the screen, press F9
Acer - Alt + F10
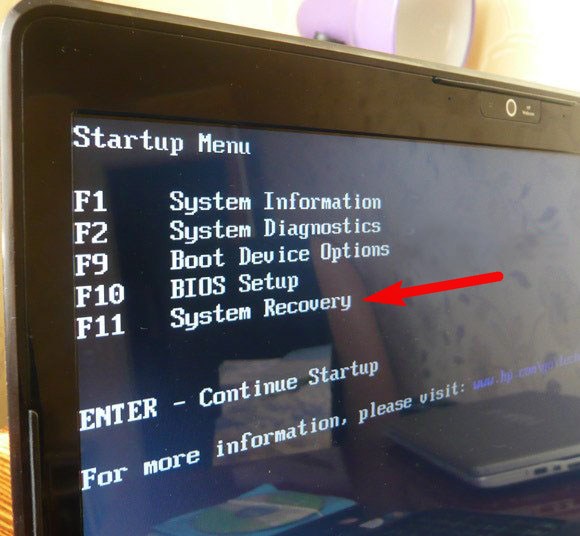
HP pavilion - when you turn on the laptop, press the esc key. Enter the start menu, then press the F11 key
Samsung - F4
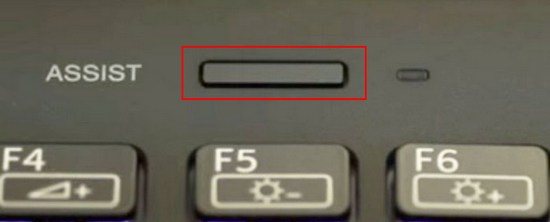
Sony vaio - F10. New Sony VAIO laptops use dedicated button AssistTry to click it at boot time. Boot up VAIO Care, select Start troubleshooting (Recovery) -\u003eSelect keyboard layout English -\u003e Diagnostics -\u003e VAIO Recovery Tools -\u003e Windows 8 -\u003e Run Recovery Wizard(System Restore step by step).
Toshiba - F8 or on the latest models 0 or even it may be necessary to press Fn + 0
Packard Bell - F10
Dell inspiron - when the dell splash screen appears, press Ctrl + F11
Fujitsu Siemens - F8
LG - F11
Lenovo - F11
So, we restore the Toshiba laptop to factory settings first, press F8 when loading (if you have one of the latest Toshiba laptop models, then immediately turn on the laptop and press and hold 0), a window appears Additional download options. Choose Computer troubleshooting and press Enter.

Select language settings.

Choose a Toshiba HDD RECOVERY recovery tool or it may be called Toshiba Recovery wizard.
In the next window, we are warned that drive C: will be restored to its original state, that is, everything will be deleted from it and its condition will be restored at the time of buying the laptop, drive D: will remain untouched.
You cannot interrupt the operation, so make sure that the AC adapter is connected to the laptop. Click Yes and start the process of restoring the laptop to its original factory state.
Factory rollback process in progress

The software and drivers are being installed.


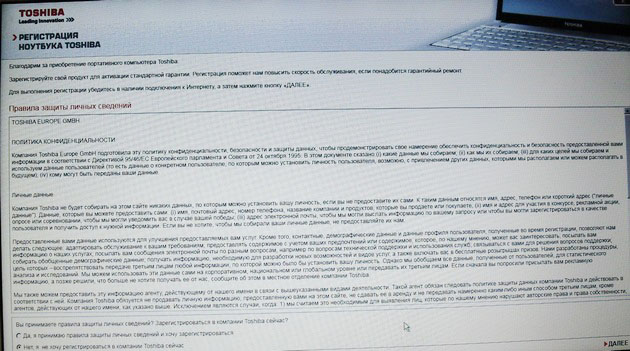
Choose a username, password for your account. Set the date, time, they are usually correct by default. If you want, you can register your laptop to extend the warranty.
First windows launch. That's all
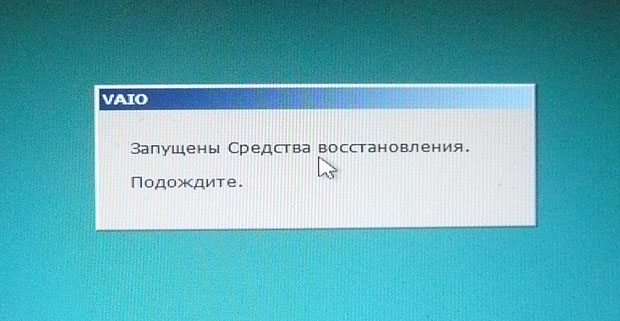
How to restore Sony laptop factory settings
Press the F10 key at boot and enter the Dispatcher windows boot, select using the keyboard Launch VAIO Recovery Center.

A window appears in front of us, in it we can familiarize ourselves with the recovery options.
For example, select Recover C drive: and in the next window we read information about what will be restored.

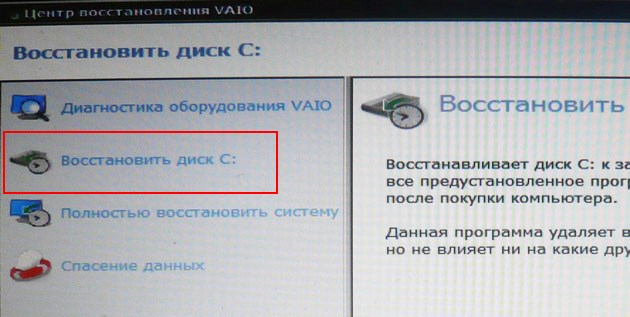
Disk C is restored: to the factory state, everything is reinstalled software, but not the software installed after the purchase of the computer, it will have to be reinstalled. This program deletes all files on the C: drive, but does not affect files on other partitions.

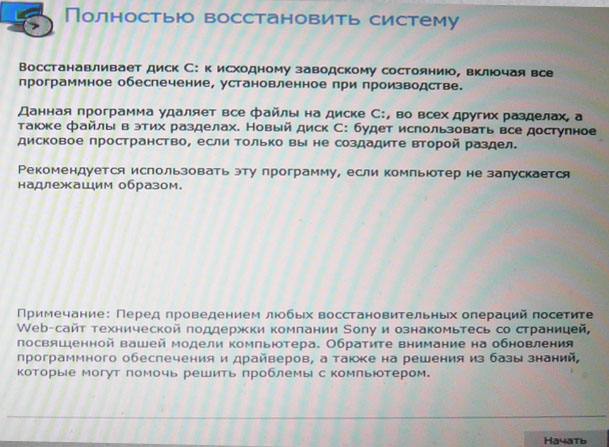
If we choose Completely restore the system, then everything on the C: drive and in all other sections will be deleted. After recovery, everything disk space will occupy C drive:

How to reset your HP laptop to factory settings
If the laptop does not load at all due to system errors and you want to restore its original settings, then, in order not to lose your data, you can download it from any Live CD, then transfer important files to a portable hard drive, then restore the factory settings, since when you restore the factory settings, all your data from the laptop will be deleted .
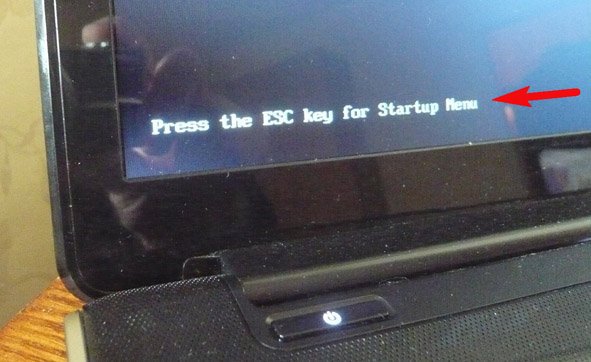
When you turn on the laptop, press E sc.
We enter the boot menu, as we see, the F11 key is responsible for restoring the factory settings - System recovery. Press the F11 key.
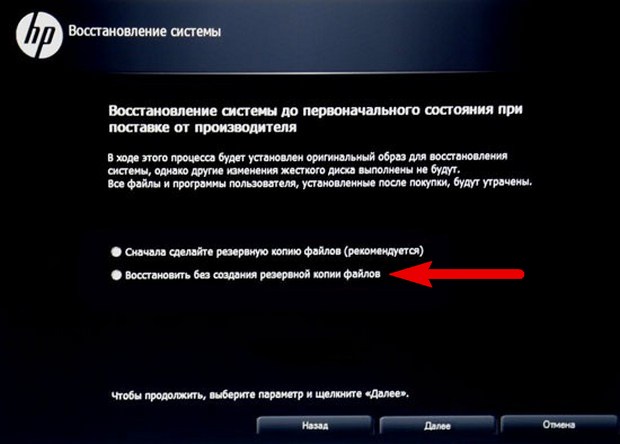
A window appears HP Recovery Manager. Here we need the item “ System Restore to initial condition upon delivery from the manufacturer».

Click on “ Restore without backing up files ”and click Next.
Now you need to disconnect all external devices: printer, scanner, mouse, click Next and the process of restoring the factory settings of the HP laptop will begin.
Is there an alternative to the factory default recovery program built into the laptop? Yes there are programs and and they have much more opportunities.
The initial state with the factory settings (for example, after replacing a failed hard drive).
How to do it?
Toshiba Laptop Recovery with:
- insert (the first of several, usually 3) into the optical drive and turn off the power;
- while holding down the F12 key on the keyboard, turn on;
- when the inscription appears Toshiba Leading Innovation \u003e\u003e\u003erelease the F12 key;
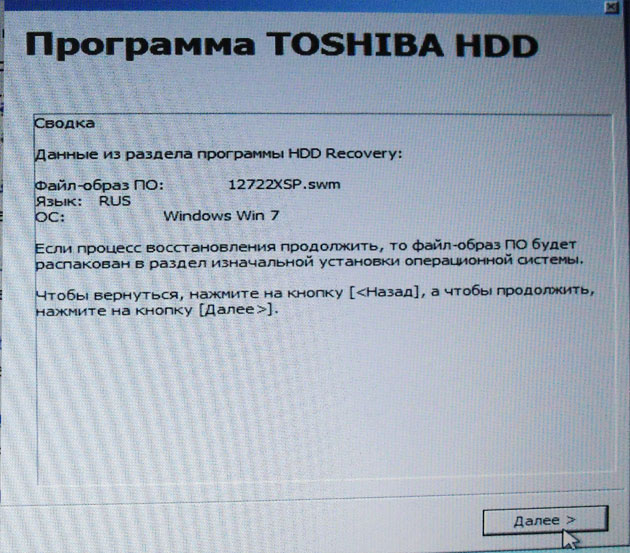
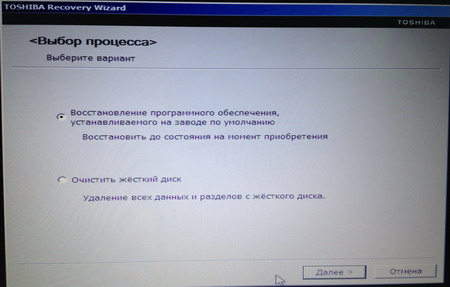
- in the window <Выбор процесса> select Toshiba Recovery Wizard -\u003e Next;
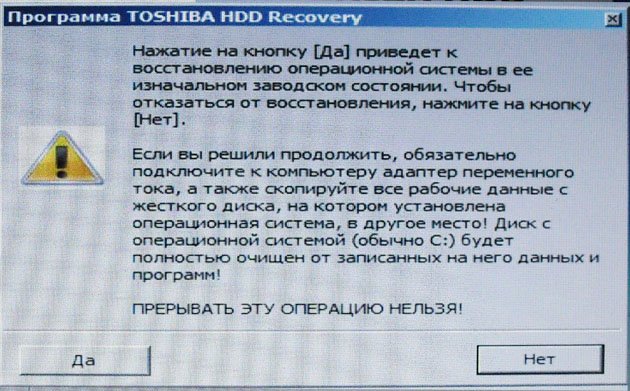
- in the window Toshiba Recovery Wizard with message "Caution! When performing recovery, all data will be deleted and recorded again ... " click Yes;
- in the next window, select the switch Factory installed software recovery. Restore to the state at the time of purchase -\u003e Next;
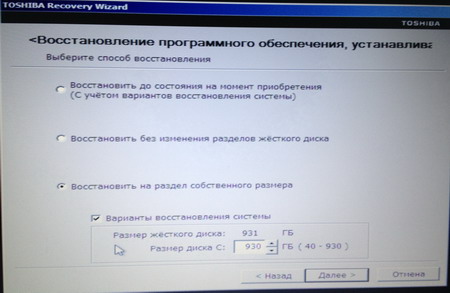
- in the next window, set the required switch - Restore to the state at the time of purchase, Restore without changing hard drive partitions, Restore to own size partition (if you installed a new hard drive, select the last item) -\u003e Next;
- in the message box “All sections will be deleted. You will lose all data on the hard drive. Are you sure you want to continue? ” click Further;
- section initialization will begin;
- after that, copying of files will begin;
- when a message box appears “To continue, insert the next disc and click OK.”insert and click Ok;
- when a window appears asking you to insert, insert it and click Ok;
- after copying the files, the recovery process will begin;

- after the restoration is complete, the creation of the CRC file will begin;
- after the message appears “Recovery Complete” press the button Done;
- after rebooting, the installation program will start the services;
- the installation of devices begins (it reboots several times);
- Wait until the recovery process is complete.
Notes
1. If the sound was pressing the FN + ESC keys, turn it on to hear sounds during the recovery process.
2. In the process of recovery reboots several times.
3. The average duration of the recovery process is about 3 hours.
4. Be sure to wait until the recovery process ends (otherwise you will have to start all over again! ..).
5. Sometimes during recovery it seems that hung, but it’s not. You can make sure that It doesn’t hang, according to the LED of the hard drive: if it blinks, then there is nothing to worry about.


