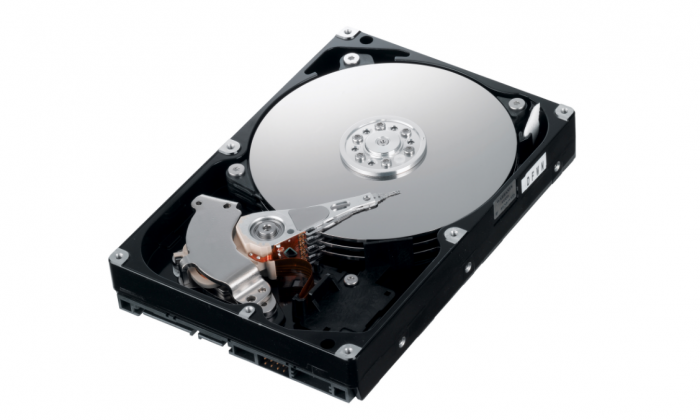
Hard disk drive (HDD) is a storage device or main storage device in most PCs. A large number of people are faced with the fact that the computer (laptop) does not see the hard drive. What to do in this case?
In computer slang, it is called a hard drive, and it can be external and internal. On a device that works on the principle of magnetic recording, not only user information is stored, but also the operating system, which operates with service data.
How to solve the problem of “invisibility” of the hard drive ?. Let's take a look at what is hDD and how to make the pc detect it.
If a malfunction occurs in hard work disk, then the computer does not display all the recorded information. A PC may not see a hard drive for many reasons. We will try to describe all the causes of malfunctions and the available methods for their elimination.
All these reasons apply to both internal and external hard drives, and the "treatment" in either case will be the same.
Diagnostic measures
If such a problem occurs, a diagnosis should be made initially. Its purpose is to identify the source of the malfunction. After all, the problem may not be in the hard drive, but in the operating system. To find out, the hard drive is connected to another PC.
If the computer boots, it means that the “sick” is not the hard drive, but the operating system itself. And if not, the problem, accordingly, lies in the malfunction of the hard drive. In this case, it is most advisable to take the device to the workshop for repair or exchange it for a new one if the warranty is valid.
In the first case, when the problem lies in the operating system, you can fix it yourself. There are several methods to do this yourself, without financial expenses.
- 1. While the operating system is loading, click Del / F2 several times. If all goes well, you will see BIOS settings.
- 2. If you have disabled internal hard drive from the computer, wrap it in an antistatic to avoid failure due to electrostatic discharge.
- 3. Before all manipulations with the hard drive, learn well how to connect it.
- 4. Antistatic is useful for the bottom of the hard drive (where the board).
Main problems and solutions
There are problems with hard drives that you can fix with your own hands. For example, if the contacts are removed, it is not necessary to contact the repair shop.Outgoing contacts
If the contact is removed, the computer will not see the hard drive. To fix the problem, reconnect all cables in the system unit. Check all the connections carefully, and then, perhaps, the problem will be solved.Incorrect BIOS settings
If even the BIOS (basic input / output system) does not see the hard drive, the problem may lie in the system date. If a failure occurs operating system, the date could be changed, and your computer has “moved” to the past. Reset the system date by removing the battery on the motherboard for 20-35 minutes, and then reinstalling it.
If the problem was precisely in the wrong date settings, the computer will identify the hard drive as physical media information.
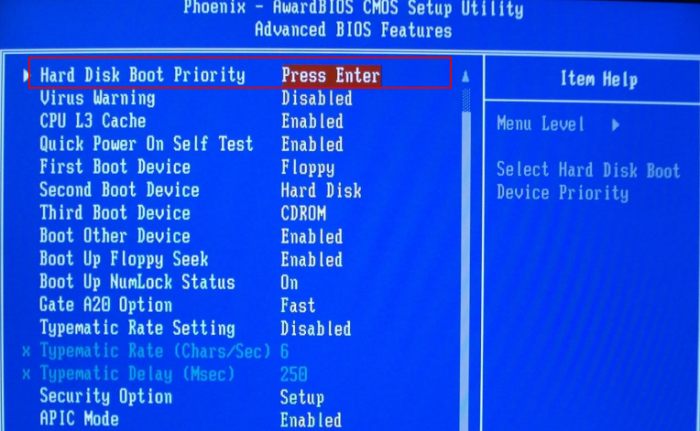
There is another problem, which lies in the fact that devices are not loading in the correct order. In the BIOS, find “Boot” and make the HDD a priority device that will boot first.
Not enough food
If the hard drive makes suspicious sounds and from time to time it disappears, then it is “read” again, the problem is hidden in the lack of power, so from time to time the PC does not see the hard disk (HDD). There are two ways to fix the problem: the first is to buy a good power supply, the second is to remove a device from the boot.Device conflict
If two hard drives of the same model are installed on your computer at once, they can conflict with each other. In this case, the following will help you:- 1. Diagnose both devices for troubleshooting.
- 2. Connect both hard drives to the operating system separately.
Bus version
Older versions of Windows OS may not support SATA.The most reasonable thing is to upgrade to new version OS If for some reason you cannot do this, you need to reinstall the operating system and integrate the drivers that are supported by SATA.
The problem in the settings of the operating system
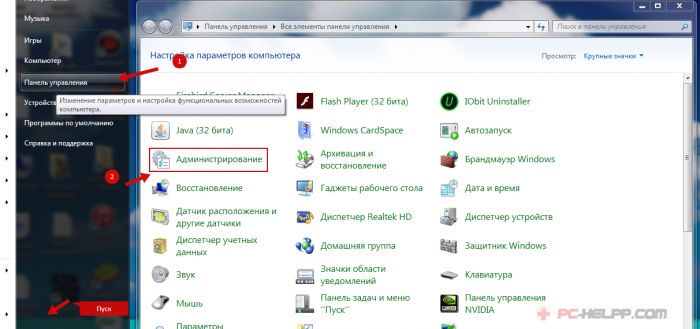
If everything is normal in the BIOS, and the operating system does not recognize the device, you must configure it manually using the OS features. Do the following:Step One Go to the “Control Panel” from the “Start” menu and click on the “Administrative Tools” section.
Step Two Click on “Computer Management”.
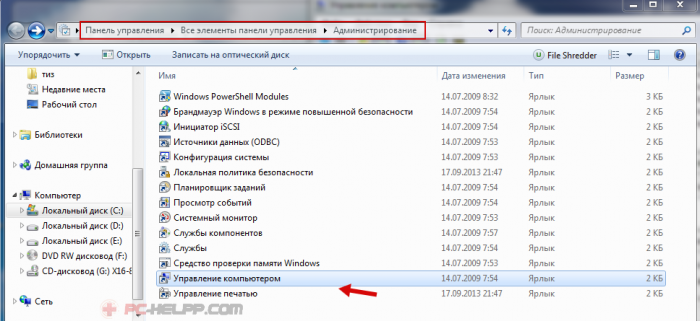
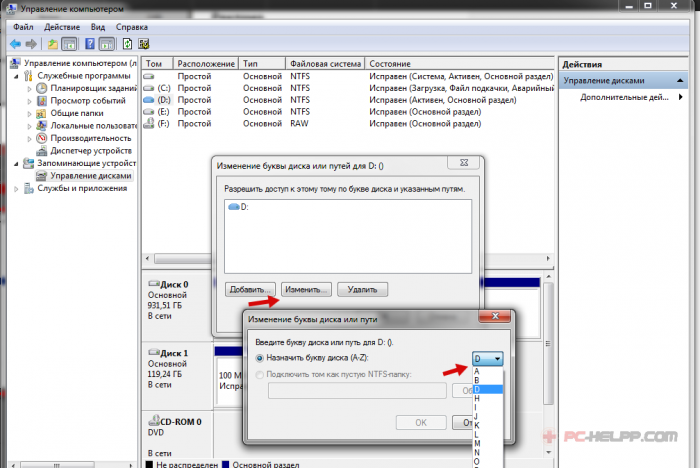
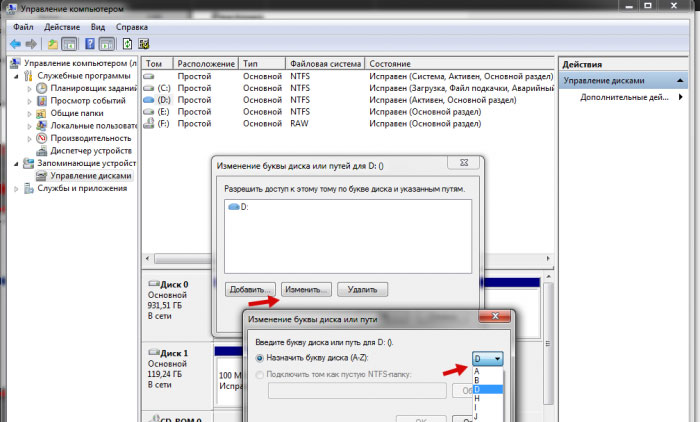
Step Three Click on “Disk Management”. Here you will see all the drives that are connected to the computer. There will be no letter on one of the devices. Right-click on the nameless device and open “Change drive letter” and assign your volume letter to the volume.
After that, you need to reboot the system.
If all these methods did not help and the computer (laptop) still does not see the hard disk (HDD), then most likely you need to bring it in for repair. On your own, you are unlikely to be able to detect a malfunction, and a computer technician can do this quickly. And there are cases when only professional help is recommended.
Users sometimes encounter such a problem when the system refuses to recognize the hard drive, not only the one that connects to the system as an additional device, but also the already installed hard drive, on which the operating system for boot is located. What could be the reason for this situation? How can I fix this problem? This article will offer some basic solutions to this problem. In most cases, they are the ones that are effective. However, first you still have to determine the cause of the failure.
The system does not see the hard drive: reasons
As the most common reason for such a failure, most experts call the incorrect connection of the hard disk with loops to motherboard. But even with the right connection, a situation may arise in which the system refuses to see new hard the drive, although it is absolutely functional, the drivers are installed, and the operating system is fully operational. Most often, this problem refers to incorrect BIOS settings. But more on this will be said a little later. A similar situation can also be observed in the presence of software failures, when the connected device is assigned a letter that is already used by the system. The disk may also contain errors. If this is the hard drive from which the operating system is started, then boot sectors and records that need to be restored may be damaged.
The system does not see the hard drive: physical causes and solutions
Considering why the system refuses to see hard sATA drive, we will start with problems that are physical in nature. As it should already be clear, for starters it is recommended to check the correct connection of all wires and the density of the loops in the corresponding connectors. In addition to this, a very common cause malfunctioning hard drives today are called overheating of the south bridge. This is more common with laptops. In this case, first turn off the device and allow it to cool. A possible solution to the problem for stationary units may be the option to reset the settings by removing from the slot cMOS batteries. At the same time, you should find on the motherboard a special Clear CMOS jumper, which is usually located near the battery. First, the jumper must be switched for 15 seconds to position 2-3, and then return to the initial connection 1-2. Here it is worth paying attention to the correct connection of the Master / Slave. A hard drive with an IDE interface must necessarily have a Master connection. All other devices, including optical drives, and external hard disks - Slave. This applies only to those cases when the system does not see second hard disk. However, this is far from the whole problem.
The system does not see hard drives: BIOS setup
Another reason why the hard drive may not be recognized is because of incorrect settings. bIOS systems. If the system at startup reports that system disk not found and asks to insert it, it is possible that another device is simply set in the download priority. The priority device to boot in the appropriate section should be selected exactly HDD. If the system does not recognize the hard drive even after that, you need to go to the settings section of the hard drive and disable AHCI mode in the SATA configuration settings line. You must install a RAID or Standard IDE as the parameter used.
The system does not see hard drives: disk management section
Suppose the main hard drive is recognized by the operating system without problems and boots. The user connects a second hard drive, but receives no effect. Why might the system not recognize the hard drive? But there are many reasons. One of them is that the disk is just assigned the wrong letter. To fix this problem is quite simple. You need to go into computer management and use the same section for disks. All devices will be displayed here, even if they do not work correctly or are not recognized at the initial stage of loading. You need to select the appropriate drive, call up the submenu with the right mouse button and refer to the line for changing the drive path or letter. After that, you must enter an unused value and save the settings. You may need to reboot.
Driver issues
Another problem for many users is missing or incorrectly installed drivers, which are responsible for the operation of an external and installed hard drive on the motherboard. If the user has a driver disk, which must be included with the device, then there are no problems. You will just need to install or reinstall the drivers. If such a disk is not included, then you can use the Driverpack Solution package or install a program like Driver Booster, which will scan and identify missing, damaged or updated drivers and install them in the system.
Checking the HDD and boot record
The most unpleasant situation in which the system may not see the hard drives is when the operating system does not boot as a result of software errors or damage to the surface of the hard drive. In the first case, you need any boot disk. It will be necessary by pressing the R key to call the recovery console and go to the command line, then check the disk for errors with the command chkdskc: / f / r, and then register the lines Bootrec.exe /FixMbr and Bootrec.exe/FixBoot, which will allow fix boot records. If this does not have a positive effect, you will need to overwrite boot sector, using the command Bootrec.exe / RebuildBcd for this purpose. If the problem was actually related to a similar situation, then the download after restart will proceed in normal mode without failures. With mechanical damage, there is nothing left but to replace the hard drive. Some argue that using the program HDD Regenerator can be restored bad sectors by magnetization reversal of a disk, but it is hard to believe in it.
Conclusion
It remains only to say that these are far from all solutions for those cases when the system does not see the hard drive. It is simply impossible to foresee all situations. However, the situations discussed above are most common. Depending on the situation, you can use one or another technique that will fix the problem. This article intentionally did not address problems when the system does not see the hard drive as a result of virus exposure, however, such situations also occur. Protect your own personal computer should be a priority for any user. Also, this article did not address issues related to incorrect partitioning or formatting hard drive.
If after reinstalling windows 7 or 8.1, and also after upgrading them to Windows 10, your computer does not see the second hard disk or the second logical partition on the disk (disk D, conditionally), in this manual you will find two simple solutions problems, as well as a video guide to fix it. Also, the described methods should help if you installed a second hard drive or SSD, it is visible in the BIOS (UEFI), but not visible in Windows Explorer.
If the second hard drive does not appear in the BIOS, but it happened after some action inside the computer or simply after installing the second hard drive, I recommend that you check first of all whether everything is connected correctly:.
How to "enable" a second hard drive or SSD in Windows
All we need to fix a problem with a disk that is not visible is the built-in Disk Management utility, which is present in Windows 7, 8.1, and Windows 10.
To start it, click windows keys + R on the keyboard (where Windows is the key with the corresponding logo), and in the “Run” window that appears, type diskmgmt.msc then press Enter.
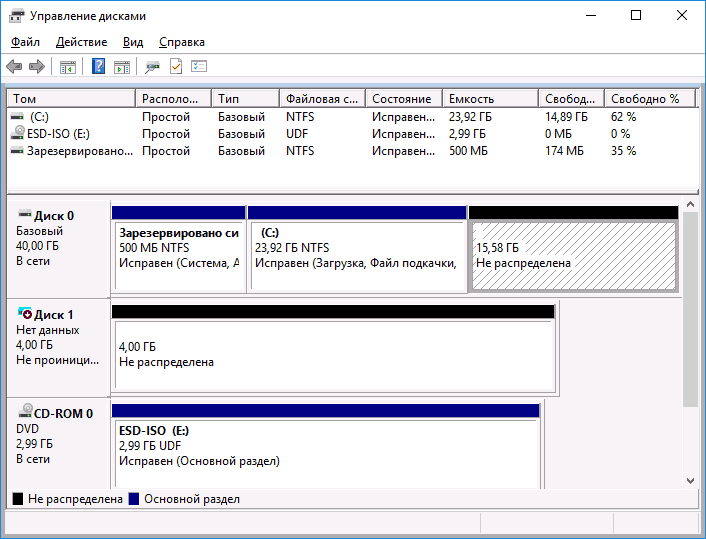
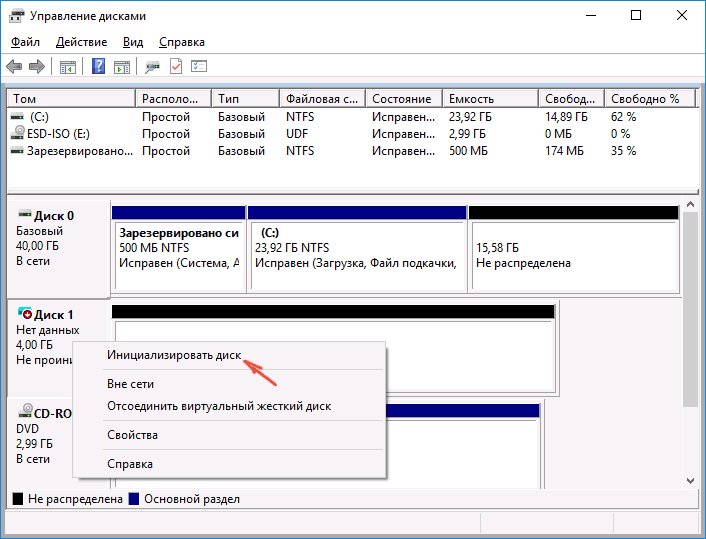
After a short initialization, the disk management window will open. In it, you should pay attention to the following things at the bottom of the window: are there any disks in the information about which the following information is present.
- "No data. Not initialized ”(if you do not see a physical HDD or SSD).
- Are there areas on the hard drive in which it says "Not allocated" (if you do not see a partition on one physical drive).
- If there is neither one nor the other, and instead you see a RAW partition (on a physical disk or logical partition), as well as an NTFS or FAT32 partition, which does not appear in the explorer and does not have a drive letter, just right-click on it under such a section and select either “Format” (for RAW) or “Assign a drive letter” (for an already formatted partition). If there was data on the disk, see.
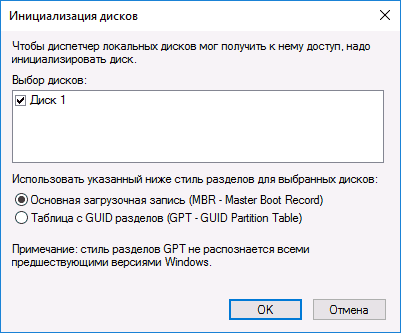
In the first case, right-click on the name of the disk and select the menu item “Initialize Disk”. In the window that appears after this, you must select the partition structure - GPT (GUID) or MBR (in Windows 7 this choice may not appear).
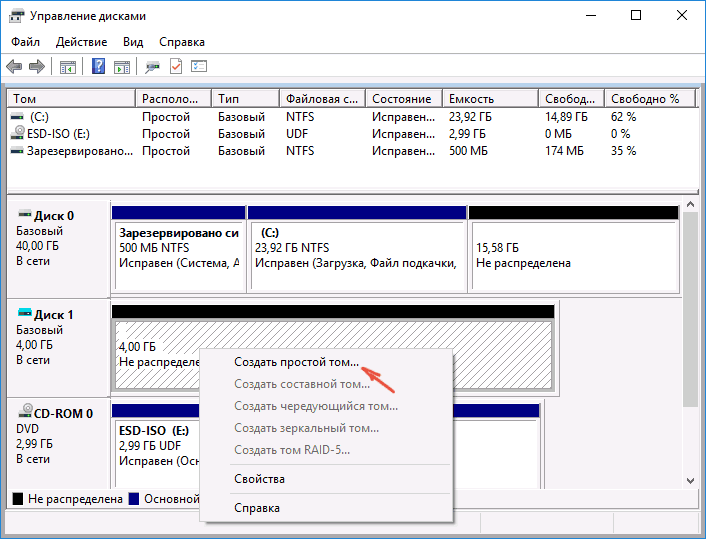
Upon completion of the initialization of the disk, you will get the "Not distributed" area on it - i.e. the second of the two cases described above.
The next step for the first case and the only one for the second is to right-click on the unallocated area, select the menu item "Create a simple volume".
After that, you just have to follow the instructions of the volume creation wizard: assign a letter, select file system (if in doubt, NTFS) and size.
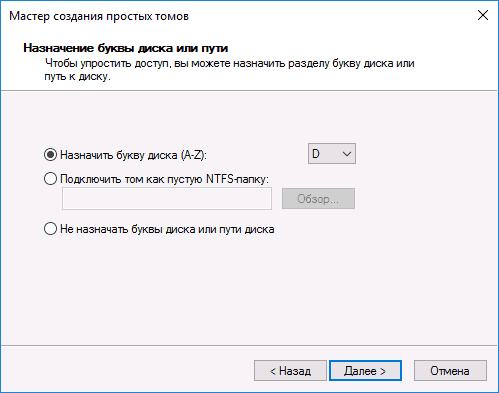
Regarding size - default new disc or section will occupy all free place. If you need to create several partitions on one disk, specify the size manually (less than the available free space), and then do the same with the remaining unallocated space.
Upon completion of all these steps, a second disk will appear in Windows Explorer and will be suitable for use.
Video instruction
Below is a small video guide, where all the steps that allow you to add a second disk to the system (turn it on in Windows Explorer) described above are shown clearly and with some additional explanations.
Making the second disk visible using the command line
Caution: the following way to fix a missing second disk with command line given for informational purposes only. If the above methods did not help you, but you do not understand the essence of the commands below, it is better not to use them.
I also note that these steps are unchanged applicable for basic (non-dynamic or RAID disks) without extended partitions.
Run the command line as administrator, and then enter the following commands in order:
- diskpart
- list disk
Remember the number of the disk that is not visible, or the number of the disk (hereinafter - N), the partition on which is not displayed in Explorer. Enter command select disk N and press Enter.
In the first case, when the second physical disk is not visible, use the following commands (note: the data will be deleted. If the disk is no longer displayed, but there was data on it, do not do the described, maybe just assign a drive letter or use programs to recover lost partitions ):
- clean(cleans the disk. Data will be lost.)
- create partition primary (here you can also set the parameter size \u003d S, setting the size of the partition in megabytes, if you want to make several partitions).
- format fs \u003d ntfs quick
- assign letter \u003d D (assign the letter D).
In the second case (there is an unallocated area on one hard drive that is not visible in the explorer) we use all the same commands, except for clean (cleaning the disk), as a result, the operation to create the partition will be performed on the unallocated location of the selected physical disk.
Note: in the methods using the command line, I described only two basic, most likely options, but others are possible, so do this only if you understand and are confident in your actions, and also take care of the safety of the data. You can read more about working with partitions using Diskpart at official page Microsoft
One click of a button is enough to turn on the computer. Unfortunately, there are times when the system fails to initialize the hard drive. In this case, a problem may arise not only with an additional hard drive, but also with the main HDD. Why does the computer not see the hard drive and how to deal with it?
In fact, there are several reasons conducive to hard failure drive. In most cases, the problem can be fixed on its own. To correct the situation, it is necessary to understand the cause of the breakdown.
The main reasons for the "loss" of the disk
When the hard drive disappears, the first thing that comes to mind is the incorrect connection of the hard drive to the motherboard. In fact, there are several reasons that cause this problem. The main “breakdowns” of the information carrier include:
- Lack of contact;
- Incorrectly specified drive boot priority;
- Old operating system;
- The system does not support a connection interface;
- Lack of drivers;
- Lack of nutrition;
- The absence of a section letter;
- Device conflict;
- BIOS failure.
It does not matter for what reason the computer does not see the hard drive, you need to understand what to do in a given situation.
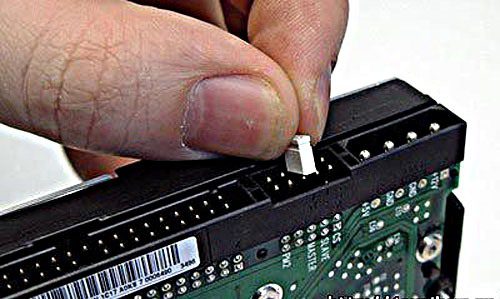
A common cause that causes a “lost” hard drive can be considered a wrong connection. When connecting a cable or power cable, users sometimes loosely insert chips. As a result, the motherboard does not see the hard drive.
The same situation can occur if the connector on the motherboard does not work. To correct the situation, it is necessary to double-check the correct connection, as well as the operability of the port (it is best to temporarily use a different connector). The same applies to cables, it is better to replace them.
Drive loading priority
If you connected the hard drive correctly, but the system does not see it, most likely the problem is boot priorities. To fix the "breakdown", you must enter the BIOS. To do this, click one of the following buttons (each computer has its own key):
- Delete
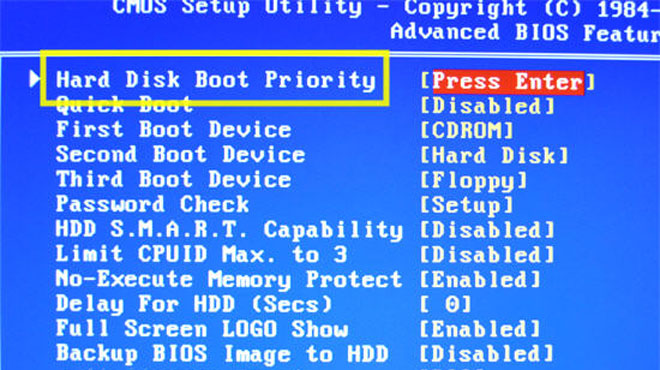
When the BIOS boots up, go to the “Boot” tab. After that, you need to install your disk in the "Hard Disk Boot Priority" item. As soon as the configuration is completed, you need to press the F10 button so that the changes are saved and the computer reboots. Now it remains only to wait for the system to boot.
Old operating system
Technology does not stand in one place. Each year, new storage media appear, the volume of which is growing in arithmetic progression. Many users purchase hard drives of 1 TB or more, but do not want to part with legacy operating systems. For example, Windows XP.
Unfortunately, outdated systems are not able to work with large volumes. You can solve the problem by simply reinstalling the operating system. If you don’t want to do this, you can use specialized software such as Partition Manager. Programs add support for hard drives up to 2 TB.
Connection Interface Problem
Another issue with legacy operating systems is the definition of a SATA connector. If you connect the hard drive to a similar port, the system will not detect it. You can solve the problem by reinstalling the OS.
Those who do not want to part with their favorite OS need to go to the store where SATA-IDE adapters are sold. It should be noted right away that such devices may not be in every store, so it will take some time until the adapter is delivered to the warehouse.
Lack of drivers
A similar situation occurs on weak computerson which an outdated operating system is installed. When new devices enter the market (hard drives are no exception), operating system developers add all the necessary drivers to the distribution.
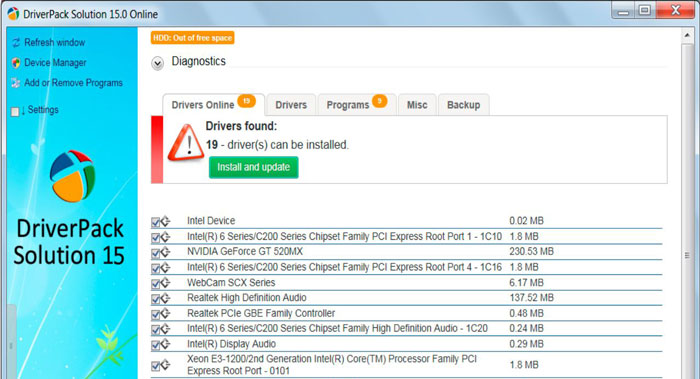
If the hard drive was connected, but the system identified it as an unknown device, you need to download the driver. This can be done both from the official website of the manufacturer's company, and using special driver packs. For example, Driver Pack Solution.
Installation does not take much time. After installing the drivers, the hard drive will be automatically detected. You may need to restart your computer.
Power shortage
Some users of older devices write: "what to do if the computer does not see the disk." At the same time, the wires and connectors are working, and the system is new. In fact, the reason for the lack of a hard drive can be a banal lack of power.
When purchasing a new drive, you need to ask the seller how much energy the device consumes. It is also necessary to calculate how much energy the system unit and all its components consume. After that, you need to pay attention to your power supply. Perhaps he is just weak. In order for the hard drive to work, you will have to consider purchasing a more powerful power supply.
Missing section letter
There are times when the system does not see the hard drive connected as an additional drive. If the OS has installed the driver, there are “traces” in the device manager hard drive detected, but the drive is not displayed in My Computer, you must go to administration.
To do this, open "Start", and then select "Control Panel." In the window that opens, click on the "Administration" section.
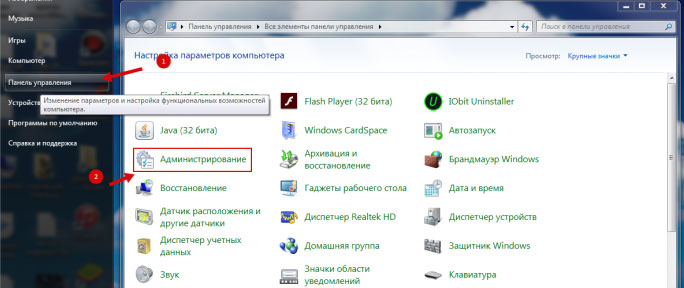
After a second, a new window opens with a list of controls. You need to find the "Computer Management" section, and then go to it.
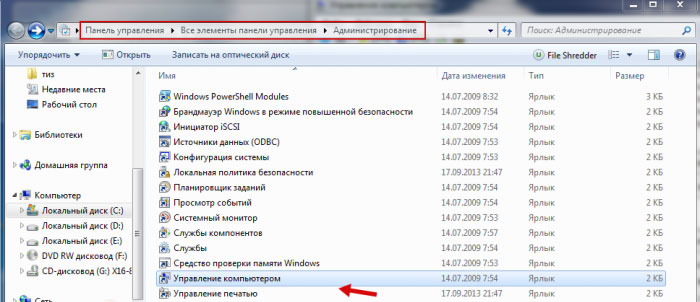
In the next step, in the left column, you need to find the "Disk Management" item. All mapped drives will be assigned a letter, except that you recently mapped. You need to right-click on the hard drive, and then select "Change drive letter" from the context menu. Now it remains only to choose any letter. For the changes to take effect, it is recommended that you restart your computer.
It is important to note that in rare cases, even after assigning a letter, the hard drive does not appear in “My Computer”. Most likely the reason is an unsupported file system. In "Disk Management", you need to call the context menu with the right mouse button and then format the system by installing the NTFS file system.
There is a device conflict
Users sometimes do not understand why the computer does not see the disk if the connection is made correctly? In rare cases, a device conflict may occur. This happens when two identical drives are installed, released by the same company.
To fix the problem, you need to connect the drive to the motherboard one at a time, and then indicate in the BIOS the hard drive on which the operating system is installed.
BIOS crash
It is extremely rare that a situation may occur when a BIOS failure occurs. Why the computer does not see the disk in this case is difficult to say. Sometimes a DVD-ROM or video card may disappear. The problem can be solved by resetting the BIOS.
First you need to turn off the power of the PC. Then find the jumper (a small “contact closure”) located on the motherboard. It can be found near the battery. The jumper should be moved to contacts 2-3. Now you need to wait about 15 seconds. This time should be enough to reset the settings. It remains only to return the jumper to its original place, and restart the computer. The system will automatically detect the new disk.
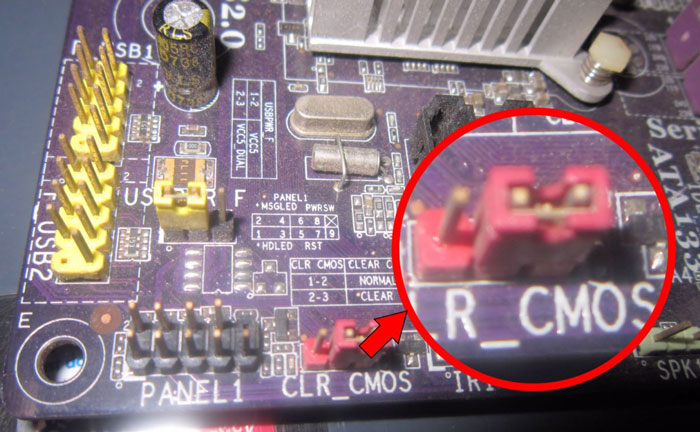
In the event that you did not manage to find a jumper, it is recommended to use the second method of resetting the BIOS. After turning off the power, you need to remove the round battery from the motherboard. Reset will occur within one minute. When the battery is returned, the computer can be turned on.
Do I need to contact specialists
In 95% of cases, any user can cope with the connection of the hard drive. If you tried all the methods, the description above and the hard drive did not appear on the computer, you can contact the specialists. Most likely the problem lies in the breakdown of the hard drive or the motherboard.
You can also contact a specialist if the drive malfunctions. At the same time, the device makes characteristic sounds, errors appear or the disk completely disappears.
Conclusion
More often than not, users who discover a problem connecting a drive start to get nervous. It is necessary to calm down, as serious consequences may arise. You should analyze the situation, and then go through the above methods. In most cases, you can solve the problem on your own. If you decide to use specialized software, carefully study the functionality and instructions.
Most users start to panic when they say “DISK BOOT FAILURE. INSERT SYSTEM DISK AND PRESS ENTER. " This message has various variations, such as “Missing Operating System” or “Operating System Not Found”.
Do you know this situation? Wait to tear your hair out. According to company experts - http://www.paradise-r.ru/nodisk.html, in 90% of cases nothing happened to your data and the problem lies in small physical problems that you can fix yourself. But first things first.
The most common causes of a “missing” drive
In this article, we will consider the 6 most common causes of this error. And let's start with the most popular of them:
1. BIOS settings failed
In this case, the BIOS settings must be reset. There are several ways to do this:
- Turn off the power to the computer. Look for Clean CMOS on the motherboard. There should be a jumper next to it. Carry it with contacts 1-2 to contacts 2-3. Wait a minute and bring the jumper back. Now the settings are reset to standard values \u200b\u200band the BIOS should recognize your hard disk.
- Turn off the power to the computer. Locate the flat battery on the motherboard. Take it out. Wait 60 seconds - during this time, the capacitors will be discharged and the BIOS settings will return to the factory values. Now you can put the battery back in the slot and turn on the computer. If everything is done correctly, the BIOS will recognize your HDD.
2. Corrosion of the contacts of the loop (SATA)
poor contact with the power connector (MOLEX)
To make sure the diagnosis is correct, try connecting the hard drive to another computer. Or, if possible, replace a pair of cables with similar ones.
For example, a loose power cord may be detected from the power supply when it comes to the desktop system unit. A DATA cable can be purchased at a computer store for a modest cost.
3. Wrong jumpers on the IDE hard drive
The IDE interface made it possible to connect several devices to the motherboard via a single loop. For ranking purposes, the old IDE hard drives had jumpers (Master and Slave) that allowed to prioritize the device at boot time. For the correct recognition of devices it is necessary that they work in different modes. For example, the hard drive is switched to Master, and the CD / DVD-ROM to Slave. Or vice versa.
4. The computer does not see the external drive (USB, eSATA)
If your external hard drive is not recognized by the computer, try connecting another device to the same connector (USB flash drive or mouse). If a new device is detected, then the problem is in the hard drive itself.
5. Overheating of the southern chipset
This problem is especially common for laptops. The south bridge is directly responsible for the operation of the SATA / PATA controllers. Due to its overheating, the hard disk may not work correctly. Turn off your laptop and let the chipset cool down properly. Also consider cleaning the cooling system so that this problem does not bother you in the future.
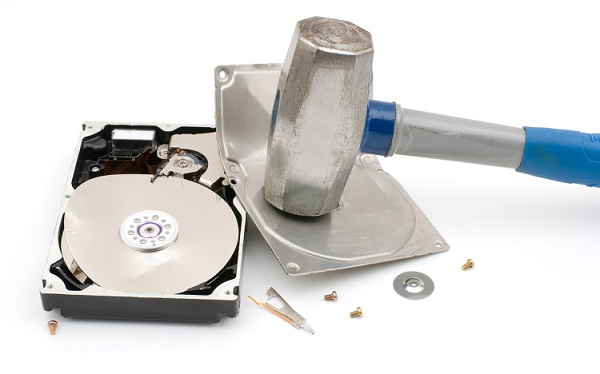
6. Mechanical damage
If you are even remotely familiar with the structure of a hard disk, you should know how closely the details are located in it. The reading head is in some fractions of a millimeter from the surface of the mirror plates. That is why it is highly discouraged to subject the HDD to shock and shocks. One careless movement and the head will scratch the plate, permanently destroying the data stored on it.
Is a service center inevitable?
Did the above methods not help you? It makes sense to resort to extreme measures if during the hard drive you hear:
- Abnormal clicks;
- A strong buzz;
- wookiee friction.
The above symptoms clearly indicate mechanical damage. And here it is up to you to decide. If you are confident in your abilities, you can try to restore the disk yourself using special utilities, like mHDD or Victoria.
However, remember - at the manufacturer's plants, assembly hard drives occurs in sterile conditions, eliminating the ingress of dust on fragile parts and the formation of fingerprints on them. It is possible that your hard drive can still be saved. And, disassembling its body on its own, you seriously increase the likelihood of a "fatal outcome."
If the data on the disk is really important to you - do not risk it and contact the nearest service center for help from qualified specialists. Even if the hard drive itself cannot be repaired, the service center employees have special equipment to recover data from its plates.
With the support of: http://www.paradise-r.ru/


