If there was a serious failure in Windows that blocked access to the user interface, then the only option to make the system operational again is to restore the OS via the BIOS. To do this, you can use:
- Drive with windows distribution;
- Previously created by user backup (backup) of the system, if any.
When a rollback through BIOS may be required
- Virus. There is malware (advanced worms or trojans) that infects not only files, but also the recovery environment. Removing the virus initiates the start of the rollback procedure at the time when the OS is infected. In this case, the only the right decision - restore the system through the BIOS;
- Damage system files and critical failure.These phenomena have one result - the OS does not load up to the user interface. A distribution disk or image for recovery and a BIOS tool come to the rescue.
Creating an image and recovery point for Windows 7
Timely creation of an OS backup is the best that a user can do to save important data available on a computer.
Backup - backing up information stored in the system for the purpose of its subsequent restoration through BIOS or recovery tool.
To create a backup of the system in Windows 7, the method of archiving the system image is used. The program provides the user with the opportunity to create an accurate image of the OS with all available data and personal settings. You can roll back Windows to this image in the event of a program or hardware failure.
Comment. You can create a recovery disk if windows computer installed by the manufacturer.
Image creation algorithm:
An image with which you can roll back the system through the BIOS has been created. Errors at this stage usually do not occur, the main thing is that the device can accommodate the downloaded information.
As for the recovery point, then everything is a little simpler:
It is worth noting the fact that the creation control point only possible if the recovery function is activated on the PC.
Comment. On Windows 7, by default, creating rollback points is an automatic process that occurs when programs are installed on the system that affect the basic parameters.
Creating a drive and recovery points - insurance. Not all users think that something bad can happen to the OS, so no one thinks about such a tool.
Now let's talk about configuring the BIOS to start Windows from a boot disk or flash drive.
BIOS setup
BIOS setup is a mandatory procedure, without which recovery through the disk is impossible.
The first step is to call BIOS. Each laptop model has its own key for calling the program. It can be F1, F4, F8, F9, F11, F12 and Delete. You can find the key you need either in the book on using the PC, or on the website of the manufacturer.
Setting up BIOS is not difficult, for this it is necessary:

Depending on the firmware, the appearance of the program may vary, however, the essence of the settings is the same - put in the first place the medium from which the operating system starts loading.
There is a so-called "omnivorous" combination. It allows you to completely forget about BIOS settings in the future:
- In the first place put - USB-Flash;
- On the second - CD / DVD;
- On the third - HDD.
This option is universal, but not optimal. In this case, do not forget the drive or flash drive in the drive, as this will slow down the loading of even the most powerful personal computers.
Rollback Windows 7 system through BIOS
OS rollback through BIOS is performed when user interface due to failure or error is not available. The rollback algorithm for the distribution disk and for the backup medium is the same:
- Configure the BIOS as indicated in the paragraph above. We set the parameters depending on which external device was chosen to store the backup copy or the distribution kit of the system;
- After completing setting the parameters, insert installation disk or an image in a computer drive. We are waiting for the download and choose not install windows, and recovery, as shown in the screenshot below:
This instruction on how to roll back Windows 7 through the BIOS ends. If the computer contains important information, the main thing to remember is one thing: always keep in stock external mediaon which the system image is recorded. Update the copy at least once a month.
A video in which all the ways to restore the functionality of the Seven are clearly presented:
Many users know that the BIOS is a necessary component of every computer, with which you can easily install and run the operating system. From this we can assume that if serious problems arose with Windows, then it can be restored through the BIOS.
Faced with problems in the system, many users (and even specialists) simply rearrange the operating system. Certainly this method effective, but also the most extreme, because the problem of computer operation can be dealt with much faster by first trying to perform the system recovery procedure.
How to restore the system via BIOS?
System recovery through the BIOS is performed if the operating system does not start, which means that system restore cannot be performed using standard Windows tools.
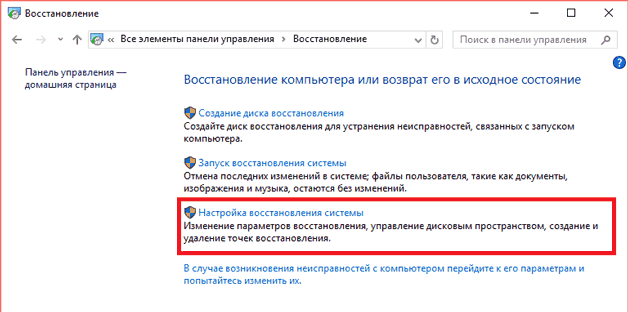
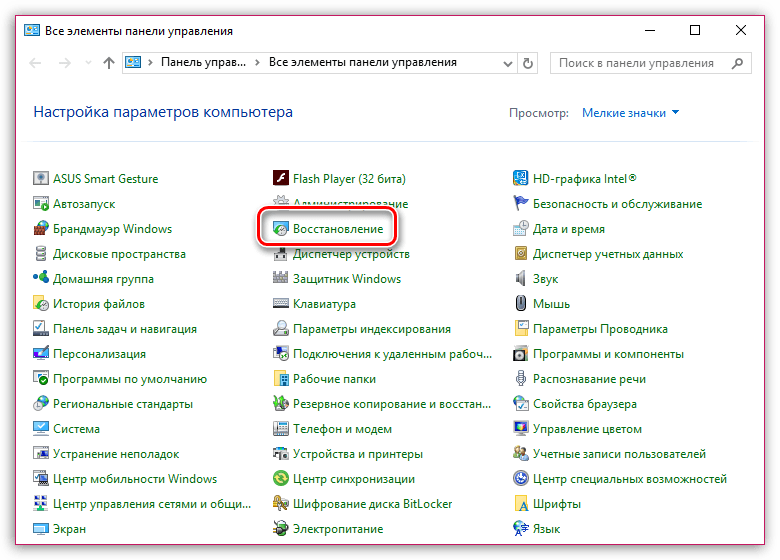
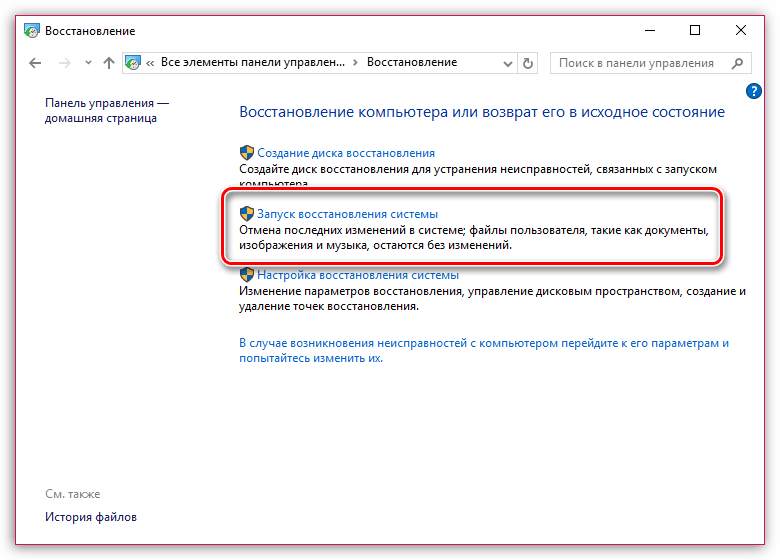
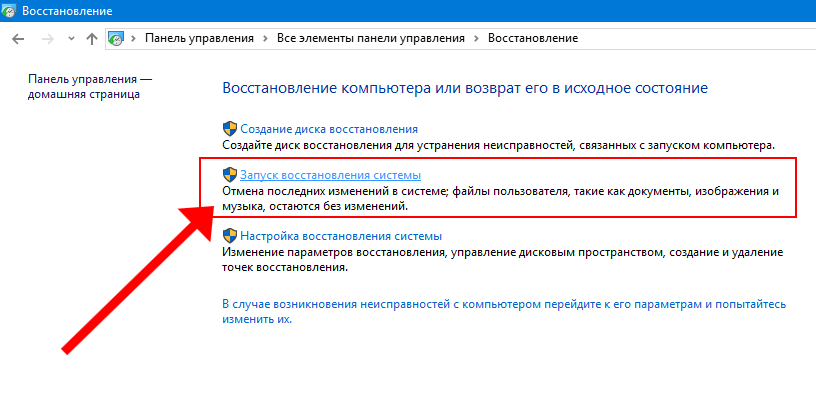
A few words about the regular system recovery tool. You can find it if you open it in the menu "Control Panel" section "Recovery" .
In the next window, click on the button "Starting System Restore" , and then select a recovery point when there were no problems with the computer.
Stage 1: Preparing Windows Distribution Media
In order to restore the system through the BIOS, you will definitely need a Windows installation disc. If you don’t have one, you can write a bootable USB flash drive with a Windows distribution to any other computer, for example, using UltraISO.
Stage 2: BIOS entry
Having prepared a Windows disk or a bootable USB flash drive, insert the media into the computer, after which you can proceed to restore the system through the BIOS.
First we need to get into the BIOS. The BIOS is entered at the very early stage of the computer boot by pressing a specific button.
Each BIOS or computer may have its own key (or combination) for entering the BIOS. As a rule, in most cases this is either F2either Del.
So, turn on the computer. As soon as it starts to boot, start repeatedly and quickly press the key responsible for entering the BIOS. After a couple of moments, the BIOS will appear on your screen.
If the first time you failed to enter the BIOS, try again, but using the new key.
Stage 3: setting the main bootloader
The appearance of the BIOS will depend on its version. For example, if you have a modern BIOS UEFI installed, then you will be greeted with a fairly convenient interface, as well as the ability to work with a keyboard and mouse.
If installed on your computer old version BIOS, you will have to be content with managing only with the keyboard.
In BIOS, we need to install the media with the Windows distribution, which we connected to the computer before, as the main boot device. That is, at the moment the procedure is no different from if you were reinstalling Windows.
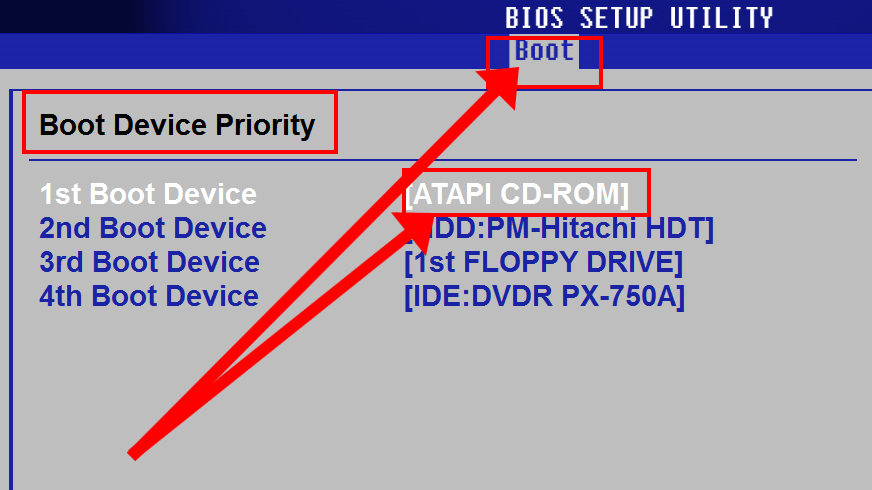
In order to expose a USB flash drive or disk as the main boot device, you will need to find the parameter "First boot device" (in your case, the name may be slightly different, but the essence remains the same). This option is usually located in the Boot, Advansed Featuers, Boot Device Configuration, or Boot Sequence sections.
In the screenshot below, a Windows disc is used, so you need to set the “CDROM” item first. If you use a USB flash drive with a Windows distribution, select its name.
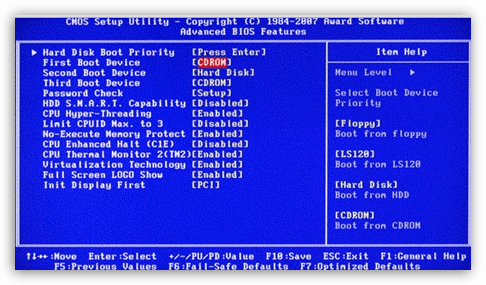
Save the changes, and then exit the BIOS (for this, pay attention to the lower area of \u200b\u200bthe window where the names of the buttons and the actions for which they are responsible are displayed. For example, in our case, to save the changes, click on the F10 button, and to exit the BIOS, press by pressing the ESC key.
Stage 4: System Restore
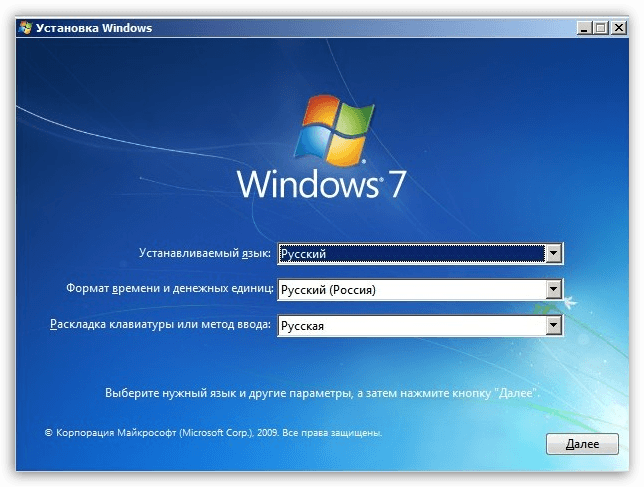
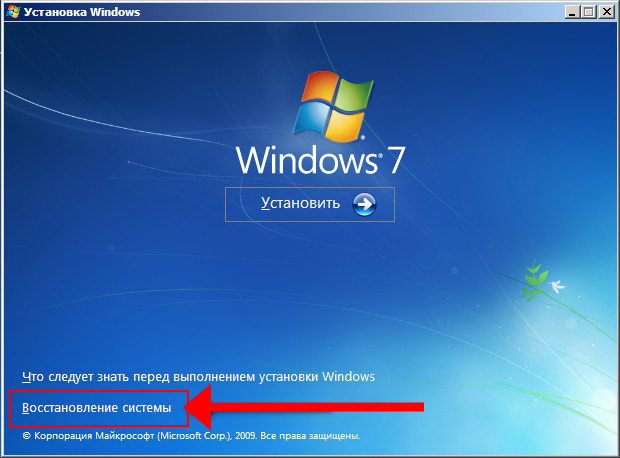
The computer will restart, and then the Windows Installer interface will appear on the screen. Set the language and go on.
In the next window in the lower area click on the button "System Restore" .

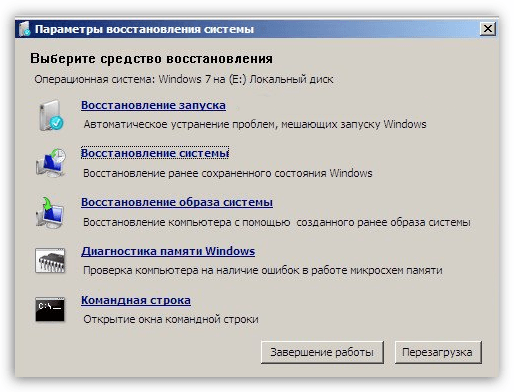
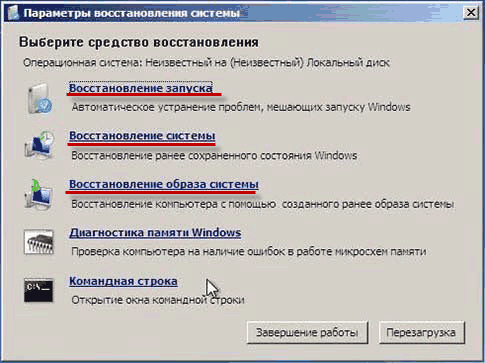
1. Startup recovery - the function will start a system scan for errors that interfere launch windows, and timely eliminate them;
2. System recovery - if your computer had saved points for rollback, then in this menu you can choose the appropriate one when there were no problems with the computer;
3. System image recovery - if the system image was previously taken from the OS, then this function will allow you to use it to restore Windows;
4. Diagnostics windows memory - Run a computer memory check;
5. Command line - the terminal window starts.
Selecting the first item, the system will begin scanning. Be prepared for the fact that the search for errors can take quite a long time.
Once the scan is complete, you just have to click on the button Fix and Restart and then verify the success of the recovery.

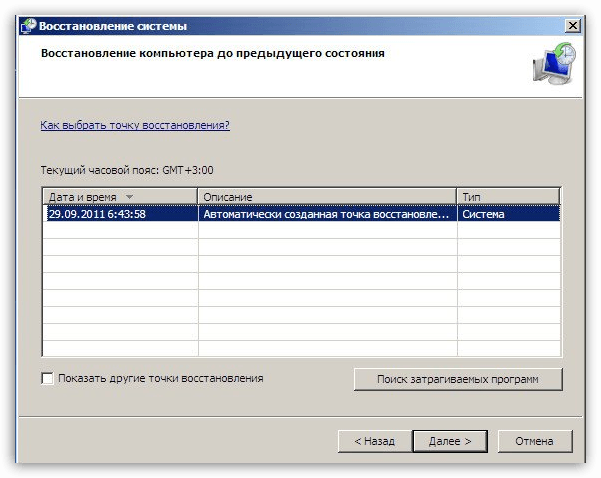
If your computer has saved recovery points, select the second item "System Restore" .
Next, you will be prompted to select a recovery point and begin the rollback procedure. The duration of system recovery will depend on how many changes to the system have been made since the selected point, i.e. if the point was created long ago, then the process can drag on for several hours.
We hope we have helped you figure out how to perform system recovery through the BIOS.
Modern technologies are developing rapidly, but most of the principles and methods of work of the equipment remain unchanged. Each a new version family operating systems Windows gets a better set of features. For example, when software crash in the work or installation of any drivers, the process of system recovery in a newer OS will be much faster.
At the moment, system recovery occurs through BIOS. Even other types of systems (like Linux) contain an OS recovery item. Therefore, it is very important to know how to make Windows operational after a virus attack or a critical failure. At the moment, this can be done using the installation disk (flash drive), a special resuscitator, and in more modern versions - from the SSD media or a special section of the hard drive of your PC or laptop.
How to restore the system through BIOS
It should be recalled that Microsoft has stopped supporting the version of Windows XP since April 2014. However, even in spite of this, quite a few companies (including in the USA, Europe) continue to use the services of this OS. So the question is how to make recovery windows systems XP through BIOS without a disk remains quite relevant. Indeed, even considering the good stability indicators of this system, it does not tolerate frequent installation-uninstallations software (especially if it does not have certification).
Before you restore Windows XP through BIOS, find the installation disk with this system, and then:
- insert it into the CD-ROM and reboot the device;
- press at the start of the system the DELETE, F1, F2 key to enter the BIOS;
- click the menu item Boot Device;
- select first optical drive, save the changes and restart the PC:

- after the line “Press any key” appears on the screen, press the spacebar - activate functionality installation disk;
- in the dialog box that appears, click the "R" button, then select desired version OS (if it is not one on the PC) and press Enter;
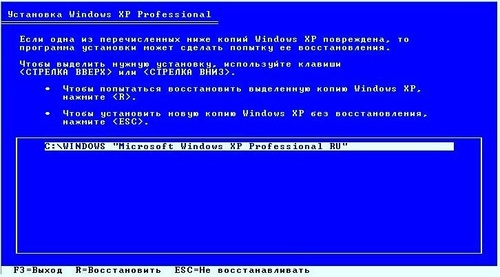
- now enter fixboot in latin letters, press Enter, and then confirm with the "Y" key;
- the process may take some time, upon its completion enter the fixmbr command in the line and press the keys, as in the previous step;
- entering the Exit command will allow the PC to reboot, after which you can work in normal mode.
Thus, you were able to save yourself from a rather lengthy process of installing the OS. Also, do not forget to enter the BIOS by the method described above and rearrange the way to boot the system from CD-ROM to the hard drive.
As you can see, restoring the functionality of Windows XP is not so difficult. Use our tips on how to restore the system through BIOS and enjoy the clear work of your PC for as long as possible. In more modern versions of Windows (7 and 8), you can restore the OS in even fewer steps - do not be afraid to use the products of progress!
Hello dear readers of the blog site. Not so long ago, in one of my articles I promised to talk about how to restore the systemwindows 7
when any software malfunctions occur on your computer. Such a solution is the best and most correct way in case of malfunctions associated with errors during the installation of updates, incorrect settings change, as well as when installing either your computer or laptop. This approach can fix problems that slow down or block your computer.
Many inexperienced users in the event of such a situation resort to the services of paid computer assistance, while giving not a little money. However, you can restore windows 7 yourself without spending a dime.
During the procedure, you may encounter the problem of the lack of a recovery point, since the protection for the disk on which the OS was installed was disabled, and, accordingly, the storage of copies of the system parameters and previous versions Files has also been disabled. In order not to encounter such a situation in the future, I advise you to read, .
There are several ways you can restore windows 7 with your own hands. I will try to explain in detail and accessible about them below.
Restoring windows with embedded system services
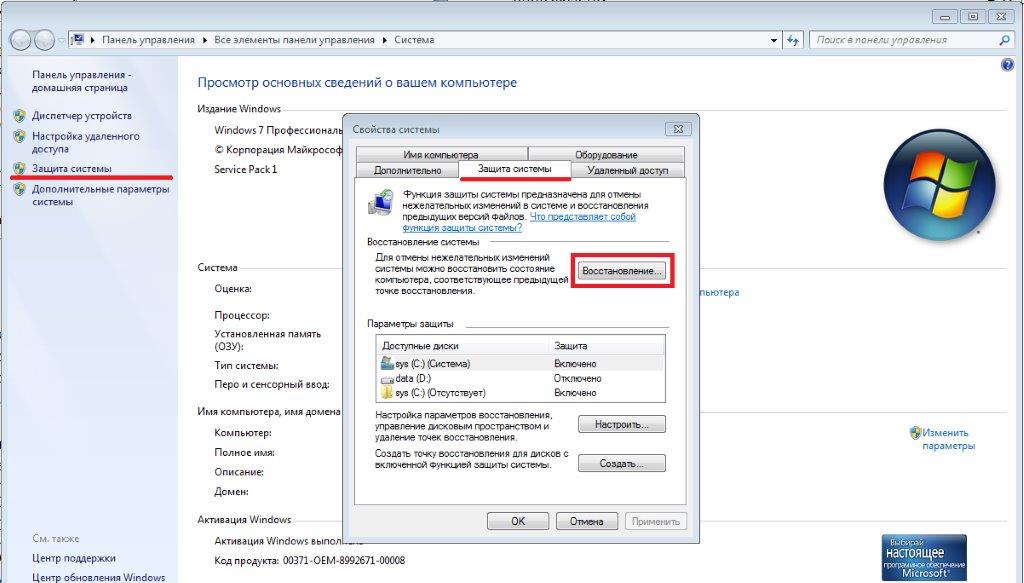
In the built-in services of the OS, there are many useful utilities to simplify the work with the computer, as well as configure and protect it. Restore systemwindows using the built-in utility, you can only if your computer is not damaged so much that Windows does not start. If the computer starts up normally, but you are sure that you need a rollback, then after loading Windows, right-click on the shortcut My computerand select the item The properties. Before you open a window of basic information about your computer, in which on the left side select System protection after which an additional window will open Properties of the system, where you need to press the button Recovery.
Such actions will launch the utility. System Restore,where it is enough to press a button Further.
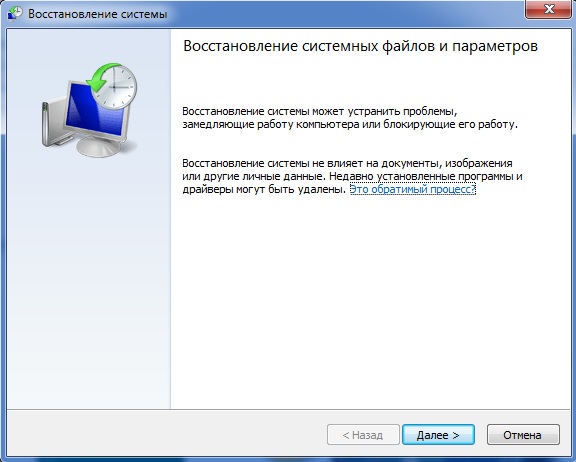
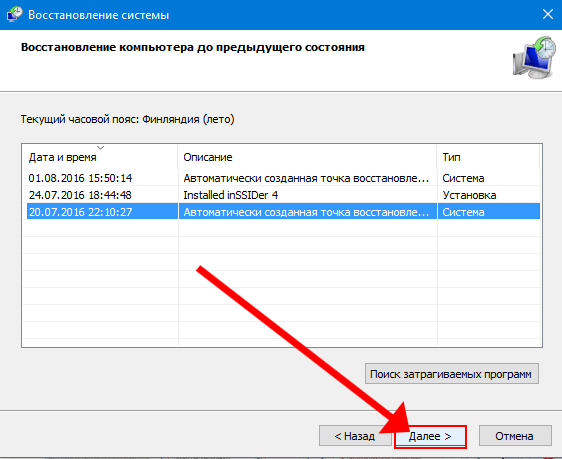
If you did everything according to the instructions, the result of the correct actions will be the appearance of a new window with the choice of recovery points. To display all possible points, just check the box next to Show other recovery points.Knowing the date and time when your operating system began to junk, you can select a point formed earlier than this event. If you have decided on the choice of windows recovery point, then select it and click Further.

After all the manipulations, another window will appear before you, in which information on system recovery will be summed up. If you use a password to enter, then in this window it is possible to create a password reset medium. Although a floppy disk will be written there, but as you know, no one is already using floppy disks, you can create a password reset flash drive. By name, it’s clear why it is needed.

The last thing you should do is press the button Done after which a message will be displayed on the screen that the recovery process cannot be interrupted. To continue the process, just click Yes.
Now it remains to wait for the end of the process, after which the computer will reboot and information will appear on the screen that the windows recovery was successful.
System Restore from Safe Mode
There are situations when a computer displays a simple black screen when loading instead of the usual desktop interface. In this case, do not be upset, we will come to the rescue . I will not describe in detail how to run this mode, since I wrote an entire article on this subject, which you can read by clicking on the link above. The essence of this method is quite understandable, but for the lazy I will write a little the process itself.
At the time of loading the computer, press the F8 key several times, after which a list of additional boot options will be displayed. You can choose any mode, since it is not important for recovery. After you have selected the desired item and clicked Enter the system should boot into safe mode with minimal settings.
Next, you need to do the same steps that are described in the first method, since when loading safe mode, the system does not change the style of its work, but only turns off unnecessary files. Actually with this method, everything is clear.
System Recovery via BIOS
Last and most effective way The rollback is starting windows 7 recovery via BIOS. This method will allow you to revive the computer even in difficult situations, it is enough to turn it on.
The only thing that should be at hand is a boot disk or. I described in more detail about this method in, but here I will try to describe this method a little. Before you begin the process of restoring the system through the BIOS, insert the disk or USB flash drive into the computer. When you turn on the computer at a certain frequency, press Delor F12 (it all depends on the manufacturer of the computer and the version of the firmware), so you run the BIOS. After loading, go to the menu Boot /BootDevicePriorityand select which media the system will boot from. If you use a disk, then select DVD, if a flash drive, then USB HDD. We save all the changes and restart the computer. In BIOS, just press the F10 key.
After the computer has rebooted, the installer window should appear. Here we select the item System Restoreand click Further.If you did everything correctly, you will be prompted to select a recovery point. From my own experience I want to say that it is best to choose the first successful launch. In this case, all programs that were installed during the work on the computer will be deleted. Do not worry about the safety of personal information, it will not be affected. After the recovery point has been selected, click Further, wait for the windows 7 recovery process to finish and click Yes done. Actually, this is the end of the system recovery process through the BIOS; all that remains is to remove the media from the computer and change the order of the devices from which the download should be made in the BIOS settings.
So we examined the main ways to restore windows 7. If none of them helped you or during the process there were questions that you couldn’t solve yourself, then be sure to ask them in the comments.
You can also watch a detailed video instruction, after watching which there should be no questions
No one is immune from such an unpleasant event as the collapse of the Windows operating system. No matter how pathetic it may sound, but after the novice user independently returns from the digital nonexistence the OS once stopped working, he feels almost like God. If you, dear reader, asked the question: “How to restore the system through BIOS”, then it is easy to assume that your business is really bad, since the system simply does not load, and therefore use the option standard rollback through a previously backed up OS, you cannot. However, it is highly probable that the reason for your difficulty has a completely different nature of explanation. Nevertheless, in this article you will definitely find a way how you can return your OS to its former state of performance. Doubt the methods presented recovery windows really work!
Today we will consider:
Inspirational introduction or In search of a perfect understanding of the subject
It is human nature to seek easier solutions. However, in the process of choosing one or another method that would allow a beginner to get out of a problematic situation without losses, alas, not many can be avoided. Do you know why? Because and most of them involve partial or complete loss of user data.

Often rush and recklessness taking place in human nature become derivatives of misunderstanding. As a result, an “unsuitable in a specific situation”, but already involved recovery algorithm threatens with very unpleasant consequences: along with the profile settings, folders with valuable information disappear from the desktop, as well as a number of other irreversible actions.
And taking into account the fact that with the development of the Internet more and more “woeful teachers” began to appear on the Internet, it is easy to imagine what an inexperienced beginner can expect after he applies the instructions of the “expert rogue” and completely destroys the OS, which just had a problem with the boot record.
Further, more, “convenient” advice in the language of professionals can even be interpreted meaningfully by a beginner in his own way. But, inexperienced in computer matters, a housewife, oh, how much you need, sometimes, good advice on what and how to press so that Windows can again please its owner with truly grandiose opportunities ... Let us leave the lyrics and talk about our specific matters.
When BIOS (a) cannot be avoided, DOS enters the game
In any case, the base system acts as a kind of independent intermediary (naturally in the programmatic sense of the word), which is capable of contributing to the implementation of the recovery process in the most seemingly hopeless situation.

A small digression: the base microsystem, as such, does not have built-in OS recovery software, but it is some kind of intermediate authority capable of transferring control single task DOS operating system , which in turn has a number of capabilities for conducting critical operations to restore the health of a crashed OS.
After launching DOS tools (for ease of understanding: DOS is a small operating system that resides on an optical storage medium (CD / DVD) or on a different type of storage device (flash drive). This console system transfers all authority to manage disk devices and direct access to BIOS software functionality (unlimited use of PC hardware resources).
Moreover, the use of DOS tools in such cases allows you to reanimate the OS with the least loss and most that is not in the correct way. The low-level method of interacting with the software components of the OS allows you to correct virtually any system flaws and "operational" flaws of the developer with surgical accuracy.
So what to do when the system does not boot: using a boot disk
In the case when you do not have the opportunity to use regular Windows means To restore the OS, you need to resort to the method described below.
- Install in the drive of your computer the installation distribution kit of your OS of the exact version that has ceased to function (this is the case with a flash drive).
- Now turn off and on the computer again.
- Then constantly, with an interval of two presses per second, tap on the service key, through which you enter basic settings System BIOS (usually this is the “Delete” or “F2” button).

- After you find yourself in the main BIOS window (a), click on the “Boot” tab. Depending on the version of the microsystem installed on your computer, the optional section in which you need to change some settings may be called differently, and access to it can be carried out only after several transitions on the corresponding tabs ( see information in this article ).
- Set as a bootloader a device for reading data from a disk, or assign a priority to a USB storage device (USB flash drive).
- Save the changes.
After rebooting, a service message will be displayed on the monitor screen in the form of an invitation to make the corresponding choice “Press any key ...” - at this moment press any key on the PC keyboard. Of course, we are talking about a situation where the user uses an installation disk with a Windows distribution or emergency disk recovery, which can be done in a couple of clicks yourself.
Depending on the version and edition of the OS you are using, there may be several options for starting the recovery environment. The most optimal choice is exclusively your prerogative. For example, if before the crash the OS on your PC was not activated function reserve copy and the system generally does not have any kind of recovery control point, here the diversity of choice is significantly reduced not in favor of the user. Nevertheless, there is still a way out!
Practical solution # 2: What to do if the computer system does not have a recovery checkpoint, but the user has a Windows installation distribution
- We repeat all the steps from the previous instruction on loading accurate to the last point.
- Choose the option " System Restore ».
- In the next window, activate the item of the same name and follow the instructions that will accompany the entire recovery process in the form of short messages on the computer screen.

You won’t need anything further from you, unless you press the next key a few times after you specify the data required by the installer (username, PC name, password for entry and other “organizational issues”).
Of course, everything will remain in place, but ... you will not see the previously installed programs. Unfortunately, all previously used software will have to be reinstalled.
Method number 3: Enable "Safe Mode"
While passing through a computer system Post test , Press the F8 key repeatedly. From the list, select the option “Download in safe mode”. Different windows versions this paragraph may differ slightly in designation. However, in essence, this item is intended for the same thing - to boot the system using only critical Windows services.

After the system boots up:
- We go to the control panel (naturally through the "Start" menu).
- Next, select the "Recovery" section.

- Then, activate the item we need "Launching ... a system."
- We select the most suitable (in time) backup from the displayed list and go to the kitchen to drink tea, coffee or another favorite drink.
This method is applicable to literally all versions of Microsoft operating systems. However, there are still some nuances in the process of implementing this method, and they are inherent exclusively in Windows 8.
Often the owner of the fast-moving eight simply cannot use the safe mode due to the opposition of the software tools for loading this OS. And again, good news - we will teach you, dear reader, what needs to be done in order to make the capricious figure eight open an additional boot menu by pressing the "F8" key.
We look at the pictures, read, learn and act!
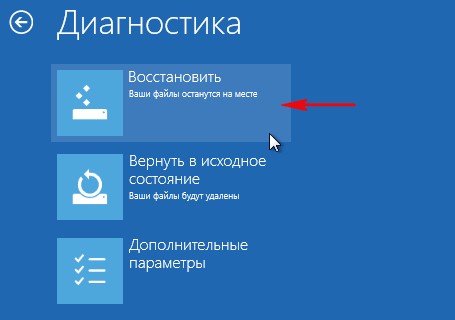
- Insert installation system distribution or emergency boot windows drive 8 (how to set the priority bootloader CD / DVD drive or flash drive, ).
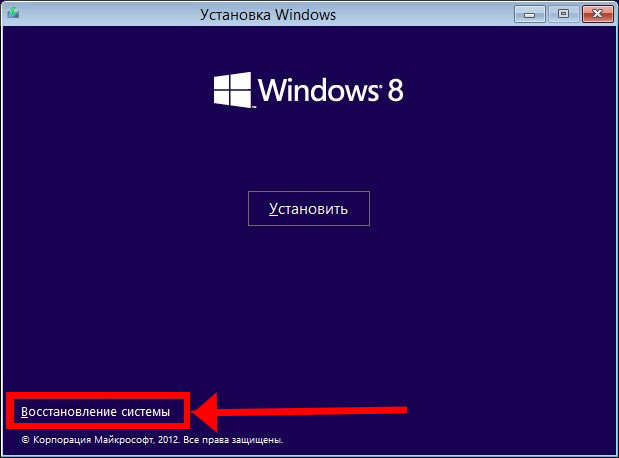
- Click on the link "System Restore".

- Then, go to the block "Diagnostics".

- Now, click on the icon "Extra options".
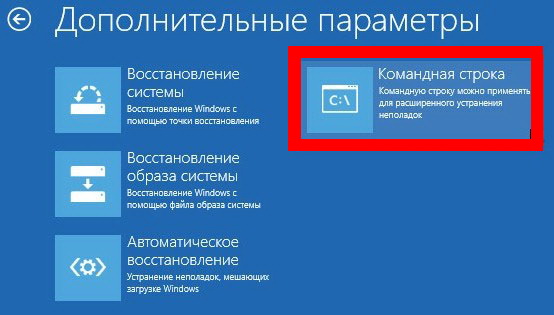
- Finally, select the tool we are interested in. "Command line".
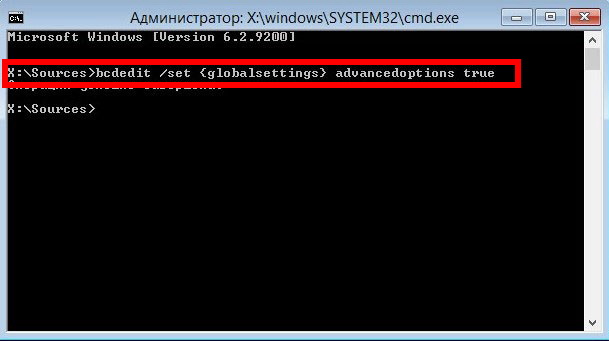
- In the command console, write - bcdedit / set (globalsettings) advancedoptions true.
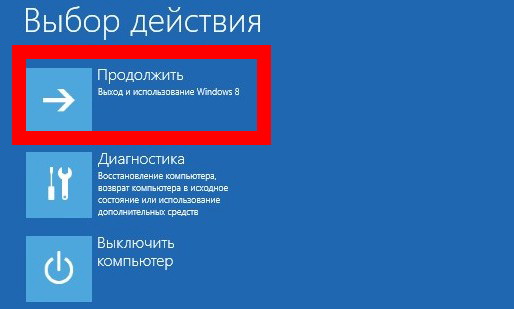
- Exit the software environment "Cmd".
- You next choice - "Proceed…".
A similar method is also relevant for the newfangled ten (Windows 10), and also works flawlessly when the user computer is equipped with an SSD solid state drive with an optimized boot process.
Option number 4: And again she - "saving" command line
In some cases without this method recovery just can not do. Command line - this is a software interface that allows you to directly interact with the hard drive controller indicating to the latter what and how to overwrite and fix in order for the system (which, incidentally, is in one of the areas hard drive) became operational again.
So, turn on the computer (reboot) and again press the F8 key several times:
- Select the item "Download in safe mode with command line support."
- After you find yourself in the Windows environment, in the command console, enter "rstrui.exe".
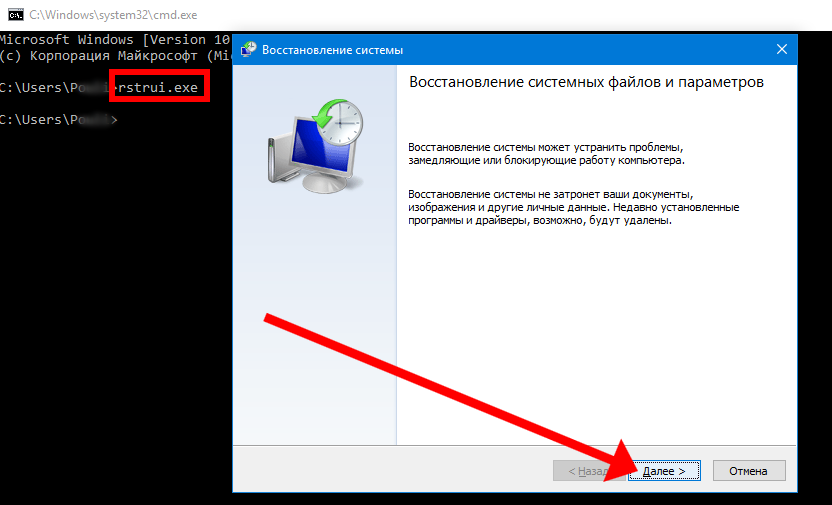
- In the next window, click "Next."
- Choose a backup suitable for you.
The above actions will cause the system to roll back to its original condition according to the activated backup.
As a concluding part: a successful finale is guaranteed!
In this article, the author intentionally did not describe in detail the “System Update” recovery option that was implemented in Windows 8 and is called “Refresh Your PC” in the original. And all because: if there is a rescue “Recovery” section on your hard drive, then in case of any malfunction the system will offer this method of recovery on its own - the user will only have to agree with “machine courtesy to help”. For the rest, you choose which particular rollback method to consider rational and appropriate specifically in your situation. However, it never hurts to make a backup copy of the data located on the hard drive. Connect the HDD to another PC and copy files or use boot disk « Livecd »And transfer valuable information to another (not system) area of \u200b\u200bthe drive. Well, the author of this article wishes you a truly productive choice and only the positive results that you expect. All the best to you, friends!


