On a PC with decent experience, you should check the file system monthly. In Windows Explorer 7, right-click on the disk icon and select "Properties | Tools ”and in the“ Check the disk for errors ”section, click“ Run Scan ”.
Chkdsk command for Windows 8
 For Windows 8, the disk scan dialog box has been trimmed. To start a scan, open a command prompt as administrator. Type “chkdsk c: / f / r” (without quotation marks) with the appropriate volume letters.
The / f option fixes errors, / r starts file recovery on bad sectors.
Check disk in Windows 10
 Open Explorer, select drive C in the left device tree, right-click on it and click on Properties. In the window that opens, go to the Tools tab. Now it remains only to click on the Check button.
If the system has already checked this disk, then it will offer to run the check again.
A photo: manufacturing company
. You can get such an error when working in the Acronis Disk Director program, which is the partition manager of the hard disk.An error can occur when performing various operations in this program, but most often if you increase the volume of one disk due to another, for example, increase the disk space C: due to D: on a laptop and simple computer. The cause of the error does not always lie in the damage. file system hard drive, and checking the hard disk partitions for errors may not give results.
File system damaged
Hello friends! The reason for writing this article was comments on my other article. After working with Acronis Disk Director in Disk Management, some users experienced this situation - when separating space from disk D :, this space disappeared to nowhere, while the Acronis Disk Director, in turn, showed that the operation was successful and drive D: has become smaller and drive C: larger.At work, I also often had to deal with such a task and she has a solution.
Interestingly, such a “File System Corrupted” error may not exist, you just work in Acronis Disk Director, then reboot and are very surprised to enter “Disk Management”, one disk will become smaller and the other will remain as it was.
Last time I encountered such an error like this. At work, a system administrator neighbor came up to me and said in a whisper: “Listen, I’m having some kind of mysticism, like I didn’t drink yesterday. On a laptop with the Windows 7 operating system installed, you need to increase the space of the C: drive by Acronis Disk Director, take the space from the E: drive and attach it to C :, and after rebooting this space disappears to nowhere, the C: drive remains the same, and the drive E: getting smaller every time I try.
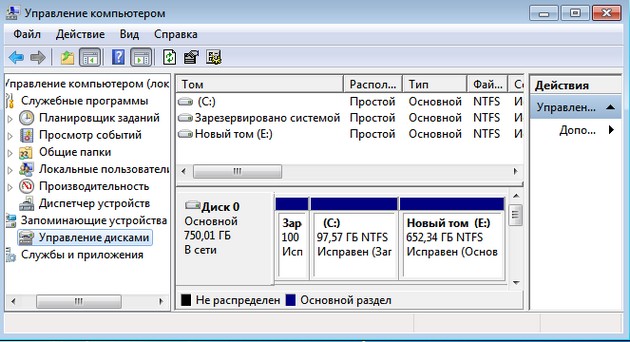
In the "Disk Management" of this laptop there was such a picture, drive C: occupied a capacity of 97 GB, and drive E: 650 GB. The letter D: was occupied by the drive, so we will work with C: and E: drives.
The task was set to take 100 GB from the E: drive and attach it to the C: drive to make it approximately 200 GB.
In this situation, using the tools of the operating system itself, such an operation cannot be verified, so I decided to use the Acronis Disk Director program,
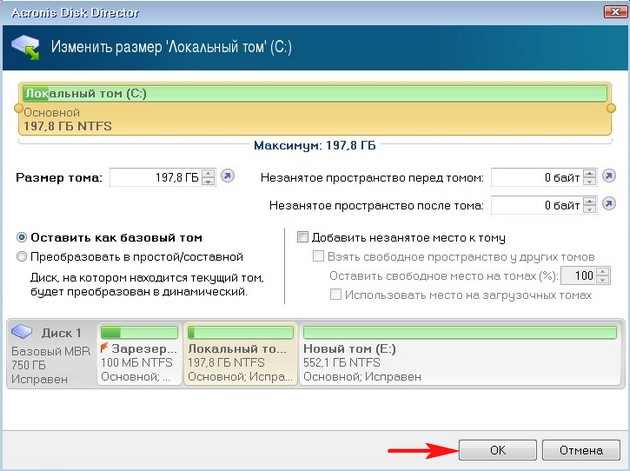
When I booted from the program’s boot disk, I first tweaked the E: 100 GB drive. Right-click on drive E: and select "Resize Volume" from the menu

such a window will appear. Change the size of the selected volume (E :) to a smaller side so that the unallocated space is in front of the volume (E :) and after the disk (C :), put 100 GB, then add the free space to the disk (C :) and it will become 100 GB more.
We cling with the right mouse to a kind of delimiter and move it to the right, thereby reducing the disk space E: by 100 GB and click OK. An unallocated space of 100 GB appears.

Now we right-click on the C: drive and select "Resize Volume" in the menu


The following window will appear. In it, we lead the delimiter to the right to the end, thereby increasing the C drive: by 100GB and OK.

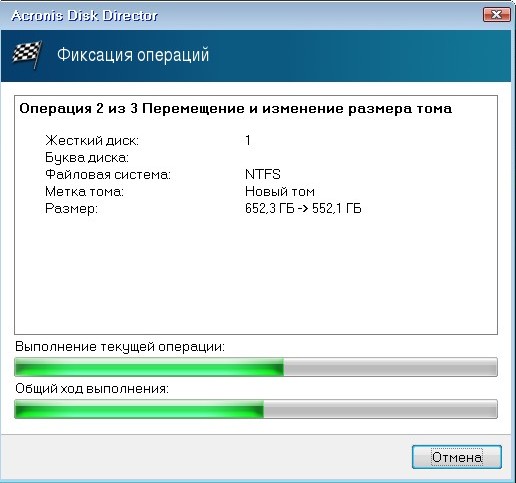
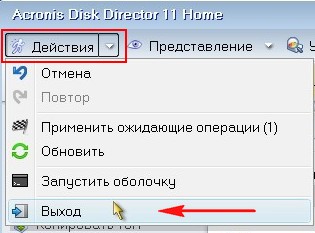
Our program works in the pending operation mode and for all our actions to work, you need to click the "Apply pending operations" and "Continue" buttons.


Here is the attention of friends, sometimes an error may occur " The file system is corrupted. Use the verification tool to detect and fix file system errors". What to do? I tell further.
We exit the Acronis program and reboot.
After the reboot, we immediately enter the "Disk Management" and see a strange situation. Drive C: what was the volume of this and remained 97GB, and drive E: became less than 552, 13 GB.

At this time, you begin to fire me and my article and the Acronis program, while in the meantime I start hiccuping accordingly.
Again, boot from the Acronis Disk Director program disk. Let's do this. We pluck off the C: or D: drive a small piece of space and leave it unallocated, then boot into the operating system and attach it back to the C: drive, but using utility program Windows "Disk Management".
Right-click on the C: drive and select "Resize Volume" in the menu
Nothing lasts forever in our world ... especially hDD a computer. This hard worker every second has to read and write a huge amount of data. It is no wonder that one day we find that some files are not deleted, not moved, and some cannot be read at all, then the hard drive starts making strange sounds and, in the end, dies. But it was so easy to follow your health hard drive and take measures in time to extend his life and create backups precious information.
(mosloadposition debug)
Windows Disk Check
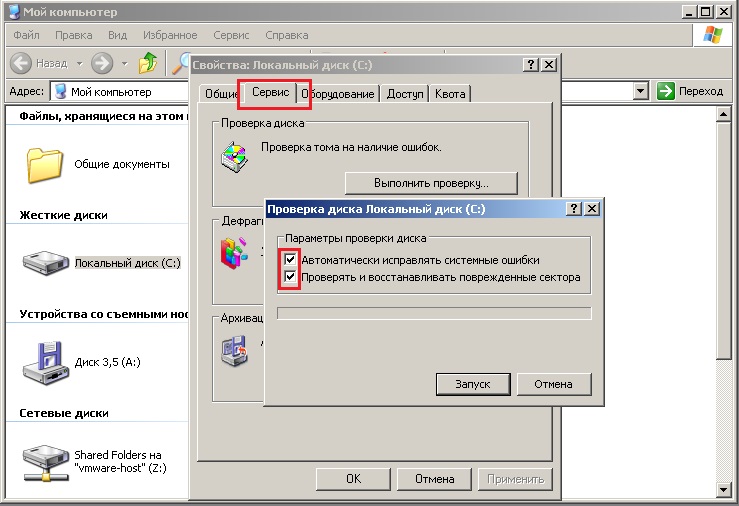
The Windows operating system has a very convenient tool for checking the computer’s hard drive and searching for it bad sectors and file system bug fixes. To run such a scan, open the “My Computer” window, right-click on the drive that you want to check, and select “Properties”. Go to the “Service” tab and in the “Disk Test” section, click the “Run Scan ...” button.
To automatically fix problems with files and folders detected during the check, check the "Automatically fix system errors". Otherwise, Disk Checker will only inform you of the errors found, but will not fix them.
To perform a more thorough scan of the disk, check the option “Scan and repair bad sectors”. In this case, the program will try to find and fix physical errors on the hard drive itself.
To achieve maximum results, we recommend that you note both options: "Automatically fix system errors" and "Check and repair bad sectors." In this case, both file and physical errors of the disk will be searched. All damaged (also called “bad”) sectors will be detected and marked as unusable, and the Disk Check program will try to recover the information recorded on them. 
To start the test, click the "Run" button.
The program will scan the hard drive for several minutes or even hours. If any files are open on this disk or the currently running one is installed operating system you will need to restart the computer, which you will receive a warning. When asked about checking the disk the next time you restart your computer, click Yes.
Close all programs and restart the computer. The next time you boot, you will see Disk Check.
Scanning the hard disk for errors and fixing them can take a lot of time. Therefore, be patient and do not disturb your computer until the operating system boots up.
When checking a disk on which not a single file is open and no programs are running, a reboot is not required. The only condition is that during the test it will not be possible to work with this disk.
The Disk Check program has an analogue - the shkdsk command. This is the same disk check, but run from the command line: click "Start" - "Run", type cmd (in English) and click "OK". 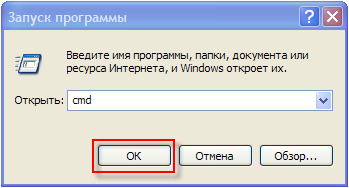
In the Windows shell window, type chkdsk c: / r / f in English
Press “Enter” on the keyboard.
Decipher the contents of the string you typed:
chkdsk - disk check command.
c: is the letter of the disk being checked, it can be d, e, f, etc. A colon after the drive letter is required!
/ r - the chkdsk command launched with this parameter detects bad sectors and restores that part of the data that can still be read from disk.
/ f - this option sets error correction on the disk.
When using the / r and / f attributes, there should not be open filesfolders running programs and a loaded operating system. Otherwise, you will see a request to check the disk the next time you restart the computer. Press the Y key on the keyboard (in English) and then Enter.
Windows will inform you that the disk check will be performed the next time the computer boots. Now close the shell window and restart the computer.
The next time you boot your PC, you will observe a disk check against a blue background. As before, you have to wait until the operating system boots up.
If you find file system errors, chkdsk program will try to fix them by asking you for confirmation:
Lost clusters: 5; conversations: 2.
Convert lost cluster chains to files?
Press “Y” on the keyboard (in English). Windows will save each lost chain in the root of the disk as a file File0001.chk. If you want Windows to fix errors on disk without saving data from bad sectorsthen enter "N".
If chkdsk reports a large number lost sectors on the hard drive, you should immediately save all important information from the hard drive to another medium and think about repairing the drive or buying a new one.
Disk scan in Acronis Disk Director Suite
In addition to the built-in Windows tools for checking the disk, there are many useful programs. Not so long ago we talked about working with partitions in Acronis Disk Director Suite. This wonderful program is also able to check hard sections disk for file system errors.
To start the scan, select the desired disk partition in the list and click the "Check" button. 
Select one of the verification options. We recommend that you select “Search and fix found errors,” but you can try two other options: “Search for errors on a partition” and “Search for errors and bad sectors”. To start the test, click OK. 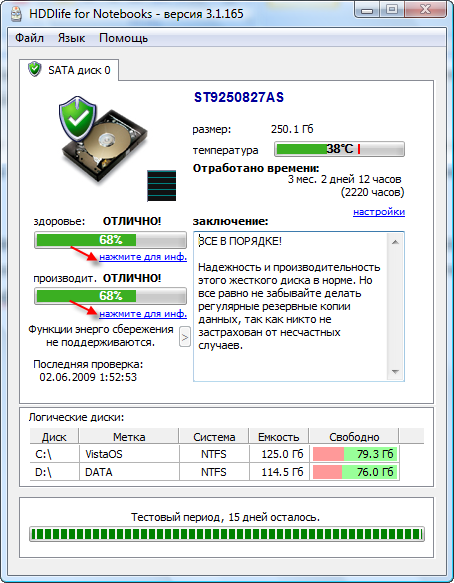
If you select the option “Search and fix found errors” or “Search for errors and bad sectors” on the disk on which files, folders, programs or the operating system are running, you will need to restart your computer, and you will receive a warning.
Press on the keyboard "Y" (in English), and then "Enter". Close the Acronis Disk Director Suite warning window by clicking the Close button and restart the computer. The next time you boot your PC, the disk verification process will start. The results of checking the disk partition will be reflected here.
If the disk scan was performed without rebooting, then the results of the partition verification and error correction you will see in the Acronis Disk Director Suite window.
However, frequent hard drive checks take too much time. It is much more useful to constantly monitor the health and performance of the hard disk using the wonderful program HDDlife.
HDD Health Monitoring in HDDlife
HDDlife is designed to monitor the status hard drives computer and inform you of their imminent demise. Download the program and get more full information about it can be on the official website http://www.hddlife.ru.
HDDlife has a clear Russified interface and is easy to use. But the best part is that the developers created a version for laptops. Therefore, if you are a happy owner of a mobile PC, download the special version - HDDlife for Notebooks, and if you have a regular computer, download HDDlife Professional.
To install HDDlife, run the downloaded file, accept the license agreement and click the "Next" button several times. In general, everything is as usual. When installing on OS Windows Vista You will be prompted to install a gadget that will show the status of the computer’s hard drive on the side panel of the gadgets. Do not forget to tick the corresponding option.
After the first launch, HDDlife will analyze the health status and performance of all available computer hard drives and will give you your verdict. 
In addition to data on the health and performance of the hard drive, you will receive information about the brand, time worked, hard volume disk quantity free space, operating and critical temperatures of the hard drive.
Pay particular attention to the "Conclusion" field. Here HDDlife will give you useful recommendations for saving data and will warn you in case of a possible imminent death of the hard drive.
To get detailed information about the parameters checked during the analysis of the health and performance of the hard drive (SMART attributes), click one of the tiny links located under the health and performance indicators. 
In the window that opens, you will see all the HDDlife attributes verified by the hard drive and the status of each of them in percentage terms. Select the parameter you are interested in in the table and at the bottom of the window you will find a detailed description of it. 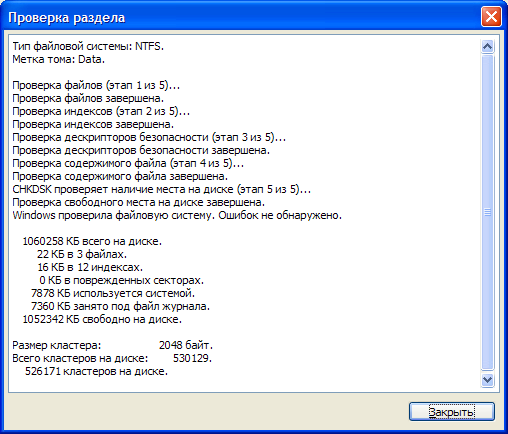
The attributes listed here depend on the model of hard drive. Some of them may be marked as “Unknown attribute”. This means that the manufacturer of the hard drive has not published information about the name and purpose of this parameter of the hard drive.
Pay special attention to the health attributes of the hard drive, which are highlighted in the table with special icons:
- read error rate;
- promotion time;
- number of reassigned sectors;
- positioning errors;
- number of start retries.
These errors are most often caused by damage, wear, or malfunction of the disc mechanics. The smaller the numbers here, the worse for the hard drive. When critical values \u200b\u200bare reached, HDDlife will notify you of this. You just have to copy all the important information from the dying hard drive to other media (USB flash drive, DVD-ROM, etc.) and seriously think about buying a new hard drive.
Especially for the project Yachaynik, Elena Carlton
(mosloadposition cpanel)
In case of emergency power failure personal Computer crashes its work. If you are lucky, then after the power is restored, the computer can be turned on again and it will continue to work properly. But in 5 percent of cases a problem arises. It is due to the fact that errors occur in the file hard system drive. Such errors lead to the fact that the download fails to read the necessary files. And, of course, the computer does not turn on. To eliminate errors in the file system, check its error checking. And here a problem arises. After all, checking the file system for errors requires a working computer. And this, as a consequence of the same mistake, is just not there.
Therefore, to perform the check, you can use boot disk or bootable flash drive. Those. it will be a Live CD or similar to Live Flash. But in the case when at hand there is another computer you can do easier. The last time I used the “do it easier” method. 1. removed the hard drive on which an error occurred in the file system 2. connected to a workable computer as a second drive 3. built-in windows tools performed a hard drive check 4. removed the hard drive after checking 5. and returned it to the target computer. The launch showed that the system was restored. Here is such a not-so-complicated way to check and restore the file system after errors appear in it.
Checking the file system with regular tools - step by step
To perform a FS check, we perform the following operations: - go to “Computer” or “My Computer” - depending on who has which version of the operating system windows systems - opens the context menu of the disk that you intend to check - select the "PROPERTIES" item in the context menu - go to the "SERVICE" tab in the dialog that opens - on the opened tab we see the item "Check for errors" and the "CHECK" button - on the detected button and click. - a dialog box appears that clarifies the consent to perform a disk check - we answer yes. (It is important to pay attention to the fact that the option "Scan and repair bad sectors" is checked on the image). In the event that this option is set, the check will consist of 5 stages, not three. The scan will be longer, but one of the elements of the scan will be the search and remap bad blocks on the hard drive.
In the event that you check system diskfrom which it was launched Windows program error checking will report that verification is currently not possible and a reboot is required to complete it. If you agree to restart, the check will be performed the next time you turn on the computer. In the same case, when we check the file system on a hard drive removed from a third-party inoperable computer and connect it to our working one, the necessary logical drive will be checked for errors immediately after it is launched. No reboot needed. For beginners, the question may arise - "which logical drive of the target hard drive to check if there are several logical drives?". The answer is - you need to check the one on which the operating system is installed. Everything is logical here. If the OS does not start on the target computer, then we can assume that the FS is malfunctioning. But the OS is then on a certain logical drive, then it has problems with FS. Confusedly, but somehow. After checking the FS for errors and eliminating them, there is a good chance that the computer will work normally again. If its performance has not been restored, then either the errors in the FS of the disk are fatal and you have to reinstall the OS, or the reason for the inoperability of the computer lies in something completely different, and not in the hard drive.
Running a hard drive error check through the command line
If you do not want to run a disk check using the graphical tools of the OS, then you can start it using the command line tools. To do this - run - Start - Run - and in the command prompt window write the command "cmd" - execute. If you have Windows 8.0 or Windows 8.1, then you cannot find the “run” window. And the command line window can be launched through hotkey combination - “Windows + R”.

To start the test, the command - CHKDSK D: / F / R 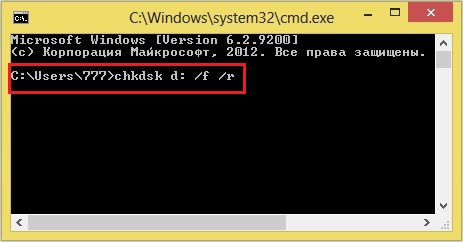 As you can see from the command the drive is set to drive "D". The following are the commands: / F - disk error correction command / R - a command to search for bad sectors and restore surviving information. If you intend to study in more detail all the features of the CHKDSK disk check command, you can use command line Windows display the parameters of this command - for this we use the command chkdsk /?


