System Restore regularly monitors changes system files computer and uses a feature called system protection to create recovery points. System protection is enabled by default on the hard drive on which Windows is installed. You can enable system recovery for other drives by enabling system protection for these drives.
How to enable system recovery in Windows 7
You cannot enable system protection for a disk that is formatted in file systems FAT and FAT32.
- Then do the following:
- To restore system settings and previous versions of files, click Restore system settings and previous versions files.
- To restore only previous versions of files, click Restore only previous versions of files.
- Click OK, and again OK.
How to disable system recovery in Windows 7
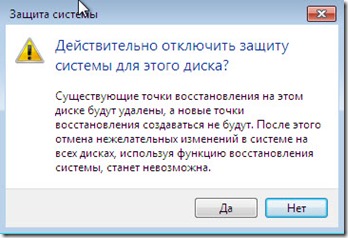
Disabling system protection deletes all restore points for this drive. Until you turn on system protection again and create new recovery points, you cannot restore a disk using recovery points. Also disabling system protection deletes all previous versions of files saved for this drive. Old versions - These are copies of files and folders that Windows automatically saves using recovery points.
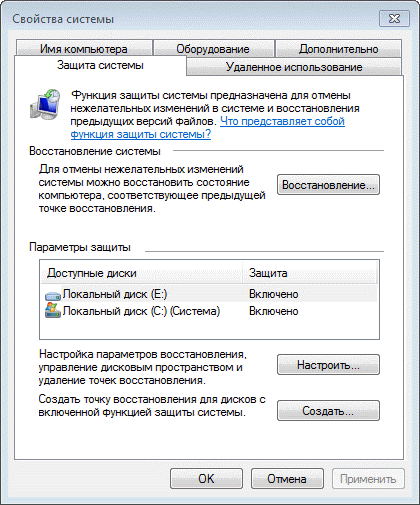
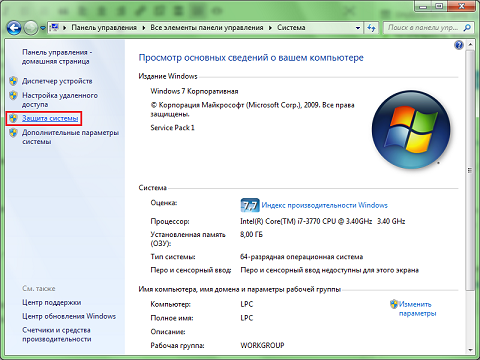
- Open the System via Start - right-click on Computer and select Properties.
- In the left pane, click System Protection. Here you must have administrator rights. If you are prompted for administrator rights or consent, enter the password or confirm.
- In the System Settings field, select a drive and click Configure.
- Click Turn off system protection, click OK, and then OK again.
System protection creates recovery points where system settings and previous versions of files are saved. Using system recovery, you can fix windows work 7, for example, in case of malfunctions due to the installation of programs, codecs and drivers, a failure in file associations and incorrect operation after cleaning the registry.
New System Protection and Recovery Features
Along with friends in Windows Vista system protection and recovery capabilities; there are improvements in Windows 7. The most significant are listed in the table below.
Customization disk space
In Windows 7, the graphical interface again provided the opportunity to set the percentage of disk space that is allocated to protect the system. This feature existed in Windows XP, but disappeared in Windows Vista, although it could be done from command line.
Fine tune protection
You can configure protection of previous versions of files along with system parameters or separately.
Search for affected programs
For each recovery point, you can view a list of programs and drivers that the rollback will affect. Obviously, such programs may not work properly after system recovery. Thus, you can know in advance which programs may need to be reinstalled after system recovery.
Using a backup system image
Backup features copy windows 7 allow you to create a complete operating system image. If such an image exists, it can be used for restoration as one of the points.
These and other system protection and recovery capabilities will be discussed later in the article. However, first I would like to pay attention to one important issue. The protection of the system, some users undeservedly turn off almost the first thing. About why this does not make sense in Windows 7, I want to talk first of all.
Why you do not need to disable system protection
It is believed that disabling System Restore can improve Windows performance. As an argument, as a rule, lead to savings random access memory (by disabling the service) and disk space. In fact, these arguments are almost 10 years old, if you count from the release of Windows XP, so applying them to the modern hardware is simply pointless. Do you still have 256 MB of memory and hDD 40 GB?
Disabling one service will not affect the performance of Windows 7 in any way - you simply won’t notice it, as it was unnoticed in previous Windows OSs. Disk space - yes, it saves, but in the era of terabyte hard drives, on which tens and hundreds of gigabytes of media files are stored, talking about savings from a couple of gigabytes of files intended for system recovery is simply not serious. Even if your hard drive has a relatively modest capacity, you can flexibly configure the space allotted to protect the system, which will be discussed later in the article.
Using System Restore, you can fix Windows 7, for example, if:
* problems due to installation of programs, codecs and drivers
* crash in file associations
* malfunctioning after cleaning the registry
* system boot problems
Download problems are perhaps the most unpleasant for users. In Windows 7, they can be overcome in two ways from the Windows RE recovery environment. It has a special boot recovery feature, and also allows you to restore the system by returning to the checkpoint, which can also help to boot the system. Moreover, now you do not even need an installation disk - you can use the Windows RE environment preinstalled on your hard disk or boot into it using a pre-created recovery disk.
In addition, Windows 7 introduced new recovery options, which are described below. Thus, by disabling system recovery, you do not gain anything, but on the contrary lose a convenient tool that allows you to restore not only the system, but also peace of mind.
How system protection works
Like Windows Vista, Windows 7 protects and restores the system using the Volume Shadow Copy service. This service tracks changes throughout the section, and this is a big difference from Windows XP, where the system recovery service only tracked a key set of system and application files. However, user files (with the exception of these types) are not included in the system restore points, so returning to the previous point will not result in the loss of documents and other files in your profile. However, the Volume Shadow Copy service monitors changes in user files, and you can restore them to previous versions.
You can create a recovery point manually at any time. Also, in Windows 7, recovery points are created automatically when:
* installing applications and drivers (if their installer is compatible with system protection)
* installation windows Updates Update
* restoring the system to one of the previous points (this makes it possible to cancel the changes if, for example, the wrong point was accidentally selected)
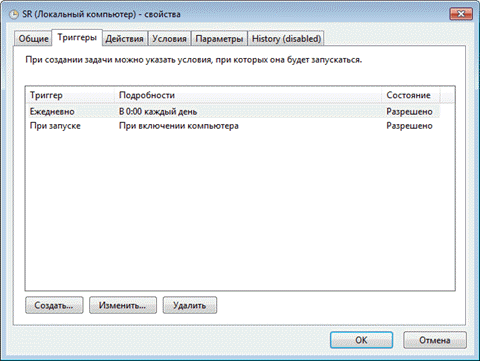
In addition, recovery points are scheduled. The regularity of creating points is monitored by the Task Scheduler, which is a snap-in of the console. microsoft Management (MMC). The task for checking and creating recovery points is located in the Task Scheduler Library - Microsoft - Windows - SystemRestore folder. The task is launched daily at 00:00 and when the computer is turned on.
Despite the outward similarity of this task to what it was in Windows Vista, there is a significant difference in Windows 7. In Windows Vista, the task checked whether points were created in the last 24 hours, and if there were none, created a new point. On Windows 7, this interval is extended to 7 days.
In practice, this means that if there is no daily installation of Windows applications, drivers and updates, recovery points are created once a week. This allows more efficient use of disk space and provides a wider time interval for system recovery.
The amount of disk space allocated for the volume shadow copy service (and storage of recovery points including) depends on the capacity hard drive, or partition, if the disk is divided into several partitions. If the volume is less than 64 GB, 3% of the volume shadow copy service is allocated. If the partition is larger than 64 GB, previous versions of files and system restore points will be allocated 5% of disk space or 10 GB (the smaller of these values \u200b\u200bis used). When the disk space allocated for the volume shadow copy service runs out, the old recovery points are deleted and replaced with new ones. Windows 7 has the ability to manage the space allocated to protect the system, and this will be discussed later.
System Security Setup
There are various ways to access system security settings. You can:
* open Control Panel - System - System Protection
* right-click on the Computer icon in the Start menu, on the desktop or in Windows Explorer and select Properties, and then click System Protection
* at the command prompt or in the Run (WIN + R) window, enter rundll32.exe shell32.dll, Control_RunDLL sysdm.cpl, 4
From this window you can:
* start system recovery
* set up system protection and remove control points
* create recovery point
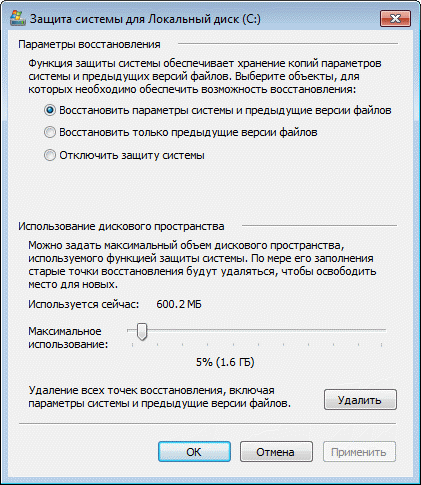
Compared with Windows Vista, the Configure button is new, which opens the system recovery options for the disk.
This window has two new features and one well-forgotten old one. You can:
* configure protection of previous versions of files along with system parameters or separately
* configure the disk space reserved for storing recovery points (it is graphically configured in the same way as in Windows XP, but shadow copy functions are used, as in Windows Vista)
* delete recovery points
Let's look at these features in more detail.
Recovery Options
The ability to protect previous versions of files separately, while not protecting system settings, is new in Windows 7. If you set this option, the efficiency of system recovery will be slightly reduced. Therefore, I recommend leaving the default value.
The ability to restore previous versions of files first appeared in Windows Vista. Moreover, it can be viewed not separately, but in combination with backup windows tools 7. The fact is that different versions of files are saved not only using the shadow copy service of the volume, but also when using Windows archiving. The file properties on the Previous Versions tab indicate the location: Recovery point or Archiving.
In addition to previous versions of individual files, the Volume Shadow Copy service allows you to restore previous versions of folders and their contents.
Disk space usage
At first glance, Windows 7 simply returned the ability to manage disk space reserved for system recovery, which existed in Windows XP but disappeared in Windows Vista.
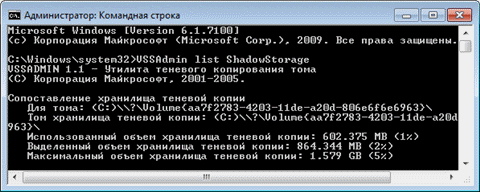
However on windows 7 user interface, familiar with Windows XP, manages technology that came from Microsoft's server operating systems and was first introduced in the Windows Vista client system. In fact, you are managing the disk space allocated for shadow copy storage. This feature was also available in Windows Vista, but was implemented only on the command line using the VSSAdmin command. On Windows 7, this command is also available. For example, to view the disk space occupied by shadow copies, you can run the command on behalf of the administrator:
VSSAdmin list ShadowStorage
and see information about the space used.
As in Windows Vista, you can specify the maximum amount of disk space for shadow copies from the command line:
VSSAdmin Resize ShadowStorage / For \u003d C: / On \u003d C: / MaxSize \u003d 5GB
Delete recovery points
Deleting all restore points is new windows feature 7. In Windows XP and Vista, it was possible to delete only all points except the last using the disk cleaning program (in Windows 7, this option is no longer in the cleaning program), and deleting absolutely all points was possible only by disabling system protection. Now you can delete all points without disabling system protection. This removes not only the recovery points, but also the entire contents of the shadow copy storage, so previous versions of the files will not be available.
However, even after deleting all points, you can use System Restore to return to a point that uses a backup system image. This is a new feature of Windows 7, and you will learn about it below from the story about the system recovery process, in which there have also been changes for the better.
Start System Restore
System recovery is an important feature of Windows 7. Therefore, it is not surprising that you can start it in many ways:
* on the Start menu - Search enter Recovery and click System Restore
* in the Start menu - Search or in the Run window (WIN + R) enter rstrui and press the Enter key
* in the Backup and Restore control panel item, click Restore system settings or a computer at the bottom, and then click the Start System Restore button
* open the Control Panel - System - System Protection and click the System Restore button
* In addition, system recovery can be started from Windows RE
Whichever way you start System Restore, you will be prompted to select a checkpoint.
You can return to the last created point or select any other of the available ones.
The figure above highlights the new system recovery options. If you have created a backup system image, you can use it as a recovery point. To see this point, check the box. Show other recovery points.
In addition, now you can find out which programs will affect changes during recovery. Select a recovery point and click Search for affected programs.
However, you can search for affected programs without opening the recovery point selection window. Before starting the recovery operation, Windows 7 displays a summary window where the Search for affected programs link is also available.
It remains to press the button Done, and the system recovery process will start.
Cancel System Restore
You can cancel last recovery system, if you accidentally chose the wrong point, or the restoration did not bring the desired results. This is possible due to the fact that Windows 7 creates a breakpoint before recovery. To undo system recovery, run it again.
The system will prompt you to cancel system recovery or select a different recovery point.
Do not set the minimum disk space for system recovery. This will limit your ability to restore previous versions of files and reduce the time range for returning the system to a checkpoint.
If you do not have an installation windows drive 7, be sure to create a system recovery disk. This should be done, even though you can boot from the hard disk into the Windows RE recovery environment. If the service partition with Windows RE is damaged, you can boot from the recovery disk and return the system to the point created before the problem occurred.
Manually create recovery points before modifying system files and cleaning the registry. When a problem arises after cleaning the registry, users, as a rule, are not able to fix it. Creating a recovery point takes a couple of minutes, and returning to it will allow you to easily solve the problem without any help.
Surely, most of you have heard about what system recovery is and why it is needed, but no one really delved into it. But since you came to this article, it means that it can only mean that you needed some connection with the appearance of an error (for example, or), but there were no saved points, and the service itself was simply turned off.
Therefore, right now, I will familiarize you in detail with how to enable system recovery in Windows 7 on a computer and how you can create and save a recovery point yourself. Just in case, I’ll also consider how to disable it for those to whom this service interferes or does not need at all.
What is system recovery
System Restore is a feature that is installed by default on every operating system. Thanks to it, a checkpoint is created on the computer before installing various programs or drivers, as well as updates. Which, in turn, saves the affected system files in a backup copy with the further prospect of their resumption in the event of a failure or breakdown of the operating system.
This function initially does not use a large number of not occupied place on your disk, perhaps it will seem to someone a huge minus and an extra waste, so there’s always not enough, free space. But believe me, as practice shows, the included system recovery helps in solving almost 60% - 70% of all emerging problems and errors on the computer.
Of course, all recovery problems cannot be solved, but nevertheless, in some cases you will be able to save your nerves, and sometimes the money that can be spent on the master. “Avaricious pays twice” - this saying is like 100% here, so don’t be sorry free space and read on how to enable system recovery in Windows 7.
How to enable system recovery
To enable the function system recovery in windows 7 go to the protection settings. To do this, go to " Start"And select the properties" Computer"By clicking on it with the right mouse button. Now, in the properties window that opens, where all the information about the machine is indicated, in the left navigation panel click on “ Extra options».
The following window will appear titled “ Properties of the system"Where we go to the tab" ".
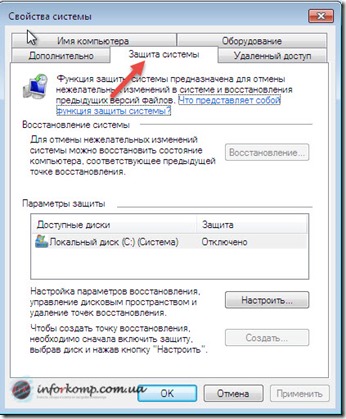
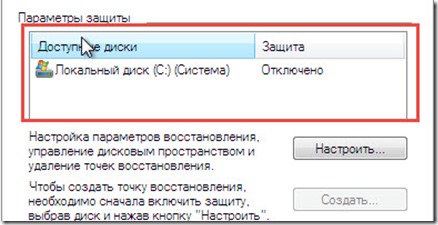
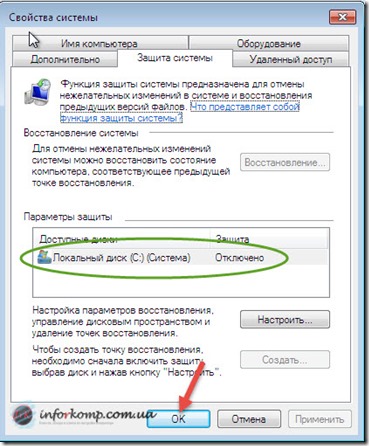
Immediately pay attention on the "Security Settings" field in which our sections will be indicated hard drive. If in front of each section is the word " Included”Means everything is in order your system is observed and periodically creates control points and saves the necessary system files. But if opposite these drives is the option " Off”This means that the computer is not observed and will not be able to restore its previous state.
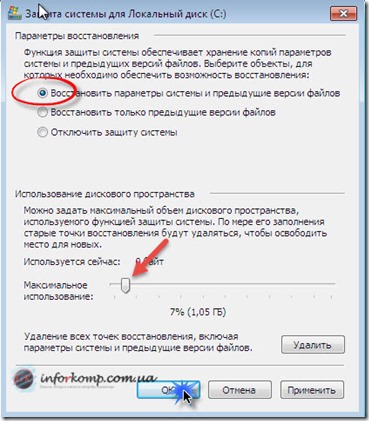
So, marking the drive “ FROM:\\"Click" Tune". And in the window that appears, mark " Restore settings and previous versions of files". Further, going down a little lower, we need to use the slider to specify the amount of free space on the hard drive that you find necessary. I recommend setting a maximum of 5% to 10%, not more, you can choose a middle ground by putting 7% or 8%, this is how you like it. Having dealt with this millet, click " OK».
That's all, now we can easily create a checkpoint and restore the system in case of malfunction or failure.
Creating and saving a recovery point
Of course, you do not need to create recovery points regularly. Basically, only in those situations in which you are not 100% sure of the installed program, driver, or operating system updates. For example, by creating a breakpoint you will begin installing the driver on the sound. But this driver will not be of high quality and every time you boot the computer on the screen will be displayed blue screen from . That's it in this case, you can use the point created earlier with the saved files of the previous version and just without bothering to choose a date and return the computer to its previous state.
Suddenly, if you forgot to save the settings and have already installed something, it does not matter. Almost always operating system It recognizes the installation of the application and automatically creates a rollback point. A manual option is suitable for you to be safe, because the system then monitors this, but there are different cases.
Let's go back to how to create a recovery point ourselves. All this must be done in the same " System properties", Only this time we will not configure, but create, therefore, respectively click on" Create". A window will open where we indicate the name for further nitrification of our point.
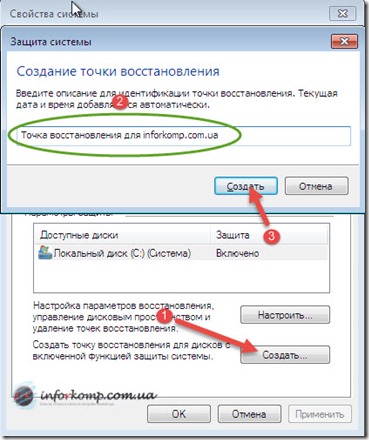
The creation process begins in a few seconds, followed by notification that the recovery point has been successfully created.

Now, when you go to the system rollback window, you will be able to find in the list a point you created with the name that you specified earlier.
If you suddenly decided, for some reason, to turn off this function, maybe you do not have enough free space on the HDD or think that you do not need it, then now you will see how to turn off this whole thing.
Disabling can be said similar to its inclusion. To enter the settings, go along the same path as before to the “ Properties of the system", Again we note desired drive and go to "N adjustments". But this time we put a dot in front of " Disable system protection"And click" OK».
You will also see a window confirming the disconnection, but if you really decide to disconnect everything, without hesitation click “ YES».
After application, you can pay attention to the fact that in the " Security Settings", Opposite the section, the word" Off". By clicking " OK»You confirm the saving of the parameters, and the window simply closes.
Perhaps someone will tell you that the inclusion of system recovery is a stupid idea and a waste of time, but personally, I recommend you to do this without fail, because, in my practice, with this function I figured out a huge number of errors, breakdowns and freezes. Therefore, if you want to solve any problem without problems, then subscribe to us, and we will definitely fix any problems and mistakes together with you.
System protection creates recovery points where system settings and previous versions of files are saved. Using System Restore, you can fix Windows 7, for example, in the event of a malfunction due to the installation of programs, codecs and drivers, a failure in file associations and incorrect operation after cleaning the registry.
On this page:
New System Protection and Recovery Features
Along with Windows Vista’s familiar system protection and recovery capabilities, there are enhancements to Windows 7. The most significant are listed in the table below.
| New opportunity | Description |
| Disk space setup | In Windows 7, the graphical interface again provided the opportunity to set the percentage of disk space that is allocated to protect the system. This feature existed in Windows XP, but disappeared in Windows Vista, although it could be done from the command line. |
| Fine tune protection | You can configure protection of previous versions of files along with system parameters or separately. |
| Search for affected programs | For each recovery point, you can view a list of programs and drivers that the rollback will affect. Obviously, such programs may not work properly after system recovery. Thus, you can know in advance which programs may need to be reinstalled after system recovery. |
| Using a backup system image | Windows 7 backup capabilities allow you to create a complete operating system image. If such an image exists, it can be used for restoration as one of the points. |
These and other system protection and recovery capabilities will be discussed later in the article. However, first I would like to pay attention to one important issue. The protection of the system, some users undeservedly turn off almost the first thing. About why this does not make sense in Windows 7, I want to talk first of all.
Why you do not need to disable system protection
There is an opinion that by disabling system protection, you can increase the performance of Windows. As an argument, as a rule, they lead to the saving of RAM (by disabling the system recovery service) and disk space. In fact, these arguments are almost 10 years old, if you count from the release of Windows XP, so applying them to the modern hardware is simply pointless. Do you still have 256 MB of memory and a 40 GB hard drive?
Disabling one service will not affect the performance of Windows 7 in any way - you simply won’t notice it, as it was unnoticed in previous Windows OSs. Disk space - yes, it’s saved, but in the era of terabyte hard drives that store tens and hundreds of gigabytes of media files, talking about saving from a couple of gigabytes of files designed to restore the system is simply not serious. Even if your hard drive has a relatively modest capacity, you can flexibly configure the space allotted to protect the system, which will be discussed later in the article.
- problems with installing programs, codecs and drivers
- file association failure
- malfunctioning after cleaning the registry
- system boot problems
Download problems are perhaps the most unpleasant for users. In Windows 7, they can be overcome in two ways from the Windows RE recovery environment. It has a special boot recovery feature, and also allows you to restore the system by returning to the checkpoint, which can also help to boot the system. Moreover, now you do not even need an installation disk - you can use the Windows RE environment preinstalled on your hard disk or boot into it using a pre-created recovery disk.
In addition, Windows 7 introduced new recovery options, which are described below. Thus, by disabling system protection, you won’t gain anything, but on the contrary lose a convenient tool that allows you to restore not only the system, but also peace of mind.
How system protection works
Like Windows Vista, Windows 7 protects and restores the system using the Volume Shadow Copy service. This service tracks changes throughout the section, and this is a big difference from Windows XP, where the system recovery service only tracked a key set of system and application files. However, user files are not included in the system restore points, so returning to the previous point will not result in the loss of documents and other files in your profile. However, the Volume Shadow Copy service monitors changes in user files, and you can restore them to previous versions.
You can create a recovery point manually at any time. Also, in Windows 7, recovery points are created automatically when:
- installing applications and drivers (if their installer is compatible with system protection)
- install Windows Update
- restoring the system to one of the previous points (this makes it possible to cancel the changes if, for example, the wrong point was accidentally selected)
In addition, recovery points are scheduled. The regularity of creating points is monitored Task Scheduler, which is a snap-in of the Microsoft Management Console (MMC). The task of checking and creating recovery points is located in the folder Task Scheduler Library - Microsoft - Windows - SystemRestore. The task is launched daily at 00:00 and when the computer is turned on.
Despite the outward similarity of this task to what it was in Windows Vista, there is a significant difference in Windows 7. In Windows Vista, the task checked whether points were created in the last 24 hours, and if there were none, created a new point. On Windows 7, this interval is extended to 7 days. In practice, this means that if there is no daily installation of Windows applications, drivers and updates, recovery points are created once a week. This allows more efficient use of disk space and provides a wider time interval for system recovery.
The amount of disk space allocated for the Volume Shadow Copy service (and storage of recovery points including) depends on the capacity of the hard disk, or partition, if the disk is divided into several partitions. If the volume is less than 64 GB, 3% of the volume shadow copy service is allocated. If the partition is larger than 64 GB, previous versions of files and system restore points will be allocated 5% of disk space or 10 GB (the smaller of these values \u200b\u200bis used). When the disk space allocated for the volume shadow copy service runs out, the old recovery points are deleted and replaced with new ones. Windows 7 has the ability to manage the space allocated to protect the system, and this will be discussed later.
System Security Setup
There are various ways to access system security settings. You can:
- open Control Panel- System - System Protection
- right click on the icon A computer on the menu Starton the desktop or in explorer and select The propertiesand then click System protection
- on the command line or in a window Run (WIN + R) enter rundll32.exe shell32.dll, Control_RunDLL sysdm.cpl, 4
From this window you can:
- run system recovery
- configure system protection and remove breakpoints
- create recovery point
Compared to Windows Vista, the button is new Tune, which opens the system recovery options for the selected drive.
This window has two new features and one well-forgotten old one. You can:
- configure protection of previous versions of files along with system parameters or separately
- configure the disk space allocated for storing recovery points (it is graphically configured in the same way as in Windows XP, but shadow copy functions are used, as in Windows Vista)
- delete restore points
Let's look at these features in more detail.
Recovery Options
The ability to protect previous versions of files separately, while not protecting system settings, is new in Windows 7. If you set this option, the efficiency of system recovery will be slightly reduced. Therefore, I recommend leaving the default value.
The ability to restore previous versions of files first appeared in Windows Vista. Moreover, it can be considered not separately, but in combination with backup using Windows 7. The fact is that different versions of files are saved not only using the shadow copy service of the volume, but also when using Windows archiving. In the file properties tab Previous Versions location is indicated: Recovery point or Archiving.
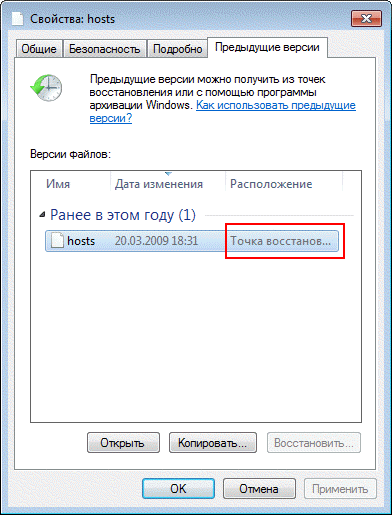
In addition to previous versions of individual files, the Volume Shadow Copy service allows you to restore previous versions of folders and their contents. Read more about previous versions in the article.
Disk space usage
At first glance, Windows 7 simply returned the ability to manage disk space reserved for system recovery, which existed in Windows XP but disappeared in Windows Vista.

However, in Windows 7, a user interface familiar from Windows XP controls technology that came from Microsoft's server operating systems and was first introduced in the Windows Vista client system. In fact, you are managing the disk space allocated for shadow copy storage. This feature was also available in Windows Vista, but was implemented only on the command line using the command Vssadmin. On Windows 7, this command is also available. For example, to view the disk space occupied by shadow copies, you can run the command on behalf of the administrator:
VSSAdmin list ShadowStorage
and see information about the space used.
As in Windows Vista, you can specify the maximum amount of disk space for shadow copies from the command line:
VSSAdmin Resize ShadowStorage / For \u003d C: / On \u003d C: / MaxSize \u003d 5GB
Delete recovery points
Removing all restore points is a new feature of Windows 7. In Windows XP and Vista, you could only delete all points except the last one using the disk cleaning program (in Windows 7, this option was no longer in the cleaning program), and deleting absolutely all points was possible only by disable system protection. Now you can delete all points without disabling system protection. This removes not only the recovery points, but also the entire contents of the shadow copy storage, so previous versions of the files will not be available.
However, even after deleting all points, you can use System Restore to return to a point that uses a backup system image. This is a new feature of Windows 7, and you will learn about it below from the story about the system recovery process, in which there have also been changes for the better.
Start System Restore
System recovery is an important feature of Windows 7. Therefore, it is not surprising that you can start it in many ways:
- on the menu Start - Search introduce Recovery and click System Restore
- on the menu Start - Search or out the window Run (WIN + R) enter rstrui and press enter
- in the control panel item Backup and Restore to click Restore system settings or computer bottom and then click Start System Restore
- open Control Panel- System - System Protection and press the button System Restore
- in addition, system recovery can be run from Windows RE
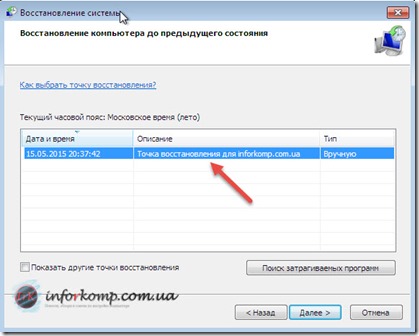
Whichever way you start System Restore, you will be prompted to select a checkpoint.
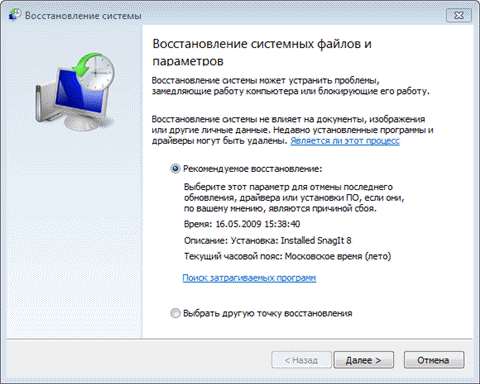
You can return to the last created point or select any other of the available ones.
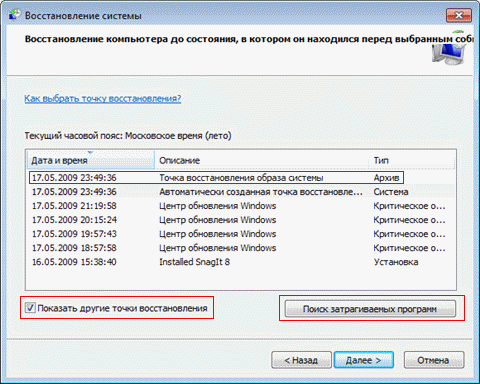
The figure above highlights the new system recovery options. If you have created a backup system image, you can use it as a recovery point. To see this point, check the box. Show other recovery points.
In addition, now you can find out which programs will affect changes during recovery. Select a recovery point and click Search for affected programs.

However, you can search for affected programs without opening the recovery point selection window. Before starting the restore operation, Windows 7 displays a summary window with a link Search for affected programs also available.

It remains to press the button Done, and the system recovery process will start.
Cancel System Restore
You can undo the last system restore if you accidentally chose the wrong point, or if the restore did not bring the desired results. This is possible due to the fact that Windows 7 creates a breakpoint before recovery. To undo system recovery, run it again.
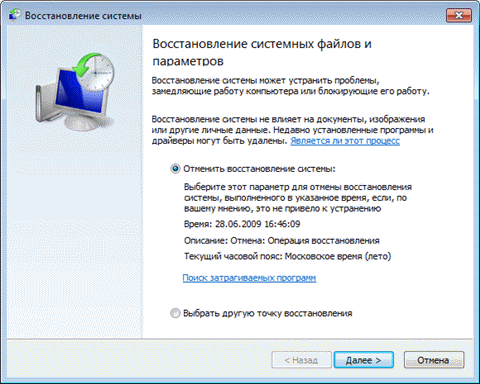
The system will prompt you to cancel system recovery or select a different recovery point.
Do not set the minimum disk space for system recovery. This will limit your ability to restore previous versions of files and reduce the time range for returning the system to a checkpoint.
If you haven't installation disk Windows 7, be sure to create a system recovery disk. This should be done, even though you can boot from the hard disk into the Windows RE recovery environment. If the service partition with Windows RE is damaged, you can boot from the recovery disk and return the system to the point created before the problem occurred.
Manually create recovery points before modifying system files and cleaning the registry. When a problem arises after cleaning the registry, users, as a rule, are not able to fix it. Creating a recovery point takes a couple of minutes, and returning to it will allow you to easily solve the problem without any help.
Protection windows systems 7 is a function necessary for the ability to restore files and settings that were accidentally deleted or incorrectly changed.
Initially, this option is enabled only on the drive on which Windows 7 is installed (usually it is the “C” drive). Under the protection of the system, a certain amount of disk space is allocated, which is actually manually configured (the following shows how). Automatically, Windows 7 usually allocates 300-500 megabytes of disk space under its protection.
Backups are monitored through recovery points. The recovery point is backup ( backup) the current state of the system. With the system protection turned on, Windows 7 sometimes makes it automatic, but it is realistic to do it and force it.
It is important to understand that restoring an individual setting or a separate file in this way, leaving all the others untouched, will fail. When using rollback (return) to a control point, your system will assume exactly the state in which it was at the time of its creation. How many changes you made from the moment you created the control point to the moment when you wanted to return to it, so many of them will roll back. Therefore, before any major changes, it is recommended to forcibly create a recovery point.
How to enable or disable system protection on Windows 7
First you need to open the Windows 7 system protection menu.
Go to the "Start" and click on "Control Panel".
Go to the "System".
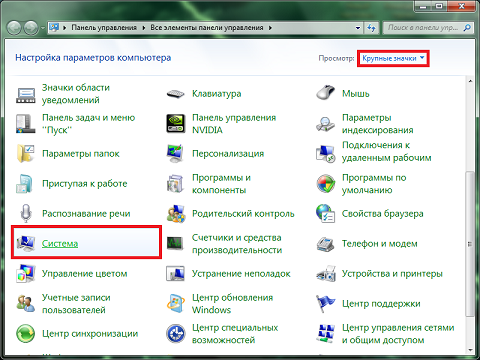
Select the section you are interested in (for each, system protection is configured separately) and click "Configure". The remaining items in this menu will be discussed further. So far, we are looking at the main thing.
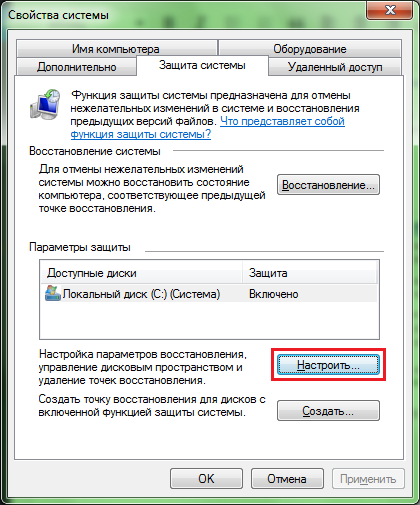
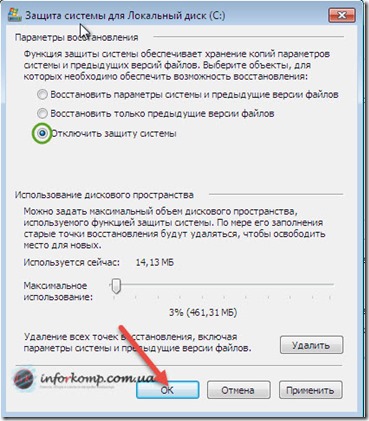
This menu will appear in front of you, in which you can turn on, turn off and configure the system protection settings for a particular partition (disk).
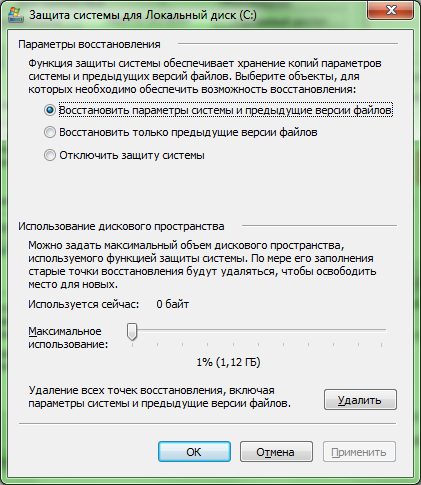
- "Restore system settings and previous versions of files" allows you to save in control points both the parameters and settings of the operating system, as well as the original versions of the modified files. This item implies the full inclusion of Windows 7 system protection within this section.
- “Restore previous versions of files” will only make it possible to save demo versions of mutable files. That is, if you set this item and change something in the system settings, it will be impossible to roll back (return to its original state). You will have to change everything back manually, but the files will still need to be restored. This clause is intended to partially enable Windows 7 system security within this section.
- “Disable system protection” will prohibit Windows 7 from backing up both system settings and mutable files. This item implies the complete disabling of Windows 7 system security within this section.
The slider below controls the amount of memory called disk space that is allocated for backups Windows 7 settings and files. The larger this disk space, the more backups the operating system will be able to store and the correspondingly longer these saved copies will be able to live. The fact is that when the allocated disk space becomes clogged up, Windows 7 deletes the oldest restore points, replacing them with new ones. To change the disk space allocated to system protection, move the slider to the desired mark.
By clicking the “Delete” button, you will permanently delete all the currently existing recovery points for Windows 7 settings and files stored on your computer.
By clicking “Apply” and “OK” you will save all the changes you have made.
Other Windows 7 System Security Features
Now let's go back to the previous tab.
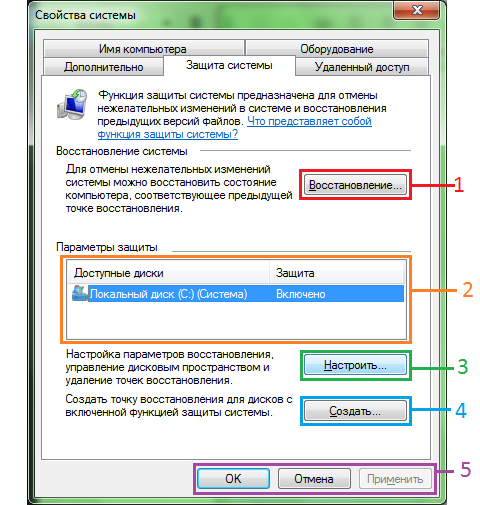
- The Restore button serves directly to restore initial state system (the state that it had during the creation of the recovery point). This button works immediately on all sections of the computer.
- In this section you can select the section whose settings you would like to change.
- We already passed this button. It displays you in the advanced system protection settings window within a specific section.
- Forcibly creates a recovery point to which you can later roll back. In general, recovery points are created automatically from time to time.
- The “Apply” and “OK” buttons save your changes. The “Cancel” button, accordingly, prevents them from being saved.


