Most of the tools and utilities in Windows 10 are designed to provide information about system performance and help determine the cause of a diagnostic tool malfunction. That is, troubleshooting utilities in Windows 10.
Four basic professional tools can be placed in the following categories:
- Event Viewer. This log contains all the most important things that happen on Windows, which makes event viewing an indispensable and potentially important tool.
- Task Manager and Resource Monitor. Anyone upgrading to Windows 10 with Windows 7 should be pleasantly surprised by the improvements in the task manager. No less useful is the resource monitor utility located on the Performance tab in the task manager.
- Sysinternals suite. This amazing and powerful set of utilities (about 80 in total) is regularly updated and is available for free download.
- Diagnostic and Recovery Toolset / Diagnostic and Recovery Toolkit. This tool is not available to all Windows 10 users. But if your organization works with Software Assurance, or you have access to a Visual Studio subscription, this toolkit is required.
Several other useful utilities are not so functional, but it is worth mentioning them.
Stability monitor
For example, the Reliability Monitor, which you might think of as a well-filtered version of Event Viewer. It displays successful and unsuccessful software and driver installations, crashes, non-responsive applications and programs, and other errors that occurred over a certain period of time. Often this provides important clues about the cause of the dramatic changes in system behavior. In the figure below is a typical display, with events presented in the weekly version.
The stability monitor can help clarify the clusters of events, allowing you to understand the causes of failures or sudden performance losses.
Double-clicking on any event in the list opens a more detailed display of information. For searching additional information You can use error messages, codes, and other details about the problem.
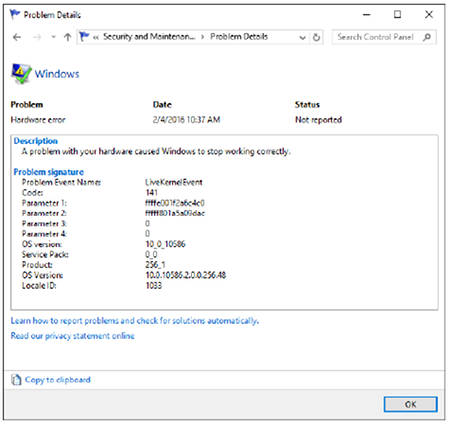
Double-clicking on an event opens important hints that can be used to troubleshoot problems.
Another tool that long-time Windows users are likely familiar with, especially if they have had to fix PC problems, is System Configuration (MSConfig.exe). One particularly useful option is on the Services tab. Here you can disable third-party services, one at a time or in batch mode, and restart the system, narrowing down the search for the causes of the problem.

You can use the system configuration utility (also known as MSConfig) to solve basic troubleshooting tasks.
Here's a quick tip on using this utility: At the bottom of the Services tab, select the “Hide all Microsoft services” check box, click the “Disable all” button, and then restart the computer. If the problem no longer occurs, the reason for the failure in third-party services.
Finally, there is the Powercfg team, which is extremely useful in identifying the causes of hyperactivity. laptop computer (that is, the battery runs much less than expected). When used with the “/ energy” key, it creates a system activity profile for 60 seconds and saves it in the current directory as an HTML page.
Microsoft Universal Management Console
The Microsoft Management Console (MMC) itself is hopelessly boring and good for only one task, adding one or more snap-ins that enable more in-depth control of a specific function or mode. You can save the result as Microsoft Common Console Document files, and then identify them using the .msc extension.
MMC is the basis for many of the pre-configured management tools that are available as .msc files in Windows 10. Perhaps the most famous and richest in functionality will be the computer control console, which contains several snap-ins for easy access to a wide range of system settings.
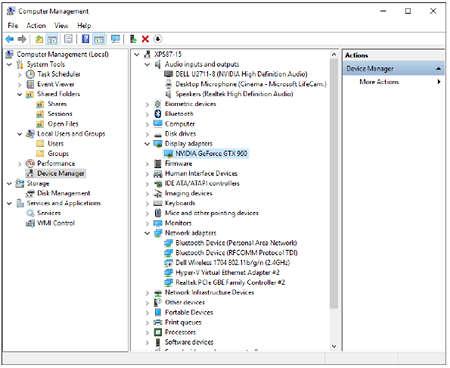
Computer management is integrated into the console and combines several snap-ins for quick access to general system management tools.
The MMC layout (albeit a bit old-fashioned) is in good agreement with all of its tools. MMC is based on hardware configuration tools, including a device manager that can be opened in offline, computer management and disk management.
If you don’t like the set of pre-configured snap-ins of the “Computer Management” option, you can create your own. To do this, execute the MMC command in the console, and then add your snap-ins in a new empty window. The following figure shows the snap-in dialog box that can be opened on the File menu. In the list on the left, select the necessary snap-in and click the Add button to include it in the user console. Save the result as a .msc file.
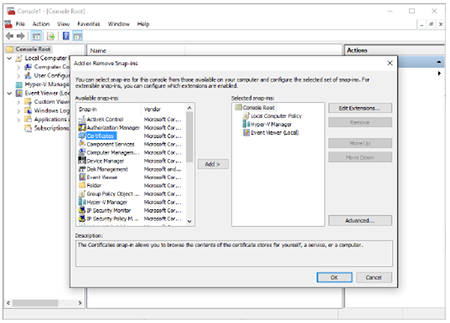
You can create a custom MMC with your list of snap-ins.
The table lists all the snap-ins included with Windows 10 Pro. A description of each of them can be found at the bottom of the dialog box for adding or removing snap-ins, when you select it from the list on the left.
Console Name - File Name
Authorization Manager / Azman.msc
Certificate Manager (local machine) / Certificate Manager (local machine) - Certlm.msc
Certificate Manager (current user) - certificatemgr.msc
Component Services / Component Services - Comexp.msc
Computer Management - compmgmt.msc
Device Manager - devmgmt.msc
Disk Management - diskmgmt.msc
Event Viewer / Event Viewer - Eventvwr.msc
Shared Folders / Shared Folders - Fsmgmt.msc
Local Group Policy Editor group policy - gpedit.msc
Local Users and Groups / Local Users and Groups - Lusrmgr.msc
Performance Monitor - Perfmon.msc
Print Management / Print Management - Printmanagement.msc
Resultant Set of Policy / Resultant Policy - Rsop.msc
Local Security Policy / Secpol.msc
Services / Services - Services.msc
Task Scheduler / Task Scheduler - Taskschd.msc
Trusted Platform Module- Tpm.msc
Manager Hyper-V Manager / Hyper-V Technology Manager - Virtmgmt.msc
Windows Firewall with Advanced Security / Windows Firewall with Advanced Security - WF.msc
Windows Management Instrumentation windows Management - WmiMgmt.msc
Another common feature of each MMC-based console is the ability to open additional information about the object, as well as its configuration parameters. For example, in the snap-in of services, you can double-click on any entry in the list of available local services and set the type of its start, stop and pause, or resume this service.
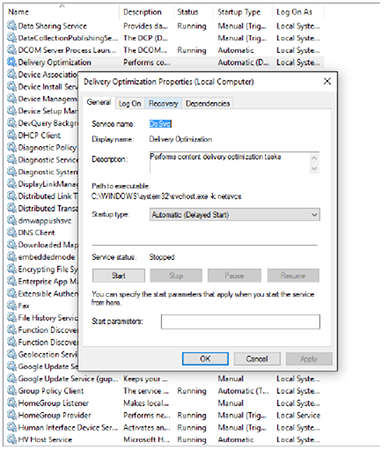
In the Details panel, you can see detailed information about the subject, for example, the configuration parameters of this service.
Management and Deployment Tools
As a rule, at home or in a small business, one user is working on a computer. But in Windows domains, you can use Group Policy objects to configure user and machine settings.
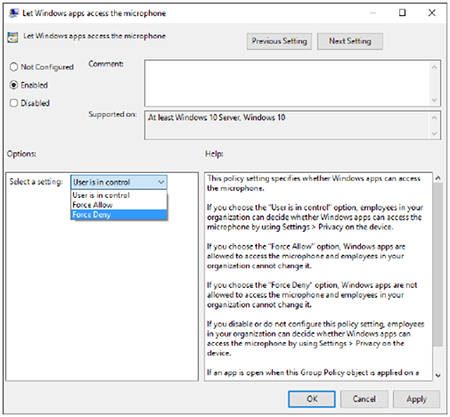
Even if you are on a small network, you can use the policy editor to manage the settings of the local computer policy. To complete this task, open the Local Group Policy Editor (gpedit.msc), which is available only in Windows 10 Pro, Enterprise, and schools. Many of the policies available here date from years, even decades, but each a new version Windows tends to add new policies. The figure below is a group of new privacy settings that appeared with Windows 10.
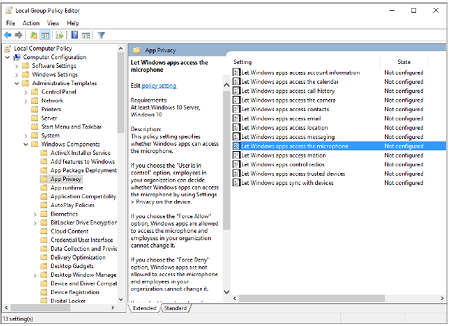
Using Group Policy, you can set or restrict rights for users of an individual PC.
To apply a specific policy on a PC, you must first configure it. For some policies, you can choose one of several options that regular user cannot override.
Work with the cloud
Many designed for agnostic platforms, cloud services Microsoft are managed through a web browser and work on any operating system. For example, as an administrator, you can manage virtual machines and cloud services in Microsoft Azure through its web interface.
Several cloud services directly related to Windows 10, including the latest client software for cloud storage microsoft files. This so-called next-generation synchronization client is able to synchronize OneDrive for business files with a computer and display synchronized content in File Explorer.
In addition, you can create a virtual machine with Windows 10 in the Microsoft Azure cloud, or connect a working account on a PC using Azure Active Directory.
You have probably witnessed more than once that the “tenth of Windows”, although constantly being refined, is a rather damp operating system, and there are a lot of trifling problems in it.
Developers solve only the most common problems by introducing fixes in service packs or issuing extraordinary patches (fixes) to get rid of a specific error. So, for example, it was with the menu “ Parameters».
In the event of special cases involving only a computer with a certain hardware or software, Microsoft suggests using an integrated troubleshooting tool.
Run the troubleshooter
Computer diagnostics with Windows 10 starts with the launch of a tool designed to search for and correct errors on a PC.
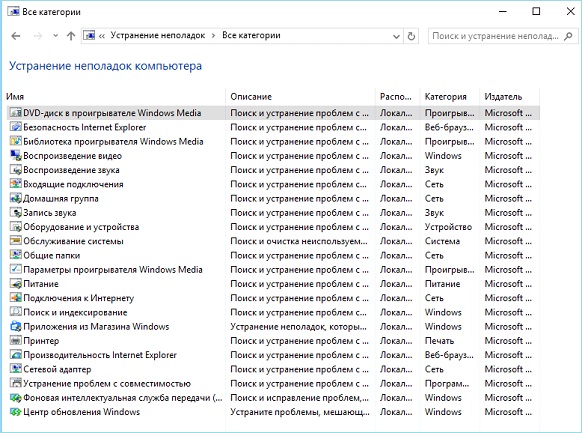
Note that Windows 10 includes about 20 tools designed to identify problems that have arisen and then fix them.
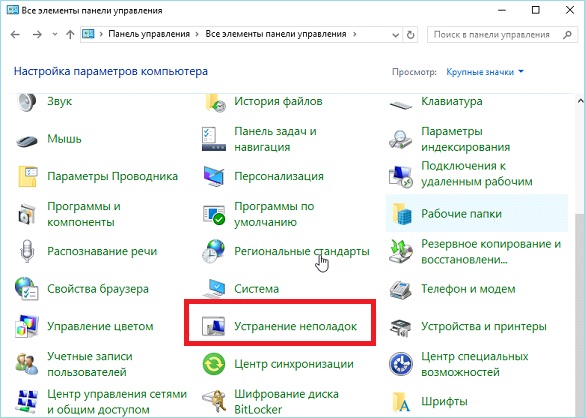
Tools are launched through the "Control Panel".
- We go to the "Control Panel".
- Switch the type of visualization of the elements to "Categories".
- Launch the “Troubleshooting” applet to open a window with a list of applications for troubleshooting computer problems and fixing them.
The principle of operation of any component is as follows: it checks the current system settings and compares them with the default settings.
When problems are detected, the user is notified about this, and he is invited to return the parameters Windows 10 in the initial state or somehow change automatically to fix the problem.
Like this Windows 10 struggling with launching software.
Search and conflict resolution tools are divided into several categories, many of them also include subcategories.

- Programs - with the help of this tool, applications are executed that, when launched, encounter problems related to incompatibility.

After starting the search for problems, the utility will conduct a thorough scan of the system and display the entire list of applications installed in it.
In the window you need to select the problem program and click " Further»To run diagnostics in order to identify the source of the conflict.
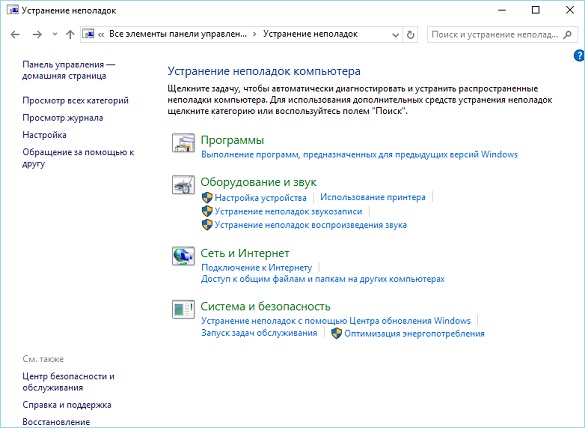
- Equipment and sound - using the tools placed in this category, diagnostics of sound equipment used on a computer with Windows 10.

The funds include:
- device setup - detection of difficulties in operation or in the process of configuring a specific hardware component of a computer;
- sound - used when there is a problem during playback / recording sound or talking on Skype and similar programs for Windows 10;
- network - diagnostics of work and setup of networks, including wireless, and network devices;
- printer - getting rid of conflicts that arise during the printing process;
- Windows Media - Search for the causes of complications in playing videos and DVDs;
- video playback - identification of the reasons that do not allow playing video files;
- background Transfer Service - diagnosing problems that prevent downloading files in the background;
- applications from the store - Identification of factors that prevent applications from the Windows Store from functioning normally.
As you can see, the set of tools for troubleshooting and returning your computer to a state of normal functioning in Windows 10 is large.
Another question is their effectiveness. But here, all responsibility lies with the developers with more than 20 years of experience in creating operating systems.
In any case, these tools have repeatedly saved newcomers from the rollback of the system, execution full reset or its complete reinstallation.
For ease of searching for the required application, all tools can be displayed in one window without sorting by category. The button is responsible for this Browse all categories».
To use the diagnostic tools from the user does not require absolutely nothing. The functioning of each element is accompanied by the launch of a wizard window with prompts, a pair of buttons and the presence of switches (checkbox, check box).
![]()
The only thing that should be done after identifying the problem is to apply the recommended fix for it.

Be careful, the application will need administrator privileges to change some settings. Such functions are distinguished by the presence of a blue-yellow shield icon.

Windows 10 introduced new features for identifying and fixing problems in its functioning, which allow you to detect a problem even before the computer starts (in preload mode).
To open the menu with a list of available tools, restart the computer with the Shift key held down. After rebooting, on the action selection screen, click on “Troubleshooting”.
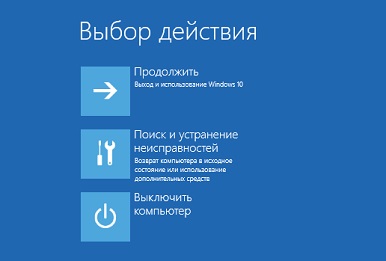
Two options are available here: resetting the PC to its original state (resetting Windows 10) and additional options.
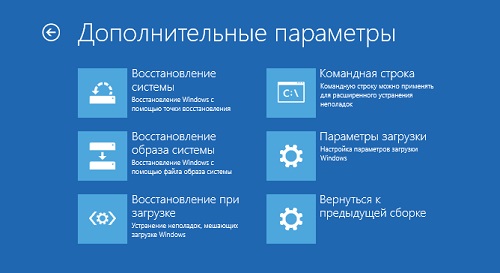
In additional parameters, there are tools that allow you to restore the functionality of Windows 10 by:
- rollback to the previous state;
- use of a system image;
- return to the previous assembly;
- launching tools to restore the load of the "tens";
- seizing opportunities command line.
As you can see, Windows 10 is distinguished not only by the presence of errors and minor problems, but also by a powerful set of tools to eliminate them and return the computer to healthy state, sometimes without requiring the user virtually no activity and special knowledge.
This article focuses on the messages that appear on the “ Auto Recovery"And inform the user that operating system It did not start correctly or the computer did not start correctly Windows 10. In the article we will deal with the causes of their appearance and consider how to get rid of such messages and prevent their occurrence.
When a notification appears that the PC did not boot correctly, you must restart the computer. In cases where the message pops up when the system reboot due to interruption windows updates, It helps.
The second thing that can become the source of the problem is the abnormal mode of operation of the power supply, as a result of which the hardware components operate in a mode different from typical for them. Due to two failed attempts windows boot 10, the latter calls the system recovery function, thereby providing the user with a solution to the problem.
Perhaps the cause of the problem is the drivers. Remember or see which drivers were installed last and roll back them.
Message appears after resetting or updating Windows
A common algorithm, the execution of which leads to an error, is the following: turning on the PC after updating / reset windows accompanied by a blue screen, and after collecting information, a window with options for restoring the operating system starts up.
- In this case, go to the "Advanced Options".
- We call the "Troubleshooting".
- Again, go to the "Advanced Options".
- Click "Launch Options".
- Click "Restart."
After restarting the computer, “Boot Parameters” will open, where, using the F6 key, start safe mode with command line support.

We execute the sequence of commands:
- sfc / scannow - scan system files with damaged ones;
- dism / Online / Cleanup-Image / RestoreHealth;
The error "The computer does not start correctly" appears
It happens that when you turn on the computer, an alert appears informing you that the computer / laptop has been diagnosed. The latter ends with a blue screen with the text "The computer did not start correctly" and the recommendation to open "Advanced Settings" after rebooting.

This situation indicates the damage to system files, often the registry.

The culprit of the situation are:
- power outages;
- the work of viruses or antivirus programs;
- windows 10 updates
- removal or incorrect values \u200b\u200bof keys critical for the OS to work.
To solve the problem, do the following.
1. Go to the "Advanced Options".
2. Click on the item “Troubleshooting”.
3. Click on the button labeled "System Restore."
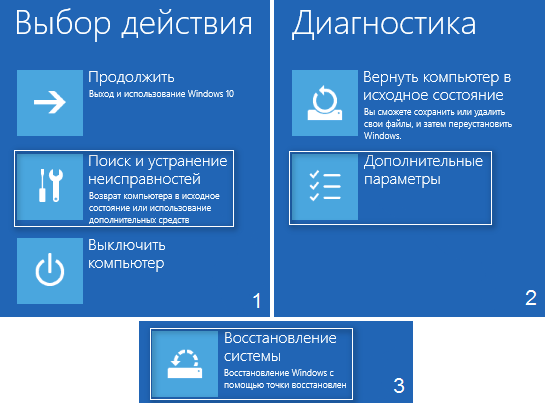
4. With the active function of creating rollback points, select one of the last snapshots of the system and click Next, then Finish.

Often, resuming Windows 10 solves this problem.
5. If the option is disabled (it should be turned on after the system returns to working condition), a window will appear where you need to select "Troubleshooting".
6. Click "Restore PC to its original state" in order to reset Windows 10.
7. Be sure to choose the option to save personal files (all located on the C \\ drive: the files will remain in their places after a Windows reset, but installed programs this does not apply).
Further actions can both correct the situation and exacerbate it. Their implementation can lead to unexpected consequences. Following the steps below will put the system at risk, remember this.
Using the command line, as in the previous method, check for integrity system files, fix the damaged ones, and also restore the registry files from the backup.
8. We execute the “diskpart” command in order to call the tool for working with partitions.
9. Enter “list volume” - the result of the command will be the visualization of the list of volumes of all disks connected to the PC.
10. In the list we find system disk and reserved by the system and remember their letter marks.
11. Close the program by executing “exit”.

12. Enter "sfc / scannow / offbootdir \u003d F: \\ / offwindir \u003d C: \\ Windows" and press "Enter".
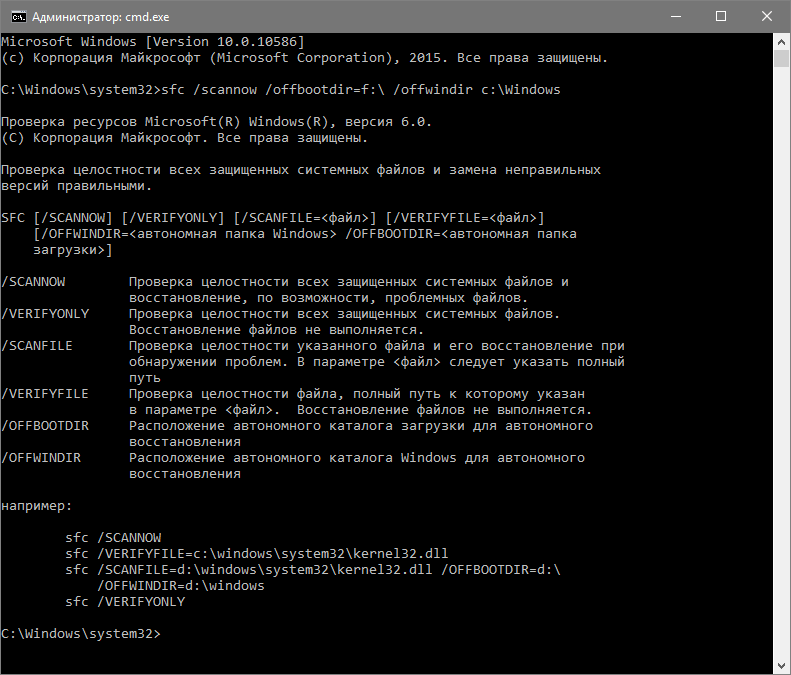
Here: F is the volume or drive reserved by the system (with bootloader), C is the system partition.
13. “C:” - go to the system drive where Windows is located
14. “md configbackup” - create the “configbackup” directory.
15. "cd Windows \\ System32 \\ config \\" - go to the appropriate folder.
16. "copy * c: \\ configbackup \\" - copy the previously created directory into it.
17. "cd Windows \\ System32 \\ config \\ regback \\" - go to the system folder "regback".
18. "copy * c: \\ windows \\ system32 \\ config \\" - copy the contents of the specified directory to the active one.
19. Press “A” with the Latin keyboard layout and “Enter” to confirm overwriting the files.
These steps will restore the registry files from the automatically created backup.
20. Close the command prompt window and click on the button with the text “Continue. Quit and use Windows 10. "
With a high degree of probability, Windows 10 will start after this simple algorithm is executed.
Cases of completely “killing” Windows 10 by manipulating registry files are extremely rare, but they do happen. If this happened or the actions taken did not bring the desired result, one of two solutions remains:
- Reset Windows 10;
- Reinstall the operating system.
The first is done through the “Troubleshooting” item in the additional parameters. Even in critical situations, you can get there using bootable media from windows distribution 10.
In the second case, you need a bootable USB flash drive and about 30 minutes of partially free time.
Solving problems with a computer using the system itself and just a couple of buttons is the dream of any user. A similar feature is called the "Troubleshooter" and it has been present on Windows since XP. However, only in Windows 10 did it work as it should and really began to solve some problems, largely thanks to the system of active statistics collection.
How to run the troubleshooter
There are two ways to launch the troubleshooter in Windows 10: through the Options window, which many call " Windows settings", And through the control panel. In fact, these are two different utilities that are in different places, but they work the same way.
Via the Options window (automatic troubleshooting)
Automatic troubleshooting is a utility that offers solutions to only the most obvious problems with Windows 10:
- problems with recording and playing sound;
- problems with the video;
- problems with recognizing the keyboard, printer, and other connected devices;
- problems with Wi-Fi, Bluetooth and Ethernet;
- the appearance of a blue screen;
- fast battery discharge;
- problems with the store and receiving updates;
- windows Explorer and Windows internal search errors
- compatibility issues.
This utility is rendered closer to user interfaceto make it easier to find, and has the most simplified functionality.

Via the control panel (troubleshooting wizard)
The troubleshooting wizard has been present in Windows 10 since XP. It is on its basis that an automatic troubleshooting tool has been created, which is described above. It can solve much large quantity problems compared to its simplified version. Finding the troubleshooting wizard will be more difficult, as the path to this utility is carefully hidden by the developers.
Possible problems
This is not funny, but errors can occur in the troubleshooter. Fortunately, there are not many of them and they are very easy to fix.
There is an endless search for problems
If you have a pirated version of Windows, just try disconnecting your Internet connection. If not, the problem is connecting to the Microsoft server (in order to find solutions, the system synchronizes its database with the cloud).
Finding problems should not take more than three minutes.
Most likely, incorrect data was specified as the address of the Microsoft server. This can happen if you installed old version Windows 10 and since then it has never been updated. If the system does not update itself, most likely the problem is the ban that has been introduced, so you will have to force the search for updates through the command line.
On some windows versions 10 this problem may also be related to the limited internet connection. You just need to change one of the settings.
Troubleshooter freezes at startup
This problem is much worse, as it may be due to a fatal system error. The first thing, as in the case of an endless search for problems, is to try updating the system. This can be done in the usual way.

First, try running an update check
It will hardly help, but it was worth a try. It will not work to look for a problem, so only a full system check will help.
If this does not help you, you have only two options:
- run the troubleshooter through another utility (both options are described above);
- reset the system to factory settings.
If you plan to choose an option with a factory reset, of course we will tell you how to do it.


