How to boot into the recovery console. Windows recovery. Recovery Console Rules
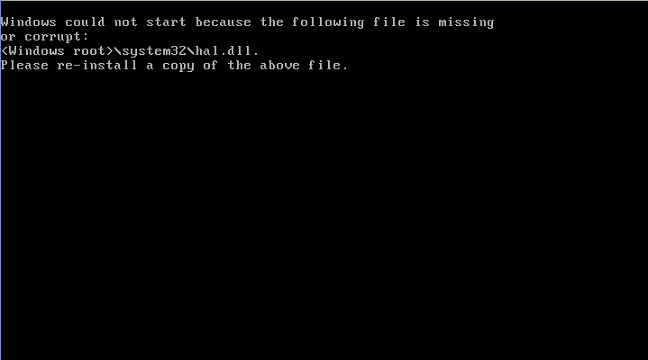
If in the process of working with windows computer XP, Vista, 7, 8 will be damaged for some reason and you will not be able to start the system, take the opportunity restore windows its performance without the need to reinstall Windows. One of the most common reasons for not being able to start Windows is to corrupt the boot record or system filesrequired to download. Among the main symptoms that indicate damage to system files or that boot record spoiled, you can list the following: when you turn on the computer, one of the following error messages appears on the screen:
It restarts on its own, making you think that this could be an accident. However, as soon as the desktop starts to boot, the reboot is repeated again. You can stop this frustrating cycle once and for all. Watch how the computer starts after rebooting. Select "Recovery Console" in the "Startup Options" list.
Adding to the boot menu
Follow the instructions and select Restore or Restore. Enter the administrator password for the computer. The computer will shut down and restart again. Now the reboot cycle should be allowed. If the registry bushes are damaged, the following errors are displayed at startup.
Insert (replace) system disk and press any key (Insert a system diskette and press any key);
Hard disk failed / absent;
Hard disk error / I / O error ( Hard error disk / input / output data);
after completing the BIOS testing phase, the computer freezes;
the multisystem boot menu does not appear;
the computer freezes immediately after the message Verifying DMI Pool data appears.
The most difficult process is recovery damaged system if Windows is installed in the disk partition containing the NTFS file table, as a result of which you cannot use boot floppies and special DOS utilities. Also, some difficulties can cause the recovery of a damaged boot windows entries, which can be erased by some DOS utilities, such as the FDISK program. For these purposes, the developers have provided a special mechanism, which is called Recovery Console (RC), or recovery console.
Method 1: Perform a rollback of system recovery offline
This is probably the easiest way. If for some reason you need to manually restore the registry bushes, use method 2. Each bus snapshot folder contains registry bushes, system files, and other data. The following is a brief overview of this article. As a result, all changes and settings that were made after the installation program was completed were lost.
The highest number indicates the most recent snapshot, and the lowest number indicates the oldest snapshot. Select the one you want to restore. In addition, you can also sort system recovery snapshots using the Date column.
Recovery Console
Using the recovery console, you can disable or connect specialized operating system services, format disks (including partitions containing file system NTFS), load data from disk and save it to disk, replace corrupted files, as well as perform many other tasks. In other words, the console recovery windows - this is special utilitywhich will allow you to perform thin windows setup and create a workable configuration for the normal launch of the operating system. NOTE We recommend that you use the recovery console only if you are an experienced Windows user. In order to use the recovery console, you must have an administrator account on your system. In order to take advantage of the features of the recovery console, first of all you need to access this program, which should be taken care of in advance. There are two different ways to access the recovery console: using the emergency diskette or by installing this program on disk. Let's look at both options in more detail.
Select the following files. Now you just rolled back the registry. Complete the system recovery process. Currently, there are many opportunities for its restoration, but almost all of them require third-party software.
All you need is your installation key. We will really do the repair. We can even make the machine automatically log in as an Administrator! We will not format or lose any data if you follow my explicit instructions. Yes, here you click this key to restore the installation.
Install Recovery Console
To install the recovery console, start Windows XP, put the distribution disk in the CD-ROM drive Microsoft Windows 7, then do the following sequence of commands:
Start - Run. In the window that appears Run Program type the following command: : \\ i 386 \\ wi nnt23.exe / cmdcons where is the name of the CD-ROM drive installed in your system. For example, if the CD-ROM is recognized in Windows as the E: drive, the command will look like this: E: \\ i386 \\ winnt23.exe / cmdcons \\ Windows will display a message that the recovery console will be installed as one of the system startup parameters and It will take about 7 MB of disk space. Accept the offer to install the recovery console by clicking the button Yes. After a few seconds, the master windows installation will be launched and will automatically transfer all the necessary files to hDD your computer. As soon as the recovery console is installed, the system will report. Now on the menu windows bootthat appears after turning on the computer’s power, an additional item will appear - Recovery windows systems. You can start the recovery console by selecting this item with the arrow keys and then pressing the Enter key.
The process overwrites all system files and what not. It took about 4 minutes by my car. As soon as the computer starts backup, it will go to the installer. Promote the user administrator status or what you have. Remember that use this only for good and not for evil.
Work with the recovery console
Come in and you are ready to go! Do you have another way to get back to your computer that does not require any media? When your computer crashes or does not boot, you are limited by what you can do to make it happen again. Most people do not like to format and start from scratch if they cannot start their computer.
Quick recovery: using the emergency floppy disk You can start the quick recovery mode system recovery without the need to preinstall the recovery console from the Windows XP distribution, however, for this you will need an emergency diskette on which all the necessary recovery windows system files. To create an emergency diskette, run the backup or restore wizard by executing the following sequence of commands: Start -\u003e All programs -\u003e Accessories -\u003e Utilities -\u003e Data backup (Start -\u003e All Programs -\u003e Accessories -\u003e System Tools -\u003e Backup ) In the backup wizard window, click on the Advanced Mode link, after which the wizard switches to the save and restore data mode. Click on the Wizard button disaster recovery system. In the window that appears, click Next, then in the Backup media or file name field specify the path to the disk partition where the emergency archive will be stored and its name, for example, D: \\ backup.bkf. For security reasons, it is not recommended to archive data in the same disk partition in which you are using it. copy of windows XP, - it’s better to specify another physical or logical drive, ZIP drive, or CD-ROM drive. In the next window, click Finish. The wizard will scan your disks for system files to be archived, then create them backup in the specified folder. Upon completion of this procedure, you have to create a rescue disk. Insert a blank floppy disk into the drive and in the window that prompts you to create emergency disk click OK, and then wait until the files are copied. Now you have completed all the preliminary procedures necessary for a system disaster recovery. To restore Windows, you need to boot your computer using Microsoft boot floppy disks or the Windows XP distribution CD (if your computer supports the direct boot function from the CD). At the initial stage of installing Windows, after the installation wizard welcomes you to the screen, press the R key to invoke the console for execution quick recovery.
Below are the steps required to download Recovery Console. Press any key when you see this message. The recovery console is now ready for use, and you can enter commands to try to fix your computer problem.
You can also install the Recovery Console on your computer so that it is always present as a boot option every time you start the computer. Computer step by step Make your PC better. Due to various reasons after rebooting or when you want to start your system, it no longer starts. This is usually permission to reinstall the operating system. Correct reinstallation requires formatting the system partition, but in this way all your personal data that was saved on this partition will be lost.
At the request of the installation wizard, insert the emergency diskette into the drive and wait for the console to load. You will be offered two different modes Windows recovery - fast (fast repair) and selective (manual repair). When you select the quick system recovery mode, the following components will be automatically restored: system registry, boot information, main system files, boot record. If you switch to the selective recovery mode, you will be able to independently specify the components to be restored, but you will not be able to restore the damaged registry. Recovery system registry use fast mode. By default, the full recovery mode of Windows XP will be launched: the necessary system files will be downloaded from the Windows distribution CD, after which the program will read the saved configuration from the emergency diskette. After that, you will be prompted to restore the data to system drive. To continue restoring the disk, press the C key; full recovery by pressing the F3 key. After the system configuration is restored, the program will restart your computer.
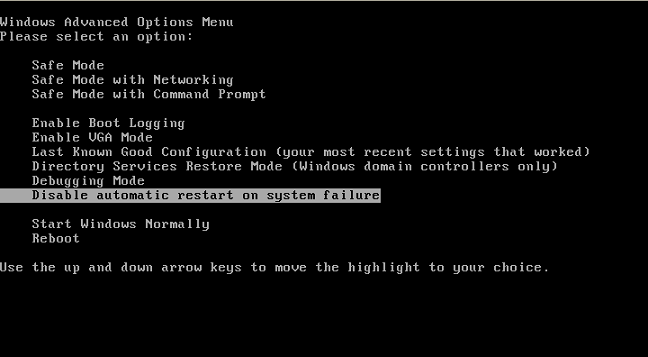
First, we recommend trying various troubleshooting steps to fix your operating system and depending on the system. after the repair, you can decide whether it is possible to use the system further or if the reinstallation is absolutely. necessary. The first option to be selected from this menu. If this does not fix the problem, and the system in which it is located continues the restart cycle, and you cannot determine the error. This will help you identify the error and then the cause of the system failure.
Starting from the installation disk
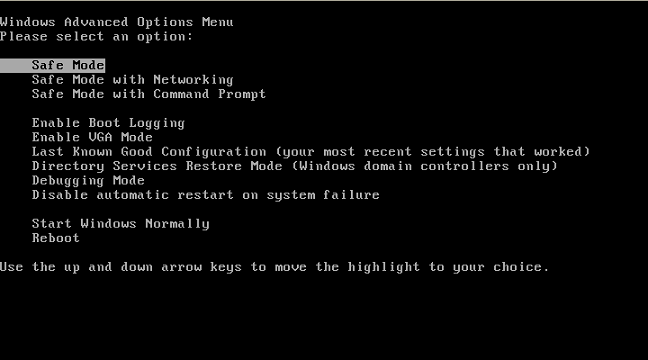
The second step is to download and from here you can remove any driver or install software that caused a system crash. IN safe mode you have a good chance of treating the system. security software for disinfecting system access Safe mode using a network. This way you will have Internet access. When the text part of the installer begins, follow the prompts.
Console commands
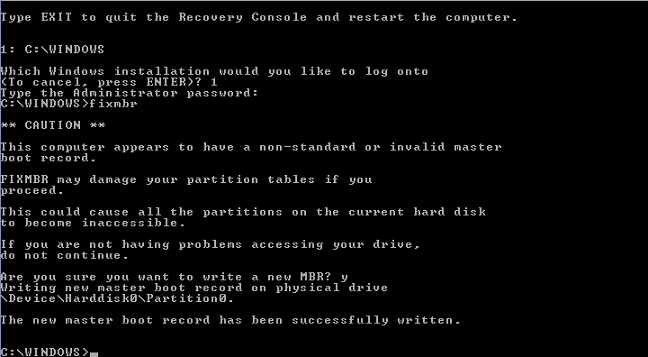
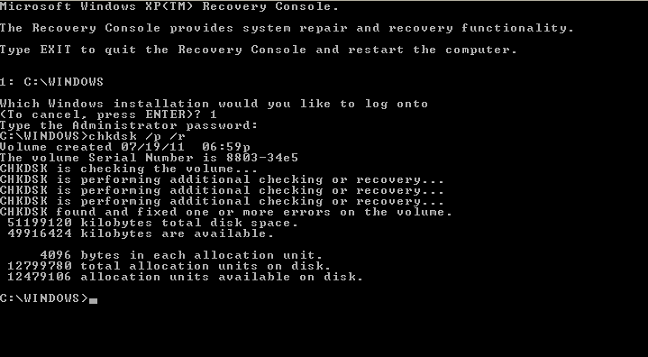
When you start the recovery console as an alternative option to boot the system, you can independently perform a series of actions necessary to restore Windows using a special set of system commands. In general, the methodology for working with the recovery console resembles the algorithm for working with the FDISK program or in MS-DOS, with the only difference being that RC uses its own list of available commands. Immediately after starting the recovery console, NTDTECT will scan the disks of the computer in order to determine the hardware configuration of the computer, after which the recovery console will automatically execute the LOGON command, presenting on the screen a list of all the Windows 7 installations detected on your computer In response to the question “What copy of Windows should I log in to?”, Enter the Windows 7 installation number from the list provided by the program. For example, if a damaged copy of Windows 7 is located on the C: drive and is listed under number 1, simply press 1. Then enter the password windows administratorvalid for this Windows installation, after which you will be able to manage the Windows Recovery Console by typing the appropriate directives on the command line.
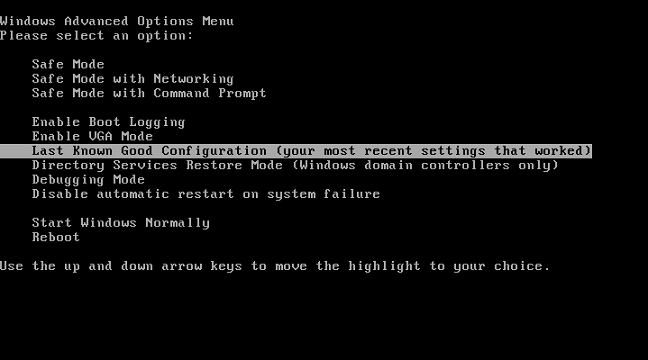
If you have a dual connection, boot or multi-boot the system, select the installation you want to access from the recovery console. If all of the above steps could not restore your system, perform the repair. We recommend this type of reinstallation because you can recover your data after you too. restored them, you can prepare for clean installation. What is the last known good configuration?
Disk Setup Hardware Errors
These options can be used to start the computer if a problem occurs.
What disables automatic restart when a system crashes?
If the existing problem does not appear again. If you run in safe mode, you can eliminate the default settings, programs, and major device drivers as much as possible. causes.
In the command syntax, the drive name is the drive letter in which to write boot sector.
Good day, dear readers. Surely everyone heard about the semi-mythical recovery console that can be run from a disk with an operating system, but I think that not everyone knows how to use it, in fact. This article will discuss just that, namely, what exactly is this - Recovery Console - and why is it needed.
This command overrides the default setting that is written to boot partition system. Then the tool tries to restore everything that it finds.
Browse the files on the selected drive. Reinstall a copy of the above file.
Using the recovery console, you can copy the file you need with installation disk to the system partition.
Let's start with the theory. As I think, it is obvious from the name, using the recovery console you can, in fact, restore the operating system, namely, interact with it for these purposes :)
Using this recovery console, you can copy, delete, move files, in some places, fix some local OS problems, stop services, and perform other administrative operations. As a rule, it makes sense to use this mode if you have very serious damage Windows, in the sense that you can’t even get into it in order to start the built-in system recovery or use the necessary programs (as a rule, the most common error of such a plan that prevents getting into the OS is "ntldr is missing. Press Ctrl + Alt + Del to restart "). And so, about how to get into it and how to use it.
If installing the recovery console with third-party controller drivers. If the manufacturer has not included any installation files, the computer will still be able to start system recovery in safe mode. Select “All Files and Folders” from the options in the left pane.
From the drop-down menu, select “Local hard disks". The graphical interface no longer wants to start - neither in normal nor in safe mode. You created recovery points earlier, but they do not use anything because you do not have access to them. Usually in this case only new installation. In this case, you restore the registry files that were previously copied when restoring the system from their hidden directory.
How to run and apply
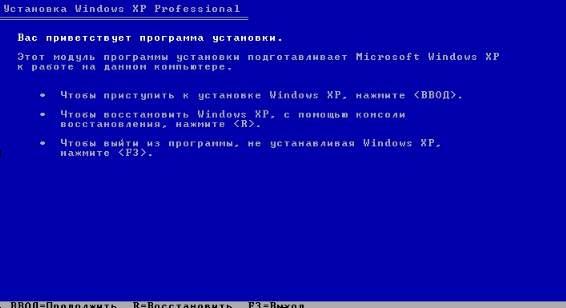
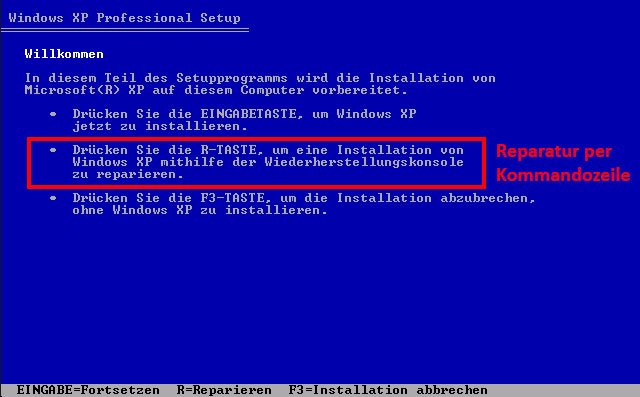
In order to start it, you need to insert a disk (or USB flash drive) with Windows and boot from it (to do this, go to (DEL button at the MOST early stage of computer boot), and then find there the section related to Bootand choose as your first download source CD-ROM. Then save the changes and restart the computer). You will see this window:
Press 1 and enter the administrator password. If you have not set up a password yourself, you can return without a password. Recovery point: Log in as an administrator. Since you have a recovery point where the last registry was enabled, you can remove it from the hidden recovery order. Select "Show contents of the system folder" and "Show all files and folders." If necessary, remove the hook next to “Use Simple File Sharing” and “Hide Protected System Files”.
After "Add, Advanced, Search Now", enter your administrator account with full access to the folder access rights. In the "Snapshot" subdirectory, you will find the most recent registry backup. In the registry files folder and overwrite there. Old files with current system recovery.
If this window does not appear, then change the distribution Windows. In many "assemblies" and the like, this option is cut out. Why - it’s decidedly not clear, but the fact remains.
Next we press the button R and we have the very coveted console. If you have several operating systems, then you will be asked to choose one OS, with which you will work, and therefore, if necessary, indicate it (as a rule, enter the number under which the OS lives in the presented list and click Enter) After that, you will be asked to enter a password for account Administrator (if any). Of course, again, we enter if there is one and again click in Enter.
Teams and their functions
Proceed as follows. If the output file parameter is not specified, the output is displayed. A copy copies the file to the destination directory. Goal cannot be removable media by default, and no placeholders can be used. By default, no placeholders can be used. You will see a list of all files, including hidden and system files.
A drive variable is the drive letter for deleting an existing partition; A section is the name of a section to delete an existing section and can be used instead of a variable. The launch type uses one of the following formats. Exit shuts down the recovery console and restarts the computer.
What to do next? In principle, out of interest, you can list the available commands by typing " help". If you need to know in more detail what a particular team is doing from the list, you can type" help "where command_name - The name of your team. I will not describe all the commands, but I will name the most basic ones that are most often used, because a description of all the commands is beyond the scope of this article, and indeed it is a volume the size of a small book :-) And so, the main ones:
Uninstall Recovery Console
The source variable indicates the file to be expanded. By default, the directory cannot be removable media and cannot be write protected. The format formats the volume. Help If you do not use a command variable to specify a command, it lists all the commands supported by the recovery console.
Use this command to switch to another installation or to a different subdirectory. The map displays active device mappings. The set is used to display and define environment variables for the recovery console. Your files are saved. If you see only a black screen and the startup process will work after a few seconds, the boot sectors are likely to be defective.
fixboot and fixmbr - these 2 commands restore the boot sector and mbr (Master Boot Record). As a rule, they should be performed if you were susceptible to virus attacks and some of them entered the boot sector, or when installing a new OS, a failure occurred that caused the sector to crash. By the way, the boot sector is a special sector on, which is loaded first. A MBR is the data needed to load the operating system. goal MBR - choice from which section hard drive should boot the OS.
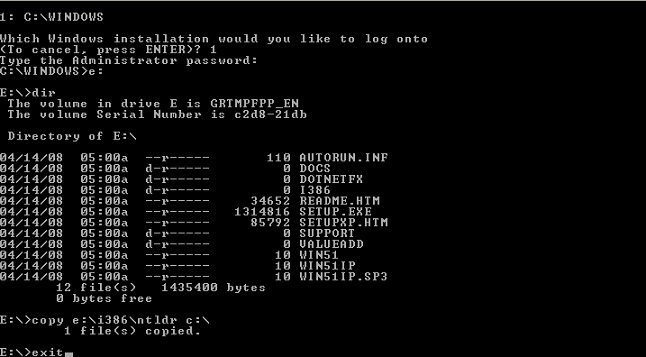
copy, - command to copy files. May come in handy to fix the error " NTLDR is missing". To fix it, you need to transfer 2 files from your disk -" NTLDR"and" NTDETECT.COM". For this we will use the team copy. It works like this: " copy "where - the full path to the file or folder that we want to copy, and - The full path to the place we want to copy. That is, to copy, we prescribe the following commands (in turn): copy e: \\ i386 \\ ntldr c: \\ copy e: \\ i386 \\ ntdetect.com c: \\ Where e: \\ is your letter CD \\ DVD drive, and c: \\ - this is the letter where the operating system is located where you, in fact, want to copy these files.
Disable and Enable. These two commands disable or enable system services or respectively. The first command has the format " Disable "where is the vertical stick" |
"means" or ". The second is" Enable "where means start type. There are five of them:
SERVICE_BOOT_START. Indicates that the service or driver will be started by the bootloader. Applies only to the drivers needed to boot the system.
SERVICE_SYSTEM_START. Indicates that the driver or service will start during the OS startup process.
SERVICE_AUTO_START. Means start type " automatic"
SERVICE_DEMAND_START. Means start type " manual", i.e. manual.
SERVICE_DISABLED. Means start type disabled", i.e. disabled. For the command Enable not applicable.
Let's analyze the service example eventlog (the event log). Disable eventlog. This command disables our service. Eventlog, i.e. assigns her status SERVICE_DISABLED. Enable eventlog service_auto_start. Allows the event log to load into auto mode. As you know, it is useful for restoring services if, for example, they completely do not want to start from under the system when you have disconnected something with your soul :)
Also the video above. If you are not in safe mode or it does not work, the repair unit remains. Here's how to do it manually. More automated version below.
If this does not work, repair. This will replace the damaged system files, but your own files will be saved. Before you, however, back up your data, if possible.
Attention! Operation overwrites everything installed updates. Then you must reinstall it. If you do not have Service Pack 2 installed, data loss will occur. This helps even if protected mode refuses to start. or there are problems with the download manager.
cd (or chdir) dir, cls, exit. Let's start in order. Command cd is an abbreviation for chdir (change directory). It allows you to navigate between folders and drives, and also displays the full path of the current directory. If the command is without parameters, then it shows the current address of the folder where you are located. To go to any place you need to enter cd ,
Where - The address where you want to go. As it can be specified as a full path, and local, i.e. the name of the folder that is located in the current directory, or its path, starting from the current directory. To go up one level (i.e. return to the directory that is a child of yours), you need to enter " cd ..". Example: cd c: \\ - go to the root of the disk FROM: cd c: \\ windows - go to the directory with your Windowsusing an absolute address. You can also do this by typing cd% systemroot% cd system32 - go to the system32 directory, which is located in the folder Windowsusing the local address. cd - shows us where we are (c: \\ windows \\ system32) cd .. - we return to the level up, i.e. in windows folder cd .. - again we return to the level up to the root of drive C: cd "Program Files" - go to the folder " Program files". notethat to go to a folder that uses spaces in the name, you need to write the path in quotation marks. cd - shows us " c: \\ Program Files" Command Dir Lists the files in this folder. Command cls clears the screen, i.e. it becomes empty, as at the very beginning. Command Exit comes out Recovery Consoles and the computer restarts.
Perhaps we’ll finish the sim with the teams.
By the way, you can install the recovery console in your OS and start it from the start menu (system selection menu), and not insert a disk every time. To do this, insert / mount the drive with WindowsGo to Start - Run and type in there D: \\ i386 \\ winnt32.exe / cmdcons"where D: - drive letter of your drive. Then proceed according to the instructions. When the program starts to update, and you have a copy Windows not licensed then click " Cancel", she will install the Recovery Console for you, using the means she has. Removing the Recovery Console from your start menu and system will be a little more difficult. To do this, do the following:
Open My computer
Go to the drive where your system and recovery console are installed
Tools - Folder Options - View tab - Check the box next to "Show hidden files and folders "and uncheck" hide system files "
In the root of the disk, delete hidden foldercmdcons, and also delete the hidden file Cmldr
Find file Boot.ini and right-click on it - Properties - change the checkbox from "Read-only". Open this file with notepad
Delete the line with your console (for example, "C: \\ cmdcons \\ bootsect.dat \u003d" Microsoft Windows Recovery Console "/ cmdcons"). Save the file and close it.
Check the box next to "Hide system files" and select "Do not show hidden files and folders"
On the sim with the installation-removal of the console in the system, perhaps, let's finish. Yes, and considering the console, too.
In general, the article is more likely to be enlightening in nature, which, however, does not prevent it from being extremely useful in a million cases. Which ones? Well, for example, you came to some forum with a problem, and once you got something like "Yes, you need to enter this and that" in the recovery console, in the hope that you definitely do not know what it is , and be afraid to ask again. But you won’t be fooled now - you know what kind of console it is, where it lives and even partly how to use it! :-) In general .. We must go so that this does not happen ;-)
Afterword
These are the pies, comrades.
By the way, keep in mind that thoughtless use of the console (replacing system files with some left-handed analogs downloaded from the Internet or disabling important services) can harm your system and, as a result, nerves. So don’t forget about the command " help". It will be useful to you more than once ;-)
If you have any questions, additions, corrections, etc., then write in the comments - I will be glad to help, answer, listen and all that jazz.
PS: For the existence of this article, special thanks to a friend of the project and a member of our team under the nickname “barn4k“