Want to repair a damaged file yourself? Looking for a program that can fix the internal structure of a file and restore the original image quality? Does the image viewer no longer display photos or are you only able to see small “preview” images?
How to recover damaged files by the program
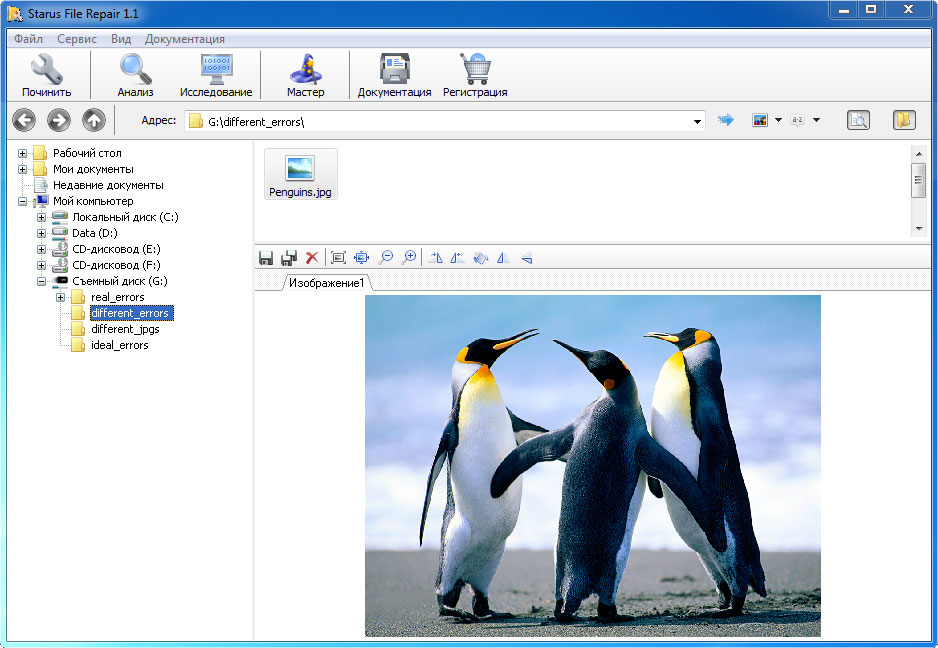
Starus file repair
Perform recovery corrupted files using the Starus File Repair program. The program features are not limited to recovery logical structure file. The program will also save all image data, including “Priview” and Exif data. The powerful Starus File Repair algorithm professionally eliminates the negative effects of a virus attack, software and hardware failures.
The program interface, executed in the style of Windows Explorer, has a function for previewing images. That is, you can evaluate the quality of recovery corrupted information even before the file is saved and the program itself is registered. The built-in “File Repair Wizard” simplifies your task and helps you quickly find corrupted images and restore them to their original quality, even after serious damage.
The algorithm of the Starus File Repair program allows you to recover damaged files in two ways:
- Using the “File Repair Wizard” - allows you to work with many files located in different folders. All damage will be fixed, and the files are saved in the folder you specified.
- The process of recovering damaged files without using the wizard - allows you to view the contents of the file before saving.
How to recover damaged files using the wizard
Using a convenient step-by-step wizard, you will see in each new window detailed step by step instructionsto help you easily fix needed files. To use the wizard to restore and save damaged files, you just need to select the "Wizard" item in the "File" menu.

In the "File Selection" window, you must specify the damaged files that you want to recover and save. Here you can add any number of files from various folders to the recovery list, delete files or completely clear the list. Here you can choose your usual way of displaying files ("Icons", "List", "Table") and use file sorting.
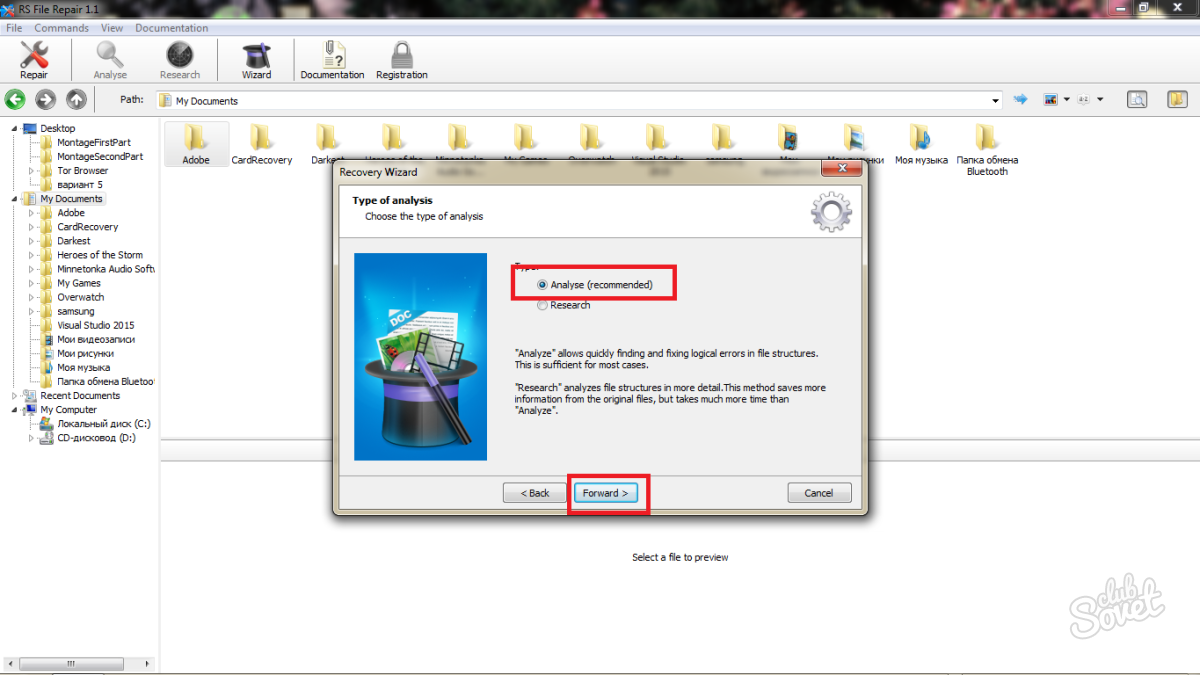
The next step is to select the type of analysis of the restored data.
For quick recovery we use the “Analysis” function - in most cases this process is enough to eliminate damage to the logical structure of files.
For deeper processing of damaged files, use the "Investigation" function. A more detailed analysis will take longer, but it is guaranteed to extract all the useful information from the structure of a badly damaged file.
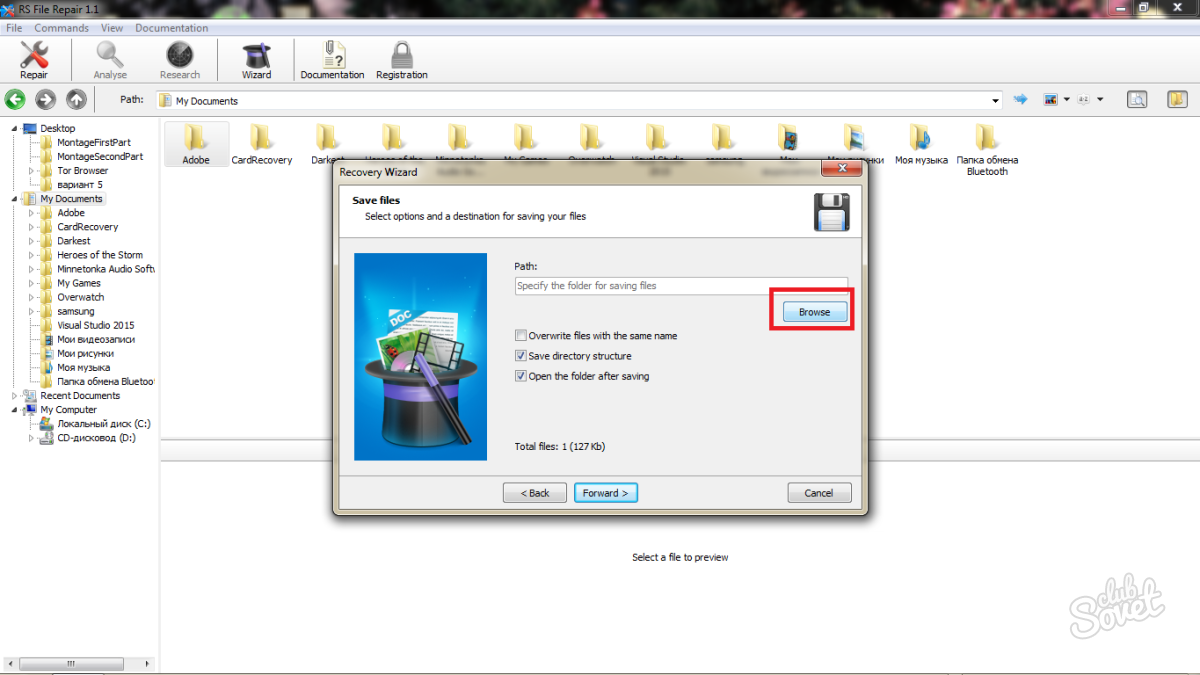
Having previously enabled it, you can use the following options in the recovery process:
- Overwrite files when matching names
- Save directory structure
- Open folder after operation is completed
How to recover damaged preview files
Manual recovery without using the wizard consists of three simple steps:
First, select the folder in the left part of the main program window in which the files you need are located. The entire contents of the directory will be displayed on the right, in which we will find the damaged file - the contents of such a file are not displayed in the program.
Next, restore the structure of the damaged file. In the main menu of the “File” program, select the “Analysis” or “Research” option, depending on the degree of damage to the file. After the analysis process is completed, the files will be available for preview.
The last and most enjoyable step is to save the repaired files.
PhotoRec is powerful and simple program recovery deleted files. Finds what others have missed by searching for content. Free, unlike colleagues.
1. Where to download PhotoRec
You will notice another program in the archive:
- testdisk_win.exe - a program to recover from formatting.
- fidentify_win.exe - definition of file types in a folder.
- photorec_win.exe is the console version of PhotoRec.
- qphotorec_win.exe - actually our review hero.
Without them, PhotoRec’s functionality will be compromised.
2. Work with PhotoRec
2.1. Theory (briefly)
As I said, the program searches for files by content. It’s easier to explain by analogy: if something looks like a duck, swims like a duck and quacks like a duck, then this is probably a duck.
Applies to our case. Imagine the situation: the flash drive broke in half. The first memory chip split, data was extracted from the second. Problem: without the file table remaining on the broken chip, the contents of the memory are a series of zeros and ones without indicating where one ends and the next file begins. PhotoRec will scan them in order and fetch familiar data types from the hash. Restoring files after formatting is nothing for her.
Method advantage:
- Does the flash drive ask for formatting because the file system has been deleted? Set PhotoRec on all flash memory and data will be found. Data is restored regardless of whether there is a file system or not.
Two disadvantages:
- A big nuisance is the situation when a file is stored in parts in different places of memory. helps prevent a situation, but not do it every time after writing data? Yes, and flash drives it is harmful, memory cells will wear out faster than expected. PhotoRec will determine the beginning of the file, perhaps the middle and the end, but it cannot stick together.
- Names and folders are not restored. However, what is the difference, what are the photos from your birthday called if they open correctly?
Tip: if PhotoRec did not restore the files that were probably on the flash drive, send a colleague to the battle. Another algorithm is a different result.
2.2. Practice
Step 1. Select a drive.
Can choose as drive entirely (the only true option, if the flash drive requires formatting), and separate section (C, D, E and so on).
Select a partition instead of a disk only when restoring data from hard drive. The reason for saving time is that searching within clearly defined boundaries is faster than a full scan. Yes and unnecessary files recover less.
Item Description:
- List of visible drives. Lines starting with Disk - physical disk Drive - logical. In order not to get confused, select your flash drive in the lines Drive.
- List of detected partitions. Displayed as logical drive in the "Computer" window (C, D, E and so on). First line " No partition»Allows you to choose to scan the entire disk.
- The choice file systemwhich (was) on the disk. Usually the program itself sets the correct value.
- Item “ Free»- scanning only free from legally residing files registered in the file table. Helps to quickly recover a deleted file when the rest of the drive is in order. " Whole"- scan the entire disk, with the restoration of not deleted files, too.
- Select a folder where to save (press the button Browse).
The meaning of the buttons is clear from the names: “About the program”, “Select file formats”, “Search” and “Exit”.
Step 2. Specify the type of files to recover.
Click " Reset"And tick off only what you need. Most often it is doc (MS Word documents), jpg (Photo), mp3 (music), zip (archives and MS Word documents). The rest is to your taste.
Do not put more formats than necessary. For example, if you select a type tx?, a huge amount of text documents with incomprehensible contents will be found - PhotoRec considers any combination of characters more or less similar to text as separate text document. Do not confuse with MS Word documents - they have a different format.
If you choose all file types when recovering data from a slow MicroSD card memory of 32 gigabytes, you will have time to walk to the store to the other end of the city and returned exactly to complete the restoration. Checked!
Step 3. Specify a folder to save all found files.
Press “Browse” to select a folderSpecify a folder on another drive. Not on the one from which you are recovering files!
For convenience, create a folder directly on disk C:. Just make sure that it has a lot of free space.
Name the folder in English letters otherwise, the error " Failed to create file! Please choose another destination» (« Error creating file! Choose another place»):
I do not recommend creating on the Desktop or in Documents, there will be the same error. The path to it may contain Cyrillic.
Step 4. Wait.
Click " Search » and wait. The process is not fast, stock up coffee.
Wait ...Step 5. Disassemble the rubble of files.
Surely there are junk files. Among them are the ones you need, fully and partially restored. The recovered ones are not 100% open, most likely they will not, but information can be obtained from there. Like below.
3. Why is not everything restored
When a file is deleted, the entries in the file table are deleted, which indicate the places of the physical location of the data - those very zeros and ones. Pieces of memory (there may be several) that store the contents of a file are not overwritten entirely and immediately. They can get lost in a second or a year - it all depends more on the case than on the operation of some algorithms. Therefore, in practice, the recovered files contain pieces of information from new files, which is essentially damage.
The more often files are written, the higher the chance of overlapping new data. Even a seemingly innocuous operation - opening a document - can permanently erase deleted ones, because auxiliary files are written (it does Microsoft Word and a lot of other office programs).
Hence the conclusion: DO NOT DO ANYTHING WITH A USB Flash Drive, UNTIL SCAN THE RECOVERY PROGRAMS! Do not even reconnect, because Windows likes to measure the speed of flash drives to check for compatibility with ReadyBoost technology, creating a special file. Each reconnection - reducing the chance of a successful recovery.
4. How to recover damaged files
A damaged file contains interspersed random information and can be trimmed.
I noticed that PhotoRec seems to be dropping corrupted files. To extract absolutely everything from a flash drive, scan the program
4.1. File Repair program (many formats)
Is it possible to restore data directly to a USB flash drive?
It is possible, but not necessary. Better save the found in a separate folder. The TestDisk program, paired with PhotoRec, is designed to restore file tables directly to the hard drive, but i personally I do not recommend this approach, especially the restoration of the file table - not the restoration of deleted files.
How to recover deleted SMSs and contacts?
PhotoRec is not for this.
The program has restored something, but nothing opens.
Sometimes it happens. Since Recuva and File Repair did not help - reconcile.
Where does PhotoRec save files recovered after deletion?
Since you have similar questions, you have not read my note at all. Raise your eyes higher, please.
Formatted a USB flash drive, deleted important files. How to restore them?
Read my instructions (see and in order).
6. Summary
Do not forget to watch the video on YouTube:
You can not pay a lot of money to the service center to recover deleted files, but get down to business yourself. Domestic cases - deleted a file, formatted a USB flash drive - resolved one-two. Heavy (a flash drive is not detected at all, hDD makes strange sounds) the prerogative of service centers is still, fortunately, less common.
Tip of the day: backup. Burn everything of value twice on DVD and store in different places. Real photos fade, the number will never disappear.
If any file on your computer does not open due to system error - do not rush to delete it, especially if the information recorded in it is very important to you. Try one of the methods described in this article. If none of them helps you, try contacting any computer repair service center - specialists will certainly help you. In the meantime, try restoring the file yourself.
How to recover a damaged file using programs
- You can make a choice in favor of any file recovery programs, such software sometimes even happens with antiviruses. In this article, the RS File Repair utility will be taken as an example, you can download it from the link with the utility name on the official website, note that the program is not free, if you need free software, then look at programs such as MunSoft Data Recovery and R.save, plus the fact that they have the same principle of operation, and this article will be an instruction for them too.
- Find in the list of recovery programs the one that returns damaged files, click "download".

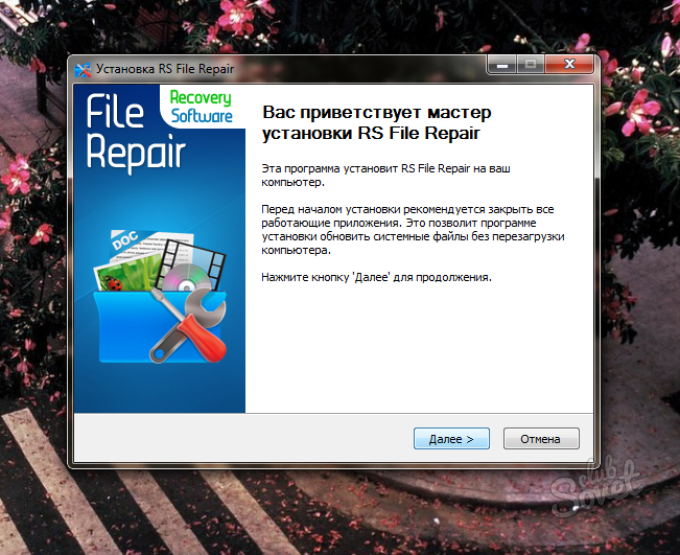
- After the download is completed, double-click on the saved file and proceed with the installation. Select the program language and click OK.

- Read the recommendations on the screen, close the remaining active applications so that nothing interferes with the installation process. Click "Next."
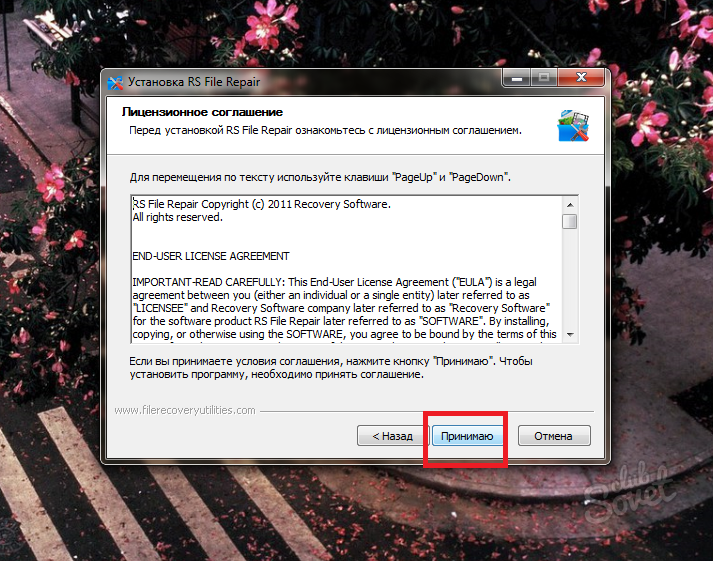
- Read the license agreement and click "I Agree."
- Select the program installation directory. If you have two disks, then do not install programs on drive C if possible.

- Installation is almost complete, you just have to click on the “Install” button.

- As soon as the program for recovering damaged files is installed, uncheck the box “Show ReadMe file” and leave it on “Run RS File Repair”.

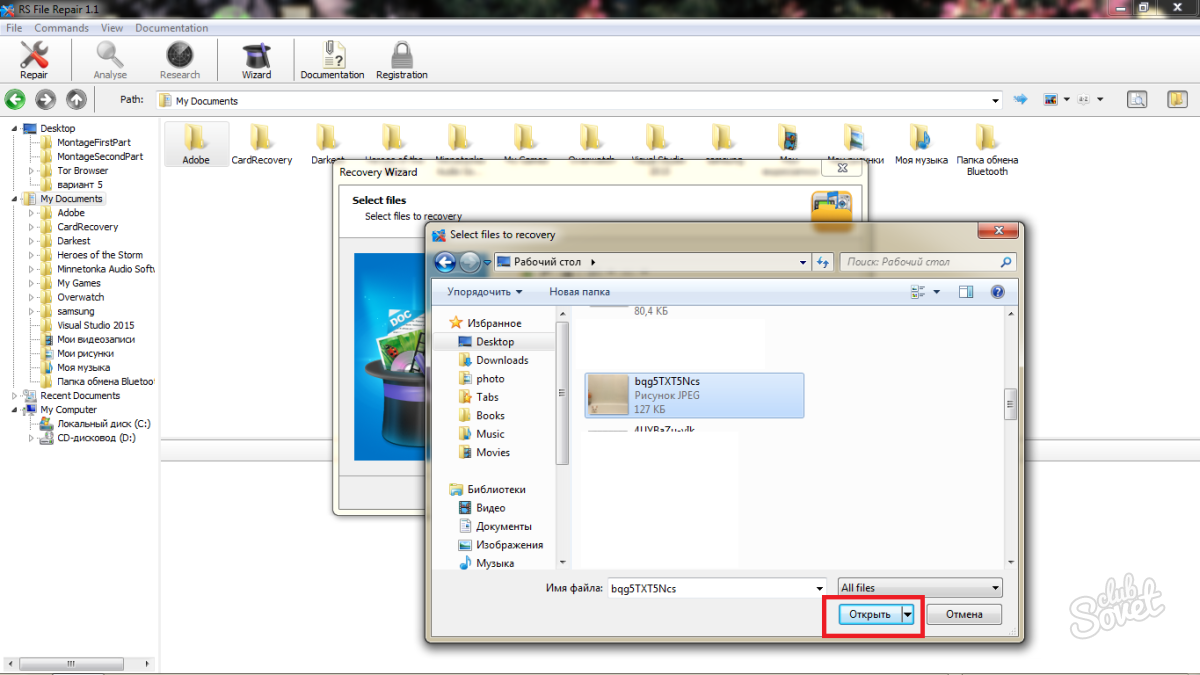
- All your work in open program will be enclosed in this small window called Recovery Wizard.

- Find the small folder icon and click on it to select the damaged files.
![]()
- Select the folder in which the file is located, click on it and click "Open."
- Select “Forward” to continue recovery.

- Two recovery methods are available to you, to put it simply, these are the “Deep” and “Superficial” methods. Of course, it is better to give your preference to the first option, but it will take a little longer.
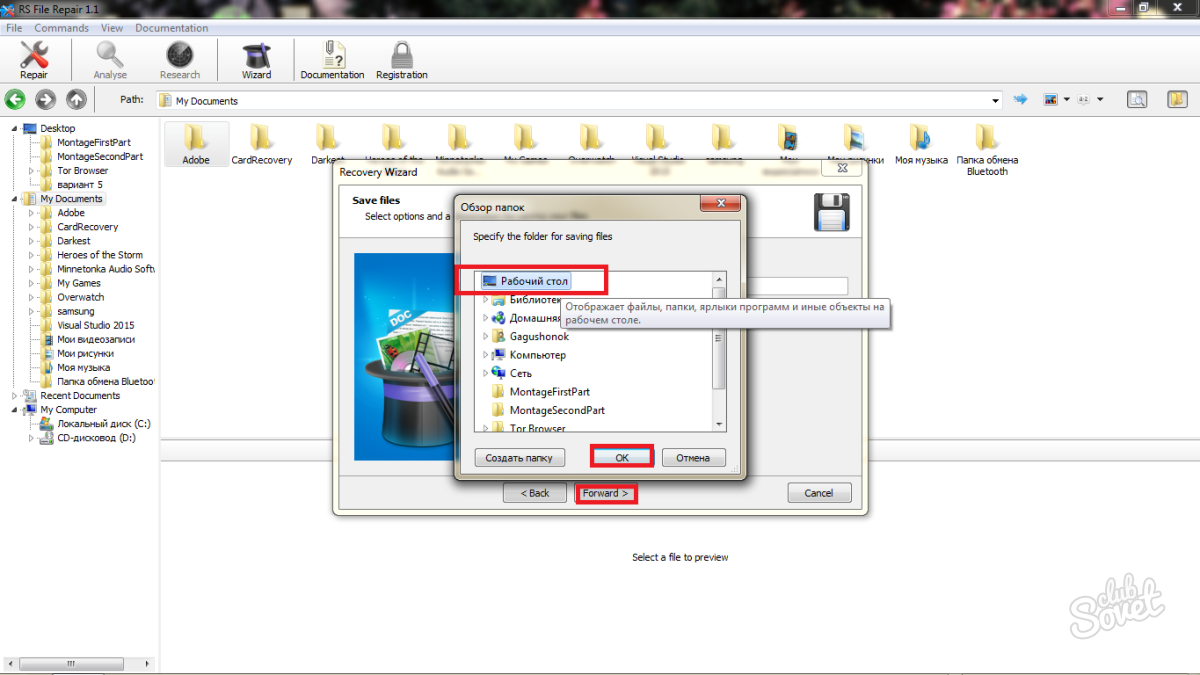
- Specify the path to save your recovered file by clicking on the word “Browse”. Do not forget to uncheck “Overwrite files with the same name”, otherwise this option will erase all files that have the same name. It is better to save everything that you have at the moment in that directory.
- On an example the desktop is selected. Click OK and then Forward.
- After a few minutes, you will see the restored file on the desktop of your computer, or in another previously selected folder. If the file took up a large amount of memory, then you have to wait a little longer.

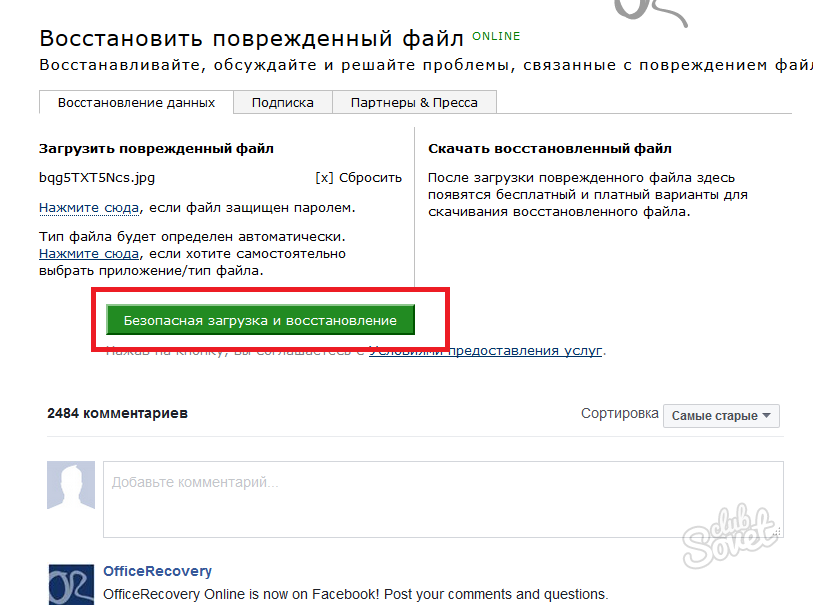
How to recover damaged files online
The option with installing special software is suitable for those users who have to do this procedure often, or with large quantity lost files. When you need to restore several small documents or photos, then installing the program is not necessary at all, since you have many online services of your choice. For example: a utility from munsoft, online officerecovery recovery, or your own service at your discretion. The last site will be taken as an example.
- Go to the online file recovery service. Choose to upload your file to the portal by clicking Browse.
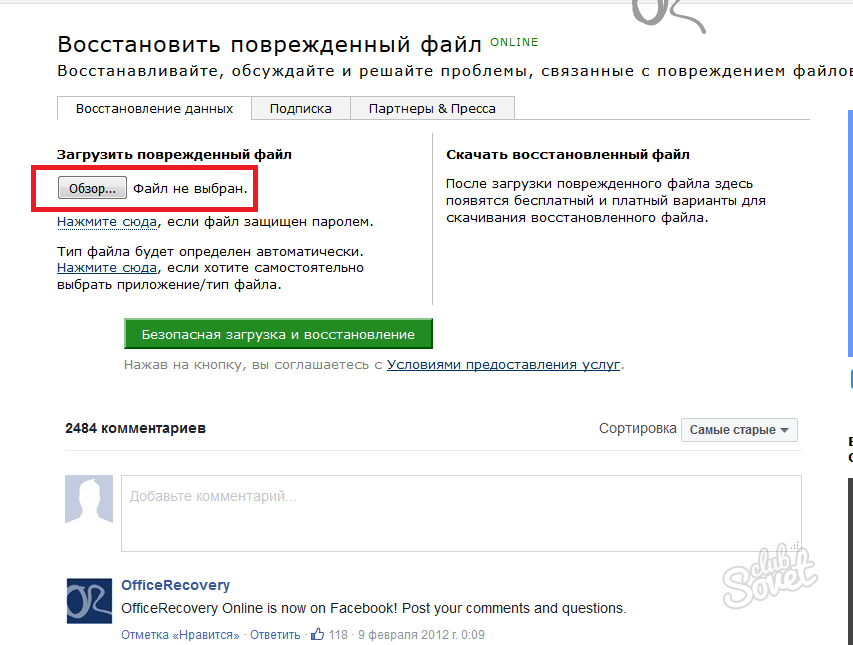
- As soon as you select the desired file and upload it, click on “Download and Restore”.
- The whole process will take from a few seconds to ten minutes, depending on your internet speed.
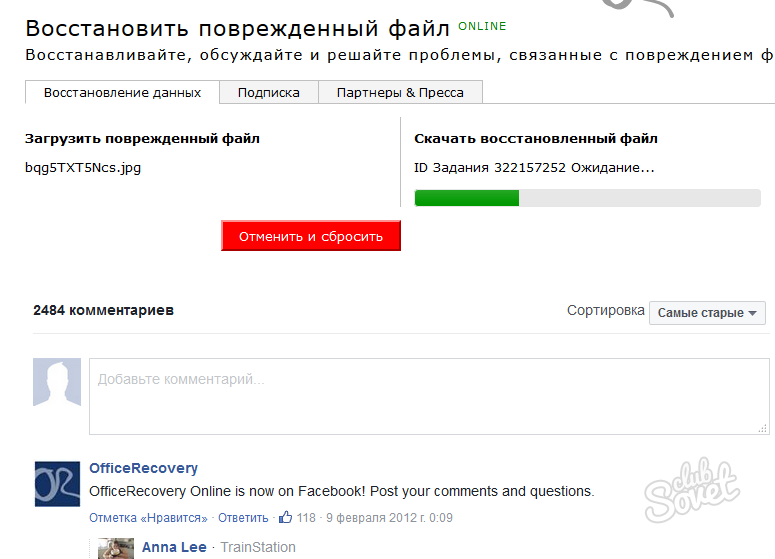
- After recovery is complete, download your file. Please note: if you do not trust the service you use, turn on your web antivirus.
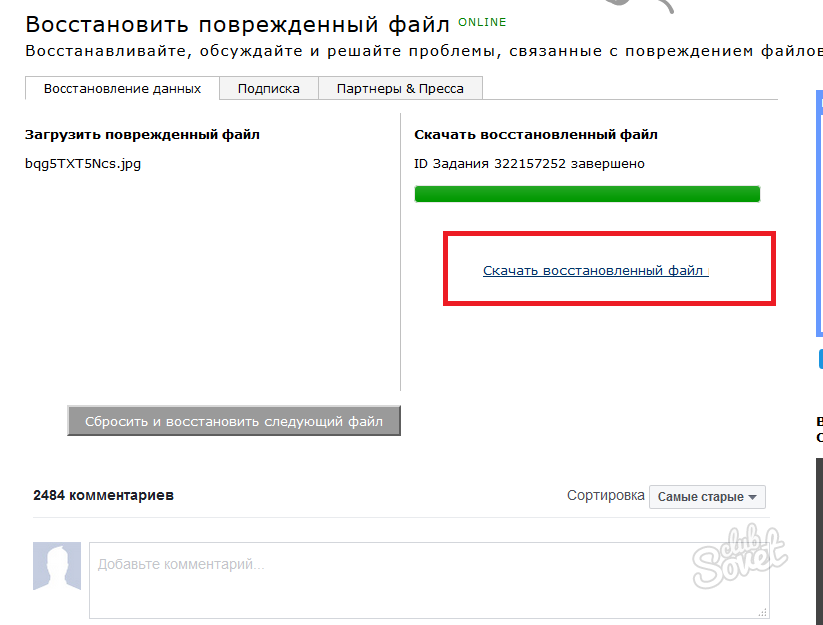
Now you know how to easily restore your damaged file in two ways to choose from. If none of the steps helped you, contact a specialist: the document may have undergone serious changes.
Not so long ago, people from all over the world could only dream of restoring accidentally deleted photographs. Now this is no longer a problem! It is enough to install special software on the computer and soon valuable photos will be with you again. In this article, we will tell you about flash drives, etc. All you need to work is a program for jpeg recovery PhotoDOCTOR files.
Photo recovery - from any device!
The Russian-language program “PhotoDOCTOR” is a real find for computer users who are faced with the problem of missing their favorite photos face to face. Install it on your PC and there will never be any problems recovering damaged or accidentally deleted photographs.
The application is universal and supports working with USB-sticks and memory cards, and can also check for tablets, phones, laptops and other devices of any brands that are suitable for recovering photos. All that is required is to start the software, connect the drive to the PC and select it in the list of available drives.
Flexible scan settings
The PhotoDOCTOR program has two modes: quick scan and full analysis. The first one will help you to carry out an operational but superficial check and find out if there are traces of photos that were recently deleted on the drive. The second one will scan the storage medium of your choice and then provide a detailed report on the work done. If you are only interested in repairing damaged Jpeg files, then in the next menu mark this format in the list and uncheck the rest. Here you can specify the approximate size of the desired photos.
Recover any files in 5 minutes!
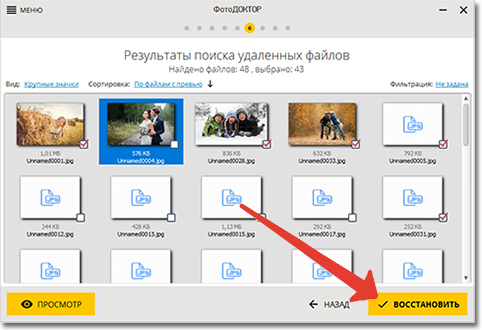
Scanning takes only a few minutes. After its completion, you can familiarize yourself with the program report on the work done. It will be presented as a list of files found by the application during the scan and suitable for recovery. If you wish, you can change the design of the results: it can be displayed not only as a list, but also as large icons or a table. Similarly, you can configure the sort mode, choosing the one that suits you from the drop-down list.
![]()
Each file can be viewed in the program before restoration. To do this, you just need to select the photo you are interested in and click on the “ View". In the window that appears, you can not only see the image, but also learn about it additional information: size, name, extension, etc. All that remains is to mark all the necessary files and remove the checkmarks from those that you do not need, and then click the " Reestablish».
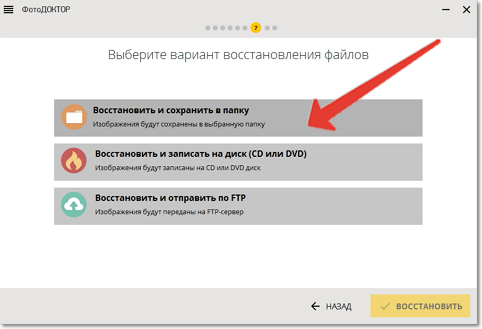
Three ways to save photos to choose from
The photo recovery application offers several ways to save recovered images. The easiest and most affordable way is to leave photos on your computer by placing them in any folder on your hard drive. If you want to protect your photos as much as possible and avoid losing them again, then you have the opportunity to burn photos to DVD or CD, as well as instantly upload images to the Internet via FTP.
Conclusion
That's all! You are convinced that JPEG recovery is very simple if you have PhotoDOCOR installed on your computer. Download software and be calm for the safety of your favorite photos, and with them pleasant memories.
The reasons for the appearance of damaged files on the PC are an emergency shutdown of the computer and a virus attack. When such problems occur, the user loses access to office documents, pictures and installers. If the images and installers can be downloaded again, then where to find information that no one has? How to recover damaged files as quickly as possible?
Utilities for "resuscitation" of information will help to solve the problem. There are many free programs. If the user remembers which HDD the remote object was stored on, then he should refrain from installing the application on this particular hard drive.
Please note that you will not be able to recover damaged files that disappeared long before the installation of the program. The faster the user detects the loss of a document, the higher the likelihood of data recovery. With active overwriting of information on the HDD and SD-card, you should not count on success.
Recuva
This is the most popular utility for recovering missing files. The Russian-language interface of the application is understandable even to a novice user. The program allows you to recover damaged files from your hard drive, SD-cards and USB-drives. The computer owner can reanimate data lost as a result of an unintentional deletion of a document in the trash, a hardware failure, or other error. The utility is intended for use in all versions of Windows.
The program works with FAT and NTFS file systems. Among the features of the application, it should be noted that there is a search function by name. User can download regular or portable version utilities. To repair damaged windows filesWithout clogging up the registry entries, just copy the standalone application to a USB stick and run the program.
Computer owners can customize the functionality. Setting parameters will simplify the work for people who have minimal skills in using such utilities and who want to speed up the search for documents. 
Pandora recovery
Using this free Russian-language program, you can recover damaged Windows 7 files. Among the features of the utility include the option to preview documents and images. This function is used when overwriting information on the same hard drive. The key advantages of the application include the ability to recover important data after deletion from a damaged file system and repeated formatting HDD. The program will allow you to recreate the disappeared objects, the MFT records of which were used by the system twice.
The user can find the desired document using special filters or select a file from the table. The utility recovers not only text notes and pictures, but also compressed archives. The application allows you to analyze the possibility of reconstructing inadvertently deleted records, taking into account the system’s reused clusters in which they were entered. 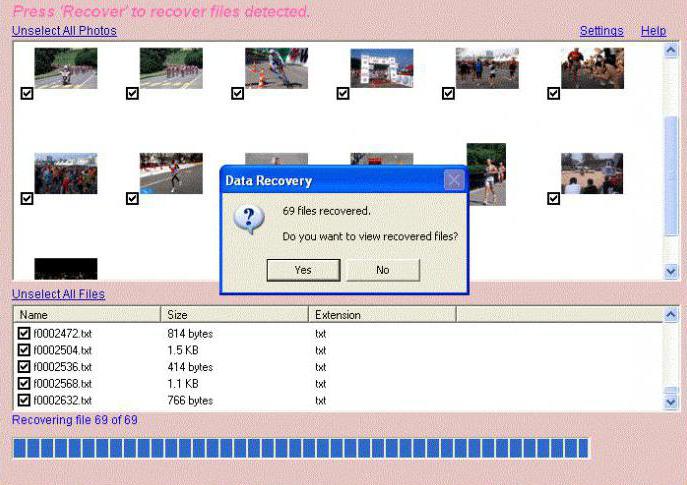
PC Inspector File Recovery
The above utilities are designed to work with various electronic storage media. PC Inspector restores objects exclusively from the HDD, including after formatting it. An application can reanimate corrupted data boot sectors and file table. The utility is used to work with different types of HDD.
The program allows you to exchange information with network drives, i.e. perform recovery of damaged files from their clusters and save the received data there. You can recreate Special Recovery with a unique application of this type. deleted objectsto which there are no active links in the directory. The utility works with different types of files and documents. 
Transcend RecoveRx
This is a free Russian-language application for recovering information from USB-drives and hard drives. The interface is clear even to novice users. Transcend RecoveRx is the simplest and most effective solution for recovering files from a damaged hard disk, SD card and other optical media. The utility confidently copes with HDD and USB-drives, which were previously formatted. To start the recovery process, just specify the storage medium and select a file from the list.
Disk drill
it popular app for Mac OS X. Most recently, the creators have released free version programs for Windows. The English-language utility has a simple interface. When installing software Downloading additional modules is not required.
User can create an image. electronic media information that will subsequently be used to recover data. These actions will help prevent damage to files on the physical drive.
Word repair free
Another free app for Windows. The utility allows you to recover damaged word files. The program does not require installation.
To start the recovery process, you need to download and open the application. Then you should go to the Repair section, click on the Open link and select the damaged file. After checking and analysis, the utility will show objects that can be restored. To save the document to disk, click on the Save button. 
PhotoRec
This is a powerful tool to repair damaged jpg files. In 2016, a program update was released. The developers have added a graphical interface. Now even novice users can work with the application.
The kit includes the TestDisk utility, which allows you to recover the lost partitions on the disk. Using PhotoRec, you can recover more than 200 images. The application is compatible with almost any device.
HD Video Repair Utility
For corrupted videos exist special utilities. Among such programs, the HD Video Repair Utility application stands out. The utility does not need to be installed.
The user needs to open the application and click on the choose movie link. Then you need to select the damaged file and click on the Scan button. An error message will appear. To fix the problem, click on the choose reference movie link, select the normal video clip and click on the Scan button. In this way, you can "teach" the program to recognize damaged files.
The recovered video will be moved to the new Repaired folder. To reanimate the initial data, the user needs 60-90 seconds to download the program and 10 minutes to recreate the records in the system. 
CD Recovery Toolbox
Unlike other utilities listed above, this application is designed to recover information from dVDs and CD. The program searches for files and folders that cannot be found in another way. A free utility can reanimate data even from scratched or unreadable disc. It is worth paying attention to the fact that the files themselves should not be damaged. Otherwise, the user will not be able to restore the necessary documents.


