Accidentally formatted a flash drive with important photos? Do not worry! After all, all files can be saved. And simple, but multifunctional “PhotoDOCTOR” is able to help with this. This guide will show you how to recover. deleted photos from a flash drive easily and quickly using this software.
Step 1. Download the program
To get started, you need to install the PhotoDOCTOR application on your computer. You can in a special section of our site. Wait until the download is completed and double-click to run the installer, and then specify the location on the hard drive, where the files of this program will be located.
Be sure to create an application shortcut on your desktop! So you can further quickly start working with software. Then start the installation process, and after its completion, proceed to restore the images.

Step 2. Connect the USB flash drive to the PC
So, in order to restore photos from a flash drive, you need to connect this drive to the computer. This is done as standard, so it is unlikely that it will be difficult for you to perform this simple procedure. After that, run the installed software. A small menu will appear on the monitor, which briefly describes how the application works. Click Next immediately.
"PhotoDOCTOR" will conduct an automatic search and show a report that lists devices that can be scanned for files to be restored. Find the USB flash drive you need in the list and go to the next step of our guide.

Step 3. Determine the type of scan
Excellent! Now you need to choose the type of scan that the program will carry out next. In total, two types of removable media verification are available in the application. To save time, you can use quick search. In this case, the software will promptly check the USB flash drive, and then it will display a list of detected files.
If you want to get a reliable result, then give preference to a complete analysis. Such a scan is considered more reliable, so the chance of finding and recovering the files you need increases several times.

Step 4. Configure the search
Further, “PhotoDOCTOR” will offer to indicate additional data about the objects you need, which will help make the scan results more accurate. For example, you can specify what format the files should search for software, and also configure the filter by their size. In the latter case, the program will produce a final report only from small (up to 1 MB), medium (from 1 to 5 MB) or large (from 5 MB) files. If you want to restore only one photo, the size of which is also known to you, then this can also be indicated in the corresponding column. Well, it's time to restore the photo from the flash drive! Click Scan.
Step 5. Save the photos
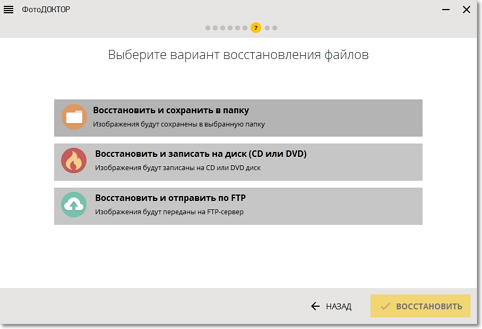
Wait for verification to complete. Immediately after that, a progress report will appear in front of you. Browse through all the images found and indicate to the program those that need to be restored. Click the orange button in the lower right part of the interface and specify the preferred method of saving photos. So all files can be left on a laptop, downloaded to disk, or sent over the Internet via an FTP server.
That's all, you have successfully figured out how to return erased photos from a flash drive quickly and easily. A ? It is easy if you have PhotoDOCOR installed on your computer!
If you have never accidentally deleted the necessary photos or formatted the camera’s memory card, then you are very lucky - there are few such lucky ones. Most users who actively take and carefully store digital photos are faced with the need to restore deleted images. Deleted Picturesthat were stored on the camera’s memory card or flash drive are the same files, so restoring them after formatting is no different from returning documents or music. However, when it comes to photos, you can still use highly specialized programs whose functionality is focused on the return of deleted images.
It should be noted immediately that better program for photo recovery is RS Photo Recovery, however it is paid, but if you want to save your time and nerves, we highly recommend it to you. In our memory, no one had problems with it. You can find how to purchase and use the program.
Magic photo recovery
You can choose one of four options for saving data - on hDD, on CD / DVD, as an ISO image, or upload via FTP. It is recommended that you choose recovery to your hard drive. The main thing is not to save photos to the medium from which the program restored them.
Using Recuva
The recovery wizard has a convenient filter by file type, which allows you to start searching only images. After formatting, Recuva does not return all the data, some files turn out to be unreadable, but the chances of successful recovery of deleted photos are quite high.

After the scan is completed, a table will appear in which all detected photos will be displayed. A green circle next to the name means that the file is fully functional and can be restored, red - that the image is damaged after formatting. Select pictures with a green circle and click Restore to save the photo to your computer.
Photorec Program
If Magic Photo Recovery or Recuva couldn’t return the necessary pictures, use heavy restoration artillery - the free Photorec program.
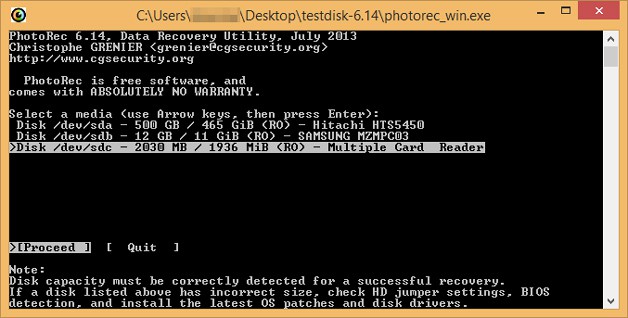
After the scan is completed, go to the “recovery” folder. Inside you will see all the detected files. Find the pictures you need and save them in another place so that you don’t lose anymore.
Good afternoon!
A flash drive is enough reliable carrier information and problems with it arise much less often than with CD / DVD discs (when actively used, they quickly get scratched, then can begin to be poorly read, etc.). But there is one small “but” - it’s much more difficult to accidentally delete something from a CD / DVD (and if the disc is disposable, it’s impossible at all).
And with a flash drive, you can inaccurate mouse movement delete all files at once! I'm not talking about the fact that many simply forget before formatting or clearing a flash drive to check if there are any extra files on it. Actually, this happened to one of my friends who brought me a flash drive asking them to restore at least some photos from it. I restored part of the files about this procedure and I want to tell in this article.
And so, let's begin to understand in order.
In general, today you can find in the network dozens, if not hundreds, of programs for recovering deleted information from different media. Among the programs, there are both good and not so good.
Why exactly is she?
A long chain of events led me to this, which happened to me when restoring a photo from a flash drive.
- Firstly, the files on the flash drive were not just deleted; the flash drive itself was not read. My Windows 8 returned an error: " File system RAW, no access. Format the disk. " Naturally - you do not need to format the flash drive!
- My second step was a program "praised" by all R-Studio (there is a note about it). Yes, of course, she scans well and sees many deleted files, but unfortunately, restores files in a heap, without a "real location" and "real names". If this is not important for you, you can use it ( link above).
- Acronis - This program is more designed to work with hard drives. If it’s already installed on my laptop, I decided to try it: it just hung right away.
- Recuva () - I did not find and did not see half of the files that were on the flash drive (after all, R-Studio found it!).
- Power Data recovery - an excellent utility, it finds many files, like R-Studio, only restores files with a common heap ( very inconvenient if there are really a lot of files. The case with a flash drive and photos missing on it is just that same unfavorable case: there are a lot of files, everyone has different names, and you need to keep this structure).
- I wanted to check the flash drive with command line : but Windows did not allow this, giving an error that the flash drive was allegedly completely defective.
- Well, the last thing I stopped at is Wonderdershare data recovery . It scanned the USB flash drive for a long time, but after a while I saw in the list of files the whole structure with the native and real names of files and folders. The program restores files to a solid 5 on a 5-point scale!
Some may be interested in the following blog posts:
- - a large list of the most top programs (more than 20) to restore information, perhaps someone will find "their" in this list;
- - simple and free software. By the way, many of them will give odds to a paid analogue - I recommend testing!
2) General rules for file recovery
Before proceeding with the direct recovery procedure, I would like to dwell on the most important basics that will be needed when restoring files in any of the programs and from any medium (flash drive, hard drive, micro SD, etc.).
What is impossible:
- copy, delete, move files on the media on which the files disappeared;
- install the program (and download it too) on the media from which the files disappeared ( if files are missing from hard drive, it is better to connect it to another PC on which to install the recovery program. In extreme cases, you can do this: download the program on external hard drive (or other flash drive) and install it where you downloaded it);
- you cannot restore files to the same media from which they disappeared. If you restore files from a USB flash drive, then restore them to your computer’s hard drive. The fact is that only restored files can overwrite other files that have not yet been restored (I apologize for the tautology).
- do not check the disk (or any other medium where the files are missing) for errors and do not correct them;
- and lastly, do not format the USB flash drive, disk, or other media if you are prompted to do so by Windows. Better at all, disconnect the storage medium from the computer and do not connect it until you decide how to recover information from it!
In principle, these are the basic rules.
By the way, do not rush immediately after recovery, format the media and load new data on it. A simple example: I have one disk from which I restored files about 2 years ago, and then I just put it down and it lay dusty. After these years, I came across several interesting programs and decided to try them - thanks to them I was able to recover several dozen files from that drive.
Conclusion: perhaps a more "experienced" person or newer programs later will help you recover even more information than you did today. Although, sometimes the "road spoon for dinner" ...
3) Instructions for recovering photos in Wondershare Data Recovery
Now let's get to practice.
1. First thing to do: close all extraneous applications: torrents, video and audio players, games, etc.
2. Insert the USB flash drive into the USB connector and do nothing with it, even if you recommend Windows OS for something.
3. Run the program Wonderdershare data recovery.
4. Turn on the "file recovery" function. See the screenshot below.

5. Now select the USB flash drive from which you will recover photos (or other files. By the way, Wonderdershare data recovery, supports dozens of other file types: archives, music, documents, etc.).
It is recommended to check the box next to "deep scan". ![]()


