However, hello! I am very glad to welcome you to my portal "" Today I want to paint a rather broad concept as system recovery. Moreover, this concept we will affect everyone windows versions, consider all known recovery methods starting from standard program and ending with the recovery console. We will take into account not only desktops but also laptops, because the latter have their own unique and very convenient recovery utility!
Detailed articles about system recovery on all Windows systems, in different ways, on computers and laptops, I have already described in the heading « » but all this is not it. I would like to write an article that will be divided into several sub-points, so to speak "all in one place"
So let me write down the points by which you can navigate and clicking on it, immediately see exactly what you need:
Go!
Recovery of Windows XP, 7 and 8.
Let's start with the simplest thing, because if this method helps you, then you won't have to strain yourself again and try to restore your computer to a normal state in more sophisticated ways.
In order to start the "System Restore" program, you need to go to the "Start" menu, then select "Programs" or "All Programs", (who has how) then select "Standard", then "Service" and "System Restore".
For Windows 8, it's easier to search for "System Restore" and find what you need. Then everything should be done as described in this
Restoring Windows from the command line.

This step will help you if the computer does not boot into normal mode. It happens that it hangs or even crawls out You can avoid all this by restoring the operating system with command line. You can learn more about this procedure
How to restore the system through the recovery console.
This procedure, which is (as I understand it) only in the arsenal of Windows XP.

With it, you can restore a damaged boot record, etc., etc. Complete instruction on this matter awaits you
How to restore Windows on laptops using the special Recovery function.
This function is available only to laptop owners and this is their undoubted advantage.

This recovery method consists in the fact that the computer returns to the stage at which it was during the purchase in the store. I.e, all settings, passwords are reset, all data, programs, etc. are deleted. At the end of this operation, you get a fully working laptop. (For those who do not know how to restore the operating system or it, this function will be an undoubted plus) The disadvantage of this function is that if you have already reinstalled Windows (yourself or in the SC), then most likely the partition of the disk on which that recovery program is recorded has been deleted , so your laptop is now "on a par" with a stationary PC. You can read about how to properly restore Windows to factory settings. For example, one of the laptop models is disassembled there, but these recovery programs are like 2 drops of water similar to each other, (most often the color and design changes) therefore do not worry, I think you can cope with this task.
Restoring the operating system using a recovery disk (for seven and above).
This disc is able to return your OS to working form if in the process of work there were any errors, failures, etc. This is mainly due to viruses, and also due to improper installation of programs, most often This method suitable in the case when the disk has already been created in advance and is on the shelf, and Windows has crashed just now. Only in this case can you restore it to the moment when you burned this disc. Read more about this.
Last Known Good Configuration (with working parameters), (for XP) and Last Known Good Configuration (optional) (for 7 and above).
Alternatively, if the OS does not boot in normal mode, you can try to press the F8 key when turning on the computer (for laptops it is more difficult. I came across laptops in which a special menu is called using other keys from F5 to F12. You will have to experiment a little that to find out which key is responsible for this.) and the corresponding window should appear:

Here you can try to select for XP: "Load the last known good configuration (with working parameters)", and for 7 and 8: "Last known good configuration (optional).
Sometimes this function helped me \u003d)
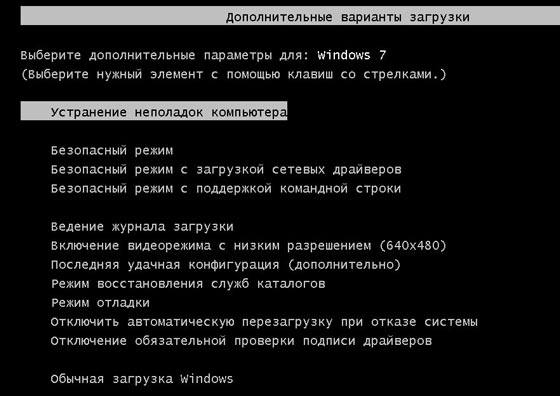
Eliminate computer problems (for seven and above).
If you have a seven or higher, then you have another option for system recovery. When you turn it on, you will also need to call a special startup menu (how to do it is written above) and then select "Troubleshoot computer problems". Everything that will happen next is intuitively understandable even for a first grader. A window like this will appear:

As we can see here we have 5 tools that can help us restore Windows:
Startup recovery.
If a boot record your OS is damaged and when you turn on the computer on a black screen, it writes an error like in the picture below or something like that, then this is what you need

This is normal return windows in the previous state, where everything worked more or less adequately. We considered such a recovery at the very beginning of our article - this is point 1.
System image recovery.
This function allows you to recreate the system from the image that you made earlier and it lies with you, let's say somewhere on your hard drive. Below, in point 8, we will take a closer look at how to create this system image and, of course, how to recover from it.
Windows Memory Diagnostics.
You may have a problem with your RAM. From this, the computer often freezes and throws out the blue screen of death. This program help you find out how your rAM and whether it is worth replacing it.
In principle, it is a universal remedy. Using it (by entering special commands), you can, for example, start a system restore or format hDD... A very useful thing.
How to restore an operating system from an image.
Let's start by telling you how to create this very system image. It must be prepared in advance, so to speak, on a "rainy day", when the system is completely out of order.
We go to the "Start" menu, select "Control Panel" and in the "System and Security" item, select "Archiving computer data"


After that, you should select the hard drive where you want to save this system image. It is advisable to save where the operating system itself is not.
In the next window, the disk on which Windows itself is located will already be selected. Just click "Next". Another confirmation window appears. Feel free to click "Archive" and the image creation process will begin.
Now, after the process of creating the image is completed, you can always restore your old version systems.

Note: I created the image on Windows 7. On XP and 8 this process not much different.
Starting a system restore from an image is very easy. It is enough to press F8 when turning on the computer, (how to do it is written above) then select "Computer troubleshooting". System recovery options will open. (All of them are described above) Here you need to select 3 item "System image recovery"
In the next window, just click the "Next" button

After that, system recovery from the image will begin. Naturally, all the data that is on the system disk will be deleted and the system will be written there. If you do not know how to save all your data before restoring the system, then
Fuh! Kapets, how much I have written here. I have listed absolutely all the ways to restore systems that are currently known to me)) Maybe, of course, I missed something. Write your questions in the comments. I will be happy to answer them! Thanks for your attention! Good luck!
Windows has a very useful function that, in the event of any errors, will help restore the system to a working state. This function is called "System Restore" and today we will talk about it, describe how it works, what it is for and how to configure it.
The instruction was written on a computer under windows management 10, but setting up and running System Restore is also done in Windows 7 and 8.
System Restore is a feature in Windows that automatically or at your request backs up system files, a copy of some drivers, a copy of the registry settings, and a copy of some programs. And it makes it possible at any time from this copy to restore the system's performance, and return it to the state in which it was before the restore point was created.
When is installed windows update, some programs are installed - the system automatically makes a system restore point to roll back the system - if something goes wrong during the installation. You yourself can start creating a system restore point at any time, when necessary. When windows system 7 did not boot - it was possible to press the F8 key when turning on the computer, after which a menu appeared and in it choosing "Load the last successful configuration" - you returned the system to work. In Windows 8 and 10, if the system does not boot, a menu automatically appears in which you can restore the system's performance using a restore point. Also, if after updating the computer began to work with errors, you can roll back the system.

No personal files are backed up during system restore point creation. Therefore, it is not worth hoping that by rolling back the system with its help, some deleted personal file will return. That is, if you roll back the system a few days ago, personal files will not be touched, and will be the same as before starting the recovery.
What happens to applications during a system rollback?
If you restore the system from a previously created restore point - then all applications that were installed after creating the point - will be deleted! That is, the applications will only remain those that were at that time.
When you start System Restore, by selecting the point to rollback, you can see which applications will be affected.
Will System Restore Remove Viruses and Malware?
No, unfortunately viruses and malware are registered in many places and a rollback here will not completely solve the problem. Although, if you roll back the system a few days ago, the system will be more efficient and you can immediately start cleaning it from viruses and malware. Antivirus often does not find everything, especially it does not save you from malware. Therefore, I recommend using free software (there are paid versions of these programs, but for a one-time treatment, free ones are enough !!!).
On some computers, the restore feature is enabled by default for system disk C, in others it is disabled for all drives. You can enable automatic creation of system restore points not only for the system drive, but for all available drives on the computer.
To enable the system restore function, you need to enter "Create a point" in the search bar and select "Create a restore point" from the options found

In the "System Protection" tab next to "Protection Options" you will see all active disks in the system, and next to them it will be written whether the system restore function for this disk is enabled or disabled. If the function is disabled for any of the disks, and you want to enable it for it - click on the disk itself, then select "Configure".
In my case, the system restore function is enabled for the local C drive, and disabled for the D drive, so we will enable this function for it. Click on local disk D and select "Customize"

In the window that opens, check the box "Enable system protection", below using the slider, you can allocate space on the hard disk to store the created restore points. The more space you give for points, the more they will be stored. If space is left to a minimum, then each next created point will overwrite the previous one. After selecting the parameters - click "OK".

The system will now automatically create restore points for the disks you selected above.
The system automatically creates a restore point once a week, or when some drivers or updates are installed. But you can create it yourself whenever you want. To do this, in the search bar, as above, write "Create a point" and select from the options found "Create a restore point" \u003d\u003e in the window that opens, click "Create"

In the next window, you can add a description for the created restore point, which is optional. Click "Create"

We are waiting for a couple of minutes

After creating a point, you will see a notification window "The recovery point was created successfully", click "Close"

When something bad happens to your system, errors start to appear, or it does not boot at all, a rollback to a previously created restore point can save you.
To roll back Windows to an earlier state from the system itself, you need to enter "Create a point" in the search bar and select "Create a restore point" from the options found
In the "System Protection" tab, select "Restore"

By default, only one restore point will be shown, check the "Show other restore points" box to see all of them. Decide on the point to which you want to roll back the system, select it (by clicking on it once with the left mouse button) \u003d\u003e click on "Search for affected programs" to see which programs will be affected during system recovery.

Two lists will open: in the upper one you will see the programs and drivers that will be removed during the system restore from this point, and in the lower one - the programs and drivers that will be restored. After reading, click "Close".

When you have already finally decided on the point to restore - select it with the left mouse button and click "Next"

Select the disks you want to recover from the restore point and click "Next"

Next window with general information about the upcoming restoration, click "Finish"

After you click "Yes", the restoration can no longer be canceled, you will need to wait until it completes this process. If you click "No", then cancel the restore process completely.

The computer will reboot and recovery will begin, after ten minutes the system will boot and will be the same as at the time of the creation of the restore point to which you rolled it back. Before restoring the system, a restore point was also created, to which you can return as needed.
Restore Windows to an earlier point if the systems won't boot.
If the computer does not start Windows, then in Windows 7 you need to press the f8 key when turning on the computer and select "Load Last Known Good Configuration". If after that Windows does not boot, select "Safe Mode with Boot" from the menu. network drivers". In safe mode, and check the local drive C for errors (go to" Computer "\u003d\u003e click on the local drive C with the right mouse button and select" Properties "\u003d\u003e in the" Service "tab click on" Run check "\u003d\u003e put a check in all the boxes and click "Start" \u003d\u003e after reboot, the scan will take place and the system should boot)

In Windows 8 and 10, if the system does not boot, the boot menu should load, in which you can both return Windows to an earlier state (using a restore point) and reset the system to factory settings. If this menu does not load, you can use another computer and restore the system.
In Windows 10, there is still a possibility.

It is also possible that your system will not boot due to a recent installed update, it can be removed via safe mode and.

System restore, although not an ideal tool, still saves and very often the system from reinstalling. Therefore, when errors occur in Windows, first of all try to restore the system from a restore point. That's all for today, if there are additions - write comments! Good luck 🙂
Let's assume that we have a working PC in which. We are faced with the problem of recovery operating system... The system is dead - long live the system! Probably, this is how you need to think at this moment and not panic.
Panic in case of operating system failures is one of the main reasons due to which sometimes they lose not only the operating system, but also their precious data.
You cannot panic, you cannot make hasty decisions. First you need to think carefully about everything. And to act according to the developed plan.
Why do we often make the wrong decisions? This is from the field of psychology. It is very difficult for a PC user who is accustomed to the trouble-free operation of a computer to realize that his loyal friend and assistant suddenly refuses to work. This is sometimes perceived as an annoying misunderstanding. It seems that just a little more here, and the problem will be solved. I don't want to believe that before our amazed eyes arose new problem, and now the computer will not solve our problems, but we will solve the PC problems.
Winged expression of V.S. Chernomyrdina: “Well, this has never happened, and now - again” concerns the problem of failure of the operating system.
So what do we have "again"? What do we have if the operating system fails?
The first - the system may still be a little alive! And she herself will offer us to restore ourselves to a state of some earlier time. At that time, the so-called operating system restore points... These points are created during the installation of updates to the operating system, as well as during some other system operations.
Then the PC user can choose the nearest in time (the best - for yesterday or even today, but this happens extremely rarely, only if you are very lucky!) Operating system restore point, specify it in the menu and run the recovery program and then load the operating system ...
The operating system will be restored to the date and time specified in the restore point. As a rule, user data is completely preserved, or it is saved as it was at the time the operating system restore point was created. In the latter case, you need to take care of restoring user data from the corresponding ones.
Second – operating system distribution... If the system is licensed, then, as a rule, it comes with installation discs - with the distribution of the operating system. With their help, the system can be restored.
But here it is important to understand two nuances:
- The operating system distribution kit can restore the operating system as it was when the PC was purchased.
- The operating system distribution kit can restore the operating system, keeping in it all the changes and additions that have accumulated during the operation of the computer.
How do you know about these nuances? By booting from the operating system distribution and looking at the menu that offers a bootable software... If this menu has an option "Restore ...", then it is much better than if there is no such option.
The second (operating system recovery) is much better than the first (re-initial system installation). Since in case of recovery original state operating system (as when buying a PC), we lose all the accumulated changes and additions, as well as user data, "acquired by overwork." This will cause a lot of additional problems.
Further, we must remember that in some cases, reinstalling the system from the operating system distribution kit can lead to the loss of user data, "acquired by overwork." For example, if the data was stored in the "My Documents" folder included in the operating system distribution kit.
So, from the distribution of the operating system, you can restore the operating system without loss and, in some cases, even save user data. Or you can restore the operating system to its original state... It is possible that when restoring the operating system, we will lose all (or partially) user data. Then, after restoring the operating system, another user is needed.
And if there is no operating system distribution kit? Some PCs (especially laptops) come without a distribution kit, but their hard drives in special invisible sections hard disk operating system recovery tools are stored.
Such recovery from a special partition on the hard disk of a PC (laptop), as a rule, guarantees the restoration of the operating system at the time of purchase. That is, all subsequent changes to the operating system and all user data will most likely be irretrievably lost.
They will need to be additionally restored. Well, not so bad! At least the computer will start working again, black or blue screens will be replaced by the familiar Windows screensaver. Further recovery of user data is a matter of time and technique.
In this article, you will learn how in Windows, using the built-in tools, you can restore lost files from backup copies, reanimate the system partition from the image, and also return the system to normal operation in the event of a failure.
Introduction
In the previous article devoted to, we talked about what mechanisms in Windows can be used to protect yourself from the loss of important information after a critical hardware or software failure, as well as create tools to resuscitate your computer in the event of a complete system crash.
In the same article, you will learn about the information recovery algorithms existing in Windows and what to do if at one "fine" moment the operating system stops starting or does it with errors.
File recovery
If you have taken care of backing up important data in advance, then the procedure for restoring them will not require much effort and will consist of only two steps: choosing an archive with the necessary information and specifying the location where you need to save it.
As with archiving, the same system tool is used to restore folders and files - Archiving and restoringwhich can be run from Control panels or start menu (All Programs - Maintenance).

In the window that opens after launch, in the section Archiving (upper part of the window), you can see information about whether archive copies were previously created on this system, and if so, when this happened. If information about archiving is found, the chances of recovering the required data are greatly increased. The most important thing is that backups are made regularly and contain all the latest information you need.
To recover lost files from the archive, click the button Recover my files in section Recovery, which is located at the bottom of the window.

Immediately after that, the following window will open, where you will be asked to select the required files and folders from the required archive. In this case, to restore folders in whole or the entire disk, use the button Browse folders, and to restore individual files - the button Browse files... You can also use the button Search, to find the desired objects by name.
By default, the system offers to select files and folders from the last created archive. But you have the right to change this by clicking on the link Choose another date and change the search location. Please note that you cannot restore files from different archives created at different times in one task.

After you finish the selection, in the center of the window File recovery a list of all selected files and folders that you plan to revive will be displayed. In case of an error, you can delete unnecessary data from it by clicking on the corresponding button on the right.
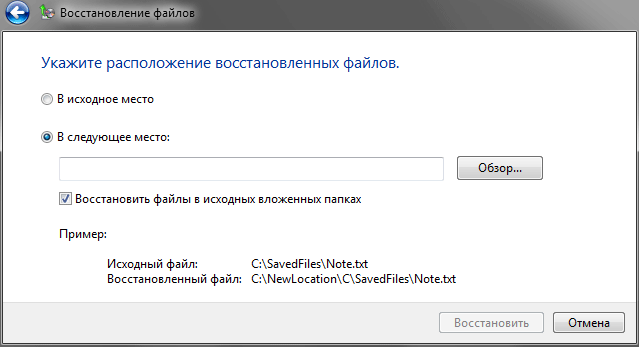
Here we are offered two options: restore the information to its original location while preserving the old paths to files and folders, or choose the location for the recovered files on our own. You can choose the first option if you are sure that the restoration of the previous data will not affect the existing ones. For example, an archive copy may contain a document of the same name, which also exists on your system, but at the same time has an older edition.
The second option is more flexible, as it allows you to save the recovered data anywhere on the media. True, in this case, system user libraries and folders, for example, such as AppData or Documents, in order to get the usual access to them, you will have to manually write to the necessary Windows directories. But here the situation is somewhat brightened up by the ability to restore files in the original subfolders (you need to tick the corresponding item). At the very least, this will give you the opportunity to find out the storage paths of certain system libraries.

After you have chosen a suitable place to save the data, it remains to click on the button Restoreto start the data recovery process. You can follow the progress of the procedure on the screen using a special indicator strip. The recovery time will directly depend on the volume of the selected objects.

If everything goes well, then immediately after the completion of the process, you will see the inscription in front of you - Files restored... Then you can either view the list of recovered files by clicking on the link of the same name, or complete the procedure by clicking on the button Done.
Recovering system files and settings from restore points
Quite often the work of Windows is accompanied by the occurrence of various kinds system errors, the source of which can be completely different reasons. As a result, almost every user sooner or later may face the question of how to return the system to its normal operating condition. Perhaps an experienced user, by analyzing the errors and recent actions in the system, is able to identify the source of the problem and fix it. True, such situations are more an exception to the rule than the norm, and in most cases, determining the causes of computer malfunctions is a difficult task even for experienced users.
It is for such cases that the Windows developers have built into the system a special mechanism for automatically creating intermediate copies of the registry and key system files, naming them recovery points... In case of normal system operation, default restore points are created weekly. In addition, they are created whenever any major changes are made to the OS, for example, before installing software, updates, or device drivers. You can also create a restore point manually at any time.
When restoring the system from a restore point, the system files and computer settings are returned to the state at the point in time you selected. This does not change any personal files or files you create.
The number of restore points saved depends on the total free space on the disk and on the size of the allocated space for system recovery. With a deficit disk space, as new points are created, old ones will start to be deleted.
Since there are many restore points in Windows, they can cover a very wide time range. Therefore, if necessary, users can "roll back" the system parameters back for several days, weeks or even months.
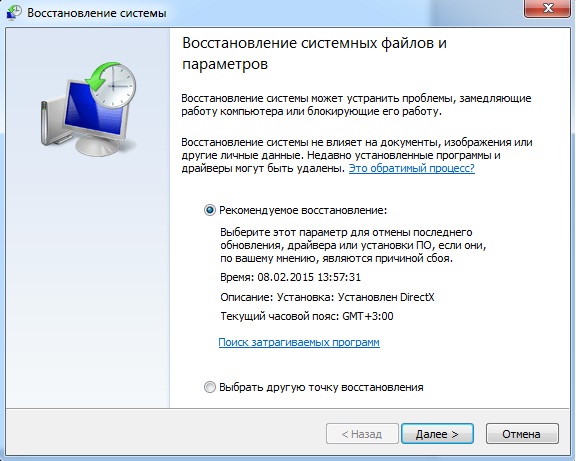
So, if your operating system suddenly began to malfunction at some point, freeze and periodically give errors, then it's time to turn to the program System Restore and try to get it back to normal. To do this, we launch the already familiar component Archiving and restoring and at the bottom of the window that opens, click on the link.

After that, another window will open, where you can read some useful information about what will happen during the restoration of a previously saved state of the computer.

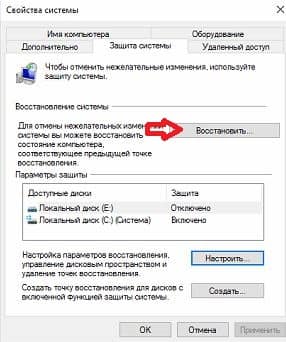
To start the process of restoring the system from restore points, click on the button with the self-explanatory name, after which the window of the tool of interest to us will open directly in front of you. By the way, restoring system files and parameters can be started from start menuby selecting the item All programsthen folder Standard, then the folder Service and at the end of the application System Restore.
If you have not made any installations of programs in the system in the near future, then the initial wizard window will open in front of you, which will contain only some introductory information.

If there were such settings, then in the start window you will be prompted to select the desired restore point.

By default, the recommended option is the most recent restore point that was created before significant changes were made to the system. If you want to "roll back" Windows to an earlier state, then you can select the item Choose a different restore point.

In the list of possible restore points that opens, you can see the date of their creation and description, which you can focus on when choosing a point. The option is placed immediately below the list. Show other restore pointsto extend the time interval for displaying recovery points. Sometimes this can be useful if you need to roll back the system several weeks ago.
At this stage, your main task is to remember the time when the system still worked normally without errors and select a restore point corresponding to this period. If you quickly reacted to the occurrence of system failures, then most often it is enough to select a restore point created a few days ago. If you have tolerated incorrect windows work, you will have to strain your memory and remember at least approximately the time when the problems began.
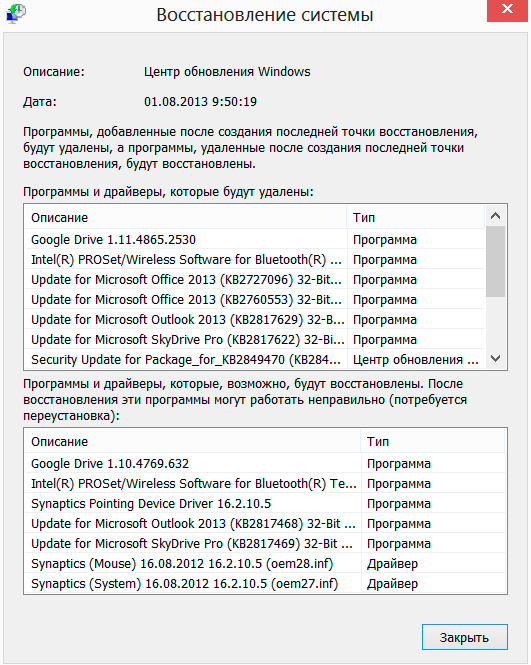
After selecting the desired restore point, on the right below the list, the button will become active Search for affected programs... By clicking on it, you can get detailed information about those applications that, after a system rollback, will be deleted or restored and may require reinstallation.

After pressing the button Further in the lower right part of the window, a new window with the resulting information will open in front of you, where you will have to confirm your intention to restore the system from the selected restore point by clicking on the button Done.

The recovery time for Windows depends on the amount of information that needs to be returned to its "place" and may be different, but, as a rule, does not exceed 5-7 minutes. In the process, the computer will automatically restart. If your account is protected by a password, you will need to enter it to continue and the recovery procedure. In conclusion, a window with a message about a successful or unsuccessful recovery operating system.
Usually, the system recovery process goes without problems, but if for some reason the OS return from the specified recovery point failed or the system continues to fail after recovery, then you can try to do the same by selecting an earlier point.
Sometimes there are situations when the operating system comes to a state in which it is impossible to restore its normal performance by the above methods. There are also cases when Windows simply refuses to boot after critical failures or hardware malfunctions, which means that it will no longer be possible to launch the file recovery mechanisms built into it and familiar to us.
It is in such cases that the previously created image of the system would come in handy. If it is present, it will take very little time to restore the computer to normal operation. But if you were too lazy at one time to create a backup copy of the system partition, then get ready for a complete reinstallation and configuration of Windows, as well as all applications. But let's not talk about sad things, and let's imagine that you still have an image of the system. Consider two cases of how you can use it.
First, suppose that Windows, although it is no longer functional, is still able to boot. Then, as in previous cases, the tool will again help us Archiving and restoring... Opening the already familiar window, in the group Recovery click on the link at the very bottom Restore system settings or computer, and in the next window the link Advanced recovery methods.
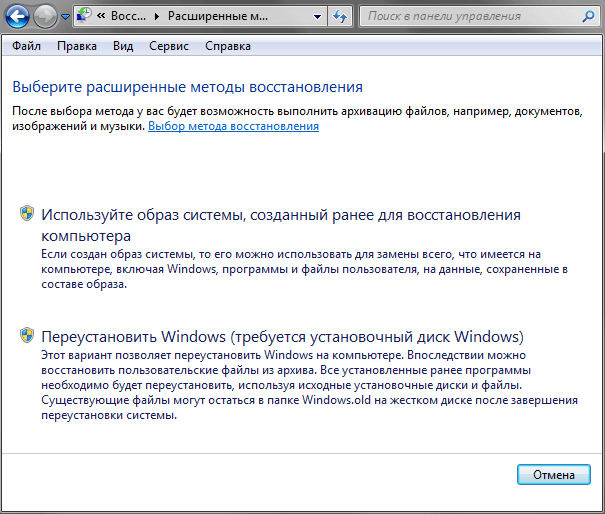
Next, you have to choose between two methods of system recovery: using a system image or installation disk Windows (complete reinstallation of the system and programs). It is clear that in our case we choose the first option.
In the next window, the recovery wizard will ask you to back up your personal data. This step will come in handy for those who have not previously created backups. required files and folders. Also, do not forget that the data in the image could be outdated and creating fresh copies of user data will never hurt. If necessary, you can skip archiving by clicking on the corresponding button.

As a result, after creating a fresh archive copy of the necessary information or skipping this step, the wizard will inform you about the need to restart the computer to continue the recovery procedure.

Immediately after restarting your PC, you will no longer see the usual operating system. Restoring the system partition from the image will take place in a special mode, in which the computer boots with a minimum set of system files necessary for it to perform key operations, and an ascetic graphical shell.
Now is the time to remember about the second option for system recovery, when windows startup impossible for some reason. When the system is operational, after pressing the button Restart, shutdown of the computer and its further boot in recovery mode occur automatically. If you do not have the opportunity to start the OS, then you will have to boot the PC in the desired mode yourself. And there can be two cases here.
The first case. Windows is installed on the computer, but it does not start. In this situation, to enter the recovery mode, immediately after restarting the computer, press the F8 key until a menu appears on a black background with additional boot options.

The second case. Windows is not installed on the computer. For example, this option is possible in case of exiting building hard disk and its subsequent replacement with a new one. In this situation, we will not be able to boot from the hard drive, but it can be done using an optical media, or rather Recovery disk, about the creation of which we also talked about in the material on data archiving. This disk is bootable and contains all the necessary tools for system recovery. If you don't have a recovery disc at hand, then you can use installation discWindows.
Remember that to start a computer from an optical disc, in the BIOS menu, the first device to boot must be specified optical drive... Recommendations on how to do this can be found in our articles on windows installation, eg, .
After booting the computer from a DVD, depending on the situation, you may first open a window with a choice of language, and then the installation window, where you should select the item below System Restoreto get into the mode we need with the recovery parameters.

So, having dealt with different methods starting the system recovery mode, we go directly to the description of the procedure for restoring Windows from the image.
After starting the procedure, the first thing you have to do is select the keyboard layout for data entry.

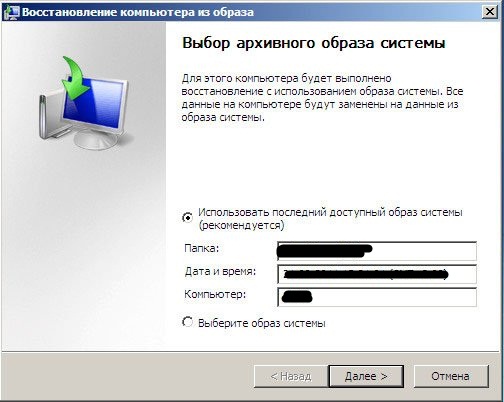
In the future, the number of windows that will appear in front of you will depend on how you got into recovery mode. If this happened after the computer was booted from optical media, then the next step will be to select the system recovery options, where you will need to click on the item System image recovery... After that, the wizard will search for archived images on all available media and display a window for selecting a system image.

If you got into recovery mode through the menu Additional download options, then before proceeding to this window, you will have to specify the username with administrator rights, and, if necessary, the password for the account.
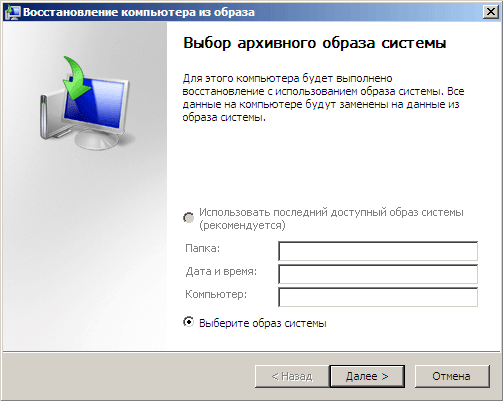
If it came from a component Archiving and restoring, then the number of manipulations will be minimal. Bypassing the choice of recovery tools, users will immediately see a window where they will need to specify the desired archive image of the system partition, and, if necessary, its location.
After choosing a suitable image and pressing the key Further, another window will appear with a choice of additional parameters.

Here you will have to answer an important question: do you need to repartition and reformat the existing disk. Of course, you can abandon formatting and restore data to already existing folders, keeping all current information on disk. But keep in mind that applications that are not included in the image will stop running, but their files will continue to be stored on disk. Thus, you run the risk of getting a bunch of software garbage, which will be very difficult to remove in full later.
So the option with formatting looks more preferable, especially since you have the opportunity to select sections that should remain unchanged using the button Exclude drives... If the restored system partition still contains important information that has not been archived, then the option of restoring without formatting may indeed be relevant.
Finally, after making a selection and pressing the button Further, the screen will display the resulting information. To start the recovery procedure directly, click on the button Done.
The duration of the recovery process will directly depend on the size of the system image. It is clear that the larger it is, the longer the recovery will take. Generally, this action can take from several tens of minutes to several hours.
Immediately after restoring the system partition, if necessary, you can restore personal folders and files from the last backups.
Conclusion
So, now you know how the standard Windows OS tools can restore not only lost files and important information, but also return a computer to a normal working state, in which the system began to malfunction or even stopped loading.
Remember that you will only be able to recover data in Windows using the built-in tools if you have taken care of creating backup copies of the system image and important files in advance. Windows cannot recover lost information using special software algorithms. To do this, you will have to use third-party applications.
However, you shouldn't hope that such software will solve all your problems. Unfortunately, most often, it is not possible to completely reanimate lost files at home. Of course, in critical situations, you can contact certain organizations, where, with the help of advanced algorithms and special equipment, you will most likely be helped to return valuable information, but such services can be quite expensive.
As practice shows, the availability of backups is one of the most inexpensive and at the same time effective ways saving important data. Do not forget about this and try not only to make archives of the most valuable files in a timely manner, but also always have a system image at hand.


