Greetings, friends.
Probably, every user of a computer or laptop was faced with a situation where he understands that it is time to reinstall the operating system. This is due to the appearance of difficulties in the work, frequent mistakes and other unpleasant moments. But what if you do not have a USB drive, a plastic disk for recording an image, or a drive refuses to work? Do not worry. Today I will tell you how to hard drive install windows. Many do not even suspect that such tools exist at all.
It must be said right away that this option is suitable only for operating systems that are in working condition, since many movements will need to be done using the shell. That is, if you suddenly appeared blue screen - this method will not help.
In addition, it is worth noting that this manual should only be used for future reference. windows installation 7 and more modern versions. Moreover, it does not matter on which device the operation is performed. Therefore, Windows XP cannot be placed on a computer or laptop in this way. Since other mechanisms are used there.
For the procedure itself, we need several tools:
A program for working with images is usually DAEMON Tools. Personally, I generally use the built-in features of Win.
Utility Easybsd.
The image of the OS itself.
Step-by-step instruction( )
Important! It is advisable that up to this point your hard drive has already been divided into at least two partitions - for the system and files.

So, to install Windows 8 from the HDD, you need to perform a series of actions. First, create a separate section for the installation files:
Now, to install Windows 10 or earlier, you need to properly prepare the files themselves:


Now it is necessary to do so, the computer understood where to boot from. For this, the application is just needed EasyBCD. The sequence of actions is as follows:
Suddenly, in some situation you don’t understand something, you can just watch the video:
If you select "", you will see a record appears or not. In your case, it should already be in place.
After the work done, close the application and restart the computer. As a result, a menu should appear in which users can select the desired system. Then indicate installation disk "". As a result, the standard OS installation procedure should start.
Bootice( )
The last chain of actions can be performed through Bootice. The program allows you not to create additional disk, but installs all of the available.
We do the following:
It is worth noting that it is not necessary to indicate exactly where the file is responsible for the correct loading of the system, since the application will find it itself.
Installation( )
This method does not require setting boot parameters via BIOS, as is the case with a plastic disk or USB drive. This approach is useful if suddenly your keyboard buttons do not work, allowing you to get to the right place.

In general, regardless of the version of the future OS, the process is almost the same.
It is important to remember that before starting the process it is best to have one connected hard drive. This will simplify the process of selecting a partition. In addition, equipment will spend less resources, which in general will have a positive effect on performance. Therefore, you should not install the OS in such a way on another hDD. The same can be said about the placement on the SSD. Of course, in the case of the correct execution of each action, problems should not arise. But even with the slightest error, it is possible to lose all the data on any of the partitions.
It is also worth noting that a similar procedure is possible with external hard drive. True, for this, you still need to run Win to set all the parameters. However, again, such procedures are not recommended, since by mistake you can simply delete the data.

In the case of using a plug-in device, you can set the boot setting from the BIOS in the BIOS and simply place a new shell on the laptop or computer. True, for this you need to correctly write the OS to an external component. More details are available.
In any case, regardless of the method chosen, everyone can post a new one if the Windows is already on the computer.
Well, I hope the article helps you deal with problems on your device.
In general, I would like to recommend finding a compact portable USB device in advance (today they cost minimal money) and recording the correct system. Personally, I have three of them - for each latest version OS from Microsoft Corporation. Thus, I can insert a USB flash drive into the port at any second, and within two hours completely restore the computer’s performance, while having a brand new shell.
Good luck in your hard work! Subscribe and share the blog with others.
Installation of each new release of Windows is easier than the previous one and requires less and less effort from the user. With the release of Windows 10, this task was simplified nowhere: now to install an operating system on a computer, you do not need any special knowledge and ingenious applications. You do not even need the Windows distribution kit - the installation program "learned" to download it itself. She herself creates the installation media - a DVD-ROM or USB flash drive. The user can only respond to requests and follow instructions that are understandable even to those who do this for the first time.
Today we will tell you how to cleanly install Windows 10 on any laptop and desktop PC. A clean installation is understood as installing the OS on a medium where there is no operating system (for example, on new computer or formatted hard drive). Or to where it is, but is subject to complete rewriting without saving the installed software, accounts and settings. By the way, don’t worry about the license: if you replace the system legally activated, you can save it. And we will not hide from you what needs to be done for this.
What do you need
- Bootable media to record the distribution of Windows 10. It can be a USB-stick for 3 or more GB, DVD-ROM, portable or internal hard disk. Since the vast majority of users prefer to install Windows from a USB flash drive, consider this method as the main one.
- or a set of files.
- Transfer Utility system files to installation media. If you intend to install Windows 10 on a PC with UEFI (advanced "BIOS"), you can do without it - you just need to copy the files and folders of the distribution package to a USB flash drive. By the way, in Windows 8 and 10, the ISO image can be opened in Windows Explorer as a regular folder, but in earlier systems this will require a special application, for example, any archiver program.
- The computer on which you will prepare the bootable USB flash drive.
Cooking a flash drive
If you don’t have a dozens distribution kit prepared in advance, it’s easier and more convenient to instruct Microsoft Media Creation Tools to download it and use it to burn it to a USB flash drive or DVD.

The utility does not require installation on a PC, just run it with administrator rights.
After starting Media Creation Tools:
- In the "License Terms" window, click "Accept."

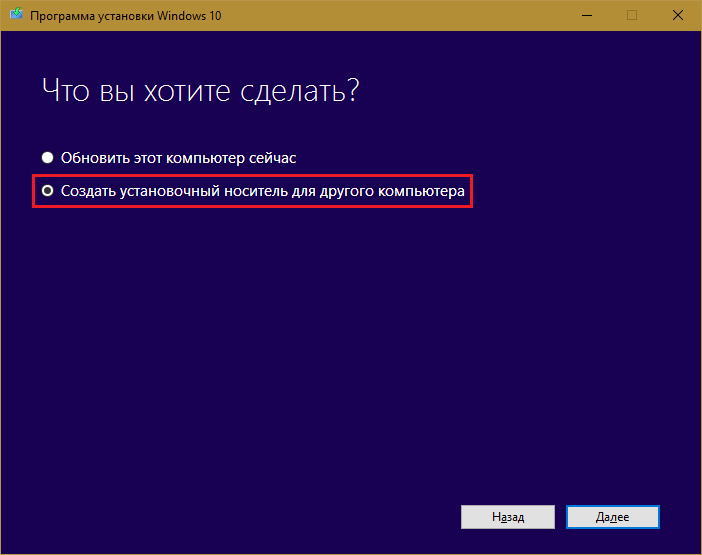
- To the question “What do you want to do?” We answer: “Create media for another computer.”
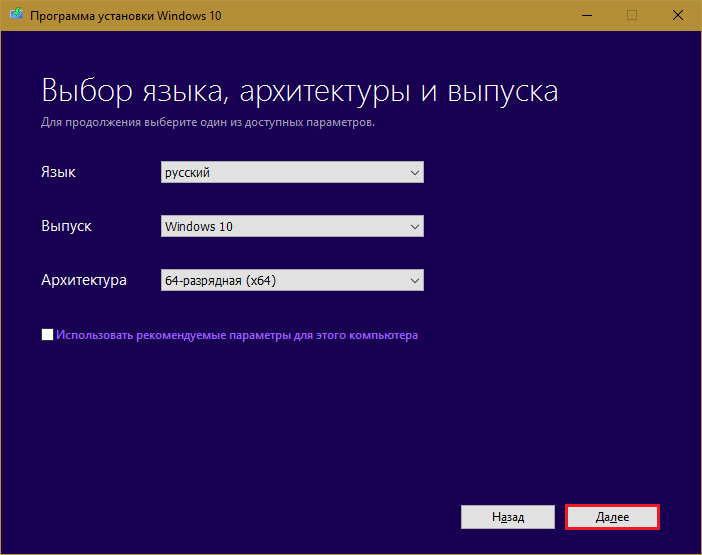
- In the section “Selecting parameters” we define the system language, release (“home for one PC” or “Windows 10”) and architecture (bit rate) - 64 or 32. If the selection options are inactive, the “Use recommended parameters” box should be unchecked.
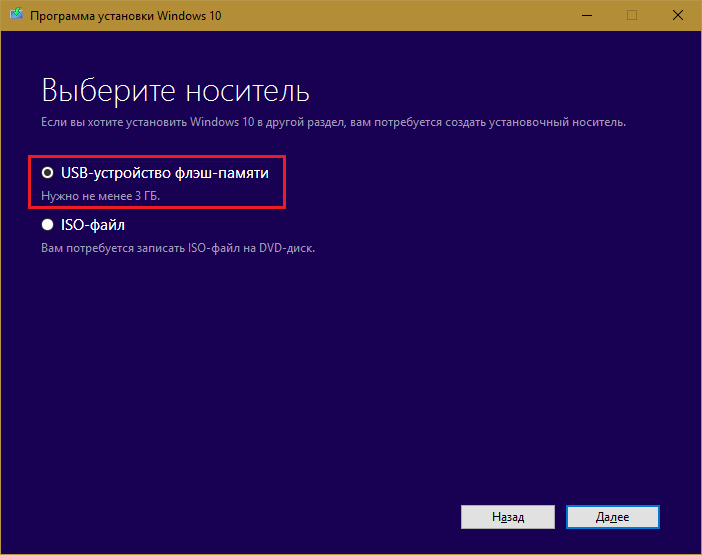
- Next, select the drive: USB - to create a bootable USB flash drive, or an ISO file - to upload an image that you later burn to DVD.
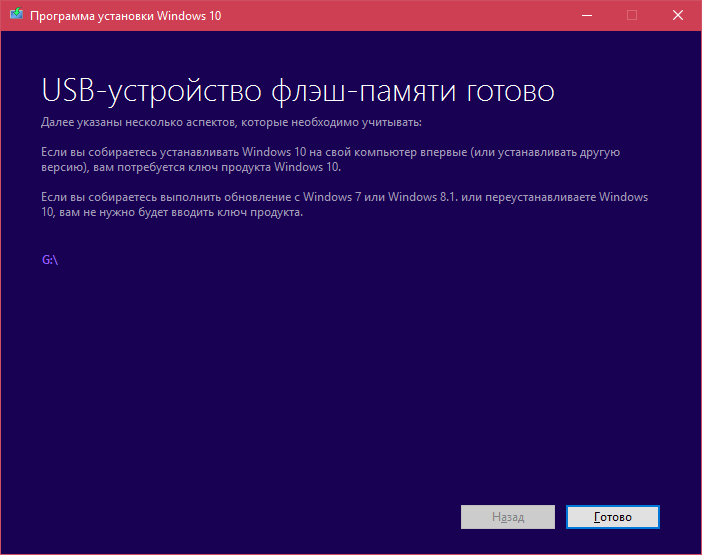
- Having selected the USB device, click “Next” and wait 30-50 minutes while the program downloads the distribution package and creates the installation media. At this time, the computer is available for use.

- You’ll be informed by the message that it’s time to proceed with the installation: “The USB flash drive is ready.”
If you downloaded the distribution kit in advance or you do not have stable Internet access, use to create installation media Windows 10 other tools. For instance:
- Rufus It works without installation. To write the operating system to a USB flash drive, it is enough to indicate the distribution location, as well as determine the partition scheme and the type of system interface: MBR for computers with BIOS (old), GPT for computers with UEFI (new, released later than 2013) or MBR for computers with UEFI ( if on a PC with UEFI there are disks marked according to the MBR standard).

- . This utility is as simple as Rufus. In the section "Add to USB disk"Just select the item" Windows Vista / 7/8/10, etc. ", indicate the path to the image of Vinodovs 10 and click the" Go "button.

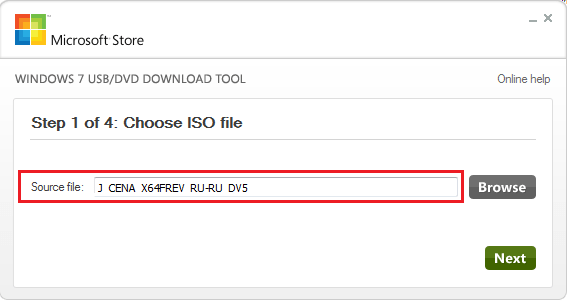
- Windows 7 USB / DVD Download Tool. This proprietary microsoft utility able to transfer everything to USB sticks and DVDs windows versionsstarting with the "seven", just 4 steps.
In addition to these, there are many other free utilities for creating installation media. You can use any - the result will be the same.
Start installation
Installation Launch Options
There are two ways to start the installation of Windows 10:
- From under a working system. It can be used if you plan to reinstall it or install the “top ten” from scratch in another partition of the disk.
- When booting from the installation media (via BIOS). A universal option, which is suitable for installing the system on a new computer, and for reinstalling the old copy of Windows.
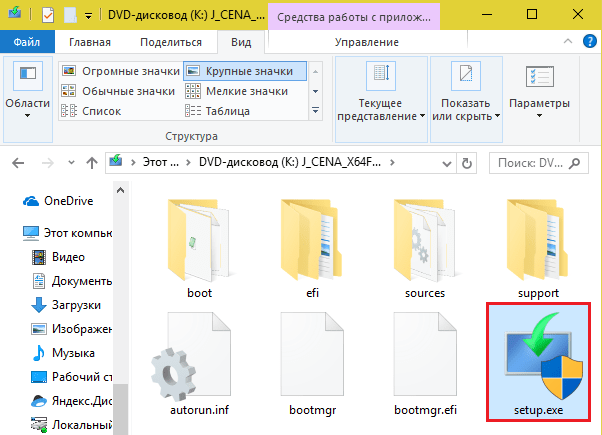
If you select the first option, open boot disk or a USB flash drive in Explorer and run the Setup.exe file.
If you select the second, boot the computer from the installation media.
How to boot a PC or laptop from a flash drive
The BIOS Setup utility on different computers has a different interface. To enter it, immediately after turning on the machine and the manufacturer's splash screen appears, press a certain key. Which one is usually indicated at the bottom of the splash screen window. Most often it is Delete, F2 and Escape, sometimes - F1, F3, F10, F12 or a combination of several keys.
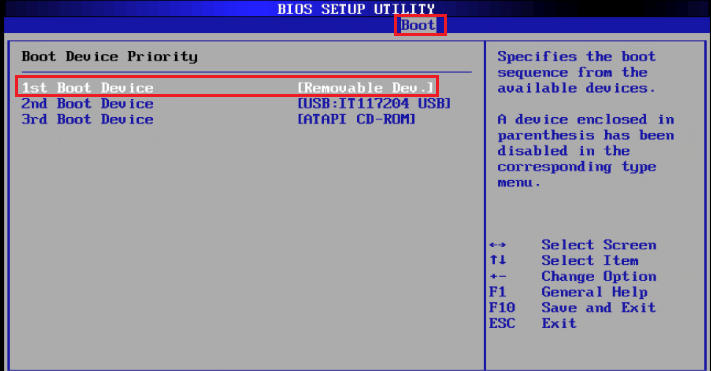
Having opened the utility, go to the “Boot” section. In the BIOS version of the Setup Utility shown in the screenshot, this is a separate tab in the top menu.
In other versions, it is not as such, and the necessary settings are collected in the Advanced Bios Features section. In order not to confuse anything at the most crucial moment, study the BIOS interface of your computer in advance and figure out what and where is located.
In the “Boot” section, you will see a list of devices from which the machine can boot. The first place is usually a hard drive. You need to make sure that the computer first checks boot files not on it, but on a flash drive. To do this, using the arrow keys, as well as F5, F6, plus and minus (a hint is located in the right half of the BIOS window), raise the USB device to the top of the list. To save the settings and exit the utility, press F10.
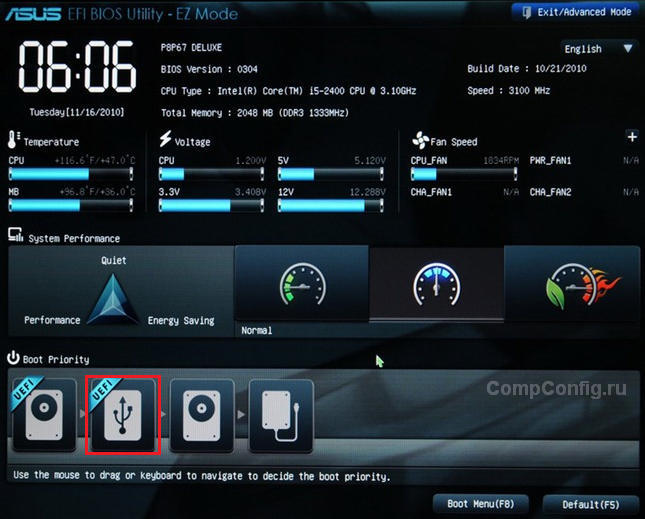
In graphical versions of UEFI, the order of devices does not need to be changed, just click on the USB device. After that, the PC will restart and start booting from the selected medium.
The main part of the installation
Most of the installation process for Windows 10 takes place without the active participation of the user. You will have to work only at the beginning and a little at the end.
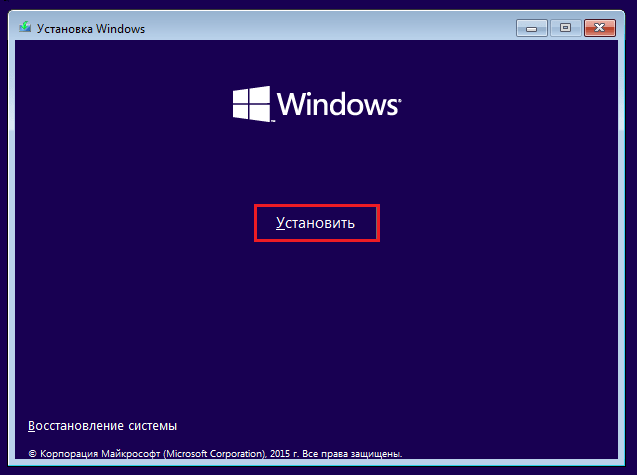
So, the first thing you have to do is choose the language of the operating system, formats of time, monetary units and the main keyboard layout. If you downloaded Russian windows version, by default, Russian will be here.

After determining the language settings, click the "Install" button.
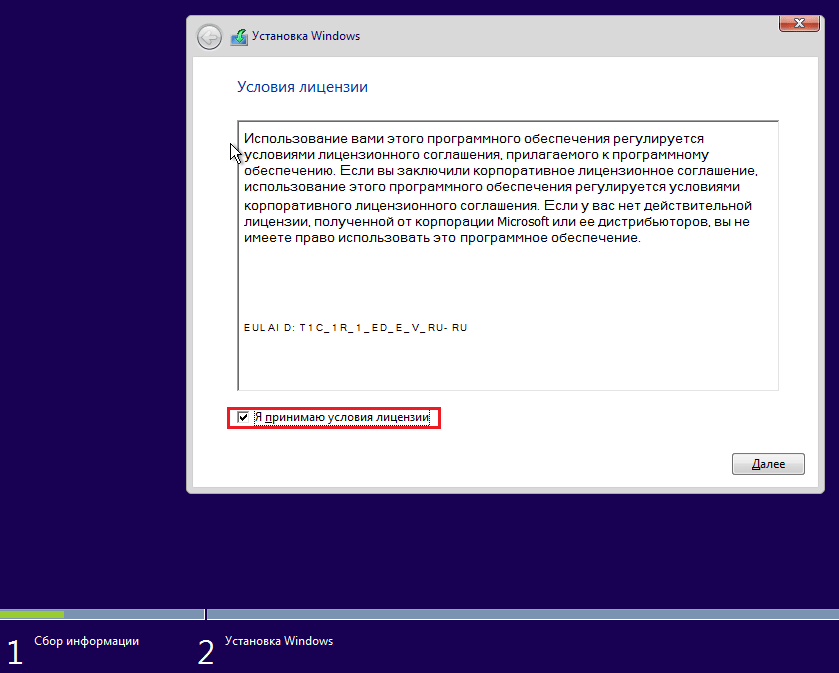
Accept the terms of the license. To proceed to the next task now and in the future, click the "Next" button.
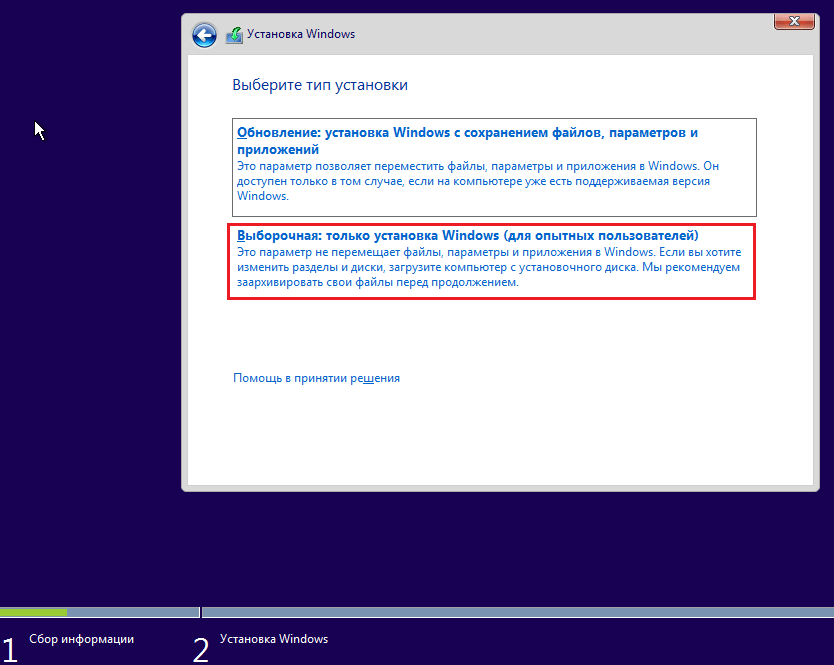
Now you have to determine the type of installation - as an update or "custom" (in previous versions it was called "clean"). We accordingly need the second type.
We pass to the choice of the place where "settles" new windows. If the hard disk is not divided into partitions or you want to change their proportions, select the desired area of \u200b\u200bthe disk and click "Create".
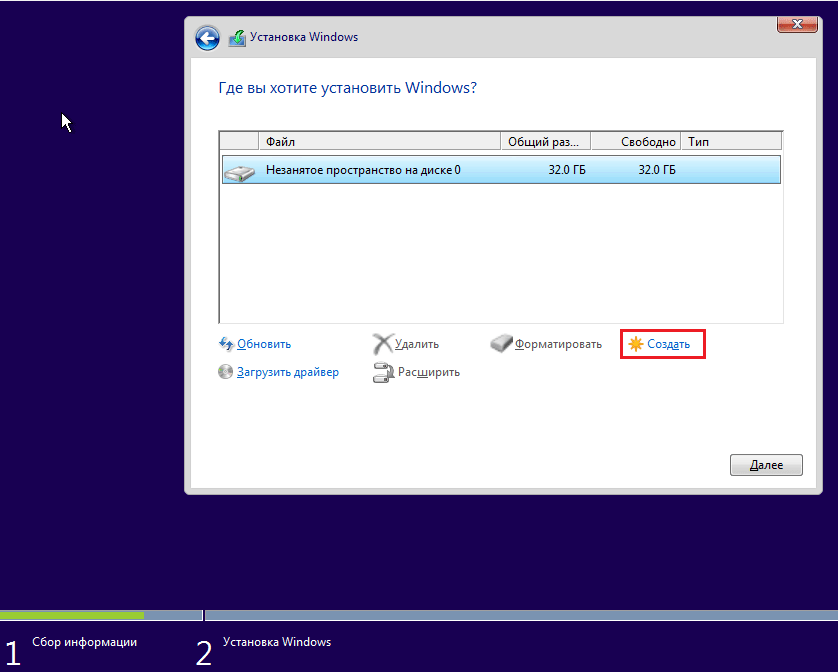
In the "Size" field, specify the number of megabytes that you assign to the system partition. 64-bit Windows 10 requires at least 32 GB. Click Apply. If necessary, create other partitions in the same way, and then format them.
Attention! If you want to install the system while retaining the license, do not format the drive, and install in the same section as the previous one - activated copy of windows. The second important factor in maintaining activation is that the new system must be the same version as the old one. If you install Windows 10 Ultimate instead of Home, you can’t do without losing a license!

After finishing work with the disk, you can relax - the next 40-60 minutes, the process will go on without your participation. If you want, just watch him.
About 1/4 of the time it will take to copy files.

Following this, the computer will restart and continue the installation. Most of the time the Windows logo will hang on the screen and the “wheel” will rotate. You can understand what stage the process is at from the messages at the bottom of the screen.

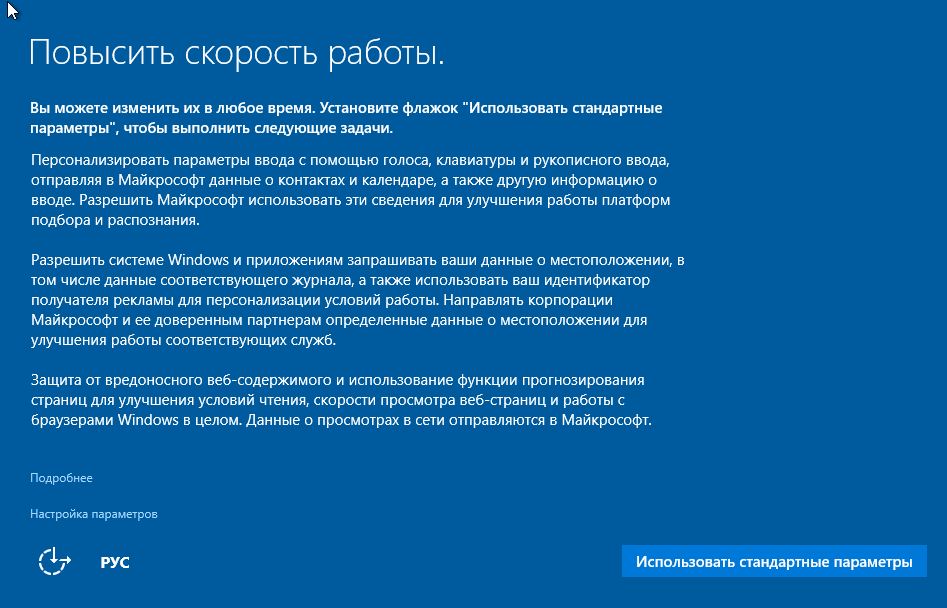
It's time to go back to action, because the installation is nearing completion. When you see a proposal to increase the speed of work, click the "Use standard settings" button. If you wish, you can change them later.

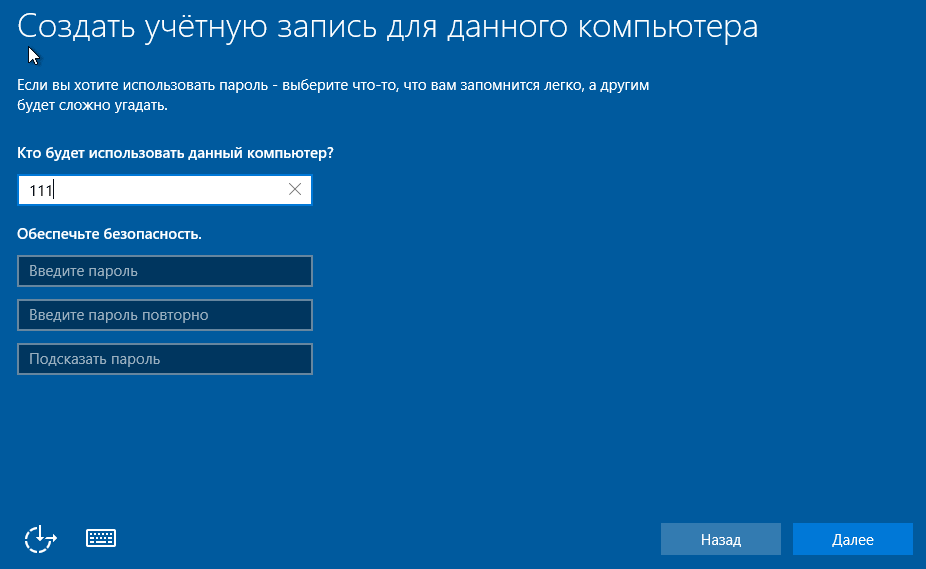
After the upgrade you have to create account first user. By default, administrative rights will be assigned to it. Everything is simple here - enter a username and enter a password if necessary.

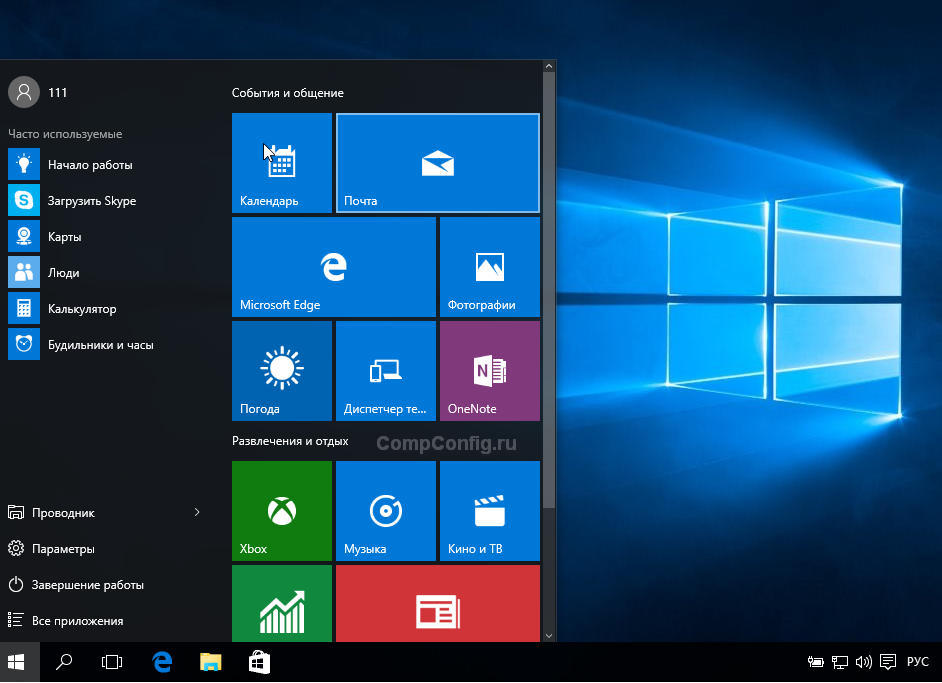
Finally - the long-awaited desktop. Everything is ready, the installation of Windows 10 is completed. We hope that it didn’t bore you too much, because now you have to set up the network, design your desktop, install applications and other pleasant efforts to “settle in” the new OS.
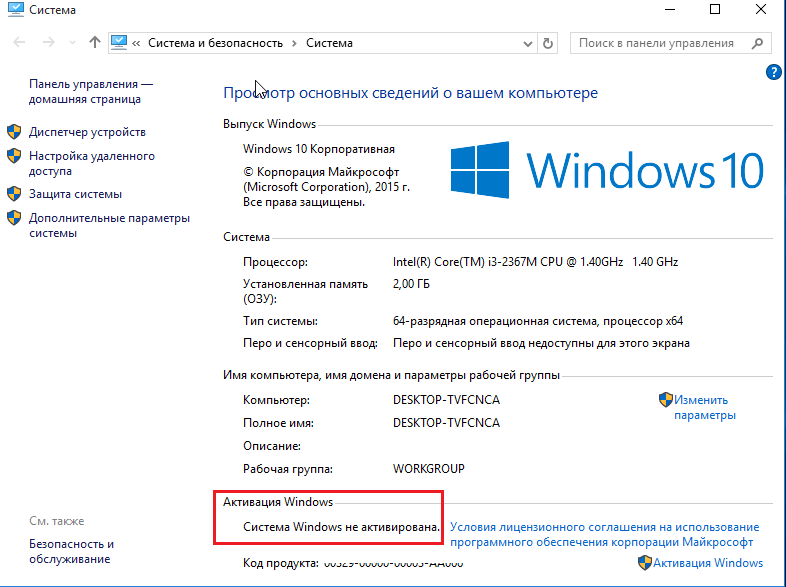
If during the installation of Windows did not require you to enter a license key, check if the activation is in place. Open the context menu of the Start button and go to the system settings.
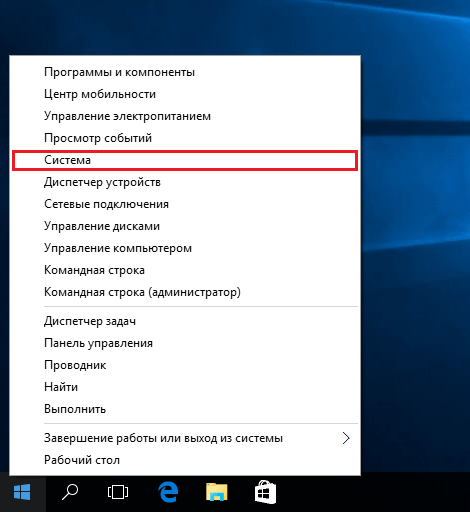
Activation information is at the bottom of the basic computer information window. In our example, it was not completed, since the "ten" was installed in the virtual machine from full zero.
If you succeeded in reinstalling while maintaining the license, you can delete the folder C: \\ Windows.old, which contains the files of the previous copy of the system. They are no longer needed - activation information has been successfully transferred to a new one.
How to install a system from a hard drive
There are situations when no flash drives or DVDs are at hand. In a word, nothing but the hard drive of the same computer on which you need to install Windows 10.
To install the "tens" from the hard drive, you must observe 3 conditions:
- Have a distribution kit. More convenient - in the form of a set of files and folders. If you have only an ISO image, you will have to unzip it, for example, using an archiver application (WinRAR, 7-zip and analogues) or Windows Explorer (only in the G8 and G10).
- Have an additional partition on a hard disk with a capacity of 3 GB or more. Preferably free.
- The computer must boot from the same drive. If not, you will need a media with a Live CD / Live USB (portable operating system), such as BartPE, Alkid Live CD, etc. Their images you can easily find on the network.
The media of the installation files will be the hard drive, or rather, its additional partition. You will need an operating system to copy the distribution kit and create its bootloader.
Installation procedure
- Boot the computer from a hard drive or portable OS media.
- Copy the files and folders of the Windows 10 distribution to the root of the additional partition (not the one where the system will be installed).

- Rename the boot file (bootmgr), for example, to “Win10”. The length of his name should not exceed 5 characters.

Now you have to create a boot loader using the BootICE utility. Instead, you can use other boot management tools, but we chose BootICE, since we consider it the most simple and convenient tool.
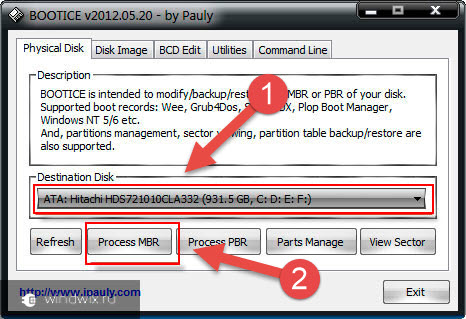
- Run the utility (it does not require installation). In the “Physical disk” section, select the computer’s hard drive from the “Destination disc” list. Click the "MBR Management" (Process MBR) button.

- Check the “Grub4DOS” item and click “Install / Config”.

It happens that if you need to install Windows 10, you don’t find a flash drive of the right size at hand, and the drive has outlived its own and has not been used for a long time, so installing “dozens” from the drive is unrealistic. In this case, the method of installing the operating system from the hard drive will come to the rescue. Yes, one of the hard disk partitions will serve as a boot device with Windows 10 distributions.
What is needed
To install Windows 10 from another HDD or partition successfully, the following tools are needed:
- management program windows bootloader (we will use EasyBCD with a graphical interface);
- utility for unpacking the image;
- a free partition on a hard drive with a volume of at least 4-5 GB (for recording installation files);
- An ISO image of a satisfactory edition or build of Windows 10.
Preparation for installation
In principle, installing dozens from the hard drive is the same as installing the preceding Microsoft OS. Let's see how this is done using the EasyBCD utility and Daemon Tools as an example.
We will use Deamon Tools only for copying the contents of the image to disk, which any archiver or file manager does well, so if you do not use this program, it makes no sense to install it. Its functionality in our case will completely replace 7Z or Total Commander.
Many users recommend creating a new partition (or biting about 8-10 GB of free space from the existing one) to write installation files to it, in order to protect itself from losing important information stored on the boot partition. So let's do it, implying that you do not have a small free partition created to install dozens from your hard drive.
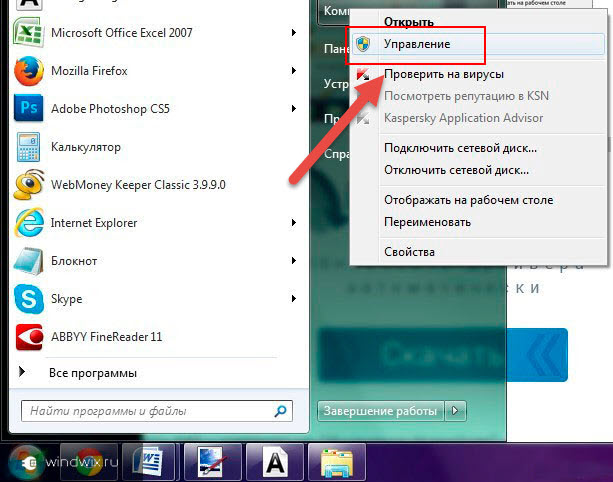
- We go to the "Management" using the context menu of the "My Computer" folder.
- Go to the "Disk Management" section.
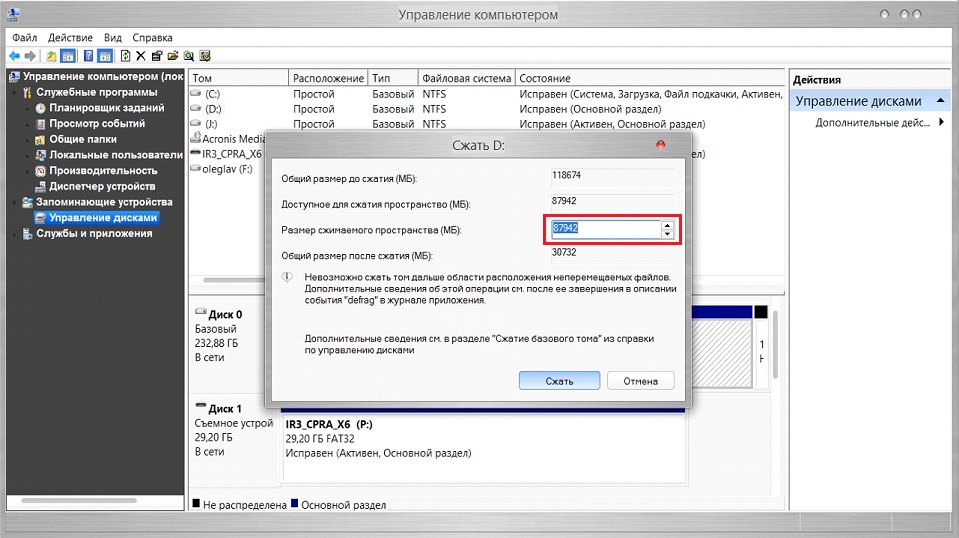
- We select the section from which we need to cut off a little unallocated space to create a new one, call its context menu and click “Compress Volume”.

- Enter the size by which we will compress the space, and click "Compress".
This volume will be used to form a new partition, onto which we will later copy the Windows 10 installation distribution kit. Therefore, the size should at least 15% exceed the image size.
- Create a “Simple Volume” in place of the unallocated area, calling its context menu.
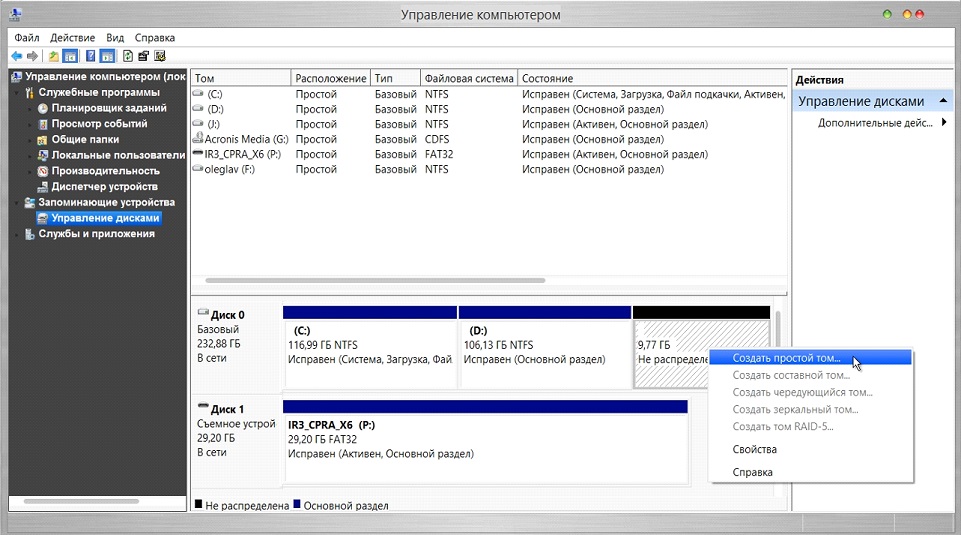
- Specify the volume label, its file system (preferably NTFS), the standard cluster size, and click Finish.
- Now copy the contents of the ISO image to the newly created section. This can be done by unpacking the ISO using the archiver or, for example, through Daemon Tools.
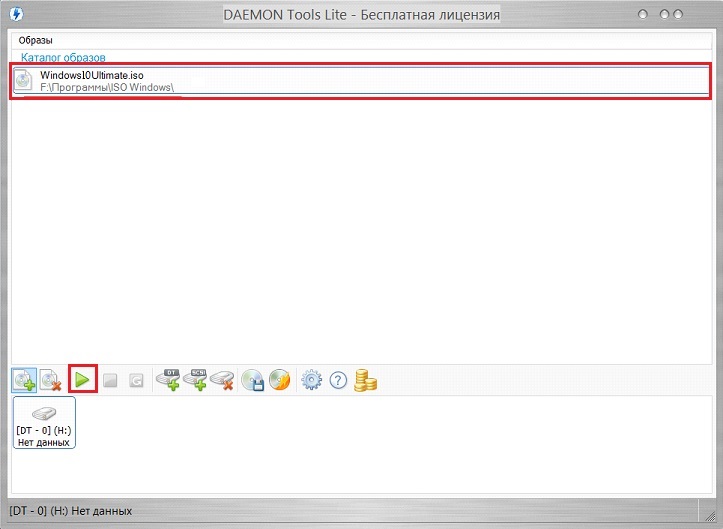
- Launch DT and add ISO to its window with windows distribution 10 by dragging its icon or using the “Add” button.

- Select the added document and click "Mount."
- We copy all the contents of the disk mounted in the virtual drive to the new partition of the newly created hard disk only.
It remains to create a new boot record to start the computer using the unpacked image as bootable media.
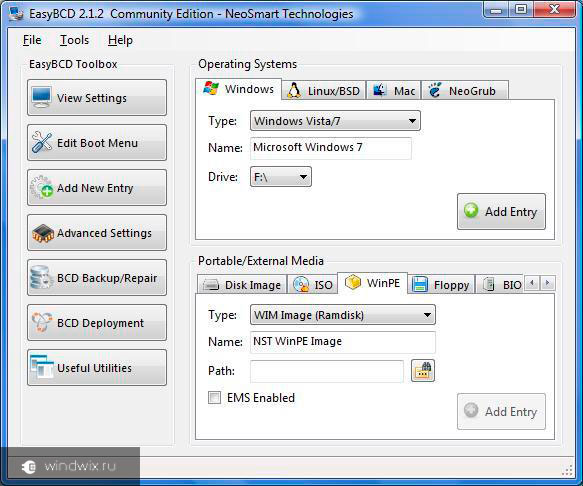
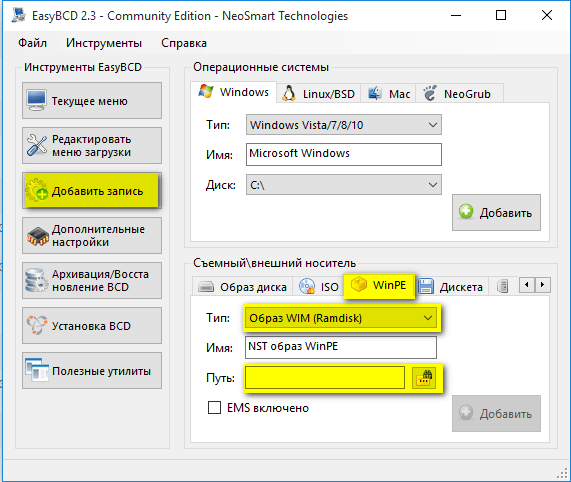
- Launch EasyBCD and click on the “Add Record” button located on the left side of the interface.

- In the "Removable / external storage»Go to the" WinPE "tab and set a name similar to the name of the created partition.
- We click on the icon with three dots, located to the right of the "Path" form, and specify the file "boot.wim" located in the "sources" directory.

- Click "Add."
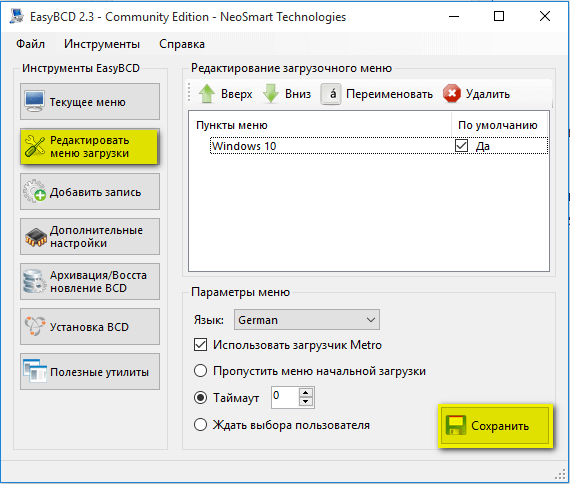
This action will add a new item to the list of bootable operating systems, the name of which is specified in the "Name" form.
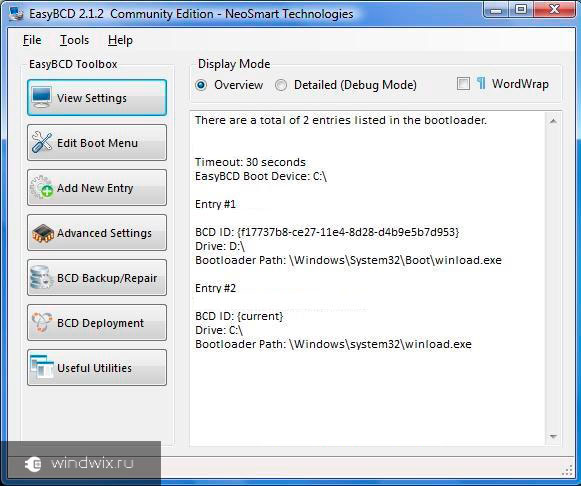
To be sure, click "Current Settings" and check if a new boot entry has been added to the Windows bootloader.
Installation of "tens"
- We restart the computer.
- We select the second option to start the PC from the hard drive, and press "Enter".
And repeat the above hundreds of times, we will not. On this today's goal is achieved.
(Visited 6,621 times, 4 visits today)
Greetings, dear readers of my blog. Today I decided to write an article that will be very useful for you. People often have situations when the "setting" of the operating system for the PC is very necessary, but there is neither a DVD-disk of suitable sizes, nor a USB-drive. In this case, you will need installing Windows 10 from a hard drive. The article will describe step-by-step instruction the whole process, all the details and features.
Here we can mention a few obvious advantages. The first is the internal hard drive of a laptop or computer capable of guaranteeing maximum execution speed. The second - this method does not require spending a lot of time and money on the purchase of a volume disk or flash drive. All you need is an ISO image that can be downloaded without any problems from the official website of the developers, two programs - EasyBCD, UltraISO and free space on the system partition (5 gigabytes or more).
Microsoft has taken care of creating a unique utility with the help of which each user can easily download ISO format files or update the system to Windows 10 themselves. Media Creation Tool is considered very easy to use, so you should not have any difficulties.
What are EasyBCD and UltraISO for?
EasyBCD - Absolutely free programwhose main goal is quality and quick setup downloads of all operating windows systems, Linux BSD and others. Released by NeoSmart in 2004.
UltraISO - software for Windows, the main goals of which are not only the creation, but also the convention and editing of various formats of DVD and CD images. It is a fairly common and effective software product.
Installation start
Turn on the PC, start the disk management console. To complete the operation simply press the key combination Win + R. After that, without errors, enter the command “diskmgmt.msc”.
In the list that appears, select the system partition, use the right mouse button to click on the “Compress volume” menu item.

Open the menu item "Compressible space size". Enter the value 6000, click on the “Compress” tab. Do not forget that the value of the number you want to enter should be taken into account depending on the size of the IS0 file.
Volume creation
After some time, the system will perform the above steps. In the window: “Disk Management” some changes should occur. If the entire process was completed successfully and without errors, then a new labeled space should appear on your PC. Right-click on it and go to "Create a simple volume." 3 times click on the “Next” tab.
RMB - right mouse button.
Section formatting
It is important not to miss one item, which is called "Formatting the section." In the “Volume Label” field that appears, enter the name “data”. The final action will be clicking on the inscription "Finish".
Again, if all the actions were done correctly, then in the "My Computer" section you will notice the added new empty volume of 5.85 gigabytes.

Install UltraISO
In cases where you have Windows 7, you need to install the program, the functions of which I described a little higher in the text. After the process is complete, run this program, and use the explorer to find the image you want. Open it, move all the files to the section you just created.
Using EasyBCD
It is time to move on to the next unique and very useful program - EasyBCD. In order to installing Windows 10 on your hard drive held, you must download this application. After starting, you will notice a new tab - “Add Entry”. Next, select "WinPE". In the Type field, go to WIM Image (Ramdisk). Do not forget to enter a name and indicate the path to boot image "Boot.wim".
The implementation of this stage should be taken very seriously. To do this, simply click LMB on the binoculars icon, open the data volume. In the Sources section, select the boot.wim file. In the EasyBCD application window, click on "Add". If all of the above steps were performed without errors, then you can safely proceed to the final stage of the entire installation process.
Final stage
Find the “Edit boot menu” tab. Here you need to click on the “Save” item. Be sure to reboot your personal computer. This eliminates the risk of various errors and the fact that the system simply freezes. On the operating system selection screen, find the Data tab so that the Windows 10 installer starts.
Important: if you need to conduct a clean installation of the OS, you need to completely clear the system partition. So that later there would be no errors and other troubles, create it again and be sure to format it.
Windows 10 in a virtual machine
On this I would like to complete this article. Do not forget to tell friends in social networks and subscribe to my blog. And you won’t even notice how more and more newer, interesting and, most importantly, articles that are most useful to you will appear every day.
Sincerely, Victor
Many of those who have experienced installing or reinstalling Windows systems know that in most cases they are used to perform this operation external media like or USB drives. If you try to run installation file from the hard drive, the user will not receive the desired result. Therefore, for Windows 7, installation from a hard disk should be performed using completely different methods. For the average user, there are five main options that we will discuss now.
Windows 7: installation from the hard drive. Installation options
So, we will consider some directions in the installation of the seventh version of the system. Among the main options are the following:
- installation on top of the old "seven";
- installation as a second OS;
- installation using command line;
- use of special utilities;
- installing the system on an external HDD.
Each of these methods has its advantages and disadvantages, however, for all of them, one common rule is to have an image of the installation distribution of the system, which you will have to work with later. In addition, if the computer already has hard sections drive, when installing Windows 7, you can not touch them. Otherwise, they will need to be created. But more on that later.
Preliminary information
Now let's look at some initial conditions, which, if necessary, must be observed without fail.
The system requirements are such that a system with 32-bit architecture requires at least 16 GB of free disk space, and for the x64 system - about 20 GB. And this provided that there are already installed systemthe directory of which after installation will be renamed to Windows.old. You can’t delete it manually by any means (unless you do a disk cleanup). Then it will just be impossible to roll back.
Installation on top of an old system
Using this technique, you immediately need to understand that formatting the hard drive during the installation of Windows 7 will not work, even if it is a system partition. But we will rely on the fact that the distribution is located on drive C when the partition is done. How to partition a disk will be discussed later.
As already understood, the downloaded distribution kit must first be placed on an independent partition (usually this is drive D). You can, of course, start the installation from it, but then errors will come out. Now just select the installation file Setup.exe from the Archive directory, followed by the installation of Windows 7, which is no different from the standard procedure.
In this case, for Windows 7, installation from the hard drive is more likely a means of updating system files, since the new configuration may inherit the old errors. It is not comfortable.
An alternative method to install Windows 7 as a second OS: what might be needed?
However, you can do otherwise. To install the system, a method is provided for installing it not on top of the existing OS, but as an additional OS, which can then be loaded when you select from the boot menu (Boot). The main thing is to create boot partition in the original volume.
For all operations, you need only an application that can work with images and create a utility that creates the MBR boot sector on the selected partition. As an example, we use Daemon Tools and EasyBCD.
Create Partition
It’s not possible to just download the installation distribution, even if it is located on the system drive. This is due only to the fact that the system itself does not recognize it, but, if it sees it, it sets a ban on downloading. Here you need to turn to the disk management section, which can be accessed through computer administration.

Fortunately, Windows 7, like all subsequent versions, has such a tool. First we look at the virtual partition D. We call up the menu and select the volume compression (the indicated size should slightly exceed the size of the distribution kit). Next, right-click on the menu and use the create command simple volume (without this, the system will not determine that this section is operational).
How to break the hard drive when installing Windows 7, it is clear. We proceed to the most crucial part.
System installation
Now we are directly interested in installing Window 7. Hard systems discs are such that they still do not see the distribution.
We start the Daemon Tools program and mount the image using the appropriate command, indicating the path to the saved file. We copy it to the newly created partition (unpacked image file).

Now we launch the EasyBCD application and press the add record button, after which we indicate the WinPE tab at the bottom, and then enter “ New volume", And in the path line we determine the location of the boot.wim file.

After the record is added, just restart the computer or laptop. In this case, the standard “seven” installation starts.
Installing Windows 7 Using the Command Line
Yet again, this option cannot be applied when the initial system has damage or errors. But in the case of recovery will do.
![]()
When Windows starts, press the F8 key ( standard method unlike Windows 10) and from the menu, select the troubleshooting line (the first in the list). In the additional parameters, specify the same thing, after which we use what is needed in the language selection window and proceed to the system recovery, where we select the command line.
In the console, we write two lines:
- X: \\\u003e windows \\ system32\u003e E;
- E:\u003e setup.exe
Do not be afraid to make a mistake. Drive letters in DOS and Windows do not match. In extreme cases, an error will simply be issued, after which it will be necessary to correct the corresponding symbol, but, as a rule, this is not required. Well, then the process starts, no different from the standard. Note that in this case, you do not even need to reboot the system.
Installation on top of any system using the BOOTICE utility
Now suppose we need another installation of Windows 7. There is a formatted hard drive. The catch is to create a bootable device as an HDD partition.
The BOOTICE utility was created in order to emulate the continuation of the installation of Windows 7, creating and overwriting the boot sector (there is a bootmgr folder in the unpacked distribution for this).
To start the installation, you need to change the boot record MBR to GRUB4DOS. But here you need to consider one feature. The fact is that the utility requires the creation of the name of the boot loader manager of no more than five characters (letters).
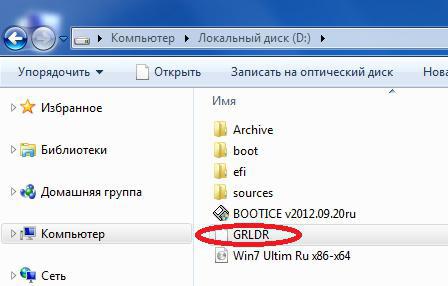
Rename the bootmgr file to GRLDR, and then run the utility itself. The menu is immediately visible new entry, so there we put a checkmark (destination disk), and then press the change installation button and select save to disk in the configuration. It remains only to reboot the device, after which the installation of Windows 7 will be activated. Installation from the hard drive will follow immediately. As a rule, problems should not arise.
Install Windows 7 on an external hard drive
But, despite all the nuances of installing the "seven" on the hard drive, some users try to install the system on removable media, in particular USB-HDD. What to say? This is fundamentally wrong!

The question is: why create problems for yourself out of the blue? From any USB device, loading is much slower than from a hard drive. The external drive itself (Winchester) is subjected to more severe physical impact and is not immune from the appearance of failures and errors. Nevertheless, “especially gifted” users will have to use (at least) a virtual machine. And many of these “geeks” have no idea what it is.
Of course, for the rest we can say that any virtual emulation, for example, using WMWare or the same built-in Hyper-V module can be carried out quite simply. But the matter is not limited to automatic settings. Here you have to set the appropriate system configuration parameters. And all those who say that with the operating system installed in it can be created in a couple of clicks and in five minutes are absolutely wrong. Nothing like this!
Possible errors and failures
Now the saddest thing. What to do if installation We do not consider issues of equipment failure in principle. External hard drive must be enabled in the BIOS, as well as boot priority from the main device.
If you have problems with file system, you can always use a command like sfc / scannow or chkntfs x / c (if as system disk section C is selected. Well, if the Winchester “sprinkled”, there's nothing to be done. Will have to change. Although ... Many experts advise first to use the program supposedly magnetizing surface of the disk, but it is difficult to believe in such a method.
On the other hand, when installing the system on an external drive, you can’t do without utilities like ImageX included with the Windows AIK package. In addition, the PWBoot module does not recognize Cyrillic characters at all, but it works like a command line. So is it worth it to do?
And that's not all! When the selection of several simultaneous installations begins, you will have to choose between the standard VHD container format and a conventional removable device. It is believed that the VHD format is read faster, but the problem of enabling this type of media is precisely the use of BIOS settings. And when switching from BIOS to UEFI (which is not always supported), there can be much more problems. However, for Windows 7, installation can be done using any of the above methods. But formatting partitions in most cases will fail.
Thus, the conclusion suggests itself that the simplest is the ideal solution. Using specific methods with the creation boot sectors the ordinary user will not use. It's obvious. But the system update technique looks much simpler, but it also has its drawbacks. In general, it is better to make a “clean” installation by first copying the necessary information to another medium.


