We are faced with the task: to transfer all the information from one memory card to another, and at the same time maintain the operability of the programs installed on the card. For example, this is often necessary after acquiring a new larger memory card. It seems to be a simple matter, but there are some nuances here, so we will consider the whole process in detail.
Preparing memory cards
So, there is an 8GB microSD card, its place should be taken by a purchased 16GB card. 1. The first thing to do is format a new card by phone. This will allow you to identify possible problems (for example, incompatibility) at an early stage. On phones on Symbian 9.2 (for example,) this is done like this: Menu -\u003e Tools -\u003e Memory -\u003e Options -\u003e Format. a map.

After successful formatting, we assign a name to the memory card. Name, preferably assigned the same as the old one. We remove the card from the phone.
2. The next action is enable the display of hidden files and folders on the computer (if not already done). This is necessary so that such objects appear in Explorer (and they are on the map, in particular, the folder System is hidden), because we have to copy everything.

In Windows XP, this can be done like this: go to " Control Panel", Select the applet" Folder properties"/ View, mark" Show hidden files and folders". Confirm OK.
Data transfer
3. Now we will directly deal with file transfer. We put back the old memory card into the phone. We connect the phone to the computer via a USB data cable, on the phone we select the mode Data transmission (aka “Drive”). Open in Windows Explorer contents of the memory card. On the computer for a while we create a folder where we will rewrite everything from the old card. Select all the objects on the memory card and copy them to the prepared folder.
I want to note right away that, depending on the size of the memory card and its filling, this can take a lot of time, because often the “drive” mode does not allow copying / writing to the memory card at maximum speed. The USB card reader will speed up the process, of course, if one is available.
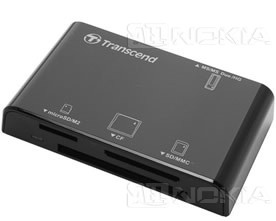
In this case, information exchange operations between the computer and the card will be close to the maximum permissible speed, which will drastically reduce the time for copying data.
4. After the operation is completed, we remove the old memory card, insert the new one and likewise copy all the contents from the folder on the computer to the new card. After formatting, a folder structure has already been created on the map; we respond to a request for replacement in the affirmative.
5. Install the memory card in nokia phone and reboot it (off / on).
We check. Everything should work as before.
Altanets Full migration information from one memory card to anotherMoving data from an Android device to an iPhone may seem like a nontrivial task. However, with the proliferation of cloud services, this is not difficult. Using services such as Dropbox and Google, you can get the same content on your “apple” smartphone as on an Android device. This can be useful both when fully migrating from one platform to another, or when changing phones temporarily.
the iPhone is one step ahead of Android smartphones in many ways. These include stability, performance, the highest build quality, used body materials. An important advantage of iOS devices is that software products in App store pass strict control, which guarantees high quality of purchased software. Cupertino company gadgets come with newest version operating system iOS and further updates are not a problem, which cannot be said about Android devices. Another advantage of iOS is its intuitive interface, which makes the operating system very simple and convenient to use.
Google, Facebook and Twitter
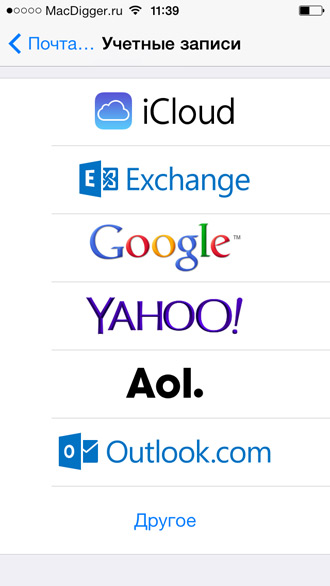
Many cloud servicesincluding google mail, Facebook, Twitter, store data in the cloud. Cross-platform support for these services means that by switching from Android to iOS 7, you can automatically transfer all your information to the iPhone. This applies to contacts, mail and other data. You just need to specify the account settings in the settings of the Apple operating system.
For example, if you store contacts on Facebook and Twitter, you can use the special functions of iOS 7. The Apple mobile platform provides the ability to “pull” data from social networks into the standard Contacts application. Go to Settings -\u003e Facebook or Settings -\u003e Twitter and click the Update Contacts button.

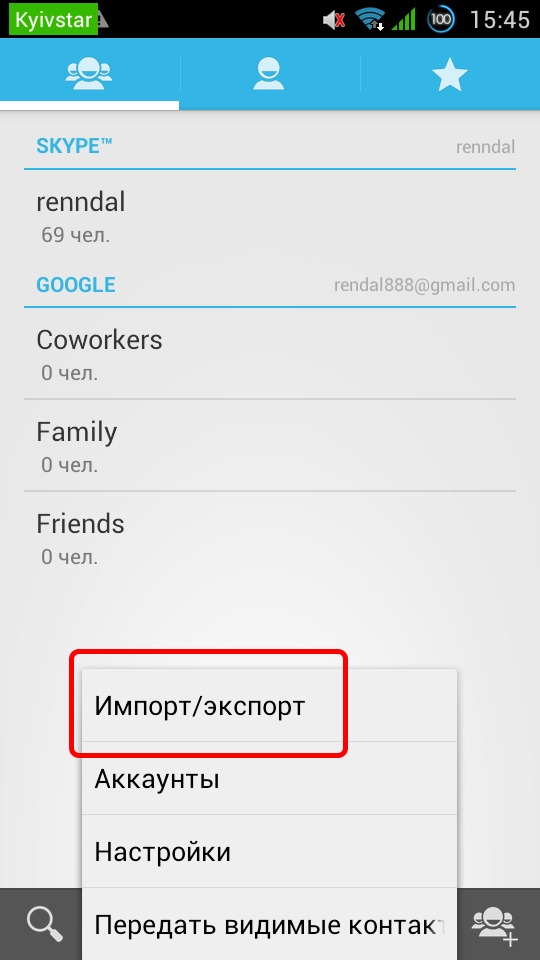
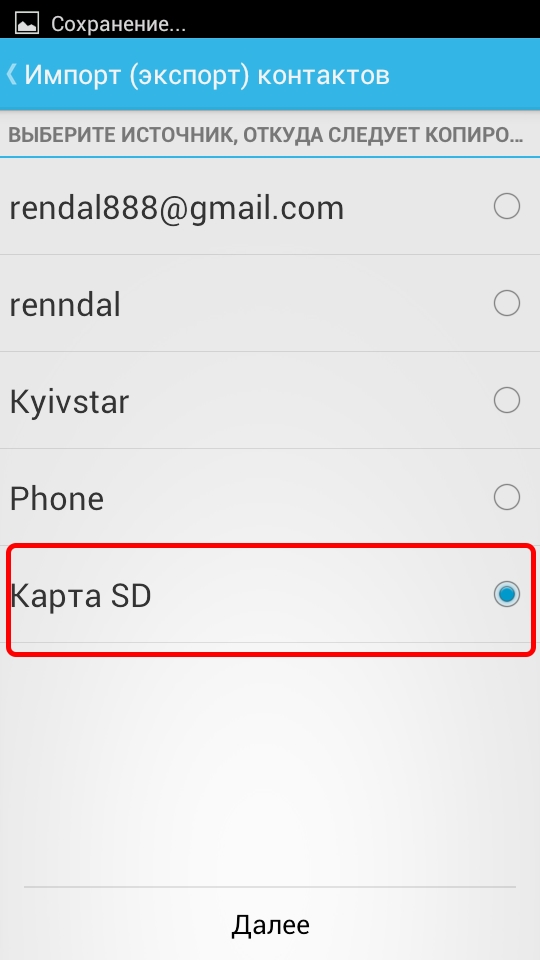
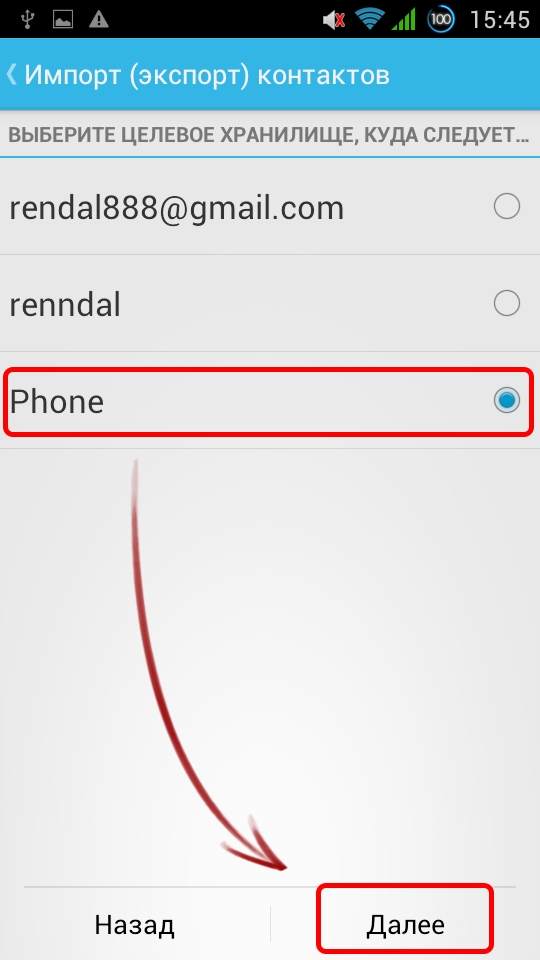
Alternative way: if the contacts are in the memory of the Android smartphone, you will need to transfer them to the SD card. To do this, go to the Contacts application on Android, select the Export to drive function from the Import \\ Export menu. All data and additional Information will be compiled in a file with a .vcf extension. Transfer it to a computer or send it by mail. Now open the .vcf file on your iPhone using the Contacts app or upload it to the cloud on iCloud.com.
Connect Dropbox
A popular service is available on most modern mobile and desktop operating systems. With it, photos and videos can be automatically uploaded to the cloud. To transfer images from an Android-smartphone to iPhone, just register on the service, download a free client from Google play and run it on the device. After the program completes the transfer of data to the cloud, all content from the “google phone” will be available in Dropbox on your iPhone.
Transfer files
from a computer to a USB flash drive / disk.
And from a flash drive / disk to a computer.
Very often, computer users may need to save
some files, be it keys to electronic wallets, photographs, text documents, music and more - to external media.
And vice versa, having on external media
some files - download them to your computer.
Such external media information, among others, are
flash drives ( USB flash Drive) and discs (CD-ROM, CD-RW, DVD, etc.).
How to do it?
Themes on this page
Working with a USB flash drive on a computer
Flash drive

Flash drives are different. And in terms of memory and appearance.
The flash drive in the picture is with a retractable connector. In order to
pull out the connector - there is a special button on the side panel.
The computer has USB connectors, into which
and insert flash drives, mouse, etc.
On a laptop, the USB connectors are located mainly on the side panels.
bottom of the laptop. Depending on the "tricked out" - connectors can be two or four on one side.
On a desktop computer, USB connectors can be located on the front panel of the System Unit or on the rear. Occupy both horizontal and vertical position.
So, we begin to work with a flash drive.
Open the "Computer" folder through the "Start" button
(or "My computer"). Insert into the USB port, on the computer,
a flash drive. After a short time in the “Computer” folder, appears
"Removable drive".
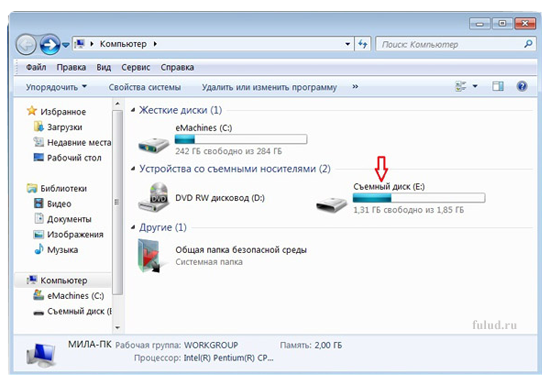
In my screenshot, this is a disk (E :). It may have a different designation for you. It is important that when loading the USB flash drive you have the “Computer” folder open. And then you yourself will see with what designation “Removable Disk” will appear in this folder.
With the advent of removable disk in the “Computer” folder, Kaspersky
will offer you options for checking files from disk for viruses.
And also, with the advent of a removable disk in the “Computer” folder,
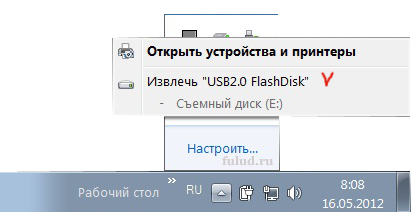
on the taskbar (below the screen), a removable disk icon will appear.
Later, this icon may take place in the “Display Area
hidden icons "(like mine). And when you mouse over this
icon - such an inscription will appear.

We will need this for safe extraction.
flash drives, after the end of the scheduled work.
In the meantime, look at the "Computer" folder.
If you already have files on the flash drive, then below the removable drive
it will be written how much free of the total volume of the flash drive.
Open removable drive (E :) - either by double-clicking, or by the right mouse button and select “Open”. In a separate window, open the folder with the file that you are going to transfer to the USB flash drive (or vice versa from the USB flash drive to the folder). Click on the file to be transferred with the right mouse button and select “Copy” from the context menu.
Go to the folder where you transfer the file, right-click
mouse over the white field of the window and select "Paste" from the context menu.
If the file is large enough, then you will see
in the new window, the copy process, with a green scale.
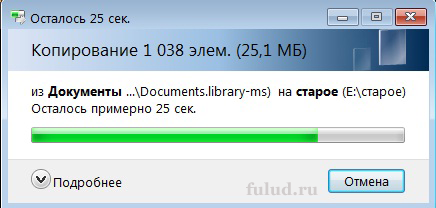
And when you paste the file into a new folder, you will also see the insertion process.
And if the file is small, then it just appears in a new place.
And that’s it! The transfer took place.
If you want to delete something unnecessary on the USB flash drive, then right-click on the file that you no longer need and select “Delete” from the context menu. In the new window confirm the deletion, click “Yes” and the file will be deleted. And again, depending on the volume - either immediately, if a small volume, or with a new window and a green scale.
If the file that you transfer from the computer to the USB flash drive is
on the computer is no longer needed, then instead of copying you can
use the "drag and drop" file.
How to do it - see page
My computer (in the right column).
Safely remove flash drive from computer
Safely remove flash drive
To safely remove the flash drive - click on the flash drive icon
on the taskbar. Or, as I have in the "Hidden Icon Display Area."
This dialog will appear
Click on the "Extract" the name of your flash drive "".
After a short time, confirmation appears that you can
remove the flash drive from the connector.
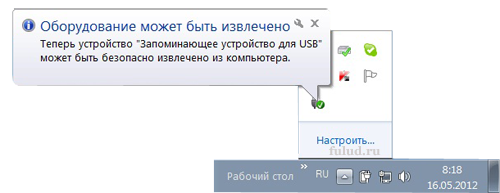
And that’s it. You can pull out a flash drive.
Teaser ad from Redclick.ru
How to transfer files from a computer to disk
Disk
On a laptop, “Drive” is located on the right side of the bottom of the laptop.
And on a desktop computer, “Disk Drive” is most often located on the front panel of the System Unit.
Open the “Computer” folder (or “My computer”) through the “Start” button, remove the drive - either manually, by pressing the button on the drive, or in the “Computer” folder, left-click on “Drive (D :)” on the top panel the “Extract” button will appear. Click this button, the drive will open. Insert your disk into the drive and close it.
After a short time, the “Autostart” window will appear and, if your disk is blank, it will offer you the option “Write files to disk”. If there are files on the disk, it will offer “Open a folder for viewing files”. In either case, choose these options.
If the disk is blank and you clicked the option “Write files to disk”, a new window will open asking “How are you planning to use the disk?”. Choose “Like a USB flash drive” and click “Next” below. After that, the process of formatting the disk will go through and a new window will open with the button "Open folder to view files." Click and the folder will open, in which it will be written: "Drag and drop files into this folder with the mouse to write them to this disk."
If, after you inserted a blank DVD-ROM into the drive, “AutoPlay” does not automatically open, then click on the drive in the Computer folder to highlight it. Then click on the “Burn to CD” button on the panel. A window will appear where you confirm that you are using the drive as a flash drive. And further - disk formatting will begin.
You can also - open "AutoPlay" from the panel.
If the disk is already with the files, then after loading the disk a window will appear with the offer “Open folder for viewing files”. At the bottom of the “Computer” folder you will see information about the loaded disk, including the volume free space. Click on the button “Open folder to view files” and a folder with your files will open. You can add files to this folder (if the amount of free space allows) - by copying or dragging files from the computer. Or vice versa - from this folder to transfer to a computer.
As on a flash drive - if the file is no longer needed on the computer, you can drag it. And if you need a file or don’t want to drag it, then just like on a USB flash drive, they copied it in one place - pasted it into another. Delete files that are no longer needed on the disk, also, with the right mouse button. At the end of the work, click on the “Eject” button on the panel and wait until the program prepares for extraction and opens the drive itself. I do not advise removing it manually using the drive button - you can damage the disk and it will no longer be usable.
In order to transfer necessary information from one gadget to another you must use special application entitled Move to iOS. This is a new development from the company APPLE which allows you to simply and quickly save all information on new device. This is not only photos and videos, but also SMS, MMS, a contact list, browser bookmarks, accounts, audio files, books and much more.
Before you start directly transferring the necessary should make sure in that on a device with Android version 4.0 systems, or whichever is later. It is also necessary for such a procedure uninterrupted connection WiFi networks and the appropriate power sources for these devices. Check if there is an iPhone enough space, for portable data.
The next step will be download and setting Move to iOS apps. It is safest to do this from the official site.
Then connect to the Internet and go to the " Programs and data»On the iPhone. On the Android a smartphone run downloaded application, click continue, read the license agreement and click that you have agreed to it, and in the upper right corner click on the link " Code search». 
In the meantime, on the iPhone, go to the " Data transfer with Android ". After that, the screen should appear the code of 10 digits which is necessary introduce on the android smartphone.
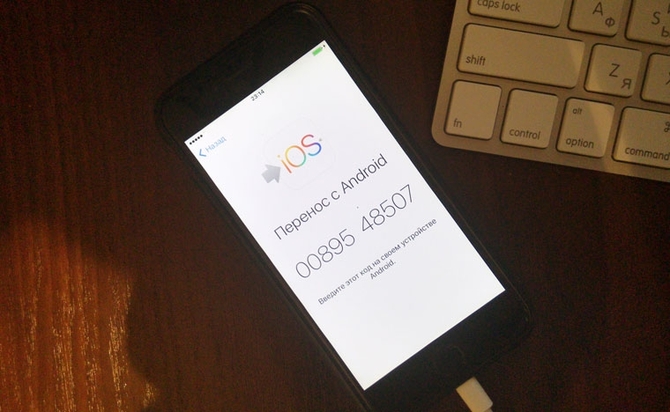
Then we press the button " Further”And then the transfer process will begin. At the end of the procedure, gadgets will let you know about it using notifications. During the transfer, you cannot minimize the application, disconnect the charger or connect to WiFi.
Transfer data from iPhone to iPhone
Using iCloud
One of simple ways will take advantage iCloud function. To do this, on the phone from which the information will be transmitted, activate the program. 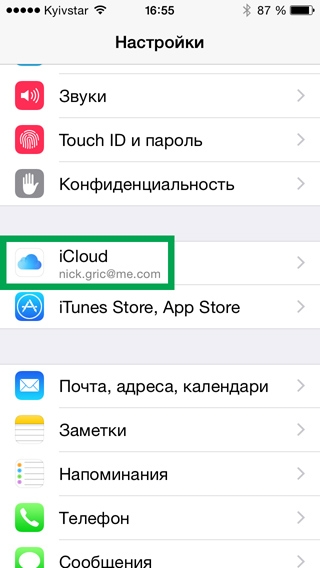
Going into the application, select necessary sections to send to another device and create a backup.
Now left turn on the phone to which the information will be saved, and in the settings menu, select the " Restore a copy from iCloud». 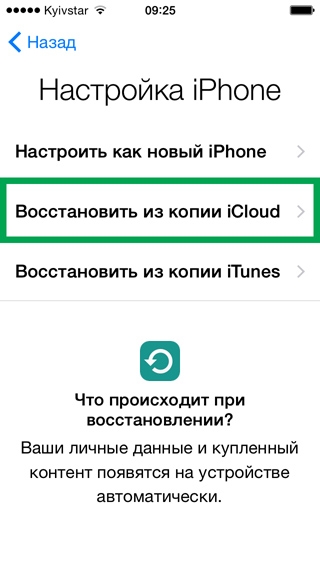
We introduce account data. 
Accept agreement. 
AND choosewhich items we save to the smartphone. The procedure is completed. 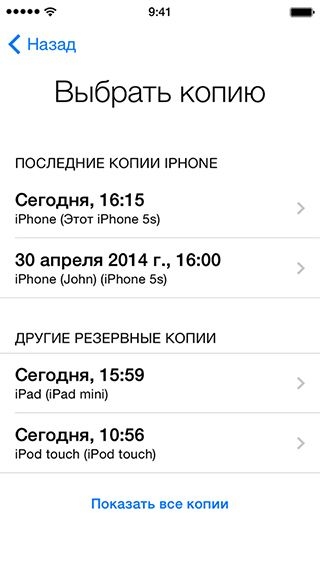
Backup Transfer
This method is even simpler and faster. The only caveat is that the data in the phone to which the information will be transferred, will be deleted and only those moved from the previous device will be saved.
To do this, connect the source device to computer using a USB cable. Launch the application iTunes and in the settings choose creation backup
(it will be saved on the computer). 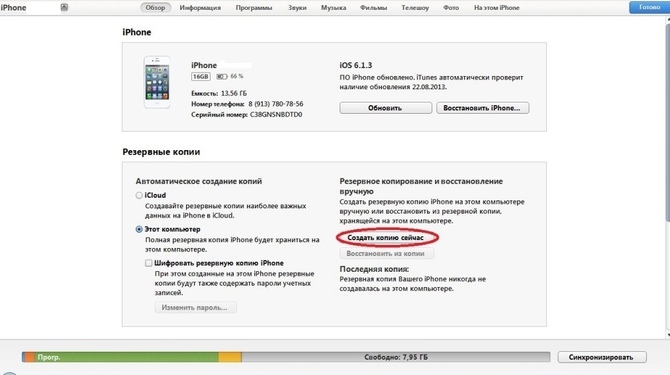
In the same way connect second phone and run the program, in it we choose recovery backup copy. 
And we are waiting for the end of the transfer.
Transfer data from iPhone to Android
Google sync
This method is used to move contacts, for this they synchronize on iphone via account. 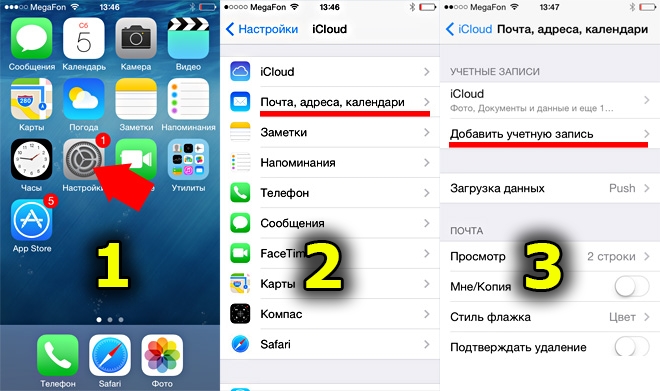
Add account.
After all this has been done, you can check your contact list by going to your Google account via mail.
To save them on the android device, select the menu settings.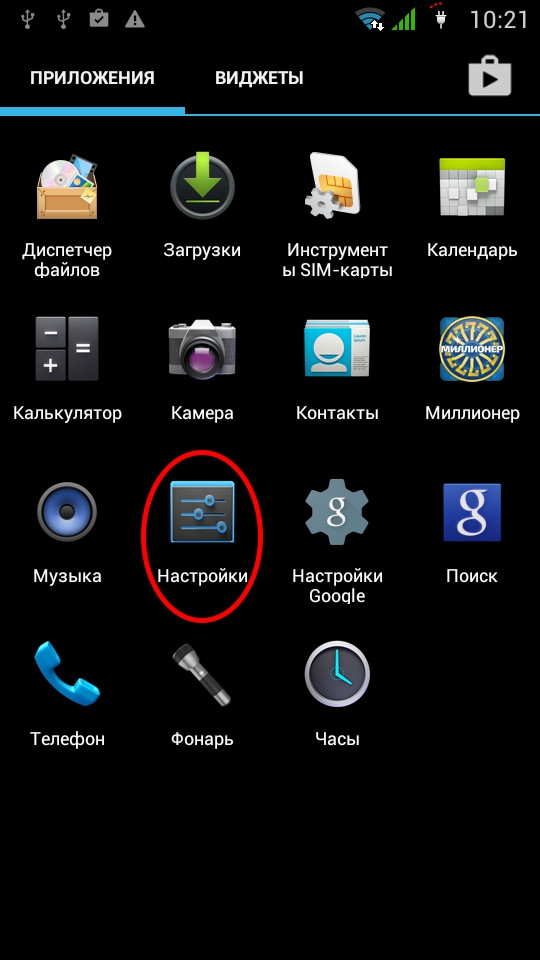
Item “ Accounts and sync». ![]()
Click on the section " Add account»And select the necessary items to transfer to the phone. 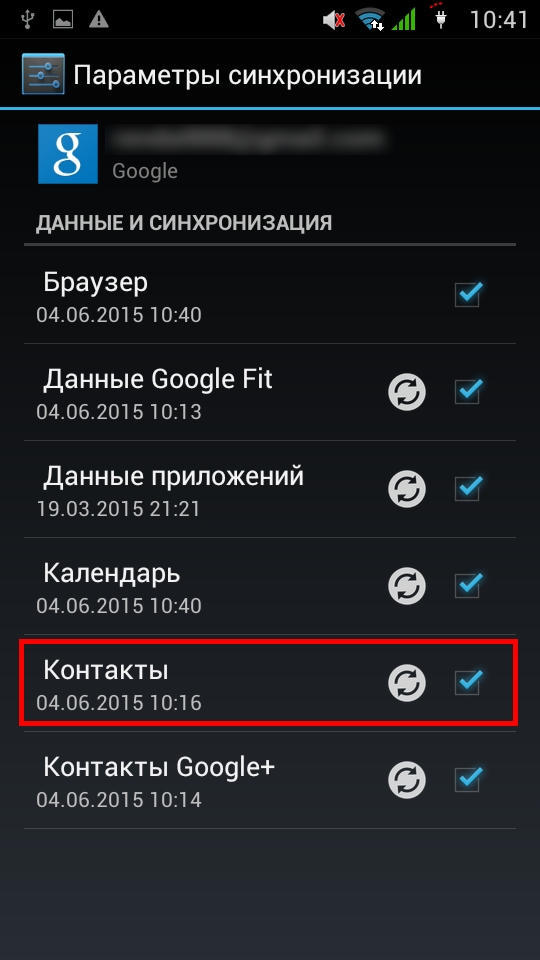
Transfer data using Outlook.
With this method, it is necessary transfer information to the Outlook server. 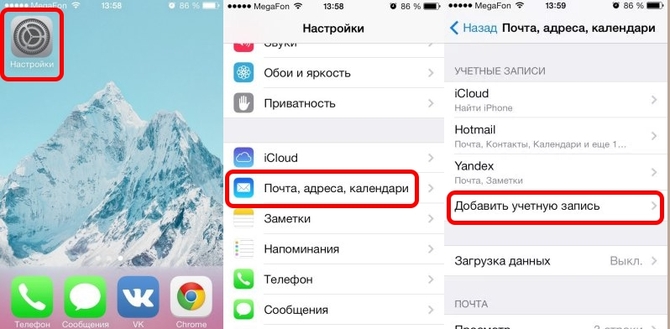
Click on the section " Add account", Create an account and select the necessary items for the transfer. 
After that, all the information will be synchronized, and it remains only to synchronize them by going to the server via an Android phone.
Transfer contacts via iCloud
The algorithm is quite simple: go to attachment from iPhone and synchronize data through apple account ID Further save information on the android device according to this scheme:

There is a similar way to transfer data through the application. Mc backupwhich acts on the principle of iCloud server and the algorithm of actions will be practically identical.
Bump Transfer
This application allows you to exchange data between gadgets in minutes. For this it is necessary to establish it on both phones, in the settings allow geolocation and running the application select information necessary for transmission, then click on the “ Connect". At the end of the transfer will pop up notification about the completion of the process.
If you purchased a new iPhone model, there will always be a problem, because everything is so familiar on the old one, everything is familiar, and so much of the necessary information is stored: different photos, SMS, contacts, chats, applications synchronized in the right order, programs, videos, pictures, calendars, and most importantly, passwords that would be useful in a new smartphone, but who remembers them. Therefore, the purchase of a new device is a joy, and at the same time a tragedy, and stress for many. How to convey information without experiencing a nervous breakdown is quite simple.
There are two options for transferring program data from iPhone to iPhone. Which one is right for you. Each of them has its pros and cons, which you will learn about now. I hope, having studied this article, you will know how to transfer information from an old smartphone to a new one yourself.
Data Transfer Using iCloud
ICloud program developed apple specially for iPhones and installed on almost all iPhone devices 3, 3S, 4, 4S, 5, 5S, 6, 6S, 7, 7 plus and beyond.
This so-called “Cloud” program provides for the possibility of transferring, storing all information from an iPhone to a virtual Internet network to a special platform, access to which is only available to you thanks to your ID and key. The process of transferring information from iPhone to another iPhone consists of the following steps.
Activating iCloud on iPhone
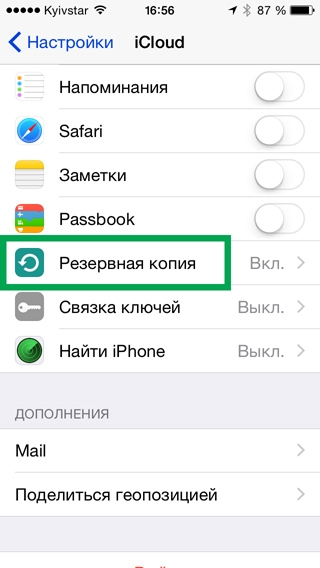
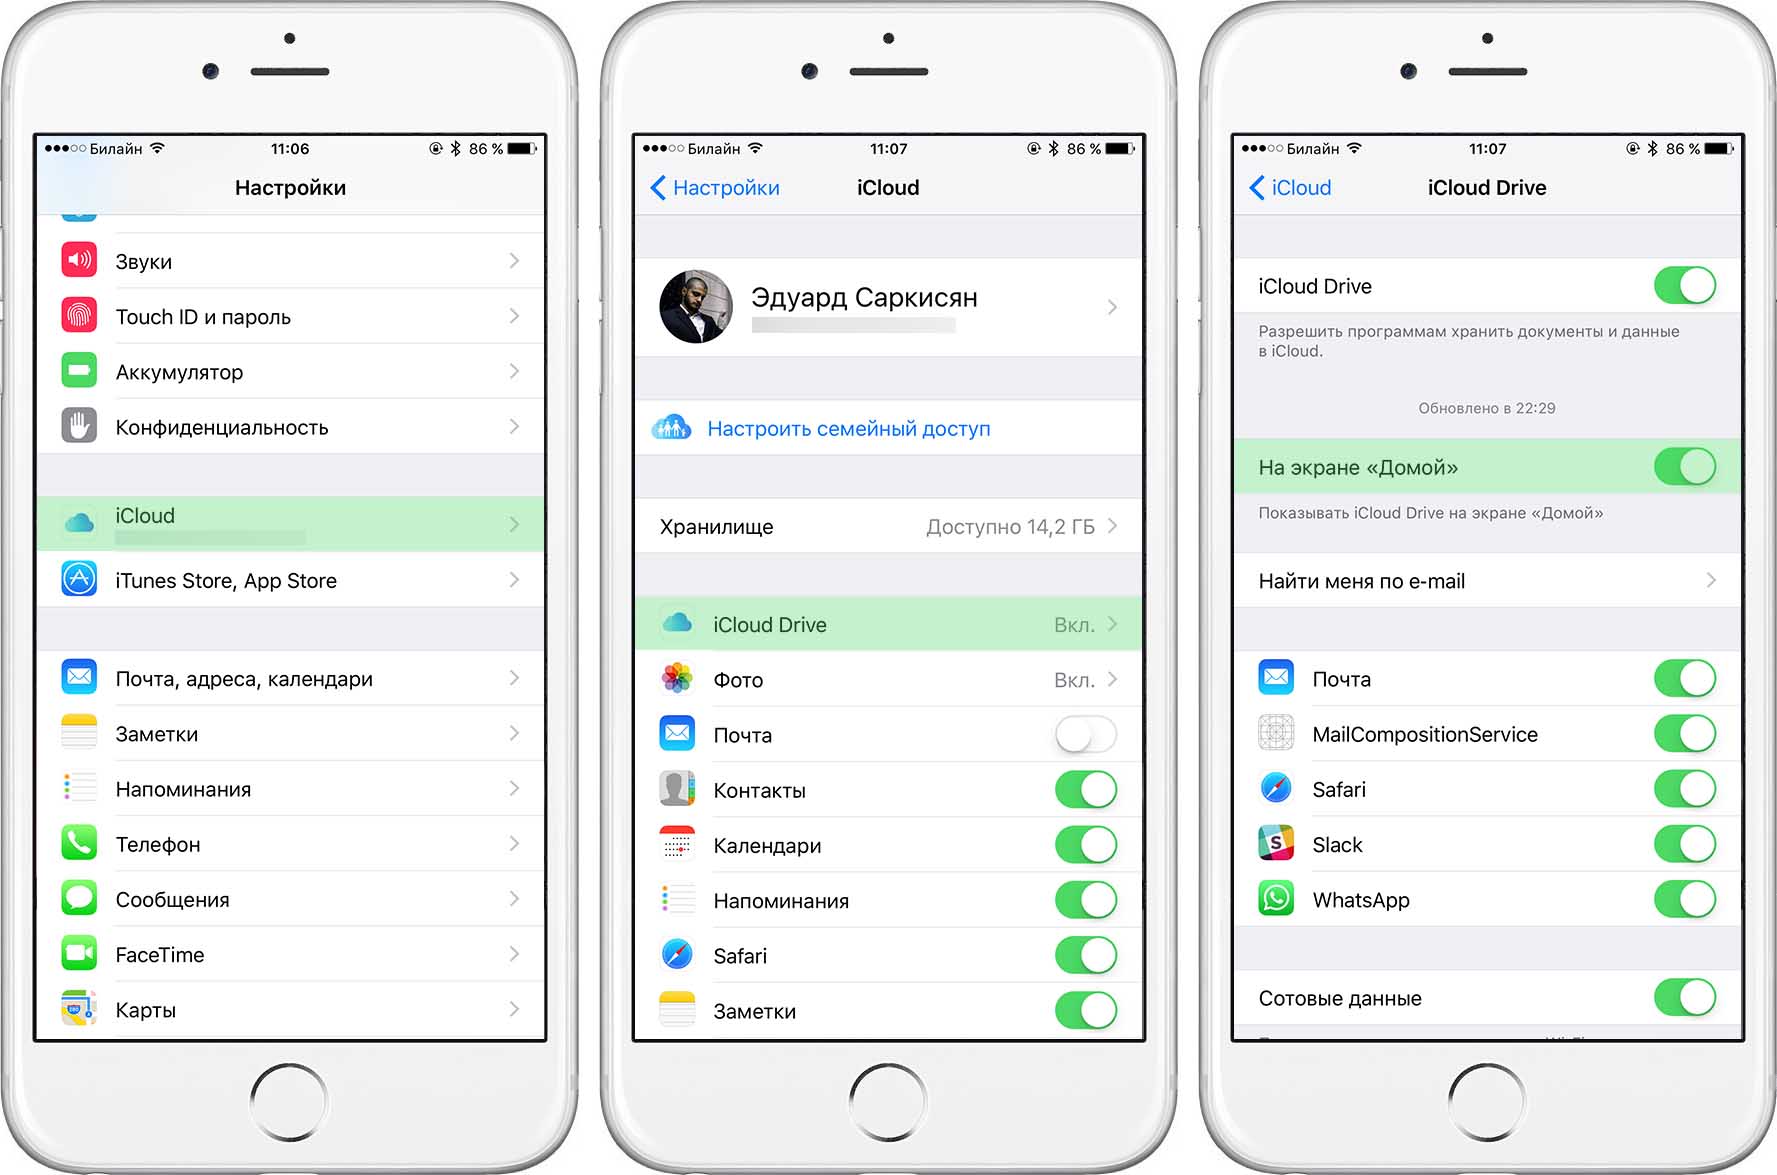
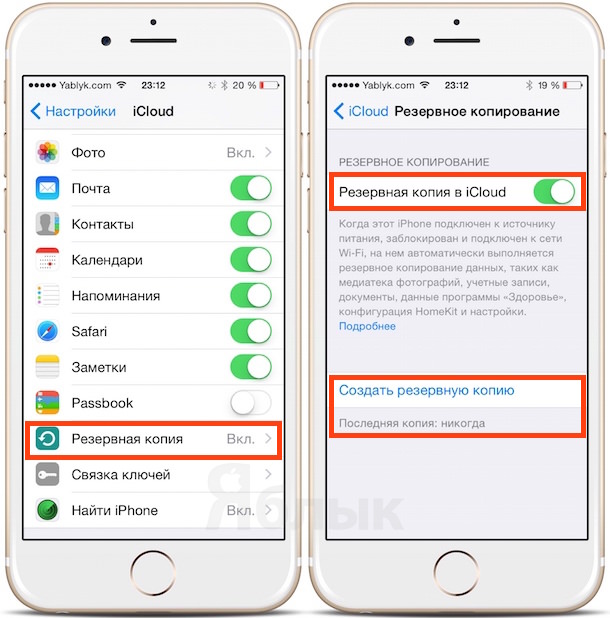
To begin with, we check the availability of WI-FI connection in the iPhone for working with the Internet. Next, we find out whether iCloud is activated in the old iPhone. If for some reason it is not activated, then it must be turned on by going to the "Settings" menu of your smartphone. In the "Settings" menu, select the iCloud cloud function. In the screen that opens, we see the cloud settings, the amount of available storage, which is very important, since transferring information to the cloud can have a rather large amount of gigabytes and not fit on it, which may disappoint you.
To prevent this from happening, you should in the settings of your smartphone check the amount of information stored on it that will be transferred. The cloud can accommodate about 5 gigabytes. If the data transfer is greater than the specified volume, then first you need to expand the volume of the cloud by purchasing additional space. If this option is not beneficial for you, then note that you can transfer the amount of data from iphone to the cloud only within 5 GB. For example, you can transfer a ringtone from iPhone to iPhone, while the ringtone for iPhone will be transferred completely free of charge.
We activate the program itself in iCloud settings, if it is not activated, the icon should show “on”. Then we activate all sections of the information that we want to transfer (photos, books, mail, contacts, calendars, reminders, notes, applications) - all that you need to save and install in a new iPhone. To do this, drag the activation icon to the right of each section of information (it should turn green).
If all the necessary sections of information are activated, we press the iCloud Drive function, and a new window opens in which we activate the specified function in the same way, allowing the programs to copy and store documents, as well as data in the iCloud storage. Visually it looks like this.
After the program is launched, activate the “Find iPhone” icon in order to subsequently find, block or erase this iPhone, as well as prevent it from being erased or re-activated without your password.
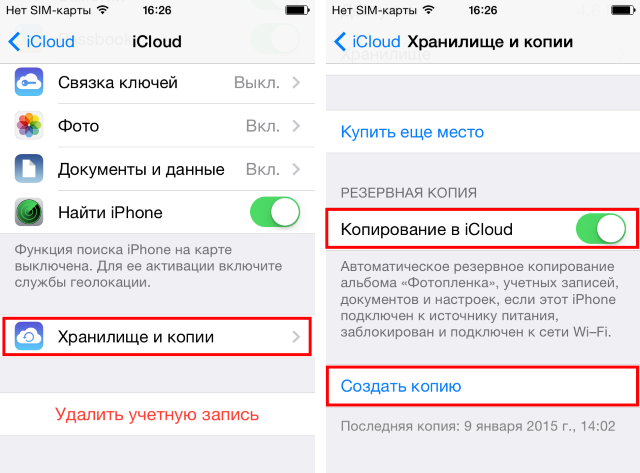
Copy data to the cloud
Next, open the "Storage and copies" section, it contains messages about the date and time of the last copy. In the backup that appears on the screen, turn on the Backup icon. Pay attention once again that the Keychain function is turned off, and the Find iPhone function is turned on. Next, activate the "Backup in iCloud" process, and then tap the bottom of the "Create backup" command button.
The step of copying data and documents from your iPhone to cloud storage launched. Information on the time and volume of the copied documents will be displayed on the screen, the very throwing of documents will be shown as “Creating a copy”. When a lot of file data was stored in the smartphone, this process will take a fairly long period of time. It looks like this
After the entire copied amount of data is sent to the cloud, you can clear old phone from the content, bringing it to the factory default state.
But before that, be sure to save the individual ID number and registration password to enter the Cloud from another smartphone.
Reset all data on iPhone
To do this, turn on the iPhone, and in the "Settings" menu, select the line "Cellular Data Network". Then, on the screen that opens, we find the “Reset Settings” command, then select “Reset Content and Settings”. The process of resetting the smartphone to the factory settings is activated, and after a few minutes the phone will restart, all your data will disappear, as if you just bought this device.
It remains to complete the process of downloading all the data from the Cloud to your new iPhone. To do this, turn it on, select a language, say, Russian, refuse the proposed connection to the geolocation service, turn on the WI-FI network and enter the settings for the new iPhone. From the proposed connection options, select the option to copy - “restore from iCloud copy”.
At the end of this step, Apple will ask you to enter the ID number and access code that you specially saved for access. After entering the requested data, iPhone will start the data recovery process. 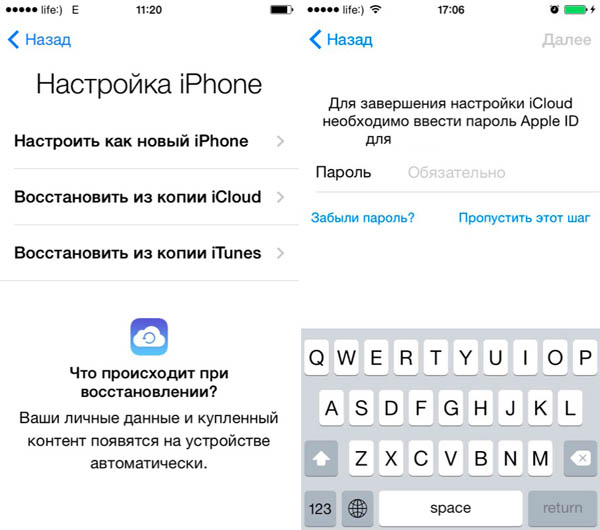
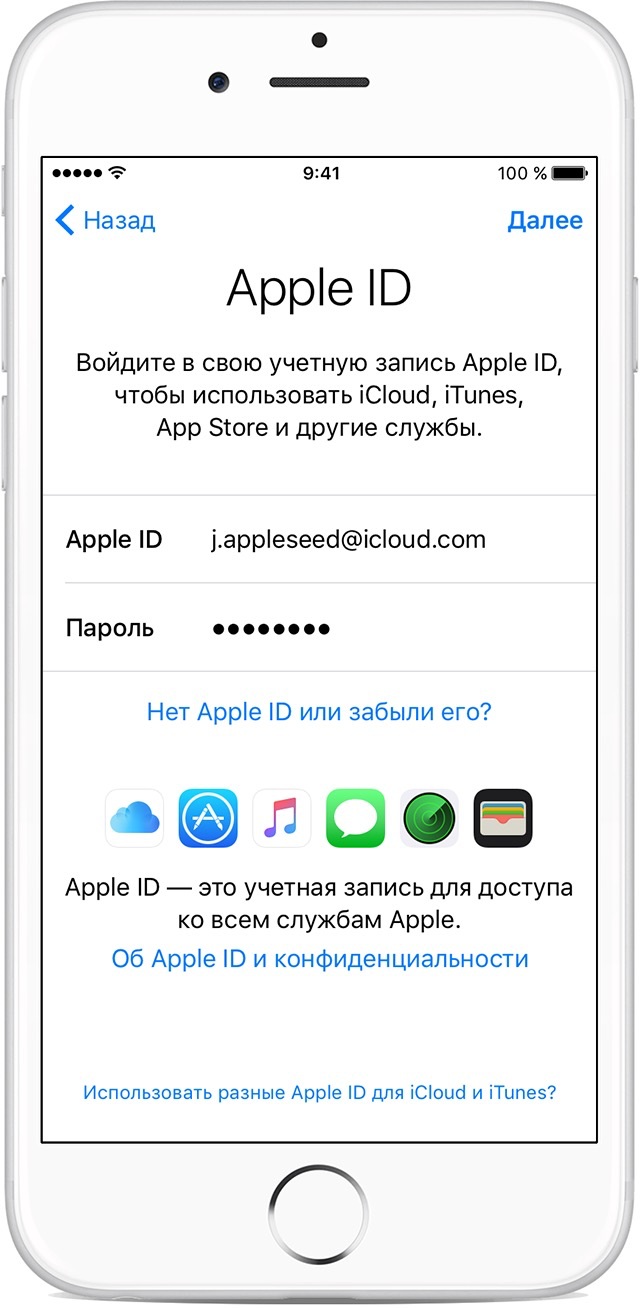
The terms of the agreement that will be requested must be accepted by clicking the “Accept” button. Then select from backup latest version, which must be sent from the cloud by clicking on the selected date for copying data.
The process of copying data to your iPhone and the process of setting up an old smartphone has started. It will take a little time depending on the amount of information being transferred. The process itself and its duration will be displayed on the screen.
After a while, the iPhone will open the main menu, which displays all the programs and applications from the old smartphone.
The process of recovering all the data stored on the cloud, as well as transferring it to your iPhone, will be completed when the smartphone restarts, and information on successful data recovery will appear on the screen. Click the Continue button.
You will see a window with the restoration of all settings. The smartphone will make settings for a little while, after which new smartphone will be filled with all stored information. We can consider the stage of data transfer from iPhone to iPhone completed.
Copy data using iTunes
There is another way how to transfer data from iPhone to iPhone can be - transfer using a PC via iTunes. For this, this given software application must be installed on your pc. If such a program is not available on your PC, then it is not difficult to download it on the Internet by going to the official website of the developer. It is copied for free, fast and easy.
After iTunes is present on the computer, you must connect via uSB cable your iPhone to PC by syncing them. Turn on iTunes program, which will detect the iPhone connected to the PC. In the upper part of the window, select the "Settings, and then" Backup "function, followed by" This computer ", then tap" Create a copy now. " When the window for synchronizing your programs appears, click the "With program copies" button. When copying is complete, the program will display the copy time for the last time.
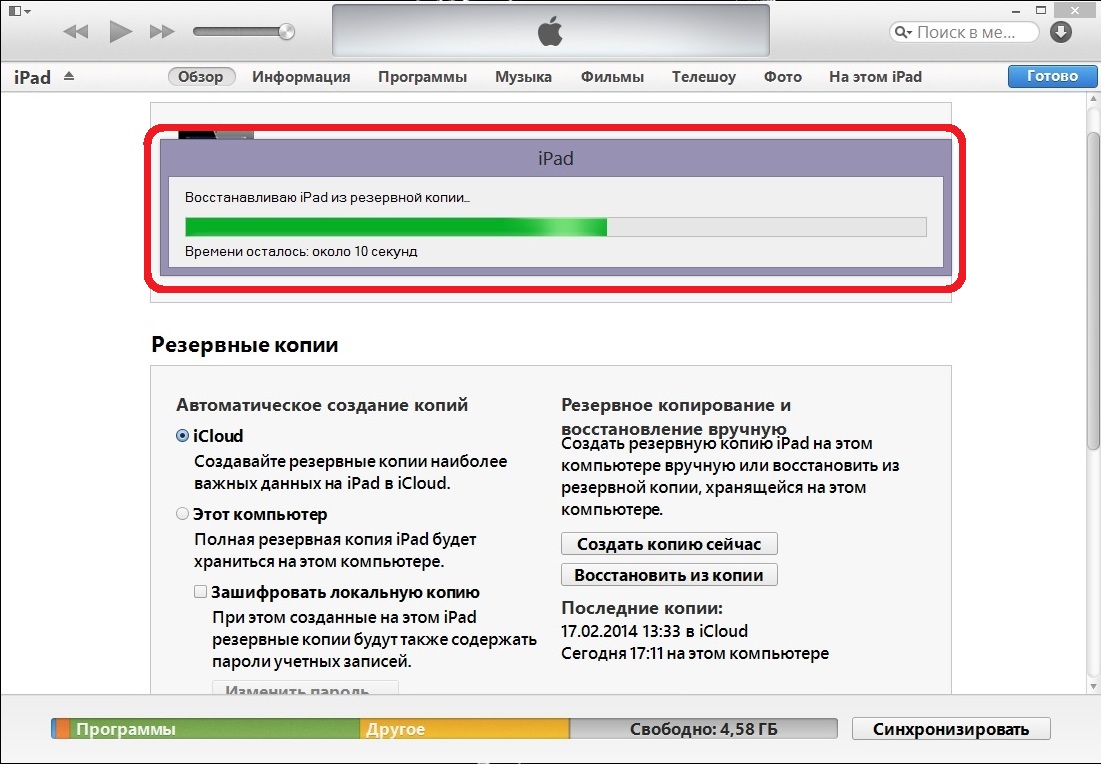
After all files are reset from iPhone to PC, disconnect iPhone from PC, reconnect new iPhone via a USB cable to a PC. Now, from a computer, information will transfer its entire volume to new iphone. To this end, in the main menu of the smartphone’s screen “Settings”, select the proposed option “Restore from copies of iTunes", And then confirm the backup of all data from the backup. After recovery, patiently wait for the program to synchronize the program data. Copying is over, you can disconnect the iPhone from the PC.


