There is not always access to the Internet on your Android phone or tablet. The problem can be solved quite simply, all that is needed is personal Computer with internet access, as well as a USB cable. In addition, it is desirable to have Root access rights and special programs that allow you to get it. We will consider in detail how to transfer the Internet from a computer to Android via USB.
The need to distribute the Internet from a PC to a mobile phone can arise in many situations. Especially when mobile traffic is limited, and you need to download a large amount of data, or update the operating system. The first thing we’ll start with is the action algorithm. We also note that distribution options with root access rights on a smartphone or Android tablet are possible, and without them.
![]()
Network Management Center
Before using your stationary PC or laptop to transfer the Internet to Android via USB, you need to check its speed. To do this, go to the network connection settings and look at the number of sent and received packets, they should approximately coincide. You can also simply open your web browser and try loading any page. If the Internet is connected and has a good speed, then you can start transferring it via USB to your mobile phone.
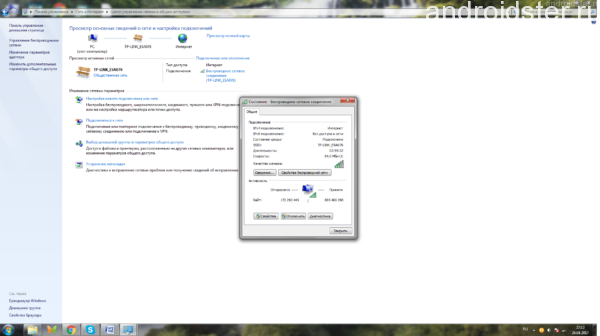
condition wireless network
With Root Permissions
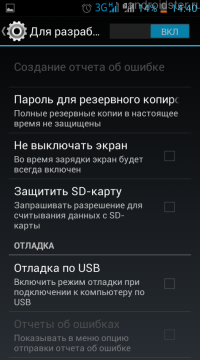
USB debugging
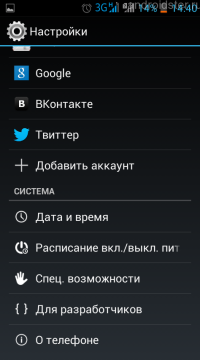
Android Settings
As the name of the subsection implies, to use this method you need to root your device. To do this simply and quickly help proprietary utility. With its help, you can install the SuperSU application on your phone with one click, which opens up great opportunities for setting up your mobile gadget. After root rights are obtained, you can proceed directly to connecting and transferring the Internet from a PC to a mobile phone, for this you need:
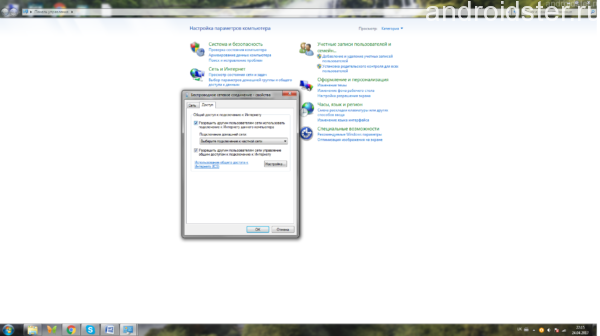
Connection Sharing
- Download and install the proprietary Android SDK utility from the official site.
- Go to the control panel / network connections and click on “properties” on the selected network. Open the shared tab and check the box next to the item: “Allow other network users to use an Internet connection this computer.»
- On the phone or tablet, go to the tab with general settings.
- Find the item “for developers” and then “USB debugging”.
- Connect the mobile device to the computer via a regular USB cable.
- Unzip the archive with the AndroidTool utility on your PC, and then run the executable file with the extension exe.
- Click on the search button for connected devices. After completing the search, we get a list among which you must select the desired smartphone.
- In the Select DNS to use field, select “DNS” and click on the connect button.
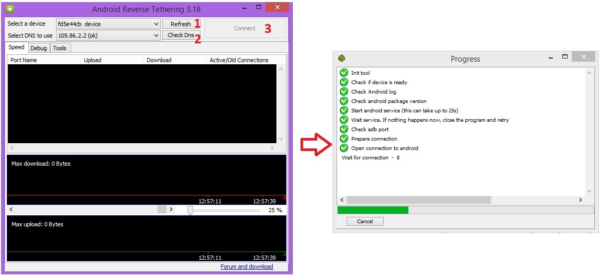
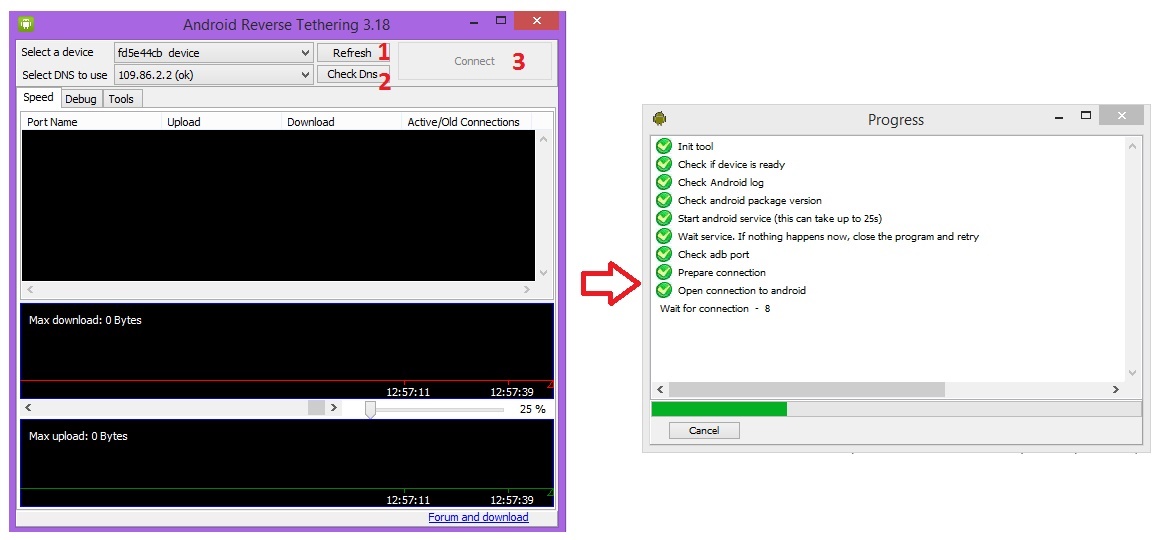
Utility interface for distributing Internet from PC to Android
After the successful completion of the above actions, the program will open a window with a running connection string. On the mobile phone, a new application called “USB tunnel” will be displayed. Before you access it, you must agree to the request for superuser rights by selecting the appropriate button. After that, the message “connection is established” will appear and you can distribute the Internet from a laptop or PC to a smartphone.
Note that if you have root access rights, you can also distribute the Internet from a computer to a phone via USB using emulators. One of them is the Android Terminal Emulator. In this case, you will need to additionally enter the IP address and subnet mask of the provider used.
A method without Root permissions
The distribution method presented above has one drawback. When rutting, the device loses its warranty, therefore it is recommended only for experienced users. If you don’t want to “crack” the OS of your phone, you can distribute the Internet from a PC via USB and without root access rights. For this, in addition to the mobile phone and computer, you will need:
- Software from Reverse Tethering NoRoot. Need.exe distribution for Windows and .apk file for Android. Free version the utility is limited to 10 minutes of work with the next 30 minutes of a break.
- Pre-installed ADB drivers for your mobile device on the pc. You can download them from the official website of the developer.
- In the settings of the mobile device, set the item "USB debugging".
Before distributing the Internet in this way, you need to connect the smartphone to the PC via a cable. Next, launch the Reverse Tethering NoRoot client program on Windows and Android. If the connection does not happen, you can try to turn on the modem mode on your mobile phone or reconnect the cable. We recommend watching the training video on the correct configuration in this way.
Further settings
After the connection is established between your PC and smartphone, you can use the worldwide network from your mobile device. At the same time, you don’t have to rack your brains on how to configure the network settings, since the program did everything before. Unfortunately, it will not be possible to use some popular apps from Google, in particular - Youtube. But you can start video hosting through a regular browser, or install a special Xposed module. A link to download the application is available in the Reverse Tethering NoRoot utility itself.
A smartphone is a device without which it is difficult to imagine modern life. This device helps business people communicate with business partners, create notes and go online. At the same time, for fans of entertainment in smartphones there is an unlimited number of a wide variety of games, as well as the ability to access the Internet for communication in social networks. networks and so on. To connect your smartphone to the Internet, you need a point wifi access. You can also connect to mobile internet via built-in 3G / 4G modem. However, what if Wi-Fi is not accessible and you need a high-speed connection? How to connect the Internet to a smartphone through a computer?
This is what will be discussed in this article. Of course, in our time, almost everyone has a Wi-Fi router. The cost of such a device is very affordable for almost everyone. However, there are still cases when there is no router, but there is an urgent need for high-speed access to the Internet.
1. What is needed to connect a smartphone to the Internet through a computer
So, first of all, to connect your smartphone to the Internet through a PC, you need a computer that is connected to cable Internet and works under the Windows operating system. There are two methods for setting up a network between a smartphone and a personal computer:
- Using the built-in USB Tether;
- Using a third-party application that allows you to connect USB Tether.
Since USB Tether is not built into every smartphone, we will consider the second way to connect the smartphone to the Internet via a PC via USB. The second method is suitable for absolutely every Android device.
Of course, you guessed it, you will need to download and install the Wired Tether application on your smartphone. After installing the program, when connecting the smartphone to the PC via USB, a new network connection to Android with unique settings will appear in the computer. Attention should be paid to the IPv4 values \u200b\u200band the subnet mask (for example, IPv4 172.20.23.253 and the subnet mask 255.255.255.252, you may have different numbers). For convenience, you can write the data of your connection to notepad.
First of all, disconnect the Internet connection. After that, go to the connection properties and open the connection access for Android USB. Next, go to the Android USB settings and change the IPv4 address and subnet mask. Here you need to enter the values \u200b\u200bthat you wrote down in the notebook (in my case, it is IP 172.20.253, subnet mask 255.255.255.252). We do not touch the remaining points - we leave as is.
1.1. Android device setup
After you have made all the necessary settings on your PC, you should proceed to the settings of the smartphone. Everything here is also easy and simple. To simplify the settings, you will need to work with scripts in a special GScript Lite application. After the application is installed, it should be launched and create a new script. In it you need to write the following text:
ifconfig usb0 up
root add default gw 172.20.23.253 dev usb0
setrror net.dns1 8.8.8.8
2. How to connect the Internet to Android through a computer via USB without programs: Video
Instead of the address 8.8.8.8, you can specify any other DNS server. However, it is worth noting that 8.8.8.8 is a Google server, which is very convenient, as it is always available.
On this, the connection of the smartphone to the Internet through the computer is completed. It remains to verify the created connection in practice. To do this, you need to connect the smartphone to the PC via USB, then launch the Wired Tether application and enable the connection. Next, turn on the action of the previously created script in the GScript Lite application and wait for the connection.
It should be noted that there are other ways to connect your smartphone to the Internet through a PC, as well as many other similar applications. Therefore, the choice is yours. However, it is worth saying that this method has been tested and is working.
Sometimes the user is faced with the task of distributing the Internet from his computer to a mobile device, a tablet or smartphone based on the Android OS. What is so difficult? - Probably ask you a question, you just need to connect to a Wi-Fi wireless network and business. And if there is no wifi router itself, and this must be done via a USB cable. It is with such a task that difficulties arise, but this is completely solvable.
How to connect Android to the Internet through a computer using a USB cable
If there is no wifi router nearby, and EDGE or 3G speed does not suit you, then you just need to connect Android to your computer, and so let's get started.
What we need for this:
1. A computer with high-speed Internet and Windows;
2. Android device (smartphone or tablet);
3. USB connection cable;
4. Special program Android Debug Bridge (very desirable).
How to distribute the Internet from a computer to Android
Before you start the whole procedure, you need to activate an additional option in your Windows network settings, for this you need to go into network connections and check the box "Allow other network users to use the Internet connection of this computer."
1. Download and unzip, it is the link between the Android device and the PC;
2. Activate the mode on Android, as we wrote earlier;
3. Connect a smartphone or tablet via USB cable to a PC;
4. In the folder where you unzipped the program, find and open the AndroidTool.exe file;
5. In the window that appears, click “Refresh” (1), then from the Select DNS to use (2) list, select DNS and click the Connect (3) button.
6. A window with a running line of connection will appear in front of you (see the picture on the right);
7. If Everything went correctly, you will see an inscription in the “Connection Done” window, and the PC will distribute the Internet to the Android smartphone or tablet;
8. Sometimes a window may appear on your smartphone or tablet asking you to grant rights for the user, click "Allow".
That's all, now your computer distributes the Internet to Android via USB, you can safely use it.
The ability to connect to the network in this way is governed by the functionality of the device. Before you get down to business, you need to study some of the nuances and features of this option for each particular gadget.
USB-modem - Internet without problems
Mobility has become the foundation of modern life. Almost all modern mobile devices have the technical ability to access the Network, which means that they can completely replace stationary analogues. That is why compact and easy-to-use USB modems are becoming increasingly popular. They allow not only to establish a stable connection, but also save money by using the Internet at a fairly affordable price.
Externally, the USB modem looks like a regular USB flash drive. It is small, especially compared to modems used on desktop personal computers. Thanks to this device, you can go online when you want: on the street, at home, in the office, in transport.
You can buy a modem in any communication salon of any operator. They are sold everywhere. After the purchase, you do not need to wait for the connection, just insert the device into the laptop and you can work.
What is the peculiarity of connecting via a USB modem?
When the modem is connected to any mobile device, the driver installation program starts in auto mode. Connection settings are also autonomous and do not require intervention.
This will take some time, after which a message should appear on the screen stating that all necessary operations have been completed, and the gadget is completely ready for use.
Even during such a simple process, difficulties may arise. For example, disabling autorun. In this case, all the settings will have to be done in manual mode. How to do it?
- Through the menu, going to the "My Computer" section, you need to find the operator whose modem you are going to configure. By clicking on the icon, you will run the installer. Next, you will be offered various settings, you must select and confirm the necessary ones. If manual configuration is not possible, you must contact the operator’s support service or go to his website. As a rule, the menu already has a separate section on the installation and activation of the modem.
- It's important to know! The modem cannot be removed from the slot until the end of the automatic installation and configuration process.
- Once all the drivers are installed, run the program. If everything is done correctly, a connection button will appear on the screen, by clicking which you can safely use the Internet.
How to connect a smartphone to the network via USB?
Everything is a bit more complicated here. The role of the modem in this case will be played by a personal computer equipped with a USB port.
In addition to special cords, in order for USB, you will need special superuser or root privileges.
There are no rights to Android - you will first have to study the algorithm for obtaining them. Step-by-step instruction is in the public domain. Assume that you have already obtained the rights.
- If you have the Windows operating system installed on your personal computer, you need to download and install the Android SDK. In the computer menu, select " Network connections", Item" Connecting to the Network ". This item contains the property settings.
- In the sharing section, you need to allow other users to use the PC’s Internet connection on the PC itself. And confirm your choice.
- Need to go back to the tablet or mobile phone. In the "Settings" section, select the item intended for developers to start debugging the Internet on the phone via USB.
- Do not forget to connect the tablet to the computer and download the proposed archive to hDD. After unpacking, you can run the AndroidTool.exe program.
- We activate the search for connected devices, start the connection.
- Attention! Installed Application may require superuser rights - provide them.
As soon as all steps are completed, the personal computer will be ready to distribute the Internet to devices with Android OS. That's all you need to know about how to distribute the Internet.
When we talk about sharing the Internet, we usually mean connecting your local computer or laptop to the Internet using a mobile device, such as a phone or tablet. But sometimes there are reverse situations when you need to connect to the Internet from a mobile device, and there are no WiFi access points, or the tariff plan does not allow this, then you have to act exactly the opposite: rummage the Internet from your stationary PC to a mobile device. This method is also called “USB Reverse Tethering,” where Reverse means “reverse.”
This procedure is unusual, but thanks to the guys from the XDA Forum, you can share the Internet from your PC to a Android Android device without unnecessary software. This method works for everyone. operating systems: Windows, Linux, and Mac. Although it does not require unnecessary programs, it will take a little work with the terminal.
As I already mentioned, the device must be manual, plus support USB pairing and the ability to create access points. Usually, on stock firmware this option is disabled, but it is turned on very simply and without problems. In addition, you will need a PC with a working Internet connection, a USB cable and a terminal emulator for Android. As an alternative to the emulator, you can use ADB.
Requirements
1. A hand-held Android smartphone / tablet with the ability to USB connect and create an access point. This can be checked in the device settings: Settings - Wireless & networks - Tethering & portable hotspot. In many stock firmware, this function is disabled, so it must be enabled. For example, CyanogenMod always has this option. Remember that when you connect the device and activate the access point, the device is defined as a USB network adapter, not disk drive or media device.
2. PC with a working Internet connection.
3. USB cable to connect the device to the computer.
4. The terminal emulator on Android device. If you do not want to enter commands from the touchscreen, then you can enter them from the computer using the "adb shell", which is part of the Android SDK.
5. Optionally, BusyBox on an Android device.
Instruction manual
1. Connect the device to the PC when uSB help cable and activate the access point. This option can be turned on even when 3G or WiFi are turned off.
1.1 If you are using Linux (Ubuntu), you do not need to install anything. NetworkManager applet will do everything for you.
1.2 If you use Windows, it will automatically find Windows Update and install the correct driver. Of course, you can avoid Windows Update and install the necessary driver manually, which is already in the Microsoft package.
1.3 If using a Mac, install the HoRNDIS driver. You will be notified of a new network interface. Click on “Network Settings” in the dialog box and add it to the list of interfaces.
1.4 If you are using Linux without a graphical interface or NetworkManager, run these commands as root (or use sudo):
ifconfig usb0 10.42.0.1 netmask 255.255.255.0
echo 1\u003e / proc / sys / net / ipv4 / ip_forward
Command for sudo:
sudo "echo 1\u003e / proc / sys / net / ipv4 / ip_forward"
iptables -t nat -F
iptables -t nat -A POSTROUTING -j MASQUERADE
2. For Linux cases, click on NetworkManager -\u003e "Edit Connections". In the "Wired" tab, select a new connection ( not Ethernet LAN) and click "Edit." In the "IPv4 Settings" tab, select "Shared to other computers" and click Save. NetworkManager will reconnect and assign the computer a new default IP address: 10.42.0.1. While we do not touch the Internet connection.
3. If it is Windows, open “Network Settings” in the control panel. Right-click on the Internet connection and select “Properties”. Go to the “Access” tab and put a tick in the box “Allow other network users to use this computer’s Internet connection”, then select USB connection in the drop-down list below. Click OK, and Windows will automatically establish a connection and assign an IP address. For Windows 7: 192.168.137.1, and for Windows XP: 192.168.0.1.
4. For the Mac system, select System Preferences -\u003e Network. If you installed HoRNDIS, then you will see a new network interface that matches your USB connectivity. Go back to System Preferences, click "Sharing" and select "Internet Sharing". Select the Internet connection (Ethernet or Airport) in "Share your connection from" and specify our USB interface in "To computers using". The Mac will assign your USB connection an IP address: 192.168.2.1.
At this point, the computer settings are finished. Now open the terminal emulator on the Android device and execute the command:
su
The following command is also entered in the terminal and works for all operating systems:
netcfg rndis0 dhcp
The name of the USB interface may be different, but usually it is rndis0 or usb0. We enter the following command to determine the interface:
busybox ifconfig
Everything, from now on, if everything went smoothly, the Internet should appear on your mobile device.
If DHCP for some reason did not work, then you can do everything manually. We open the terminal emulator on the Android device and execute the commands.


