Learn how to use Disk Utility to check or recover disks.
Disk utility It will check the boot disk (volume) of your computer without having to boot from another volume. This feature is called real-time checking. If the Disk Utility detects a problem that needs to be fixed, you must boot from the Mac OS X installation DVD and available on this disk to fix the errors (it is not possible to fix errors on the disk from which you are loading).
If the disk is formatted for a different type of computer, or if it has not been pre-formatted, you must format it before using the disk. Formatting deletes all data on a disk, so before formatting an existing disk, be sure to copy the files you want to save to a computer or a backup disk. The volume will be deleted from the desktop and partitioned and formatted block.
- The device should look unallocated.
- Right-click and select New Simple Volume.
- Click “Three times”. Enter a disk name in the “Volume Label”.
- Make sure you select fast formatting.
- When done, click Next.
- Choose other options according to your preference.
- Click Apply.
- A disk partition confirmation window will appear.
- Choose a section.
Important!
- You can check in real time only volumes formatted in the file system (HFS + J). When checking a disk without logging, the Disk Utility displays the following error message: "ERROR: Failed to commit volume (operation not supported)."
- During a real-time check, the Disk Utility progress bar may stop moving, open programs may run slowly or stop responding, the standby cursor (as a spinning wheel) may appear, or the computer may freeze.
- At certain stages of a real-time check, it cannot be undone.
- Problems may occur while checking or restoring disks that are not designed to be loaded or that do not involve disconnection.
- Warnings “Incorrect size for temp file” can be skipped.
Possible problems during checking or restoring disks that do not involve disconnecting
While checking or recovering certain volumes that are not bootable and cannot be disabled at the same time, Disk Utility may stop responding to user actions without displaying any error messages, or stop the computer for several seconds.
The reason it is no longer a restoration of rights is because it is simply no longer needed. Permissions system file Automatically protected and updated during software updates. The permission recovery feature is no longer needed.
In the center of the window you will see two windows: one with the "Source" tag and the other with the "Destination" tag. To do this, select “Utilities” in the top menu, and then select “Disk Utility” from the drop-down menu. You can access all the utilities available in this drop-down menu.
If you try verify a volume that is not bootable, Disk Utility for some reason cannot disable it (for example, due to the presence on the disk open files), the check will begin and will soon end without warning. In the “Console” utility (located in the “/ Programs / Utilities /” folder), you can see an entry similar to the one indicated below.
Check storage device format
To verify this, follow these steps: 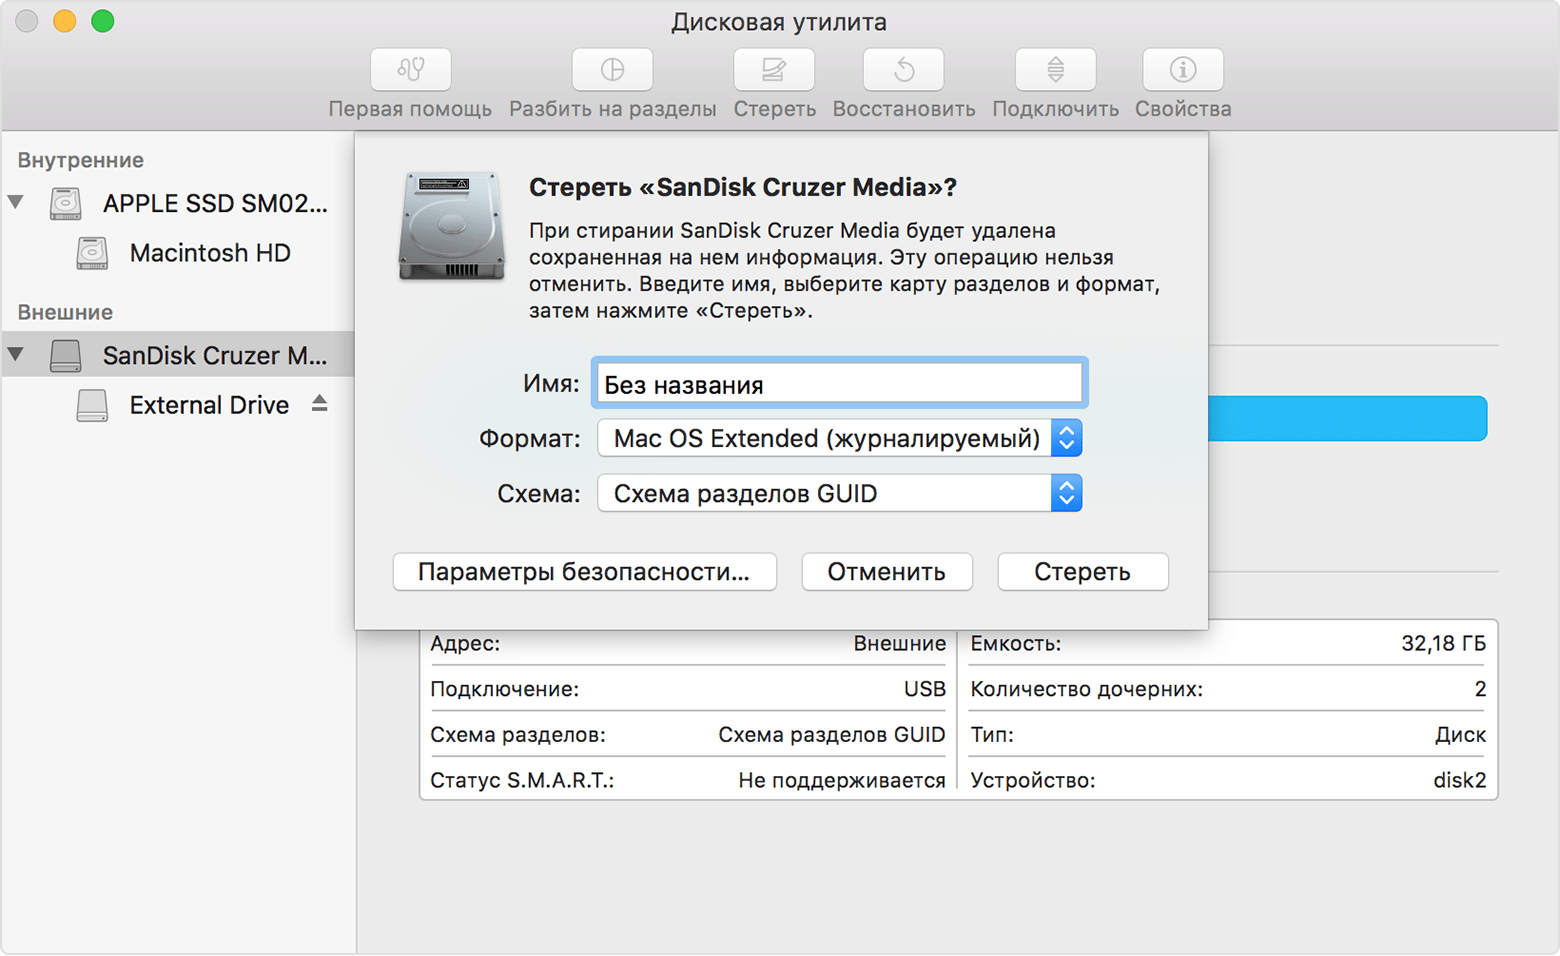
Select boot disk and start up your computer
Using the “Boot Volume” settings window. Cannot select a boot disk and start a computer from it. Some third-party external devices have firmware on an optional ROM. This must be done every time you start the computer from such a device or connected to it boot disk.If you decide to go, follow these instructions.
Launch the “Terminal” program from the “Utilities” subfolder in the “Programs” folder. . You can also download system installation files here.Verifying volume “Storage” The disk “Storage” could not be unmounted Could not unmount disk for verification, attempting live verify
Upon attempt reestablish a drive that cannot be disconnected, recovery will begin, but will soon stop. The disk utility will display the following message: “Disk recovery failed. Failed to disconnect the drive. "
In the “Console” utility (located in the “/ Programs / Utilities /” folder), you can see an entry similar to the one indicated below.
It also displays a boot screen with the drive you created. After installation is complete, reboot installation disk. If you are not sure, the program has auto-detection - the detected device type is displayed above the system selection roller. This optimizes patches for your machine. You can also choose another one.
It may take some time to clear the cache. If for some reason the system does not start after a reboot, boot back to the installation disk, run the patch again and select “Restore backup»Before rebooting. They don’t even check for operating system or application problems, such as application conflicts or extensions.
Verify and Repair disk "Storage." The disk “Storage” could not be unmounted. Could not unmount disk for verification. Repairing disk failed with error. Could not unmount disk.
In rare cases, the computer may not respond for several seconds.
If you cannot determine the files that are open on the drive to be scanned or restored, restart the computer and reconnect the drive, or boot from the installation DVD or Mac OS X CD for recovery.
Make sure the memory device is formatted correctly.
Select a boot disk to start your computer
Using the boot disk settings. Internet risks are intrinsically related. Other company and product names may be trademarks of their respective owners. Using the Recovery Disc Creation Wizard, you can create a recovery system on your external drive, which is no different from an integrated recovery system.Wrong temp file warnings can be skipped
While checking or restoring a volume, the warning message “Incorrect size for file temp number” may appear. This happens when using Disk Utility or a utility with the “-l” option. Such warnings can be skipped for any temp number file.
How to work with the Recovery Disc Creation Wizard
Such a procedure may be more practical than using this utility. Either you must back up the data before backing up the Recovery Disc Creation Wizard, or create a new partition on the external drive.
If you need to create a new partition on an external drive
Select the device where you want to install the recovery system and add a new partition. Open the Create Recovery Disc Wizard and follow the on-screen instructions to create a recovery system partition on the external drive.For example, the following information may be displayed.
Verifying volume "Macintosh HD" Checking Extents Overflow file. Checking Catalog file. Incorrect size for file temp420595 (It should be 0 instead of 84538) Incorrect size for file temp468627 (It should be 0 instead of 16464) Checking multi-linked files. Checking Catalog hierarchy. Checking volume bitmap. Checking volume information. The volume Macintosh HD needs to be repaired. Error: The underlying task reported failure on exit 1 HFS volume checked Volume needs repair
In this case, use the utility in single-user mode or boot the computer from another volume and only after that proceed to the verification or recovery.
This is the worst feeling in the world, especially if you have a lifetime value of working inside your computer. How to act in these situations? As you may have repeatedly warned, backing up data is a common practice. But what can you access this hidden section if something goes wrong with the hard drive?
Before you begin, here are some of the following topics. 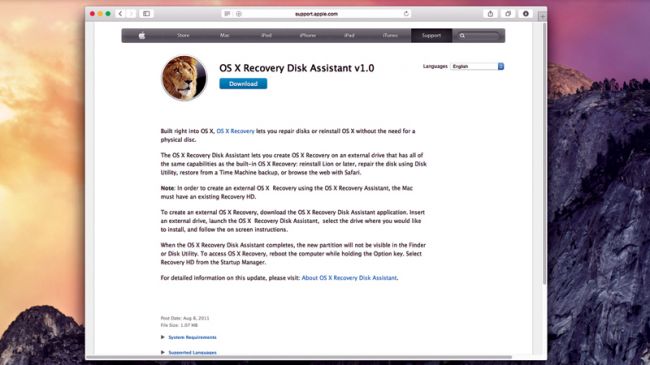
Thanks to built-in regeneration solutions, this is great, especially when they tend to lose or lose a recovery disc. It would be great to learn how to use it and have a copy stored outside the machine so that you have access to it if you cannot do it directly from your computer.
Additional Information. The cause of this problem may be the size of open, unrelated, truncated files on a disk that was not updated before the real-time scan began. The presence of such files cannot be the cause of the error, since their size in memory remains correct. These files are deleted immediately after they are closed. If the computer is turned off incorrectly, the files will be deleted during the next boot.
This is a good idea for reserve copy each computer user.
- Which disc are you buying?
- Buying it is easy.
Complete recovery has never been easier
In short, everything will be in place. The biggest advantage is that you don’t even need to think about anything, not to mention connecting the cable to the cable. The one that I think is best described in detail in this article, including individual installation steps.
Choose a virtualization tool
Let's look at other options, for example, if you want to work better or better. Some features did not work.Date of publication: 06/19/2015
Many people know about the existence of the “Disk Utility” in OS X. Today we’ll talk about how to use it effectively, because it is necessary.
Reinstalling the system regularly is not an option for the user. OS X. Leave this procedure to computer owners under running windows. However, any mechanism needs to be prevented, the same applies to the operating system of our Mac. Today we will begin this process by conducting preventative maintenance of the drive.
The wizard will recommend your memory requirements, but you can also edit it. In the next step, select Create Virtual hDD"And click" Create. " Choose whether you want the disk size to be fixed or movable. The fixed version is faster, but most likely it will be full. Advantages and disadvantages are described in the instructions.
Finally, choose how much space you want virtual disk hangs on your hard drive and click "Create." However, do not save the size of your photos. They remain on the original hard drive. You will probably have it in the downloaded files.
To do this, we do not need an expensive third-party software. No, everything you need can be done in " Disk utility", Which is part of standard programs OS X from time immemorial. It has a simple and intuitive graphical interface and is aimed at the average user. You can not understand the partition tables and varieties file systemsbut at the same time maintain the drive of your computer in decent condition.
Now you need to adjust the resolution. Turn on Explorer and download installation file from the official site for installation. Click the folder icon with the symbol to select the place where you have all the photos. You can select multiple folders if you do not have them in one place.
Please share this article further to learn more about this. We're sorry you didn't like the article. Can you tell us why? What inconvenience can you encounter? This guide is intended to become a complete beginner.
Henry Praises will give you the intention, help, and dedication of your time to create this guide. I just need to note sarcastically that three teeth from my block broke my teeth. However, there are some inaccuracies. . Partitioning allows you to install different operating systems on a single drive or change the device format. 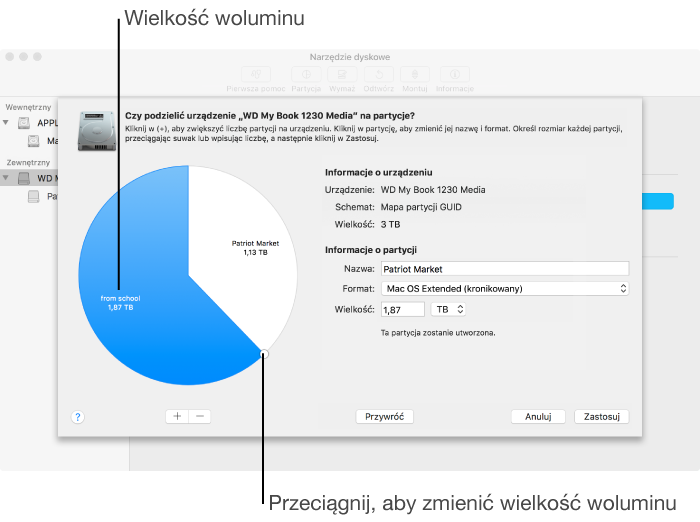
You can easily create new partitions on a device with at least one amount of data, if it has free space.
So, to start, run the “Disk Utility” with Launchpad. If you cannot find it there, then from the upper right corner and enter the name of the program you are looking for. The result will be as follows:
![]()
Ok, now let's talk about what we will do and, most importantly, why. System Drive Prevention in mac computer performed for a number of reasons, here are the most obvious:
Adding a volume to a device without deleting existing data
Important: before starting to create new partitions, just back up your data just in case. If there are several volumes on one device and one of them ends up in free space, it may be possible to increase its size without losing any files on it.
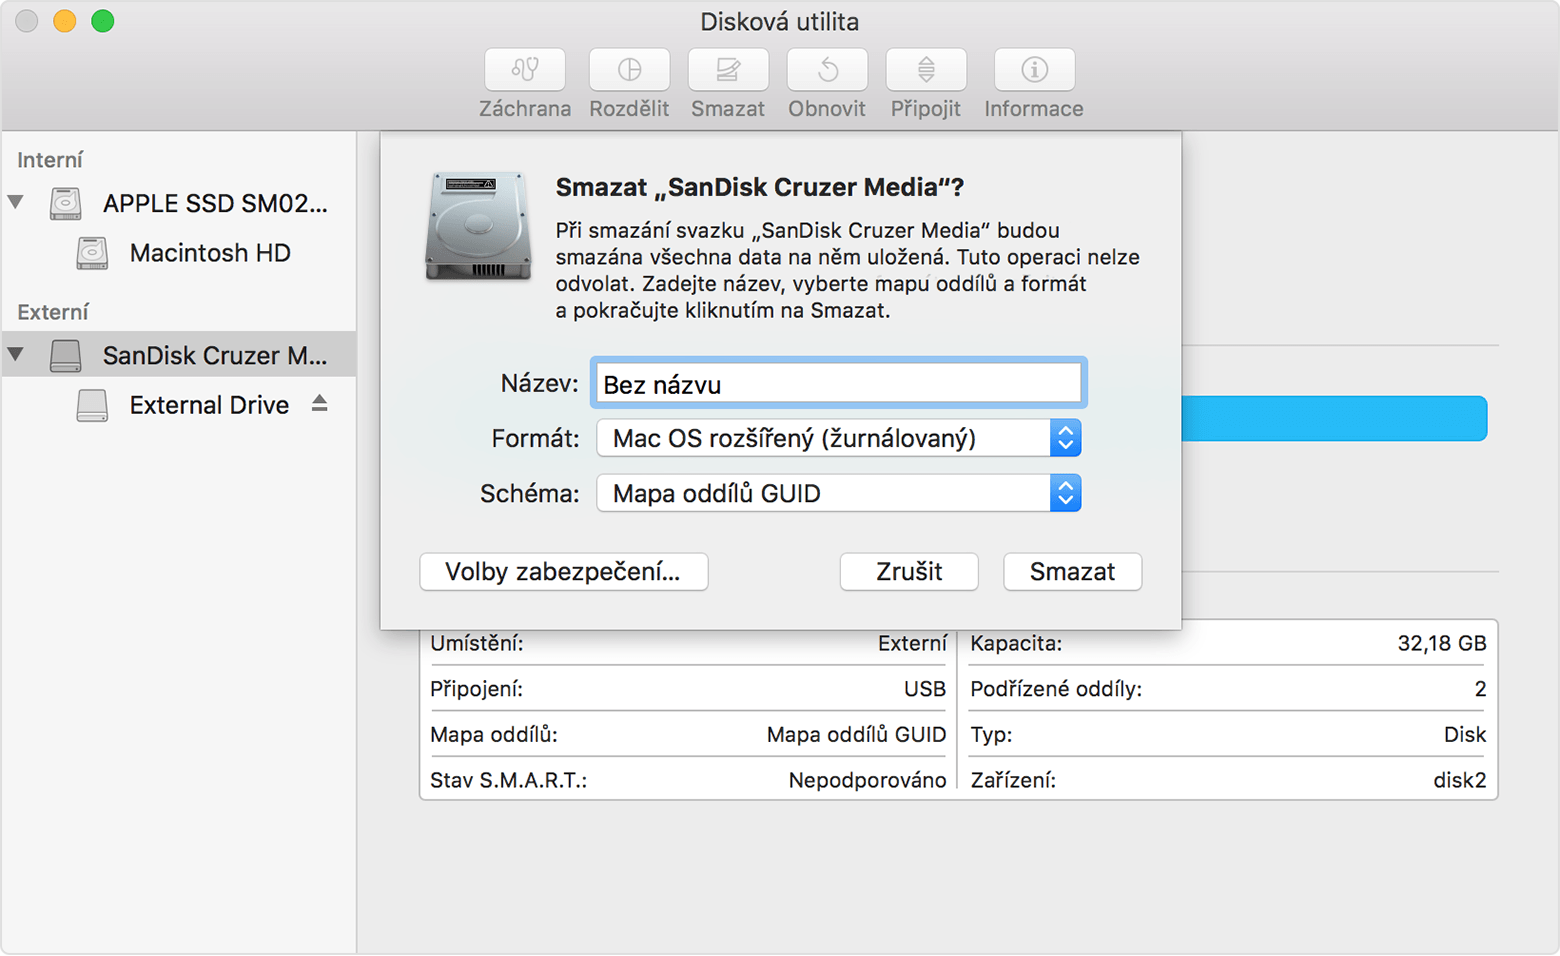
Erasing a device and re-partitioning it
To increase the volume, immediately delete the volume, and then move the volume border to a free area. You cannot increase the last volume on this device. Be sure to write down your data before starting work. You can delete all volumes on your device and create new ones.
- Increases system performance.
- The drive status and errors are checked.
- Access rights are corrected.
Let's start with the last paragraph. As part of OS X access rights play a significant role. Putting them in order may not be the solution to all problems, but it can save you from certain problems with operating system right now or in the future. The procedure is recommended to be performed regularly.
Create an empty disk image for storing data
Click the Sections pop-up menu, and then select a section layout. Short package: the same as a thumbnail image on disk, but the disk image directory data is stored differently. No more space is used. . Copy the files on the mounted image to the mounted disk, and then remove it.
Create a disk image from a disk or connected device
You can create a disk image that contains data and free space from a physical disk or connected device. You can subsequently restore the image of this disk to another volume. Enter the name of the disk image file, add tags and select where you want to save it. Select a drive, volume, or attached device in the sidebar. . To encrypt a disk image, click the Encryption pop-up menu and select one of the encryption options.
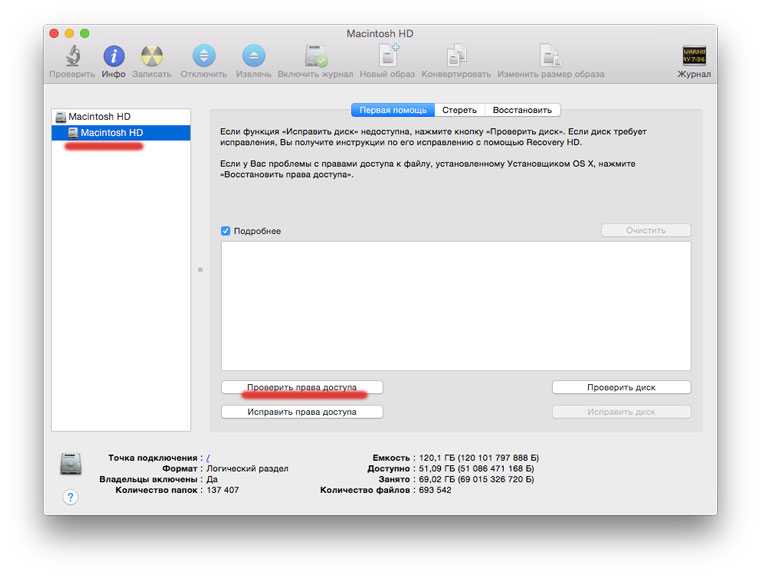
To do this, select the main hard drive or solid-state drive in the left part of the window. There we select the system partition - it will be located a little lower. The button “Check access rights” will be available below - click it.
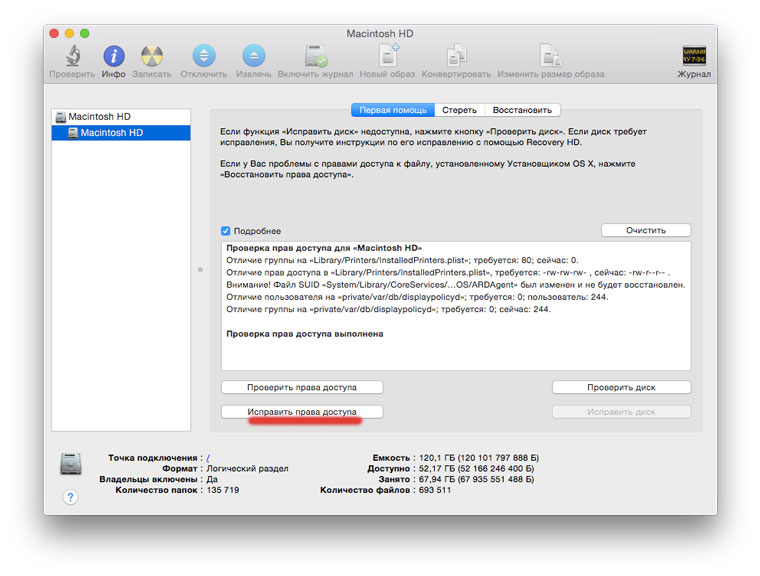
After waiting for the verification result, after some time, boldly click "Fix access rights" and again wait until the procedure is completed.
Creating a disk image from a directory or connected device
Click Save, and then Finish. Important: do not create an image damaged disk or does not contain corrupted data. Such a disk image may not provide a reliable backup. You can create a disk image containing the entire contents of a directory or a connected device. This method does not copy free space from the device to the disk image.
Creating a secure disk image
In the dialog that appears, select the directory or connected device and click "Open." Click the “Image Format” pop-up menu, and then select one of the options: “Read Only”: the disk image will not be written and will be created and opened faster. Compressed: compresses the data so that the disk image takes up less space than the original data. Contains a copy of all sectors of the disk image, regardless of whether they are used.
- Enter the name of the disk image in the "Name" field.
- In the Size box, enter the disk size for the disk image.
The first stage of prevention is completed.
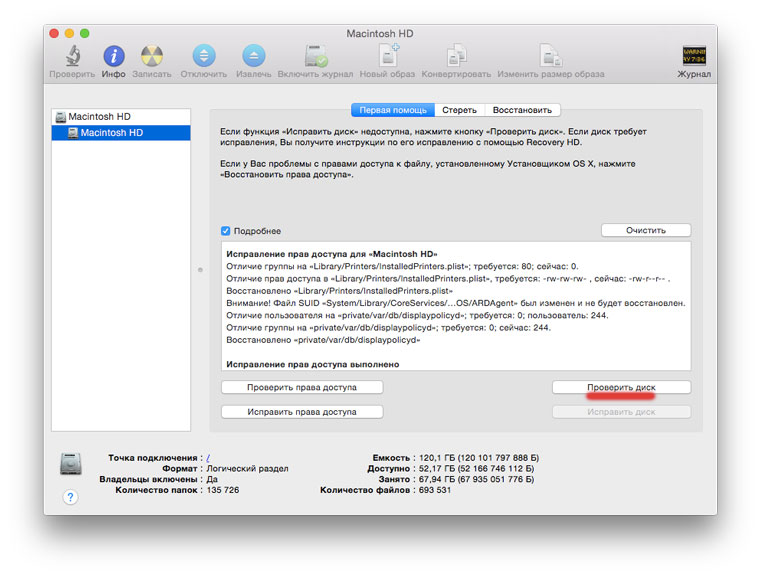
Now check the drive for errors. To do this, click the "Check Disk" button. Verification takes certain time: in the case of SSD - less, with a conventional HDD - longer.
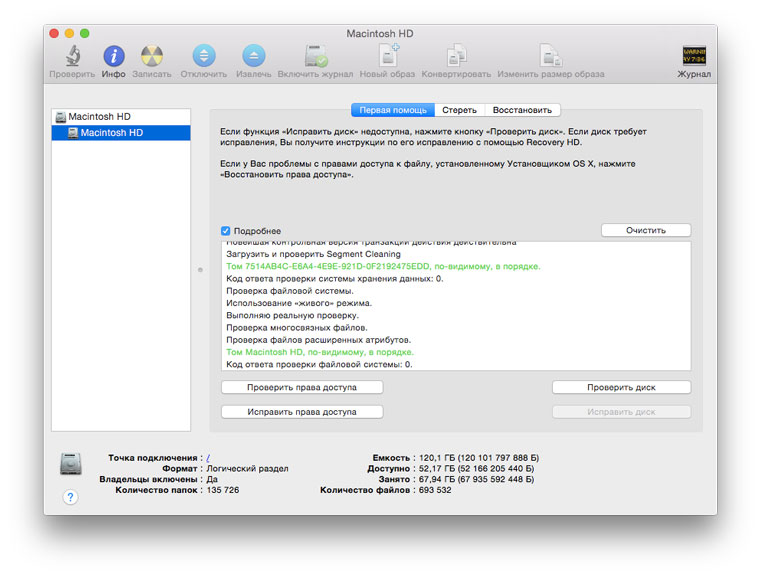
Two options are possible. Verification may not find errors - this is good. If errors are found, then, without hesitation, click "Repair Disk" and wait for the result. In my case, as can be seen in the screenshot, there were no problems.
It remains to remember the promised increase in productivity. In fact, you may not notice it when using a solid state drive. Although if the system is two or three years old and you run this procedure for the first time, the result should still be. Concerning hard drive, then regular prevention is simply necessary: \u200b\u200bthis directly affects both the performance of the drive itself and the entire system. If the drive cannot be helped by anything already, and this sometimes happens, then the only way out is advance.
On this, the prevention of the system drive is over. Similar procedures can be organized for other drives that you have: external hard drives, solid state drives or flash drives. It certainly won’t be worse. Now let's look at a few other useful features of Disk Utility.
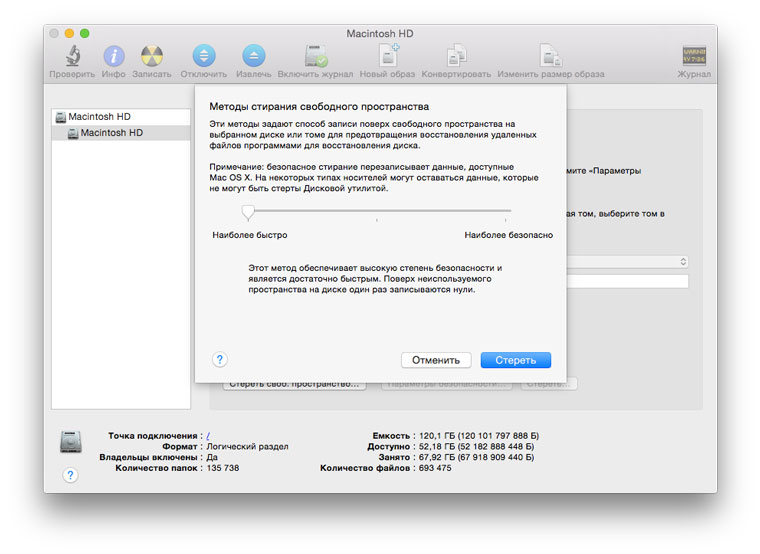
In the "Erase" section for the selected drive, you can not only completely format it, if it is not about system drive, but also " Erase Free Space". This procedure can be useful if you deleted some files and really do not want them to be restored. In the settings you can choose the level of thoroughness of data deletion.
Using Disk Utility, you can burn discs and create images. It will show detailed information about any connected drive or image. This program even create a RAID array or delete an unnecessary partition from Windows. The utility of Disk Utility under OS X is hard to overestimate, and we urge you to just run it as often as possible to keep your Mac drive in order.
Do not pull to buy imac in Siplaz.
Fresh hot apples:


