Setting up the TP-LINK TD-W8961ND modem is very simple. The instruction is suitable for other tp link models. Set up IP TV ZALA, Internet, WiFi. I will divide the procedure into three points: 1. Set up the Internet. 2. Connect WiFi. 3. Set up IpTv (Zala). I will conduct an example for the ByFly provider. .
Setting up the TP-LINK TD-W8961ND modem connect the Internet
Open any browser and enter:
- IN address bar browser write 192.168.1.1 and press Enter.
- In the window that appears, enter your username and password. Name- admin password- admin.
Let's move on to setting up the internet:
- Tab " Interface customization".
- Select item " Internet".
- Click summary and delete all PVCs. (select the channel after viewing, delete the button at the very bottom. After deleting the involved channel, select the channel pvc0-it and we will configure it).
- Ask your provider for VPI, VCI. I write 0-33 for ByFly.
- We set the PPPoE mode.
- We drive in the name and password that the provider gave or is written in the contract at the conclusion.
- We do as in the picture Rip2-b, img v2. Don't forget to click save. Here we set up the Internet for the Belarusian provider ByFly "Beltelecom".

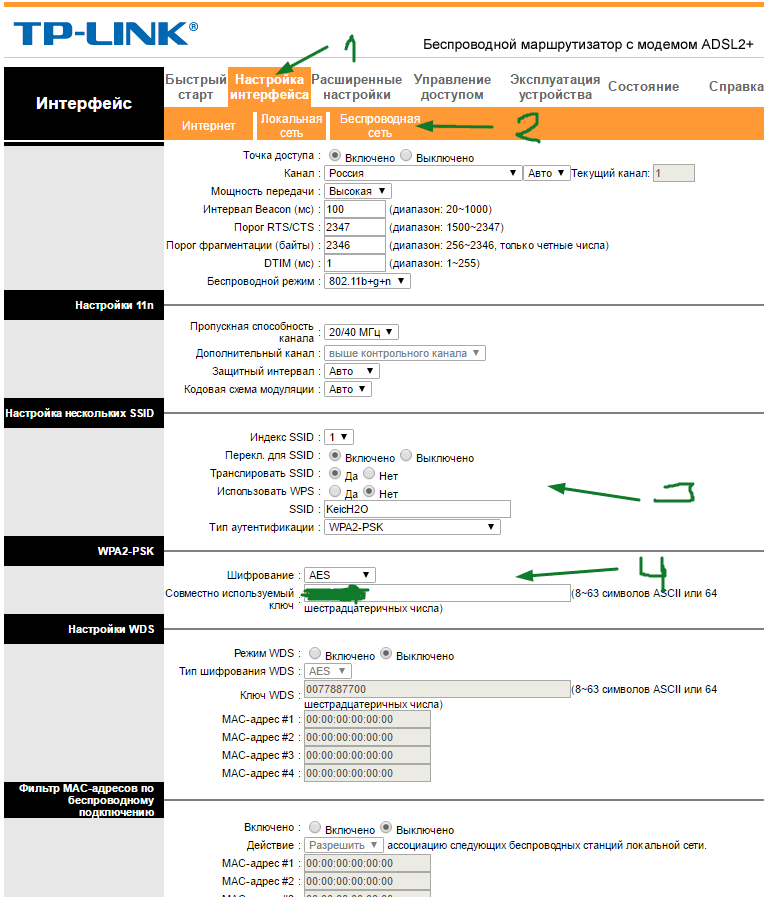
I'll start right away from the third point, set up according to the picture:
- 3. Enter a WiFi network name.
- 4. Create a password. Don't forget to save.
Here we set up WiFi for distribution from the router.
Setting up the TP-LINK TD-W8961ND modem (IP TV, ZALA-ByFly)
Let's go to the settings, as before we set up the Internet. Interface, Internet:
- Select a free channel PVC1. I want to remind you that pvc0 we had the Internet configured, we choose another one. Let's not forget state must be enabled.
- Ask your provider or google for your vpi. Depends on the region. Below I will add values for Belarus.
- Select bridge mode.
VPI/VCI values


Go to local network. You need to connect Zala to the modem and turn on the set-top box.
- We connected Ip Tv Zala, the Host Name "00100199 ..." appeared. You need to select the "mac-adres" of the halls in the DHCP table.
- Set static mode.
- Disable the fourth port.
- Set up as in the screenshot.

- Go to advanced settings.
- Click on VLAN.
- Enable the VLAN feature.
- Click on "Define Group".

Configuring VLAN ports for the Internet:

Configuring VLAN ports for Ip TV:

Back and poke" Assign VLAN PVID for each interface".

Now we need to assign a PVID. See, since we set up ports for Zala under the identifier "2". The virtual circuit is our PVC1. We put our index two for television. Do not forget that we also set two in the fourth port. And of course, for Bssid # 4, we set "2" in case of wifi on the TV.

The initial task when buying a new router is to properly connect it. There are five inputs for network connectors on the rear panel of the WR841N. The four yellow ports are used for cable connection devices (computers, laptops, TVs and other electronics equipped with an Ethernet connector). The fifth port is blue, it is necessary to connect the Internet to the router and distribute it further within the home network. Therefore, the cable that was pulled into the room by the provider must be connected to this connector. Next, it will be enough to insert the router into the outlet and press the power button.
For settings wifi router and TP-Link, you need to open any Internet browser and go to the device control panel. It can be accessed at one of the following IP addresses: 192.168.0.1 or 192.168.1.1. This combination of characters must be entered in the address bar of the browser. If you do not know which address is set as the standard one, you can check it on the bottom panel of the router. You can also use the generic tplinklogin.net address, which will automatically redirect you to the settings panel. The standard username and password are used to log in: admin.
If the system does not accept the standard login details for the TP-Link WiFi router control panel, they may have been changed earlier. You can check the current login and password with the company that provided the Internet connection and preliminary configuration of the router. If this is not possible, it is recommended to perform a factory reset. To do this, find the “Reset” button on the back of the router, which does not protrude beyond the case. Then press it with any thin oblong thin object (for example, a toothpick) and hold for about 10 seconds. After resetting the settings, there will be no problems with logging in.
Upon successful login, the initial status tab will be displayed. On it you can get acquainted with data about the Internet connection, current settings wireless mode(WiFi) and traffic statistics.

In most cases, no additional steps are required to connect to the Internet. The connection is established in about a minute after turning on the WR841N router with a cable connected to the blue input. You can check the status of the connection on the Status tab, in the WAN section.
If the connection is not established, then TP-Link setup you must specify Extra options. You can do this on the tab " Quick Setup”, and clarify the data themselves in your copy of the contract with the provider.

Select the type of connection specified in the contract or specified by the provider. If the connection type could not be found out, but you have a name account and password, click Auto Detect. The WR841N will scan the connection parameters and display the recommended connection type.

Determining the type of connection on the TP-Link router, as a rule, takes no more than 20-30 seconds.

After that, you need to enter your account information and click "Next". When the WR841N WiFi router is rebooted, an Internet connection will be established according to the parameters you specified.

Once the connection is established, any devices connected with the cable will be able to access the Internet through the WR841N. The order of the cable connection does not matter, despite the fact that the ports on the back of the device are numbered from 1 to 4. For example, you can connect a computer to port 2 and a TV to port 4 (it is not necessary to use outputs 1 and 2).
WiFi setup
The key step in configuring the WR841N router is to set the WiFi settings. To do this, open the first menu item on the "Wireless" tab. In the "Network name" field, you must enter the name under which the network will be displayed in the general list when searching for WiFi. Next - select your country in the regional settings. This affects the list of frequencies on which data will be transmitted. It is recommended to leave the "Channel" item unchanged, at the "Auto" value. With these settings, the router will independently select the WiFi transmission frequency, depending on the current load (occupation of certain frequencies by neighbors). It is also advisable to leave standard settings in the "Mode" and "Bandwidth" fields so as not to limit the maximum connection speed.
The checkbox "Enable wireless broadcasting of the router" enables data transfer via WiFi, when it is disabled wireless connection cannot be set, but the network and Internet access are maintained in wired mode. "Enable SSID Broadcast" makes the network name public. If you uncheck this box, your WiFi will go into the hidden networks category. To connect to it, you will have to enter not only the password, but also the name.

In the next step, open the "Wireless Mode -> Wireless Security" tab. By default, the Disable Protection option is selected in this menu. This means that your WiFi is open (no password is required to connect to it). It is recommended that you change this setting to "WPA-Personal/WPA2-Personal" and set a network password.
It is important to realize that encryption settings provide not only access to the network, but also the security of its use. Even if you don't mind strangers (neighbours, colleagues) using your WiFi, access without encryption carries significant risks. Information in open networks is transmitted in its original form. And this means that passwords, payment data and other confidential information will be available to any network user. For the same reason, it is not recommended to enter personal data when connecting to the Internet through public networks.
In the "Version" and "Encryption" fields, leave the "Automatic" values, and in the "PSK Password" section, enter the desired access key. The more complex the password, the less likely it is to be cracked in the event of a hacker attack. It is recommended to use letters in different cases (lowercase and uppercase), numbers and special characters.

In order to use the new settings, you will need to click on the link provided and confirm the reboot of the WR841N.

The TP-Link router reboot process takes about 30 seconds. After that, the setup page will be updated.

Security Settings
To make WiFi as secure as possible, it is recommended to disable the QSS feature. It allows you to connect any device without entering a password, within two minutes after pressing the WPS / Reset button on the back of the device. Although this option is convenient, critical vulnerabilities have been discovered in the QSS protocol, due to which you can get unauthorized access to the network. On this moment It is with the use of this function that the largest number hacking TP-Link routers. To change these settings, you need to go to the "QSS Function" tab, click the "Disable" button and reboot the WR841N router.

If you wish to continue using this connection method despite the risk of a hacker attack, you can change the connection settings or add a new device in the same menu program method. To do this, just enter the PIN code of the connected equipment or select the item "Press the button for a new device within two minutes" to activate QSS.

The next important option that ensures network security can be enabled in the Wireless -> MAC Filtering menu. When filtering is enabled, it can operate in two modes: "Allow access to stations specified in the list" and "Deny access to stations specified in the list". Select the required option and enable filtering. Changes will be applied after rebooting the router.

If you select the first option, you will be able to prohibit the connection of individual devices to the WiFi network distributed by this TP-Link router. To do this, in the "MAC address" field, you must enter a combination that can be specified in the next step. In the "description" field, write the name of the device that you understand, and change the status to "Enabled".

You can also choose the second option. When using it, only devices that are whitelisted will be able to connect to the network. As in the case of blacklisting, you will need to enter the MAC address and the name of the device, and select “Enabled” from the “Status” drop-down list.

Although this method increases security, it does not guarantee complete protection against hacking and connecting third parties to your WiFi. WiFi connection data can be intercepted and your device's MAC address can be extracted from it. After that, it will be enough for the cracker to change the address of his computer to the received one, and he will be able to enter the network.
You can check the MAC addresses of connected devices in the "Wireless Mode -> Wireless Statistics" menu. It contains only devices connected via WiFi. It also displays the statistics of work on various computers and gadgets (the number of received and sent packets). In addition to obtaining the addresses of your devices, this menu can be used to control unauthorized connections. For example, if the WiFi speed on your WR841N router has dropped and you suspect that someone else has connected to your network, you can check this in this menu.

You can change the address of the admin panel of the router in the item “Security -> Remote control". There you can also set a new port for connecting to TP-Link, but it is better to leave this setting unchanged. After saving the new IP address, you will need to restart your router.

After the configuration of your TP-Link WR841N router is completed, it is recommended to save the settings in separate file. You will be able to do this in the System Tools -> Backup copy and recovery." The configuration settings will be saved in bin format, and you can restore them through the same menu. Such a need will arise if in the future you make incorrect changes to the settings or they are accidentally reset using the “Reset” button on the rear panel.
Tutorial Video: The Easiest Way to Set Up Your TL-WR841N Router
Modern mobile devices have ceased to be exclusively a means of communication, most of them are multifunctional devices that can connect to the Internet using the built-in Wi-Fi module. Indoors, wireless connection to global network"Internet" is provided through routers.
A good solution for getting high-speed Internet with a wide range are TP-Link Wi-Fi routers. They are easy to use and allow you to get rid of unnecessary wires in the house, providing access to the Internet to several people at once. mobile devices. But for this you need to know about the rules for using the device, it is possible to connect a TP-Link Wi-Fi router yourself, you just need to use our step-by-step instructions. In this article, we will talk about correct connection router to a PC with subsequent configuration.
How to connect to PC?
After purchasing a TP-Link modem, you need to open the package and check the kit for compliance with the description in the documentation. In addition to the device itself, the box should contain a power supply, cables, a software disk and instructions.
After making sure that the device is fully equipped, you should choose a suitable place for its installation. In any case, it should be close to the computer, as the LAN cable is short. If necessary, you will have to buy an additional long cord. In principle, this is not a problem, because. it is inexpensive and is sold at every outlet of electrical engineering and accessories.
Before connecting the router, it is important to familiarize yourself with its connectors and buttons. There are several of them:
- power button;
- connector for connecting the power cable;
- WAN connector, designed to connect the router to the Internet;
- LAN connectors - there are several of them (mainly 4) and are designed to connect computers via a network cable;
- off/on QSS option button;
- button for resetting settings.
Once you figured out the purpose of the connectors, you should connect one end of the power supply to the router, and the other to the power outlet. The Internet wire provided by the provider is inserted into the WAN socket (i.e. access to the Internet is provided). Typically, the WAN connector on the device is highlighted in blue. One end of the LAN cable is connected to the router (any of the four ports can be used), the other end is connected to the corresponding socket on the computer.
Setting
Even if we are dealing with a completely new TP-Link router bought in a store (where it can be tested by employees of the outlet), experts advise you to first reset the installation to factory settings.
After a reboot, you can go to step by step setup router. For this, it is necessary to personal computer open a browser and enter the numbers 192.168.0.1 in the address bar. or 192.168.1.1 (selection based on the firmware version) and press "Enter". Next, the Setup Wizard page will open.
First you need to write the username and password (admin) in the appropriate columns.
It is better to change the password, which will protect the TP-Link router from unwanted use of your Internet by neighbors (especially if you live in an apartment building).
In the case when the provider uses Dynamic IP, or the router is connected via a modem, then after connecting it, the Internet on the computer and other devices can work immediately. But even in this case, you will have to configure Wi-Fi and install a new secret code.
To do this, you need to enter the tab, System Tools, by clicking on it, and click on Password. In the fields of the old password and login, you need to register admin, and New Password and enter the login in the appropriate fields (New Password and User Name). Changing the User Name is optional, only the password is important. After entering new data, you must confirm the actions by clicking on Confirm New Password. Next, to save the updates, click on Save.
As experts advise, on the settings page, you should update the firmware by downloading latest version. This is done through System Tools, clicking on it, go to Firmware Upgrade. Next → "Overview" → open the downloaded firmware file for the TP-Link router you are using, downloaded from tp-linkru.com. Then you need to go to Upgrade. Note that licensed firmware can be downloaded for free only from official sources.
The next step is to set up the Internet in the TP-Link router. This is done using the Network and WAN tabs. First you need to select the type of network, information about this can be obtained using the Hot-line provider, whose Internet you are using. Selecting the type of network requires saving (click on Save).
Wi-Fi network setup
To start setting up Wi-Fi, go to the Wireless tab. We write the name of the network in the Wireless Network Name column. Additionally, you can enter a country in the column below. All changes made must be saved by clicking on the Save button.
To protect a wireless connection from someone else's access, you need to go to the Wireless Security system and come up with a secret word that is not easy, but memorable for you, enter it in the PSK Password field. After saving all the changes, the device should be rebooted by clicking the Reboot button in System Tools. This action, like the rest, requires confirmation.
And so, connecting the Wi-Fi router TP-Link consists of the following basic steps:
- Enter the "Setup Wizard" tab;
- Change Password;
- Firmware update;
- Network selection;
- Wi-Fi setting;
You may find video instructions more convenient:
After completing all the above steps, you can easily configure the router yourself, thereby saving time and money on the services of a wizard.
In this guide, we will show you in detail how to set up a TP-Link router. The TP-Link Wi-Fi router is available in several versions, and for writing this article, we used the TP-Link WR841 N router version as an example. However, this instruction is quite suitable for the following models: TP-Link TL-WR740N and TP-Link TL -WR741N. You should not close the page, even if you have a TP-Link WiFi router of a different modification. In any case, there will be no significant differences, so we read the article and repeat all the steps according to the instructions.
As for connecting the TP-Link router, the scheme here is standard: We connect the router to the mains, insert the cable from the Internet provider into the WAN port, connect it to the LAN socket network cable from a computer.

You can read more about the general rules for installing and connecting a router of any model. So, there should be no questions regarding the connection, so we can immediately start setting up the TP-Link router.
Setting up a TP-Link router
Before setting up a TP-Link router, it is advisable to reset the existing settings. This is done quite simply. Each router has a special button for resetting the router settings "Reset". We press this button and hold for about 30 seconds, after which the router should reboot and the settings will be reset.
Now you can start configuring the router. To do this, you need to get into the web interface of the router. To do this, open any browser and enter 192.168.0.1 in the address bar. If the login failed, try to enter 192.168.1.1.
Note: The login address to the router interface may differ depending on the firmware installed on the device. Usually, initially, entry is made through 192.168.0.1, and after a firmware update, through 192.168.1.1.
After going to the above address, a window will appear in front of you in which you need to enter your username and password. For TP-Link routers, the default login is “admin” and a similar password. If the default password and login are not suitable, then look at the documentation of the router, it will definitely contain all the necessary information. Also, information for entering the settings web interface is available on the sticker on the bottom side. WiFi router.

So, after entering the login and password, click "send" and get into the web interface wifi router, here we will perform all the necessary settings. First of all, we need to update the TP-Link firmware to the latest version. Before downloading the firmware, you need to determine the hardware version of our router. It will be listed on the back of the router.

In our case, the version "Ver: 7.2" is used, therefore, we need to download it. You may have a different hardware version, but the essence of this does not change. We go to the site http://www.tp-linkru.com and enter the model of our Wi-Fi router in the search bar on the site, as mentioned earlier, our instruction is based on the example TP-Link router WR841 N. You enter your model in the search and click find. Select the appropriate model from the list. Next, look for the "Downloads" tab, go to it. Now we need a section " Software”, where you need to select the item “Firmware”. Here we look for the hardware version of your device and download the first firmware in the list. Unzip the firmware file to the computer and return to the wifi router settings menu.
Now we need to install the latest firmware we just downloaded. To do this, go to the "System Tools" section and select the "Firmware Upgrade" item. Now click "Browse" and specify the path to the firmware file, then click "Upgrade". Next, the router will automatically update the firmware and you will be on home page web interface.

Now you can proceed to the basic settings of the TP-Link router. Let's start by changing the login and password to enter the router settings. To do this, open the “System Tools” section, select the “Password” item and enter the desired data, then click on the “Save” button for all settings to take effect.

How to set up Internet on a TP-Link router
Half the job is done. Now you need to complete the network settings. To do this, we are looking for the “Network” section in the main menu of the interface, after which we select the “WAN” item, where we need to select the type of network. The type of connection depends on which ISP you use. To know necessary information can be in an agreement with the provider or on the official website of the service provider.

After selecting the network type, go to the "MAC Clone" tab, where you need to select the "Clone MAC Address" item and click the "Save" button.

How to set up a Wi-Fi network on TP – Link
In principle, the Internet should appear after performing the above steps, however, we recommend that you also configure WiFi networks. To do this, look for the “Wireless” section and in the “Wireless Network Name” field indicate the desired name of your Wi-Fi network.

We save the settings and go to the "Wireless Security" section. Here we need to configure the security settings of our Wi-Fi network, that is, come up with a password. In principle, you can not change anything, but then anyone can connect to your Wi-Fi network, so it’s better to set a password anyway. To do this, enter the desired password in the PSK Password field.


If everything is done correctly, then there should be no problems with Internet access. Now you know how to set up a TP-Link router, if you have any questions, ask them in the comments or in the "ask a specialist" section.
The tl link tl wr741nd router is an N series wireless router for creating a small home network in a relatively low price. Despite the fact that this model is already more than 7 years old, the WR741ND router is still actively distributed in the network equipment market.
At the same time, the WR741ND router not only received its recognition from Russian users, but also received a number of international awards.
This model is ideal for those who need to create a relatively small home network, paying a little more than a thousand rubles for it.
tp link tl wr741nd router: features and specifications
The tp link tl wr741nd router provides the following features: 

It is worth noting that for its time, its capabilities are more than impressive.
Brief overview of the tp link tl wr741nd router
The body of the router is made in white with a black indicator panel, which provides the following information:

- - POWER. This is a power indicator that glows solid green when the device is working correctly.
- - "SYS" (system parameters). If the indicator is off, it is possible system error, blinking – the device is working correctly, “on” permanently – operation in the initial parameters mode.
- - WLAN. Provides job information wireless network, can be in two states: on - the indicator is blinking, off - the indicator is off.
- - "LAN 1/2/3/4". Informs about the physical connection of the router to other network devices.
- - WAN. Informs about the connection status of the ISP's Internet cable.
- - "Qss". This is an analogue and also serves to connect devices to a wireless network. If the indicator blinks slowly - the connection to the network is in progress (the approximate connection time is two minutes), blinks quickly - the connection has failed, if it just “on” - the connection has been successfully completed.
Connectors and ports for connection are located on the rear panel of the case. network devices, namely:

- - RESET. The button is designed to reset the device configuration to the default settings.
- - POWER. Connector for connecting the power adapter supplied with the device.
- - ON/OFF. To enable/disable (reboot) the router.
- - "LAN 1/2/3/4". These connectors are designed for cable connection to the router of network devices.
- - WAN. Port for connecting to an ISP or DSL cable.
- - Antenna. Used to broadcast and receive a wireless signal.

How to connect tp link tl wr741nd wireless router?
Installing and connecting this router is not a difficult matter:
- 1. To connect, you will need broadband Internet access - this can be a DSL or Ethernet cable.
- 2. Install the router in the selected location, while taking into account that for correct operation device required:
Lack of direct sunlight;
There should be no strong heat sources in the immediate vicinity (heating radiators, heaters, etc.);
The temperature regime should be from 0 to 40 degrees Celsius;
The installation site of the router should be well ventilated.
- 3. Next, and connect the provider's cable to the "WAN" port.
- 4. Connect the power adapter to the router and turn it on.
Next, you will need to configure the Internet connection, and for this you need to go to the router interface. To enter the tp link wr741nd router in the address bar of any Internet browser, enter 192.168.0.1 (in this case, the login and password to confirm the entry are admin).

Setting up an Internet connection on a tp link tl wr741nd router
To set up an Internet connection, go to the "Network" section and do the following:
Open the subsection "WAN" and in the first line "Type of WAN connection" select one of the proposed options - according to the data provided to you by the provider:
"Dynamic IP"

Almost all fields remain unchanged, with the exception of " DNS servers» (Primary or Secondary) - respectively, if this data was provided to you by the provider.
"Statistical IP"

Here you will also need to specify the “IP address”, “Subnet mask”, “Main gateway” - all this data is indicated in the contract with the provider.
"PPPoE"

When choosing of this type connection, you must enter the authorization data provided by the Internet service provider - this is the "Username" and "Password" (indicated twice), as well as:
- - "Secondary connection", "Dynamic IP" or "Statistical IP" - if the provider provides such an opportunity.
- - "Connect on demand". During the period of network "inactivity", the connection is terminated - until the moment of accessing any network resource. If not required, enter "0" in the "Maximum Downtime" field.
- - Connect automatically. If an internet connection error occurs, recovery occurs automatically.
- - “Connect according to the schedule”. The connection is made automatically at the specified time interval.
- - Connect manually.
There is also a section with additional settings, which includes the following parameters: "MTU size" (default 1480 bytes), "Service name", "Access point name", "Interval online tracking” and “DNS servers”.
"Cable BigPond"

Here, in addition to the above settings, you will need to enter "Authentication Server" - the IP address of the authentication server or host name and "Authentication Domain".
When the configuration of the tp link wr741nd router is completed, click on the "Save" button.
tp link wr741nd router: wifi setup
For settings WIFI networks on the tp link wr741nd modem, go to the "Wireless" section and open the "Wireless Settings". This subsection requires you to specify five parameters, namely:

- - Network name. It is also "SSID" - the name entered in this line will be seen by all users connecting to the network.
- - "Region". The default is Russia.
- - "Channel". This is one of the most important parameters necessary for the correct operation of the wireless network. You can select either the “Auto” value or the channel number from 1 to 13. If it is possible to determine the channel occupancy (using any convenient utility), do it and select the most free channel.
- - "Mode". Best Option will select "11bgn mixed" because it is not known exactly which standards the devices connected to the network support.
- - "Channel width". Can be left unchanged in Auto mode.
Select one of the security modes: "WEP", "WPA-Enterprise", "WPA2 - Enterprise", "WPA - Personal", "WPA2 - Personal":

Select the type of encryption in the line of the same name - "AES" or "TKIP";
Think up and enter a password in the "PSK Password" line.
In conclusion wifi settings on the tp link wr741nd router, click save.
How to set up IPTV?
For IPTV settings you only need to go to the subsection of the same name in the router interface, select the "Bridge" mode and specify the port number to which the TV set-top box is physically connected.

Additional features of the tp link tl wr741nd wireless router
It is also worth paying attention to the "Access Control" section, which has 4 subsections: "Rule" (the main point in this section), "Node", "Purpose" and "Schedule".

This section is designed to control the devices connected to the router and the use of traffic, as well as the flexible configuration of rules:
- “Rule” - in this menu, an “Allowing” or vice versa “Prohibiting” rule is created.

- "Node" - to view and edit the list of nodes.

- "Goal" - viewing and editing the set goals.

- "Schedule" - to edit the time interval for applying the rule.

Summing up, it is worth noting that the TP-link WR741ND router is an excellent option for creating a high-quality, stable home network.