Download:
Download: (Password on archive: 12345 )
Huawei Terminal- a terminal program for direct work with Huawei wireless modems, as well as (limitedly) with any other modems.

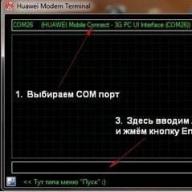
We launch. Select in the window HUAWEI Mobile Connect - 3G PC UI Interface Click To plug (Connect)

To be sure that you are really connected, type the command AT and click send: If in response from the modem OK. So you did everything right and everything is ready to work with the modem.

AT^CARDLOCK="NCK Code", Where NC Code 43963141 AT^CARDLOCK="43963141". Paste the command AT^CARDLOCK="43963141" and press the button ENTER keyboard.
Download: (Password on archive: 12345 )
DC unlock client the first program in the World that began to specialize in unlocking wireless 2G \ 3G \ 4G modems of the USB \ PCMCIA form factor. Over time, the lineup began to expand with mobile phones, smartphones, WiFi routers.

Downloading the program DC unlock client and install it. Then we launch.
1.
Next, change the language to Russian. Click Options and choose Russian

2. We choose the manufacturer of the modem or router in our case, this is Huawei. Click on Lupu as shown in the picture and reading information will go. Attention! the native program from the modem must be closed). After reading the information you will see SIM lock status - Blocked

3. Next, we need to run the command AT^CARDLOCK="NCK Code", Where NC Code is the unlock code you purchased from us. For example code 12860791 then our command will look like this AT^CARDLOCK="12860791". Paste the command AT^CARDLOCK="12860791" at the bottom of the read information and press the button ENTER keyboard.

4. After clicking on ENTER the code will be entered into our device and a message will appear OK

5. Click again on Lupu to reread the information. And you'll see where SIM lock status- inscription Unlocked

That's all. Our device has been successfully unlocked.
AT^CARDLOCK="NCK Code"– Entering the unlocking code (8-digit number). NC Code is the unlock code. Command example AT^CARDLOCK="12345678"
In its work, any modem uses a certain set of procedures or specific commands that have been universal since 1977 and have not changed since that time, but only supplemented with the advent of new communication standards. Using commands, you can configure the modem, unlock it, check its performance, and for other purposes.
The history of the emergence of AT commands
The AT command is an abbreviation for the English word attention (attention), which was proposed by Hayes when developing their own Smartmodem 300 baud modem. The use of a short set of text commands in a special format was so successful that it became the standard for other manufacturers. This standard is described in a special document from the International Association for Telephony and Telegraphy and has been issued several times with additions and explanations.
With the advent of the GSM communication standard, manufacturers did not abandon such a successful solution. A standard for AT commands was developed that describes the operation of modems in the GSM07.05 and GSM07.07 modes. Many communications equipment manufacturers may use their own proprietary AT commands, but these commands only extend the capabilities of the standard commands when specific functions are needed.
Connecting to a modem and entering commands
In order to be able to control the modem through commands, you need to connect to it. Connection can be made in several ways:
- through a Windows utility called "Hyperterminal";
- through the terminal for operating systems of the *nix family;
- using special programs provided by modem manufacturers, such as "My Huawei Terminal" or "Huawei Modem Terminal" for Huawei modems;
- through programs from independent developers, for example, the program "Terminal" or "PuTTY".
To connect a terminal shell to a modem, you need to know which port is used by the modem and what is the data rate on the port. For Windows operating systems, such information can be obtained as follows:
- right-click on the "My Computer" shortcut and select properties;
- a new window will open in which you need to click the "Device Manager" button;
- in the list of installed devices, find the desired modem and display its properties;
- on the "Modem" tab, the necessary information will be displayed, such as the COM port and speed.
This information should be memorized or written down. For USB modems, the connection through the COM port will be virtual, through the emulator, but this will not affect the connection.
Next, you need to run the terminal emulator program and connect to the modem using the already known parameters. It is worth noting that the HyperTerminal program is present only in Windows version XP or earlier. In older versions, for example, in Vista or Seven, you will need to download it from the Internet. After a successful connection to the modem occurs, a notification about this will appear in the prompt line. AT commands on the modem are only entered when the modem is in terminal mode or offline. The input is as follows:
- Each command must be preceded by the AT prefix, as if it tells the modem that the command will go on.
- The prefix is followed by a connecting symbol "+", "&" or "^".
- At the end, the command itself is entered with parameters.
- Input is completed by pressing the "Enter" button on the keyboard or "Send" in the terminal window.
To check whether the modem accepts commands and whether there is any reaction to the input, simply send it "AT" without parameters. The following lines should appear in the terminal window (depending on the modem, they may differ, but the general principle of the output does not change):
Status/Receive: OK
If the output is approximately in this format, then you can work with the modem by entering commands. If a mistake was made in some command, the modem will report this with the corresponding status.

Setting up a Huawei modem using Hyperterminal
AT commands for huawei modem are based on common standards and differ only depending on the modem model. Those. some modems may have commands that are not available in others. Setting up a modem is necessary in some cases, for example, when used in conjunction with routers, when there is a conflict between equipment operation with each other, or to unlock a modem purchased from an operator and working only with its SIM cards.
When connecting a modem to a computer, the modem is defined as three devices: the modem itself, the CD drive (virtual), and the memory card (not for all modems). For more comfortable work, you can disable CD-Rom and Flash-card emulation. Step by step instructions how to do it:
- Launch the Hyperterminal program.
- At startup, the program will prompt you to enter a new connection name and icon. Any convenient name is entered.
- If you are not automatically prompted to create a new connection, then this is done through the "File" menu.
- The next step is to select connection parameters: port number and port speed.
- After connecting the terminal to the device, enable modem mode only with the command:
- AT^U2DIAG=0 for Huawei E1550 and E1750 series modems;
- AT^SETPORT="A1;1,2" for E367, E352, E392, E353 and E171 series modems;
- AT^SETPORT="A1;1,2,3" for modems E369, E3131;
- In order for the modem to reboot without the need to disconnect it from the computer, execute the AT ^ CFUN = 1 command.
Now the device will work only in modem mode, which will eliminate many of the problems of sharing with routers.
Very often there is a need to "untie" the modem from working only with a specific operator or unlock it. For this, there is also a direct possibility by performing AT commands on the modem. The unlock commands are as follows:
- AT^CARDUNLOCK="nck md5 hash" to reset connection attempts to 10;
- AT^CARDLOCK="code nck" to unlock the operator. This code can be calculated using a special calculator based on IMEI;
AT^CARDLOCK? checks the lock status. In response to a request by this command, the modem will return information in the CARDLOCK format: A, B, 0, where A is the lock status in binary format (1 - there is a lock, 0 - there is no lock), B - the number of remaining attempts to unlock (for a new modem, this number of attempts is 10).
Basic AT commands and commands for Huawei modems
In practice, the following commands are very often used, which are informational, control or configuration commands:
- ATI - the command displays complete information about the modem.
- AT^CFUN=1 is a very practical command that allows you to apply settings and reboot the modem without disconnecting it from the computer. After the device is rebooted, it will initialize and re-register on the network. The remaining parameters of this command are as follows:
- 0 - power saving mode or standby mode;
- 1 - online mode;
- 4 - offline mode;
- 6 - device reset;
- 7 - turn off the radio module.
- AT^CLAC is a no less useful command that displays all AT commands supported by the modem on the terminal screen, and AT^CMDL informs about all AT commands.
- AT^VERSION? - shows the modem firmware version.
- AT^GETPORTMODE - gives information about all devices present in the modem, such as a virtual optical drive, drive, modem, network card, etc.
- AT^U2DIAG? - shows the currently set mode in which the device is operating.
- AT+CGMI - display information about the modem manufacturer, for example, huawei.
- AT+CGMR - shows the modem firmware version.
- AT + CIMI - gives information on the SIM card, namely its IMSI number.
- AT+CGSN - you can see the IMEI of the modem.
- AT^HWVER - shows information about the hardware of the modem, shows its revision.
- AT+CSQ - informs about the current level of the received signal from the operator.
- AT+CGMM or AT+GMM - gives information about the modem model name.
In order to get information about all available operators, you need to enter the AT+COPS? command. The screen will display information in the following format:
- Modem operation mode for operator selection: 0 - automatic, 1 - manual, 4 - automatically, if manual connection failed.
- The operator format can be output in long or short mode, or network operator number mode.
- Network availability information: 0 - unidentified network, 1 - available network, 2 - current or connected network, 3 - network unavailable or blocked.
This is far from complete information about modem AT commands and options for their use, for more details you can read the specification or contact the modem manufacturer specifically to be sure which commands and with what parameters are used in the modem.
Introduction to AT Commands
Technically, a modem is a kind of computer containing a microprocessor, read only memory, and the like. It should be noted that in terms of "computing power" modern modems are comparable to computers of a decade ago, for example, ZyXEL modems use the Motorola 68000 microprocessor, the same one that served as the "heart" of the first Apple Macintosh computers, Amiga and even workstations from Sun Microsystems of the first generation . Today's technical innovations have also found their way into modems: for example, the increasingly popular USRobotics Courier modems (and not only them) contain flash-based ROM, which allows you to upgrade control firmware on the fly. But still, it is important for the user not what chips are installed in the modem, but how it works:
speed and reliability of data exchange, as well as compatibility with modems from other manufacturers. To find out these parameters, as a rule, you do not need to disassemble the device - just look at the standards it supports.
High-level standards include the so-called hayes commands, or AT commands. They allow you to control the modem almost directly: change the value of the registers, dial a phone number, and much more. So, for example, the command ATDP123-45-67 means that the modem should call the telephone number 123-45-67 using the pulse dialing system standard for Russian PBXs, and the command ATN indicates the need to break the link. It is easy to see that these commands begin with the prefix AT, true for almost the entire specified set, which gave one of the names to the standard.
For the first time, such a command system appeared in the Smartmodem modem, released by the company Hayes(reason for appearance another name) and quickly became the current standard in the industry. After some time, it was significantly expanded, but the basic core that performs the necessary functions has been preserved.
Modem commands
The modem supports standard and extended sets of Hayes commands. The AT (Attention Code) prefix may be followed by one or more commands. These commands are written in industry standard language and allow you to communicate with the modem. Your modem is always in either command mode or direct control mode (online mode). As soon as you turn on the modem, it goes into command mode. This means that AT commands can only be sent to the modem when it is in command mode. Entering commands in the modem's direct operation mode is recognized by the modem itself as data input. However, AT commands can also be loaded into the modem in terminal mode using the appropriate software.
Any AT command entered into the modem automatically remains in it until it is unloaded from it or the modem is turned off.
Command line for AT commands
All AT commands, with the exception of two, must begin with characters. The exceptions are the escape sequence +++ and the repeat command /. The command line prefix (AT characters) is not case sensitive. You can enter one or more commands on one line. In the latter case, all commands may be separated by spaces, which are ignored by the modem through its AT command interpreter.
You can enter up to 39 characters on the command line, including A and T excluding spaces and carriage returns. If you enter more than 39 characters, a syntax error message will appear on the screen.
AT command confirmation
Most AT commands typed on the command line are immediately acknowledged by the modem. As soon as you enter the last character of the command and press a carriage return, the modem will respond with a short message: OK
Basic AT Commands
The following basic AT commands are only available when your modem is in terminal mode.
AT
All but two of the AT commands begin with this prefix.
D
Dial the number. You can use this command to dial a phone number directly from the command line. The command format is the following:
ATD
The string parameter can contain up to 45 characters. Do not use parentheses or hyphens here.
ESC sequence. This is one of two commands that are not used in the AT prefix. After connecting to another modem, you may need to return to command mode. To do this, you must type the + symbol on the keyboard three times in a row. After that, the modem will reply with an OK message and you will return to command mode again.
A/ Repeat. This command does not use a prefix AT and you don't
press carriage return. Entering this command causes the modem to repeat the last AT command entered. A very useful command for redialing a phone number.
&Fn
Initial settings. This team (n=0 or n=1) returns all modem parameters that were set in it by the manufacturer.
H
Hang up the phone. This command sends a signal to the modem, after which the line is disconnected.
ABOUT
Online mode with a modem. This command returns the modem to direct control mode. Typically used to resume communication after entering the +++ escape sequence.
Zn
Reboot modem. This team (n=0 or n==1) reboots the modem and returns it to the settings that are stored in the so-called flash memory (non-volatile memory) of the modem.
Command modifiers for dialing a phone number
Modifier! commands for dialing a telephone number allow you to set additional parameters that will make the modem automatically perform certain functions. Command modifiers for dialing a telephone number are only available if you have already entered the AT command D, i.e. the screen should have a dialing line.
Syntax:
ATO(modifier) 1234567 Basic modifiers for dialing a telephone number:
R
Pulse set. This modifier is entered after the D command and precedes the telephone number. Example:
ATDP 3243781
tone set. This modifier is entered after the D command and precedes the telephone number. Example:
ATDT 3243781
It must be said that tone and pulse methods of dialing a telephone number can be combined in a dial string.
Return to command mode after dialing a phone number. If you need to dial a phone number that is too long (more than 45 characters), you can use this modifier to separate multiple commands in the dial string.
All commands except the last must contain this modifier.
Pause while dialing a phone number. This modifier causes the modem to suspend dialing a telephone number. The modem will pause for the number of seconds specified in register S8 and then continue dialing. If you need a longer pause, just enter another modifier. In the following example, the command accesses an outside (public) telephone line with "nine":
ATDP 9, 5551212
!
Phone call forwarding. This modifier is used when multiple modems share the same telephone line. Example:
ATDP! 268
W
Determine the next telephone exchange response. This modifier is used when you need to wait for the telephone exchange to answer and continue dialing the telephone number. Example:
ATDP 8W 902 6810085
Phone calls
The following example demonstrates how to call using AT command modifiers to dial a phone number.
ATD 1234567
Here the modem dials 1234567 and then waits for a response from the station or remote modem. If the line is not detected, then the modem automatically (after a period of time specified by register S6) issues a message NO CARRIER, those. connection is not possible. If the line is found, then the modem issues a message CONNECT and starts talking to the remote modem. Communication between two modems is terminated whenever either modem performs any negative action:
The source modem is unable to recognize
called the carrier signal from the remote modem.
Command H (hang up) is transmitted.
Breaks the DTR interface between the original DTE and the modem itself, if commands are activated &D2 and &D3:
AT&F1DT9,P5551234
This command restores the default settings, dials the number using tone dialing, accesses the outside line through nine, pauses briefly, and finally dials the telephone number 555-1234.
How to dial a phone number using your phone, modem and AT commands
You can manually dial a phone number. To do this, you must enter the command (terminal) mode of your modem, pick up the handset and simply dial the desired phone number. Now:
Enter command ATH1, and press Enter in order to connect to your modem.
Enter command ATO, and press Enter in order for the modem to start working in online mode.
We answer manually
If the answering machine function (register S1) is not used, you can answer all incoming calls yourself. To do this, simply enter the following command:
ATA The modem will answer and return to online mode.
User Programmable NVRAM
All modem settings come down to the correct setting of NVRAM register values. NVRAM is a user-programmable memory that retains data when the power is turned off. NVRAM is used in modems to store the default configuration loaded into RAM at power on. NVRAM programming is done in any terminal program using AT commands. A complete list of commands can be obtained from the terminal program via the AT$ commands. AT&$ ATS$ AT%$.
Write to NVRAM factory settings with hardware data control - command AT&F1, then make adjustments to the modem settings in conjunction with a specific telephone line and write them to NVRAM on command AT&W.
AT#CLS=
This command sets the modem mode:
OK
The modem has successfully switched to the required mode of operation.
ERROR
The modem does not support this mode of operation.
AT#CLS?
The modem returns the current mode of operation.
AT #CLS=?
The modem returns possible modes of operation:
0,1,2,8
OK
AT A
The modem connects to the telephone line and enters answer mode, immediately returning a result code. VCON.
ATD
The modem connects to the telephone line and dials a telephone number.
Return value:
VCON
The modem returns this value when the remote station goes off-hook.
NO CARRIER
The modem issues this result code if long beeps are continuously detected during the time specified in register S7.
BUSY
The modem issues this result code when short beeps are detected.
NO DIAL TONE
The modem returns this value if there is no station signal on the line after going off-hook.
ATN
On this command, the modem hangs up and switches to data transfer mode, but does not violate any voice parameters. The modem also sets up the telephone line as an input/output device.
AT#BDR=
Set the speed of data exchange between the modem and the computer according to the following scheme:
OK
The modem has successfully reset the baud rate.
ERROR
The modem does not support this value for the baud rate.
AT #BDR?
The modem returns the set baud rate.
AT #BDR=?
The modem returns possible values for the baud rate:
0,1,2,4,8,16,24
AT #VBS=
This command sets how the voice data is encoded:
Return value:
OK
The modem has successfully reset the coding method.
ERROR
The modem does not support this encoding method.
AT #VBS?
The modem returns the current voice encoding method followed by an OK result code.
AT #VBS=?
The modem returns possible methods for encoding voice data:
2,3,4
OK
Each line ends with characters
AT #VSR=
This command sets the required speed for the computer to play and read voice data:
Return value:
OK The modem has successfully set the desired speed.
ERROR
The modem does not support this rate.
AT#VSR?
The modem returns the set speed for playing and reading voice data.
AT #VSR=?
The modem returns possible values for the playback and reading speed of voice data: 8000.
OK
Each line ends with characters
AT #VTD=,
This command controls various types of signals to detect them and return the necessary codes to the computer in voice playback, voice recording, and while connected to a telephone line, respectively.
AT #VSD=
This command is to enable or disable the silence detection in voice recording mode:
<п> = 0 (Set), Modem detects silence. <п> = 1, The modem does not detect silence.
AT #VLS=
The modem installs an input/output device for playing and recording voice data.
The following I/O devices are available:
OK
The modem has successfully reset the I/O device.
ERROR
The modem does not support this I/O device.
AT #VLS?
The modem returns the current I/O device followed by an OK result code.
AT #VLS=?
The modem returns the allowed I/O devices:
0,1,2,3,4
OK
Each line ends with characters
AT #VCI?
The modem returns the supported voice compression mode.
AT #VTX
This command puts the modem into voice data playback mode.
The modem begins the voice playback process by sending the resulting CONNECT code to the computer. The modem then waits for a character
CONNECT
VCON
Each line ends with characters
AT #VRX
This command sets the modem to record voice data from the current I/O device.
Voice recording begins with the modem returning a CONNECT result code to the computer. The modem then sends a character to the computer
CONNECT
VCON
Each line ends with characters
AT #VTS=[
This command is for generating DTFM signal. The signal generation line consists of three numbers, which must be separated by commas and enclosed in square brackets. The DCE will interpret the first and second numbers as the frequencies of the two-tone beep, and the third as the duration.
The frequency range is from 200 to 3300 Hz, with a frequency of 0 meaning silence. Duration ranges from 0 to 255, and is measured in 0.1 seconds.
Return value:
OK
The modem completed the command successfully.
ERROR
Options
AT #MDL?
The modem returns a model ID.
AT#MFR?
The modem returns the identifier of the manufacturer on which it was manufactured.
AT#REV?
The modem returns the revision date.
AT #VBT=
This command sets the duration of the DTMF signal generation. Used in conjunction with the AT #VTS command. The parameter for this command ranges from 1 to 40. The signal duration is measured in 0.1 seconds.
Return value:
OK
This value is returned to the modem if the command is successful.
ERROR
The modem returns this value if the parameter
AT #VBT?
The modem returns the current signal generation duration DTFM.
AT #VBT=?
The modem returns possible values for the duration of the DTFM signal generation.
OK
Each line ends with characters
AT#CID=
This command is for managing call ID.
OK
The modem has successfully changed the value for the call ID.
ERROR
The modem does not support this setting for the call ID.
AT#CID?
The modem returns the current value for the call ID.
AT #CID=?
Modem returns supported values for call id: i
0,1,2
OK
Each line ends with characters
AT #VBQ?
The modem returns the size of buffers for input and i output voice data:
TX BUF= 512
RXBUF=512
OK
Each line ends with characters
Description of some key i expressions of the BISYNC protocol ^
This symbol is usually used to separate voice data from the general stream, it starts the process of recording or playing voice. Of particular note is the joint use of this symbol with the symbol<ЕТХ>: These two characters are automatically added to the end of the voice data when recording a voice, they are also intended to interrupt the voice recording process. Hexadecimal character value
<ЕТХ>
This symbol is used in conjunction with the symbol
USRobotics modem hacking
All of the following is only valid for Sportster modems with a working command ATGW. It is very easy to check this - you need to write in any terminal ATGWO,55 and press Enter. If the modem answers OK, so this command is working. Please note that the command ATGWO,55 by itself does nothing.
So, with a simple set of two secret commands, you can turn your modem into a more advanced USR Courier modem. But this, unfortunately, is only possible for a single model, which has a checksum of ld51 or ld52. What is your amount, you can find out through the command ATP.
Sportster and Courier modems: main differences
1. Name.
2. Adaptive Speed Leveling (ASL).
3. Voice/Data switch with programmable functions (external models). Can be soldered into the modem after turning it into a Courier.
4. Call duration reporting (Clock operations). This is a function that switches between two modes: the modem works like a stopwatch and measures the time in hours, minutes and seconds from the moment it is initialized; or it shows the duration of the last (or current) session.
5. Automated redialing (the ">" command). When you specify an AT command, the modem will repeat the last command until you press any key.
6. Leased 1mf operations. Leased Line - A pair of wires leased from the telephone company or made by you.
7. Three additional levels of^call progress reporting (X5, X6, X7). According to these instructions, "the modem will return when dialing a number not only CONNECT, BU ^ Y, but also VOICE (if the other end answered with a voice. The most unpleasant thing is that the modem perceives any sneeze on the line as a voice, so this function does not work on our lines ) and HINGING (on every long beep; only works with digital stations and some older analog ones.) Set to X7.
8 Stored command execution (AT&ZC). Used in Voice/Data switch. The need for this feature is questionable.
9. Selectively enable/disable transmitter for receive-only (monitor) mode. This is for modem debugging.
10. Touchtone recognition (%T). In most modems, it does not work at all due to an error in the firmware.
11. More dialed number memory locations.
12. Compatable with USR's total control management system. Flag "MSK" according to AT17.
13. Several more "AT" commands and "S" registers.
14. Several more command/connect responses.
ASL
ASL - Adaptive Speed Leveling is an extension of the v32 protocol, in which the modem will increase the speed when the line quality improves. This protocol also includes Quick Retrain.
On the whole family of protocols v32 - retrains pass in 4-6 seconds, instead of 15 usual. Also, this gadget allows you to set asymmetric connection speeds, which helps a lot when communicating on lines that transmit (receive) well only in one direction). In addition, this extension forces the modem to connect on 7200 and only then increase the speed.
Historically, during the development of v32, so-called standard provisions and optional ones were introduced. In particular, a modem supporting v32 was required to be able to lower the speed itself or at the request of a remote modem, i.e., to be able to do fallback. As for fallforward, which is part of ASL, this is optional. This is why, for example, when connecting a USR Courier modem to Vosa's modem, the Courier can request a Quick Retrain and Vosa will simply respond to the request.
The same applies to Enhanced mode. One common misconception can be dispelled: a modem with ASL instead of working only does what it jumps in speeds, so it's better to turn it off on bad lines. However, it is not. The speed changeover takes about half a second. You can observe this by switching to command mode (+++) while connecting with the USR Courier and typing the command ATI6.
ASL is also used to enter USR Terbo, i.e. in v32terbo at 21600, which only USR modems work at (in terbo mode). By the way, ASL is not the merit of USR at all. This is the same opinion driven by advertising as the fact that SREJ is a Zyukhel feature. Not at all. Neither SREJ nor ASL are the virtues of these firms.
Unfortunately, another mistake was made in the implementation of ASL by USRobotics, which led to the fact that after the first long retrain, the possibility of short retrains is reset. And it cannot be fixed while maintaining compatibility with the original, i.e. uncorrected ASL.
In reality, however, ASL helps on bad lanes.
What are modems
So, you can make your Sportster modem think it's one of these models:
Sportster 9600
Sportster 14400
USRobotics Courier v.32bis
USRobotics Courier HST 16800
USRobotics Courier
USRobotics Shared Access, all
Gateway 2000 Telepath
You can also turn Fax Class I on or off, whether you have one or not. You can also change the country code to: US/Canada, Japan, Finland, Sweden, U.K. Swiss International.
You can also change the mount type: Internal, External, Rackmount, PCMCIA.
And lastly, you can tell the modem that it is compatible with the USR Total Control Management System. This is the MSK flag.
And further! You can change the clock frequency of the 80188 processor to 13 or 16 MHz. More precisely, not the clock frequency itself, but what the modem will show on command ATI7. Also, if you set the wrong clock frequency, the modem will not work correctly in cases where it needs to know its clock frequency.
The Sportster 9600 is the Sportster 14400, only it does not allow speeds above 9600. However, if you put in the Sportster 14400 at&n8, and then switch to Sportster 9600, then there will be a connection to 14400!
Courier HST 16800 = Courier Dual Standard HST 16800. The first is when you tell the modem that it supposedly doesn't have the V32 protocol.
USR Courier Broken System - This modem reports that it has neither HST nor V32.
USR Courier Broken System = Sportster 9600.
Gateway 2000 Telepath = Sportster. The same mode, the same possibilities.
USR Shared Access is basically a shared access network modem. It results if the Sportster modem in Sportster mode is told that it is MSK. But no new commands appear. This mode does not work because the entire network part is outside the modem.
How to cheat a modem
So the modem has a command ATGW. This command allows you to write your values into the modem's memory. Namely, there are bytes that tell the modem what it is. Further you will see descriptions like "and at the address xxx is ...". You need to compose a byte, and write it into memory in this way:
ATGWxxx,
1. At address 562 is the modem class. Bit 7 of the byte at the same address describes the modem class. If it is enabled, then the modem is Sportster (we will call this mode Sportster mode); if disabled - Courier (this mode is called Courier mode).
Bits 1-4 of this byte describe the type of montage. Better not to change:
Bit 1 when enabled indicates that the modem is PCMCIA.
Bit 2 when enabled says the modem is External.
Bit 3 when enabled says the modem is Rackmount.
Bit 4 when enabled says the modem is Internal. Only one of these four bits needs to be included.
2. At address 563, bit number 1 tells the modem that it is MSK, bit 4 - that it is Gateway 2000, not USRobotics.
3. At address 564, bit number 1 tells the modem that it has a fax.
4. At address 778, there are checkboxes for turning on / off the following charms:
Bit2-U32
3-HST
6 - for processor speed. If 1 then it is considered that the processor will work at 16, if O - at 13 mHz
1 - must always be equal to one. If it is set to 0, then the modem will say that it is a Broken System, i.e. he does not know at what frequency the processor is running, that he does not have options, and he will also respond to all commands error, but will fulfill them!
5. Address 565 is the country code.
1 - Japan (in this mode, there is no > command, no Guard Tone, and bit 1 of register S27 is described as "Reserved").
2 - Finland (there is no Guard Tone, bit 1 of register S27 is described as "Reserved").
3 - Sweden (same as Finland).
4 - U.K. (there is no command " in the dialing command atd,"On hook" is described as "Offline" and vice versa; no command >, not supported by Leased Line, no commands &P, AT&T1. Described as "Analogue" rather than "Analog", bits 1-4 of register S15 are not described at all, bit 1 of register S27 is described as "Reserved", and bit 2 of register S32 in HELP is erroneously described twice:
2 = Reserved 2 = Disable Enhanced V32 mode
5 - Undefined (?; no guard tone, bit 1 of register S27 is described as Reserved (actually this code is Norway).
6. - Swiss (no command! in dialing, no guard tone, bit 1 of register S27 marked as reserved).
7-10 - Undefined. The modem is missing, it is better not to install: the modem may die.
11 - International. It seems that this is not there either, Help is not
output, so there's no way to find out what's wrong. But, however, by ati7 you can get information that he is International. At the same time, the register s39 doesn't work at all.
To put down a bitik, you need to use the following plate:
1 - 1
2-2 3 -4 4-8
5 ~ 16
6-32
7-64
8-128
Just add up all the values to the right of the bits you choose and represent that value in hexadecimal! For example, if you need to write bits 1 and 7, then the value will be 65.
Difference
There is no difference between Gateway 2000 and USRobotics Courier modems - choose the one you prefer. There is no difference between Gateway 2000 Telepath and USRobotics Sportster modems either. The MSK flag does nothing.
The difference between the Sportster 9600 and Sportster 14480 modems is only in speeds. There is no difference between the Sportster 9600 and 14400 fax/modems. There is a difference in installation. For External Courier DS HST there is register S32 - talk/data switch. For internal it seems to be absent, but you need to look at help in External mode and then use this information in Internal mode - you just need to find a place on the board where to solder this switch. Moreover, if the installation is set incorrectly, the modem speaker will not work correctly.
Shared Access
The USRobotics Shared Access modem is an external modem with network access. Only one thing is interesting - this thing is included in Sportster, but for some reason in Sportster mode - with all the ensuing restrictions. This mode as such is absent - the network part of this modem is located outside, in hardware.
And how is it easier?
For internal modems (1D51) you must specify:
atgw562,28s34=0&w
For external modems (1D52) you must specify:
atgw562,22s34=0&w
And once again about USRobotics modems
Sportster 14400
Signs: Firmware date 1994. Clock Freq: 16 Mhz. Upgradeable to RC 21600 (HST/AON/Voice).
Problems: LJTR error (treated like this:
ATslO=255sl9=l&w).
Sportster 14400 Vi
Signs: Firmware date 1995, Clock Freq: 16 Mhz, black case.
Upgrade: Self-upgrade possible.
Problems: Chronically does not catch the BUSY signal (sometimes it is treated by installing an additional resistor).
Sportster 14400 P"n"P
Signs: Supervisor firmware date 1995, Clock Freq: 24 Mhz.
Upgrade not possible!
Problems: Chaotic hangs (for example, Drop DTR during Dialing), problems with FAX reception.
Sportster 14400 Si
Features: RPI modem, small triangular board, very cheap.
Upgrade not possible! Problems: Lack of hardware error correction.
Russian Courier 21600.
Signs: the presence of RHST, Terbo, AON, VOICE. Has a number of new features. Derived from the Sportster 14400.
Upgrade: not required.
There are no problems (you just need to configure it), modems with older firmware versions may have problems when working with modems IDC.
Sportster 28800
Features: Clock Freq: 20Mhz.
Upgrade: Upgradeable to 100% compatible flash courier V.EVR, with the ability to download branded SDL.
Problems: deafness of some models, does not pick up a signal BUSY.
Sportster 33600
Features: Clock Freq: 92Mhz
Upgrade not possible!
Problems: Chaotic hangs, problems with FAX reception.
Win Modem 28800
Signs: Internal, does not have a COM port, works only through its driver and only under Windows.
Upgrade: installation of a new driver (there is already a driver for 33600).
Russian Courier 33600
This is the creation of the upgrade team Robert Agababyan & Grisha Rusanov.
Has a number of new features. Derived from the Sportster 28800 model.
Upgrade: Ask upgraders for new firmware versions.
Issues: None seen so far.
33600 Enhanced Courier V.Evr
This is the creation of Vladimir Dodonov's upgrade team. Has a number of new features. Derived from the Sportster 28800 model.
Upgrade: Ask upgraders for new firmware versions. If your modem is equipped with a FLASH-ROM, then it is USR SDL Compatible, i.e. SDL are loaded into it.
Issues: None seen so far. t
Statistics Options
Biers (Block errors).block errors. Errors in data and protocol blocks. If there are a large number of block errors, then your modem's receiver is having problems with the telephone line. A particularly large number of Biers with a short time on the line occurs if the mrdem is operated on a decade-step exchange. /
Link Naks. Lack of confirmation. Lack of acknowledgment of receipt of one or more blocks.
speed. Speed. The last speed at which the receiver/transmitter was operating before the link was broken.
Disconnect Reason. The reason for disconnection. normal \ the end is exit with the message: DTR dropped (transition of the DTR signal to a logic zero state), that is, the computer or terminal has transferred the DTR signal (Data Termiani I Ready - readiness of the data terminal) to the state of logical \ zero, thus ending the session.
SNR (Signal to Noise Ratio). Signal to noise ratio. Measured in decibels (dB). The higher the value of this parameter, the lower the line noise, and, accordingly, the higher the speed at which the modems communicate. So, for example, the minimum allowable SNR for a speed of 2400 is 14 dB, and for 19200 - 30 dB. That is, if the SNR is less than 30 dB, then the V34 protocol will not give high speeds.
Recv/Xmit Level (-dBm) Levels of received/transmitted signals. The greater the received modulo numbers, there are less signal levels. Each receiver can ask the remote transmitter to change the level.
near echo loss (dB) Near echo drop level, i.e. how many times the near echo (short loop) is quieter than the original signal. This parameter is not very important, since the near echo is suppressed by the echo cancellation system by almost 100%. But, in any case, the larger this number (the lower the level of the near echo), the better
Far Echo Loss (dB)Far echo falloff level. This number is much more important: the far echo (long loop) is attenuated much worse, here the distortion on the line makes the canceled signal very different from the original signal and, as a result, noise remains after the extinction.
As previously stated, dTo start communicating with a newly baked module, you must send the "AT" command. Then it will automatically adjust the port speed and return "OK". Now that the speed is set, you need to fix it so that you do not perform this action every time you turn it on. The following commands are used to configure the port:
AT+IPR=19200- port speed setting.
You can set the following values: 0, 1200, 2400, 4800, 9600, 19200, 38400, 57600, 115200
0 - autoselect, this value is the default.
You can also set the transfer mode:
AT+ICF=3.3
First number - data bits/parity/stop bits
1. 8/0/2
2. 8/1/1
3. 8/0/1, is the default.
4. 7/0/2
5. 7/1/1
6. 7/0/1
The second number is even
0 - odd
1 - even
3 - no
After configuration, these parameters will be saved in the non-volatile memory of the module, so next time you will not have to do these actions.
AT+GMM- module identifier.
The module will return the manufacturer and model in response: "SIMCOM_SIM900D"
AT+GOI- shorter module identifier.
Only "SIM900D" comes in response
AT+GMR- firmware version.
It may come in handy if you want to upload a different firmware version to the module.
AT+GSV- it includes all three previous commands.
Returns the manufacturer of the module, its model and firmware version.

AT+GSN- will return the IMEI of the module.
It can be useful when you need to accurately identify the module. IMEI is also duplicated on the label pasted on the module, and they must match.
The next step is to set the real time clock of the module. To do this, issue the following command:
AT+CCLK="yy/mm/dd,hh:mm:ss+zz"
where are they in order
«
year/month/date, hour:minutes:seconds+timezone» The data must be sent with leading zeros, that is, for example, if we have "4" for the month, then "04" should be sent.
You can get back the current time and date by sending the same command, only with the "?" sign:
AT+CCLK?
- read the time from the module

ATE0- echo mode
0 - disabled
1 - enabled. It is by default.
ATV0- module response format.
1 - full text response with echo (if enabled). It is by default.
0 - return only the response code.
In the first case, OK, ERROR, etc. will always be returned, and in the second, result codes will be returned. So instead of OK it will return 0, and instead of ERROR 4.
AT+CMEE=0- error information level. Can be from 0 to 2.
0 - disabled. It will just write ERROR.
1 - error code. Will return a numeric error code.
2 - error description. He will write what exactly he does not like in the team.
To work with the module through the terminal, it is more convenient to use the ATV1, ATE1 AT+CMEE=2 modes, to communicate with the microcontroller it is better to use ATV0, ATE0 and AT+CMEE=0 - this way it will be easier to process the received responses.
These settings are not saved after the module is reloaded, so these commands must be included in the program code.
Now let's look at information about the GSM network. For example, you can find out the quality of the signal.
AT+CSQ- information about signal quality.
The module will return two numbers +CSQ: 17.0
17 - signal level. It can be in the range 0..31 or 99. The more the better, but 99 means no.
0 - coefficient of communication errors (so-called RXQUAL). It can be from 0 to 7, the lower the number, the better the quality of the connection.

AT+COPS?- information about the operator in whose network the module is registered.
You can also make a request in the form AT+COPS=? After a sufficiently long search, the module will display a list of found networks.

Well, now the commands that allow you to use cellular communications for their intended purpose.
ATD1234567890;- dialing a number.
The module will call the specified number and return one of the options
BUSY - number is busy
NO DIALTONE - no signal on the line
NO CARRIER - no network or other problem (for example, no money in the account)
NA ANSWER - no answer
CONNECT - there is a contact!
If the number is stored, for example, on the SIM card, and the SIM card is selected as the phone book (usually, as it is by default), then there is a command to call it ATD>1;. The numeric value specifies the number of the card cell where the called number is stored.
AT+CLIP=1- enable identification of incoming call number
If the command is sent from 0, the caller ID will be disabled and the module will send only the "RING" message instead of the caller's number.
ATA- answer the call.
ATH0- break all connections. It can take the values 0..5, indicating which types of connection should be broken.
ATS0=0- with this command, you can set how many beeps will pass before the handset is automatically lifted. 0 - only manually, by default.
AT+GSMBUSY=1- barring all incoming calls.
1, - bar all incoming calls
0, - allow incoming
The result of this command is not stored in memory and must be repeated at each power-up.
It is better to send a request to #100#, since the message is sent to *100# in hexadecimal format:

AT+CMIC=0.15– command for setting the microphone sensitivity. The sensitivity is determined by the numeric value that comes after the = symbol. It is used very often in alarm systems - for audio monitoring of a protected room. By experimenting with this value, you can achieve the audibility of the slightest rustle.
When receiving an SMS, the module will report this by sending a message to the terminal"+CMTI:"SM",3"
. Where 3 means the number of the received message.
To read SMS, you can use the command AT+CMGR=3.0
(3 is the number of the message we want to read, 0 is to change the status of the message to read)
In response, the module will send information about who sent the message and at what time. "REC UNREAD" means that the message has the status of unread.

AT+CMGDA="DEL ALL"
command will delete all messages
It is also possible to delete only a certain type of messages:
"DEL READ" - read
"DEL UNREAD" - unread
"DEL SENT" - sent
"DEL UNSENT" - not sent
"DEL INBOX" - received
"DEL ALL" - all messages