On Windows, there is a Temp folder in which temporary files are stored (these are temporary files that are created when installing programs, updating files necessary during the operation of a program to store temporary data and cache, and other files that were necessary for the operating system or program as a temporary data warehouse). During operation, many unnecessary files are accumulated in this folder, which are essentially garbage. The volume of these files sometimes reaches tens of gigabytes.
Naturally, there is no point in storing this garbage on your hard drive. Useful from time to time to clean. hDD from the trash. Below I will tell you how to clean the C drive correctly so as not to harm the operating system and free up the local disk from unnecessary files.
There are 2 options for cleaning the disc. The first option is to clean the disk with special utilities, the second is manual disk cleaning.
Manual disk cleaning is a more efficient and reliable method, but at the same time requiring more steps and at least minimal preparation. Cleaning using utilities does not require much time, picking the system settings and any computer knowledge. However, this method is not always effective in cases, for example, when viruses are hidden in the garbage folder. In this case, the virus files are likely to remain in place.
Cleaning C drive from debris using CCleaner
Let's see how to clean a disk from debris using the CCleaner disk cleaning program. You can download it.
Unzip the archive and run the program (no installation required).
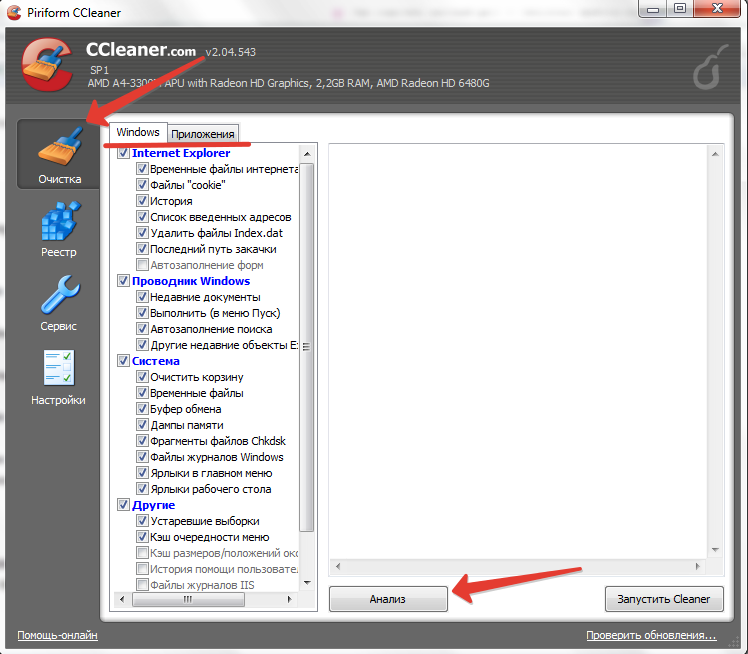
In the left part of the program window, select the tab Cleaner (cleaning hard drive) Ticks mark elements for analysis for the presence of unused files and garbage. Better leave it all unchanged. Press button Analyze to start the analysis.
After analyzing the files on the hard drive, the program will display a list of unnecessary files and the approximate total amount of free space on drive C. Press the button Run cleaner to start cleaning the drive from garbage.
A window appears that warns that the deleted files cannot be restored. Click OK to continue cleaning.
After the hard drive is cleaned up, a report will be displayed. Now the program can be closed. In the above example, nearly 4.5 gigabytes of disk space was freed on drive C.
How to clean the local C drive manually
To clean the C drive manually, you must first open access to system and hidden folders and files. Now you need to manually remove garbage from temporary folders Windows. It is advisable to clean system disk preloaded into safe mode. To do this, when you turn on the computer, press F8 and select the line Safe mode .
The location of the folders for storing temporary files in Windows XP and Windows 7 is different. Below are the folders that need to be cleaned in Windows XP and Windows 7.
To clean the system disk from debris, go to each of the folders below and delete all the attached files and folders in them. To select all the contents of a folder at once, go to it through My computer and press CTRL + A (or CTRL + Ф for the Russian keyboard layout). All files and folders will be highlighted. After that, press SHIFT + DEL to immediately delete these files, rather than moving them to the trash. After cleaning the folders, empty the trash.
In Windows XP, these are folders (some may not be):
1. C: \\ Windows \\ Temp
2. C: \\ Documents and Settings \\ % username%\\ Local Settings \\ Temp
3. C: \\ Documents and Settings \\ FOX \\ Local Settings \\ Temporary Internet Files
4. C: \\ Documents and Settings \\ FOX \\ Local Settings \\ Application Data \\ Opera \\ Opera \\ cache
5. C: \\ Temp
where% username% is the username
IN Windows Vista and Windows 7 these are folders (some may not be):
1. C: \\ Windows \\ Temp
2. C: \\ Temp
3. C: \\ Users \\% username% \\ AppData \\ Local \\ Temp
4. C: \\ Users \\% username% \\ AppData \\ Local \\ Opera \\ Opera \\ cache
5. C: \\ Users \\% username% \\ AppData \\ Local \\ Temp
6. C: \\ Users \\% username% \\ AppData \\ Local \\ Opera \\ Opera \\ cache
where % username% - Username
How to clean local C drive from garbage (from unnecessary files)In OS Windows folder exists Tempin which temporary files are stored (these are temporary files that are created when installing programs, updating files necessary during the operation of a program for storing temporary data and cache, and other files that were necessary for the operating system or program as a temporary data store) . During operation, many unnecessary files are accumulated in this folder, which are essentially garbage. The volume of these files is sometimes reaches tens of gigabytes.
Naturally, there is no point in storing this garbage on your hard drive. Useful from time to time clean the hard drive from debris. Below I will tell how to clean drive C, so as not to harm the operating system and free up the local disk from unnecessary files as much as possible.
There are 2 options for cleaning the disc. The first option is to clean the disk using special utilities, the second is to clean the disk manually.
Manual disk cleaning is a more efficient and reliable method, but at the same time requiring more steps and at least minimal preparation. Cleaning using utilities does not require much time, picking the system settings and any computer knowledge. However, this method is not always effective in cases, for example, when viruses are hidden in the garbage folder. In this case, the virus files are likely to remain in place.
Cleaning C drive from debris using CCleaner
Consider how to clean a disk from debris using CCleaner Disk Cleaner. This is a very necessary and necessary program that you just need to use at least once every two weeks. You can download it.
In the left part of the program window, select the tab Cleaner (hard drive cleaning). Ticks mark elements for analysis for the presence of unused files and garbage. Better leave it all unchanged. Press button Analyzeto start the analysis. It will take some time.
After analyzing the files on the hard drive, the program will display a list of unnecessary files and the approximate total amount of free space on drive C. Press the button Run cleaner to start cleaning the drive from garbage.
A window appears that warns that the deleted files cannot be restored. Click OK to continue cleaning.
After the hard drive is cleaned up, a report will be displayed. Now the program can be closed. In the above example, nearly 4.5 gigabytes of disk space was freed on drive C.
You can also use TuneUp Utilities to clean your disk. You can download it.
I use both the first and second through time ...
How to clean the local C drive manuallyTo clean drive C manually, you must first. Now you need to manually remove the garbage from the temporary Windows folders. It is advisable to clean the system drive after booting in safe mode. To do this, when you turn on the computer, press the F8 key and select the Safe Mode line.
The location of the folders for storing temporary files in Windows XP and Windows 7 is different. Below are the folders that need to be cleaned in Windows XP and Windows 7.
To clean the system disk from debris, go to each of the folders below and delete all the attached files and folders in them. To select all the contents of a folder at once, go to it through My computer and press CTRL + A (or CTRL + Ф for the Russian keyboard layout). All files and folders will be highlighted. After that, press SHIFT + DEL to immediately delete these files, rather than moving them to the trash. After cleaning the folders, empty the trash.
In Windows XP, these are folders (some may not be):
1. C: \\ Windows \\ Temp
2. C: \\ Documents and Settings \\% username% \\ Local Settings \\ Temp
3. C: \\ Documents and Settings \\ FOX \\ Local Settings \\ Temporary Internet Files
4. C: \\ Documents and Settings \\ FOX \\ Local Settings \\ Application Data \\ Opera \\ Opera \\ cache
5. C: \\ Temp
In Windows Vista and Windows 7, these are folders (some may not be):
1. C: \\ Windows \\ Temp
2. C: \\ Temp
3. C: \\ Users \\% username% \\ AppData \\ Local \\ Temp
4. C: \\ Users \\% username% \\ AppData \\ Local \\ Opera \\ Opera \\ cache
5. C: \\ Users \\% username% \\ AppData \\ Local \\ Temp
6. C: \\ Users \\% username% \\ AppData \\ Local \\ Opera \\ Opera \\ cache
where% username% is the username
Share the post in your social networks!
When copying material, a back link to our site is required!
The computer’s hard drive is not rubbery, and each user may encounter a situation where one or all local drives will be filled to capacity. In addition to the fact that you cannot save new files, this can also affect the operation of the computer, especially if drive C is clogged. In many cases, part of the memory is occupied by completely unnecessary information that you either simply forgot about or do not know about its existence. Let's figure out how to clean the hard drive of unnecessary files, and not harm the system.
Which files are unnecessary?
First of all, this category includes the so-called "computer trash":
- temporary information;
- data stored by the browser;
- some registry entries.
Many programs leave behind temporary or backup files, which are subsequently never used, but remain on the computer. Browsers also like to save a lot of unnecessary information about the sites you visited. Well, not a small fraction of computer waste is unused shortcuts, information on the clipboard, the remaining information from remote applications And so on. All this over time creates a load on the system drive, which leads to lags on the computer.
Unused programs setup files and much more of the contents of the hard drive only does what takes up memory. Therefore, it is worthwhile to take the time to clean up the computer.
How to get rid of junk files?
First you need to study the local drives for unnecessary installation information, films, photos, music and be sure to empty the trash - this can significantly increase the amount of free memory on a hard drive.
It is worth noting that it is not a sin to engage in the procedure for deleting unused files for preventive purposes, without waiting until the memory clogs to failure. We will consider the 3 most effective way disposal of unnecessary data:
- removal of programs;
- use of system tools;
- using CCleaner utility.
For reliability, you can consistently apply all of the above methods.
This article will help you burn movies to DVD -
Removing unnecessary software
It often happens that you install a program for one-time use and forget to delete it. And in some cases, along with the necessary software, several additional utilities are installed on the computer. In any situation, it is periodically useful to check the list of installed software, since many of them can not only take up a lot of space, but also work in the background using system resources.
Go to the control panel and select "Uninstall a program."
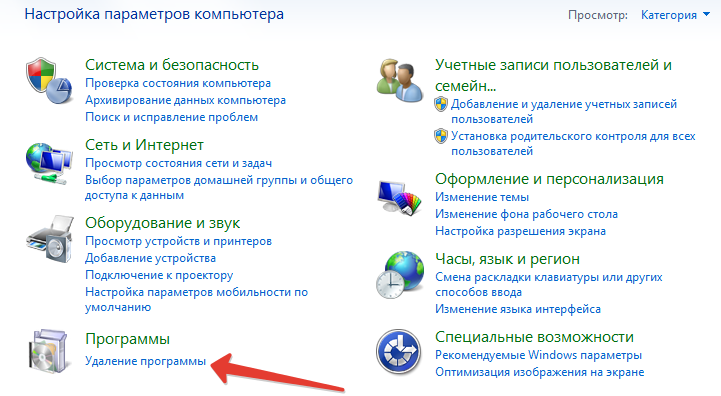
Now we begin to carefully study the list installed programs. Many names may seem unfamiliar, but you shouldn’t immediately start removing them, because this may be the software or driver needed for the system. It is better to search the Internet for what they are needed for, and even then decide their future fate. To remove a program, select it and in the upper panel click on the corresponding inscription.

Using system tools
In the operating room windows system Possibility of cleaning from “junk” files. To do this, select desired drive and right-click on it. In the context menu, click "Properties".

In the window that opens, click on the "Disk Cleanup" button.

After estimating the amount of memory that can be freed up (it may take some time), you are given the opportunity to choose which types of files to delete. You can safely tick off all points - if it were unsafe, the system would not offer to remove them. Nevertheless, it is better to pay attention to what you mark - it may turn out that you need this data. By checking the boxes, you will see how much memory will be freed. Click "OK", confirm the deletion and wait.

So easily and simply you can delete unused files from your hard drive without resorting to using additional software.
Using CCleaner
CCleaner is considered the most reliable tool in terms of cleaning your computer from debris. It can always be downloaded for free from the official site. It is extremely simple and easy to use.
For cleaning, the corresponding tab must be selected in CCleaner. In addition, pay attention to the “Windows” and “Applications” tabs, where you can find out what these or other unnecessary files refer to. If necessary, check or uncheck. Click the "Analysis" button.
After analysis, you will see how much memory will be freed, and what kind of data will be deleted. Press the button “Run Cleaner”.

In addition, in CCleaner, you can check and fix registry errors.

Conclusion
The listed methods for deleting unnecessary files have worked well on Windows 7, Windows 8 and Windows 10, however, even for Windows XP they also apply. Remember that such procedures will not only free up a lot of memory, but also improve system performance.
Stage 1. Preliminary procedures
Step 1. Check disk
First of all, it is worth checking the hard drive for errors. Perhaps the problem is only in the wrong record about the amount of free space.
Note: This applies primarily to the FAT32 file system (FAT16, FAT). If you use the NTFS file system, a transaction system will reliably protect you from these kinds of problems. (You can find out the file system in the properties of the hard disk partition - C :, D :, E: etc.).
In any case, it would not hurt to do at least a regular check hard drives.
How to do it:
Start -\u003e Run -\u003e cmd.
In the window that opens, enter "chkdsk c:" (without quotation marks) and wait for the result. Then repeat the check for other partitions of the hard drives. To enable automatic error correction, add "/ f". To describe the capabilities of the chkdsk procedure, enter "chkdsk /?".
Start -\u003e My computer -\u003e C :, D :, E: drive, etc. -\u003e Properties -\u003e Tools -\u003e Run Scan -\u003e Launch
Step 2. Disk Cleanup
For initial debris removal, use windows utility "Disk Cleanup".
How to do it:
Start -\u003e Run -\u003e cleanmgr
Start -\u003e All Programs -\u003e Accessories -\u003e Utilities -\u003e Disk Cleanup
Stage 2. Removal
Step 3. Unnecessary files
We delete the mountains of unnecessary files ourselves.
Note: Delete only those files that you yourself created or copied (programs cannot be deleted like that!). How to do this: I advise you to do this in Total Commander ("Windows Commander" is called "Total Commander" starting with version 5) as follows:
Configuration -\u003e Settings -\u003e Screen -\u003e Sorting directories -\u003e As files (also by time)
Ctrl + F6 (View -\u003e Fit)
Ctrl + \\ (root directory)
Shift + Alt + Enter (count the size of directories) and wait
Browse the most large files and delete if possible.
Browse through the largest catalogs. To understand why they are so large, go inside and return to point (4). In general, it’s worth putting in perfect order.
Step 4. Uninstall unnecessary programs
Delete it yourself unnecessary programs.
How to do it:
Start -\u003e Control Panel -\u003e Add or Remove Programs
Sort -\u003e Size
First of all, view the largest programs (above), as well as programs whose size is not defined (below). If something is not necessary -\u003e select and delete
Browse large software packages. Perhaps next to the "Delete" button there will be a "Change" button. In this case, you can remove many program components that you do not use.
Click "Install Windows Features"
Uncheck those programs that you do not need. Some items are nested; to view them, click the "Composition" button.
Step 6. Delete temporary files.
Many programs create temporary files in the directories listed below during operation. But before closing, they often forget to delete them. If you don’t have any programs open, you can safely delete temporary files - nobody needs them.
How to do it:
Turn on the hidden and system files
In Total Commander: Configuration -\u003e Settings -\u003e Screen -\u003e Display files -\u003e Show hidden / system files
In Explorer: Tools -\u003e Folder Options -\u003e View -\u003e Advanced Options -\u003e Hidden Files and Folders -\u003e Show Hidden Files and Folders.
Start -\u003e Control Panel -\u003e System -\u003e Advanced -\u003e Environment Variables
In the "User Environment Variables for ..." list, remember the TEMP path
In the System Variables list, remember the TEMP path
Using Total Commander or Explorer, delete the entire contents of these two folders.
Step 7. Delete temporary Internet files.
When browsing the Internet, the "Temporary Internet Files" folder contains the web pages that have been viewed. This allows you to load pages faster next time, as well as view them offline (after disconnecting from the network). The "Temporary Internet Files" folder has a maximum size limit. To free up space, you can reduce the size limit or simply delete the contents of this folder once.
How to do it:
Start -\u003e Control Panel -\u003e Internet Options -\u003e Temporary Internet Files
To delete the contents of a folder once, click "Delete files"
To reduce the folder size limit, click Options -\u003e Folder of temporary Internet files -\u003e Occupy no more than disk: and set as much as you want.
Can be cleaned: up to several hundred MB.
Step 8. Files of remote programs.
Some programs during uninstallation forget to delete part of their files and registry entries. You can clear the registry using the Regedit program (this is unlikely to free up a lot of space, but it can speed up the system). Files remote programs can be scattered in different directories. All that remains of them must be removed.
Note:If you deleted the program, but want to leave its settings in order to install it in the future and continue to work, do not delete its files.
How to do it:
It will be easier for you to figure out if you installed all the programs in the Program Files \\ folder.
Open the Program Files \\ folder and view its subfolders. If you find one whose name completely matches the name of the program you deleted, you can safely delete the entire folder.
Perform a similar action with the Program Files \\ Common Files \\ folder. Just keep in mind - in this folder you will see not the names of programs, but the names of developers. Therefore, delete the folder only if all the programs of this developer are deleted.
Do the same with the Documents and Settings \\ Subfolder \\ Application Data \\ folder. A subfolder means that you should iterate over all the subdirectories in Documents and Settings \\.
Step 9. Delete thumbnails.
If you are viewing image files using Explorer, you probably know what a sketch is. A thumbnail is a small copy of an image stored in a file. Sketches serve for convenient and quick access to any image. At the same time, if you are viewing the folder with images for the first time, the thumbnails will take a long time to load, and the next time - quickly. The fact is that thumbnails of images are cached (saved) in the same folder in the hidden thumbs.db file. If you have hundreds or thousands of images, thumbs.db files can take up too much space.
How to do it:
To delete thumbnail files once, search thumbs.db and delete all found files (display must be enabled hidden files).
To disable thumbnail caching, click Start -\u003e Control Panel -\u003e Folder Options -\u003e View -\u003e Advanced Settings -\u003e Do not cache thumbnails.
Step 10. Memory dump files.
If you have a system crash with BSOD (Blue Screen of Death - Blue screen death), while the operating system retains part of the operational for the analysis of the problem by specialists. If you are not an expert in machine codes, it’s better to disable this feature and delete files with content random access memory.
How to do it:
To delete memory dump files once, delete the% SystemRoot% \\ Minidump \\ folder, where% SystemRoot% is the directory windows installatione.g. C: \\ Windows.
To disable this feature, click Start -\u003e Control Panel -\u003e System -\u003e Advanced -\u003e Download and Restore -\u003e Settings -\u003e Record Debug Information -\u003e None
On average, you can clear: from a few kilobytes to megabytes.
Step 11. Removing the driver cache.
During installation, the operating system copies the driver archive so that it is more convenient to install devices later. You can delete the driver cache, but if you still have to install new devices without native drivers, the operating system will ask you to insert the CD-ROM with the Windows distribution.
How to do it:
Delete the folder "% SystemRoot% \\ Driver Cache \\ i386 \\"
On average, you can clear: 100 MB.
Step 12. Cache of protected system files.
The operating system stores protected files in the cache in order to replace them with files from the cache in case of damage to the original files. You can delete these files once or disable the cache.
How to do it:
To delete cache files once, delete the% SystemRoot% \\ system32 \\ dllcache \\ folder.
To set a new cache size, click Start -\u003e Run "sfc / cachesize \u003d X", where X is the new cache size (for example, X \u003d 0 - disable the cache). Then, follow step 1. The next time you scan protected system files, the system will fill the cache to the specified amount.
On average, you can clear: 400 MB.
Step 13. Removing the hibernation file
Sleep mode is very convenient. It allows you to turn off the computer, keeping all windows and programs in the same place. Upon entering hibernation, the system saves the contents of RAM in the hiberfil.sys file on the hard drive. It is stored permanently so that when entering sleep mode there is no problem of lack of disk space. If you don’t need this option, you can disable sleep mode.
How to do it:
Start -\u003e Control Panel -\u003e Power Options -\u003e Sleep Mode -\u003e DO NOT Allow Sleep Mode -\u003e OK.
The hiberfil.sys file will disappear and hibernation will not be available.
On average, you can clear: the size of RAM.
Stage 3. Reducing the size
Step 14. Compress Emails
If you are actively emailing with Outlook Express, you probably have hundreds emails. They can be cleaned manually, but can be compressed (increase compactness), automatically reducing the space they occupy.
How to do it:
Outlook Express -\u003e File -\u003e Folder -\u003e Compress all folders.
Step 15. Compress multimedia.
When storing multimedia files (images, sound, video) they are usually compressed using special algorithms specific to certain types of files. If you have BMP images stored, sound wav or uncompressed video - that means they can be compressed by reducing their size by about 10 times.
Note: There are two main types of compression for these types of multimedia: without loss of quality and with loss of quality. They use the latter more often and find a compromise between compression ratio and quality.
How to do it: Use encoders and related programs. The simplest thing to advise:
Photos - JPEG
Sound - MP3 (using Audiograbber or CDex)
Video - MPEG (DivX using VirtualDub)
Step 16. Archiving.
For compression various kinds data apply universal data archiving algorithms. The principle of the archiver is as follows: it finds repeating fragments in the file and replaces them with one fragment indicating the number of repetitions. The archiver should not compress uncompressed multimedia (since special encoders will be more effective) and even more compressed multimedia (the compression ratio will be zero). It is worth compressing mostly ordinary documents - they are compressed up to 10 or more times. The remaining files are at your discretion.
Note: Archive only files created or copied by you (programs cannot be archived!).
How to do it:
I recommend using the WinRar program. In it, you can evaluate the degree of compression, and decide whether to archive or not. It creates ZIP or RAR archives. RAR has a large compression ratio, and ZIP allows you to quickly extract a single file from the archive. In addition, ZIP is more common on the Internet.
You can also use the WinZip archiver (or ZIP built into Total Commander).
Step 17. Removing system recovery files.
Windows XP has a built-in system recovery feature. It works as follows - all major changes (installing drivers, programs, etc.) are fixed and recovery points are created, so that, in the event of a failure, restore the system to an earlier point in time. But the ability to recover can take up a lot of hard disk space. To solve this problem, you can delete all recovery points except the last; or you can change the amount reserved for system recovery, or disable this feature altogether.
How to do it:
To delete all recovery points except the last one, click Start -\u003e Run -\u003e cleanmgr -\u003e Advanced -\u003e System Restore -\u003e Clear
Start -\u003e All Programs -\u003e Accessories -\u003e Utilities -\u003e Disk Cleanup -\u003e Advanced -\u003e System Restore -\u003e Clear
To change the volume reserved for system recovery, click "Start -\u003e Control Panel -\u003e System -\u003e System Restore -\u003e Use disk space -\u003e Reserve on disk "and move the slider.
To disable system recovery, click Start -\u003e Control Panel -\u003e System -\u003e System Restore -\u003e Disable System Restore
On average, you can clean up: 12% of the hard drive.
Step 18. Reducing the swap file.
At windows operation uses not only random access memory, but also virtual memory located on the hard drive. Data is recorded there when there is a shortage of RAM, as well as program data that is not used for some time. By default, the size of virtual memory is 150% of RAM. Perhaps you can reduce the size of virtual memory. And if you have a lot of memory (512 MB or more), virtual memory can be turned off altogether.
Note: You can find out how much the page file is actually used: Ctrl + Alt + Delete -\u003e Performance -\u003e Page file.
How to do it:
Start -\u003e Control Panel -\u003e System -\u003e Advanced -\u003e Performance -\u003e Settings -\u003e Advanced -\u003e Virtual Memory -\u003e Change
If you want to change the size of the paging file, select Drive, Custom Size, and enter what you want in the Original Size and Maximum Size boxes. Click Set. (If the original size of the virtual memory is not enough, the system will increase the size up to the maximum.)
To delete the page file, select "No page file." Click Set.
On average, you can clean: 150% of RAM.
Step 19. Cluster.
The file system is divided into clusters - small units of information. For example, in the NTFS file system, clusters range in size from 512 bytes to 64 KB. One file can be located in two or more clusters, but no two files can be in the same cluster. Large cluster sizes increase disk system performance and reduce the harmful effects of fragmentation, which slows down the reading and writing of data. But a large cluster size increases volume loss, especially if there are a lot of small files.
How to do it: I recommend using PowerQuest Partition Magic Pro version 8.0 and higher.
Highlight hard section The drive whose cluster size you want to change.
Section -\u003e Advanced -\u003e Resize clusters (Partition -\u003e Advanced -\u003e Resize clusters)
The program will show what losses will be with different cluster sizes.
Select a new cluster size and click OK.
Step 20. Compression at the FS level.
Some files can be compressed by the archiver so that they take up less space. However, this method is not suitable for programs, although some of them have good compression potential. In this case, file system level compression can be used. With this compression, you can compress anything, even the Program Files and Windows folder. Everything becomes much smaller in volume, and performance remains almost unchanged. This is a great way to free up a lot of hard disk space. Compression only supports file system NTFS.
Note: compression can take a very long time.
How to do it:
If you do not already have a file nTFS system, I recommend converting the drive using PowerQuest Partition Magic Pro version 8.0 or higher.
Start -\u003e My Computer -\u003e Drive C :, D :, E: etc. -\u003e Properties -\u003e Compress disk to save space -\u003e OK.
Stage 4. If all else fails
Step 21. Shopping
If nothing helps you (which is unlikely), you will have to spend money on a new storage medium.
If there is not much money, I advise you to buy a CD-ReWriter. It’s not expensive at all and you can record in thousands cD-R discs (one-time recording) and CD-RW (rewritable). (I made these decisions - and now I am pleased with the choice.)
If you have enough money, you can buy a new high-capacity hard drive. But this is an extreme measure (I did this too, but only because the old one flew :).
How to do it:just go to the store and buy :)
You have finished cleaning the HDD
Now you see how much you have cleaned up your hard drive space. It is a lot or a little - judge for yourself.
Good luck in knowing your iron friend!
Each computer has several local disks (usually C and D by default, but more can be done if desired). Disk C contains all files operating system, and its volume is limited. When the hard disk space comes to an end, a system message appears: “There is not enough disk space C:”, “ Free place the disk will end soon ”, etc.
Therefore, the accumulation of garbage interferes with the normal operation of the computer. And if drive C is not cleaned periodically, then at some point you may find that it is fully occupied or. It is better not to wait for such a nuisance and periodically conduct preventive cleaning of unnecessary files and folders.
How to clean up C drive from unnecessary files.
In each windows versions There are standard tools for cleaning drive C. Additionally, you can download and install the CCleaner utility. It allows you to clean the disk, registry and remove unnecessary programs. For non-commercial use, it’s enough free version. The utility is Russified, you can download it from the official website of the developer.
In the "Cleaning" there are many settings. The developers took care of the users - when loading by default, it is immediately installed with all the necessary settings. But you can change them as you wish.
You can mark any checkboxes from the Windows tab and "Applications" for cleaning. There are sections on Windows Internet explorer (non-functional OS browser, but cannot be deleted), Explorer, System, and Other. In “Applications” you will find all other browsers, “Applications”, “Internet”, “Multimedia”, “Utilities” and Windows. CCleaner doesn’t delete the “Cleanup” program itself; it only cleans unnecessary files.
How to free up disk space C, delete unnecessary files without additional programs.
CCleaner is a great cleaner. The utility does half the work for us, but not all. If you collect various files and programs on your computer, saving them to drive C, then no utility will save. Let's see how drive C can be loaded and where we have the reserved folders with files that are not needed here.
Open "My Computer", local drive C and look at its contents. We begin a phased cleaning.
- Programs. Install programs on drive C is not worth it. But many of them try to install here by default. Follow the installation process and select other local drives yourself. If you previously acted harshly, you must check drive C for programs and remove at least unnecessary ones.
- The Downloads folder. In Windows XP, the Downloads folder was in My Documents. In Windows 7, 8, it opens from the My Computer menu. In Windows 10, the folder’s shortcut usually has a Start menu, and it can also be found through the Explorer. The Downloads folder is not cleared by default with utilities so that the user does not delete anything they need. It stores everything that we downloaded from sites, received by mail and on Skype. In it you can find the usual and installation files, pictures, archives of programs and folders. The weight of some (for example, backup of your sites) may be more than a GB. As a result, the “Downloads” folder can occupy more than half of drive C. Therefore, we look through it, transfer everything we need to disk D, and ruthlessly delete it.
- My Documents folder. In Windows 7 and above, it was called “Documents” and placed in “Libraries”. In Windows 10, the easiest way to find this folder is from Explorer. We check its contents and clean it.
- My Pictures folder. This is another folder that can take up most of the space on drive C - all are saved to it by default image files. It is located in the "Documents". Unnecessary files You can safely delete, it’s better to move it to another disk.
- My music folder. It is also located in the Documents folder. Check the contents and delete or transfer to drive D.
Manually clean drive C.
If you do not want to install CCleaner, you will have to manually clear the Temp folder with temporary files (located in windows folder), empty the Trash, cookies and browser cache. If the space is still sorely lacking, you can delete some control points system recovery. Windows also has the Disk Cleanup utility installed. She also helps make room.


