Modern browsers have a wonderful the ability to synchronize user settings with a remote server. In particular, Yandex browser, when you use the synchronization function, will also save your settings on its server.
What is it for? Imagine that you have configured your favorite browser for yourself for a long time - installed a bunch of add-ons you need, saved the necessary and interesting bookmarks to your sites, saved passwords to the sites you frequently use in your browser, etc. And then suddenly your computer breaks down ... You must admit that losing the results of your work is a shame. But with the synchronization function turned on, you can easily restore the working state of Yandex Browser. In addition, you can enable synchronization of settings for convenient work on any other computer (at work or with friends).
Turn on sync
Go to “Yandex Browser Settings” in the upper right corner, select "Synchronization". A window will appear for entering the login and password from your Yandex account with which you want to synchronize.
Further, all changes to the settings, information about added bookmarks, passwords, installed extensions will be stored on Yandex servers. To restore your settings on a “clean” browser, you will need to enable synchronization again. Within a few minutes, all settings will be downloaded from your Yandex account. You just have to wait a bit.
Sync Settings
Go to “Yandex Browser Settings” - "Settings" - in the block "Synchronization" indicate which data you want to synchronize.
How safe is synchronization?
All settings are sent to Yandex servers encrypted. And on servers, no one can get access to this information except you (of course, if your account is not intentionally hacked). But to use synchronization on someone else’s or on a working computer, which an outsider can have access to, is unsafe if only because if you save passwords in a browser, an outsider can easily recognize these passwords.
Therefore, if you still need to enable synchronization not on your device, then I recommend doing the following. First you need to go into “Yandex Browser Settings” - "Settings" and further in the block "Users" need to press a button "Add profile". For a new profile, you will need to specify its name and you will also be asked to select an image.
After creating a new profile, a new browser window will open using the created profile. Being in your profile, you must again enter the “Yandex Browser Settings” and enable synchronization by entering your username and password. In a few minutes, all your settings will be uploaded to your profile.
After finishing work on someone else’s device you just need to delete the profile created for yourself from Yandex Browser in its settings.
What is synchronization for the browser and why is it needed.
It's no secret that for convenient navigation on the Internet, we all strive to configure browsers as conveniently as possible with synchronization for ourselves. At a minimum, every person who actively uses the Internet uses bookmarks in a browser to quickly go to the necessary site.
But, unfortunately, no one is safe from data loss, for example, as a result of a virus attack. If you do not take care of saving all the bookmarks and other settings of your browser, then after disinfection of the computer and reinstallation operating system everything will have to be configured from scratch. This is at least unpleasant and inconvenient, not to mention the fact that it greatly slows down the work process.
Of course you can exercise data backupby saving, say, your browser’s bookmark files on external media or file hosting. But this is also not very convenient, because you will need to download files, open subfolders of the browser, copy information there and repeat this more than once. This method of solving the problem is already outdated.
Thanks browser sync important settings your Google Chrome, Opera, browser Mazil instantly remembered. After that, you can restore them or send them to another browser with just a couple of clicks, thus getting rid of the danger of losing convenient settings or immediately copying them to another device.
So, synchronization with anything for the browser - This is a way to quickly transfer all or part of its settings to another location, so that, if necessary, immediately restore them in case of loss, or immediately copy to another computer or smartphone without any difficulties. The most popular browsers with synchronization are Google chrome and Yandex Browser (for download, follow the links).
Browser synchronization with Yandex servers
One of the most popular now is the synchronization of the browser with a special Yandex server. It is good because almost all the necessary settings are saved, such as passwords, extensions, bookmarks, history, modules and applications. Even autocomplete forms will be remembered!
Synchronization of the browser with Yandex servers is absolutely safe - the entire transfer is carried out using a secure channel, passwords will be transmitted exclusively in encrypted form. That is, if you trust your passwords in principle to Yandex servers (you have there email etc.), then you can also trust synchronized data without fear.
In addition, on Yandex, you can change the synchronization at any time or edit the list of synchronized settings.
Sync smartphone and computer
You can synchronize browsers with each other. For example, not the most popular yet, but still quite a decent proprietary Dolphin browser for a smartphone with each version acquires new features. The latter added the ability to synchronize bookmarks with the "big brother" - the browser Google chrome.
First you will need to put an extension for Chrome - Dolphin Connect.
When you see this application in the extensions panel, click on it and select a connection method with using google account. Now go to Dolphin on your smartphone and click on the cloud. An account selection window will appear - select google account. Everything - bookmarks are synchronized.
In this article we will look at how to back up files and keep them up to date, as well as how to synchronize files between multiple computers using one of top programs FreeFileSync.
1. What is backup for?
Backup your files, such as personal documents, photos and videos, will protect them from loss as a result of accidental deletion, a malfunction in the operating system, a virus or damage hard drive.
Remember! If you do not back up your files, sooner or later you will lose them!
Another backup goal may be to synchronize your files between multiple computers. For example, you can work with the same files at home and at work, and you need the files to be updated on the home and work computers as they change, create or delete.
Also, regular file backups will greatly simplify computer recovery in the event of a failure. It will be enough for you to restore the image of the operating system, and all the files are already safely stored in the backup copy and you do not have to spend a lot of time and effort to restore them.
2. Installing FreeFileSync
During installation, you can select the “Local” or “Portable” version, which can be worn on a flash drive if, for example, you cannot install “Local” on a working PC.
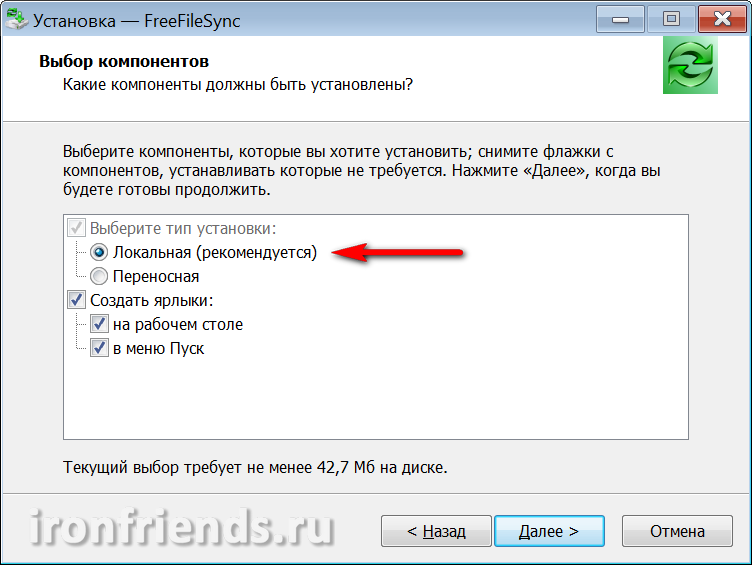
After installation, two shortcuts are created: “FreeFileSync” is the main program and “RealTimeSync” is a utility for real-time synchronization.

3. Where is it best to keep backups
Before starting the description of the FreeFileSync program, I want to say a little about where it is better to store backups.
The most reliable and convenient will be storage backups on an external hard drive.
An external drive can also be used for storage. You will not only save your valuable documents, photos and videos, but also be able to quickly restore the system in the event of a failure.
The disadvantages of storing backups on a flash drive is that its volume is very limited, the flash drive is easy to lose, and often it may take a lot of space to transfer files. In addition, flash drives are highly prone to crashes and virus infection.
CD / DVD-ROMs are also unreliable media, as they are susceptible to damage and, even if they just lie still, over time they stop reading. In addition, it is problematic to regularly update files on disks.
You can back up files to another computer hard drive. But, if a breakdown in nutrition occurs, then everything can fail hard disks. Therefore, it is also not recommended.
Keeping a backup copy on another partition of the same hard drive is unacceptable, since in the event of a drive failure, the backup will also be lost.
In general, do not be stingy and get external hard USB drive (preferably USB 3) local area network (Ethernet) or store the backup on another home, work computer or laptop.
Transcend TS1TSJ25M3
If your files are very valuable and their loss will lead to unacceptable damage, then store the backup in another room or on a server on the Internet ( cloud storage) Thus, in the event of a fire or other natural disaster, your data will remain intact.
Important confidential data should be stored in a password-encrypted form, so that the theft or loss of media does not entail the disclosure or illegal use of confidential information.
The main condition for the preservation of files is the constant availability of their copies. As soon as one of the copies is lost, restore it as soon as possible.
4. Backing up folders
The first backup can be created by simply copying the file folders to an external drive, to a network folder, or other selected medium. But it’s better to use FreeFileSync immediately, as it creates its own database to track file changes.
4.1. Select folders for backup
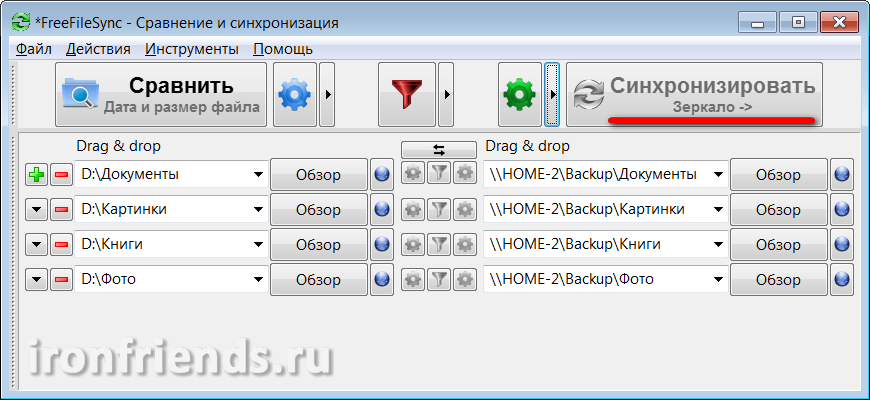
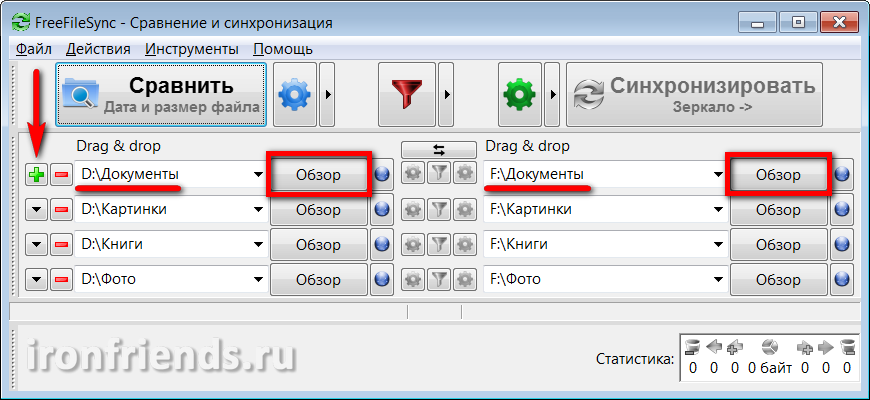
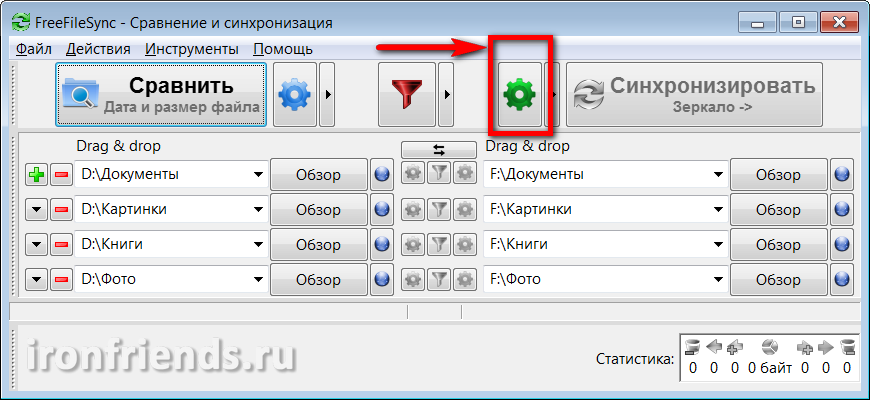
Open the program, in the left pane add folders with your files, and in the right pane select the folders you want to back up to.
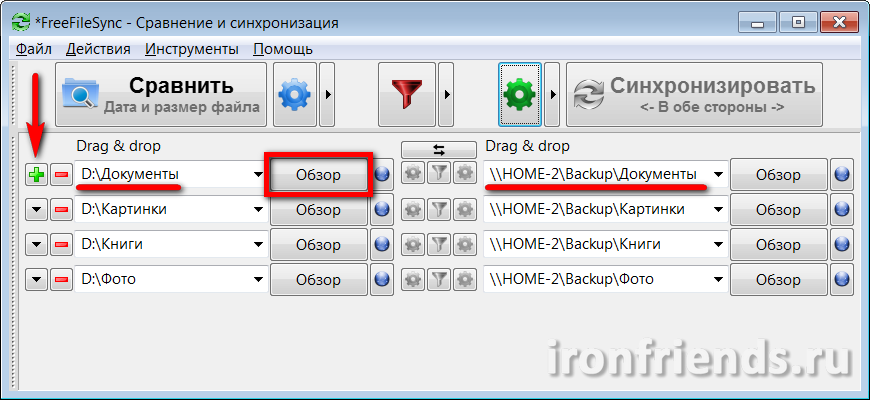
To add another pair of folders, use the plus sign “+”, to search for a folder in Explorer, use the “Browse” button. Also, the paths to folders can be entered fully or partially manually, copy and paste the paths and folder names into the required fields. If the folder in which you want to make a backup does not exist yet, then it will be created during the first backup.
For example, I created the “Backup” folder on the disk of the second home computer “HOME-2” and opened access to it via the network for reading and writing. It also stores backups of my files.
Choose the most important files for backup. It is possible to make backup copies of folders with movies and music, which can always be downloaded from the Internet, but if they are large, it is usually not advisable.
4.2. Select backup mode
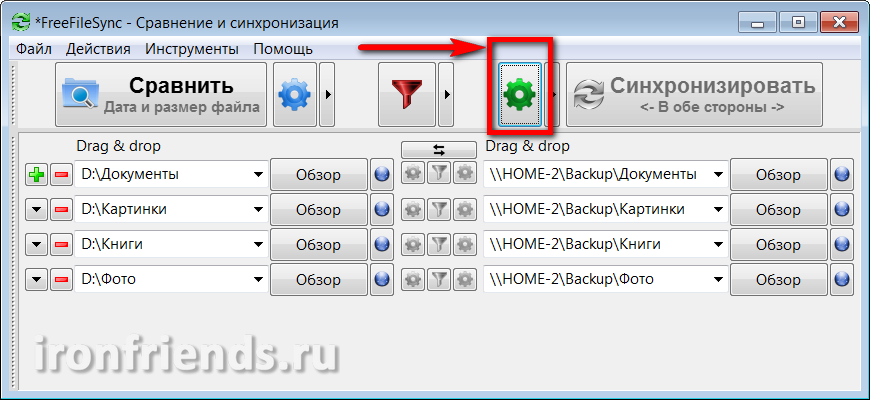
Select the Mirror backup mode and click OK.
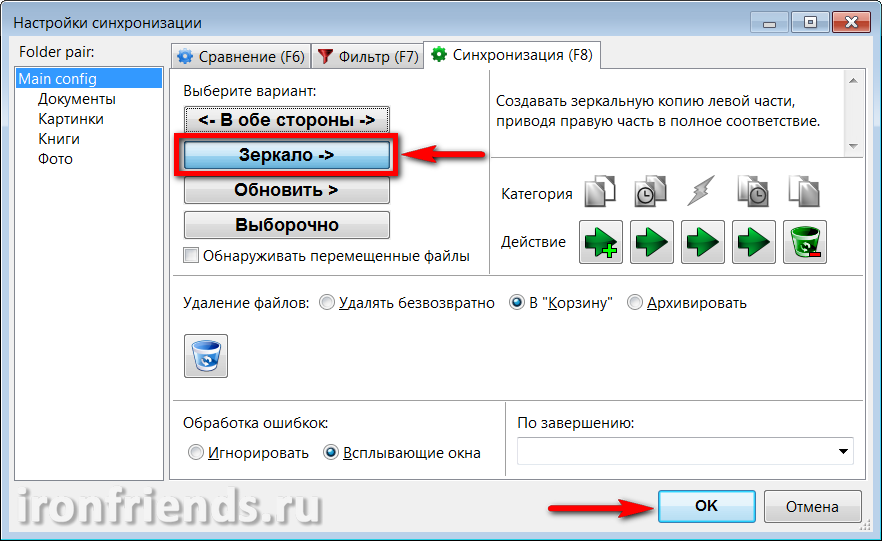
Make sure that the “Mirror” mode is set on the “Sync” button.
In this mode, when backing up, the folders on the right will be brought into exact correspondence with the folders on the left. Modified files will be replaced, new ones will be added, deleted ones will be deleted.
4.3. Comparison of reserved folders
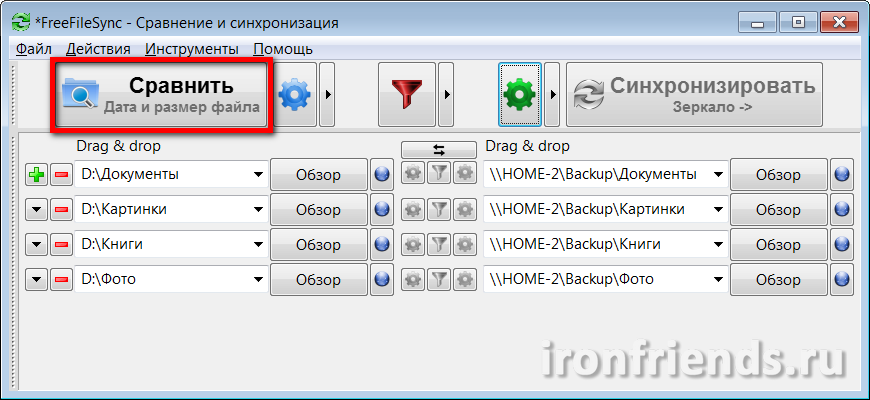
Before starting a backup, you must first compare your folders with the backup folders. To do this, click the "Compare" button.
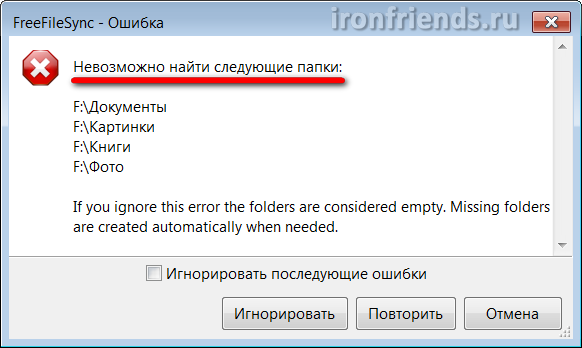
If this is your first backup and you did not create empty folders for backups, a message appears indicating the folders that were not found.
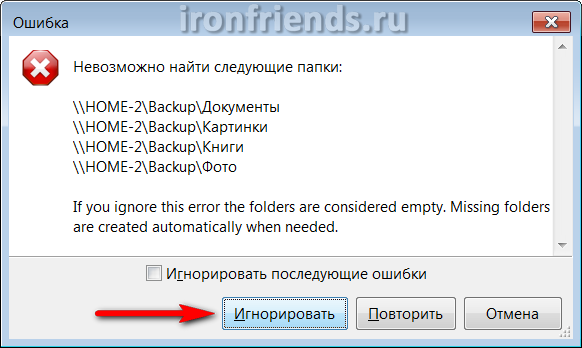
Note that these errors can be caused by an error in the path to the main folder with backups (in this example, “Backup”) or lack of access to another computer over the network (in this example, “HOME-2”).
After comparing the folders, you will see a list of files to be copied, updated and deleted, and their total size.
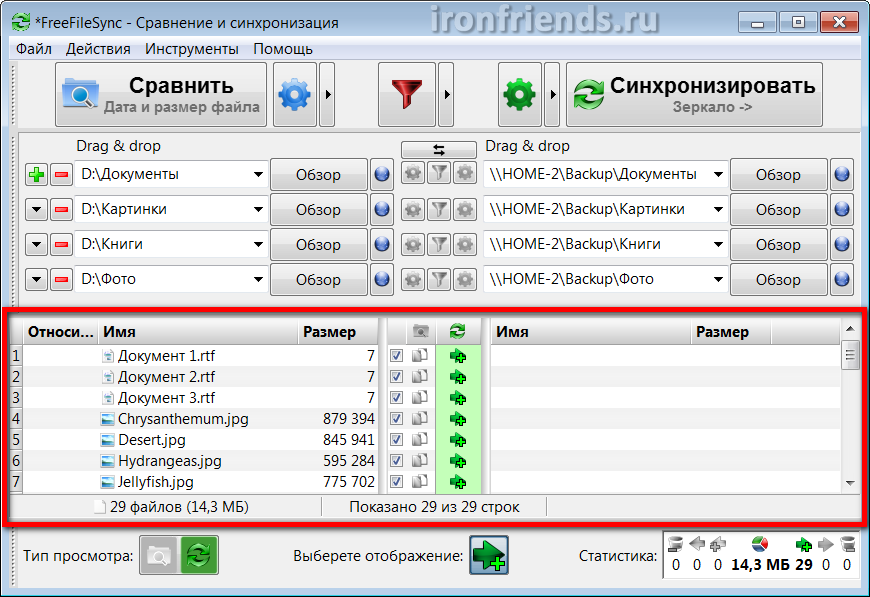
At the first backup, you will only have files to be added, the next copies will have updated and deleted files, depending on the changes you made. The renamed files will be deleted from the backup and the files with the new name will be copied to their place.
4.4. Backup
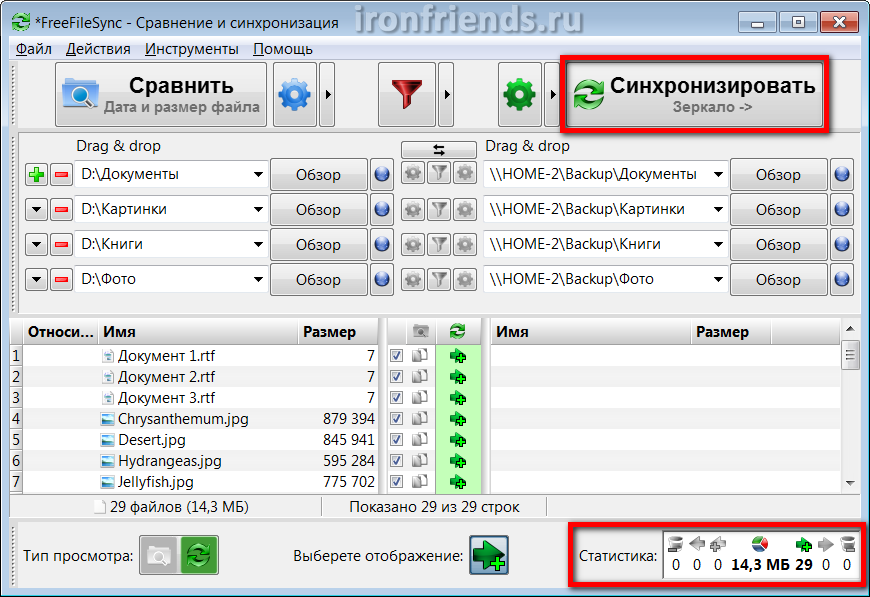
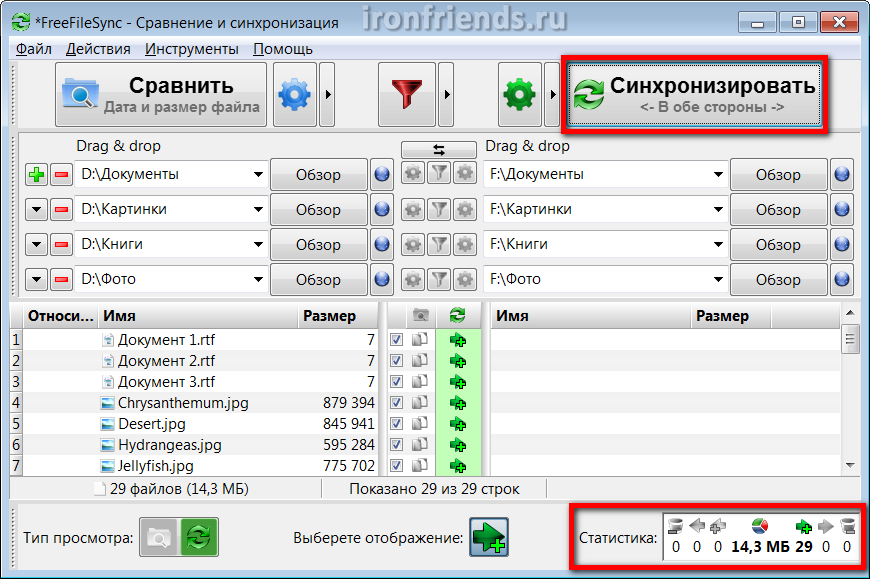
Make sure that the result of the comparison, the expected actions and the volume of the copied files look plausible and click the “Synchronize” button that has become active.
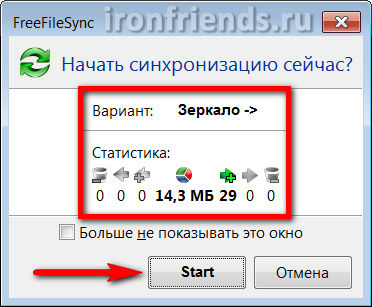
A message appears again warning of the actions being taken, in which you need to confirm the start of the backup with the "Start" button.
Depending on the size of the files, the speed of the external drive or the local network, the backup process may take a different time. But the program itself does it as fast as possible.
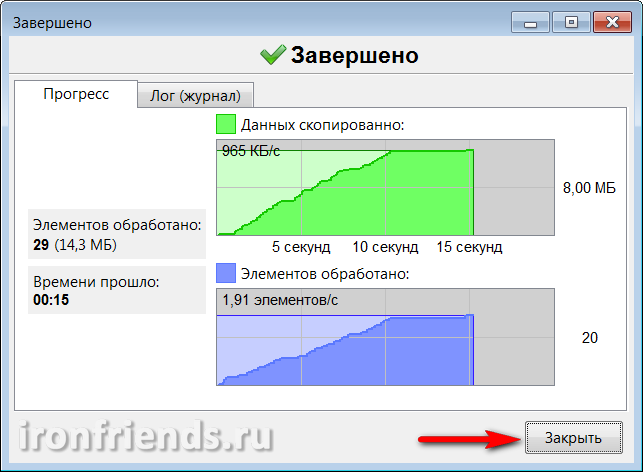
The first backup with a large file size may take long time. All subsequent backup updates take significantly less time. The backup ends with a success message.

During the backup process, various errors and warnings may occur. Most of them are not significant (for example, some service or temporary file cannot be copied). Make sure that the error is really not significant and click the "Ignore" button.
5. Folder synchronization
Folder synchronization may be required if you are working with the same files on multiple computers, for example, at home and at work. In this case, in order to make the files the same everywhere, you can use an external drive or USB flash drive for synchronization.
If you don’t have a good flash drive yet, then it’s time to get it.
5.1. Select folders to sync
Open the program on a computer with latest version your files. In the left pane, add folders with your files, and in the right pane, select the folders on the external drive or flash drive that will be used for synchronization.
When synchronizing files between multiple computers, it does not matter which folders are on the right and which are on the left. But, to avoid confusion, I recommend that you always select the files on the left of the computer and the ones on the external drive or flash drive on the right.
To add another pair of folders, use the plus sign “+”, to search for a folder in Explorer, use the “Browse” button. Also, the paths to folders can be entered fully or partially manually, copy and paste the paths and folder names into the required fields. If the folder that you want to use for synchronization does not exist, then it will be created during the first synchronization.
Store frequently modified files in separate folders (for example, “Documents”) so that they do not mix with large immutable files (for example, movies). Then synchronization will require significantly less time and space on an external drive or flash drive.
5.2. Select a sync mode
Now go to the synchronization settings using the gear icon next to the "Sync" button.
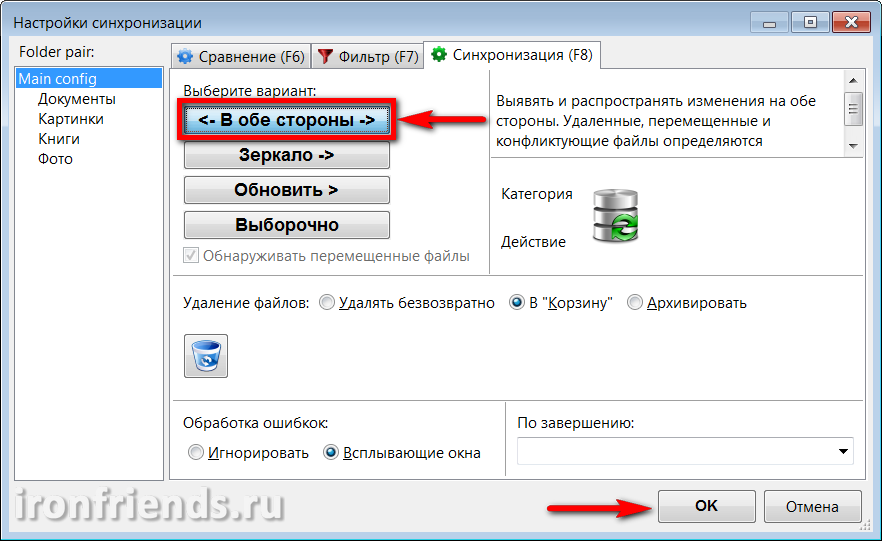
Select the synchronization mode "Round Trip" and click "OK".
Make sure that the "Synchronize" button is set to "Both ways".
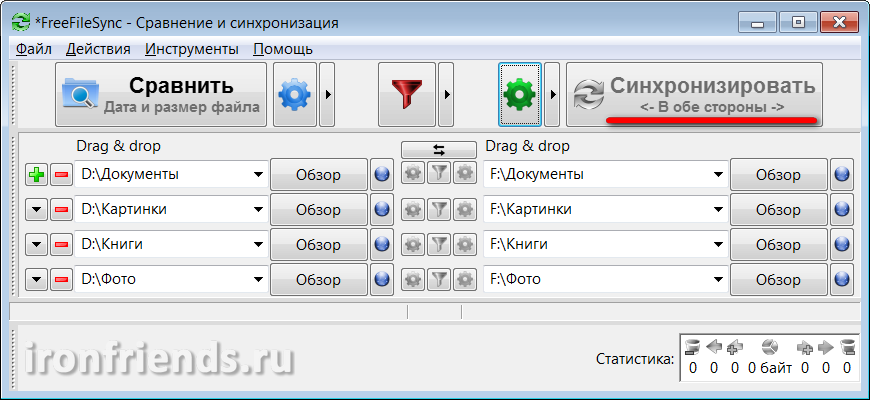
In this mode, during synchronization, folders located on the left and on the right will be brought into exact correspondence. In this case, all changes will be taken into account both from one side and from the other. Changed files will be replaced, new ones will be added, deleted ones will be deleted. For this, a database is used, consisting of special service files that the program creates in each synchronized folder.
Thanks to the database, you can make changes on several computers independently of each other and even on the external drive or flash drive, using some other computer that is not involved in synchronization. At the next synchronization, the program itself will determine which changes are the last and gracefully bring the folders with files to the final version, even if you skipped the previous synchronization and already forgot which computer and which files you changed. The program will precisely determine this by itself using the database.
5.3. Comparison of synchronized folders
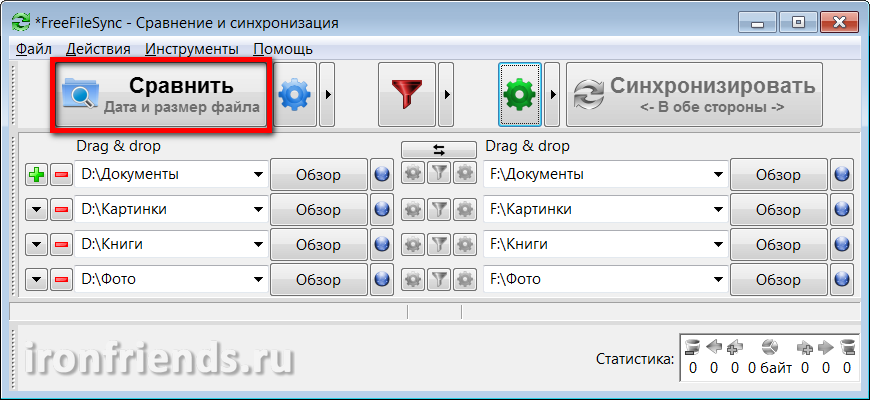
Before starting synchronization, you must first compare the folders on the computer’s drive with the folders on the external drive or flash drive. To do this, click the "Compare" button.
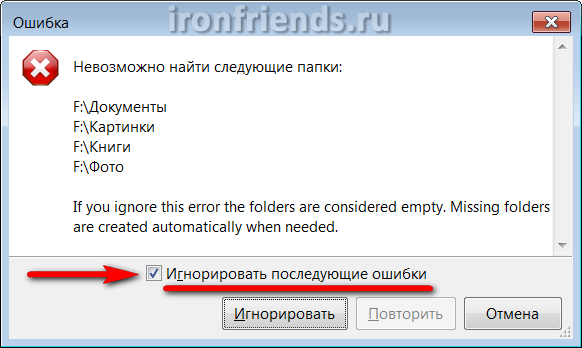
If this is your first synchronization and you did not create empty folders for synchronization on an external drive or flash drive, a message appears indicating the folders that were not found.
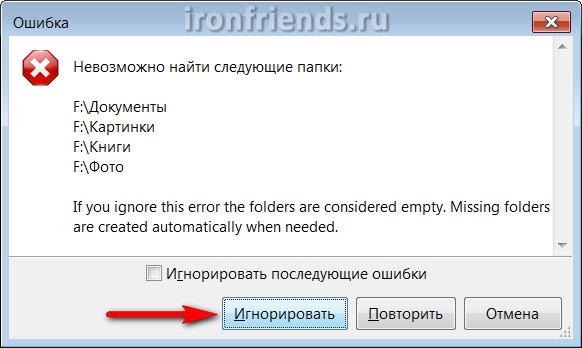
Click the Ignore button.
Note that these errors can be caused by an incorrect drive letter (in this example, “F”), as the letters can sometimes change, or problems with the connection of an external drive or flash drive (for example, a bad cable or lack of power).
After comparing the folders, you will see a list of files to be copied, updated and deleted on both sides and their total size.
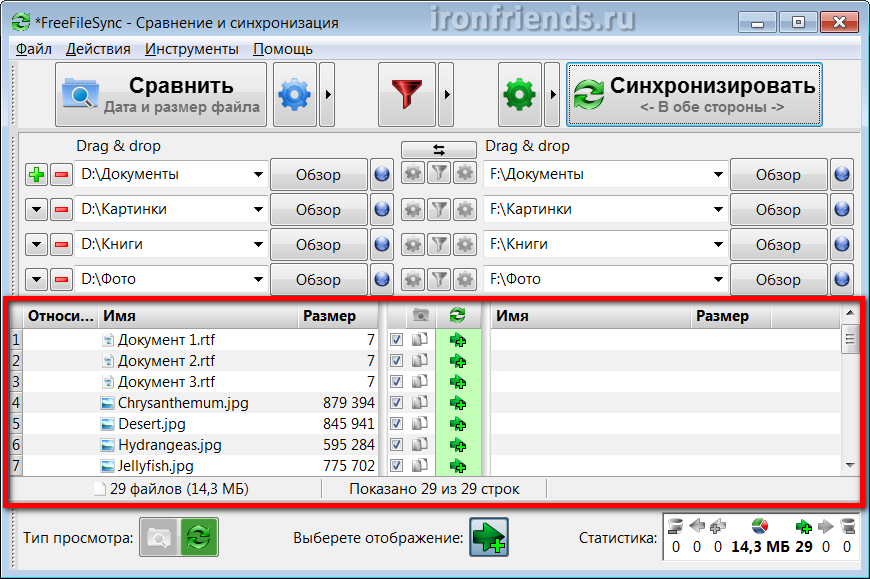
At the first synchronization, you will only have files to be added; at the next synchronization, updates and deletions will appear, depending on the changes you have made. Renamed files will be deleted and files with a new name will be copied to their place.
5.4. Start sync
Make sure that the result of the comparison, expected actions and the amount of files being synchronized look plausible and click the “Sync” button that has become active.
A message appears again warning of the actions being taken, in which you need to confirm the start of synchronization with the "Start" button.

Depending on the size of the files, the speed of the external drive or flash drive, the synchronization process may take a different time. But the program itself does it as fast as possible.
The first synchronization with a large volume of files can take a long time. All subsequent synchronization takes significantly less time. Synchronization ends with a success message.
During the synchronization process, various errors and warnings may occur. Most of them are not significant (for example, some service or temporary file cannot be copied). Make sure that the error is really not significant and click the "Ignore" button.
5.5. Sync on another computer
To synchronize folders on another computer with an external drive or flash drive, you need to install the FreeFileSync program on it, configure and synchronize on it in the same way (Section 5.1-5.4).
Also, when installing the program, you can select the “Portable” version and install the program on an external drive or flash drive, which will be used for synchronization. It is recommended to use this method if you cannot install the program on another computer (for example, at work).
6. FreeFileSync program settings
The program has a few settings and they are all quite understandable and useful.
The program remembers the last folders for synchronization. But it’s better to save the synchronization settings to a file using the “File / Save” menu.
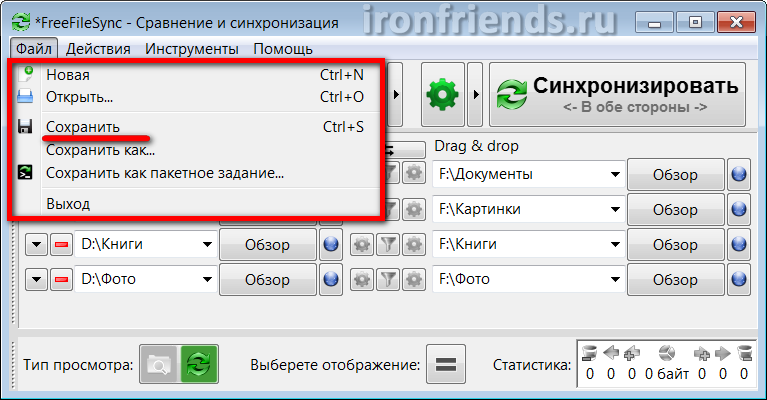
Using the File menu, you can create a new configuration or open an existing one. Thus, you can create several different configurations, for example, separately for backing up files to the second home computer and separately for synchronizing documents using a flash drive with a working computer.
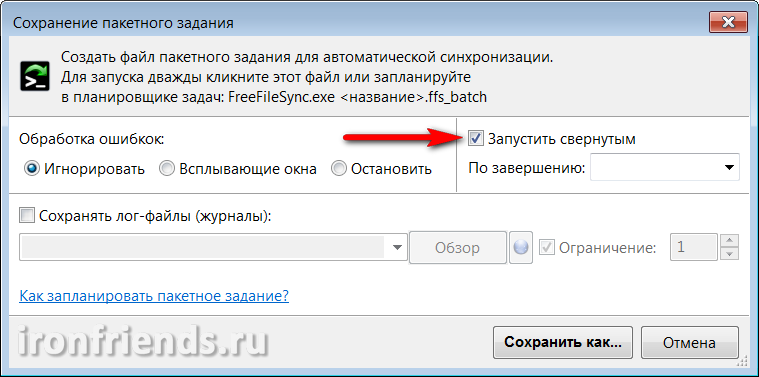
If you select "Save as a batch job", then this file can be used to manually start the backup, synchronize folders, or specify it in the scheduler for automatic scheduled backups.
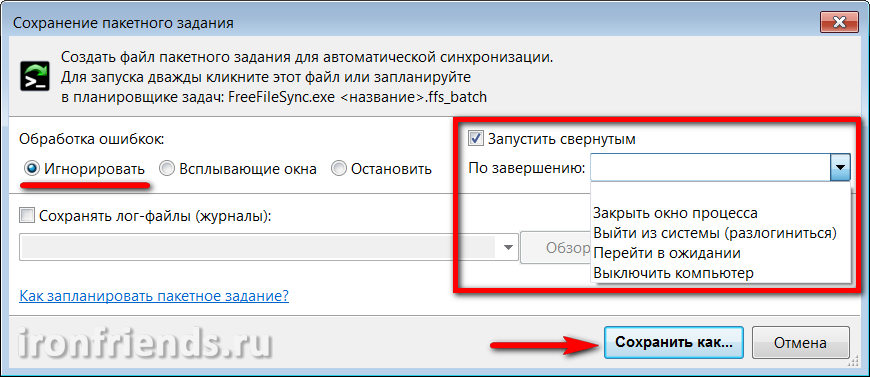
If you plan to start a batch job automatically on a schedule, then when saving, you can set the error handling to “Ignore”, check “Run minimized”, and the action to complete “Close the process window” or “Turn off the computer” (for backup at the end days).
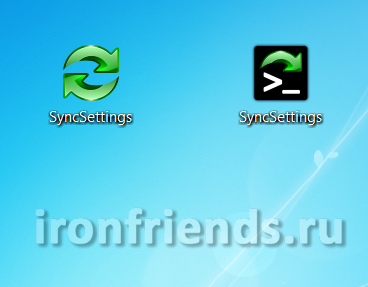
The settings file and batch job have corresponding icons and can be started without opening the main program.
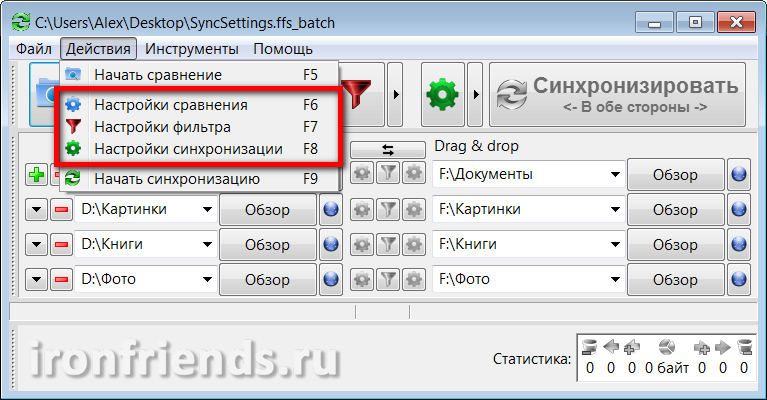
6.2. Compare, Filter, and Sync Settings
From the “Actions” menu you can go to “Comparison settings”, “Filter settings” and “Synchronization settings”.
In the comparison settings, instead of the "Date and file size" mode, you can set the "File Content", but this is not recommended, since it will greatly slow down the speed of the program.
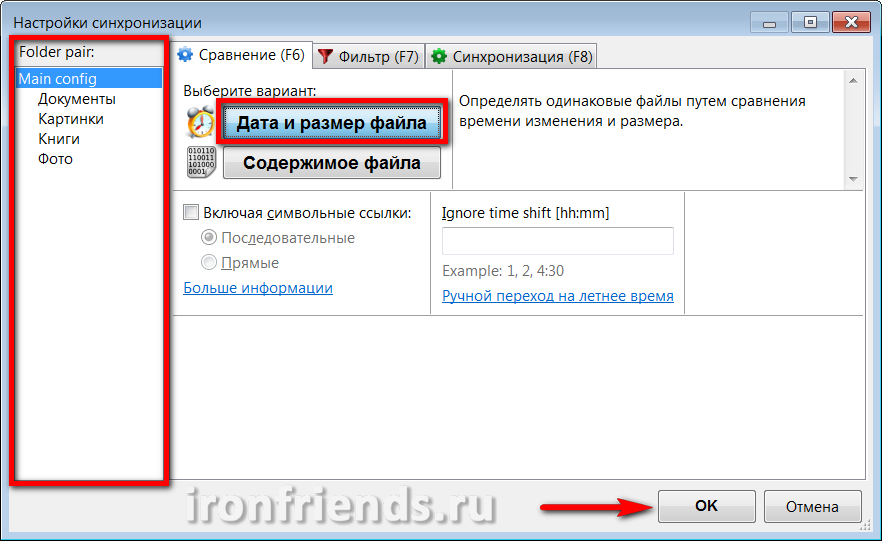
In the left pane, you can select folders and set comparison options for each of them individually. It is also possible to enable copying symbolic links, if you know why this is necessary.
In the filter settings, you can exclude individual files and folders from backup.
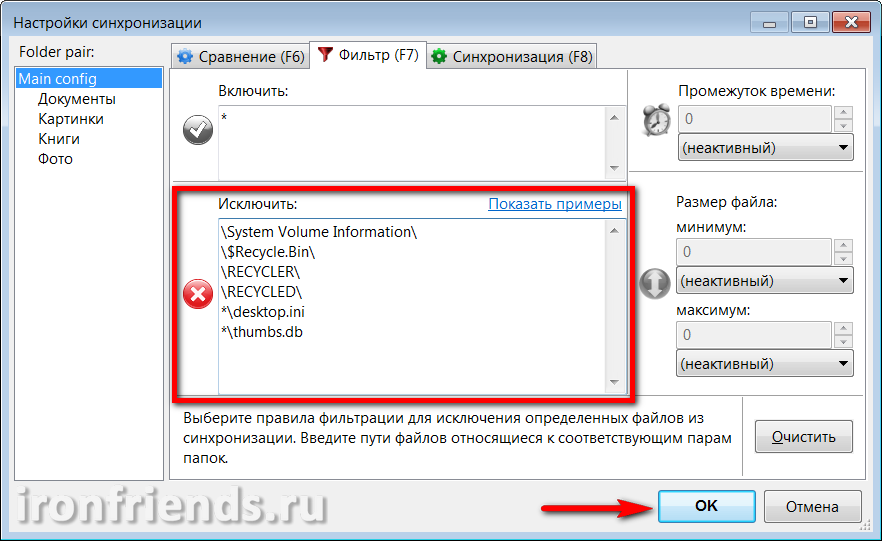
For example, if your folder “D: \\ Documents” contains a folder “Video” with large filesthat you have already copied somewhere, then to exclude it from synchronization, add the line “D: \\ Documents \\ Video \\” to the “Exclude” section. If you want to exclude from the backup all installers of programs that can be downloaded from the Internet, add the line “* .exe” to the “Exclude” section.
In the left panel, you can select folders and set filter settings for each of them individually.
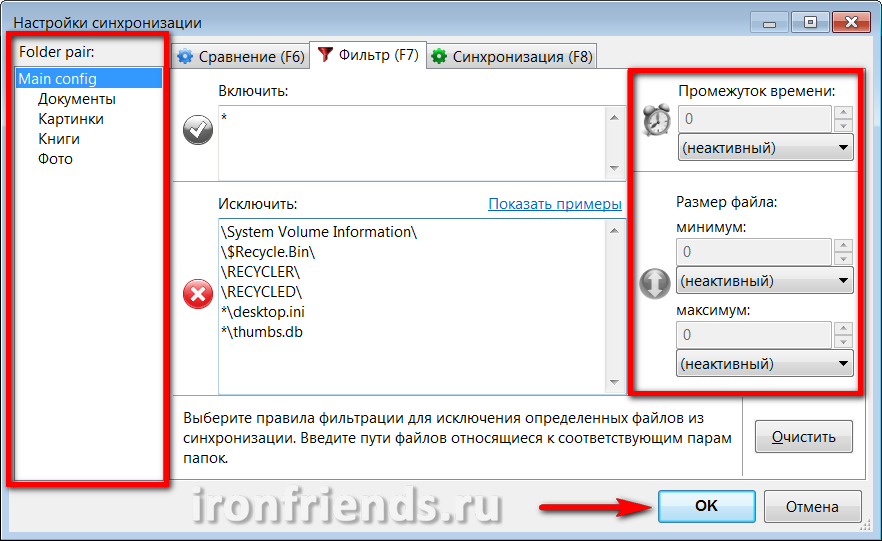
Using the fields on the right, you can filter out files that are not needed for synchronization by the time interval from their last change and size. This way you can filter out, for example, files that are too old and too large.
Sync settings
Sync settings are the most important, most useful and allow you to flexibly control the process of creating backups or synchronizing folders.
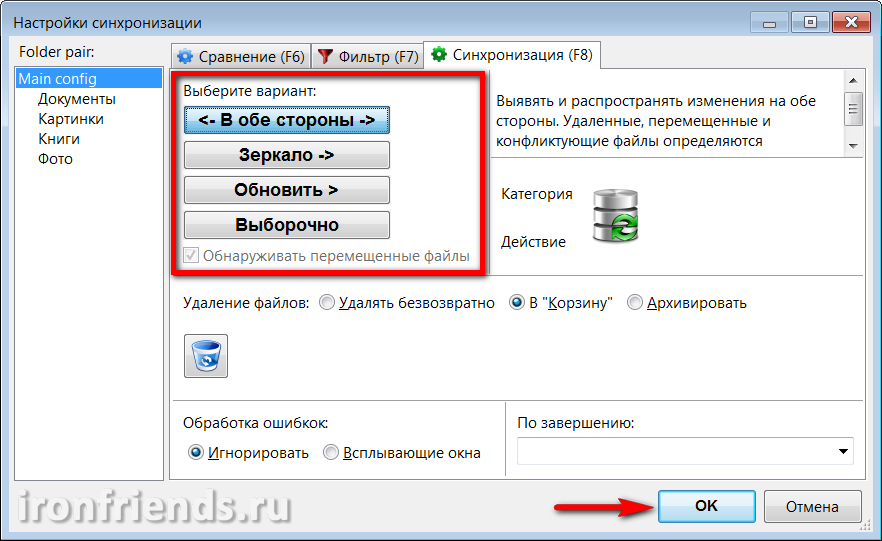
The following synchronization options are available.
| Round trip | Used to synchronize folders between multiple computers. The folders on the left and right are fully aligned using the change database. Files are copied and deleted in both directions. |
| Mirror | Used for backup. The folders on the right are fully aligned with the folders on the left. Files are copied only from left to right, files deleted on the left are deleted and on the right. |
| Refresh | New and changed files from the folders on the left are copied to the folders on the right, but files deleted in the folders on the left are not deleted from the folders on the right. This may be necessary if you need to keep old files in a backup. |
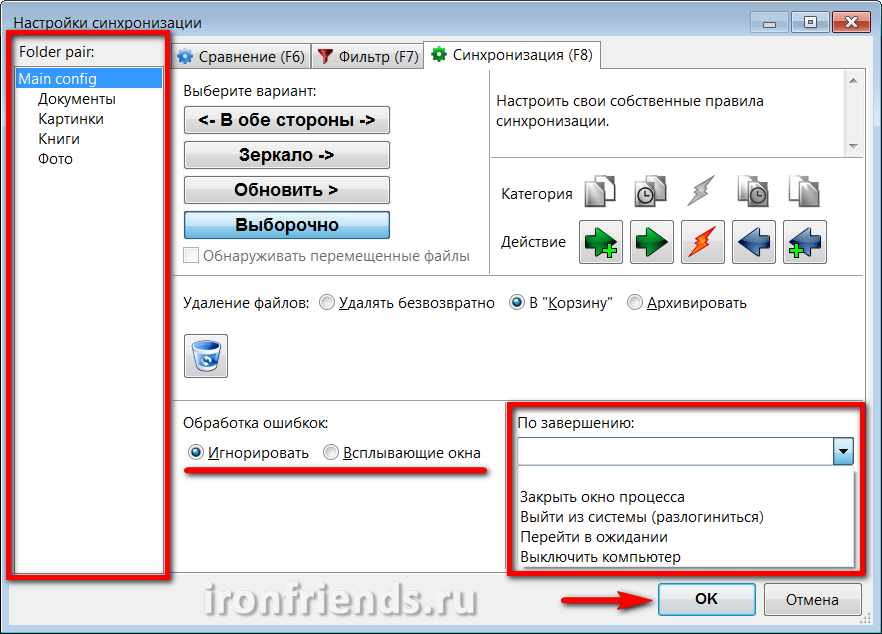
| Selectively | Allows you to configure your own synchronization rules when new, changed and deleted files both left and right. It can be used to solve some specific problems. |
In all modes, except for the "In both directions" synchronization, you can set your own rules for new, updated and deleted files.

There is also the option “Detect moved files”, which is useful if you often restore order in folders. In this case, the files will not be copied again, but simply moved to the copy.
A little lower you can configure the settings for deleting files - “Delete permanently”, “To Trash” or “Archive”.
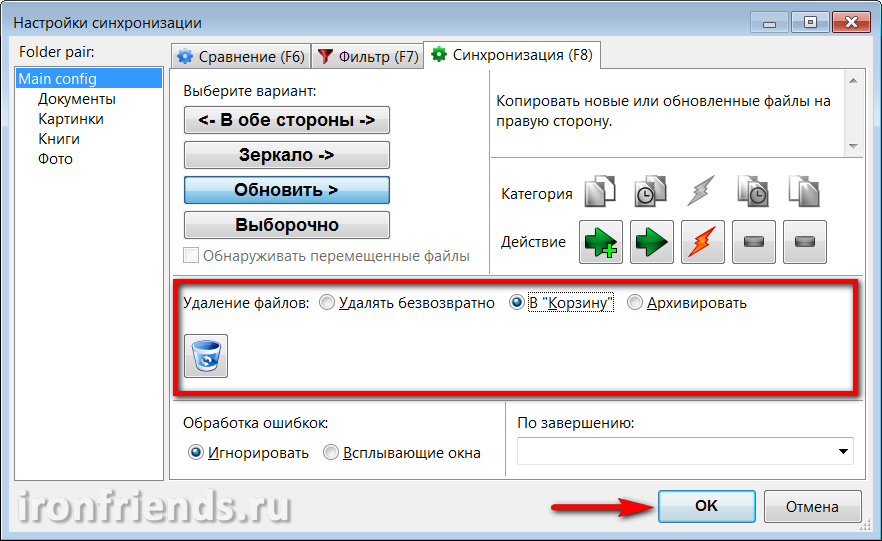
By default, files located on hard drivesare removed to the trash. If you make a mistake with the synchronization settings and some needed files, then they can be restored.
Files on flash drives and network folders are not deleted to the trash. You can restore them only with the help of special file recovery programs. If you make a mistake, do nothing with the flash drive or disk until you restore the files you need from them.
If you select the "Archive" option, the files will not be deleted, but will be moved to the folder specified by the user.
If you need to synchronize a large amount of data and there is no way to control the process, it is recommended to set the option “Error handling” to “Ignore”. You can also select the desired action to complete the synchronization, for example, turn off the computer.
You can also set synchronization settings for each individual folder by selecting it in the left pane.
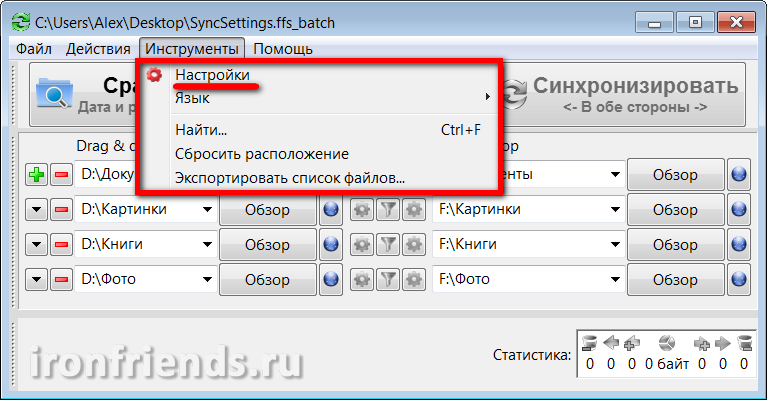
6.3. Other settings and tools
From the "Tools" menu, you can go to the "Settings" of the program itself, change the "Language" of the interface, "Find" files and folders in the comparison results, "Reset location" of all folders and "Export file list" into a text document.
By default, the program settings include “Fail-safe file backup”, which makes backup or synchronization more reliable.
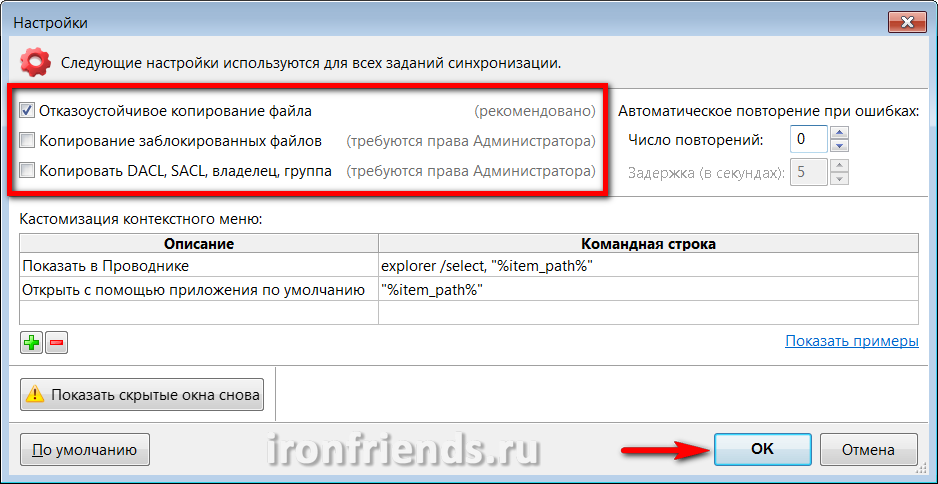
You can enable “Copy locked files” if such problems occur. The option “Copy DACL, SACL, owner, group” allows you to copy file permissions if you set such restrictions and want to keep them in a backup copy to limit access to them or subsequent restoration of files along with security settings.
I do not recommend experimenting with security settings, especially file encryption, to inexperienced users. This can lead to a permanent loss of access to files in the event of a system failure or user error.
“Automatic error retry” allows you to set the number of attempts to copy files and the interval between attempts in case of temporary problems with the network or media.
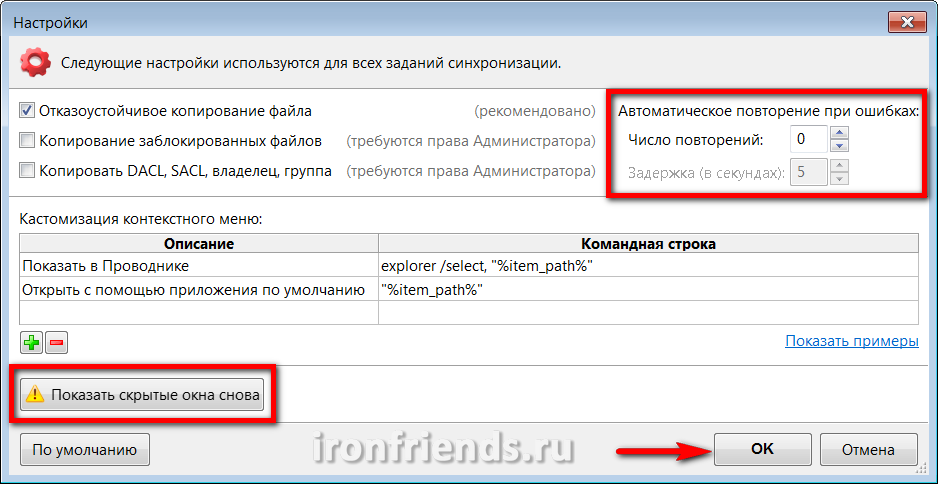
Below are the rules for customizing the context menu for experienced users with a link to examples of their use.
The “Show hidden windows again” button restores the display that you previously disabled using the “Ignore subsequent errors” checkbox.
The “Default” button returns all program settings to the initial state. Use it when you are not sure that you configured everything correctly.
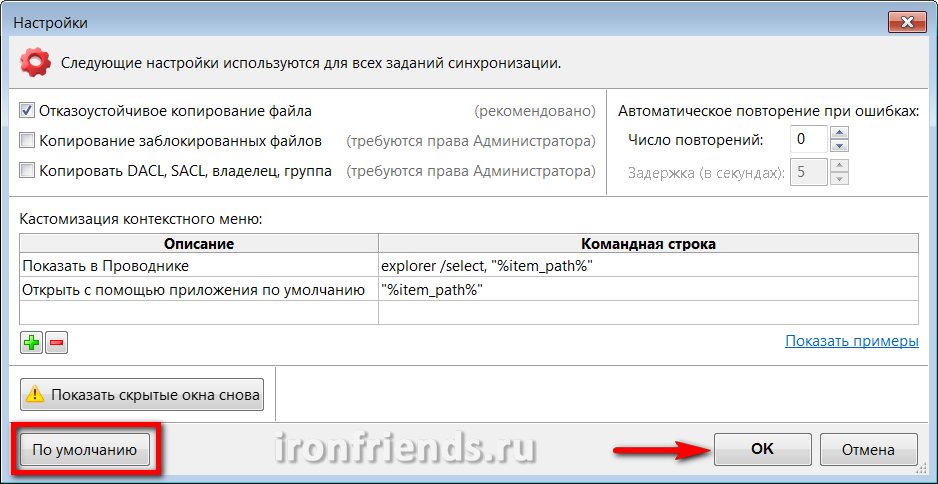
Well, do not forget to confirm all the changes made with the OK button.
7. Real-time backup
Here we look at the additional RealTimeSync utility, which is installed together with the main program and is used for automatic synchronization.
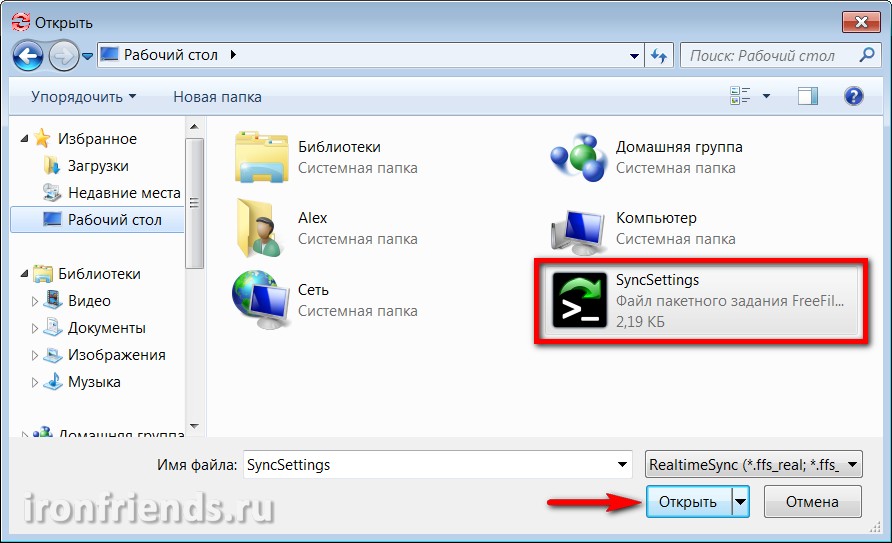
Open the utility using the RealTimeSync shortcut on the desktop or in the “START” menu, go to the “File” menu and select “Open”.
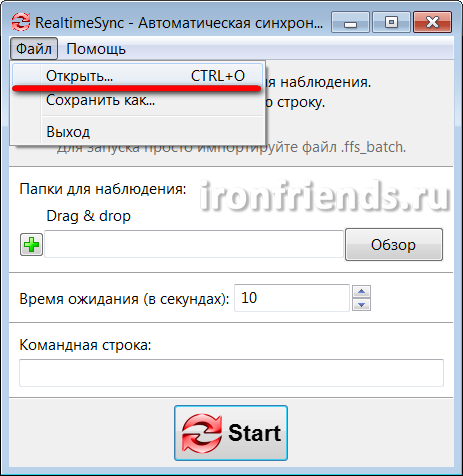
Leave only the folders with files on the computer’s disk in the “Folders for monitoring” section, and delete the folders with the backup on the external disk, flash drive or local network.
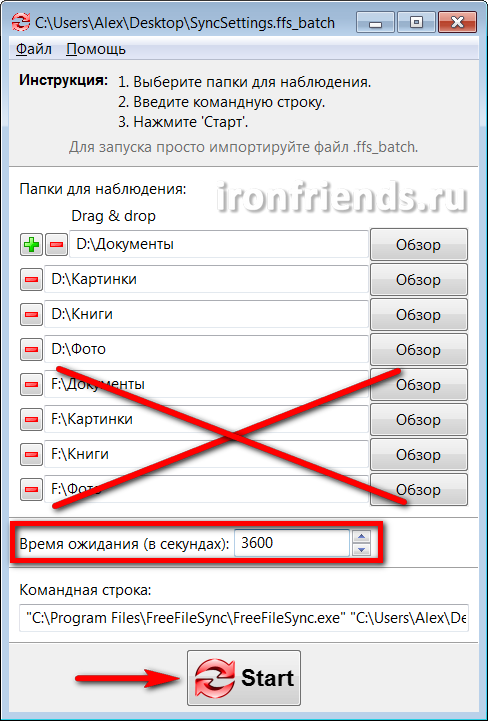
Set the time in seconds after which you would like to check folders for modified files. For example, setting 3600 seconds, folders will be checked every hour after the start of monitoring. It remains only to press the “Start” button, the program will minimize to the system tray (in the icon next to the clock) and begin monitoring the folders.
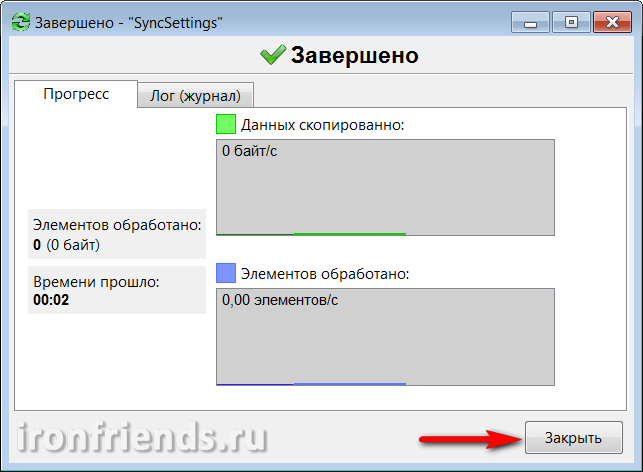
If during the next check file changes occur in the specified folders, the program will start the synchronization process, which will end with the output of the corresponding window.
If the “Run minimized” checkbox is set in the settings of the batch job, this message will not be displayed and synchronization will be performed in silent mode.
If, at the moment of detecting changes in the folders, the utility cannot access external driveflash drive or network folder with backups, a corresponding message will appear.
If the option “Error handling” is set to “Ignore” in the settings of the batch job, this message will not be displayed and synchronization will occur when access to the device with backups is resumed.

Of the advantages of the RealTimeSync utility, it is easy to configure and use it, but it also has several disadvantages. Firstly, you need to start it manually or configure autoload yourself with Windows (for example, by copying a shortcut to the “Startup” folder in the “START” menu). Secondly, it does not allow you to set a flexible schedule for synchronization. And thirdly, sometimes synchronization does not work.
8. Scheduled backups
As an alternative to the RealTimeSync utility, you can use the "Windows Task Scheduler", which does not have all of these shortcomings and has more flexible features.
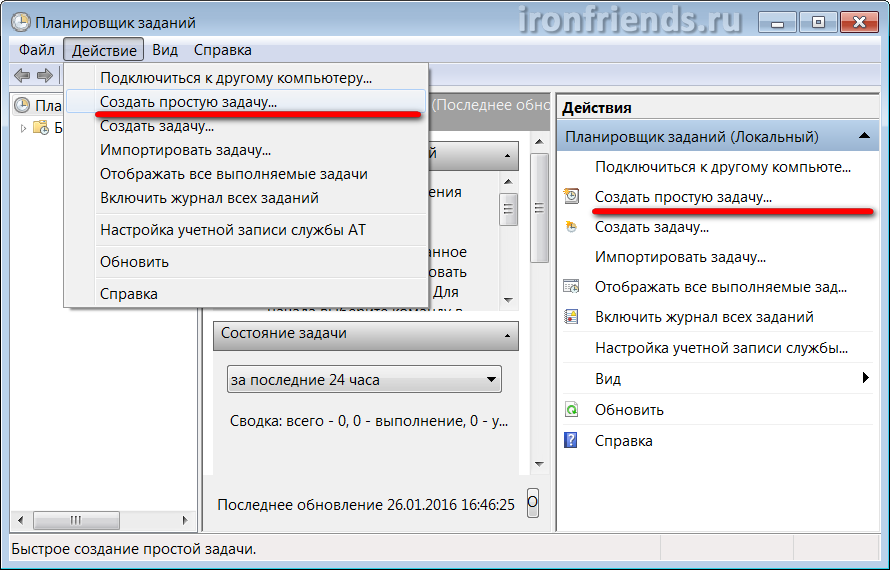
Go to "Control Panel \\ System and Security \\ Administration" and select "Task Scheduler" or "Schedule of Tasks."
Select Create Simple Task.
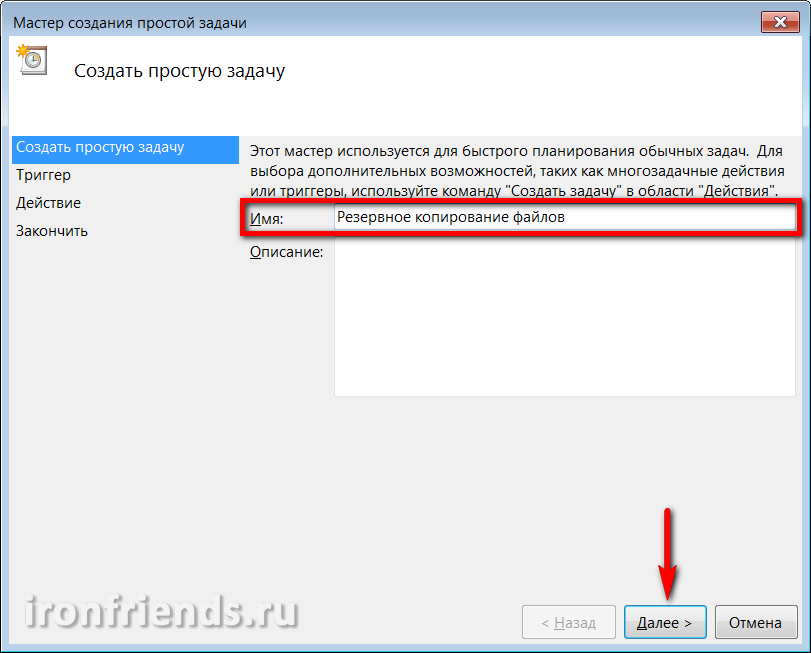
Enter a meaningful name for the task and click on the “Next” button.
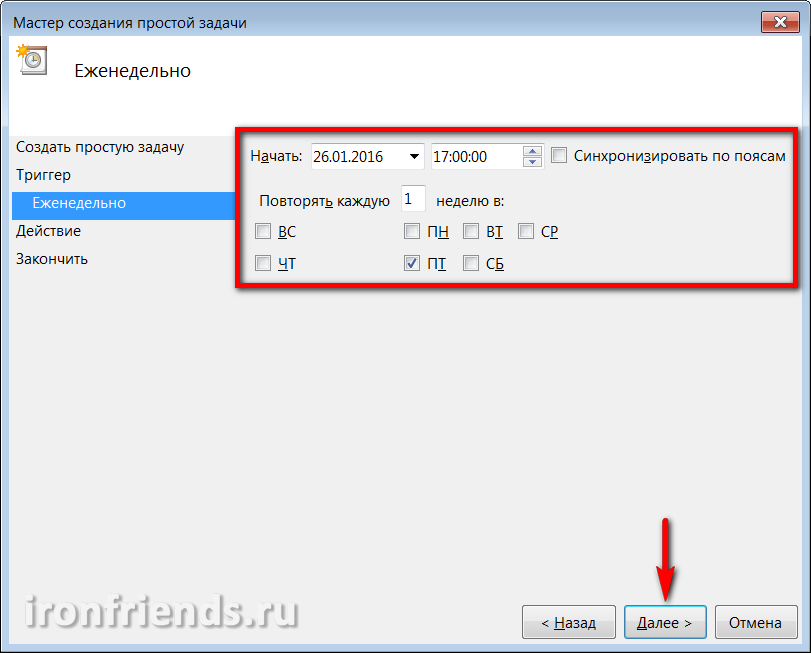
Choose how often you would like to back up.
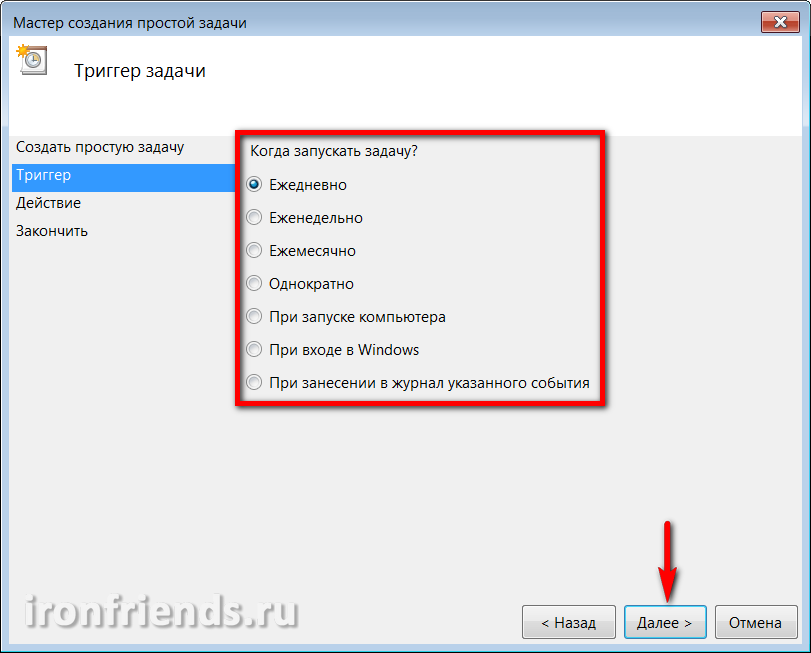
Then determine more precisely the day and time at which the computer is likely to be turned on to perform synchronization. For example, every Friday at 17:00.
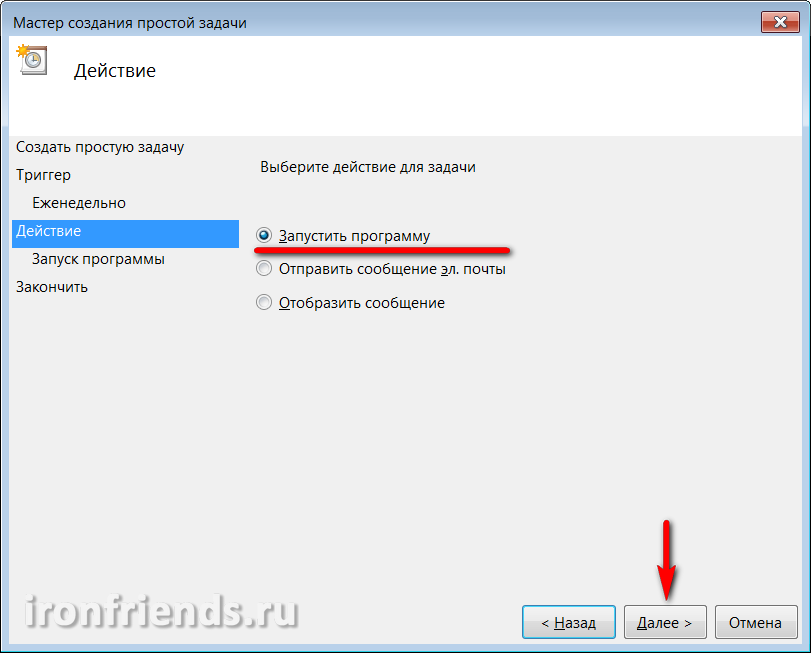
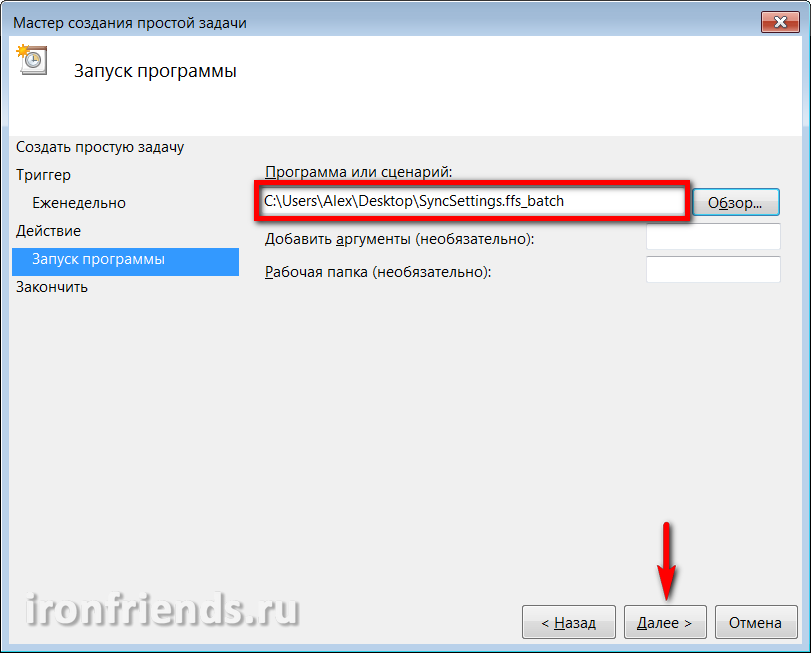
Select an action for the Run Program task.
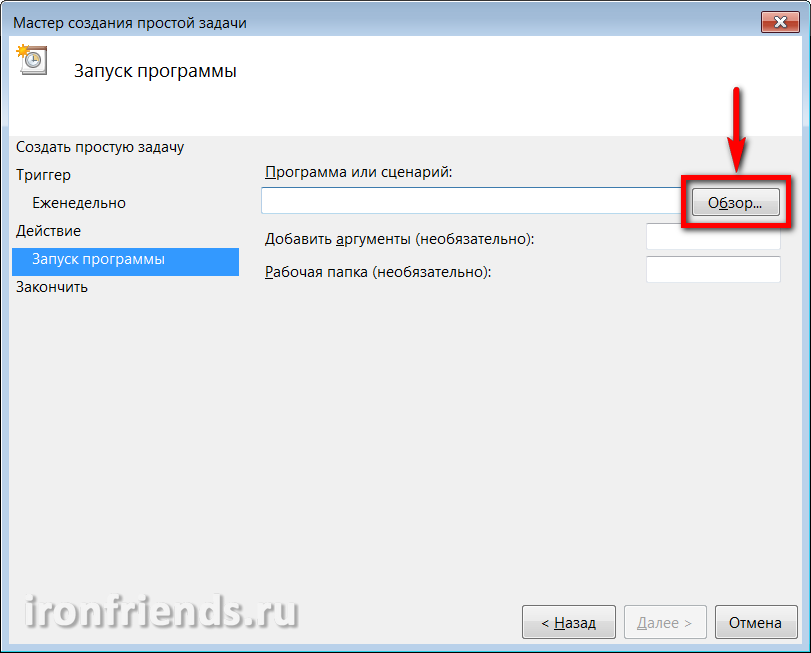
Click the Browse button.
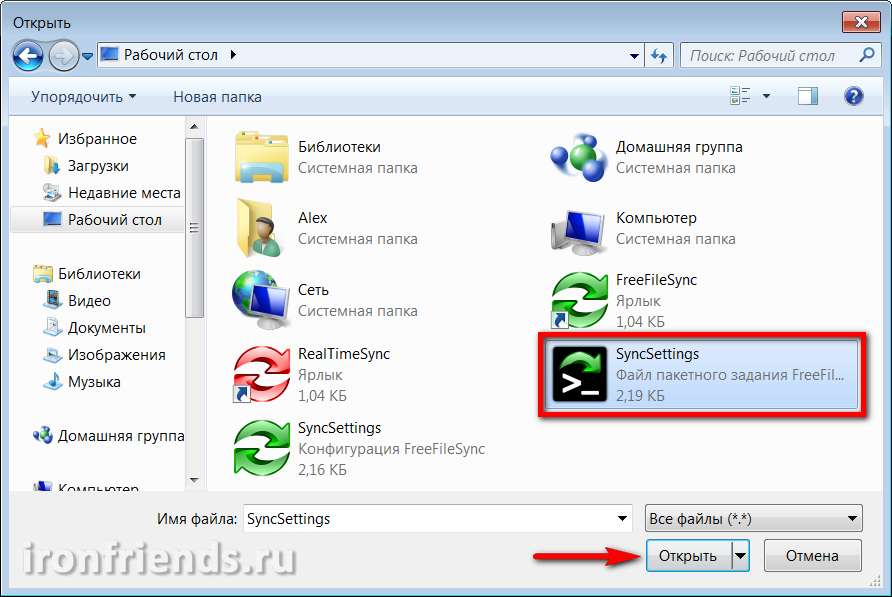
Select the batch job file created in FreeFileSync.
Click the Finish button.
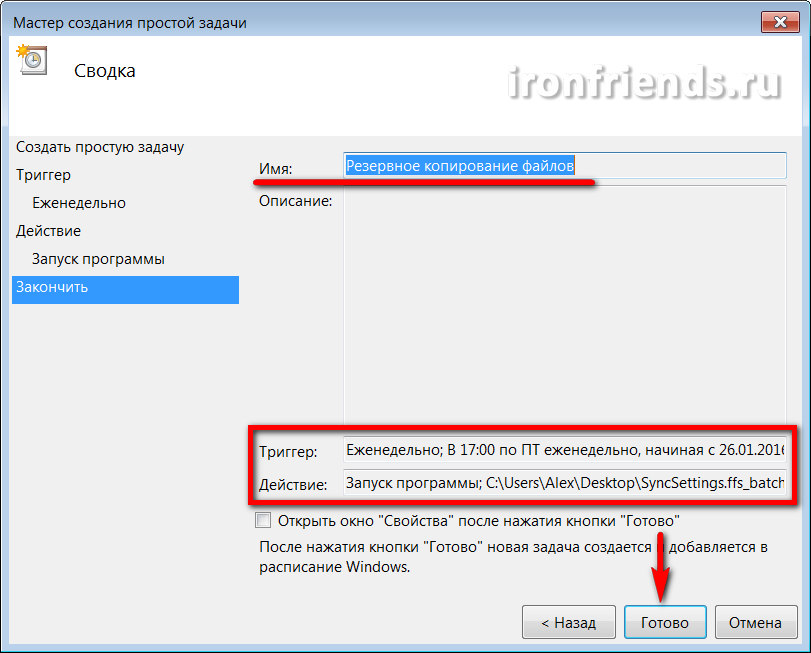
Now, file backups will be performed clearly on the appointed day and time. If the computer turns off at this time, the task will be executed the next time it is turned on. Make sure that the backup media is available at the right time.
You can delete or change the backup settings at any time in the “Task Scheduler Library”.
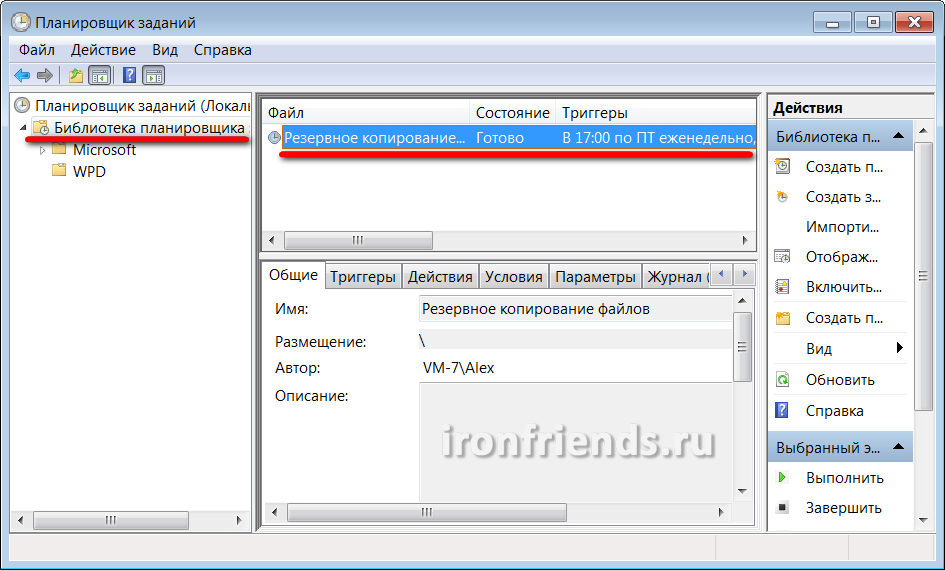
The batch job file itself can also be changed at any time, regardless of the scheduler, using the FreeFileSync program.
You can also create an unlimited number of batch synchronization jobs and tasks in the scheduler with a wide variety of settings and backup plans.
That's all, keep your files on reliable media and don't neglect backup.
9. References
Below you can download full version programs for backup and file synchronization.
Transcend TS1TSJ25M3
Transcend TS1TSJ25M3
Transcend TS1TSJ25M3
File Sync Between personal computer and laptop
Long gone are the days when one computer was shared between dozens and even hundreds of users. Now, at the current real cheapness of all netbooks, there are often cases when one person has two or even more computers - as a rule, this is an ordinary personal (stationary) computer, portable netbook, laptop or subnote (who has enough money for that), well and a communicator, which, in essence, is the same computer.
And this, I note, is not fopping at all. It is very convenient to work at home on a desktop computer: a powerful machine will cost you a little and upgrade easily, and you can put it down so that it does not occupy the precious space of the top cover of the table. However, if a person needs to travel somewhere - around the city, on business trips, abroad, and so on - then he usually needs another computer: portable, mobile. Now the time is this: a lot of people are already working via the Internet, they need to carry a lot of files and documents with them, while also having the ability to quickly edit all this - in general, they can’t do without a laptop.
Some users solve this problem by purchasing a decent-quality laptop and working on it at home and on trips. Yes, a reasonable approach. But completely compromise. The more powerful the laptop, the bigger, heavier and more expensive it is. At home, working on it is more or less convenient, but carrying with you is already a problem. If you buy an inexpensive lightweight netbook, then it is not suitable for permanent work at home, because it has a small display, not too fast, and so on. On trips, this is the most it (especially when you don’t want to spend a lot of money on a traveling computer), but using it constantly is very inconvenient.
As a result, many people come to a double option: a desktop computer at home and a netbook subnote for travel.
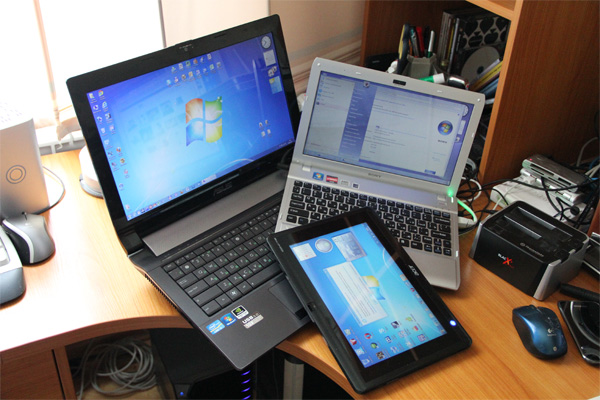
All sorts of laptops, netbooks, tablets
And here in full growth the question arises of synchronizing your personal data: documents, photos, music and so on and so forth. Before leaving, you definitely need to make a copy of all your data on the netbook - God forbid, you will forget something. During the trip you will work with this data: add new documents there, edit old ones and so on. Upon returning, the new data must be transferred to a stationary computer - God forbid, you forget something, the work of several days will be lost.
And how to transfer all this, you ask? Again, overtake folders in bulk or manually select files that have changed over the past few days?
Of course, this task does not need to be solved manually - we are dealing with a computer. Let synchronization deal with special programs that are designed for that.
I note that in this article we will only consider the issue of synchronizing a stationary computer with a portable computer - laptop, netbook, desktop. We will consider synchronization issues for two remote machines (for example, a working computer and a home one) in another article, since they are solved in a slightly different way.
So, synchronizing your home PC with a laptop. Personally, I use the rather powerful and advanced program SyncBackPro for this purpose, but it is, firstly, specifically paid ($ 50), secondly, English-speaking (more precisely, there is no support for the Russian language), and thirdly, it is too complicated for ordinary non-advanced users. And in fact, they do not need a kind of power: the software needs to be selected for the corresponding tasks, and not vice versa.
Therefore, I recommend you another program. It is completely free (more precisely, we will talk about free version, because it also has a paid one, for commercial use), supports the Russian language and has very good capabilities.
The program is called AllwaySync -.
Before the first launch of the program, it is better to make sure that everything is prepared in advance. What exactly? First, you need to know which folders you need to copy to your laptop, that is, where and what your data is stored.
By the way, the manner of many users (unfortunately, very, very many users) to create and store documents directly on the desktop - it is deeply vicious in essence. Because then you are tormented to separate flies from cutlets: documents from application shortcuts and shortcuts to other documents. This is not to mention the fact that many users (unfortunately, very, very many users) simply forget to copy the "Desktop" folder, naively believing that the files posted there are in the "My Documents" folder.
Here you can advise the following:
Store relevant data only in the appropriate folders!
Documents - in "My documents", images and photos - in "Images", music - in "My music", and so on. Then you will have no problems copying and archiving this data: you just need to save your user’s folder and that’s all, all your data is with you.
It is also a completely bad manner to create various folders in the root of the disk and shove files there. In this case, you will probably forget to copy something, because miss some daddy. Because your personal data should be in the folder of your personal data, and inside it, create folders of any kind of nesting!
The second one. On a laptop connected to the local network, share the drive or folder where your data should be placed for access. If you store everything in the "My Documents" folder (oh, what a fellow you are), then on the laptop, share the corresponding folder. (We will not go into the jungle of types of network access now.) You just go to the properties of the corresponding folder, click on the "Access" button, go to "Sharing" and there, to the left of the "Add" button, type "Everything". Then replace the "Read" option with "Read and write" and click the "Sharing" button. That's all, the folder will be open for network access. (You also need to create a user on the laptop with the same username and password as on your desktop computer.)

Create Access
Now on a desktop computer, go to "Network", find the laptop there, click on it, on the shared folder, right-click and select "Connect a network drive". Give the drive the desired letter (for example, “Z”) and press “OK”. Now you have the desired netbook folder connected to a desktop computer under the guise of a "Z" drive.
Well, after that you can start the AllwaySync program and configure the synchronization. (All the large screenshots below are clickable for enlargement.)
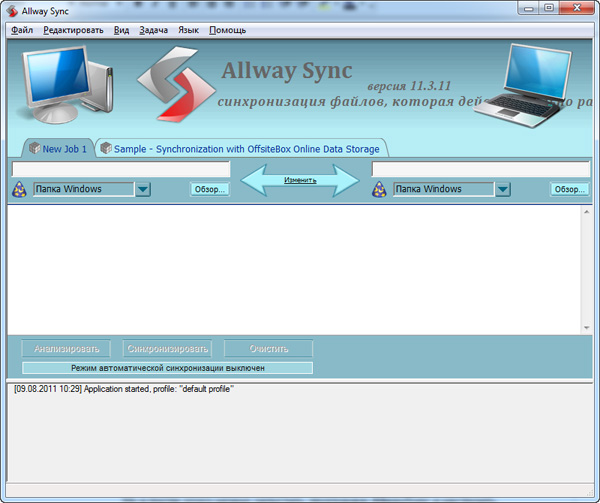
The main window of the program
The system there is very simple. In the tab at the top, change the task name to a more understandable one - for example, "My Documents". In the field on the left you need to specify the path to the source folder (this is done using the "Browse" button), in the folder on the right - to the destination folder. There we indicate, for example, "D: \\ Users \\ Petya Mokin \\ My Documents" in the source folder, "Z: \\ Users \\ Petya Mokin \\ My Documents" in the destination folder. Or, if you need to copy all your data, not just documents, just "D: \\ Users \\ Petya Mokin \\" and "Z: \\ Users \\ Petya Mokin".
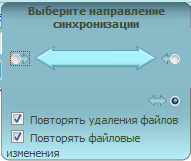
Type of synchronization
By default, exact mirroring is set: that is, the program will make both folders completely identical. If a file is added or changed in one of them, it will be copied to another folder. If a file was deleted in one of them, it will be deleted in the second folder.
This synchronization mode is needed when working with files on both a desktop computer and a laptop. If you only need to copy files, but not synchronize them (you never know what tasks happen), then you can set the direction of synchronization here.
Set folders, configured. Now you can click the "Analyze" button to check which files the program was going to copy. Get something like this report.
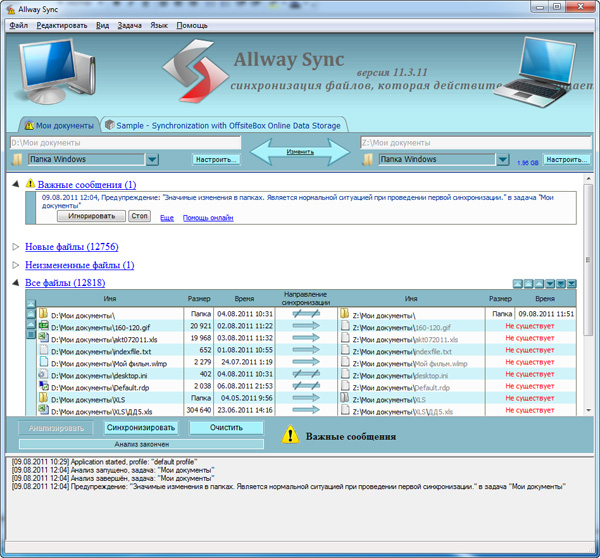
Analysis results
There also appeared an "Important message" in which you are simply warned that the program saw a large number of changes - of course, because we have never copied this folder yet. There you must click "Ignore", and you can also set the behavior of the program in such cases - for example, ignore automatically.
Now that everything is in order, you can click the "Sync" button, and the program will fully synchronize the two folders. When you return from a trip with a laptop, you will need to connect it to the network, call this program and simply press one button so that the updated or added files are copied to the desktop computer. That's all!
If you have other data folders on your PC - configure their synchronization in the same way.
By the way, the program can synchronize not only Windows folders. If you call the drop-down menu under the specified folders, get the following.
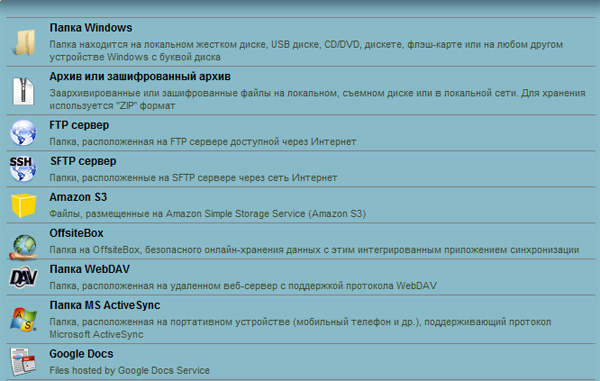
Types of Sync
That is, the program can turn your folders into archives or encrypted archives, copy data to FTP servers or secure FTP servers, synchronize with online storages, with mobile devices and Google Docs documents.
Online storages or FTP, by the way, can solve the problem of remote synchronization - in cases where these two computers cannot be included in the local network (for example, a work computer and a home computer).
By default, a task template for synchronizing your data with the OffsiteBox online service is created there. This makes sense if you need access to your data when traveling from any computer. However, for free on OffsiteBox you will be given no more than a gigabyte (by modern standards, this is pah), so it hardly makes sense to register on this service. (On Dropbox, which we'll talk about more, give 2 GB.)
If you constantly transfer files back and forth from a computer to a laptop and vice versa, then it may be more convenient for you to make automatic synchronization - for example, according to a schedule. This program can do this, and there are many options there: when connecting the device, after a certain period, when detecting changes in files, when the computer is idle, using the Windows scheduler.
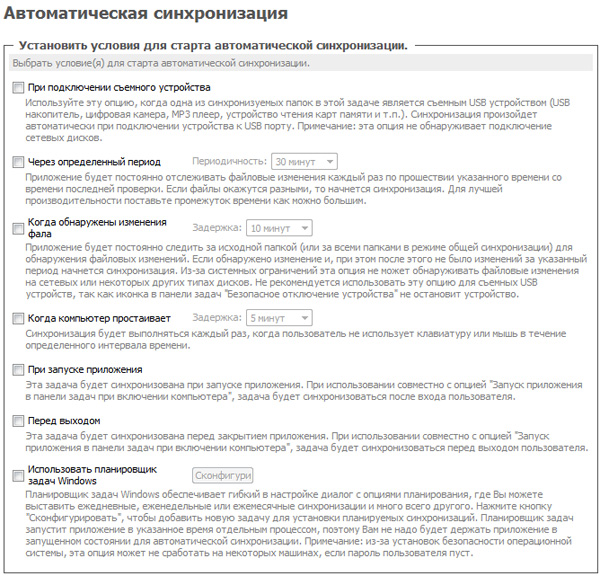
Auto sync setup
The program has options "Synchronize all" - to run all installed tasks at once.
In order not to delete something very necessary (you never know, accidentally kill the whole folder on the laptop, and the program will kill the same on the computer during synchronization), you can configure how the program will deal with the deleted files. For example, she can store them in a special folder.

Setting delete mode
Well, you can also set very flexible filters for selecting what to include in the synchronization and what not. For example, if you do not need photographs from five years ago from a photo album, you can simply set this in the filtering options. Moreover, if the files are not copied to the laptop, then during the subsequent synchronization they, of course, will not be deleted - the files will simply remain at the source without a copy on the laptop.
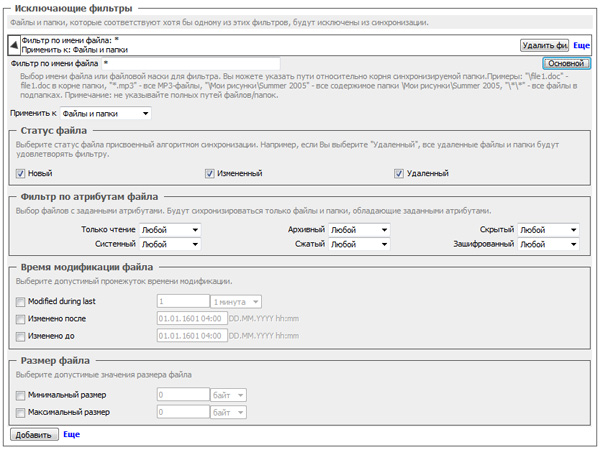
Filter settings
Here is such a program. In my opinion, for the free version it is just very good - on the one hand, easy to use, but on the other - it has very developed functionality.
So put it, configure it - and after that you will have no problems with synchronizing personal data!
9 months ago
The software will allow you to synchronize both standard applications and financial utilities, office suites, database programs, and more.
As a rule, handheld devices are sold along with a special software. Let's say ActiveSync for Pocket PC, Palm Desktop for Palm OS, PC Suite for Nokia products. However, if you want to have a full-fledged tool with which you can work, then this requires more advanced third-party mechanisms.
We warn that the full exchange of data between various devices such as a media player, computer, PDA, smartphone, phone is directly impossible. Definitely, an intermediary will be needed, which can be a desktop computer. Plus additional utilities.
Palm OS is best suited for management. Office packages, financial organizers, specialized business software and programs for working with databases and projects, usually with conduits, that is, with a special module for the HotSync system. It starts during synchronization. The module exchanges data with both the desktop version of the application and with microsoft program Outlook
If you take the Documents To Go package from DataViz, then this is a whole office set for the PDA to work with MS Word, Excel, Access and PowerPoint files. It can use both converted versions of documents and regular .doc and .xls files.
If you want to sync files, then you need to add them to the Documents To Go Desktop list. This is a special application. It is included in the package and is installed on a desktop PC. After that, you can work with documents on both a handheld and a desktop computer. After each synchronization, you will have identical documents.
There is a similar feature in ActiveSync - standard program synchronization for Pocket PC, but it is implemented differently. When you install this application in the “My Documents” folder, you will also need to create a subfolder named My Documents, in which Name is the name of your PDA specified during configuration.
Files and subdirectories of this folder will automatically be copied to the PDA in the My Documents directory. Moreover, the date of change of copies will be tracked. An older copy will automatically be replaced with a newer one.
We warn that this function does not allow working with files in other directories or on the local network. If you need to synchronize documents scattered across different hard drives, then use specialized programs that allow you to make special copies for transferring between computers.
Possible alternative solutions. Say the IntelliSync program can be configured to filter backed up data. The application manages a group of smartphones or PDAs based on Windows Mobile. At each synchronization, it uploads certain groups of data to them. IntelliSync can work not only with PDAs, but also with laptops that also need periodic synchronization.
In addition to full-featured packages, there are many add-ons on the market, such as SyncExpress and MightySync, which add new features to ActiveSync. In particular, they train this program for synchronizing folders on memory cards, working with Outlook Express, and so on. Handheld devices have an infrared port or Bluetooth. They support memory cards of various formats. They can be used for simplified information exchange.
And to create a personal database, it is enough to use the usual TXT format by creating a directory on the memory card. For example, Info with subfolders ToDo, Agenda, Notes, Docs. And place files in them. Information can be edited both from a PDA and from a desktop computer by connecting a card reader to it.
Now a few words about mobile phones. It’s best to transfer data through Microsoft Outlook. This does not apply to smartphones under running windows Mobile, Palm OS or Symbian. Here it is permissible to operate with files, as well as on a PDA. That is, apply special program or a plugin for the file manager.
Need to view memory as logical drive. For end-to-end synchronization, you need to make a copy of the folder with the notes tree on the hard drive of the desktop computer, and then transfer it to the smartphone.
If the task is to organize the synchronization of documents from a folder on a local computer with a cloud service, and then from anywhere from a laptop to synchronize documents in auto mode, then you can choose SkyDrive from Microsoft. There are good alternatives for synchronizing automatically. For example, automatic folder synchronization is possible. Local computer-cloud-laptop, DropBox or Yandex.Disk are quite suitable for this.


