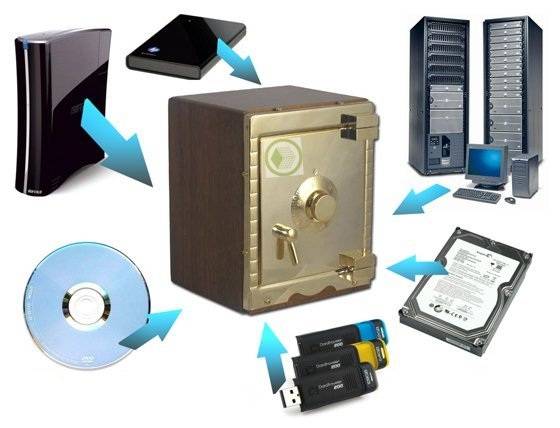
Before wondering how to do backup Android, you need to understand what it is for. Any operating system during operation, accumulates errors in itself. Because of them, she begins to work more slowly, freezes. Sometimes a failure occurs that completely deletes all or part of the personal data. Even an experienced user can be confused by this situation. Therefore, it is worth taking care of saving your applications, contacts and photos on a flash drive, computer or in the information cloud in advance. Backup allows you to transfer data to another Android device.
There are many ways to back up data on Android. Out of ignorance, people very often resort to using unfamiliar, difficult-to-use utilities or even root rights. To do this, you need to download additional softwarefind to him step by step instructions and hope that they are detailed enough. There is always a risk of doing something wrong, rushing or not understanding the instructions. But manufacturers made sure that the backup process does not take a lot of time and effort from the user. There are two simple ways copying information. In this case, you need to use only the capabilities of the device itself:
- backup using an SD card;
- duplication of all data on Google servers.
Backup through Google servers
Do not worry about your applications downloaded through Google play. It has the excellent ability to remember all the applications ever installed through your account on any Android device. We go in Play market and select the menu item - My Applications - All. A list of all the programs installed from your account will appear. It remains only to select the necessary ones and restore them to the selected device.
 To successfully copy data without using a computer, go to the settings menu. To get started, find the items "Personal data - Recovery and reset." In the sub-item “Backup and recovery”, select “Copy data” and wait from 10 to 40 seconds. So you save necessary informationwith just a few clicks.
Contacts should be taken care of separately. All the same, in the settings menu we find the tab “Google Accounts”. Need to sync your device with gmail. To do this, click on the mailing address, and a menu appears. Daw marks indicate data that you can synchronize.
All photos can be saved with using google+. it social network from Google, which is often used just for backup. By uploading photos to your account, you can open or close access to them from other devices (you also open or close access to albums in Vkontakte). Now you can open media files from any tablet, smartphone or computer through your account.
It is worth remembering the download limit of 5 GB. If there are more photos, we strongly recommend that you simply save them to your computer via the USB cable.
Do you have important photos and videos on your phone on your phone? Excellent. But what happens if you decide to buy new phone or your sd-card will not be able to fit all the data? Save files to the cloud by backing up your files on your Android phone!
There are several very easy-to-use android applications that let you store your photos and videos in the cloud. Obviously, you will kill two birds with one stone.
- free up space on the sd memory or internal memory of the smartphone
- make a backup, and if you accidentally delete it, you can always
How to back up photos and videos to the cloud or computer using Google Photos
Google Photos is one of best ways storage, backup and viewing photos for users of android devices. It will also be easy to upload photos and videos to the storage through your Google account. (If you don’t have one, create one). The Google Photos app can be downloaded for free from the store. Google play.
After that, your photos will be uploaded to the space on your Google Drivee and you will receive a notification upon completion.
Google Drive currently provides 15 GB free space in your cloud. For Android backup, this is more than enough. Depending on the size of the photos and videos you save, you can save thousands of photos and hundreds of videos. In addition, you can access or download photos, videos and other files from any device through a web browser.
How to back up photos and videos to the cloud using Dropbox
Dropbox is a free application for Android. The web service of the same name provides up to 2 GB of online storage for free. All you have to do is create a Dropbox account, download the application to your phone and computer. After that, and you are ready to start backup on your phone. Dropbox lets you save photos and videos to the cloud and access them from anywhere mobile devicewhere there is a web browser.
First you need to register and create an account in Dropbox. Then you need to install and configure the Dropbox app on your phone. After that, you can upload photos and videos until your cloud runs out of space!
Here's how to backup photos and videos using the Dropbox app for Android:
- Download the Dropbox app from Google Play.
- Launch Dropbox from the main screen or from the application. Click Sign In.
- Enter your address email and password and log in to your account.
- Click the Add button (the + icon in the blue circle).
- Click Upload photo or video.
- Mark the photos or videos you want to upload to Dropbox.
- Click "Download" in the lower right corner of the screen.
Your photos and videos will now be uploaded to the Dropbox folder. You can access them from almost any device connected to the Internet. If you use the Dropbox app on your computer, you can simply open the file and save it like any other document.
Conclusion. Backup Android is easy. Download one of the applications (Dropbox, Google drive or Google Photo) and copy the files to the cloud. Spending an hour of your time, you will protect yourself from deleting priceless files.
Syncs Google significantly with Android devices. In the case when you accidentally deleted something from your Android deviceswell, Google sync saves you from a lot of trouble. In the event of a disaster, when they got destroyed all the data from the device, fortunately, Google saves some backups in place. These backups offer a great sense of security in case something goes wrong with the device data.
Let's see how you can restore an Android phone from backups without much effort using Google backup and the ultimate application available in the market, called.
Backing up device data using android backup service:
You can archive photos, videos, music and files on your device using your google account. The service can be used to back up data connected to one or more Google accounts. If you want to replace the device or erase existing data, you can restore the data using any account where you back up data.
Steps to back up data using android backup service:
1. First of all, open the settings menu of your device.
2. Currently under “Personal,” click on backup and reset.
3. Check the box next to “Back up data.”
If you have more than one Google account on your device: click on the backup account and select the account you want to set as a backup account and if your device does not have an account backup Touch Backup account to add a new account.
Automatically restore application settings
When reinstalling the application on your device, you can select the option to restore the application settings. This feature has a prerequisite, which is already backing up data with your Google account, and the application that you are about to reinstall also uses the backup service. Some applications may not back up and restore all data.
Steps to restore application settings on your device
1. Open the settings menu of your device.
2. According to “Personal,” touch backup and restore.
3. Check the " Auto Recovery».
Recover data and settings using the Android backup service:
The Android backup service can be used to restore data on a new device and restore application settings after you backed up your data to your Google account. When you add your Google account to a new device, the data that you previously saved to your Google account is restored to the new device.
What data and settings will be restored.
- Gmail Settings
- Google Calendar Options
- Wi-Fi networks and passwords
- Wallpaper Home Screen
- Apps installed through Google Play
- Display options
- Language and input settings
- date and time
- Third-Party Application and Data Options
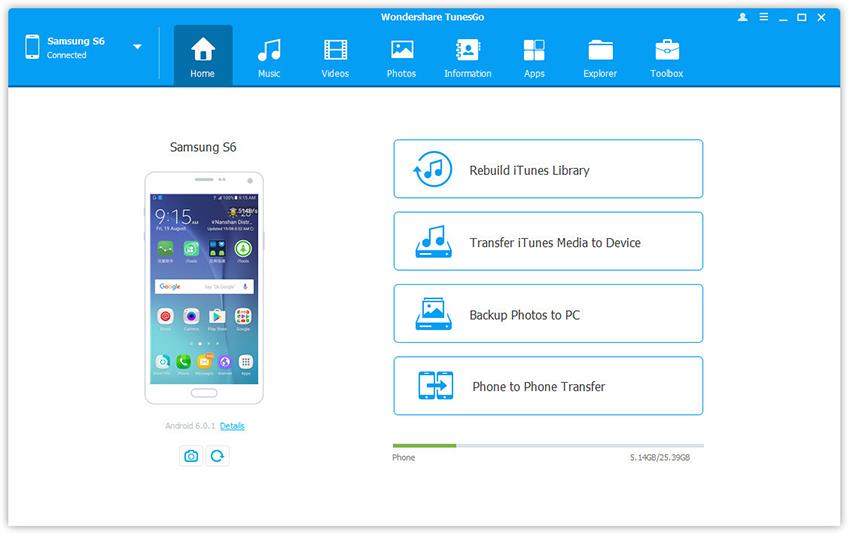
Backup and Restore with TunesGo
- a solution to manage your mobile lifestyle
- Backup music, photos, videos, contacts, SMS, call logs, etc. applications to your computer and restore them easily
- Manage, export and import your contacts and SMS, deduplicate contacts, reply SMS from computer
- One-click root - the root of Android phones / tablets to take full control of your device
- Phone translation - transfer music, photos, videos, contacts, SMS between two mobile phones (Android and iPhone supported)
- Application Manager - install, remove, import or backup applications in a package
- GIF Maker - Create Gif from Photos, Motion Photos, Videos
- iTunes Manager - Sync iTunes music to Android or transfer music from Android to iTunes
- Fully compatible with 3000+ Android devices (Android 2.2 - Android 7.0) from Samsung, LG, HTC, Huawei, Motorola, Sony, etc.
Steps for Android Backup Devices
Step 1: Connect the device to the computer, run. The program will recognize your device immediately. If the connection fails, check if the USB Debug activation is on your device and if you have given permission to the computer to connect your Android device.
Step 2: Click the “Toolbox” button at the top of the program launch window.
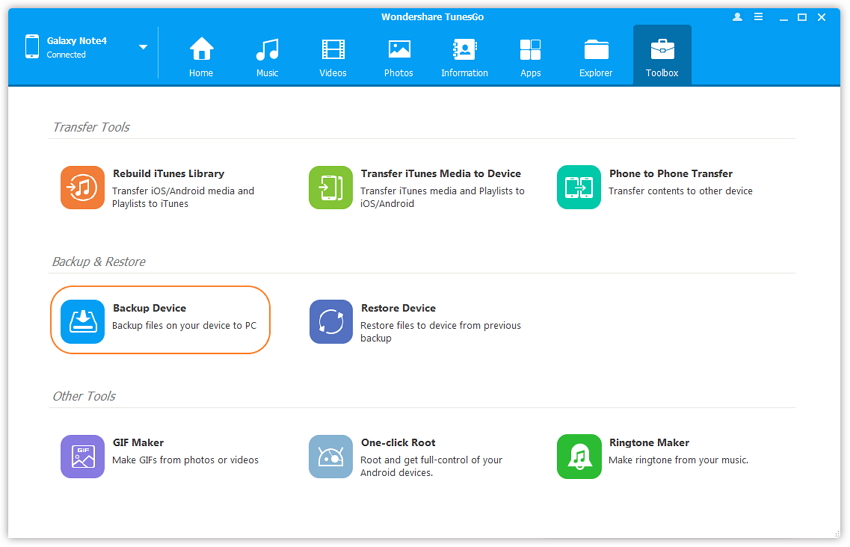
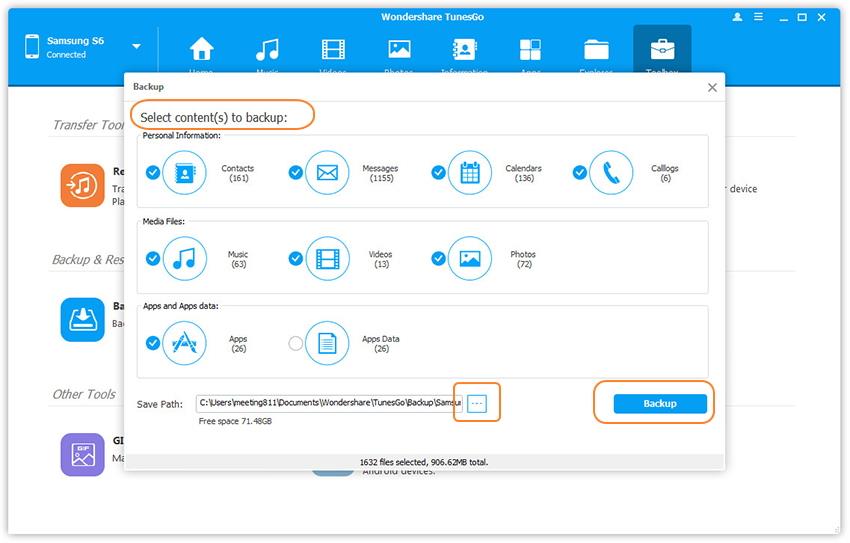
Step 3: Click the “Backup Device” button and select the files you want to back up your Android to your computer, and then click the “Backup” button to start backing up data.
Steps to restore data to another phone
Step 1: Click "Restore device" on the main interface of the program. TunesGo can support backups created by other mobile managers too, such as MobileGo, Samsung kies, iCloud and iTunes, etc. Select the backup file that you want to restore from the list.
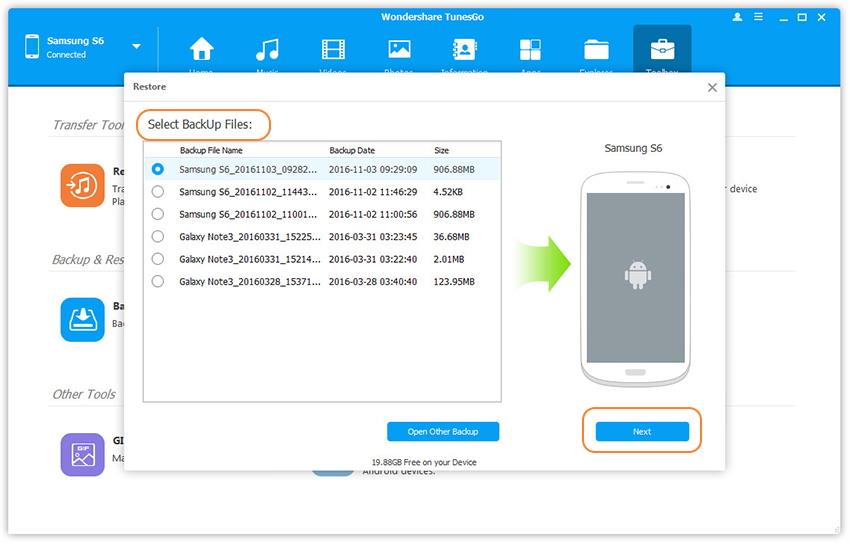
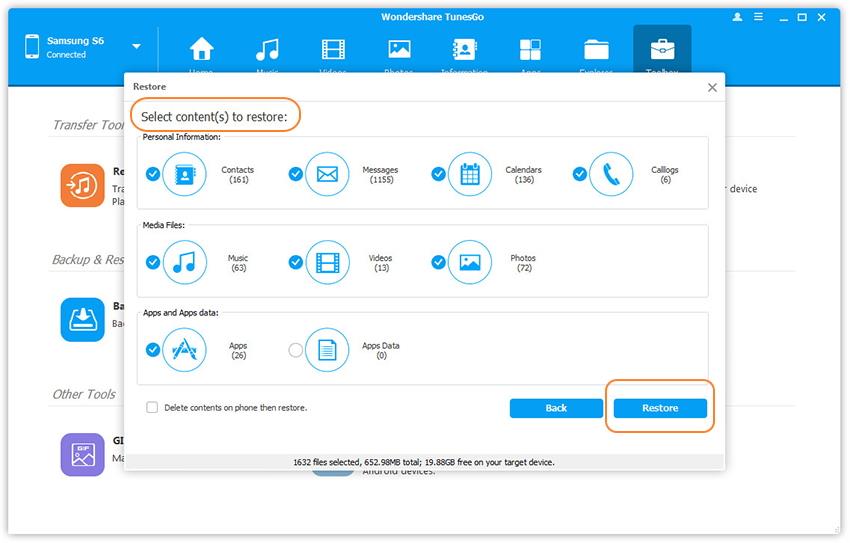
Step2: Now the data from the backup file, which can be transferred to windows, such as contacts, messages, photos, callogs, applications, etc., will be listed. You can select the data necessary for the transfer, click the "Restore" button. The selected data will be completely restored to your phone.
At times without data reset or rollback android to factory options to continue working with a phone or tablet is simply impossible. Reason for this a large number of, but the result is always one loss of all your own data that has accumulated long time. Forewarned means armed. In the provided note we will talk about how to make a backup (backup) of valuable data with support for a Google account.
It's no secret that Android and Google are one whole, and the OS is completely and entirely dependent on its own manufacturer. The ability to create backups is provided by default in, that is, you do not need to install additional applications.
1. At the beginning, you need to connect the synchronization of your device with a Google account: Settings -\u003e Personal -\u003e Accounts -\u003e Google.
2. You need to select your account and tick off all fields.
3. Next, go to Settings -\u003e Personal -\u003e Backup and Reset Settings and tick off the fields Data Archiving and Auto Recovery. It is necessary to check that the account with which you worked in paragraph 1 was registered in the field of the Backup Account.
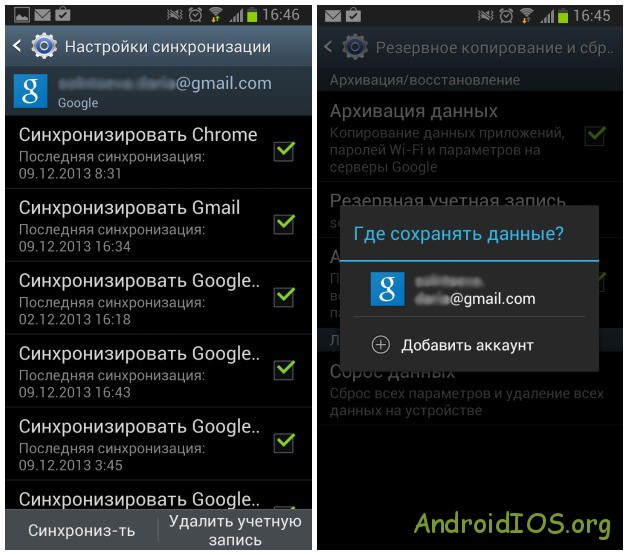
Check all the fields with checkmarks in the data synchronization section with your Google account (on the left) and make sure that this account is selected for Auto Recovery (on the right)
In the data synchronization section with a Google account, the "Sync" button is available. Click on it and all your data will be copied to the storage. Next, to resume them, you need to log in to your own Google account from the telephone, and the data will be returned to you. By data we mean all applications delivered earlier to the device, settings wireless networks, passwords and more.
How to backup the contact list in the phone book?
Go to the device’s Contacts and select “Import / Export” in the Menu. In the window that opens, select export the list to internal memory (to SD card)
There are situations, a code reset of data stored on your device and a rollback to the manufacturer’s settings is simply necessary for Android to work. There may be any reasons, but the result is always the same - the irretrievable loss of all available data that has been lovingly accumulating for a long time. Therefore, the need for backup ( firmware backup android) photos, contacts, installed applications and other things. So that you can avoid a long and exhausting search for the necessary information, we want to offer you detailed material on how to backup the system, and its further restoration.
Surprisingly, not many people know about the ability of the system itself to do backup android, and if necessary, save all your existing content. It is clear that in the operation of any system there may be a malfunction, which can occur due to clutter, for example, and as a result, the inevitable deletion of data. Or after buying a new phone, you will need to transfer information to new smartphone. Now you can cope using standard tools without resorting to installing special applications.
How to back up and restore using a Google account
It is well known that Android and Google are one and the same. Such integration makes it possible to save backups in the cloud, and easy access to them when system recovery is required. What we need to do for this:
1st step. To synchronize with a Google account, we find in the settings "personal", then "accounts", and then Google.
2nd step. Choose your account, check all fields with checkmarks.
3rd step. Go to the settings, then “personal”, then “backup”, and finally “reset”. We mark the fields “data archiving” and “auto recovery”. Pre-check the account we worked with (see step 1). It is important that it is registered in the backup field. account. In the synchronization section, click the "Sync" button. To restore the saved data, log into your account google record from the phone (“data” means all passwords, wireless network settings, as well as previously installed applications).
Immediately after the settings have been reset to factory defaults, or when you connect an old account to the new device, the system should download all the data from your account, make sure that you have an Internet connection in advance.
It is worth noting that such conservation relates to what is associated with google services. That is, if, at the cost of tremendous efforts, you have reached the last level of a game, then you may not be able to return to it. During recovery, from the list of applications that are too long, we delete those that you no longer need.
If you have applications that are not connected to the Google server, then backup and recovery are performed in other ways.
Using standard ADB tools
Step by step:
- Turn on USB debugging on Adnroid;
- Download the proprietary program from the ADB RUN website (version 3.21.35 and higher);
- Install the driver on the PC (if it has not previously been installed);
- USB cable
Create a backup:
- Run Adb Run, select the Backup menu;
- We select the first item "Adb Backup";
- We take our android smartphone (tablet) and press the button “create a backup copy (password is optional).
Restore from backup:
- Select the item "Adb Restore";
- Click on “restore data” on the Android device.
Using custom Recovery (root)
To use this method, you need to understand that Recovery should already be installed, because the creation of a backup itself cannot be called a backup, it is rather the creation of an integral image of the current state of the firmware.
- After recovery installationenter it;
- Select the menu item "Backup and Restore"
- Next comes the “Backup” menu item (to create a backup)
- To restore, select "Restore".
Online Nandroid Backup (root required)

Regardless of the name, unfortunately, nothing is stored in the cloud. The program does not have a graphical interface, therefore, we will act from the terminal. This type of backup was created specifically for those who are already tired of rebooting to Recovery to perform Backup, as well as to create a slice of the current state of the entire system, and what is already installed in it.
Using DataSync (root)

This program will be successful for backing up existing applications and quickly transferring them to another device. However, if your goal is to create archival copies of the applications themselves, and not just the available data and settings, then this application should not be used.
Features of OBackup (root)
Backups are created similarly to ONB (third method), only in this case we see a graphical and intuitive interface, and a means of sending a backup to a cloud drive.
Titanum Backup (root)

Perhaps the most convenient and flexible feature of high-quality backup. And although in this case, the current state of the system is not cut, it backs up all user and system applications, as well as their data. If your plan is to switch to another firmware and then restore everything you need, then we recommend this method as much as possible.
Helium (root / root)
Effective means to perform android backup. The principle of operation is based on ADB, but with the ability to select the application for which a copy is created
(The application does not work on Motorola). In this case, it is possible to work without root rights, in this case, you need to connect the android to the PC. So, step by step:
Download free Helium from the official store google apps Play
In the absence of Root rights, download and install the add-on on the PC. It is possible to install drivers on the computer (for non-Root devices) available on the download page.
Creating a backup in Helium on devices with root
- Launch the application;
- We refuse the offer to enter Google disk, because this function does not work correctly (copies, but restores only in the paid version);
- Save backups using internal or external memory. To create them, select desired applications in the "backup" section, press the button to start the process, select where we will save the data.
The recovery process is also extremely simple.
Creating a backup in Helium on NOT root devices
- Everything basically looks, as in the previous case, only with some reservations: After downloading and installing the add-on to the computer, we launch it;
- Turn on USB debugging on the android;
- We launch
- The rest of the actions are the same as for root.
We hope that our material will be useful to you, good luck!


