In general, the buyer of any Android device receives from the box a device designed for the "average user". Manufacturers understand that meeting the needs of absolutely everyone will still fail. Of course, not every consumer is ready to put up with this state of affairs. This reality has led to the appearance of modified, custom firmware and just a variety of advanced system components. A special environment is required to install such firmware and add-ons, as well as to manipulate them android recovery - modified recovery. One of the first solutions of this kind, which became available to a wide range of users, is ClockworkMod Recovery (CWM).
CWM Recovery is an Android recovery environment modified by third-party developers, designed to perform many non-standard operations from the point of view of device manufacturers. The ClockworkMod team is developing the CWM recovery, but their brainchild is a fairly adaptable solution, so many users bring their own changes and, in turn, adjust the recovery to their devices and their own tasks.
Interface and Management
The CWM interface is nothing special - these are ordinary menu items, the name of each of which corresponds to the heading of the list of commands. It is very similar to the standard factory recovery of most Android devices, only there are more points and the expandable lists of applicable commands are wider.
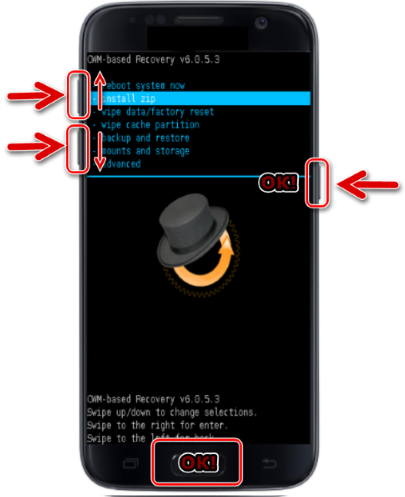
Management is carried out using the physical buttons of the device - " Volume +», « Volume-», « Nutrition". Depending on the model of the device, there may be variations, in particular, the physical button " Nome»Or touch buttons below the screen. In general, use the volume keys to move through items. Clicking " Volume +"Leads to a move up one point," Volume-”, Respectively, one point down. Confirmation of entering the menu or executing the command is pressing the " Nutrition", Or the physical button" Home»On the device.
Installation * .zip
The main, which means the most frequently used function in CWM Recovery is the installation of firmware and various system fix packs. Most of these files are distributed in the format * .zip, therefore, the corresponding paragraph CWM recovery for installation is called quite logical - " install zip". Selecting this item opens a list of possible file location paths. * .zip. It is possible to install files from an SD card in various variations (1), as well as download firmware using adb sideload (2).
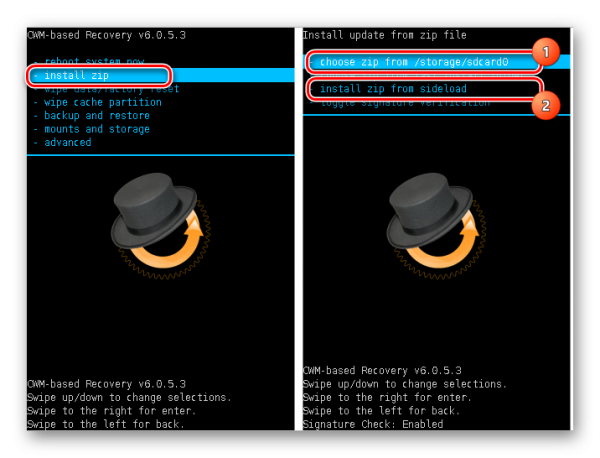
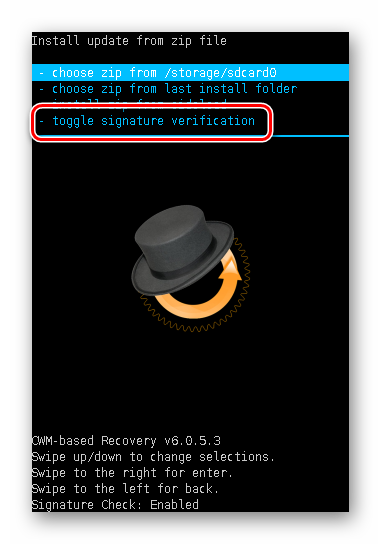
An important positive point that allows you to avoid writing incorrect files to the device is the ability to verify the firmware signature before starting the file transfer procedure - the “ toogle signature verification».
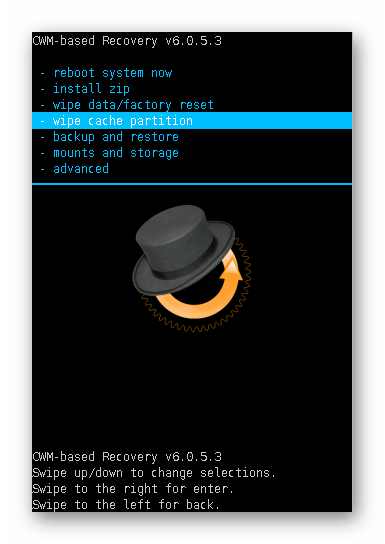
Partition Cleaning
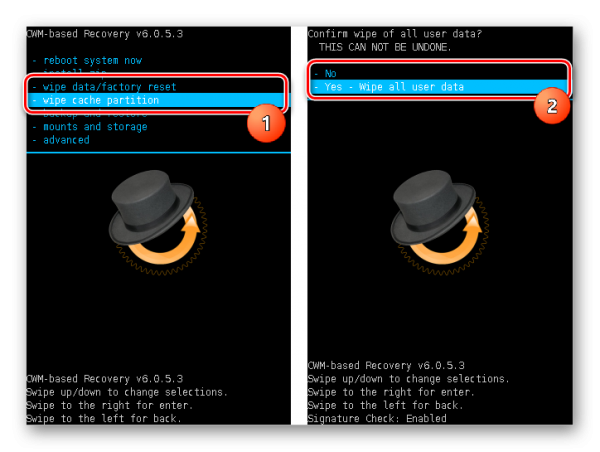
To fix errors when installing firmware, many romodels recommend cleaning partitions Data and Cache before the procedure. In addition, such an operation is often simply necessary - without it, in most cases, stable operation of the device is impossible when switching from one firmware to another type of solution. In the main menu of CWM Recovery, the cleaning procedure has two items - “ wipe data / factory reset"And" wipe cache partition". After selecting one or the second section, in the drop-down list there are only two items: “ No"- to cancel, or" Yes, wipe ...»To start the procedure.
Backup creation
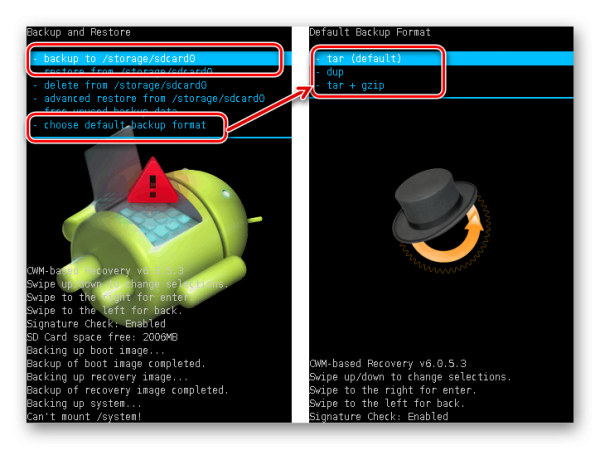
In order to save user data in case of malfunctions during the firmware process, or to play it safe in case of unsuccessful procedure, it is necessary to create a backup copy of the system. CWM Recovery developers have provided this feature in their recovery environment. The call of the considered function is carried out when selecting the item “ backup and storage". This is not to say that the possibilities are varied, but they are quite sufficient for most users. Copying information from sections of the device to a memory card is available - “ backup to storage / sdcard0". Moreover, the procedure begins immediately after selecting this item, no additional settings are provided. But you can determine the file format of the future backup in advance by selecting " сhoose default backup format". The remaining menu items " backup and storage»Are intended for backup recovery operations.
Mounting and formatting partitions
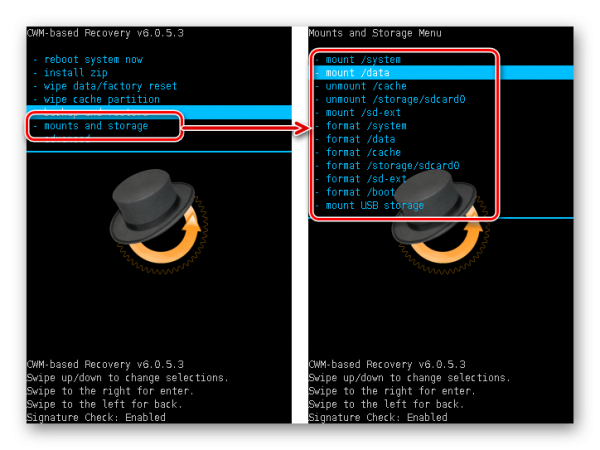
The developers of CWM Recovery combined the mounting and formatting operations of various partitions into one menu, called " mount and storage". The list of revealed features is minimally sufficient for basic procedures with sections of the device’s memory. All functions are performed in accordance with the names of the list items that call them.
Additional features
The last item on the CWM Recovery main menu is “ advanced". This, according to the developer, access to features for advanced users. It is unclear what the “advancement” of the functions available in the menu is, but nevertheless they are present in the recovery and may be needed in many situations. Through the menu " advanced"The recovery itself is rebooted, reboot into bootloader mode, and the" Dalvik cache», Viewing the log file and turning off the device at the end of all manipulations in recovery.

Advantages
- A small number of menu items that provide access to basic operations when working with sections of the device’s memory;
- There is a function to verify the signature of the firmware;
- For many outdated device models, this is the only way to easily backup and restore the device from backup.
disadvantages
- Lack of Russian interface language;
- Some non-obviousness of the actions offered in the menu;
- Lack of control over procedures;
- Lack of additional settings;
- Incorrect user actions in recovery can lead to damage to the device.
Despite the fact that ClockworkMod’s recovery is one of the first solutions to ensure widespread customization of Android, today its relevance is gradually decreasing, especially on new devices. This is due to the emergence of more advanced tools, with more functionality. At the same time, you should not completely write off CWM Recovery as an environment providing firmware, creating a backup and restoring Android devices. For owners of somewhat outdated, but quite functional devices, CWM Recovery is sometimes the only way to keep a smartphone or tablet in a state that is in line with the current trends in the Android world.
- Description
- Help
Recovery reboot - when your phone hangs it's just awful. In this case, people usually restart the phone (or tablet, if it is faulty). But sometimes the problem is not solved by a normal restart, because the inconsistency itself in the operating system itself. And then the Recovery Reboot application helps to solve the problem.
The application is insanely convenient without errors. This, in fact, is the second operating system for a smartphone or tablet, which will help to understand the operation of the device’s operating system. Thus, you can create the necessary copies in reserve, upgrade operating system and adjust it for yourself as it’s convenient for you. If violations are found in the system, using the Recovery Reboot application they can be fixed by returning the device’s operating system to work in standard mode.
The possibilities of the application are almost endless when it comes to controlling your device. The rest, as for Recovery Reboot on Android, is best studied independently, through scientific examination and attempts to explore all the features of the application. It will be useful for those who decide to completely control their phone. However, in this case you will need access to root rights.
Recovery is softwarethat is present in every phone. With it, you can flash the phone, make a backup, change the font, make full reset settings.
If you are a very curious user, then over time you will be visited by the thought of flashing the phone. And the first thing you learn is that there are official and custom firmware. And with the help of which recovery these firmwares are installed and how to install custom recovery, we will now find out.
Types of Recovery
Types of custom recovery
In turn, custom recovery is divided into two types: CWM and TWRP.
CWM recovery looks like this:
It may slightly differ from the one in the screenshot, but in most cases it looks just like that.
You can control CWM recovery using the volume rocker and the power key. With the volume rocker you can move the blue line up and down, and the power button selects the item.
TWRP recovery has a slightly different look:
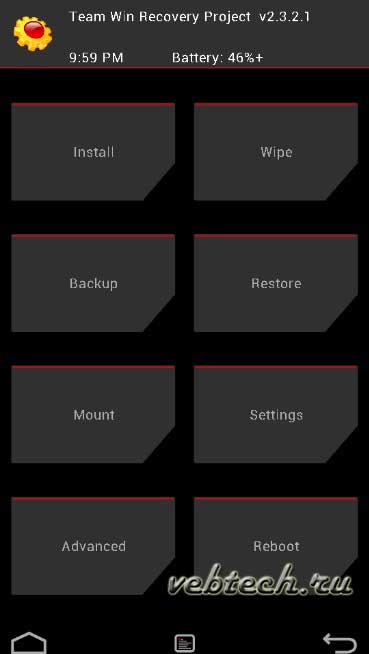
He has touch control, so it’s a little easier to deal with.
Craftsmen often release TWRP recovery in Russian, to make it even easier to use.
Menu items
We’ll deal a bit with the translation and values \u200b\u200bof menu items. Since the menu is generally similar, we look only at the main points that may be needed during firmware:
- Install - installation. This item opens a USB flash drive for selecting an archive with firmware or font.
- Wipe - wipes. They are responsible for the complete cleaning of the system, reset the system to the factory settings.
- Backup and Restore - backup and recovery. Creature backups and their recovery (helps in case of unsuccessful firmware phone).
It’s better not to touch the rest of the items, because you can break firewood, and the firmware will fly off.
How to install custom recovery
In fact, there are many ways to install custom recovery. You can use a computer and programs such as Flashtool, ADB. But there are programs on the phone: Flashtool, RAM manager.
To get started, download recovery for your device.
Now we will install custom recovery without a computer, but this is necessary.
Consider the RAM Installer program. Install it on your smartphone, then open it and provide root.

Click on the three dots at the top and click on Flash Image. Next, select the path where the recovery is downloaded. It is advisable to unpack it at the root of the card so that in the future you do not have to search long. Then we press the “Flash” button. We are waiting for the end of the operation until the green SUCCESS message appears.
On some devices, before using this program you need to install Busy Box.
This is only one of the ways to install custom recovery, so you should not immediately try it on your device. Each device has its own installation instructions.
Problems installing custom recovery
Installation problems can be very different, mainly crooked hands. But besides everything, you can download the recovery not for your device, make a mistake during installation, etc. Therefore, I want to give some tips:
- Download recovery only for your device;
- Install strictly according to the instructions;
- Programs and recovery need to be downloaded only from trusted sources.
One of the most popular forums is w3bsit3-dns.com, where you can find anything for your smartphone.
Conclusion
In conclusion, I want to say that installing custom recovery does not take so much time, but it requires attention. It is very important to choose the right program and find a recovery for YOUR smartphone.
But then, before you will discover many new features, such as custom firmware, various patches and fonts. Perhaps your phone will work faster and drain the battery more slowly. Also, in custom firmware there are much fewer bugs than in official ones (although it depends on which manufacturer).
But remember that you carry out all the actions at your own peril and risk, and no one is responsible for your experiments, except for yourself.


